





BlueBull
Members
-
Joined
Everything posted by BlueBull
-
Yes, it has the Settings -> "VM Options" -> "Firmware" = "EFI (recommended)" parameter set ever since I installed Unraid years ago. It's an UEFI VM indeed, always has been
-
Following this thread as I have the same issue but then on VMware vSphere. Migration to internal boot finished successfully according to the Unraid wizard but then when I detach the USB boot device and configure the newly installed boot disk as boot device in the VM BIOS, it just doesn't want to boot up. Even with the USB still attached but just switching to the internal boot disk as primary boot device it doesn't work. Hopefully someone figured this out as I've tried everything I could think of short of creating a new VM, which I'm hesitant to do for now
-
This thread seems quite dead but still you never know, I might get a reply: I'm wondering whether anyone has succeeded in switching to the new internal boot with vSphere? I tried switching over by presenting an additional vDisk to Unraid and pointing it to that as boot device. From the Unraid side, it completed the migration to internal boot successfully it reports, but it's not booting I'm afraid, so I had to switch back to USB passthrough. It just complains that no boot device has been found. I did go into the VM BIOS and disabled USB boot plus left HDD boot as the only enabled boot method but to no avail I'll keep trying things and report back if I find anything P.S: Yes, I know I should move away from vSphere and towards, for instance, Proxmox. However, I have five nodes with three of them in a three-node cluster with vSAN enabled and another one in a two-node cluster. This includes a virtualized firewall. Migrating that is no easy task, especially because I have about 30 VM's running
-
Throwing my hat into the ring. I'm experiencing the same issue on 7.0. Will update to 7.0.0.1 to see if it improves. The strange thing is, these errors were timestamped at a time when I didn't have a tab open with the Unraid interface
-
That is very good news. Congrats! Well-deserved
-
For anyone stumbling in here like I did, you can backup the Unraid flash device using Veeam, though with a bit of a workaround I'm not sure starting from what version of Veeam (I have version 12.3) but under "Inventory" -> "Unstructured data" you can add an SMB share as a backup source to Veeam. Unraid also has the possibility to share the flash drive as an SMB share. So, just click on "flash" in the main Unraid menu to go to the settings for the flash device. Set up the SMB share there. You best limit it to only one user to having access through SMB. Also, I didn't give the user read+write access but only read access and I chose "yes (hidden)" as publishing settings so the share is only approachable if you know the share name. If you want to be even more cautious, then give it a custom share name in stead of the default "flash". Then add that SMB share to Veeam through the unstructured data menu I mentioned above and set up a backup job for it as usual. You can right click the share and choose "add to backup job" to do this Lastly, but also rather importantly, I wouldn't backup the flash device too frequently, as to limit the wear and tear on the USB device. Veeam does do incremental backups so after the initial backup, the load should be a bit lighter but still, better safe than sorry. I chose to backup once a week, also because there is already the Unraid connect flash backup and my Backup & Restore plugin also backs up the flash device already. The Veeam flash backup for me is only a last resort, if my Unraid server is fully offline and broken and if the Unraid connect backup for some reason hasn't run, is too old or is corrupt or something
-
Late reply but I wanted to say thank you! Funny coincidence, because I was looking at exactly the same environment variable for exactly the same container. I was even planning on giving it exactly the same 2g of RAM. Your answer (and the posed question as well) couldn't have been more perfect for my use case *edit* For anyone wanting to try this out, note that in my case adding this variable to a running container, damaged it beyond repair. It spit out a whole bunch of (SQLite) database errors, crashed and kept crashing on launch, all the while quick-firing DB errors. I had to remove the appdata completely to get it running again. This wasn't really an issue because I hadn't configured anything yet but just know this might happen. After deleting the appdata it starts up fine with the new parameter. Could be a fluke, could be that I should have stopped the container first or it could be that this variable needs to be added before the first run. Whatever the case, if you want to add this variable to an already configured container, back up your appdata and perhaps stop the container first. If it turns out that the only way to add it is before the first run....wel that's a problem I guess if your container was already configured
-
Ah, that is good news. Well all right, I guess I have my answer, that is by far the cleanest and least risky solution. Thank you very much for your prompt assistance and replies, I truly appreciate it
-
Alright, sounds logical indeed, thanks for you reply. In your opinion, how risky is this? What happens if, after the procedure you describe of cloning the data drive, the clone isn't bit-by-bit perfect? Suppose I start the array without parity and with an imperfect clone, would I notice this at all? I assume not, unless I have checksum data or the filesystem has catastrophic damage? And if I would in fact notice it, can I just stop the array again and re-insert the original data drive? Also, I might be able to use something like the unbalance plugin to first make sure the data drive is as empty as I can get it, would that be a good idea? I have enough free space for this This cloning station is from the well-known and often-used brand StarTech by the way, but I haven't used its cloning function before yet
-
Hello My question is pretty simple, and I am almost certain the answer is "no", but just to be sure I wanted to ask. I did something quite stupid, which is that I have shucked about half of my drives (12TB and 18TB, 13 drives total, single-parity) and didn't really pay attention to the details. I now read somewhere that your parity drive determines the speed of your entire array, which I didn't know, and decided to check the parity drive out. Surprise, surprise, my parity drive is shucked and is one of only two in the array which is 5400RPM in stead of 7200RPM. My other 18TB's that are in the array are 7200RPM and only one 12TB is also 5400RPM. So now my question: is it possible with some special procedure to swap a data drive present in the array with the parity drive, without having to buy another 18TB drive (at full cost, since to be sure that it's 7200RPM it can't be shucked) and without losing data? And would this indeed yield a noticeable performance increase? I'm almost certain that this isn't possible, because that would require two drives to be offline at the same time in a single-parity array. But perhaps I'm missing something, so I thought I'd ask. I do have a two-bay offline (so should be bit-by-bit) HDD cloning station by the way, perhaps that can help? But I'm not sure how risky this is and I'm not sure how Unraid would respond to not only a missing drive but also a parity drive that has changed ID (serial) at the same time. What do you think? So then I would take out both drives, clone the parity drive to the data drive, put the cloned parity drive in and assign it in place of the original one, start the array which will say that a drive is missing, stop the array, wipe and insert the old parity drive in place of the original data drive and let it rebuild. Seems mighty risky though and I'm not even sure if it's at all possible, given that the parity drive ID will have changed Cheers!
-
Oh, I wasn't aware there was a GitHub for this plugin. I should have known though, since I now realize there's a raw.githubusercontent.com link to the PLG in the original post and I know that can be used to find the underlying repository. Apologies for the double request Lol, yes, I know that in development, things that on the surface and/or for a layman seem easy to implement, rarely actually are. If it ever materializes, great and if not then I'm still just as grateful for the enormous amount of effort you put in to develop this and share it with us. If there's any way in which I could help with this request or with something else (providing logs, testing, feedback,....) don't hesitate to let me know, I'll gladly do so
-
I have been using the beta for a while with no issues at all. Seems quite stable. I've even done a few restores already and that worked, too. It took a while to figure out but I was even able to migrate my config file from stable -> beta I have a feature request but it's more of a nice-to-have than a must-have. I hope you don't mind me posting it here. Would it be possible to integrate a faster way to do a manual backup of one or a few containers? At the moment, to do a manual backup of for example a single container, we have to take a screenshot of current "skip?"-settings, put all other containers except the one we want to back up on "Skip? - Yes", do the manual backup and then use the screenshot (or recreate them by heart) to put the skip settings back to how they were before. It would be very cool if there was, for instance, a checkbox next to the container names somewhere, which is coupled to the manual backup button to quickly tell it which containers you would like to manually back up At a later stage, such a checkbox could even be expanded to something like a batch edit functionality if you want, so you can batch change backup settings for multiple containers at once, including the skip settings. But just the manual backup thing would already be very cool
-
For those who stumble in here and read this, like me, you can in fact enable both settings with a hack. I got this from a VMware employee on a forum and it isn't really documented anywhere that this is possible. Totally unsupported by VMware as well, obviously. Also completely at your own risk, again obviously. I've been running it like this for 1.5 years or something without any issues though. I did all of this with vCenter but I suspect ESXi standalone should work as well. You can configure it as follows Stop array and clean shutdown Unraid VM Disable Hardware Virtualization in the Unraid VM settings Enable PCI Passthrough and pass the PCI device through to the VM. Don't boot just yet and also make sure any other VM settings you want are set at this point, see the note below for why Right click the VM and choose "remove from inventory" (DO NOT CHOOSE "DELETE FROM DISK"). This is on vSphere 8.0 with vCenter, it could be named differently on earlier versions or standalone ESXi. What it does is it only removes the VM from the GUI inventory but it leaves all the files in the datastore, including the VM config file. We will simply add the VM again after the following Browse the datastore where the VM files are stored and download the *.vmx file (with * your VM's name. In my case it's called "unRAID_Server.vmx") to your local PC. This vmx file contains all the VM settings, including those for passthrough and hardware virtualization Create a copy of the vmx file, just as a safeguard, so you have a backup Open the vmx file in a text editor and add the below lines somewhere. At the bottom is fine. The lines that are commented (#) I added because when you register the VM in step 9, it will remove these configuration lines from the config file but it won't remove the commented lines, making it easier to add the settings again by copy paste when necessary later on (see note below for why that might be necessary at some point) #vhv.allowPassthru= "TRUE" vhv.allowPassthru= "TRUE" #vhv.enable= "TRUE" vhv.enable= "TRUE" Upload the vmx file to the same location as before. It will ask to overwrite the vmx file already there, let it do so Right click the vmx file or if that doesn't work put a checkmark in front of it. Choose "register VM" in the right-click menu or above the file list and go through the wizard That's it, the VM will now be added again with both settings enabled and working NOTE: Any time you want to change a setting on this VM, it will refuse to do so and produce an error mentioning "hardware virtualization". This is because you have both these settings enabled. If you want to change VM settings, first you have to disable hardware virtualization again, then change the settings you want, which it will now allow and then go through the above steps (start from step 4) again to enable hardware virtualization once more. You can now use the commented lines we added to the file to add the configurations more quickly. It's tedious, I know, but it's the only way to have both settings enabled and still change the VM settings UPDATE: This works up to vSphere 8.0 Update 2. Not tested later versions
-
I had this error or at least a very similar one and it had been bugging me for ages. I tried all sorts of things but nothing seemed to help. It had been going on for months by this time. Then I did a few things today and suddenly it is resolved. I'm not sure which action resolved it so I'll list them all, for anyone else like me that might stumble in here. I suspect it was either the logout or the cookie delete, or a combination of both that did it, but that is just a guess Logged out unraid connect Fully disabled a chrome browser extension meant to show the details of all cookies of the website that's being displayed. It can also edit, export, delete,...those cookies. It's called "EditThisCookie" but there are many others Disabled DarkReader extension specifically for the unraid interface. This extension generates a "dark mode" version of every webpage even when the page itself doesn't have that. I left this extension enabled, just added unraid to the exception list Logged out unraid itself, so a local logout Went to browser cookie management and deleted all cookies for the unraid interface and for good measure also deleted all unraid.net, forums.unraid.net and all related cookies closed browser completely opened browser and logged unraid back in Logged unraid connect back in Before this, every time I switched pages on the unraid interface, 10-15 of these errors would scroll by and they detailed my PC from which I had the unraid interface open as the "client" in the error message. They would also periodically appear, 20-30 at a time, usually every few minutes but sometimes continuously, even when not doing anything in the interface except just having the page open. All in all, hundreds and hundreds of these errors used to littered the logs. After these actions, no more error, not matter what I do For reference, her is one of my error messages. There were a few different ones with the same general error message but different HTTP commands, different referrer URLs, different "excess" number,.... They all said "limiting requests, excess" and "authlimit" though Dec 23 09:11:49 unRAIDServer nginx: 2023/12/23 09:11:49 [error] 27474#27474: *7340846 limiting requests, excess: 20.958 by zone "authlimit", client: 192.168.0.178, server: , request: "GET /login HTTP/2.0", host: "192.168.0.16", referrer: "https://192.168.0.16/Main" *edit* After having a recurrence of this issue, I can (in my case) safely say that it was caused by the DarkReader extension, as it started occurring again right after I enabled that again for the Unraid interface. If you do not have this extension, it might be worth it to try disabling your other extensions one by one, especially those that have any influence on web page content, to find out which extension might be causing it, if any
-
You are awesome for sharing the script! I greatly appreciate it, thank you
-
Understood. Thank you for the feedback, I really appreciate it. I will proceed as planned then *edit* Oh I do have one, unrelated question if you don't mind. Any idea why the S.M.A.R.T power-on hours statistic for those ancient 6TB drives would only show 11256 hours of power-on time, while those drives have spent 2-3 years almost 24/7 powered on (no spindown) in my array and before that more than 6 years in a NAS used at a medium-sized enterprise? It has me scratching my head. My 12TB drives show about 55% of the power-on hours (6227 hours) of the 6TB ones and are about 1.5years old
-
Hi everyone I currently have 1 x 12TB parity drive, 8 x 12TB data drives and 3 x 6TB data drives in one array. I have bought two 18TB drives. My plan is to replace parity with an 18TB drive to enable higher capacities, repurpose the previous 12TB parity drive as a data drive and finally, replace one of the 6TB data drives with an 18TB one. I could also replace the 6TB with the previous parity drive and add the 18TB as an additional drive if that is better for some reason My plan, which is based mostly on guessing, is: - Replace 12TB parity with 18TB and let it sync, temporarily leaving out the previous parity drive (or should I plug that back in simultaneously? No, right?) - Replace 6TB drive with 18TB drive and let it sync - Add the 12TB previous parity drive, let it zero it and add it to the array Is that the most efficient way to go about it? If not, why? Am I missing something important here? Am I doing anything potentially dangerous? And finally, would you do something else other than these three steps? Do note that I only have one additional free SATA/SAS connection in my server, so that limits what I can do. Also, those 6TB drives are ancient anyways, at least 8 years old, so I thought that it's about time I started replacing them, even if just with new 6TB drives (but of course I won't go for 6TB. Expansion is too tempting. This is the way) Cheers and thanks in advance!
-
Bit of a late reply but for anyone stumbling in here by searching on google, like me: shucked (3.5") WD My Book 8TB, 12TB, 14TB and 18TB in the last two months, all still have ordinary SATA connectors and none of them needed 3.3V pin fix. Those 18TB ones were shucked yesterday. Also shucked 12TB WD Elements about 3 months ago, same thing. The speed is also as expected, as are the temperatures, which are both comparable to some of my non-shucked drives of the same brand and sizes, all WD Red Plus or Pro. Price difference was about 20% here in Europe, 40% in case of recertified My Book drives bought from WD themselves. Still worth it in my opinion, at least in Europe, could be with American prices that it would hardly be worth it anymore Model codes: WD My Book 8TB: WD80EMZZ WD My Book 12TB: WD120EDBZ WD Elements 12TB: WD120EMFZ and WD120EDBZ WD My Book 14TB: No model number noted down WD My Book 18TB: WD180EDGZ
-
I have the same issue and have had it on 6.11 and now 6.12. I have found loading unraid in an incognito window (chrome and brave browser, not sure about other browsers) solves it and the GUI loads fully. However I have no idea what the cause is. Also, a while (as in, an hour or so) later it happens again, in the incognito mode window. Opening a different incognito window solves it again, for a while. It looks exactly the same as in your screenshot and in my case it appears (though I am not certain) to happen more often when the server is under load. Also, like Gabriel_B mentions, my syslog window also doesn't populate when those parts of the GUI aren't populating
-
For anyone stumbling into this topic and having this fail at the last step, check if you have a tag attached to your docker repository. If so, enter the repository with a colon and the tag added to it, so docker.io/[DockerUsername]/[DockerRepositoryname]:[tag] By the way, I think that in stead of the tag name, "latest" as tag should work too and pull the latest version irregardless of its tag, but I didn't test this so YMMV Sorry for reviving an older thread but the above steps failed at the last one and it took me a while to figure out why, so I thought I'd share the potential solution
-
I have the same issue too. It appears to be widespread, so I'm confident that it will be resolved quickly. Since I had rebooted my server today, at first I was fearful that something was wrong on my end. I'm glad there isn't. Following this topic to get updates
-
Hi. I'm willing to test if you're still looking for testers 1) I have a basic understanding of the shell, since I set up and manage some pretty large Ubuntu servers (Zabbix monitoring with multiple proxies for a large enterprise environment) at work. I'm very far from proficient though, I would call myself a novice still 2) Mover tuning is installed and have been using it for a while. 2b) Unraid version 6.11.5, the latest one 3 & 4) I can test moving both ways. I have cache enabled on multiple very active, very large shares and I can also test the other way around, simply by moving my appdata back and forth or by setting up some test shares that download to spinning disks and then move to cache 5) I do not have multiple cache pools at the moment, but I am running unraid on ESXi which in this case is a benefit because I can make extra cache drives at-will and destroy them after testing. I have enough space left on my ESXi datastored (both NVMe and spinning disk) to do this. I can even split my existing cache drive in two if needed, giving us 2 x 750GB NVMe cache to test with I'm interested in this addition to unraid as I often really miss a mover progress indication when moving data onto my array. I back up my ESXi VM's and gaming rig through veeam to unraid, meaning that I regularely copy very large files to unraid which makes a progress indicator very handy. I'm also a bit of a data hoarder so I download large volumes of... ehmmm... linux ISO's... for archiving reasons Let me know. Cheers
-
Correct. ESXi 8.0 with a passed-through PCIe SAS HBA and coupled to a vCenter server and an NVMe (well, a VMDK on an NVMe) cache drive. No linux boot manager or anything like that, these days you can boot directly off of the unraid USB drive without any workarounds, so it should be a fairly standard unraid install. I've thought about just disabling cache for that share but the problem is that if those files remain open, that will keep my drives spun up permanently. I've tried looking for a cause myself but can't make heads or tails of it since the files remain open even after there is no more connection over NFS or SMB for that matter
-
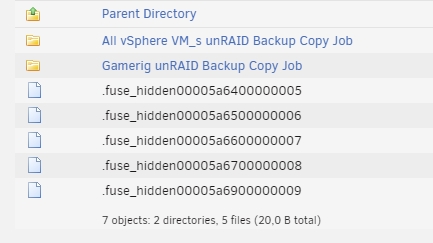
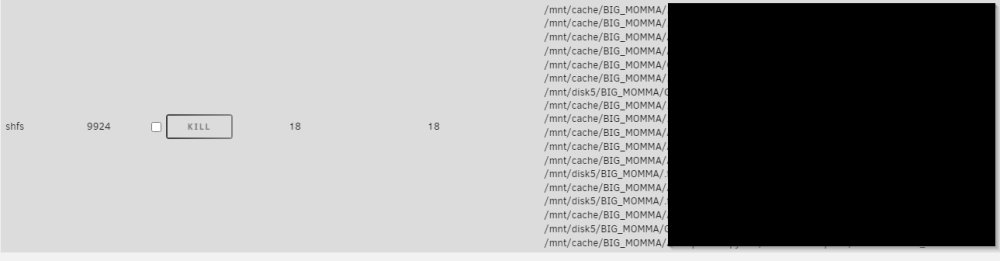
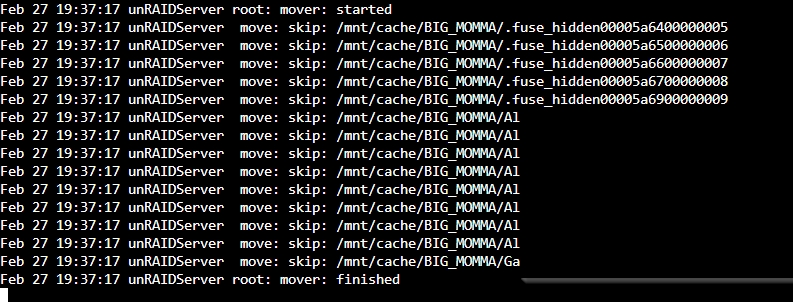
Hello I use Veeam backup to backup my (vSphere) VM's and workstations and subsequently copy those backups from my Veeam server's local storage to an unraid share through NFS. Every time such a backup copy process runs, some .fuse_hidden files are being created in the backup root directory. The backup copies complete succesfully. After that, even if I shutdown my Veeam server, the SHFS process keeps these .fuse_hidden files open on the array, along with all the backup files that were written to the array. I have cache enabled for this share and all the files are written to cache. The mover process then refuses to move these files to my spinning disks, neither the fuse nor the backup files, it skips them A reboot solves it, the fuse_hidden files disappear and then the mover works again too but this is not a solution of course. I have already completely disabled docker and I'm not running any VM's. The Veeam server has been offline for about 4 hours now but the files remain open, at least according to the open files plugin You can find a screenshot of what the files look like, what the open files look like, what the mover process output looks like and an anonymous diagnostics file attached. I have blacked out the filenames wherever they contained personal information, but all screenshots display both the .fuse_hidden files and the actual Veeam backup files Any ideas what could be causing this and/or how I might resolve this? I find it very strange that these files remain open even when I shut down the Veeam server. This must be something on the array itself causing this, since I have also shut down every other device with access to my array and the files remain open Cheers Diagnostics.zip
-
Thank you for this addition. Luckily I was aware of this but since I stumbled onto this thread after a google search, this will likely help people in the future that make that same stumble. Much appreciated




