





Amane
Members
-
Joined
-
Last visited
Everything posted by Amane
-
Falls du mir dein genauen Zustand der Daten aktuell schildern kannst, könnte man evtl. besser helfen und ein (find mv) Befehl basteln oder so, je nach ausmass.. 😅
-
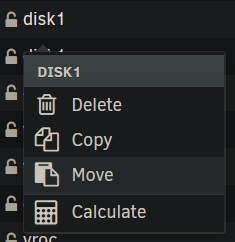
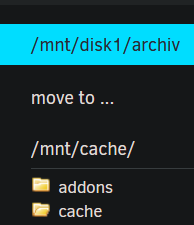
Hallo Mit dem Dynamix File Manager Plugin siehst du auch wo die Daten liegen und wenn du diese manuel umsortieren möchtest kannst du das dort ziemlich gut machen: anschliessend wählst du die Zielplatte aus.. Achtung, wenn du den inhalt von disk1 in meinem fall nach cache verschieben willst, musst du nur wie oben gezeigt disk1 move und dann die Zielplatte auswählen: Schau einfach gut auf die Pfade.. Hilft das?
-
Hab mal im eingesteckten Zustand rebootet. Am anfang des Bootprozesses war der Link aktiv, bis Unraid gebootet hat, dann ging sie down.. muss mal in den systemlogs schauen.. Apr 13 19:09:11 unraid unraid-api[10591]: ✔️ UNRAID API started successfully! Apr 13 19:09:23 unraid SysDrivers: SysDrivers Build Complete Apr 13 19:09:44 unraid kernel: mlx5_core 0000:61:00.0: poll_health:824:(pid 0): Fatal error 1 detected Apr 13 19:09:44 unraid kernel: mlx5_core 0000:61:00.0: print_health_info:423:(pid 0): PCI slot is unavailable Apr 13 19:09:46 unraid kernel: mlx5_core 0000:61:00.0 eth2: mlx5e_ethtool_get_link_ksettings: query port ptys failed: -67 Apr 13 19:09:46 unraid kernel: mlx5_core 0000:61:00.0 eth2: mlx5e_ethtool_get_link_ksettings: query port ptys failed: -67 Apr 13 19:09:46 unraid kernel: mlx5_core 0000:61:00.1: poll_health:824:(pid 0): Fatal error 1 detected Apr 13 19:09:46 unraid kernel: mlx5_core 0000:61:00.1: print_health_info:423:(pid 0): PCI slot is unavailable Apr 13 19:09:46 unraid kernel: mlx5_core 0000:61:00.1 eth3: mlx5e_ethtool_get_link_ksettings: query port ptys failed: -67 Apr 13 19:09:46 unraid kernel: mlx5_core 0000:61:00.1 eth3: mlx5e_ethtool_get_link_ksettings: query port ptys failed: -67 Apr 13 19:09:49 unraid kernel: mlx5_core 0000:61:00.0: mlx5_crdump_collect:50:(pid 1083): crdump: failed to lock vsc gw err -16 Apr 13 19:09:49 unraid kernel: mlx5_core 0000:61:00.0: mlx5_health_try_recover:335:(pid 1083): handling bad device here Apr 13 19:09:49 unraid kernel: mlx5_core 0000:61:00.0: mlx5_error_sw_reset:243:(pid 1083): start Apr 13 19:09:49 unraid kernel: mlx5_core 0000:61:00.0 eth2: mlx5e_ethtool_get_link_ksettings: query port ptys failed: -67 Apr 13 19:09:49 unraid kernel: mlx5_core 0000:61:00.0 eth2: mlx5e_ethtool_get_link_ksettings: query port ptys failed: -67 Apr 13 19:09:49 unraid kernel: mlx5_core 0000:61:00.1 eth3: mlx5e_ethtool_get_link_ksettings: query port ptys failed: -67 Apr 13 19:09:49 unraid kernel: mlx5_core 0000:61:00.1 eth3: mlx5e_ethtool_get_link_ksettings: query port ptys failed: -67 Apr 13 19:09:50 unraid kernel: mlx5_core 0000:61:00.1: mlx5_crdump_collect:50:(pid 1206): crdump: failed to lock vsc gw err -16 Apr 13 19:09:50 unraid kernel: mlx5_core 0000:61:00.1: mlx5_health_try_recover:335:(pid 1206): handling bad device here Apr 13 19:09:50 unraid kernel: mlx5_core 0000:61:00.1: mlx5_error_sw_reset:243:(pid 1206): start Apr 13 19:09:51 unraid kernel: mlx5_core 0000:61:00.0: NIC IFC still 7 after 2000ms. Apr 13 19:09:51 unraid kernel: mlx5_core 0000:61:00.0: mlx5_error_sw_reset:276:(pid 1083): end Apr 13 19:09:51 unraid kernel: bond0: (slave eth2): Releasing backup interface Apr 13 19:09:51 unraid kernel: mlx5_core 0000:61:00.0: mlx5e_execute_l2_action:598:(pid 1089): MPFS, failed to add mac a0:88:c2:ae:3f:50, err(-67) Apr 13 19:09:51 unraid kernel: mlx5_core 0000:61:00.0: E-Switch: Disable: mode(LEGACY), nvfs(0), active vports(0) Apr 13 19:09:51 unraid kernel: mlx5_core 0000:61:00.0: mlx5_wait_for_pages:777:(pid 1083): Skipping wait for vf pages stage Apr 13 19:09:52 unraid kernel: mlx5_core 0000:61:00.1 eth3: mlx5e_ethtool_get_link_ksettings: query port ptys failed: -67 Apr 13 19:09:52 unraid kernel: mlx5_core 0000:61:00.1 eth3: mlx5e_ethtool_get_link_ksettings: query port ptys failed: -67 Apr 13 19:09:52 unraid kernel: mlx5_core 0000:61:00.1: NIC IFC still 7 after 2000ms. Apr 13 19:09:52 unraid kernel: mlx5_core 0000:61:00.1: mlx5_error_sw_reset:276:(pid 1206): end Apr 13 19:09:52 unraid kernel: bond0: (slave eth3): Releasing backup interface Apr 13 19:09:52 unraid kernel: mlx5_core 0000:61:00.1: mlx5e_execute_l2_action:598:(pid 1089): MPFS, failed to add mac a0:88:c2:ae:3f:51, err(-67) Apr 13 19:09:52 unraid kernel: mlx5_core 0000:61:00.1: E-Switch: Disable: mode(LEGACY), nvfs(0), active vports(0) Apr 13 19:09:52 unraid kernel: mlx5_core 0000:61:00.1: mlx5_wait_for_pages:777:(pid 1206): Skipping wait for vf pages stage Apr 13 19:10:53 unraid kernel: mlx5_core 0000:61:00.0: mlx5_health_try_recover:338:(pid 1083): health recovery flow aborted, PCI reads still not working Apr 13 19:10:55 unraid kernel: mlx5_core 0000:61:00.1: mlx5_health_try_recover:338:(pid 1206): health recovery flow aborted, PCI reads still not working * unraid kernel: mlx5_core 0000:61:00.0: poll_health:824:(pid 0): Fatal error 1 detected
-
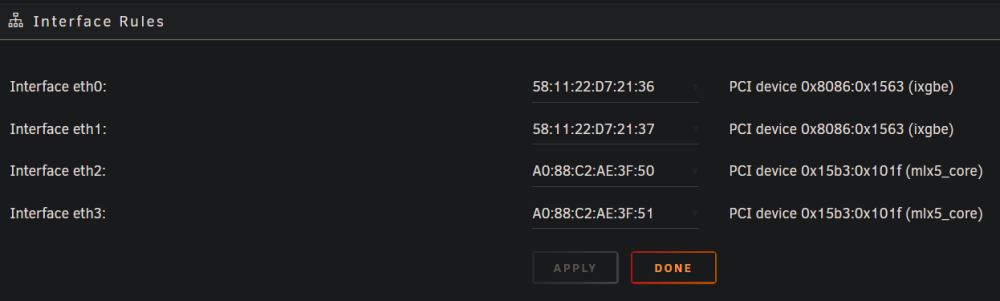
Die Karte scheinen nicht als Interface aufzutauchen, ich bin mir nicht mehr sicher wie es mit meinen QSFP+ Karten war, da erschien aber glaub ein Interface.. (Ich sehe sie nur in den Interface Rules) Sie sind auch nicht anwählbar zum bonden. und der Link ist grundsäzlich nicht aktiv..
-
Habe mir eine neue ConnectX-6 Lx (MCX631102AN-ADAT) geholt. Leider möchte sie nicht laufen: Kann ich mit der Karte noch irgendwas manuelles versuchen (Treiber, flashen), oder muss ich auf support warten?


-
Hallo Tourist Wieso denn zwei Netzwerke, was genau ist dein anligen? Man findet gestimmt auch mir der Fritzbox eine Lösung. Man kann ja auch routen einrichten?! https://avm.de/service/wissensdatenbank/dok/FRITZ-Box-7590/581_Statische-IP-Route-in-FRITZ-Box-einrichten/ Ich selber nutze 10.10.10.0/24 mein Router ist normal als Gateway 10.10.10.1 definiert. Unraid Pack ich dann auf 10.10.10.10. und alle Container bekommen von mir ein 10.10.10.100+ Mein VPN Netzwerk habe ich auf 10.10.11.0/24 gesetzt und kann somit übergreifend 10.10.10.0/23 definieren, wenn ich Kommunikation in beide Netzwerke ermöglichen möchte. Ein einfacheres Setup lässt sich bestimmt umsetzen..
-
Und diese Option macht das besser?

-
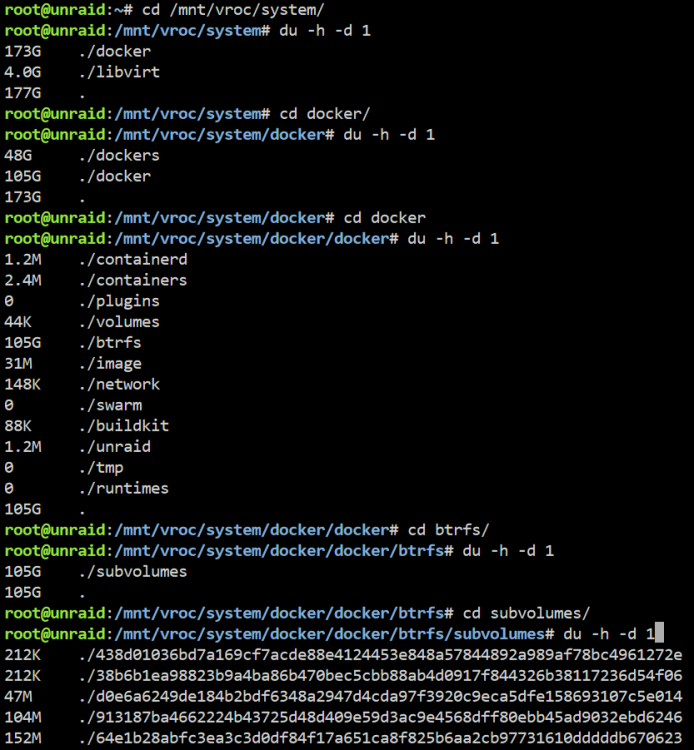
Gut zu wissen 😅 *Also besser bei btrf Option bleiben wenn man btrfs als Filesystem hat?!
-
XFS ist gut bei grossen Dateien und Systemen btrfs ist eigentlich eine gute Wahl für cache.. (ich hatte noch nie probleme soweit ich weiss - andere schon wie ich sehe..)
-
Korrekt 👍 ..sry (btrfs benutze ich nur für cache xfs für grosse und allgemeine Daten und zfs für viele Daten wenn ich noch etwas Performence durch cache und Platzersparniss durch deduplizieren raus holen möchte.. Aber das macht wohl jeder etwas anderst.. Ich glaub mit xfs und mit der Verzeichniss-Einstellung bei Docker hast du am wenigsten Probleme..
-
..stimmt 🙈 Oder mal alles durchsuchen 😀 find /mnt/disk3 -exec lsattr {} + 2>/dev/null | awk '$1 ~ /[ia]/ {print $2}'
-
ok.. falls in den Unterverzeichnissen auch kein "i" (immutable) oder "a"(append only) zu finden ist, ist es nach mir wirklich fehlerhaft..
-
ok, was kriegst du bei folgendem Befehl raus? lsattr /mnt/disk3/ irgendwo ein "i" oder "a" ?
-
Erst Backup erstellen, dann prüfen ob noch irgendwas schreibt auf der platte und wenn nicht kannst du es mit folgendem befehl versuchen: mount -o remount,rw /mnt/disk3
-
alles gut..sry
-
Das klang so, dass du Unraid (nicht einer VM) speziell Cores zuweisen kannst.. Das geht nicht korrekt? *Ne da war ich doof.. alles gut, du meinst dann hast du 4 Threads für Docker (und Unraid) .. ok 👍
-
Oh wie mach ich das denn? 😮
-
Schadet sicher nicht (ist schliesslich Windows 🤣), aber guck wenn dann, dass auch die vdisk gelöscht wird. Nicht einfach "nur" neu aufsetzen. Aber ob das wirklich helfen wird kann ich nicht garantieren.. Nur zuversichtlich hoffen. Müsste auch testen mit welchen Einstellungen dein System CPU-technisch am besten klarkommt. Vielleicht gibts noch mehr Erfahrungen mir Problemen aus dem Forum..
-
Was ich aber auch für Erfahrungen gemacht habe und evtl. erwähnenswert sein kann ist, dass ich es geschafft hatte meine Windows Maschine neu aufzusetzen und ein komplett lagging System erhalten zu haben.. Nur das Löschen der vdisk der VM und ein formatieren der Platte hat hier geholfen, da sich die Disk irgendwie übers Dateisystem verteilt hat (#konsolidierung) - keine Ahnung. Das Ergebniss des anschliessenden neu Aufstzen, mit der neu formatierten Platte, war dann wieder sehr in Ordnung. 😄
-
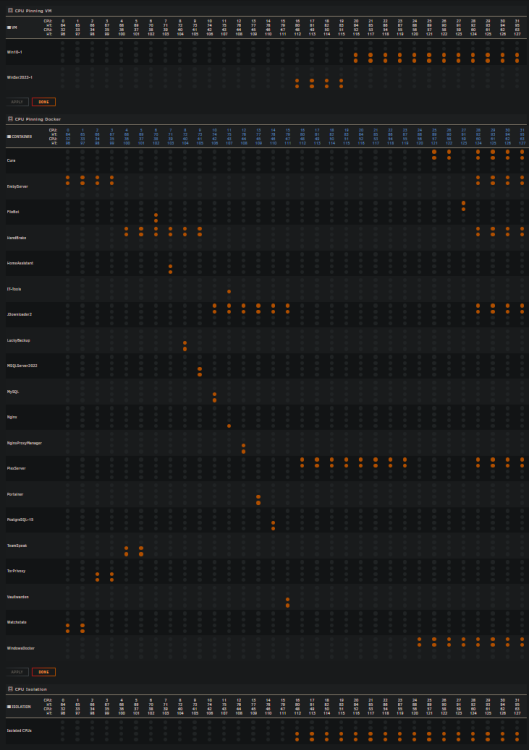
Ja, ich habe bedeutend bessere Erfahrungen mit Windows10 VMs gemacht, es fühlt sich nur damit an, als hätte ich ein eigenständiges System. Auch wenn die Theorie vielleicht was anderes sagt, hab ich eine sehr starke Gaming-VM so. (Zumindest mit 16+ Threads) Zumindest kann ich so mein System komplett auf die vielen Kerne die ich besitze verteilen.. Ich möchte meiner VM eigentlich keine 128 Threrads geben müssen und wenn ich weniger als alle zuweise, ohne Isolation bekomm ich extreme Performenceeinbussen, weil die Threads hin und her springen (das hast du ja bereits erwähnt, dass man alle zuweisen sollte) - oder eben isolation.. ich habe gute Erfahrungen damit! Bei meiner WindowsServer VM bin ich mir nicht ganz sicher, da ich Ruckler (aber nur mit VNC nicht mit RDP) habe seit ich von 2 auf 8 Threads gewechselt habe..
-
Ah Ok, versuchs mal mit, komisch wenn denn immer noch Problem auftauchen..
-
Er meint im Tab CPU Pinning, für die VMs sollten CPU abgetrennt vom restlichen System sein, das hast du? Grüsse

-
Hallo hier meine Umsetzung zu dem Thema Die permanenten Settings sehen so aus, einfach in die go Datei eintragen (/boot/config/go) : # Alias echo -e '\n# Alias from GO' >> /root/.bash_profile echo 'alias tt="tmux a -t"' >> /root/.bash_profile echo 'alias ts="tmux new -s"' >> /root/.bash_profile # Automatic start tmux echo -e '\n# Automatic start tmux' >> /root/.bash_profile echo 'export TERM=xterm-256color' >> /root/.bash_profile echo 'if [ -z "$TMUX" ]; then' >> /root/.bash_profile echo ' tmux attach-session -t "$(hostname)" || tmux new-session -s "$(hostname)"' >> /root/.bash_profile echo 'fi' >> /root/.bash_profile # TMUX configuration echo 'set -g default-terminal "xterm-256color"' > /root/.tmux.conf In der ~/.bash_profile sollte das dann so aussehen: # Alias from GO alias tt="tmux a -t" alias ts="tmux new -s" # Automatic start tmux export TERM=xterm-256color if [ -z "$TMUX" ]; then tmux attach-session -t "$(hostname)" || tmux new-session -s "$(hostname)" fi Meine Aliase musst du nicht übernehmen, kannst du aber 😄 Um Skripte direkt in einer TMUX-Session auszuführen hier mein Beitrag:
-
Use tmux 😉 #!/bin/bash # Start with TMUX SESSION_NAME="$(basename "$(dirname $0)" | sed 's/ //g')" export TERM=xterm-256color if [ -z "$TMUX" ]; then if [ $(tmux ls 2> /dev/null | grep "$SESSION_NAME" | wc -l) -gt 0 ]; then echo "Attach to exist TMUX-Session: $SESSION_NAME" tmux send-keys -t "$SESSION_NAME" "$0" C-m else echo "Create a new TMUX-Session: $SESSION_NAME" tmux new-session -d -s "$SESSION_NAME" tmux send-keys -t "$SESSION_NAME" "$0" C-m fi fi your script here.. Then you can show your scripts and attach to a session: Thats my variant.. If you have problems with tmux and 256-color settings (until the restart) : grep -q 'set -g default-terminal "xterm-256color"' ~/.tmux.conf || sed -i '1iset -g default-terminal "xterm-256color"' ~/.tmux.conf grep -q 'export TERM=xterm-256color' ~/.bash_profile || echo -e '\nexport TERM=xterm-256color' >> ~/.bash_profile . ~/.bash_profile For permanent workaround, you must add the following to the go file (/boot/config/go) : # TMUX 256-color workaround echo -e '\n# TMUX 256-color workaround' >> /root/.bash_profile echo 'export TERM=xterm-256color' >> /root/.bash_profile # TMUX configuration echo 'set -g default-terminal "xterm-256color"' > /root/.tmux.conf

-
Nein das nicht, das was du siehst ist ein onboard 10G Ethernet (RJ45) Anschluss auf dem Mainboard.





