





AgentXXL
Members
-
Joined
-
Last visited
Everything posted by AgentXXL
-
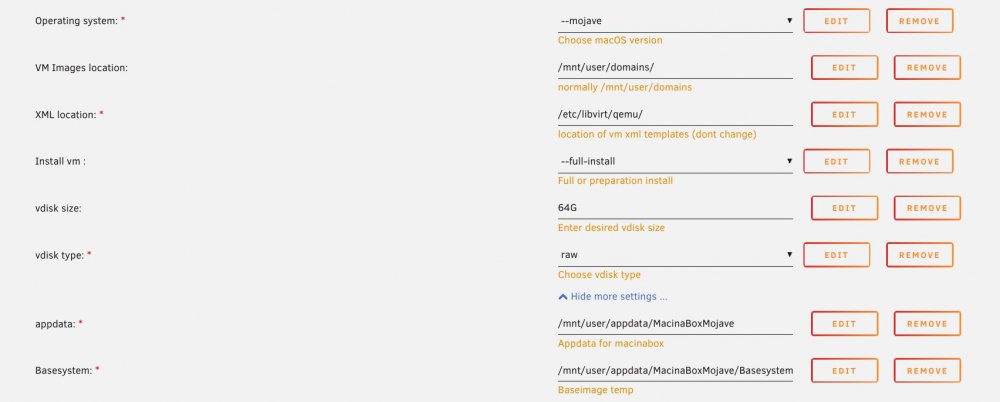
I've used the MacinaBox docker container to create multiple MacOS VMs and currently have it working for High Sierra, Mojave and Catalina. The only changes made were to the paths required by the docker container and of course selecting the correct OS version. I used the full install method for all 3. Here's a screenshot of my Mojave setup (last one I created). All it required was the 3 changes.
-
Was just going to say the same thing but had to be sure that I opened the right syslog file! Thanks for confirming my newbie attempt at help @Squid!
-
As another relative newbie (almost a year now) to unRAID, I'm trying to help give back a little to the community. This is my 1st stab at sorting through someone else's syslog diagnostics, so I might be off base but this is what I found: As it looks like your Synology is at 192.168.1.13/storj, it doesn't appear to show a login attempt as it's not set to auto-mount. Either try a manual mount or set it to automount, then refresh UD and resend the diagnostics so we can see a login attempt.
-
What OS are you using for your host? I run a Macbook Pro as my main platform so OSX Catalina is my host OS. Using the built-in screen sharing between the Macbook Pro and both the High Sierra and Catalina VMs (also using built-in screen sharing) seems to work quite well for me. It's essentially the same as VNC but it's Apple's variant. I also use OSX screen sharing to connect to my *nix and Windows systems as well, with UltraVNC server on the Windows systems and X11VNC on the *nix ones. Overall I'm not disappointed with the performance, but have tried different host/client solutions like RDP, Chrome Remote Desktop, Teamviewer and others. I have not tried Splashtop as I'm fine with the performance provided by the native OSX screen sharing.
-
You're welcome for the assistance. That's what's really great about this community - very responsive developers and Limetech themselves are fantastic. Their approach to handling security CVEs is excellent, far better than many much larger commercial companies. And of course, there seems to be a number of extremely helpful community members so I'm trying to be like them. As for your usage: most Docker containers will run on any Docker host with little or no modification. unRAID has native support for the Docker engine. You enable it under Docker in the Settings tab of the unRAID webgui. Then add your Docker containers either via the repository URL method or via Community Apps for select containers that have been developed and tested with unRAID. It's also quite easy to package your own containers, but that's easier to do if you have Docker setup on a separate Windows/Mac/*nix system. I do see the advantage of running Docker under a VM in that it's one less system you have to support and maintain. Once I've had a chance to read through the previous mentioned thread I'll see if I have any other suggestions. For general help with running Docker containers under unRAID, fire your questions at me (and others here) and we'll try to answer them for you.
-
There must be a way as others have it working. I haven't read through the thread that @ghost82 posted yet. Personally, I don't run Docker on my VMs - just natively on unRAID. What is the need to run Docker within the VM?
-
@lukeasoiler - I might have misunderstood your original post but what @vcolombo said made me think that if you're trying to install Docker under a VM that's running on unRAID, it's the BIOS for the VM that needs to have virtualization enabled. You access the BIOS/UEFI settings for a VM by pressing 'Esc' rapidly in the VM window/screen as soon as you start the VM.
-
Hmmm, so you've been able to use VMs but not Docker? Just this specific Docker container or all Dockers? When you set Docker in Settings to Enable (Yes), is that when you get your error? When you disable Docker (set to No in Settings) can you delete the docker.img file? If you have a corrupted one, it may be preventing Docker from starting. When you re-enable Docker it will download a fresh image. Note that deleting the docker.img file is safe - any Docker containers previously installed will have to be re-installed under Community Apps (under Previous Apps on the left side of the Apps tab in the unRAID webgui). Any changes to Docker container configs (like mountpoints, added paths, variables, etc) should still be in your user-templates for dockerMan on the flash drive. If you haven't added any Docker containers or would like to reset all containers to default, make sure no user-templates are in the /flash/config/plugins/dockerMan/templates-user folder. This is where the Docker XML files are stored but they are copied to /boot/config/plugins/dockerMan/templates-user in RAM when unRAID starts. If you want to ensure you're starting from scratch, make sure to remove any of the 'my.XXXXXXX.xml' template files. As for the BIOS, the Asus z390-a is a modern board but the manual doesn't list the standard BIOS options so you can probably try this: 1. On a UEFI-based computer, you shouldn't have to press a key when the computer starts. Instead, you need to hold down the Shift key and click Restart to reboot directly from the Advanced Startup options to the UEFI firmware settings. If that doesn't work, then use the standard 'hit DEL to enter BIOS' (where DEL might be F1, F2, Esc on other manufacturers). 2. Once you enter the setup menu, you can start looking for options labeled “Intel VT-x,” “Intel Virtualization Technology,” “Virtualization Extensions,” “Vanderpool,” or similar. When this option is enabled, press F10 to save the settings changes and reboot the PC. Typically, you can find the option under the Processor submenu. This submenu can be located somewhere under the “Chipset,” “Northbridge,” “Advanced Chipset Control,” or “Advanced CPU Configuration” menus. Hope this helps.
-
Check your BIOS settings to ensure virtualization is enabled. It varies a bit between manufacturers but if you tell us which motherboard model someone (including myself) can probably point you to the correct settings. Certainly a 9900K will work...
-
That's certainly a useable workaround, but in the long run I'd feel better finding the actual cause of these hung unpack processes.
-
I was having issues with my High Sierra VM so I decided to try a full de-install/cleanup and then start from scratch. I removed the MacinaBox docker and deleted all folders related to it on both the flash drive and in /appdata and /domains. So neither the MacinaBox docker nor any VMs were on my unRAID build. When I re-installed the docker and ran it, I initially installed a new High Sierra VM that's been working well. But I also noticed that there were still two folders created under /appdata - 'MacinaBox' for the main appdata folder and 'macinabox' for Basesystem. This was corrected again by changing the case of the letters so both paths used the /appdata/MacinaBox folder. I then decided to try another Catalina VM after reading up on AVX2. While my older x5650 Xeons don't support AVX2, it's really only needed to improve overall performance. The older AVX support still functions. All I changed in the MacinaBox docker were the OS choice (--catalina) and edit of the paths under 'Show more settings' as the attached image shows - change the 'MacinaBox' to 'MacinaBoxCat'. The docker ran, created the VM (as I chose --full install) and after stopping and restarting the array, both it and the High Sierra VM were available. I've run them both since the install and they both continue to function. Note that I did not pin any cores to the VMs at this time... just wanted to see how they perform 1st and so far everything is running pretty well. So for those that want to do dual (or more) Mac VMs, it looks like the key is to make sure you set your appdata and Basesystem paths correctly. I'm not sure if them both using the same case for the spelling of 'MacinaBox' had an effect, but since it's working I'm going to say that mixed case spellings between the two paths may be part of the issues others are seeing.

-
This problem is present on all Docker containers I've tried. In watching the logs it seems that the stalls when post-processing are often due to something failing in the PAR check/repair process. If you go into your temporary download location (assuming you have NZBGet setup that way, it's the 'intermediate' folder), look for any files with a .1 extension (i.e. bad files which have been replaced by repaired versions). Delete all of these 'bad' files and then check to see if the par repair might have also created any repaired files with essentially the same name but adding some leading zeroes to the name. Par repair might rename a file to filename.partxxxx whereas the rest of the series is named filename.partxx. This confuses the extraction/unpacking and will usually show up as a download with a failed extract/unpack but a successful par check/repair. I've also found that occasionally the par repair built into the NZBGet container will skip a damaged file no matter how many times you try to send it back to post-processing. If I run QuickPAR from a Windows box on the same files, it often will find one or more damaged files that the built-in par repair missed. Once I've deleted all the '.1 and renamed with extra zeroes' files, QuickPAR will successfully repair the set and then re-sending the set to post-processing is successful. In summary, I suspect the command-line version of par used by the NZBGet dockers is a possible cause of the stalls.
-
Did you verify that MacinaBox created the full VM or was it set to just do the pre-install? By default the Docker container is set to pre-install so you have to change that parameter to 'full install'. Check your log for the 'MacinaBox' container on the Docker tab - it should end looking something like this if you have it set to 'full install'. If your log verifies that the vdisk was created, once you stop and then restart the array it should appear in the VM tab and in the VM section on the Dashboard tab.
-
Did you stop and restart the array after using the docker container to create the VM? The stop/restart is required for unRAID to see the VM.
-
Change the folders used for appdata and Basesystem to something other than the default locations. I had a working Catalina VM alongside a High Sierra VM on my older system still listed in my signature. As mentioned in my post above, I just transplanted my entire unRAID setup to a used Supermicro CSE-847 system. Alas the dual Xeon x5650 CPUs don't support AVX2 so I can no longer use the Catalina VM.
-
I've got an interesting issue that I just came across. I own and use real Mac computers but also run a VM. It's nice to be able to test software that I'm not familiar with without hosing my bare-metal Macs. I was running unRAID on the system still listed in my signature until a few days ago. I had used MacinaBox to create a Catalina VM while still on the Skylake i7-6700K and it seemed to work quite well. A couple of days ago I picked up a used Supermicro CSE-847 with a x8DTN+ motherboard, dual x5650 Xeons, and for now, only 16GB of RAM. UnRAID migrated to the new hardware with no issues itself, but earlier today I tried firing up the Catalina VM. It seemed quite constrained and was running very slowly. I chalked that up to some software I'd tried a week ago that may have messed things up. To try and fix, I went ahead and deleted the VM (and disks) and the MacinaBox docker container. To ensure it was clean I also deleted the old /appdata/MacinaBox and /appdata/macinabox folders, as well as /domains/MacinaboxCatalina. I then tried re-installing MacinaBox via Community Apps, choosing to create a fresh new Catalina VM. Alas this is where the problem starts - the initial boot of the VM gets to the Clover bootloader and chooses the Mac Catalina install image, but then switches to the familiar black screen with a white Apple logo. Usually the logo is centered in the window, but for some reason it now is appearing in the upper left area of the screen. Alas it seems to hang at that point - I've left it sitting for over an hour with no change. I did some investigation and it looks like the Xeon x5650 CPUs don't support AVX2, but they do support SSE 4.2. The old i7-6700K does support AVX2, so that's why the VM ran fine on it. Guess I now have a reason to upgrade the motherboard in the Supermicro to something more modern. But in the meantime, are there any workarounds to not having AVX2 support? All that lead-up for one simple question, but I'm expecting the answer is no. Regardless, thanks @SpaceInvaderOnefor making it so easy to create Mac VMs on unRAID! One other note caused by my OCD: in the config for the MacinaBox docker container (and VM), the paths listed for appdata and Basesystem use different case for the spelling of 'MacinaBox'. This leads to the creation of 2 folders under appdata, differing only in the case of the letters. I've changed mine so they both use the same case of 'MacinaBox' and so far everything is still working with a fresh High Sierra VM. Is there any reason why these paths use different case letters in the name of the folder? I just corrected the case of the pathname for Basesystem so it uses the same folder as appdata. Any reason why I shouldn't do this? Dale

-
Yes, I found that the HBA was indeed limited by the PCIe slot. I waded through some logs and saw the link speed at 2.5 and knew something wasn't right. Then I used the DiskSpeed docker to benchmark the controller and it also reported the link speed as 2.5 at the start of the test. Moved the HBA to a x8 slot and it's now running at 5. The Supermicro is certainly an older unit and the previous owner did say it wasn't as fast as they wanted - turned it into a half-decent upgrade for me. Rare to find them locally, especially for the price I paid. I'm still planning to eventually replace the motherboard with something faster and more modern. I've read a bit about using more than a single cable to the SAS backplane so I'll keep my eyes open for a deal on a better HBA. DiskSpeed also mentioned in the post-controller benchmark that the controller was underpowered for the number of drives I'm using. That gives me more ammo to watch for a better HBA. For now I'm happier as my disk I/O speeds doubled. After running a full check with the DiskSpeed docker I'm hoping that the tunables can be tweaked to get me even a bit more performance.
-
[SOLVED] At least partially solved. After investigating a little further it appears the 1st thing I had to resolve was putting the SAS2008 controller into a PCIe x8 slot.... not sure why the previous owner had the card in a x4 slot. Needless to say that has improved things dramatically taking the link speed to 5GT/s vs 2.5GT/s. I'll do a re-run of the full disk check overnight and see if it still hangs on the 9th drive at 36%. <ORIGINAL POST> I'm not sure if I missed something while scanning through this forum topic but I'm having apparent lockups of the Diskspeed docker/webpage while testing. I just moved my media server setup into a Supermicro CSE-847 with a x8DTN+ motherboard, dual Xeon X5650 cpus, and at the moment only 16GB of RAM. The 24 bay front backplane and 12 bay rear backplane are connected to a Dell Perc (LSI2008) in IT mode. Unfortunately I've noticed my disk I/O for both the SSDs and the array are almost half what they were in the old Norco enclosure (specs still in my signature below). That's why I wanted to re-run DiskSpeed now that I'm in the new enclosure and running on 12 physical cores vs the 4 core i7 in my old Norco setup. I have 22 drives in this system currently: Parity: 2 x Ironwolf 10TB Array: 14 x 10TB + 4 x 8TB (mix of Seagate, WD and HGST) Cache: 2TB WD Blue SSD UD for Dockers/VM: 1TB Samsung 850 EVO I've tried 2 runs to check all drives. It has stopped testing (or at least outputting to the web page) at 36% through the 9th drive on both runs. For some reason the drives were tested in a different order for each of the 2 runs, but not sure if that's related to the apparent lockup. If I try and refresh the webpage while it appears hung, it resends the test request and starts the testing over again. Note that clicking on 'Abort benchmarking' while it seems to be hung does nothing. The webpage just sits there with no further updates. The only way to get it to respond is to refresh the page which restarts the testing. I did a restart of the system with all Dockers and VMs disabled other than DiskSpeed. I tried to create a debug file from the link in the lower left of the DiskSpeed startup webpage, but the tar file created is empty (wanted to see what was being sent before emailing it). My next test is to purge the DiskSpeed config and try from scratch. Note that I just attempted to run the test using Safari instead of my default of Firefox and got the same result. The testing appears to hang at 36% of what appears to be the 9th drive tested. Again, the drives were tested in a different order than the other 2 runs. Let me know if there are any suggestions as to the cause or anything else that I can provide to help troubleshoot. Thanks! Dale
-
As mentioned above there are USB enclosures that do pass the SMART and other info from the drive(s). However, if you haven't already bought drives then why not just use the WD EasyStore/Elements or Seagate offerings? Both the stock WD and Seagate enclosures for their 10TB+ models have worked for me to pass SMART and other info via USB. Unless you're concerned about getting a longer warranty (3 - 5 yrs for retail bare drives, 2 years for drives in USB enclosures), just buy the less expensive USB drives and shuck the bare drive from the enclosure after you've let them preclear and/or stress test. The WD enclosures are almost always 'white label' REDs (the WD NAS series). Every 10TB+ Seagate that I've shucked has been a Barracuda Pro. And yes, the bare drives are still warrantied after being shucked from the USB enclosure, but in most cases only for 2 years. I've returned a bare drive to Seagate that came from an enclosure using the serial number on the bare drive itself. Not one question about why it wasn't in the USB enclosure - they just sent me a replacement sealed retail Barracuda Pro. Others have had similar experiences with recent WD drives. You save considerable money purchasing the USB drives over the bare drive. My queries to both Seagate and WD on why they do this have never been answered. They sell the same bare drive with it installed in their USB enclosure cheaper than the bare retail drive. But as mentioned above, most of the USB drives from WD/Seagate have only 2 years of warranty, even though the bare drives inside are the same model as their bare drives. Hope that helps.
-
New backplanes? Unless I've missed something, Norcotek is now out of business. A few months ago I emailed and tried calling (disconnected number) to see if I could get replacement backplanes for my 4220. No response from the email and I've seen other mentions that Norcotek is dead. Not sure what kind of speeds you're seeing, but I've got 18 drives in mine and the speed maxes at about 150Mbps for writes to the array. More common to see it around 80 - 110 Mbps. The SATA/SAS controller and the motherboard+CPU combo plays into this as well. 16 of my drives are connected to my LSI 9201-16i which a PCIe 2.0 card that I have installed in a PCIe x8 slot. Max speed of this LSI is 6Gbps (SATA3) but it's also limited by the rest of the system and how many PCIe lanes are in use and/or dedicated to other hardware. I'm looking at a Supermicro enclosure to eventually replace my 4220 but for now I've removed the defective backplanes and direct-wired to each drive using miniSAS SFF-8087 to 4 SATA forward breakout cables. And of course separate power for each drive too. Definitely a LOT more mess than using the backplanes, but at least my system is now not throwing random UDMA CRC errors that it did when using the backplanes. I may look at upgrading the LSI to a PCIe 3.0 version with 12Gbps capability, but not until after I get a new motherboard/CPU. I'm budgeting to eventually pickup a Threadripper setup so I can run a few more VMs and still have some CPU core headroom. Dale
-
No problem. Glad that's helping, but you don't have to delete all files and re-download - just delete the bad/renamed files for each affected download and attempt a re-postprocess from nzbget. For example, delete all files that have been renamed with the extension '.1' or any files that have had the extra leading '0' attached to the part identifier. Occassionally I'll have to ask nzbget to 'download remaining files' and let it attempt another repair before the unpack even tries to start. For some older content that often has more missing articles, I wish I could find a way to tell nzbget to download ALL remaining files as sometimes it stops download of the next parity file and just marks the download as failed. Some older (and even sometimes new) content need the full set of parity files for par to successfully repair the archive. Note that on the failed 7zip extracts that hang, I will sometimes just stop the nzbget Docker container and then use my Windows box with 7zip installed to do the extract manually. This is rare as most times I can cleanup the intermediate download folder and nzbget will then successfully call 7zip and proceed with the extract. Dale
-
I and other users are seeing the same issue. I've discovered a few issues that seem to be related. First is that the par check/repair stage seems to fail randomly. Sometimes nzbget reports 'PAR Success' but no matter how many times I try and re-postprocess the download, the unpack fails or gets stuck. If I run QuickPAR from Windows using the same PAR set, it often finds 1 or 2 files that have all blocks present but they need to be re-joined. Once QuickPAR has re-joined these blocks/files, then nzbget can successfully unpack. The other issue is some PAR repairs leave the renamed damaged files in the source folder. I find this confuses nzbget's unpack processing, especially when the first file in the archive set has a renamed copy. For example, if nzbget PAR does a repair/rejoin, it sometimes seems to create a file with one more leading '0' in the filename, i.e. xxxxxxxxxxxxxxxxx.7z.001 is repaired/rejoined but there is a copy of the bad file named xxxxxxxxxxxxxxxxx.7z.0001. The same can happen with rar archives - the filename might be xxxxxxxxxxxxxxxxx.part001.rar and after the repair/rejoin there's a 2nd file named xxxxxxxxxxxxxxxxx.part0001.rar. When you look at the source folder (the 'intermediate' folder for most, depending on how you have nzbget configured) and delete all the 'bad' files that have been renamed and then do a re-postprocess, the unpack will usually succeed. The 3rd case of failure I've found is the complete 'halt' of the extract/unpack process, which seems to be a bug on the way 7zip is called to process .7z archives. The logs show the unpack request is calling 7zip but the unpack hangs for some reason that the logs don't identify. Hope these findings might help others and maybe even help the nzbget team further refine their post-processing routines. Note that I've also found these same issues when using the Linuxserver.io build of the nzbget Docker container. This means the issues are likely inherent to the nzbget app and/or the par/unrar/7zip extensions. Dale
-
I was happy when I bought it over 6 years ago and used it for FreeNAS for many years with only 8 of the 20 bays populated with drives. When I moved to unRAID about 9 months ago, I had major issues with the hot-swap SATA backplanes that Norcotek has installed in the case. I eventually had to remove all the backplanes and now the drives are direct cabled - no more easy hot-swap but I never really needed that anyways. And as far as I know, Norcotek is now out of business. They haven't responded to multiple emails asking about replacement backplanes and their phone number has been disconnected. This means you'll have to look for something else - I'm considering a Supermicro 24 disk enclosure myself, but also picked up a Rosewill 4500 so I can do a 2nd unRAID setup with up to 15 x 3.5" drives (again, all direct cabled).
-
Try the Krusader docker container.... it's quite full-featured as a file/directory utility. Just make sure to add the paths to the mountpoints for your UD device(s) so you can copy to the array.
-
@TechMed So if you have UPS units and they're correctly configured to do shutdowns, why does this problem happen? If the remote shares on the other systems are also UPS protected, you just need to tweak your UPS shutdown sequence so that unRAID shuts down before the other systems do. This should prevent UD lockups as the remote shares should still be valid during the unRAID shutdown. The other thing to remember is to have your network gear all UPS protected as well. If your router/switches go down, that could cause the same issue where the remote shares/systems are no longer reachable until they restart. I have 2 remote mounts and haven't encountered a UD lockup like you describe. Hopefully it's just setting the shutdown times so that unRAID shuts down before the others.




