


T0a
Members
-
Joined
-
Last visited
Everything posted by T0a
-
This will allow everyone in my network to access the NSF shares, right? I would rather try to avoid that. As of now, only certain IP addresses have access to the shares. However, I cannot apply the options to these IP addresses as the rule input field has a size limit.
-
Indeed that solved the problem. Thank you so much! For reference, I clicked on the tab shares and selected the backup share. Then, under "Nfs Security Settings", I modified the existing rule to "<ip>(sec=sys,rw,insecure,anongid=100,anonuid=25699,no_root_squash)", where <ip> is the address of the Linux client. Update: Is there a way to set the options globally for NFS instead of per rule and IP for all shares? The rule field seems to have a length restriction. Thus, I cannot technically add the same options to all IPs.
-
No, I execute these commands on the Linux client. It mounts a backup share from the Unraid server and then rsyncs the data to the share. Update: Seems like the ownership issue only occurs when using the root user: toa@client:~$ sudo umount /mnt/backup toa@client:~$ sudo mount -t nfs4 192.168.178.21:/mnt/user/backup/clients/ /mnt/backup toa@client:~$ touch /mnt/backup/ toa@client:~$ touch /mnt/backup/file toa@client:~$ sudo umount /mnt/backup toa@client:~$ sudo su root@client:# sudo mount -t nfs4 192.168.178.21:/mnt/user/backup/clients/ /mnt/backup root@client:# touch /mnt/backup/file2 root@client:# ls -ahl /mnt/backup/ total 3.8G drwxrwxrwx 1 root root 115 Jun 11 15:34 . drwxr-xr-x 3 root root 4.0K Nov 17 2019 .. -rw-r--r-- 1 toa users 0 Jun 11 15:29 file -rw-r--r-- 1 nobody nogroup 0 Jun 11 15:34 file2
-
Hi 👋, I recently upgraded to Unraid 6.10.2 and try to backup another Linux host via NFS4 and rsync to my Unraid server. The same procedure worked with NFS3 and rsync in the past. However, after upgrading and switching to NFS4 the files do not preserve their ownership anymore and I receive errors from rsync in my client logs as follows. Exemplary, an error from rsync. 11/06/2022 10:30:28 rsync: chown "/mnt/backup/opt/gitea" failed: Operation not permitted (1) User permission comparison: root@client:/mnt/backup/opt/gitea# ls -ahl /mnt/backup/opt/gitea/ total 8.0K drwx------ 1 nobody nogroup 58 Jan 2 13:30 . drwx------ 1 nobody nogroup 4.0K Jun 4 15:06 .. drwx------ 1 nobody nogroup 158 Jun 11 00:00 backup -rw------- 1 nobody nogroup 491 Jun 11 10:31 docker-compose.yml root@client:/mnt/backup/opt/gitea# ls -al /opt/gitea/ total 20 drwxr-xr-x 4 toa toa 4096 Jan 2 13:30 . drwxr-xr-x 30 root root 4096 Jun 4 15:06 .. drwxr-xr-x 2 1000 1000 4096 Jun 11 00:00 backup -rw-r--r-- 1 toa toa 491 Nov 26 2021 docker-compose.yml drwxr-xr-x 5 root root 4096 Dec 28 2020 gitea User id and group for user root@client:/# id toa uid=1000(toa) gid=100(users) groups=100(users),20(dialout),995(docker) root@unraid:/# id toa uid=1000(toa) gid=100(users) groups=100(users) The rsync commands that I execute as root user on the Linux hosts to mount the NFS share from the Unraid server: mount -t nfs4 192.168.178.21:/mnt/user/backup/clients/client /mnt/backup ... rsync -av --delete --delete-excluded $OPT_EXCLUDES /opt /mnt/backup Before, as an example the file 'docker-compose.yml' showed the owner and group 'toa' in the remote share on the client. My research lead me to this article. On the client side, I then set "NEED_IDMAPD=yes" and "NEED_GSSD=no" in the file '/etc/default/nfs-common'. I didn't enable the 'Domain' setting in the '/etc/idmapd.conf' file as I couldn't find that setting in Unraid. Afterwards, I restarted the client and tried again with the same errors. Would love to get some help on this problem. Feel free to request further information for troubleshooting. Thank you in advance!
-
FYI: There is a small typo in the "nuke uptime column" settings help text: "This will remmove (nuke) the uptime column"
-
Hi, upgraded to Unraid 6.10.2 today. I experienced a strange UI issue where the loading animation didn't stop when renaming the description of the server (see screenshot attached). I use Firefox version 101.0 (64-bit). What you will find in the diagnostics I attached - it may help to reproduce the issue: 1. Took the array offline 2. Disabled smb1 3. Renamed server description to NAS 3.1 The loading animation didn't stop. I then clicked on another tab and loading stopped 4. Started the array 4.1 Strange Firefox popup appeared. Cannot remember the text anymore, but I clicked resend in the modal dialog 5. Stale configuration appeared suddenly in the footer after clicking the button from the Firefox modal dialog 6. Seems like I could not start the array anymore 6.1 Removed disk assignment from array and reassigned 7. Stale message went away 7.1. Still could not start the array from the UI anymore (no button) 8. Reboot 9. Array successfully started From the system logs only the following messages look suspicious to me: Jun 5 12:53:17 Zeus nginx: 2022/06/05 12:53:17 [error] 9589#9589: *6130 open() "/usr/local/emhttp/images/directory.png" failed (2: No such file or directory) while sending to client, client: 192.168.178.25, server: , request: "GET /images/directory.png HTTP/1.1", host: "192.168.178.21" Jun 5 12:53:23 Zeus nginx: 2022/06/05 12:53:23 [error] 9589#9589: *6156 open() "/usr/local/emhttp/images/directory.png" failed (2: No such file or directory) while sending to client, client: 192.168.178.25, server: , request: "GET /images/directory.png HTTP/1.1", host: "192.168.178.21" [...] # More occured in the meantime, but not part of the diagnostics Jun 5 15:57:24 Zeus nginx: 2022/06/05 15:57:24 [error] 9589#9589: *103560 open() "/usr/local/emhttp/images/ui-icons_222222_256x240.png" failed (2: No such file or directory) while sending to client, client: 192.168.178.25, server: , request: "GET /images/ui-icons_222222_256x240.png HTTP/1.1", host: "192.168.178.21" Jun 5 16:22:23 Zeus nginx: 2022/06/05 16:22:23 [error] 9589#9589: *122857 open() "/usr/local/emhttp/images/ui-icons_222222_256x240.png" failed (2: No such file or directory) while sending to client, client: 192.168.178.25, server: , request: "GET /images/ui-icons_222222_256x240.png HTTP/1.1", host: "192.168.178.21" Jun 5 16:30:19 Zeus nginx: 2022/06/05 16:30:19 [error] 9589#9589: *126641 open() "/usr/local/emhttp/images/file-types.png" failed (2: No such file or directory) while sending to client, client: 192.168.178.25, server: , request: "GET /images/file-types.png HTTP/1.1", host: "192.168.178.21" Jun 5 16:30:37 Zeus nginx: 2022/06/05 16:30:37 [error] 9589#9589: *126641 open() "/usr/local/emhttp/images/file-types.png" failed (2: No such file or directory) while sending to client, client: 192.168.178.25, server: , request: "GET /images/file-types.png HTTP/1.1", host: "192.168.178.21" Jun 5 16:30:42 Zeus nginx: 2022/06/05 16:30:42 [error] 9589#9589: *126641 open() "/usr/local/emhttp/images/file-types.png" failed (2: No such file or directory) while sending to client, client: 192.168.178.25, server: , request: "GET /images/file-types.png HTTP/1.1", host: "192.168.178.21" Though, they might be totally unrelated or caused by a plugin I use. Don't know. zeus-diagnostics-20220605-1239.zip
-
Why don't you use the official Zerotier image for the template? Does your image contain custom changes for Unraid?
-
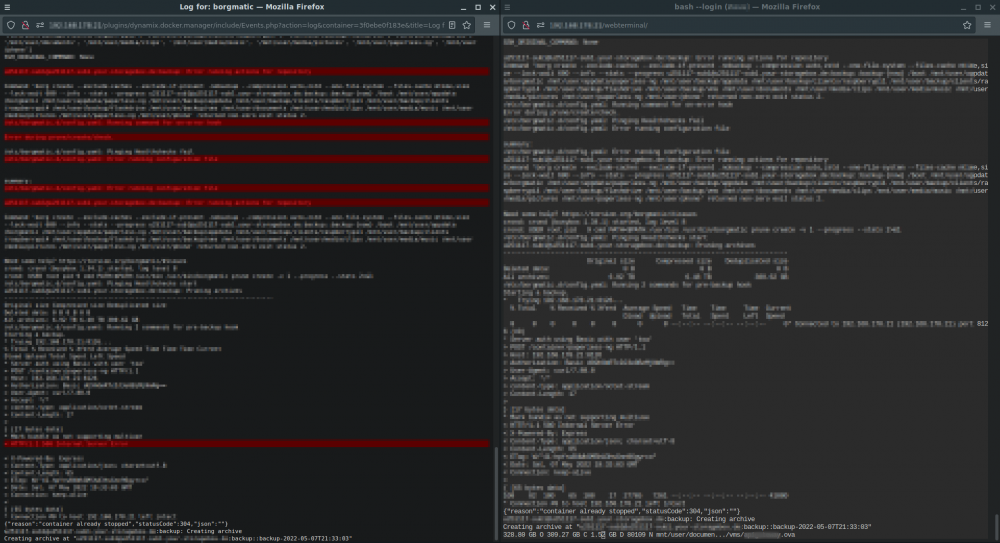
I added the progress flag to my borgmatic command (borgmatic create --verbosity 1 --progress --stats) today and noticed that the logs available via the WebUI are incomplete when compared to docker logs from the command line. The left side shows the logs via the build-in web UI log viewer. The right side shows the logs via `docker logs -f <id>`. Not sure whether this is an issue with how Unraid fetches the docker logs for the container. Anybody experienced something similar in the past or can explain that behavior?
-
Thanks @dlandon. I cannot proceed my preclear session from yesterday after a server shutdown. Any ideas? Is this expected behavior? Are there any workarounds? I don't want to start the preclear from the beginning. Update: My mistake. You need to click "start preclear" and then the plugins asks to resume. I initially though "start preclear" will trigger a new preclear run. I expected the UI to show my paused session in the devices table. Log: May 3 16:22:27 Preclear resumed on all devices.

-
I just tested this plugin with a new disk attached via USB to my Unraid server (6.9.2). I started the preclear process and paused it when the status reached 65%. Unfortunately, no "*.resume" was created on "/boot": May 02 17:49:33 preclear_disk_WD-WX92DA1DAR18_12570: Preclear Disk Version: 1.0.25 May 02 17:49:33 preclear_disk_WD-WX92DA1DAR18_12570: Disk size: 4000787030016 May 02 17:49:33 preclear_disk_WD-WX92DA1DAR18_12570: Disk blocks: 976754646 May 02 17:49:33 preclear_disk_WD-WX92DA1DAR18_12570: Blocks (512 bytes): 7814037168 May 02 17:49:33 preclear_disk_WD-WX92DA1DAR18_12570: Block size: 4096 May 02 17:49:33 preclear_disk_WD-WX92DA1DAR18_12570: Start sector: 0 May 02 17:49:36 preclear_disk_WD-WX92DA1DAR18_12570: Zeroing: zeroing the disk started (1/5) ... May 02 17:49:36 preclear_disk_WD-WX92DA1DAR18_12570: Zeroing: emptying the MBR. May 02 19:13:16 preclear_disk_WD-WX92DA1DAR18_12570: Zeroing: progress - 25% zeroed @ 192 MB/s May 02 20:45:26 preclear_disk_WD-WX92DA1DAR18_12570: Zeroing: progress - 50% zeroed @ 167 MB/s May 02 21:49:18 preclear_disk_WD-WX92DA1DAR18_12570: Pause requested May 02 21:49:18 preclear_disk_WD-WX92DA1DAR18_12570: cp: cannot create regular file '/boot/preclear_reports/WD-WX92DA1DAR18.resume': No such file or directory May 02 21:49:18 preclear_disk_WD-WX92DA1DAR18_12570: Paused After manually creating the folder "/boot/preclear_reports", starting the preclear process and pausing it again the file "WD-WX92DA1DAR18.resume" gets written to disk as expected: root@server:/boot# ls /boot/preclear_reports/ WD-WX92DA1DAR18.resume root@server:/boot# cat /boot/preclear_reports/WD-WX92DA1DAR18.resume # parsed arguments verify_disk_mbr='' erase_preclear='n' short_test='' read_stress='y' erase_disk='n' notify_freq='1' format_html='' verify_zeroed='' write_disk_mbr='' write_size='' skip_preread='y' read_size='' notify_channel='4' no_prompt='y' cycles='1' skip_postread='' read_blocks='' # current operation current_op='zero' current_pos='2621668589568' current_timer='14431' current_cycle='1' # previous operations preread_average='' preread_speed='' write_average='' write_speed='' postread_average='' postread_speed='' # current elapsed time main_elapsed_time='14442' cycle_elapsed_time='14441'
-
Maybe WatchTower will serve your needs. Personally, I don't like automatic updates for my containers as I have the urge for checking the application after an update. Keep in mind that even minor updates might break the setup. Maybe Diun will serve your needs. I have not stated to remove the paperless-ng container any time soon. Please re-read the introduction post again:
-
That is because both instances share the same session identifier (cookie). Apply to one of them the environment variable PAPERLESS_COOKIE_PREFIX=second. Updated the FAQ.
-
Migrate from paperless to paperless-ng: https://paperless-ng.readthedocs.io/en/latest/setup.html?highlight=migrate#migration-to-paperless-ng Migrating from paperless to paperless-ngx: https://paperless-ngx.readthedocs.io/en/latest/setup.html?highlight=migrate#migrating-from-paperless Migrate from paperless-ng to paperless-ngx: https://paperless-ngx.readthedocs.io/en/latest/setup.html?highlight=migrate#migrating-from-paperless-ng Will add those links to the first post. Please do a full backup first!
-
Ich habe bereits ein paperless-ngx Unraid Template vorbereitet, welches wartet akzeptiert zu werden. Die beiden Templates paperless-ng und paperless-ngx werden dann fuer eine Weile koexistieren. Damit kann jeder entscheiden, ob und wann er migrieren moechte. Bis klar ist wie sich paperless-ngx mit der neuen Dev-Gemeinde entwickelt, ist meine Empfehlung aber weiterhin auf paperless-ng fuer ein produktives System zu setzen. Jonas hat sich nicht zum Status von paperless-ng geaussert und ist seit Monaten abwesend. Es ist moeglich, dass er irgendwann zurueckkehrt und die Entwicklung weiter geht. Update: Template paperless-ngx nun ist verfuegbar
-
- Reserved -
-
Overview: Dedicated support thread for the Docker template paperless-ngx provided via the selfhosters/unRAID-CA-templates repository. Project Page: https://github.com/paperless-ngx/paperless-ngx Demo: https://demo.paperless-ngx.com/ Documentation: https://docs.paperless-ngx.com Registry: https://github.com/paperless-ngx/paperless-ngx/pkgs/container/paperless-ngx Changelog: https://docs.paperless-ngx.com/changelog/ This is the official paperless-ngx Docker support thread. Feel free to ask questions, share your experience with paperless-ngx or describe your paperless setup at home. I try to update this main post regularly based on your feedback. From here on, I will use the terms paperless and paperless-ngx interchangeable. 1. What is paperless-ngx and how does it differ from paperless-ng? Paperless-ngx forked from paperless-ng to continue the great work and distribute responsibility of supporting and advancing the project among a team of people. The paperless-ng project hasn't received a lot of updates and bug fixes in the past month. Even pull requests are not merged for some time now. For now, the paperless-ng and paperless-ngx Unraid templates will coexist in the community application store. That allows existing users to still rely on the mature paperless-ng for their productive environment and make the change to paperless-ngx once they feel comfortable. Consider joining us! Discussion of this transition can be found in issues #1599 and #1632. 2. How to Install 2. 1 New Installation Download and install a Redis container from the community application store (CA) Download and configure the paperless-ngx container from the CA Make sure you point the container to your Redis instance. Use your actual IP and not localhost, because the reference is resolved in the container. In case you need to pass a password to Redis, use the following connection string redis://:[PASSWORD]@[IP]:6379 instead. At the moment Redis doesn't support users and only provides authentication against a global password. You can pass anything as a username, including the empty string as in my example here. To configure a password for your Redis container, set 'redis-server --requirepass "your-secret"' as post arguments on the Redis docker container. Also make sure to not use any special characters. Otherwise, the connection string might not be readable by paperless. Create a user account after this container is created i.e. from Unraids Docker UI, click the paperless-ngx icon and choose Console. Then enter the command "python manage.py createsuperuser" in the prompt and follow the instructions. Alternative, set 'PAPERLESS_ADMIN_USER' and 'PAPERLESS_ADMIN_PASSWORD' in your paperless-ngx docker template (docs). With the later approach, it might be easier to find your password to sensible documents stored in paperless. 2.1 Migration from paperless-ng Paperless-ngx is meant to be a drop-in replacement for Paperless-ng and thus upgrading should be trivial for most users, especially when using docker. However, as with any major change, it is recommended to take a full backup first! Migrating from paperless to paperless-ngx: https://docs.paperless-ngx.com/setup/#migrating-from-paperless Migrate from paperless-ng to paperless-ngx: https://docs.paperless-ngx.com/setup/#migrating-from-paperless-ng Migrate from paperless to paperless-ng: https://paperless-ng.readthedocs.io/en/latest/setup.html?highlight=migrate#migration-to-paperless-ng 3. My personal paperless workflow I use the iOS app ScannerPro to scan my documents and upload them via the app to a webDAV target on my Unraid server. The webDAV target is mounted in the container as consume directory. I use the pre and post hooks to execute web hooks in order to check via Home Assistant whether the processing failed for an uploaded document. Home Assistant sends then notifications about the import status to my phone. This way I can throw away the physical document without worrying about it not being imported. How does your workflow look like? Feel free to share it in this thread. Here you can also find the official recommended workflow for managing your documents with paperless-ngx. 4. FAQ 4.1 Why does the consumer not pick up my files? The consumer service uses inotify to detect new documents in the consume folder. This subsystem, however, does not support NFS shares. You can disable inotify and use a time-based polling mechanism instead (checkout the 'PAPERLESS_CONSUMER_POLLING' variable. If set to a value n greater than 0, inotify is disabled and the directory is polled every n seconds). 4.2 How to customize paperless-ngx? Paperless-ngx does support much more environment variables than the Unraid template initially offers. You can find them in the documentation here. Make sure to have a proper backup before playing around with the environment variables. 4.3 What scanner do you use for paperless-ngx at home? A list of scanners used by our community: iPhone with ScannerPro app; one time purchase (@T0a) More will be added when you share your scanner Paperless-ngx also maintains a list of recommended scanners. Feel free opening a pull request over there to add your recommended scanner to the documentation too. 4.4 Can I use paperless-ngx on a mobile device? Mobile support in paperless-ngx is also almost there. Some layouts don't work yet on small screens. There is also a mobile app in pretty early development stage. Though, it is only available in the Android store yet. 4.5 What is the future of the original paperless-ng template in Unraid? At some point, I will probably remove the paperless-ng template and close its support thread. 4.6 How to configure PostgreSQL as a database? See this post on how to configure PostgreSQL in the template. The official documentation gives further migration steps needed. 4.7 When running two instances of paperless, I cannot stay logged-in to both That is because both instances share the same session identifier (cookie). Apply to one of them the environment variable PAPERLESS_COOKIE_PREFIX (documentation).

-
I am aware of the fork and involved as well. Until the first dust has setteled and the fork is going forward in a good healthy way, I will offer it to the UnRaid community. It may be as a separate container though. Right now, they are organizing the project and still in the migration phase. Let‘s give them time and let the fork mature. Until then, I would recommend not exposing paperless-ng to the the Internet directly. This is because, security related fixes in third-party dependendies are not merged anymore. You should not expose it anyways since it is not hardended in any way!
-
Ich kann dir Borg bzw. Borgmatic als Backup Option für die Hetzner Storagebox empfehlen. Schau dir mal beispielsweise diesen Artikel an: https://dominicpratt.de/hetzner-storagebox-mit-borgmatic/ In den Community Applications gibt es auch einen Docker Container für Borgmatic. Ich setze das Setup sehr erfolgreich mit meiner Storagebox und UnRaid Server ein.
-
Sorry for bringing up this old thread. Is there a reason, why the apps from smdion's repository are still available via CA? The repository seems deprecated for a while now and the two remaining templates are not up-to-date anymore. For example, 'cadvisor' still pulls its images from the deprecated docker hub provider. For the latter, I created a pull-request to the selfhosters template repository. @Squid May I suggest to remove smdion's 'cadvisor' template from CA or blacklist his repository? Let me know what you think.
-
I would like to add authentication for the node-exporter and the Prometheus metrics endpoint. What I did so far: scrape_configs: - job_name: 'prometheus' scrape_interval: 15s static_configs: - targets: ["localhost:9090"] - targets: ["<UNRAID_IP>:9100"] basic_auth: username: myuser password: mypassword I then updated the data source with the basic auth option in Grafana given the credentials listed above. Though, it seems like Grafana does not receive any metrics after that. Do I have to add the basic auth credentials to the node-exporter too? If so, how can I pass the web.yml with the field basic_auth_users and the bcrypted password to the node-exporter plugin then? Follow-up question: How can I pass a web.yml to the Prometheus container configuring basic authenticiation for connections to the Prometheus expression browser and HTTP API (reference) ? Would love to see an "Authentication" section in one of the entry posts.
-
Ah, thanks for the heads up! I will try it and proceed with caution. Do you know if the problems with the 2.x image are known to the company? Hopefully, they stabilize the image then.
-
Hi @ich777 👋, just installed your CheckMK Raw container and noticed the version provided is 1.x. Any chance to get the container updated or any chance to get another container in CA with version 2.x? Is there a reason you ship your container with version 1.x? Thanks you very much in advance.
-
How is this related to cdr/code-server? Is the gitpod-io implementation superior in any concern?
-
Eine Alternative wäre ein Board ohne IPMI zu nehmen und stattdessen PIKVM zu verwenden.
-
In Heimdall go to users and then try the link in the column 'app.apps.autologin_url'. Using that link should auto login your user and require to not enter any password. Note, anybody acquiring that link is able to gain admin privileges using that link! It is like handing out your password. Hope that helps.


