


p0p
Members
-
Joined
-
Last visited
Everything posted by p0p
-
Just to be sure: Did you create a ticket for that issue?
-
Hey everyone! I put together a step-by-step guide for setting up Immich on Unraid with a focus on performance. It's aimed at new installations and covers the full setup from shares to running containers, plus migrating your Google Photos library via Takeout. 🔗 https://rorar.github.io/immich-unraid-manual/ What's in the guide: - Storage layout that puts thumbnails and encoded video on your SSD/NVMe cache while keeping originals on the array - Custom Docker network (no port exposure for internal services, container name resolution) - Templates for GPU-accelerated transcoding and ML inference (NVIDIA NVENC, Intel QSV, AMD VAAPI) - Google Takeout export, download via Firefox container directly to Unraid, and import with PhotoMigrator - Immich admin configuration (image settings, hardware acceleration, transcoding options, mobile app setup) - FolderView3 for proper container start order The docs site has a few nice touches: - Enter your Unraid IP once at the top and every <your-unraid-ip> placeholder updates across all pages, including copy-able code blocks - Quicklinks that take you straight to the right Unraid UI page (Shares, Terminal, Docker, Apps) - Fullscreen viewer for the GPU decision diagram - Dark mode, search, previous/next navigation The guide is Unraid-native (no Docker Compose) and follows the official Immich container images for faster updates. Full guide: https://rorar.github.io/immich-unraid-manual/ GitHub repo: https://github.com/rorar/immich-unraid-manual --- I'd love your feedback! This is the first version and I'm sure there are things I missed or could explain better. If you spot mistakes, have suggestions, or want to add something, feel free to reply here or open an issue on GitHub: https://github.com/rorar/immich-unraid-manual/issues. PRs are welcome too! PS: Apps will soon be available in the CA Apps, stay tuned 🙂
-
Quick Win: Enter your Unraid IP/URL. At the top menu click on the USB Tab. -> A table with all your connected USB-devices will appear. Find the Table Row for with your Unraid USB-device. It's the one in the table column Volume(Storage) where it says UNRAID Click on the "Sheet" Icon. -> A Webterminal window will appear. You'll find the GUID at the last line (I've redacted mine) Copy the GUID and for example use it for support purpose.


-
Docker Services can rely on each other. For example paperless-ngx relies on redis. If the start order is incorrect, paperless-ngx may not start correctly and/or exits with as failed. Think of a docker-compose file where the services are structured / orchestrated to work hand in hand. Also from my experience with unRAID: Having an incorrect start order may crash your docker system (and can take your VM system with it).
-
Thanks, voted!
-
True, I was able to do migrate my overseer -> seer service as well this way. For convenience and for non-tech users/unraid beginners, a migration script would be helpful. Also increases the user user experience as a faster way to get seer up and running
-
Hey @binhex :) Would it be possible for you to integrate a migration script from overseerr to seerr, triggered for example by a template flag( MIGRATE_FROM_OVERSEERR=true)?
-
Would you please share which plugin project would benefit from it? If there's an further usecase, maybe this request is getting more present to the devs. :)
-
@binhex still, there seems to be some confusion about the use of the API key. For UnRaid novices that wants stuff "just working" may need some clarification inside the description. Example: "To use the slskd API key, you need to enter between 16 and 255 a randomized characters here." Would that kind of sentence make sense to you @booyou284 or does it still need some clarification?
-
Hi @binhex Many thanks for the docker container setup. 😊 Would you please document anywhere (inside the Unraid Docker Template Overview / Port: HTTP Web Interface / ...) that the API port for binhex-slsk is 8980 and different from the original slskd container where it is port 5030? I was trying to connect LazyLibrarian with binhex-slsk and couldn't figure this out 😅 Also please add the Varible SLSKD_API_KEY with a note to generate an API key with openssl rand -hex 16 on the any Linux machine Many thanks!
-
Hey @ich777 vielen Dank für deine ausführliche Antwort / many thanks for your detailed answer :) Sorry for the late reply... I was battling with mental health issue over the new year. As it's requested before: Would it be possible to offer two official Unraid kernel branches, that user can switch from the Update Manager? "Standard" one is without and "Advanced" is with eBPF. If you're interested in the "lore", check out this article from the officials of IT Niedersachsen / IT Lower Saxony. :D Huh, basically true. Do you have statistics about System Specs of the Unraid User base how many (percentage of) users run Unraid on a toaster a budget system that maybe impacted by this change? As for RAM usage, would it be possible to load the modules dynamically into the RAM, if they're used? In my believes, storage isn't really a problem anymore. For example faster internal networking (Docker <-> System, network bridges,...) faster external networking (SMB, NFS,...) Shares I/O speed Balanced CPU load due to autohandling (network) packages/load As Unraid steadily seems to evolve to a next generation and with the upcoming system on the disc instead of an external flash drive... Wouldn't it be a good idea to take the plunge?
-
Would you mind to tell me the impact in size, for the users and for the system? (Maybe build a Kernel Testbuild with your build tools¹) Is there any feelable / measurable impact in terms of performance (of course we have a german word for that:"Schwuppdizität")? Are there trade-offs except for disk space/download usage? How could the Unraid System benefit from enabling the full eBPF functionality and therefore the userbase? I'm very curious about the outcome and here to learn 🙂 1. https://github.com/ich777/unraid_kernel
-
Summary: Please enable CONFIG_DEBUG_INFO_BTF=y in future Unraid kernels (currently missing in 6.12.24 and above). This single flag generates /sys/kernel/btf/vmlinux, unlocking full CO-RE eBPF functionality. The final goal is to get bpftune running on Unraid and widen compatibility for applications in need of full eBPF functionality. Benefits: Enables modern tools like bpftune (Oracle's BPF auto-tuner) in "full mode" for automatic optimization of TCP buffers, congestion control (BBR), IP frag limits, and neighbor tables.¹ Higher network throughput: Dynamically scales buffers based on real workload (e.g., +20-50% on git clones/large downloads via adaptive tcp_rmem/tcp_wmem). Zero config: No manual sysctl tuning needed; bpftune observes + adjusts safely, backing off under memory pressure. Future-proofs Unraid for eBPF apps (CrowdStrike, monitoring, auto-tuning).² Impact: Minimal (just one config flag); all other BPF features already enabled since 6.10.³ Tested: bpftune compiles/runs in legacy mode (-L), but full fentry/fexit + per-netns tuning requires BTF. Reference: https://github.com/oracle/bpftune https://forums.unraid.net/topic/137188-kernel-enable-config_debug_info_btf-needed-for-crowdstrike-agent/ https://docs.unraid.net/unraid-os/release-notes/6.10.0/ If you're interested, please upvote using the link below:
-
Yes one "main" valkey xml template and the other one for immich. the only difference is the path added for immich
-
As an "advanced user" I'm often adding variables. I'd like to keep my variables sorted/clean and don't want to leave a mess where my future me has put in my last crippling brain cells where I've put them and how they are connected. ;) Thanks for letting me know!
-
I meant these lines :)
-
Small feature request for the final release: Move Docker template lines upwards and downwards on the GUI with Ctrl+Up/Down-Key and via drag-and-drop so you don't have to edit the xml file. EDIT: Also a feature, like a button, to "blame" CA Applications to be outdated and the maintainer gets informed. For example @SpaceInvaderOne 's PostgreSQL_Immich, which runs on pgvecto-rs and will be replaced by VectorChord . Users should be informed as well.
-
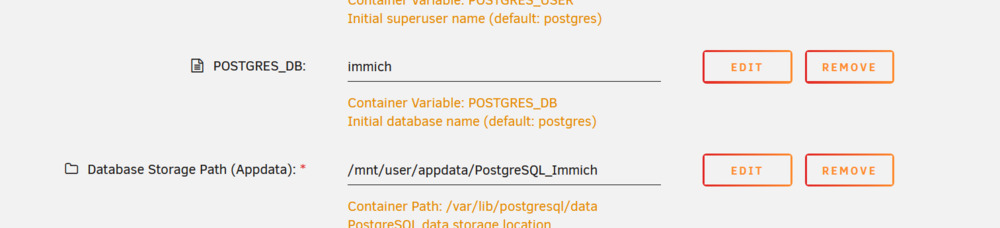
Hi @SnuK Would you please Update the Valkey_Immich template to the "valkey:latest" tag instead of "valkey:8.0.6-trixie", as there were urgent security fixes implemented in https://github.com/valkey-io/valkey/releases/tag/8.1.4? People are exposing their Immich Installation to the web and to avoid a cascading attack, it might be a good idea to do so. Also for the standard appdata path, the Immich folder is lowercased /mnt/cache/appdata/immich your Config Immich appdata folder is uppercased /mnt/user/appdata/immich/database/redis. Please fix this as well :)
-
Feature Request: Add a Desktop background with the explanation to hold ALT and move the window with mouse button if the window is off. I came here the 3rd time because I forgot this and honestly, this "bug" is annoying ^^
-
Hey @TidalBuzz , great decision for joining the fam. :) Nice to have you onboard for better Swooshification (UX) ^^
-
Hi, would it be possible to introduce a feature that automatically moves media files to Cache drive, if streamed? There are several discussions in the wild, for example this one. Possible Workflow: - User installs Plex/Emby/Jellyfin/audiobookshelf/... docker container - Inside XML-Template, User selects to move to Cache for active media (maybe choose which filetypes) - User starts docker container - User streams media (aka. media file in use) - Consideration: If streamed longer than x minutes, than move to Cache - Space is reserved on cache / if cache is full, nothing happens - Media gets moved to cache temporarily (stays there for y hours) - If streaming is finished, - either remove immediately or - stays there for y hours - If streaming is not finished - stays there for y hours Pros: - Reduce HDD Noise while streaming - Reduce HDD Spinups - Reduce HDD wearout - Helps users with low RAM* - SSD/NVMe Caches are faster, if more users streams at the same time (for example 4K content), max. read-speed could get exceeded = buffering Cons: - For multiple streaming users and huge files, larger Cache drive may be required * Users with higher RAM can use --mount type=tmpfs,destination=/tmp,tmpfs-size=4000000000 for plex, but for low budget / starter NAS buildsm RAM might be limited. So this would be a nice option. What do you think? :) All the best p0p
-
Hey, hätte jemand Lust für Readest einen CD/CI Pipeline zu bauen und in Docker Hub zu pflegen? Readest ist ein moderner eBook Reader mit einer Weboberfläche. Interessant ist hier die Cross Compatibility als native Apps zwischen MacOS, Linux, Windows, iOS und Android :) Zudem gibt's eine Umfangreiche Sync Funktion; dadurch werden auch die Bibliothek, Lesefortschritte, Hervorhebungen, und Notizen über alle Geräte hinweg synchronisiert. Eine Dockerfile gibt es hier: GitHubreadest/Dockerfile at main · readest/readestReadest is a modern, feature-rich ebook reader designed for avid readers offering seamless cross-platform access, powerful tools, and an intuitive interface to elevate your reading experience. - re...
-
Hey @C3004, would it be possible to add the Hardcover API for regular books to your project?
-
Fast Zum Beispiel bin ich gerade dran wger als Unraid Template aufzusetzen. Das derzeitige template ist veraltet. Dazu müssen mehrere Container erstellt werden. Meine Überlegung war, einen master container zu haben, der über die Community Applications die anderen Container herunterlädt bzw. automatisch nachlädt. Workaround wäre es, dem Master Container privileged rechte zu geben und die my-wger-* XML Dateien aus meinem GitHub repo direkt nach `flash\config\plugins\dockerMan\templates-user` herunterzuladen. 🥸 Natürlich geht das einfacher über Docker Compose... aber wir haben auch Nicht-Techies-Pumper unter uns, die sich über ein Template freuen.
-
Hallo, besteht die Möglichkeit Docker basierte CA über die Kommandozeile zu installieren? fiktives Beispiel: commapp install foobar --change-config "foobar-name": foo="bar" > field-entry commapp install redis --change-config "Redis Port": Target="1234" > 9876 (Original ist: Target="6379" > 6379)


