


MAM59
Members
-
Joined
-
Last visited
Everything posted by MAM59
-
Hmm... for further tests pls stick to the cache-only test. This is much more reliable about speed. And pls, check the flow control settings on both server, switch and client. Could be somebody is stepping on the brake pedal throughout transfer. In Unraid use the Tips & Tweaks plugin (and DO NOT disable Flow Control), in your switch check the ports menues and in windows you find the settings under the details of the NIC. afterwards check with "ethtool eth0" on UNRAID, it should look like this: root@F:~# ethtool eth0 Settings for eth0: Supported ports: [ FIBRE ] Supported link modes: 1000baseX/Full 10000baseCR/Full 10000baseSR/Full Supported pause frame use: Symmetric Receive-only Supports auto-negotiation: No Supported FEC modes: Not reported Advertised link modes: 1000baseX/Full 10000baseCR/Full 10000baseSR/Full Advertised pause frame use: Symmetric Advertised auto-negotiation: No Advertised FEC modes: Not reported Speed: 10000Mb/s Duplex: Full Auto-negotiation: off Port: FIBRE PHYAD: 0 Transceiver: internal Supports Wake-on: d Wake-on: d Current message level: 0x00000014 (20) link ifdown Link detected: yes Watch out the field Supported pause frame use: and Advertised pause fram use: They should not show "none" (note: some adapters in windows have no setting for this, the feature is always turned on there)
-
There are two things I would take a look at: enable flow control (although it should not be necessary if all members run at 10G speed, but it may help to recover if a packet gets lost/errors out on CAT cable) Writing to UNRAID does not always go to the cache. The cache is only used for NEW files, not if old files get overwritten (CAN work, usually does NOT WORK because of race conditions). The 200-240 Mb/s are likely the speed to directly write onto a normal magnetic disk. You can try these things to check it out: delete the file on the server BEFORE you try to write it (and wait 1-4s to give the filesystem time to update). If speed goes up to almost 10G speed, you know that the 200 are "normal behaviour". create a share that ONLY resides on an SSD drive (primary = SSD, secondary = NONE) and check the write speed. If it is as high as expected (~500 MB/s for SATA SSDs, ~1 Gb/s for NVMe SSDs) all is fine too. Thinking about your enourmous amount of (unused) RAM you might consider to switch some Filesystems to ZFS and work with a very large ARC (RAM) cache someday.
-
na ja, das ist inzwischen OT, also zurück zu seinem Routermenü...
-
Das hier sind alle "legale" Frequenzen und erlaubte "Protokolle": Es gibt also reichlich "PON", je nachdem, wie und wann etwas installiert wurde. Bei uns ist es gerade erst (November 2025) eingeschaltet worden, aber mit max. 1G schon ausgereizt) Du weißt also nie vorher, was da in Deinem Ausbaugebiet flimmert. Vor allen Dingen sind manchmal recht ähnliche Frequenzen im Einsatz (zB. 1300+-10 und 1310+-10), da können auch die Sender/Empfänger schon überlappen) Ausserdem ist es den Lieferanten/herstellern freigestellt, welche Frequenzen zum Senden und welche zum Empfang verwendet werden. Es gibt Provider, die lassen sich extra Spezialmodule bauen damit ja kein anderer in ihr Gebiet vordringen kann. So unterläuft man z.B. den verbotenen Routerzwang. (und ja, meine FB mach nur max 10G, aber das wird noch Jahre dauern, bis das hier ankommt, wenn überhaupt) Ich kann immer nur eine oder 2 Generationen weiter planen. Die werden hier erstmal 2.5G anbieten und irgendwann vielleicht mal 10. Und 50 hab ich bislang auch intern nur zwischen den Servern im Rack bislang (na ja, 40, aber eben so "fast" :-) )

-
Ich will Dir Deine naiven Träume nicht vermiesen, aber: allein bei PON gibt es 16 verschiedenen Frequenzkombinationen (die Module passen nicht zueinander) selbst wenn die Verbindung geht, viele Provider denken sich noch mehr Kapseln aus, verbreitet sind PPOe und VLANs für Daten & Telefon. Und das ist in jeder Stadt (oder sogar in verschiedenen Stadtteilen) ANDERS. Das Ganze ist überhaupt nicht genormt, Du hast zwar Routerfreiheit, aber meistens gibts die gar nicht zu kaufen. (Ich hab die neutrale Lösung gewählt, Modem vom Provider (damit ist PON und eine eventuelle PON-ID (jeder Andere würde es MAC Adresse nennen) sein Ding) und meine eigene Fritzbox (mit 10G WAN+10G LAN). Da musste man nur noch die passenden VLANs einrichten, dann fluppte es). Na ja, KAUFEN kann man es, aber es würde hier wohl nicht funktionieren. Die Anbieter versuchen sich durch die Frequenzwahl gegenseitig auszubremsen. Warum wohl gibt es dauernd Versuche des Überbaus? Ich würde also keinen Cent ausgeben für so ein Ding oder eine Fritzbox mit SFP (noch nichtmals "+") Einschub für die Glasfaser. Ist vorprogrammierter Elektroschrott.
-
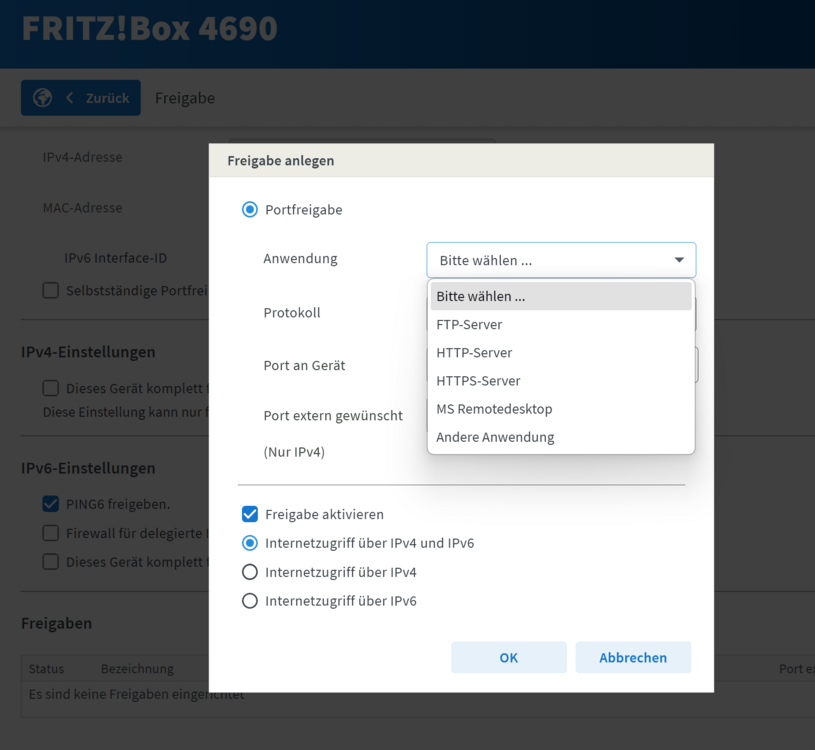
So "versteckt" sind die ja offensichtlich gar nicht, sofern man weis, wonach man suchen muß... Jo, wie @mgutt schon sagte. HTTP und HTTPS freigeben und schon fluppt es. Viele Hersteller liefern eine Liste mit "well-known ports" vorkonfiguriert mit. Die Portnummer muss man nur eingeben, wenn es eben nicht well-known ist. zB: Und kein Hersteller liefert Dir ne Anleitung "wie betreibe ich meinen eigenen Webserver hinter dem Router?" mit. Die gehen (nicht ganz zu unrecht) davon aus, dass einfache User es gar nicht wissen wollen und die anderen es schon wissen und sich nur einmalig durch die Menüs klicken müssen. Deine sehen übrigens recht übersichtlich und gut sortiert aus. Da haben wir schon Schlimmeres erlebt. (abgesehen von Hardcore Routern wie z.B. Microtik, die können zwar ALLES, aber da gibts nix zum Klicken und auch keine Kontrolle ob man irgendwo noch eine kausale Abhängigkeit übersehen und vergessen hat...)
-
Ja, aber das las sich so, als wenn hier jemand ihm den Vorschlag gemacht hätte. Mit dem Wechsel ist es bei Glasfaser eh nicht so einfach, ausser der Provider stellt ihm ein Modem mit "normalem" LAN Port als Ausgang. Bei Kombigeräten hast Du oft "verloren", da die Anbieter durchaus verschiedene Protokolle und auch merkwürdige Frequenzen benutzen können. Es gibt keinen Standard, der sich allgemein durchgesetzt hat.
-
ja, das stand ja von anfang an da. Nur, warum sollte er den Router wechseln ? er muss ihn nur richtig konfigurieren. Und da wir dieses Dingen alle nicht kennen, wäre der richtige Ansprechpartner dafür sein Provider. Aber es sieht ja so aus, als wenn sich die richtigen Einstellungen nur etwas verklausuliert hinter ein paar Menüs verstecken.
-
Wer hier hat denn DAVON gesprochen???
-
Macht ja auch Sinn, HTTPS ist nun mal 443, da braucht man nix extra eingeben. Es existiert also gar kein Problem ausser "wie sag ichs meinem Router?".
-
you have now learned why external drives via USB are not recommended for UNRAID... (ok, not helpful, but I am afraid you have to restore the backup of your flashdrive to the stick and retry. Hopefully you have a backup, else you have to regenerate the stick from scratch and restore your license...) If you have installed UNRAID.net you should be able to find and download a backup of the stick there.
-
yeah, I am aware that it happens, but I cannot see anything in UNRAID that may cause it.
-
Yeah I was afraid that it happens that way. I did not say Java or Python are bad, it is just that these languages allow constructs that may cause a really heavy demand for memory which results into a "system shock" to free up enough memory to be able to satisfy the demand. And a second later, the memory is released again. Very simple statements like "a = b" may trigger this because b can be a gigantic array with subarrays and so on. This is programmer stuff, but often even programmers have no clue what they are doing :-) Anyway, this is nothing you can do anything against. You could only turn off these apps/dockers one by one and watch out if the pings still are bad or if they are stable then. Once you have found the bad one, there maybe a chance to fix it. Dunno. Anyway, could be a loooong and depressing search, sorry.
-
no clue. you are running a lot of interpreter stuff (Java, Python), they are invisible to the system. Python takes the largest amount of cpu time, but this does not automatically prove it as the culprit. It must be something that is able to block the whole system for a certain time (for instance big writes that overwhelm the internal buffers or something). But because they are only visible for the split of a second, they logs do not catch such events. Sticking to networking I would suspect missing/wrong Flow Control, but you are running at 1G speed only, Flow Control is not necessary there. To be safe I would disable the WiFi chip in the BIOS so UNRAID does not see him and maybe tries to initialize it (which also costs time and hickups). But this is a very far away guess and try. I dont think this could be the reason. (but then, just try and see. does not harm anything)
-
sorry, cannot see any local reason in your diagnostics anymore.
-
can be anything because you are using a wireguard tunnel (dunno why ?) this can also be a result of the tunnelserver on the other end having hickups, your isp, or failing dns queries...
-
Ich versteh zwar auch nicht, was Du eigentlich erreichen willst (siehe @alturismo ), aber bei Deinem Router würde ich mal das Dropdown Menü "Dienst" aufklappen und gucken, ob da was von HTTPS oder WWW oder so steht. Kann sein, dass 443 vordefiniert ist und man es gar nicht von Hand eintragen darf/kann. Ansonsten bist Du hier falsch, nur Dein Lieferant kann Dir mit dem Router weiterhelfen.
-
wenn 443 wirklich gesperrt seien sollte, gibts keine Lösung. Letsencrypt stellt nur für Port 80 und 443 aus, keine Umleitungen möglich. Allerdings zweifle ich doch stark, dass 443 wirklich vom Provider geblockt sein sollte. Warum?
-
would not help, the resets block the bus (and therefor the whole system) if addressed or not. You need to take it out physically (but first try to move away the data from it (could take a Looooooooooooooooooong time...)
-
He told you the reason already. Your faulty drive is causing delays because it resets all the time and all other processes are halted during the reset.
-
man kann sich auch totsparen...
-
Running pihole ON UNRAID is possible, running it FOR UNRAID is always a bad idea because it will not be available at boot time when it is already needed. So it makes no difference if you run in on a seperate IP or on a bridge, it simply will not work. UNRAIDs DNS settings must always point "elsewhere" outside the box. Also, UNRAID does not need any adfilter, it will hardly be used for browsing around because you cannot store any URLs/users/passwords. After every reboot they will be gone, this does not really attrack people :-)
-
not really anymore. (but little known to the public and not often used too) Althow 53 is still standard for DNS, modern resolvers can be configured to use any port with the ..#port syntax for " port=value This keyword changes the default TCP/UDP name server port to value from its default, port 53. The abbreviation for this keyword is po. " root@F:~# nslookup > set port=5353 > server 192.168.0.3 Default server: 192.168.0.3 Address: 192.168.0.3#5353 >
-
You have not read (or understood) my tldr plugin note. instead of "man find" you just type "tldr find" on the shell/ssh. It is just what you are asking for. root@F:~# tldr find info: cache is stale (last update: 14d, 5h ago), updating... info: downloading 'tldr.sha256sums'... 3.35 KiB info: downloading 'tldr-pages.en.zip'... 2.88 MiB info: validating sha256sums... OK info: extracting 'pages.en'... 6774 pages, 37 new info: cache update successful (total: 6774 pages, 37 new). warning: 1 page(s) found for other platforms: 1. windows (tldr --platform windows find) find Find files or directories under a directory tree, recursively. See also: fd. More information: https://manned.org/find. Find files by extension: find root_path -name '*.ext' Find files matching multiple path/name patterns: find root_path -path '*/path/*/*.ext' -or -name '*pattern*' Find directories matching a given name, in case-insensitive mode: find root_path -type d -iname '*lib*' Find files matching a given pattern, excluding specific paths: find root_path -name '*.py' -not -path '*/site-packages/*' very simple
-
Better you do 😉 The thing is, how you leave the session. UNRAID has no session timeout, so if you just close the window of/in the browser, it remains open. And then it depends on your browser's settings, if you have set them strict and paranoid, the browser "forgets" everything once he is reopened someday. So a "new" session is started on UNRAID (making them TWO running ones). And if this happens over and over again, you finally reach the configured limit of 50 and the warning starts to begin. If you restart unraid (or at least the NGINX Server for the GUI) all old sessions will be erased from memory too and the count begins again with "1". If the browser is configured to remember the old session, it is picked up again and just resumed, no new session is created. But again, it is a local setting in your browser.


