Mainfrezzer
Members
-
Joined
-
Last visited
Everything posted by Mainfrezzer
-
if youre already that far, you should have the option to create a bridge by simply going to Settings/NetworkSettings.
-
The easiest way to is use a secondary nic. USB or Onboard (granted the usb one works on the current build) Otherwise youre left over with a virtual nic and thats pain on unraid, unless you get static ips.
-
should have looked here before figuring that out for myself. I was baffled earlier today when i couldnt use the lxc container anymore to use the reverse proxy i set up on it to access my dockers to circumvent the host access requirement. i could have sworn that was working before. Since i have to activate it now for it to work, i can scap the lxc plugin completely. thank you for the plugin, served me very well ❤️
-
xfs is only available for single disk pools. your option would be zfs mirror in that case.
-
huh, if thats the case, diagnostics certainly would be needed, once that issue occurs. given that youll need physical access to the server once it happens or you trigger a reboot, syslog server needs to be setup beforehand That behavior is usually pretty common with powertop. it just simply turns the nic of, once theres no more network activity and never turns it back on.
-
Sound highly like a powertop --auto-tune issue
-
Ich weiß ja nicht welche Influxdb 1.8 probiert wurde, die im Appstore ist definitiv nicht Alpine und hat apt als Paketmanager
-
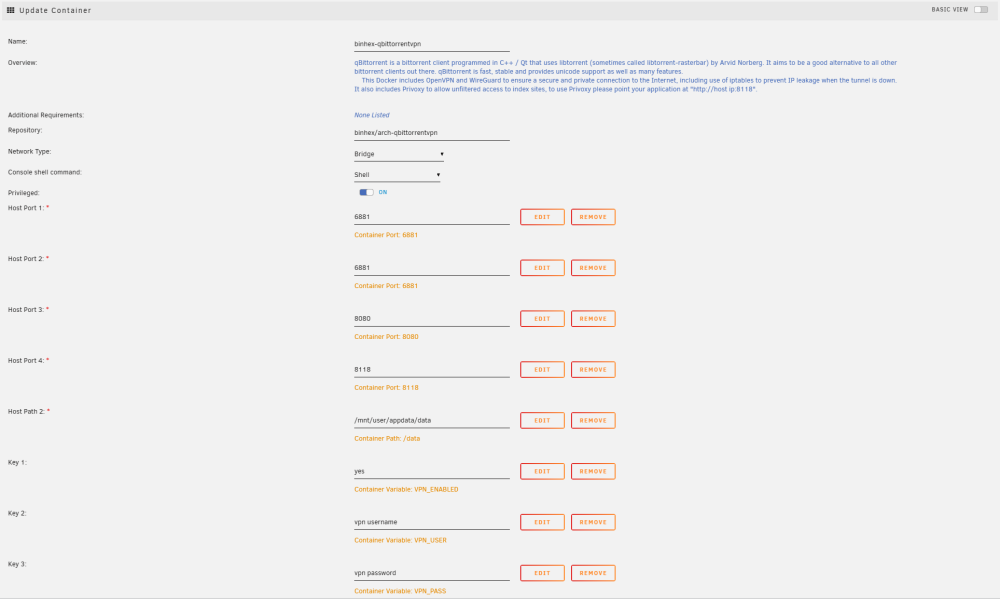
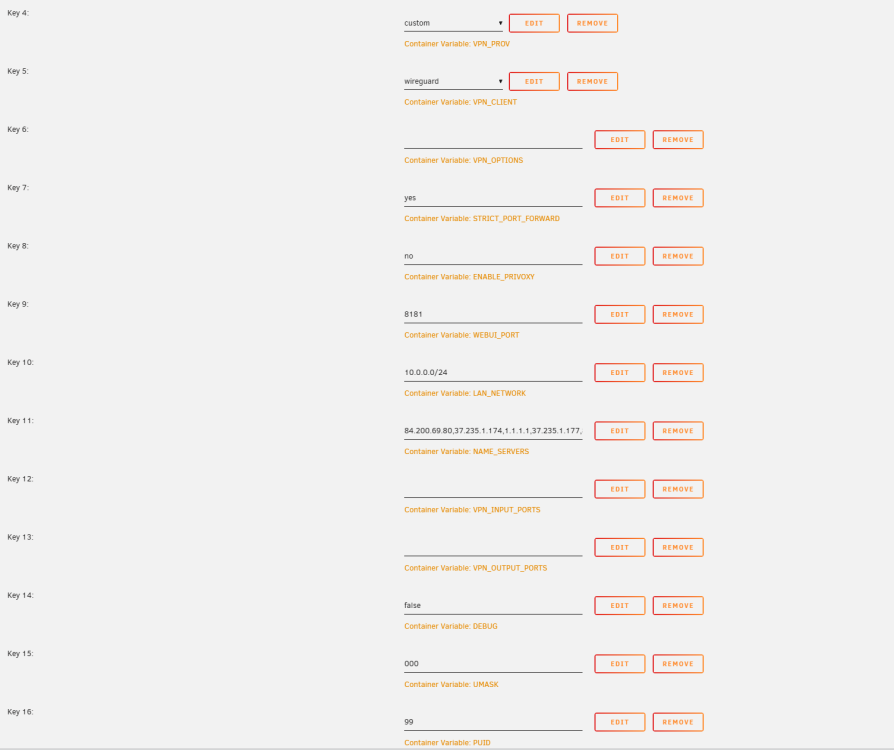
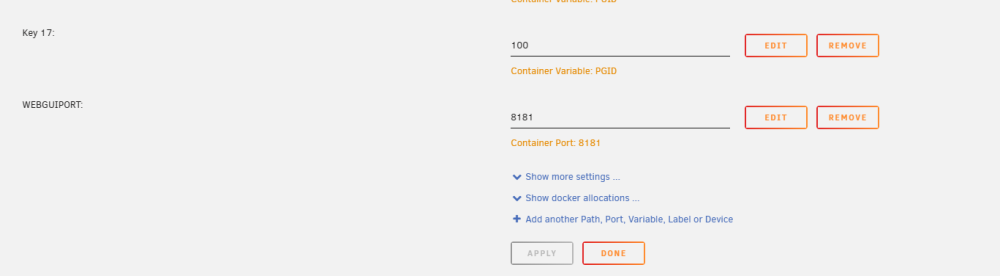
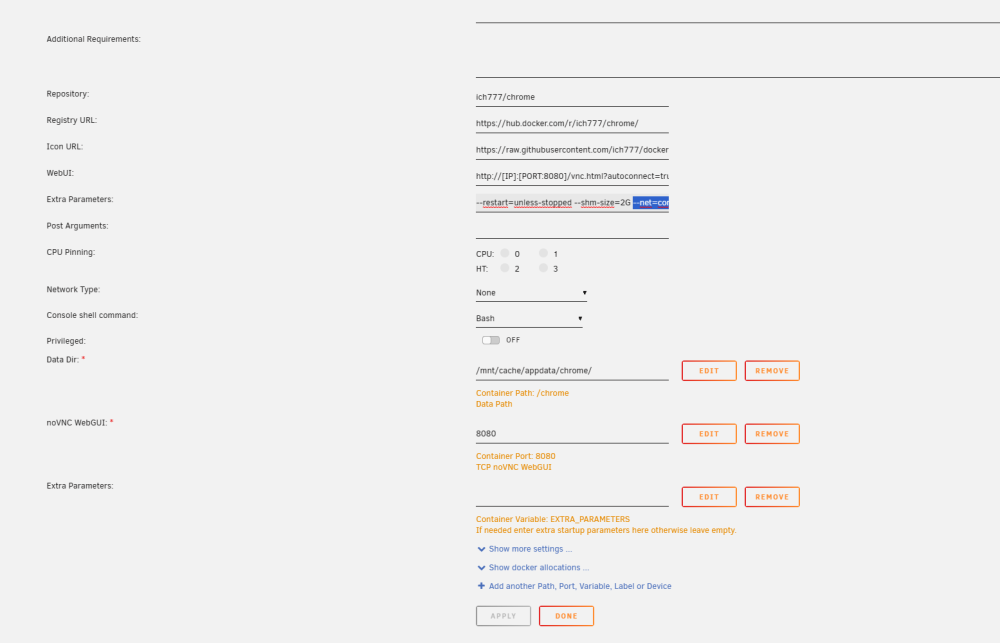
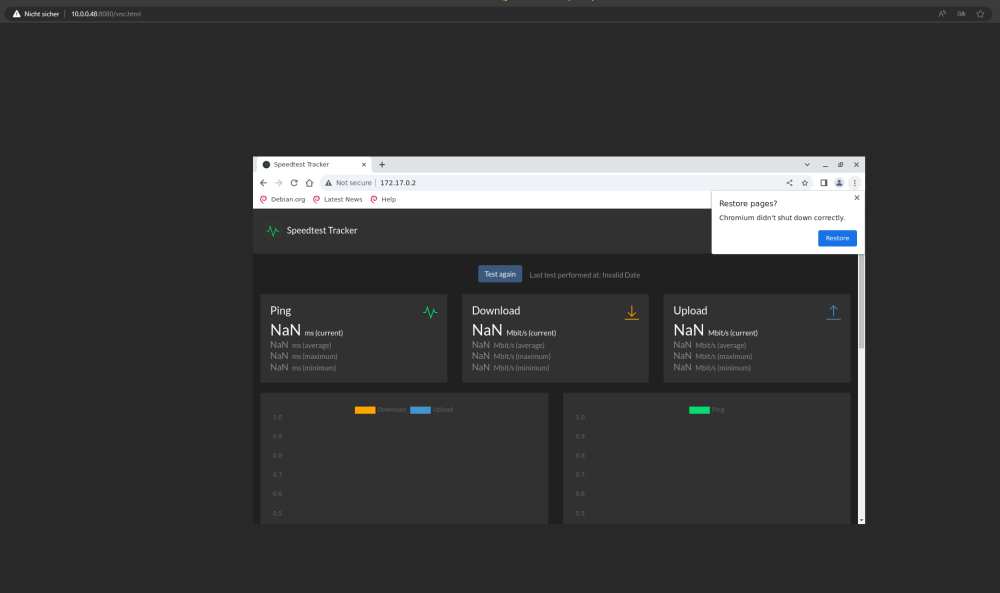
So, ive set it up on my end for visual guidance. Binhex Chrome: What you need to enter into the binhex console iptables -A OUTPUT -s 172.17.0.0/16 -d 10.0.0.0/24 -o eth0 -p tcp -m tcp --sport 8080 -j ACCEPT && iptables -A INPUT -s 10.0.0.0/24 -d 172.17.0.0/16 -i eth0 -p tcp -m tcp --dport 8080 -j ACCEPT Change the 10.0.0.0/24 to whatever your network is. 192.168.0.0/24 for example. Now you can access your Binhex Interface on UNRAID-IP:8181 and your chrome docker is UNRAID-IP:8080 From the chrome docker you can just access the rest from the 172.17.0.X:PORT As mentioned before, if you go the privoxy route, which i highly recommend, it looks like this: You change in binhex the Key 8: (ENABLE_PRIVOXY) to "yes" you open your firefox, chrome, edge, whatever. Go to setting and search for "Proxy" You set the http proxy to your unraidip:8118 now your browser gets routed through the vpn container and can access 172.17.0.X natively and you dont need to use the iptables command on every binhex-container start.
-
thats because if you funnel a container through another container, it ignores the mappings from the template. 8080 is the port that chrome would have on the qbittorrentvpn. Depending on how you connect it changes following: Scenario 1: You connect through privoxy You would just enter 172.17.0.6:8080 or whatever your binhex ip is Scenario 2: you still try to reach the chrome vnc without privoxy If 8080 is already used on your server, you would map the container port in binhex from 8080 and "translate" it to port 8222 on the host side. You would need to enter and also change the iptable rules for that and then you could connect via the unraid ip + port Edit: I just saw the 8080 is being used by the binhexcontainer. Thats unfortunate^^ i would highly recommend you take the delugevpn in this case because that another can of tuna i dont wanna open now (although, it seems like you can just move it. So do that, put binhex WEBUI_PORT on something else than 8080 or any of the other ports the "passthrough" container will use. 8181 or something)
-
the http proxy work with any browser. (dont ask me for anything about phones xD) Unless you wanna connect to the browser within the vpn connection to use the vpn connection. that wouldnt work and you need to run following code in the binhexvpn container iptables -A OUTPUT -s 172.17.0.0/16 -d YOUR.LOCAL.NET.WORK/24 -o eth0 -p tcp -m tcp --sport 8080 -j ACCEPT iptables -A INPUT -s YOUR.LOCAL.NET.WORK/24 -d 172.17.0.0/16 -i eth0 -p tcp -m tcp --dport 8080 -j ACCEPT so that you can connect from your browser, to the browser. But thats a bit unnecessary since you can just tell your browser to use the privoxy http proxy and type in the adress:port of the services you want to reach.
-
Okay, ive spend too much time with that influxdb stuff Quick work around is to enable and use privoxy in the binhex container and use that to access the container that are tunnled through the binhexvpn 172.17.0.X ip for the binhexcontainer :port for the service, that works. and doesnt require messing around with the docker image. (If you wanna mess with the docker image, you have to use iptables to allow the connections, but that is not persistent unless you modify the whole docker image for that) iptables -A OUTPUT -s 172.17.0.0/16 -d YOUR.LOCAL.NET.WORK/24 -o eth0 -p tcp -m tcp --sport 8080 -j ACCEPT iptables -A INPUT -s YOUR.LOCAL.NET.WORK/24 -d 172.17.0.0/16 -i eth0 -p tcp -m tcp --dport 8080 -j ACCEPT for chrome, for example
-
Which particular containers are you using? So i can have a look at it.
-
Well, did you "forward" the port(s) in Binhexvpn? Meaning adding the portmappings from the speedtest container to the binhex container?
-
Set the speedtest container to networktype = none and add this to the extra parameter --net=container:binhex-delugevpn (replace "binhex-delugevpn" with any container you want, i.e. "binhexvpn")
-
Habe mir jetzt gerade mal die Zeit genommen das auf 6.12.4 zu testen. Scheint wohl ein bisschen "funky" zu sein. vhost0 wird zwar vor Wireguard erstellt, startet wohl den Tunnel fürn kurzen Moment und dann isser wieder aus. Da müsst man sich wohl nen script zusammen schustern dass den Tunnel nochmals neu startet oder über nen 2. Tunnel rein & dann nochmals starten. ( sleep 60 ; wg-quick up wg0) & (ggf. wg0 gegen den Tunnel auswechseln der dafür benutzt wird) Das in der go Datei sollte das Problem beheben. Vhost scheint wohl wie shim-br0 an Docker gebunden zu sein. Das heißt aber auch dass man noch den 2. "Notfallzugang" benötigt falls mal das Array nicht startet, obwohl vhost0 immer da ist. Edit: Bemerke gerade, die schöne Umgehung funktioniert nicht so dufte wie früher. Mit vhost0 kommt man zwar wunderbar überall ins Lan und auf Unraid, allerdings nicht mehr ins Internet (Abgesehen man lässt ipv6 auf eth0). Im Endeffekt muss man dann halt wählen. Zugang zum lokalen Netzwerk und Unraid oder Zugang zu Unraid und dem Internet. Is ja aber auch nun wieder die 2 - Tunnel Lösung. Update: Die Funktionalität kann herstellt werden mit PostUp=logger -t wireguard 'Tunnel WireGuard-wg4 started';/usr/local/emhttp/webGui/scripts/update_services PostUp=iptables -t nat -A POSTROUTING -s 10.253.4.0/24 -o eth0 -j MASQUERADE;ip6tables -t nat -A POSTROUTING -s fc00:253:4:0::/64 -o eth0 -j MASQUERADE PostUp=iptables -t nat -A POSTROUTING -s 10.253.4.0/24 -o vhost0 -j MASQUERADE;ip6tables -t nat -A POSTROUTING -s fc00:253:4:0::/64 -o vhost0 -j MASQUERADE PostDown=logger -t wireguard 'Tunnel WireGuard-wg4 stopped';/usr/local/emhttp/webGui/scripts/update_services PostDown=iptables -t nat -D POSTROUTING -s 10.253.4.0/24 -o eth0 -j MASQUERADE;ip6tables -t nat -D POSTROUTING -s fc00:253:4:0::/64 -o eth0 -j MASQUERADE PostDown=iptables -t nat -D POSTROUTING -s 10.253.4.0/24 -o vhost0 -j MASQUERADE;ip6tables -t nat -D POSTROUTING -s fc00:253:4:0::/64 -o vhost0 -j MASQUERADE
-
Docker container have absolutely nothing, and i mean really absolutely nothing, to do with anything on the host system. Everything within the dockercontainer is selfcontained, except for the parts you expose to the host, which i see your attempt to modify the appdata share in the logs.
-
As it has been said earlier, that's impossible currently with the Filemanager (from unraid share/disk to ud). Krusader with the mountpoint /mnt works for me perfectly fine as gui. You could also export the UD disk/remote share via SMB and copy that way.
-
Since 6.12 it should be as simple as to head over to Settings -> Network Settings -> Interface Extra and exclude all the network adapters except the one you want to use. https://docs.unraid.net/unraid-os/release-notes/6.12.0/#network-improvements
-
Theres a call trace related to i915, did you try to add enable_dc=0 yet?
-
You can still set it up via the store. you have to click, after searching for it, in the top right "Click Here To Get More Results From DockerHub". The first entry for "wg-easy" is this one.
-
Weil die SSD über den USB-Adapter ne ganze andere Identifizierung hat im Gegensatz wenn sie direkt via Sata angeschlossen ist Das Datenratenproblem sieht mir im ersten Moment so aus als würden die Daten direkt aufs Array geschrieben. Passt nämlich von der Schreibrate her. Ohne Ende BTRFS Einträge sind ja im Log vorhanden, allerdings hab ich keine Ahnung von btrfs um etwas nützliches beizutragen.
-
Yep. was confused about it at first too. But at least that worked fine.
-
Läuft Unraid mit ner Brücke? (I.e ist in den Netzwerkeinstellungen Bridging aktiviert?)
-
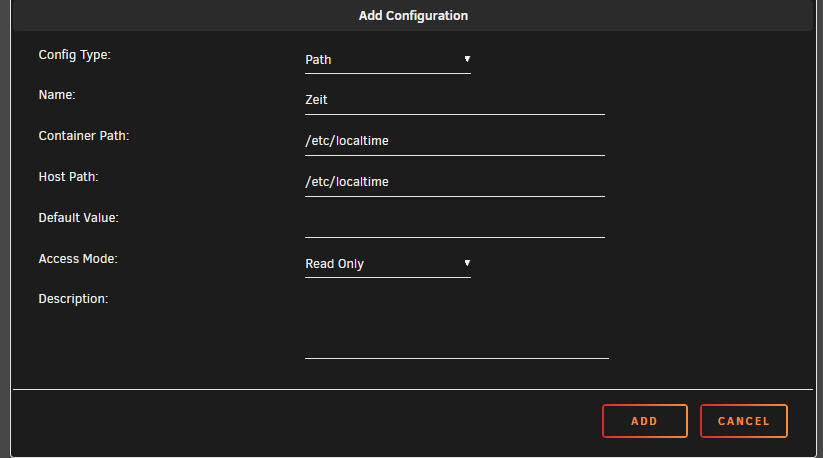
Ist beides Jacke wie Hose. Wobei das eigentlich nicht nötig gewesen wäre, da wie ich bereits sagte, Unraid die TZ Data grundsätzlich basierend auf der eigenen Zeitzone sendet. Siehe hier: tzdata.mp4
-
Wenn man den Dockercontainer editiert, ganz nach unten scrollen Dort klicken und dann öffnet sich ein Fenster wo man folgendes eintragen kann