





Cessquill
Members
-
Joined
-
Last visited
Everything posted by Cessquill
-
I haven't tried the bootable Seagate utility, but I was assuming it would just load to a command prompt with the tools preinstalled. For me it was easier to go via Unraid (plus no downtime). In other news, I haven't had a single issue since applying the above (before I had three issues in about a week).
-
I'm not at my machine at the moment, but somebody else would know better. Your script would pause the docker (assuming that's the correct name), but I'm guessing it would unpause it straight away. You'd need a second part to the script in an else block that checks if docker is paused and whether the mover is running. If the mover has finished, unpause. Something like... if ( $percent > $moveAt ) { docker pause rtorrentvpn; exec("/usr/local/sbin/mover"); } else { if (!moverRunning && dockerIsPaused) { docker unpause rtorrentvpn; } } ...although without researching I don't know how to check if the mover is running and a docker is paused - this is just to illustrate the concept.
-
docker pause <name-of-container> / docker unpause <name-of-container> then?
-
Without delving into whether it's possible to interact with rtorrent at that level, can't you just stop and start the docker with "docker stop <name-of-container>" and "docker start <name-of-container>" commands?
-
For this, I have... proxy_set_header Host $host; proxy_set_header X-Forwarded-Proto $scheme; proxy_set_header X-Real-IP $remote_addr; proxy_set_header X-Forwarded-For $proxy_add_x_forwarded_for; proxy_max_temp_file_size 16384m; client_max_body_size 0; ...in that field and it's working fine. Can't remember much more about it though since I set it up once and haven't touched it since.
-
@AgentXXL - from a Spaceinvaderone video, in pfSense go to Services, DNS Resolver and in the custom options at the bottom enter server: private-domain: "unraid.net" (think that relates to your issue here) EDIT: Ignore me, I see that you've been given the same advice already.
-
Sorry, long day. As you were
-
Oddly, it looks fine on my Chrome.
-
Updated original post to reflect new structure of SeaChest Utilities zip file
-
Yes
-
I'd have thought centos, but not being a Linux guy I'm not sure (or how much difference it makes). I'll update the post when it's clear.
-
That's changed since I did it last week. I'm just starting to test, but @TDD or @JorgeB may be more help here
-
Thanks for that - I did see onlySeagate when trawling through the text doc manuals; forgot to go back to it (before I'd got SC working).
-
Of course, yes. Partly seeking confirmation I hadn't done something seriously wrong - little bit out of my depth!
-
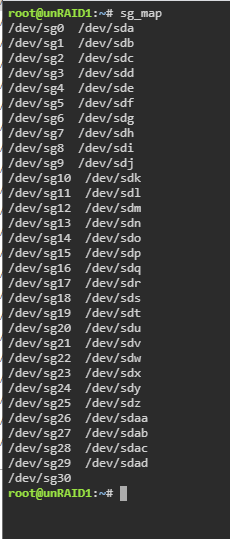
NOTE: There's a TL;DR section at the end of this post with required steps People with specific Seagate Ironwolf disks on LSI controllers have been having issues with Unraid 6.9.0 and 6.9.1. Typically when spinning up the drive could drop off the system. Getting it back on would require checking, unassigning, reassigning and rebuilding its contents (about 24 hours). It happened to me three times in a week across two of my four affected drives. The drive in question is the 8TB Ironwolf ST8000VN004, although 10TB has been mentioned, so it may affect several. There have been various comments and suggestions over the threads, and it appears that there is a workaround solution. The workaround is reversible, so if an official fix comes along you can revert your settings back. This thread is here to consolidate the great advice given by @TDD, @SimonF, @JorgeB and others to hopefully make it easier for people to follow. This thread is also here to hopefully provide a central place for those with the same hardware combo to track developments. NOTE: Carry out these steps at your own risk. Whilst I will list each step I did and it's all possible within Unraid, it's your data. Read through, and only carry anything out if you feel comfortable. I'm far from an expert - I'm just consolidating valuable information scattered - if this is doing more harm than good, or is repeated elsewhere, then close this off. The solution involves making changes to the settings of the Ironwolf disk. This is done by running some Seagate command line utilities (SeaChest) explained by @TDD here The changes we will be making are Disable EPC Disable Low Current Spinup (not confirmed if this is required) The Seagate utilities refer to disks slightly differently than Unraid, but there is a way to translate one to the other, explained by @SimonF here I have carried out these steps and it looks to have solved the issue for me. I've therefore listed them below in case it helps anybody. It is nowhere near as long-winded as it looks - I've just listed literally every step. Note that I am not really a Linux person, so getting the Seagate utilities onto Unraid might look like a right kludge. If there's a better way, let me know. All work is carried out on a Windows machine. I use Notepad to help me prepare commands beforehand, I can construct each command first, then copy and paste it into the terminal. If you have the option, make these changes before upgrading Unraid... Part 1: Identify the disk(s) you need to work on EDIT: See the end of this part for an alternate method of identifying the disks 1. Go down your drives list on the Unraid main tab. Note down the part in brackets next to any relevant disk (eg, sdg, sdaa, sdac, sdad) 2. Open up a Terminal window from the header bar in Unraid 3. Type the following command and press enter. This will give you a list of all drives with their sg and sd reference sg_map 4. Note down the sg reference of each drive you identified in step 1 (eg, sdg=sg6, sdaa=sg26, etc.) There is a second way to get the disk references which you may prefer. It uses SeaChest, so needs carrying out after Part 2 (below). @TDD explains it in this post here... Part 2: Get SeaChest onto Unraid NOTE: I copied SeaChest onto my Flash drive, and then into the tmp folder. There's probably a better way of doing this EDIT: Since writing this the zip file to download has changed its structure, I've updated the instructions to match the new download. 5. Open your flash drive from Windows (eg \\tower\flash), create a folder called "seachest" and enter it 6. Go to https://www.seagate.com/gb/en/support/software/seachest/ and download "SeaChest Utilities" 7. Open the downloaded zip file and navigate to Linux\Lin64\ubuntu-20.04_x86_64\ (when this guide was written, it was just "Linux\Lin64". The naming of the ubuntu folder may change in future downloads) 8. Copy all files from there to the seachest folder on your flash drive Now we need to move the seachest folder to /tmp. I used mc, but many will just copy over with a command. The rest of this part takes place in the Terminal window opened in step 2... 9. Open Midnight Commander by typing "mc" 10. Using arrows and enter, click the ".." entry on the left side 11. Using arrows and enter, click the "/boot" folder 12. Tab to switch to the right panel, use arrows and enter to click the ".." 13. Using arrows and enter, click the "/tmp" folder 14. Tab back to the left panel and press F6 and enter to move the seachest folder into tmp 15. F10 to exit Midnight Commander Finally, we need to change to the seachest folder on /tmp and make these utilities executable... 16. Enter the following commands... cd /tmp/seachest ...to change to your new seachest folder, and... chmod +x SeaChest_* ...to make the files executable. Part 3: Making the changes to your Seagate drive(s) EDIT: When this guide was written, there was what looked like a version number at the end of each file, represented by XXXX below. Now each file has "_x86_64-linux-gnu" so where it mentions XXXX you need to replace with that. This is all done in the Terminal window. The commands here have two things that may be different on your setup - the version of SeaChest downloaded (XXXX) and the drive you're working on (YY). This is where Notepad comes in handy - plan out all required commands first 17. Get the info about a drive... ./SeaChest_Info_XXXX -d /dev/sgYY -i ...in my case (as an example) "SeaChest_Info_150_11923_64 -d /dev/sg6 -i" You should notice that EPC has "enabled" next to it and Low Current Spinup is enabled 18. Disable EPC... ./SeaChest_PowerControl_XXXX -d /dev/sgYY --EPCfeature disable ...for example "SeaChest_PowerControl_1100_11923_64 -d /dev/sg6 --EPCfeature disable" 19. Repeat step 17 to confirm EPC is now disabled 20. Repeat steps 17-19 for any other disks you need to set 21. Disable Low Current Spinup...: ./SeaChest_Configure_XXXX -d /dev/sgYY --lowCurrentSpinup disable ...for example "SeaChest_Configure_1170_11923_64 -d /dev/sg6 --lowCurrentSpinup disable" It is not possible to check this without rebooting, but if you do not get any errors it's likely to be fine. 22. Repeat step 21 for any other disks You should now be good to go. Once this was done (took about 15 minutes) I rebooted and then upgraded from 6.8.3 to 6.9.1. It's been fine since when before I would get a drive drop off every few days. Make sure you have a full backup of 6.8.3, and don't make too many system changes for a while in case you need to roll back. Seachest will be removed when you reboot the system (as it's in /tmp). If you want to retain it on your boot drive, Copy to /tmp instead of moving it. You will need to copy it off /boot to run it each time, as you need to make it executable. Completely fine if you want to hold off for an official fix. I'm not so sure it will be a software fix though, since it affects these specific drives only. It may be a firmware update for the drive, which may just make similar changes to above. As an afterthought, looking through these Seagate utilities, it might be possible to write a user script to completely automate this. Another alternative is to boot onto a linux USB and run it outside of Unraid (would be more difficult to identify drives). *********************************************** TL;DR - Just the Steps I've had to do this several times myself and wanted somewhere to just get all the commands I'll need... Get all /dev/sgYY numbers from list (compared to dashboard disk assignments)... sg_map Download seachest from https://www.seagate.com/gb/en/support/software/seachest/ Extract and copy seachest folder to /tmp Change to seachest and make files executable... cd /tmp/seachest chmod +x SeaChest_* For each drive you need to change (XXXX is suffix in seachest files, YY is number obtained from above)... ./SeaChest_Info_XXXX -d /dev/sgYY -i ./SeaChest_PowerControl_XXXX -d /dev/sgYY --EPCfeature disable ./SeaChest_Configure_XXXX -d /dev/sgYY --lowCurrentSpinup disable Repeat first info command at the end to confirm EPC is disabled. Cold boot to make sure all sorted.
-
To second this, I tried it last night and it seems to be going well. It was easier than I was expecting. I'm just creating a General Support post collating the entries spread across the 6.9.0 & 6.9.1 topics and including the resulting step-by-steps that I took if you don't mind.
-
As per my support thread I've got 4 of the ST8000VN004 drives and three random drop-outs. I'm going to roll back to 6.8.3 for now though as I could do with a few days without unprotected array anxiety!
-
At the top of the page In the Deluge support thread
-
If you're using Deluge as a privoxy then this is down to a Deluge update. Check in that thread for what you need to do (pinned post, plus posts from the last few days).
-
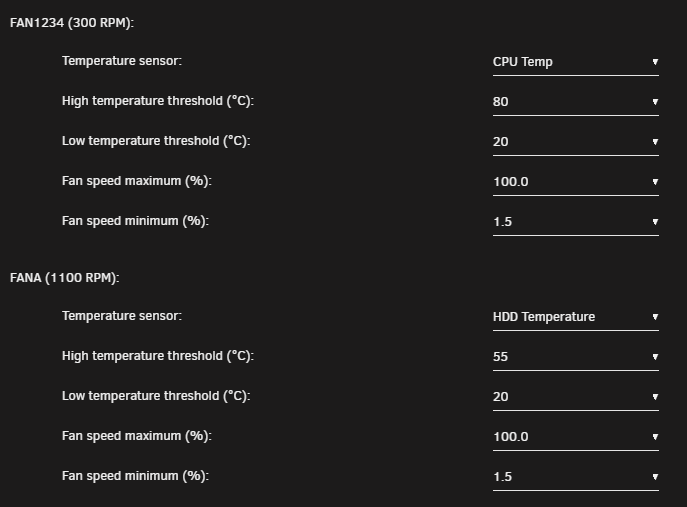
I think this plugin just solved a lot of problems for me in one go, so I think I've just bought you a beer (if a beer is more there, let me know!). If I can just run through what I've done to make sure I'm not being very stupid, as this is a bit new to me... My Unraid system is built on a SuperMicro X10SL7-F motherboard inside a SuperMicro SC846 chassis. Up until last week it was running stock fans and quiet PSU, but after a year of working from home, I decided it was time to make it quieter. I replaced all the fans with... 3 x Noctua 120mm 3000RPM PWM industrial fans in the fan wall. All plugged into FAN A using a 3 way PWM molex-powered splitter 2 x Noctua 80mm PWM exhaust fans in the rear, plugged into FAN 4 with 2 way PWM splitter 2 x Noctua 92mm PWM fans on a Noctua CPU cooler plugged into FAN 1 with 2 way PWM splitter As you probably know, this then resulted all fans cycling between low and full every 10 seconds due to the bios-set fan thresholds being crossed. After researching, I arrived here and was able to tweak the lower and upper thresholds to what I think is OK using the config editor (non-critical, critical, non-recoverable)... FAN 1 (2 x 92mm CPU) - Lower: 0, 100, 300. Upper: 2200, 2300, 2400 FAN 4 (2 x 80mm exhaust) - Lower: 0, 100, 300. Upper: 2400, 2500, 2600 FAN A (3 x 120mm fan wall) - Lower: 400, 500, 600. Upper: 3200, 3300, 3400 These are broadly set using the Noctua website specs, and stopped the constant cycling. Haven't yet found a guide on what these values should be. They were still running fast though, so I enabled fan control, which is now whisper quiet and cooler than before. Hoping it's OK... Left polling times as default Unchecked my two SSDs in the "hard drives to poll" option I've set FAN1234 to track the CPU temperature with temp/speed ranges left. This bought down speeds massively, but not sure it's the right thing to do Set FANA (the fan wall pulling air across the hot swap bays) to track HDD Temperature and set the temp limits to 55 high, 20 low Just spun up all hard drives. The CPU is at 35C, system 33C, HDD 35C. Fans 1, 4, A are spinning at 400, 500 1200RPM. I'm honestly over the moon about how my house is now back to normal noise, and I haven't had any temperature warnings yet. Just looking for reassurance/guidance. Thanks again!
-
Hi - thanks for making this! Didn't realise you'd done it and found it by accident. Installing now and trying out
-
Interesting, yep. Still on earlier (new) release and same here. My reverse proxy (NGINX proxy manager) points to 9080 and works (via https and SSL cert) and locally on 9443
-
Progress - kind of. Tried all of the above, no difference. Then tried accessing from externally via reverse proxy, and I'm in. Restored original config/session and it's back to how it was (externally). Just can't access the web GUI from inside my network. All other dockers are fine internally (incl 7 other binhex), and I've made no changes to pfSense. Hadn't tried external links for a year because of lockdown here. My network here isn't complicated, so I'm scratching my head.
-
Cleared cookies, tried two different browsers on another machine, just times out. Was definitely working before update, so a bit confused.
-
Hi - renamed the .rc file, updated the container, didn't make any other changes. Can't get into the web GUI (took too long to respond). As far as I'm aware, I'm running stock. Attached log with user/pass redacted. Any ideas? supervisord.log



