






Jcloud
Members
-
Joined
Everything posted by Jcloud
-
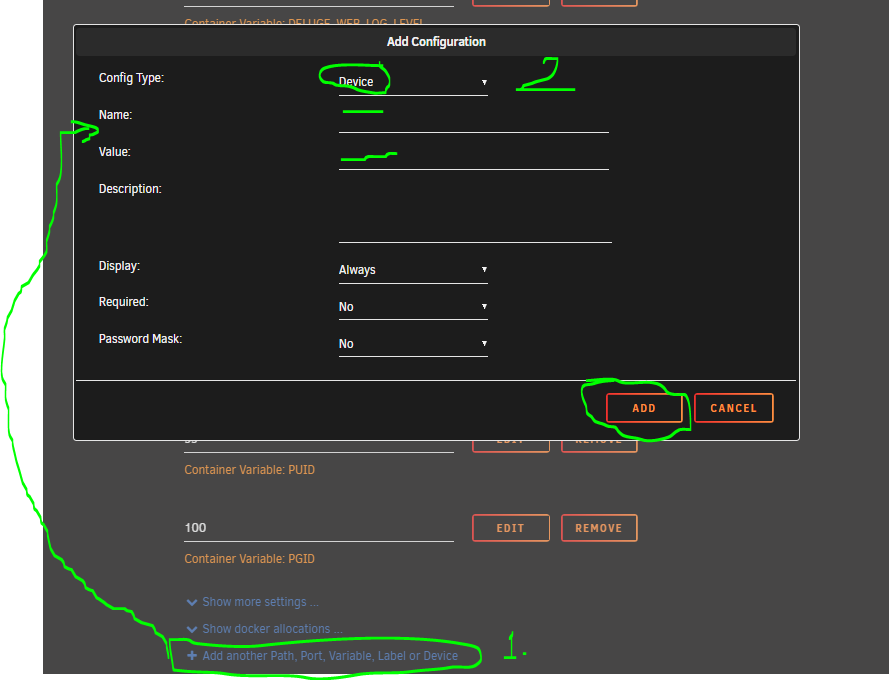
I admit this isn't answering your question directly. But if the IOMMU groups permit for your motherboard, perhaps stubbing out the USB controller in Unraid used by the ports for the printer, and allocating the stubbed USB controller, instead of the usb device (printer) to your VM? That's my 2-cents. Sorry I wouldn't know where to begin for a keep-alive script.Information and method is appreciated, but could we please get the instructions also be provided in text form, so as not to sit/skip through 11min video? More of a general request/observation w/ Spaceinvader post(s) in general.Was bored, saw your post did some digging. I've never passed a device to a docker before, or used SageTV Containers, but found other containers which have done this -- I figure it's got to be similar. From a Docker command line perspective I think you want to use your system's equivalent to: --device=/dev/dvb \ From a generic Docker template stand-point I think you're wanting to "add device" to Docker template, or perhaps the Docker template already has one added? Here's an unraid forum for tvheadend which has some code box/snips for --device; might give you pointers on how it gets done (from a 'high-level' general idea stand point): https://forums.unraid.net/topic/44872-support-binhex-tvheadend/ Not the silver-bullet, I'm guessing, you were looking for but some pointers to the direction you were looking for.
 I have about the same perspective, although I don't use unassigned drive for this (good idea though). Now that multiple-cache pools is a thing, I could see myself setting up a modest spinner drive as a cache drive for my BT share. Using an SSD as a cache drive for BT would be a hard-pass for me.This looks like a fun way to break my system, time to make a few redundant backups of my flash-drive. Thanks for posting all of this.Hey, thanks for reading and trying to help me out, I appreciate the example. I've since resolved my issue by changing the Docker containers I use, streamlined things for my given task-set. I wasn't sure how helpful it would be, but thought maybe it held some insight for you - described symptoms seemed the same/similar to me. But that's all I presently got. GL Have a good one everyone.[BACKGROUND:] I would call this an edge-case, and just annoyance level of a bug - however I found this to be very annoying when caught in it. The Unraid webui, TOWER/Docker/, can be thrown into a refresh-loop - causing a number of page functions to stop working, or greyed-out, while the UI waits for the loop/task to stop. This was found trying to setup a VPN-client container and pointing a Torrent client container to the VPN container. [ISSUE:] When a Docker container fails to be edited/created (the container becomes orphaned) - expected behavior. If a container is linked to another container, such as using 'extra parameter' "--net=container:nordvpn" that container becomes dependent on the linked container - expected behavior. If the required container is edited/updated the other container also updates - expected behavior. If the required-container is edited incorrectly and fails creation/update the container becomes orphaned; Docker/webui notices the dependency-container has changed and attempts to update other container. However the second container fails to update, because the dependency-container has been orphaned - The Unraid Webui gets stuck in a loop trying to rebuild the container. Only way I found to stop this loop is to try and remove the second container; afterwards hit refresh button on web browser; and then remake both containers. On two occasions I was unable to remove the second container, and had to go into Settings and stop/start Docker completely. [STEPS TO REPRODUCE ISSUE:] 0* From APP store-plugin grab: nordvpn transmission 1* Per instructions from nordvpn - Overview: https://www.youtube.com/watch?v=znSu_FuKFW0 * Edit Transmission container settings: * Disabled network * 'Extra Parameters:' == '--net=container:nordvpn' * APPLY (webui) 2* Edit Nordvpn container * Make a change and save which will cause an error in updating/rebuilding the container and cause the container image to orphan (I did this as I was trying things to troubleshoot and get VPN-bittorrent to actually work). Example to cause container update failure: 'Extra Parameters:' == '--device /dev/net/tun --cap-add=NET_ADMIN,SYS_ADMIN' * APPLY (webui) The update to Nordvpn should have failed; taking user back to TOWER/Docker where the system attempts to rebuild Transmission and is stuck in a loop. This loop continues until the user removes the Transmission container, and hits the refresh button in web browser. --EOF I hope I outlined the issue enough to be useful, if there's something which needs better explanation let me know. Please move this post if it's in the wrong thread. Have a good one everyone! hydra-diagnostics-20210603-1246.zipIt appears that you aren't the only one: https://github.com/bubuntux/nordvpn/issues/75 Question of my own, what's the syntax format for the "Location" variable? I tried to use: "us8297.nordvpn.com" which resulted in, "[Warning] could not determine server tag" and "[Error] picking servers: no servers found" in the log window. If I leave the "Location" variable empty (let the docker/app auto-detect the server) the log stops at "Connecting..." 2021-06-03T10:01:46-05:00] Firewall is up, everything has to go through the vpn [2021-06-03T10:01:46-05:00] Enabling connection to secure interfaces [2021-06-03T10:01:46-05:00] Enabling connection to nordvpn group [2021-06-03T10:01:46-05:00] Enabling connection to docker network [2021-06-03T10:01:46-05:00] Enabling connection to network 192.168.100.0/24 [2021-06-03T10:01:46-05:00] Restarting the service [2021-06-03T10:01:46-05:00] Waiting for the service to start [2021-06-03T10:01:47-05:00] Logging in [2021-06-03T10:01:53-05:00] Setting up NordVPN Version 3.9.5 CyberSec is already set to 'disabled'. DNS is set to '1.0.0.1, 1.1.1.1, 8.8.8.8' successfully. Technology is already set to 'OpenVPN'. Subnet 172.17.0.0/16 is whitelisted successfully. Subnet 192.168.100.0/24 is whitelisted successfully. Port 9091 (UDP|TCP) is whitelisted successfully. Port 54321 (UDP|TCP) is whitelisted successfully. [2021-06-03T10:01:53-05:00] Connecting... Just edited the container, adding environment variable DEBUG=on; no new information. [2021-06-03T10:10:09-05:00] Firewall is up, everything has to go through the vpn [2021-06-03T10:10:09-05:00] Enabling connection to secure interfaces [2021-06-03T10:10:09-05:00] Enabling connection to nordvpn group [2021-06-03T10:10:09-05:00] Enabling connection to docker network [2021-06-03T10:10:09-05:00] Enabling connection to network 192.168.100.0/24 [2021-06-03T10:10:09-05:00] Restarting the service [2021-06-03T10:10:09-05:00] Waiting for the service to start [2021-06-03T10:10:10-05:00] Logging in [2021-06-03T10:10:21-05:00] Setting up NordVPN Version 3.9.5 CyberSec is already set to 'disabled'. DNS is set to '1.0.0.1, 1.1.1.1, 8.8.8.8' successfully. Technology is already set to 'OpenVPN'. Subnet 172.17.0.0/16 is whitelisted successfully. Subnet 192.168.100.0/24 is whitelisted successfully. Port 9091 (UDP|TCP) is whitelisted successfully. Port 54321 (UDP|TCP) is whitelisted successfully. Protocol: UDP Firewall: enabled Kill Switch: disabled CyberSec: disabled Obfuscate: disabled Notify: disabled Auto-connect: disabled DNS: 1.0.0.1, 1.1.1.1, 8.8.8.8 Whitelisted ports: 9091 (UDP|TCP) 54321 (UDP|TCP) Whitelisted subnets: 172.17.0.0/16 192.168.100.0/24 [2021-06-03T10:10:21-05:00] Connecting... [2021-06-03T10:10:21-05:00] Setting up NordVPN Version 3.9.5 CyberSec is already set to 'disabled'. DNS is set to '1.0.0.1, 1.1.1.1, 8.8.8.8' successfully. Technology is already set to 'OpenVPN'. Subnet 172.17.0.0/16 is whitelisted successfully. Subnet 192.168.100.0/24 is whitelisted successfully. Port 9091 (UDP|TCP) is whitelisted successfully. Port 54321 (UDP|TCP) is whitelisted successfully. Protocol: UDP Firewall: enabled Kill Switch: disabled CyberSec: disabled Obfuscate: disabled Notify: disabled Auto-connect: disabled DNS: 1.0.0.1, 1.1.1.1, 8.8.8.8 Whitelisted ports: 9091 (UDP|TCP) 54321 (UDP|TCP) Whitelisted subnets: 172.17.0.0/16 192.168.100.0/24 [2021-06-03T10:10:21-05:00] Connecting... If I open the console for the Nordvpn container, and type the CLI: "curl ifconfig.io" the reported IP address is NOT my WAN IP, but appears to be a NORD server/node: 207.38.90.204. However, when I open my Transmission docker container (modified per spaceinvader video - 97%-certain it's correctly modified). The Webui is unable to reach Transmission backend (server not found). Per the Docker documentation I added an environmental-variable 'PORTS'='9091,54321' -- this change allowed me to access the Transmission-webgui. Anyone have ideas on how to resolve or further troubleshoot? EDITED: I think figured out my issue; NordVPN everything was working normally, but Transmission only had the tunnel and not an IP address, so when I tried to access it from web-browser the errors were from cached info from previous changes in settings. I couldn't figure out how to resolve the issue, so I changed programs, moved to binhex-delugevpn. Have a good one everyone.Just saw this (paid attention to forums) I'll take a look at it in a few, do some reading, probably make the tweeks. Thanks for pushing on my radar. Sent from my SAMSUNG-SGH-I537 using TapatalkThe docker container, or something else? Assuming you're talking about the Docker container; open the Unraid webgui, click on Docker menu, on the line for the container click "force update."It's the first line in the dashboard, "ID" - I believe that is it.Ah. 1gb, nice, way better then anything available to me in my area. I used to run into the problem you have, with my torrent client, prioritizing network at my router fixed the issue (for me). I might look into it, time permitting.Yup. It is the underlying idea of what what you want, as a proof of concept example. Perhaps, why not submit the idea to them directly? https://ideas.storj.io/ This software is only an ALPHA stages after all.Best I could think of would be to setup some kind of QoS, and/or traffic shaper, on your router if it's supported feature of the device. From the Docker itself, I'm unaware of any such bandwidth limiter.I'm community-small-fry at: 24TB array (4TB duel-parity, 3 & 4 TB disks - WD reds, black, golds) 13TB used (54%). I would love to update my array, but my budget is what it is. Anyone have any youtube channels to recommend scrapping/archiving? Please direct-message replies, as this is tangent to post.You mentioned making a new user share for this, is it using/on the cache-pool? That's my guess.. . . From that link: That is used in Step-3. The Unraid Docker template runs this (from the setup link): $ docker run -d --restart unless-stopped -p 28967:28967 \ -e WALLET="0xXXXXXXXXXXXXXXXXXXXXXXXXXXXXXXXXXXXXXXXX" \ -e EMAIL="[email protected]" \ -e ADDRESS="domain.ddns.net:28967" \ -e BANDWIDTH="20TB" \ -e STORAGE="2TB" \ --mount type=bind,source="<identity-dir>",destination=/app/identity \ --mount type=bind,source="<storage-dir>",destination=/app/config \ --name storagenode storjlabs/storagenode:alpha The data on Storj is encrypted, the manual step is basically generating an encryption key and the token is signing it, similar to an SSL certificate is my guess. What's wrong with a command prompt? It's much easier to program; arguably just as efficient to execute as GUI; much lighter-weight on system resources. From log file or console? I think that's due to being a new node on the network, if that's coming from the log file - give it some time to be on the network. Did you run a command from console or was this in the log file?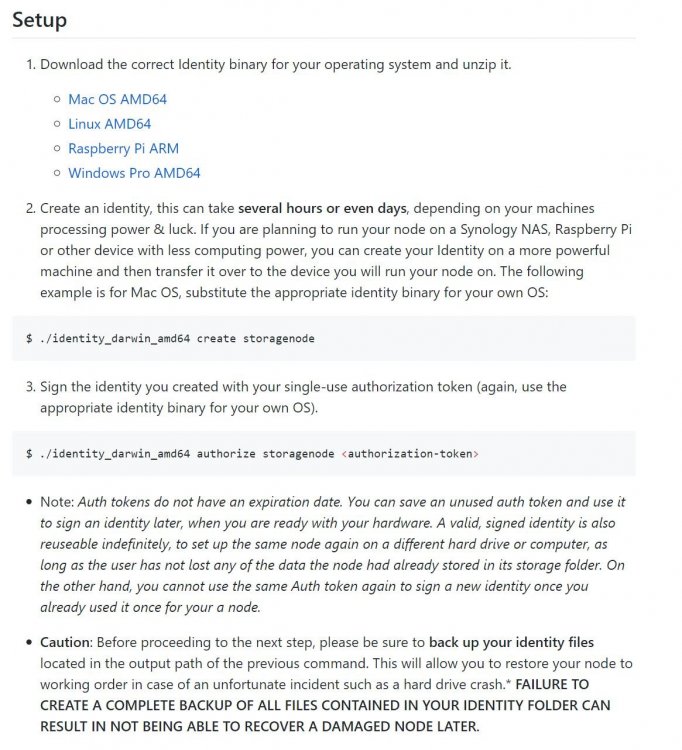

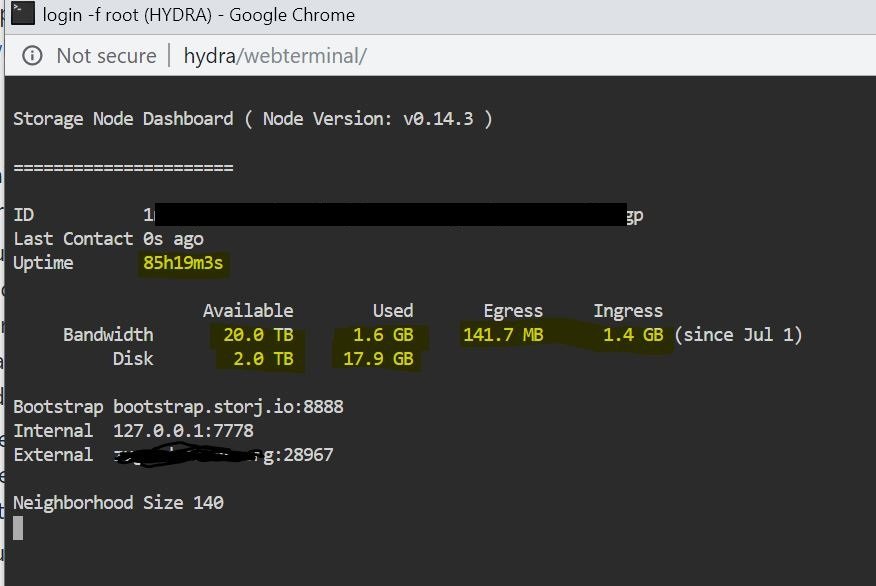 Please be sure to read Storj setup instructions at: https://github.com/storj/storj/wiki/Storage-Node-Setup-Instructions Their video: Has good information on the setup process. The video showed me what I was doing wrong/different in pulling up the "dashboard." The "dashboard" is command: docker exec -it StorjNode-V3 /app/dashboard.sh Which gives you this: EDIT: The template is on CA now.
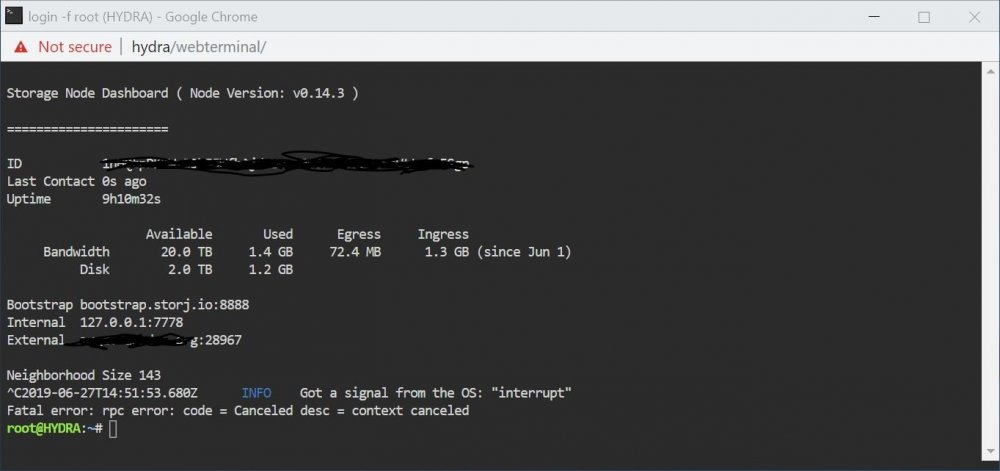 @nuhll Just confirmed in Storj community chat, storjstat.com / StorjMonitor only works with V2-network presently.Nope, just a template not a fork of the Docker container (which is what StorjMonitor is). I haven't looked at storjMonitor site in a year, I just checked my StorjStat account appears to be gone. 😕 Also, my V3 client appears to be working, but the dashboard is not. I'll probably spend a week messing around with StorjNode client (familiarize with it); double-check that StorjStat supports the new network; then see what I can do.Squid's CA FAQ says the refresh time should be about two hours. If I don't see it tomorrow, after work, I'll poke around some more.As of tonight I just made a template, and been testing, it's different from V2 for sure. It's pretty straight forward making the template from the Storj documentation linked on the email Storj sends you with the Auth Token. I'll post an Unrad template in about an hour (DONE), and from their it should show up in Community Apps (if I don't see it in APPS in ~24 hours, I'll poke around again and see if I missed something).I've clicked on it and did a cursory look at it - depression is a hell'va mind-block, so I'm trying to get into it. However, I plan on doing it, as back in October I sort-a committed myself to it. I'm also behind on upfiring, never did hear back from their Devs on the network ports, so I might put that out as, "here try this. What bugs are there?"I've mostly skimmed this, but I have two tweaks which I don't think have been covered: The first tweak is a registry change I found useful for Steam games, or rather when they needed to be installed. The issue is that program installers require administrator access, but user mapped network drives are not shared with other users. However there is a registry setting which can be added to allow mapped network drives to be shared (essentially flattening the “UAC landscape”). Open Regedit: HKEY_LOCAL_MACHINE\SOFTWARE\Microsoft\Windows\CurrentVersion\Policies\System\ EnableLinkedConnections DWORD flag to 1 I've made a reg file which can be download, then double-clicked on to just import the flag without using regedit. Once the key has been added to your registry, Windows has to be rebooted for it to take effect. Second tweak, how to uninstall Candy Crush a few other bits of Windows-bloat: Personally I don't use, Candy Crush, Skype, the built-in One Note, The Xbox features, and a few other bits -- with a bit of Power-Shell this can be uninstalled. To uninstall the Windows bloatware, we use the following PowerShell commands: "Get-AppxPackage" and "Remove-AppxPackage". 1. Right-click on Start/Windows-button & click on "Windows PowerShell (admin)" ** Note: command-prompt won't work; have to use PowerShell. ** 2. Open a second "Windows PowerShell (admin)" - Optional but useful. 3. In the first PowerShell console - type: Get-AppxPackage <return> You'll get something like this: (IT WILL BE A LONG LIST) Windows PowerShell Copyright (C) Microsoft Corporation. All rights reserved. PS C:\Windows\system32> Get-AppxPackage Name : Microsoft.Windows.CloudExperienceHost Publisher : CN=Microsoft Windows, O=Microsoft Corporation, L=Redmond, S=Washington, C=US Architecture : Neutral ResourceId : neutral Version : 10.0.17134.1 PackageFullName : Microsoft.Windows.CloudExperienceHost_10.0.17134.1_neutral_neutral_cw5n1h 2txyewy InstallLocation : C:\Windows\SystemApps\Microsoft.Windows.CloudExperienceHost_cw5n1h2txyewy IsFramework : False PackageFamilyName : Microsoft.Windows.CloudExperienceHost_cw5n1h2txyewy PublisherId : cw5n1h2txyewy IsResourcePackage : False IsBundle : False IsDevelopmentMode : False IsPartiallyStaged : False SignatureKind : System Status : Ok Name : Microsoft.AAD.BrokerPlugin Publisher : CN=Microsoft Windows, O=Microsoft Corporation, L=Redmond, S=Washington, C=US Architecture : Neutral ResourceId : neutral Version : 1000.17134.1.0 PackageFullName : Microsoft.AAD.BrokerPlugin_1000.17134.1.0_neutral_neutral_cw5n1h2txyewy InstallLocation : C:\Windows\SystemApps\Microsoft.AAD.BrokerPlugin_cw5n1h2txyewy IsFramework : False PackageFamilyName : Microsoft.AAD.BrokerPlugin_cw5n1h2txyewy PublisherId : cw5n1h2txyewy IsResourcePackage : False IsBundle : False IsDevelopmentMode : False IsPartiallyStaged : False SignatureKind : System Status : Ok . . . 4. Now to remove an item you want to find its "PackageFullName" - High light and copy it, for example (Candy Crush): king.com.CandyCrushSodaSaga_1.137.700.0_x86__kgqvnymyfvs32 5. In the second PowerShell console you run the second command with the "PackageFullName" to uninstall it. Remove-AppxPackage king.com.CandyCrushSodaSaga_1.137.700.0_x86__kgqvnymyfvs32 Now just repeat steps 4 and 5 to uninstall the bits you don't want (at least the bits which Windows will allow to be uninstalled). Third tweak, to close off another MS-Mothership-call. Click on Start/Windows button, click on Settings, Click on "Privacy," Click on "Diagnostic & feedback," scroll all the way to bottom - to category, "Feedback Frequency." Change "Automatically (recommended)" to "Never." *** The steps of third-tweak is based on the layout of build 1803/1809. *** EnableLinkedConnections.reg






