






1812
Members
-
Joined
-
Last visited
Everything posted by 1812
-
Yes. In some step, something is incorrect. Without knowing everything you did and verifying each step, there is no way to know so you will have to try the process again. But I can already see that you didn't follow the steps as written because it says to only copy over the bzimage and bzmodules. That may not matter, but it shows inattention to detail. So now you should roll back to stock unraid, reboot, and start over and follow the steps as written, and then report back.
-
You could try another disk to see if you just got a bad one. I have no guidance because I don't use the raid controller with disks in raid 0 because weird things like this can happen.
-
I use an H220. I've actually used them in several HP servers from G6 to this one for years without issue and they are pretty cheap. I bought an h240 once but it didn't send drive temps through at the time,. So now it sits in a box until that's better supported or I figure out what needs to be configured. But there is no real need for a card like that which does 12gbps in most unRaid servers, mine included. Even on 10gbe networking, my transfers to an SSD cache pool are limited by network speed.
-
I use a slew of Samsung evo ssd's in my ml350p gen 8 without issue. But his is using an HBA. After my initial issues with the onboard raid controller, I avoid it like the plague. But there are some others running disks in Raid 0 using the controller without issues. I don't have a fix for you aside from getting a HBA or waiting to see if the patch works out. Do you have other disks you can try to see if it's the disk itself or something else?
-
Correct. Currently there is no other way. But, there is something in development by other forum members to use/froce the controller in JBOD mode even though it's not available in the bios. If that becomes viable then I'll definitely share here.
-
You did not follow the steps in the first post for "VM problems - pass-through" your logs show 0000:04:00.1: DMAR: Device is ineligible for IOMMU domain attach due to platform RMRR requirement. Contact your platform vendor. 0000:04:00.1: DMAR: Device is ineligible for IOMMU domain attach due to platform RMRR requirement. Contact your platform vendor. your fix is:
-
For real. I've gotten a few kernel panics/crashes on my m1 Mac.... early adopter price....
-
any reason why virtmanager won't connect to my server? I keep getting port 22 connection refused.... yes I have a pw on the server also, can anyone else confirm that removing a video card and going back to vnc makes the vm hang on "Guest has not initialized the display (yet).
-
Welcome to the "new" new method of working around HP's RMRR problem on unRaid. For the previous/deprecated method which was no longer working, see: https://forums.unraid.net/topic/72681-unraid-hp-proliant-edition-rmrr-error-patching/ Additionally, for 6.9 there was a way to compile the patch yourself using the now deprecated kernel helper. This method starting with 6.10 is more streamlined as the patch is pre-built into unRaid now. First the disclaimer: This patch been tested with no negative attributes observed by myself and many others. . Many have been running an RMRR patched version since mid 2018 when we first started producing them, and so far have had no reported issues. In 2021 I sold my last proliant, so as new releases of unRaid are made public, it will be on the users to report any issues as they may (or may not) arise.. As the patch only omits RMRR checks, it should not affect any other core function of the OS. But as a general notice, neither Limetech or myself, or any contributors are responsible/liable for any loss of data or damage to hardware in enabling this patch in unRaid, or on any other system you install it. The "New" New unRaid HP Proliant Edition - RMRR Error Patching Description/Problem It is well documented that many HP Proliant servers have RMRR issues using certain BIOS versions after about 2011 when trying to passthrough devices in a linux environment. Device passthrough fails and the onscreen error will show: vfio: failed to set iommu for container: Operation not permitted And a look further into the logs show: Device is ineligible for IOMMU domain attach due to platform RMRR requirement. Contact your platform vendor. HP is aware of this problem and is not updating older machines. There are some bios options to try to fix this on newer models with some success. On unRaid, the problem is addressed by patching out the RMRR check. As of 6.10 the patch is now built into unraid, but off by default. Information regarding the patch can be found here: https://github.com/kiler129/relax-intel-rmrr Note: the patch author states: ------------------ --->>>A big thanks to @ich777 for creating the ability for users to previously easily compile the patch themselves, and to @limetech for now incorporating it into unRaid itself. <<<--- ------------------ Previously, @AnnabellaRenee87 and I maintained and provided the patched file for users. But now you will be able to easily enable the patch as it is included in unRaid starting with 6.10. Installation/Enable Procedure valid starting with 6.10 For users already using a previously patched version of unRaid, follow these steps: 1. Make a backup of your flash device by clicking on the main tab, then scroll down to your boot device section, click flash, then click flash backup and wait for the download. 2. Modify your syslinux.cfg by going to the main tab>boot device>flash in the "Unraid OS" section. Modify to the following: append intel_iommu=relax_rmrr initrd=/bzroot The patch is off by default and requires this to enable it. 3. Update to at least 6.10 of unRaid, reboot. 4. After the server has booted up, open a terminal and enter dmesg | grep 'Intel-IOMMU' If the patch is active you will get the following response DMAR: Intel-IOMMU: assuming all RMRRs are relaxable. This can lead to instability or data loss For users already running 6.10 and above follow these steps: 1. Make a backup of your flash device by clicking on the main tab, then scroll down to your boot device section, click flash, then click flash backup and wait for the download. 2. Modify your syslinux.cfg by going to the main tab>boot device>flash in the "Unraid OS" section. Modify to the following: append intel_iommu=relax_rmrr initrd=/bzroot The patch is off by default and requires this to enable it. 3. Reboot. 4. After the server has booted up, open a terminal and enter dmesg | grep 'Intel-IOMMU' If the patch is active you will get the following response DMAR: Intel-IOMMU: assuming all RMRRs are relaxable. This can lead to instability or data loss Disable To disable the patch, remove the modification to syslinux.cfg and reboot. Other Proliant Problems Check this thread for fixes to other common Proliant problems: https://forums.unraid.net/topic/59375-hp-proliant-workstation-unraid-information-thread/ Happy unRaiding!
-
Simply amazing stuff. You are a credit to the community.
-
It keeps pulling Catalina instead of Big Sur for me even though I selected Big Sur twice with method 1....macOS Product: 061-86291 Switched to method 2 says it's trying for Product: 001-86606... I guess I'll leave it overnight and see what greets me in the am. update: method 2 downloaded Big Sur
-
moderately sized, about 70TB in disk space, which turns into 24TB array, 26TB pool for backup, 1tb mirrored cache, 2 tb mirrored pool w/4 disks
-
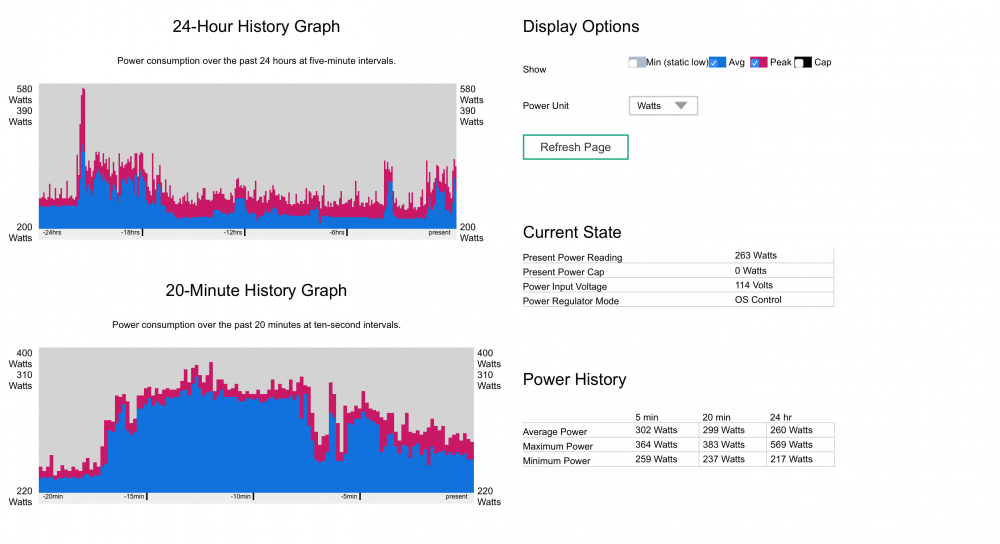
I think I win... or lose... overnight "idle" low is about 217 watts. But it's never really at idle.That includes: 2 8 core processors (32 threads) 128 GB ram 5 disk main array in various states of spun up and down 7 disk backup pool spun down 2 SSD cache up 4 SSD pool up 1 vm running with 2 rx580's and some various dockers contributing to a few watts here and there.
-
brothers and sisters, I'm here to testify! thanks to this thread and specifically to @ghost82 I am a a redeemed clover convert and a believer in opencore. not only is the vm booting faster, but I'm benchmarking 10% higher than the same os image on clover. And free performance is worth a lot. THANKS!xml (had to copy from the running vm) <?xml version='1.0' encoding='UTF-8'?> <domain type='kvm' id='34' xmlns:qemu='http://libvirt.org/schemas/domain/qemu/1.0'> <name>Desktop</name> <uuid>9e8e043c-3cfd-8a45-aeac-d80f5cbd234f</uuid> <metadata> <vmtemplate xmlns="unraid" name="MacOS" icon="/mnt/user/domains/MacinaboxCatalina/icon/catalina.png" os="Catalina"/> </metadata> <memory unit='KiB'>101187584</memory> <currentMemory unit='KiB'>101187584</currentMemory> <memoryBacking> <nosharepages/> </memoryBacking> <vcpu placement='static'>24</vcpu> <cputune> <vcpupin vcpu='0' cpuset='4'/> <vcpupin vcpu='1' cpuset='20'/> <vcpupin vcpu='2' cpuset='5'/> <vcpupin vcpu='3' cpuset='21'/> <vcpupin vcpu='4' cpuset='6'/> <vcpupin vcpu='5' cpuset='22'/> <vcpupin vcpu='6' cpuset='7'/> <vcpupin vcpu='7' cpuset='23'/> <vcpupin vcpu='8' cpuset='8'/> <vcpupin vcpu='9' cpuset='24'/> <vcpupin vcpu='10' cpuset='9'/> <vcpupin vcpu='11' cpuset='25'/> <vcpupin vcpu='12' cpuset='10'/> <vcpupin vcpu='13' cpuset='26'/> <vcpupin vcpu='14' cpuset='11'/> <vcpupin vcpu='15' cpuset='27'/> <vcpupin vcpu='16' cpuset='12'/> <vcpupin vcpu='17' cpuset='28'/> <vcpupin vcpu='18' cpuset='13'/> <vcpupin vcpu='19' cpuset='29'/> <vcpupin vcpu='20' cpuset='14'/> <vcpupin vcpu='21' cpuset='30'/> <vcpupin vcpu='22' cpuset='15'/> <vcpupin vcpu='23' cpuset='31'/> </cputune> <resource> <partition>/machine</partition> </resource> <os> <type arch='x86_64' machine='pc-q35-3.1'>hvm</type> <loader readonly='yes' type='pflash'>/mnt/scratch/vm/Desktop/ovmf/OVMF_CODE.fd</loader> <nvram>/mnt/scratch/vm/Desktop/ovmf/OVMF_VARS.fd</nvram> </os> <features> <acpi/> <apic/> <ioapic driver='qemu'/> </features> <cpu mode='host-passthrough' check='none'> <cache mode='passthrough'/> </cpu> <clock offset='utc'> <timer name='rtc' tickpolicy='catchup'/> <timer name='pit' tickpolicy='delay'/> <timer name='hpet' present='no'/> </clock> <on_poweroff>destroy</on_poweroff> <on_reboot>restart</on_reboot> <on_crash>restart</on_crash> <devices> <emulator>/usr/local/sbin/qemu</emulator> <disk type='file' device='disk'> <driver name='qemu' type='qcow2' cache='none' io='native' discard='unmap'/> <source file='/mnt/user/vm/Desktop/Clover.qcow2' index='4'/> <backingStore/> <target dev='hdc' bus='sata'/> <boot order='1'/> <alias name='sata0-0-2'/> <address type='drive' controller='0' bus='0' target='0' unit='2'/> </disk> <disk type='file' device='disk'> <driver name='qemu' type='qcow2' cache='none' io='native' discard='unmap'/> <source file='/mnt/scratch/vm/Desktop/macos_disk.qcow2' index='3'/> <backingStore/> <target dev='hdd' bus='sata'/> <alias name='sata0-0-3'/> <address type='drive' controller='0' bus='0' target='0' unit='3'/> </disk> <disk type='file' device='disk'> <driver name='qemu' type='qcow2' cache='none' io='native' discard='unmap'/> <source file='/mnt/scratch/vm/Scratch and Apps Disk/Scratch.qcow2' index='2'/> <backingStore/> <target dev='hde' bus='sata'/> <alias name='sata0-0-4'/> <address type='drive' controller='0' bus='0' target='0' unit='4'/> </disk> <disk type='file' device='disk'> <driver name='qemu' type='qcow2' cache='writeback'/> <source file='/mnt/disks/MacBackup/Backup/vdisk1.qcow2' index='1'/> <backingStore/> <target dev='hdf' bus='sata'/> <alias name='sata0-0-5'/> <address type='drive' controller='0' bus='0' target='0' unit='5'/> </disk> <controller type='usb' index='0' model='ich9-ehci1'> <alias name='usb'/> <address type='pci' domain='0x0000' bus='0x00' slot='0x07' function='0x7'/> </controller> <controller type='usb' index='0' model='ich9-uhci1'> <alias name='usb'/> <master startport='0'/> <address type='pci' domain='0x0000' bus='0x00' slot='0x07' function='0x0' multifunction='on'/> </controller> <controller type='usb' index='0' model='ich9-uhci2'> <alias name='usb'/> <master startport='2'/> <address type='pci' domain='0x0000' bus='0x00' slot='0x07' function='0x1'/> </controller> <controller type='usb' index='0' model='ich9-uhci3'> <alias name='usb'/> <master startport='4'/> <address type='pci' domain='0x0000' bus='0x00' slot='0x07' function='0x2'/> </controller> <controller type='sata' index='0'> <alias name='ide'/> <address type='pci' domain='0x0000' bus='0x00' slot='0x1f' function='0x2'/> </controller> <controller type='pci' index='0' model='pcie-root'> <alias name='pcie.0'/> </controller> <controller type='pci' index='1' model='pcie-root-port'> <model name='pcie-root-port'/> <target chassis='1' port='0x8'/> <alias name='pci.1'/> <address type='pci' domain='0x0000' bus='0x00' slot='0x01' function='0x0' multifunction='on'/> </controller> <controller type='pci' index='2' model='pcie-root-port'> <model name='pcie-root-port'/> <target chassis='2' port='0x9'/> <alias name='pci.2'/> <address type='pci' domain='0x0000' bus='0x00' slot='0x01' function='0x1'/> </controller> <controller type='pci' index='3' model='pcie-root-port'> <model name='pcie-root-port'/> <target chassis='3' port='0xa'/> <alias name='pci.3'/> <address type='pci' domain='0x0000' bus='0x00' slot='0x01' function='0x2'/> </controller> <controller type='pci' index='4' model='pcie-root-port'> <model name='pcie-root-port'/> <target chassis='4' port='0xb'/> <alias name='pci.4'/> <address type='pci' domain='0x0000' bus='0x00' slot='0x01' function='0x3'/> </controller> <controller type='pci' index='5' model='pcie-root-port'> <model name='pcie-root-port'/> <target chassis='5' port='0xc'/> <alias name='pci.5'/> <address type='pci' domain='0x0000' bus='0x00' slot='0x01' function='0x4'/> </controller> <controller type='pci' index='6' model='pcie-root-port'> <model name='pcie-root-port'/> <target chassis='6' port='0xd'/> <alias name='pci.6'/> <address type='pci' domain='0x0000' bus='0x00' slot='0x01' function='0x5'/> </controller> <controller type='pci' index='7' model='pcie-root-port'> <model name='pcie-root-port'/> <target chassis='7' port='0xe'/> <alias name='pci.7'/> <address type='pci' domain='0x0000' bus='0x00' slot='0x01' function='0x6'/> </controller> <controller type='pci' index='8' model='pcie-root-port'> <model name='pcie-root-port'/> <target chassis='8' port='0xf'/> <alias name='pci.8'/> <address type='pci' domain='0x0000' bus='0x00' slot='0x01' function='0x7'/> </controller> <controller type='pci' index='9' model='pcie-to-pci-bridge'> <model name='pcie-pci-bridge'/> <alias name='pci.9'/> <address type='pci' domain='0x0000' bus='0x07' slot='0x00' function='0x0'/> </controller> <controller type='pci' index='10' model='pcie-root-port'> <model name='pcie-root-port'/> <target chassis='10' port='0x10'/> <alias name='pci.10'/> <address type='pci' domain='0x0000' bus='0x00' slot='0x02' function='0x0' multifunction='on'/> </controller> <controller type='pci' index='11' model='pcie-root-port'> <model name='pcie-root-port'/> <target chassis='11' port='0x11'/> <alias name='pci.11'/> <address type='pci' domain='0x0000' bus='0x00' slot='0x02' function='0x1'/> </controller> <controller type='virtio-serial' index='0'> <alias name='virtio-serial0'/> <address type='pci' domain='0x0000' bus='0x02' slot='0x00' function='0x0'/> </controller> <interface type='bridge'> <mac address='52:54:00:0a:24:44'/> <source bridge='br0'/> <target dev='vnet0'/> <model type='vmxnet3'/> <alias name='net0'/> <address type='pci' domain='0x0000' bus='0x01' slot='0x00' function='0x0'/> </interface> <serial type='pty'> <source path='/dev/pts/0'/> <target type='isa-serial' port='0'> <model name='isa-serial'/> </target> <alias name='serial0'/> </serial> <console type='pty' tty='/dev/pts/0'> <source path='/dev/pts/0'/> <target type='serial' port='0'/> <alias name='serial0'/> </console> <channel type='unix'> <source mode='bind' path='/var/lib/libvirt/qemu/channel/target/domain-34-Desktop/org.qemu.guest_agent.0'/> <target type='virtio' name='org.qemu.guest_agent.0' state='connected'/> <alias name='channel0'/> <address type='virtio-serial' controller='0' bus='0' port='1'/> </channel> <input type='mouse' bus='ps2'> <alias name='input0'/> </input> <input type='keyboard' bus='ps2'> <alias name='input1'/> </input> <input type='keyboard' bus='ps2'> <alias name='input2'/> </input> <input type='keyboard' bus='ps2'> <alias name='input3'/> </input> <hostdev mode='subsystem' type='pci' managed='yes'> <driver name='vfio'/> <source> <address domain='0x0000' bus='0x47' slot='0x00' function='0x0'/> </source> <alias name='hostdev0'/> <rom file='/mnt/user/domains/vbios/580.dump'/> <address type='pci' domain='0x0000' bus='0x03' slot='0x00' function='0x0'/> </hostdev> <hostdev mode='subsystem' type='pci' managed='yes'> <driver name='vfio'/> <source> <address domain='0x0000' bus='0x41' slot='0x00' function='0x0'/> </source> <alias name='hostdev1'/> <rom file='/mnt/user/domains/vbios/580a.dump'/> <address type='pci' domain='0x0000' bus='0x04' slot='0x00' function='0x0'/> </hostdev> <hostdev mode='subsystem' type='pci' managed='yes'> <driver name='vfio'/> <source> <address domain='0x0000' bus='0x09' slot='0x00' function='0x0'/> </source> <alias name='hostdev2'/> <address type='pci' domain='0x0000' bus='0x05' slot='0x00' function='0x0'/> </hostdev> <hostdev mode='subsystem' type='pci' managed='yes'> <driver name='vfio'/> <source> <address domain='0x0000' bus='0x0a' slot='0x00' function='0x0'/> </source> <alias name='hostdev3'/> <address type='pci' domain='0x0000' bus='0x06' slot='0x00' function='0x0'/> </hostdev> <hostdev mode='subsystem' type='pci' managed='yes'> <driver name='vfio'/> <source> <address domain='0x0000' bus='0x0b' slot='0x00' function='0x0'/> </source> <alias name='hostdev4'/> <address type='pci' domain='0x0000' bus='0x08' slot='0x00' function='0x0'/> </hostdev> <hostdev mode='subsystem' type='pci' managed='yes'> <driver name='vfio'/> <source> <address domain='0x0000' bus='0x0c' slot='0x00' function='0x0'/> </source> <alias name='hostdev5'/> <address type='pci' domain='0x0000' bus='0x0a' slot='0x00' function='0x0'/> </hostdev> <memballoon model='none'/> </devices> <seclabel type='dynamic' model='dac' relabel='yes'> <label>+0:+100</label> <imagelabel>+0:+100</imagelabel> </seclabel> <qemu:commandline> <qemu:arg value='-usb'/> <qemu:arg value='-device'/> <qemu:arg value='usb-kbd,bus=usb-bus.0'/> <qemu:arg value='-device'/> <qemu:arg value='isa-applesmc,osk=theysayonceyougomacyounevergoback'/> <qemu:arg value='-smbios'/> <qemu:arg value='type=2'/> <qemu:arg value='-cpu'/> <qemu:arg value='IvyBridge,kvm=on,vendor=GenuineIntel,+invtsc,vmware-cpuid-freq=on,+pcid,+ssse3,+sse4.2,+popcnt,+avx,+aes,+xsave,+xsaveopt,check'/> <qemu:arg value='-set'/> <qemu:arg value='device.sata0-0-2.rotation_rate=1'/> <qemu:arg value='-set'/> <qemu:arg value='device.sata0-0-3.rotation_rate=1'/> <qemu:arg value='-set'/> <qemu:arg value='device.sata0-0-4.rotation_rate=1'/> </qemu:commandline> </domain> running Catalina 10.15.4 sending you the config.plist now much appreciated!I only have what was pulled of of Leoyzen's GitHub page. Just now I attempted to locate it on the web but apparently my google-fu is a bit weak today...OK so I decided to take the plunge after reading all 21 pages. My assumption was that I could take a perfectly working Catalina vm made with macinabox, mount the clover qcow2 image, trash the clover efi folder, replace with the one from @Leoyzen's github and stand a decent chance of it booting, even with no alternations to the xml. Well that didn't happen. I am able to get to the oc boot selector, but regardless of what is selected, the result is the same. This happens almost instantaneously after the boot selector. I also tried another OC.qcow2 image that was uploaded in this thread and the result was the same. Not sure where to go from here. Maybe I'm missing something obvious? Anything I can provide to help in troubleshooting?
 128gb ecc. 96gb for a vm, the rest for dockers and thingsyeah, but it may also be because i have always used acs override multifunction to break up into the smallest iommu groups. and if the sound portion of the GPU triggers it (which happens frequently) then perhaps its not working at all and i'm just working around it. will contact! i dont know if it requires both. the post isnt clear if they did the patch and then made the module to go together or if the modules are fine on their own. it may take trial and error. but you will have tons of appreciation from me and the growing proliant community!well, thats how its suppose to work. I can verify that the path does modify the correct driver. But it doesnt quite fix everything. I am able to do GPU passthrough on beta 25 where I could not before. But when I try to pass through a 10gbe adapter, it is still blocked. this may be needed to fix the issue with the network card, but its implementation is a bit over my head. if anyone wants to help, it would be appreciated! i re-ran with the v2 in that post and can confirm that it does patch the driver and is essentially the same as what I found to work.native support would be fantastic! this is all a work in progress but this is what I've gotten so far: the patch needed updating to fix changes to the iommu/intel-iommu.c driver. we use to compile this using another script, but it stopped working sometime during the 6.8 series. Once the patch was updated, it was just dropped in the patched folder. the patch still needs a little more work as it is mostly working on my system, but causing problem on another testers. its a simple patch and hopefully will be all figured out by today. for integration, would we just pull the patch (which may need updating from time to time) from a GitHub repository? if so, it may need versioning if they make anymore changes to the driver.shout out to @ich777. We'd had some problems patching the proliant edition of unraid (https://forums.unraid.net/topic/72681-unraid-hp-proliant-edition-rmrr-error-patching/) After spending some time with this docker and updating the patch, it looks like proliant owners will get to continue on unRaiding for a bit longer. much appreciated!thank you for sharing. I have been looking for an inexpensive 16i card and this looks like it will fit the billThat’s the network it uses. Go to advanced in the vm settings and edit the xml





