ghost82
Members
-
Joined
-
Last visited
Everything posted by ghost82
-
Your vfio config is wrong: Loading config from /boot/config/vfio-pci.cfg BIND=0000:01:00.0|10de:2184 0000:01:00.1|10de:1aeb 0000:01:00.2|10de:1aec 0000:01:00.3|10de:1aed --- Processing 0000:01:00.0 10de:2184 Error: Vendor:Device 10de:2184 not found at 0000:01:00.0, unable to bind device --- Processing 0000:01:00.1 10de:1aeb Error: Device 0000:01:00.1 does not exist, unable to bind device --- Processing 0000:01:00.2 10de:1aec Error: Device 0000:01:00.2 does not exist, unable to bind device --- Processing 0000:01:00.3 10de:1aed Error: Device 0000:01:00.3 does not exist, unable to bind device All 10de nvidia devices are not in your build. You have to reassign amd devices to vfio at boot: 03:00.0 1002:731f 03:00.1 1002:ab38 But first you may need to use acs override patch, because your gpu is not isolated in its iommu group (I'm not sure it will work without isolating from pci bridges): /sys/kernel/iommu_groups/1/devices/0000:00:01.0 /sys/kernel/iommu_groups/1/devices/0000:01:00.0 /sys/kernel/iommu_groups/1/devices/0000:02:00.0 /sys/kernel/iommu_groups/1/devices/0000:03:00.0 /sys/kernel/iommu_groups/1/devices/0000:03:00.1 Moreover you need to pass the gpu audio and video as multifunction, for example in your win10 vm you have: <hostdev mode='subsystem' type='pci' managed='yes'> <driver name='vfio'/> <source> <address domain='0x0000' bus='0x03' slot='0x00' function='0x0'/> </source> <rom file='/mnt/user/ISOs/vbios/5700 xt.rom'/> <address type='pci' domain='0x0000' bus='0x04' slot='0x00' function='0x0'/> </hostdev> <hostdev mode='subsystem' type='pci' managed='yes'> <driver name='vfio'/> <source> <address domain='0x0000' bus='0x03' slot='0x00' function='0x1'/> </source> <address type='pci' domain='0x0000' bus='0x05' slot='0x00' function='0x0'/> </hostdev> change it to: <hostdev mode='subsystem' type='pci' managed='yes'> <driver name='vfio'/> <source> <address domain='0x0000' bus='0x03' slot='0x00' function='0x0'/> </source> <rom file='/mnt/user/ISOs/vbios/5700 xt.rom'/> <address type='pci' domain='0x0000' bus='0x04' slot='0x00' function='0x0' multifunction='on'/> </hostdev> <hostdev mode='subsystem' type='pci' managed='yes'> <driver name='vfio'/> <source> <address domain='0x0000' bus='0x03' slot='0x00' function='0x1'/> </source> <address type='pci' domain='0x0000' bus='0x04' slot='0x00' function='0x1'/> </hostdev> Win11 vm has vnc. Reboot server after applying the changes.
-
Hi, in your syslog you have this: May 26 16:26:11 server kernel: vfio-pci 0000:0b:00.0: can't change power state from D0 to D3hot (config space inaccessible) May 26 16:26:11 server kernel: vfio-pci 0000:0b:00.1: can't change power state from D0 to D3hot (config space inaccessible) So it cannot be resetted. Since it seems you configured all well, this could be a bios issue. You are using F50 bios which is quite old, latest bios should be F63b (which should not be a final release?) or F62. Depending on your motherboard revision: Rev. 1.0 https://www.gigabyte.com/Motherboard/X470-AORUS-GAMING-7-WIFI-rev-10/support#support-dl-bios Rev 1.1 https://www.gigabyte.com/Motherboard/X470-AORUS-GAMING-7-WIFI-rev-11/support#support-dl-bios Worth a try in my opinion.
-
I never used seabios, so I don't know, but it could be that you need to enable bootmenu and add a timeout to your xml. Anyway, I'm seeing that the vm is using seabios 1.15: I compiled the latest version (1.16.0-4-gdc88f9b), maybe you can try this version (attached). Extract file bios.bin from the zip and save it somewhere on unraid (i.e. /path/to/bios.bin). Open the vm settings in xml view and change from: <os> <type arch='x86_64' machine='pc-i440fx-6.2'>hvm</type> </os> to: <os> <type arch='x86_64' machine='pc-i440fx-6.2'>hvm</type> <loader type='rom'>/path/to/bios.bin</loader> <boot dev='hd'/> <bootmenu enable='yes' timeout='30000'/> </os> Try to boot. As you can see I enabled the bootmenu with a timeout of 30 seconds, so you should have enough time to see what boot options it proposes. Seabios-1.16.0-4-gdc88f9b.zip
-
No because there is no bootloader able to run it and apple m1 arm cpu is proprietary, so qemu is not able to emulate it.
-
Maybe related to this...(?) https://mail.coreboot.org/hyperkitty/list/[email protected]/thread/72LFLT7KFMWE4GVZHWF4G34PKLVG5LRD/ Never used seabios, but what do you see when you press esc to access seabios?What boot options do you have?
-
I would say no (or at least not so many advantages), efi is just more recent than legacy bios, but I would prefer ovmf uefi because most recent oses 'prefer' uefi. This case is very particular, it's very strange that it boots bare metal and fails with that bcd error in a vm...
-
Hi! What do you mean by "error"? If you are referring to your screenshot, that are not errors, but it's a verbose mode that tells you that the bdsdxe driver is first loading and then starting Boot0002 entry. If your windows 11 starts if booted directly from ovmf menu, try to add the boot order line to the nvme block, something like this: <hostdev mode='subsystem' type='pci' managed='yes'> <driver name='vfio'/> <source> <address domain='0x0000' bus='0x00' slot='0x1f' function='0x5'/> </source> <boot order='1'/> <address type='pci' domain='0x0000' bus='0x00' slot='0x0b' function='0x0'/> </hostdev> Obviously apply it to the proper block. Delete also this to make it work: <boot dev='hd'/>
-
My first question is how windows is installed on that nvme, is it uefi or legacy bios? You are using seabios for the vm (legacy bios), switch to ovmf if it was installed in uefi mode. This error can show if bios is wrong.
-
There are kernel panic related to amd gpu. You are running unraid 6.9.2 and you are talking about "6900", is the 6900xt?That is pretty new and if you're using an old unraid version drivers may not play well, try to upgrade to 6.10.1. Once upgraded check that gpu (audio, video, etc) is bound to vfio.
-
Hi, from what I can see you did it pretty well (happy that someone reads and tries himself/herself before posting something), efifb off (maybe not needed since you are booting unraid as legacy, but let it where it is..), multifunction for the gpu, gpu isolated, allow unsafe interrrupts. So..I can see a couple of things that could cause the issue, I would try in order (Parsec vm): 1. change the bus of the gpu (audio and video) in the target vm: you are setting it at bus 0 in a q35 machine, bus 0 means "built-in", i.e. attached to pcie-root, but the gpu is not built in and the driver could cause issues. Change from: <hostdev mode='subsystem' type='pci' managed='yes'> <driver name='vfio'/> <source> <address domain='0x0000' bus='0x26' slot='0x00' function='0x0'/> </source> <rom file='/mnt/vm/domains/VBios/NVIDIA.GTX980Ti.mod.rom'/> <address type='pci' domain='0x0000' bus='0x00' slot='0x06' function='0x0' multifunction='on'/> </hostdev> <hostdev mode='subsystem' type='pci' managed='yes'> <driver name='vfio'/> <source> <address domain='0x0000' bus='0x26' slot='0x00' function='0x1'/> </source> <address type='pci' domain='0x0000' bus='0x00' slot='0x06' function='0x1'/> </hostdev> To: <hostdev mode='subsystem' type='pci' managed='yes'> <driver name='vfio'/> <source> <address domain='0x0000' bus='0x26' slot='0x00' function='0x0'/> </source> <rom file='/mnt/vm/domains/VBios/NVIDIA.GTX980Ti.mod.rom'/> <address type='pci' domain='0x0000' bus='0x05' slot='0x06' function='0x0' multifunction='on'/> </hostdev> <hostdev mode='subsystem' type='pci' managed='yes'> <driver name='vfio'/> <source> <address domain='0x0000' bus='0x26' slot='0x00' function='0x1'/> </source> <address type='pci' domain='0x0000' bus='0x05' slot='0x06' function='0x1'/> </hostdev> 2. Double check again the vbios file you are passing through: dump your own and/or check the header to remove with hex editor. 3. Some builds do not work properly when the gpu to passthrough is in the first top gpu slot: if you can move it to another slot.
-
v. 2.55 was designed for oc 0.7.7 so it fits, but if you broke your efi in some way it's not a configurator that it will recover. However you can reaplce your actual opencore image with a fresh one: https://github.com/SpaceinvaderOne/Macinabox/raw/master/bootloader/OpenCore-v16.img.zip Extract from zip and replace in /mnt/user/domains/Macinabox Monterey/Monterey-opencore.img
-
None? Really...only textedit should be recommended. However, if you want to use opencore configurator with the risk of breaking your efi, the version you want to use depends on the opencore bootloader version. Original macinabox includes opencore v.0.7.7 so opencore configurator 2.55.0.0 should work as expected: https://mackie100projects.altervista.org/occ-changelog-version-2-55-0-0/ Obviously, if you updated opencore bootloader you should read the configurator changelog and download a version compatible with the version of the bootloader.
-
Thanks for testing, I read again the link in the first post and that user solved not by putting it on bus 0, but the opposite....sorry....you already had it on a bus different than 0, so no more idea...but luckily having wifi is not a must for this vm.
-
About the wifi issue, maybe changing the target bus, as pointed by you in your first message, could fix it. Unfortunately you deleted the diagnostics file so I cannot check at what address the wifi is, but from your gif it should be at source 03:00.0 and target 07:00.0. You have another device passed through at source 01:00.0 (maybe an usb controller?). If the wifi is at 03:00.0 in the host you can try to make it "built-in" in the vm (i.e. change the target address to bus 0), if it will work or not it will depend on how the windows driver for the wifi behaves. So you could change from this: <hostdev mode='subsystem' type='pci' managed='yes'> <driver name='vfio'/> <source> <address domain='0x0000' bus='0x03' slot='0x00' function='0x0'/> </source> <address type='pci' domain='0x0000' bus='0x07' slot='0x00' function='0x0'/> </hostdev> to this: <hostdev mode='subsystem' type='pci' managed='yes'> <driver name='vfio'/> <source> <address domain='0x0000' bus='0x03' slot='0x00' function='0x0'/> </source> <address type='pci' domain='0x0000' bus='0x00' slot='0x02' function='0x0'/> </hostdev> put it in bus 0, slot 2 which should be free
-
I think I found the issue: when you edit a vm in the xml view make 2 changes: on the top of the xml, change this line: <domain type='kvm'> with this: <domain type='kvm' xmlns:qemu='http://libvirt.org/schemas/domain/qemu/1.0'> Then, add the block at the bottom. Once you made your changes save the xml and it will be saved correctly. Just tried this with unraid 6.10.1 and for some odd behavior it strips the xmlns line with the validation schemas...Even more odd is that it exits like if you saved it, but it didn't. Using virsh edit command fails too (obviously because the xml lacks the validation schemas too), but at least it points to an understandable error.
-
@astronax I think I found the culprit for the issue "xml is not saving". I had a spare usb key with unraid 6.10.1, I had also an additional pendrive, so made the array on that usb pendrive just to test the qemu/libvirt behavior. Just a note on my above post: one, before using the virsh command should export nano as default editor with this command (in terminal): export EDITOR='/usr/bin/nano' then run the virsh command. -------- However it is not needed to run the virsh command and unraid gui in xml view can be used. The issue is that the domain type line is stripped by unraid. When you view your xml in unraid make 2 changes: 1. on the top you will see a line with this: <domain type='kvm'> Change it to: <domain type='kvm' xmlns:qemu='http://libvirt.org/schemas/domain/qemu/1.0'> Then to the bottom add: <qemu:capabilities> <qemu:del capability='usb-host.hostdevice'/> </qemu:capabilities> before the </domain> tag. This time it will save. I found this because using the virsh command failed to validate too, because qemu schemas was not defined. PS: not sure if this will solve your bluetooth/wifi issue, just try...
-
It seems another user has having issues in saving custom things in his xml, starting in 6.10...can you try the virsh command, i.e. in terminal 'virsh edit 'name of vm'' to see if it works there?
-
Don't take it bad I should had ask... It seems you are not alone, it seems someone else is having issue in saving the xml with custom things...I cannot access my unraid and test myself, sorry, I should had test myself first. You can open a bug in the proper section. In the meantime, yes you can try the virsh command to edit your vm, from an unraid terminal: virsh edit 'name of the vm' make your edits then press ctrl+o to save it. Try to rerun the command and check if your edits are saved.
-
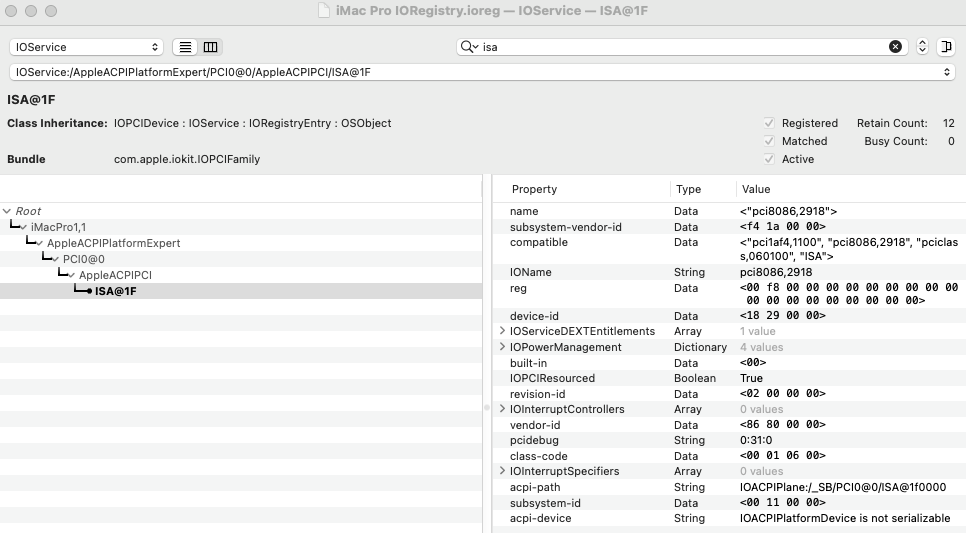
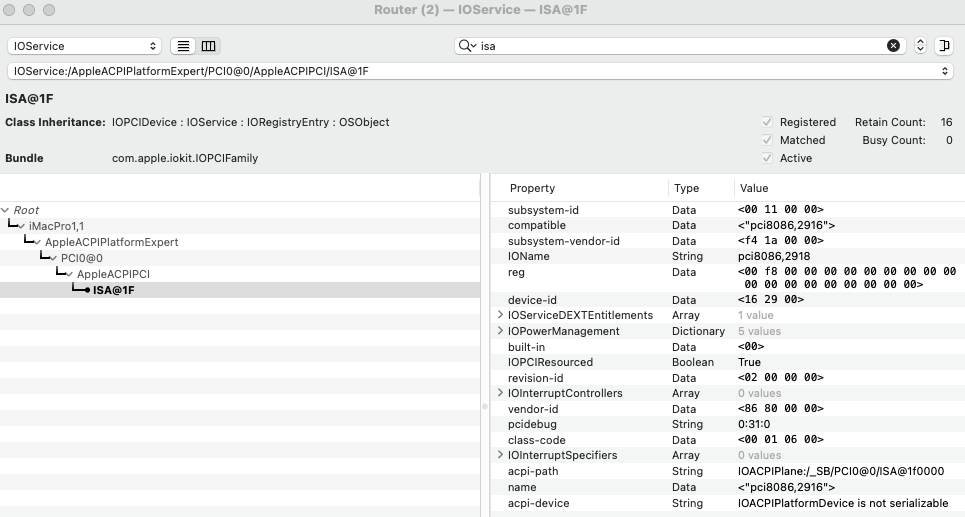
A note about the apple isa-applesmc device, because I'm seeing some errors in the configurations that users are sending to me for troubleshooting. The applesmc isa device must be defined because apple needs smc keys (osk). We have 2 ways to do this: 1. define it in the xml with: <qemu:arg value='-device'/> <qemu:arg value='isa-applesmc,osk=blablablablabla'/> This will define the device pci8086,2918: 2. define it in the config.plist: <key>DeviceProperties</key> <dict> <key>Add</key> <dict> <key>PciRoot(0x0)/Pci(0x1F,0x0)</key> <dict> <key>compatible</key> <string>pci8086,2916</string> <key>device-id</key> <data>FikA</data> <key>name</key> <string>pci8086,2916</string> </dict> </dict> <key>Delete</key> <dict/> </dict> This will define ISA pci8086,2916: If your choice is injecting the isa device with the config.plist you need to load virtualsmc.kext and you don't need the isa-applesmc defined in the xml (this is my preferred choice). ----------- Do not use both options. The original macinabox defines in its config.plist device isa injected at PciRoot(0x1)/Pci(0x1F,0x0). This is because machine version is pc-q35-4.2. Remember that if you change the machine version and you use a version >= 5.2 you need to change also the path to: PciRoot(0x0)/Pci(0x1F,0x0) Note PciRoot(0x0). This is because with machine versions >= 5.2 the pciroot is 0x0 instead of 0x1. This was reported earlier: https://forums.unraid.net/topic/84430-hackintosh-tips-to-make-a-bare-metal-macos/?do=findComment&comment=929613 Qemu changelog:
-
Try to enable unsafe interrupts: Settings -> VM -> VFIO allow unsafe interrupts -> Yes Reboot server.
-
mmm for some reason it is not saving the block in the vm, sorry to re-ask again, are you sure you are saving correctly the xml? Paste the xml, save, open again the xml, does the block is there?
-
From your latest attachment it doesn't seem tou pasted and saved the block.
-
much better in your vm log you have this: 2022-05-23T17:00:13.773914Z qemu-system-x86_64: libusb_set_interface_alt_setting: -5 [NOT_FOUND] Searching for that error it seems common when passing through that usb bluetooth device (vendor id 0x8087) and attaching it to a virtual usb controller inside the vm. A reddit user proposed this fix: <qemu:capabilities> <qemu:del capability='usb-host.hostdevice'/> </qemu:capabilities> that seems to work for some users, so it's worth a try! Open your kody vm settings, switch to xml view (advanced), top right, before the closing </domain> tag paste the above, so it looks like: <qemu:capabilities> <qemu:del capability='usb-host.hostdevice'/> </qemu:capabilities> </domain> Boot the vm and report back, if it doesn't work attach new diagnostics please. Note that you could have better luck if you could passthrough the whole usb controller to which your usb bluetooth is attached, instead of passing through the single usb bluetooth device.
-
HP? Latest version of unraid? Can you attach full diagnostics?
-
mmm nope and pfSense - Cerberus has not the new block. Can you retry?