






Zidichy
Members
-
Joined
-
Last visited
Everything posted by Zidichy
-
Thank you, I will send the debug file.
-
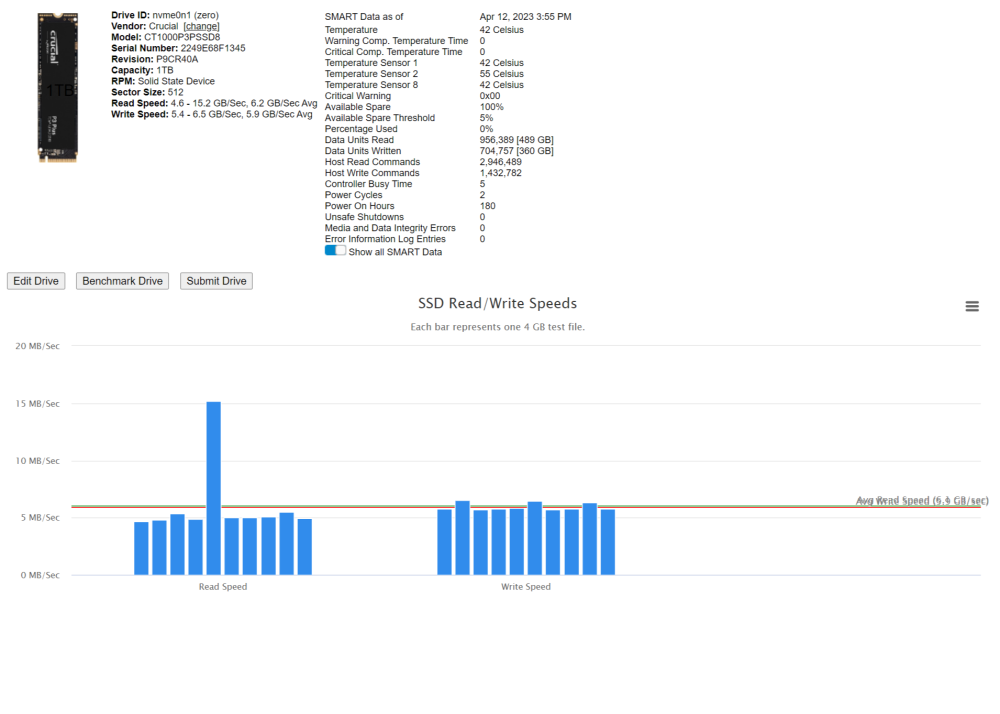
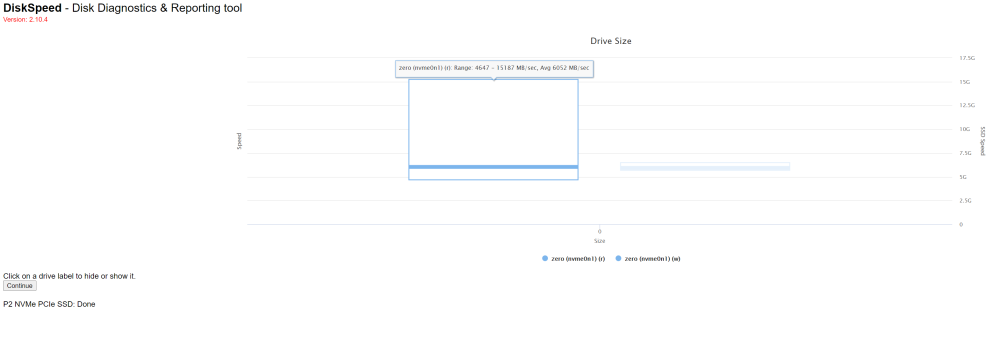
@jbartlett Hi, I just downloaded diskspeed, really nice to be able to benchmark the drives inside unraid, thank you for this container. I was wondering if you could take a look at this. While benchmarking my Crucial nvme, I get this as a end result. As you can see, the " Avg Read / Write Speed " text, is clumbed together, and very hard to see. The MB/Sec on the left doesn't seem correct, isn't it suppose to say GB/Sec for the nvme ? I would also like to request a way to be able to get back the older results again to get to this page.
-
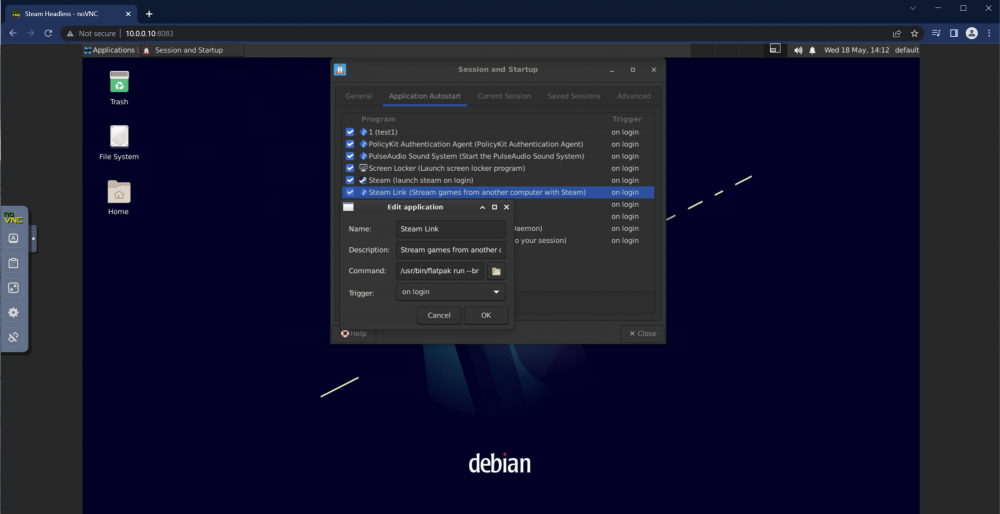
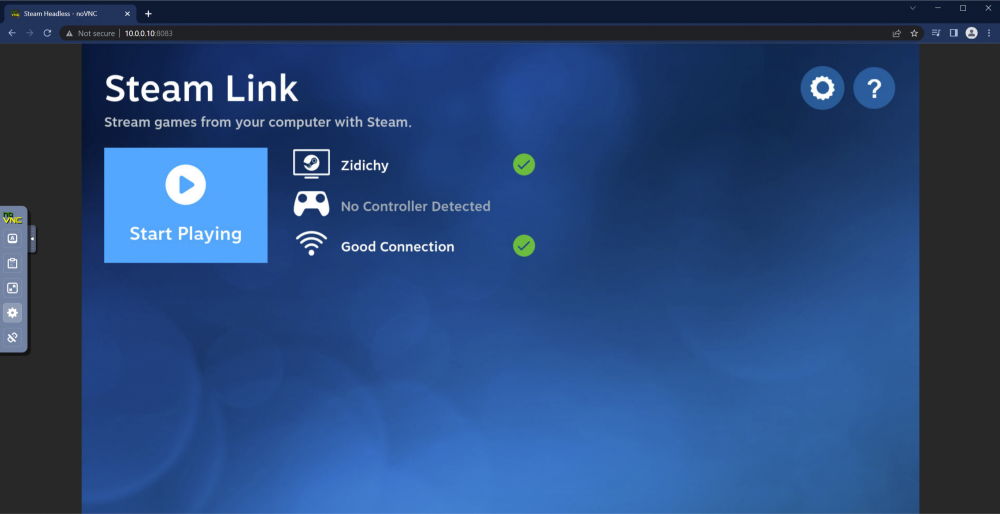
@Josh.5 It is but it's also available for linux So I installed steam link with flatpak https://flatpak.org/setup/Debian Once installed, it looks like this, https://flathub.org/apps/details/com.valvesoftware.SteamLink Then you simply pair your steam account to steam link and you have access to your entire library, basically it looks like steam big picture. To have steam link start up automatically I created a new shortcut in sessions and startup. I then added a name, desc, command, triggered on login, image below But I would prefer to have steam link as a default instead of me modifying this awesome container you have created.
-
Yes it's possible as I've done this. So I modified the container a bit, it now auto starts with steam link instead, and is all you need to do is press " Start Playing " But sadly I still have issues with the sound not getting through, the thing is I have audio working in local ip + port. So something is not correct in my rp config... console says "websocket connection to 'wss://domain.com:32123/' failed And I have high delay, guess 250Mbit/s just dosen't cut it for game streaming. However the delay is mostly because of my upload, 1Gb up should work fine as I've tested in my local environment. But in order to have this working smothly (as it does on the steam link app on ios) I belive a diffrent solution other then noVNC + nvidia gpu, is needed which I am currently using. Would also love to have the "scaling mode" set to "Local Scaling" as default instead of "none" I haven't really updated my container in a long time, since i got most of it working as a want but, @Josh.5 would it be possible to have steam link as a first choice instead of the steam client that was in the container?
-
Thanks for linkace container A75G, the container gave me a bit of trouble though, but i have it fully working now, looking forward to trying it out.
-
Yes I actually have these issues, I wouldn't post here and ask for help if I didn't. The container is working, but it's spitting out errors. The parameter command is already set in the container. I have tried the recommended version and newer versions same issue, works for awhile then starts spitting out errors. Then when I go to my domain I get 503 bad gatway.
-
I totally forgot about this, but better late then never, I was able to restore my data thanks to the info in the link you gave me! Thank you very much @JorgeB
-
However my sound is not getting through. I'm getting sound fully working in linux & windows vm's... So any help getting sound working would be appreciated.
-
Hi thanks for the reply. Absolutely here is the issue. https://github.com/b3rs3rk/gpustat-unraid/issues/36 sorry it took awhile
-
I run swag, and I was able to get this to work. However after about 2hours i got a lot of the same errors as many other in this thread. DATE: ERR error="Unable to reach the origin service. The service may be down or it may not be responding to traffic from cloudflared: EOF" cfRay=yxyxyxyxyyxyxyxy -LHR originService=https://IP:PORT DATE: ERR error="Unable to reach the origin service. The service may be down or it may not be responding to traffic from cloudflared: EOF" cfRay=yxyxyxyxyyxyxyxy -LHR originService=https://IP:PORT DATE: ERR error="Unable to reach the origin service. The service may be down or it may not be responding to traffic from cloudflared: EOF" cfRay=yxyxyxyxyyxyxyxy -LHR originService=https://IP:PORT So i removed the container and redid everything... Same error again, no change... I then moved my app data folder and removed swag container and did a clean install of swag and cloudflared and got it working, I moved my app data folder back and added my custom settings to swag container, and it worked great for another 40min~1hour20min+ then poff same error again... The service may be down or it may not be responding to traffic from cloudflared... Would be awesome to have cloudflared working flawless 100% of the time with Swag. Currently I have cloudflared stopped. I think this container is awesome and, I'll gladly help out as much as I can to get this to work, just let me know what you need me to do.
-
I had this container working fine, and started it today and came to this. Uppdated the container and same issue. Log gives following warning. WARNING: Unable to locate/open X configuration file. Package xorg-server was not found in the pkg-config search path. Perhaps you should add the directory containing `xorg-server.pc' to the PKG_CONFIG_PATH environment variable No package 'xorg-server' found Option "ProbeAllGpus" "False" added to Screen "Screen0". Option "AllowEmptyInitialConfiguration" "True" added to Screen "Screen0". New X configuration file written to '/etc/X11/xorg.conf' DONE Full log here. log.txt Any help is appreciated I got it working again, i removed everything, restarted and redid everything. For some reason was the container linked to my ubuntu vm, not sure how that happen...
-
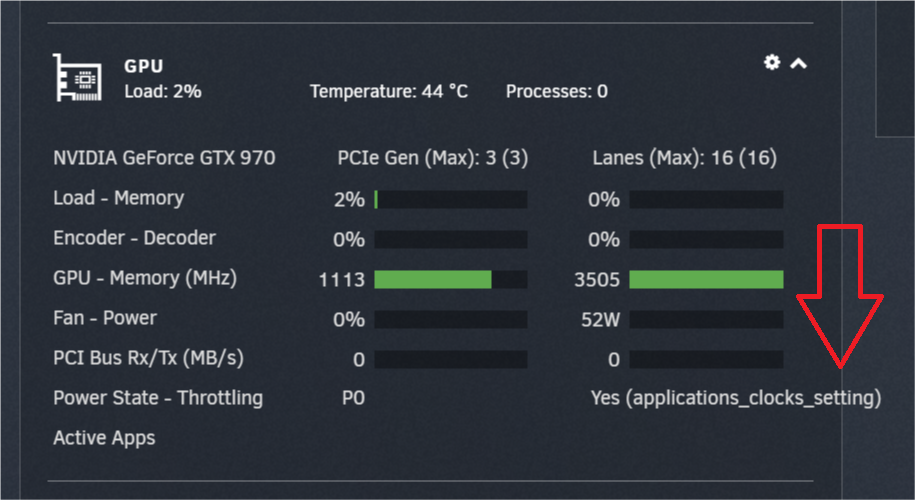
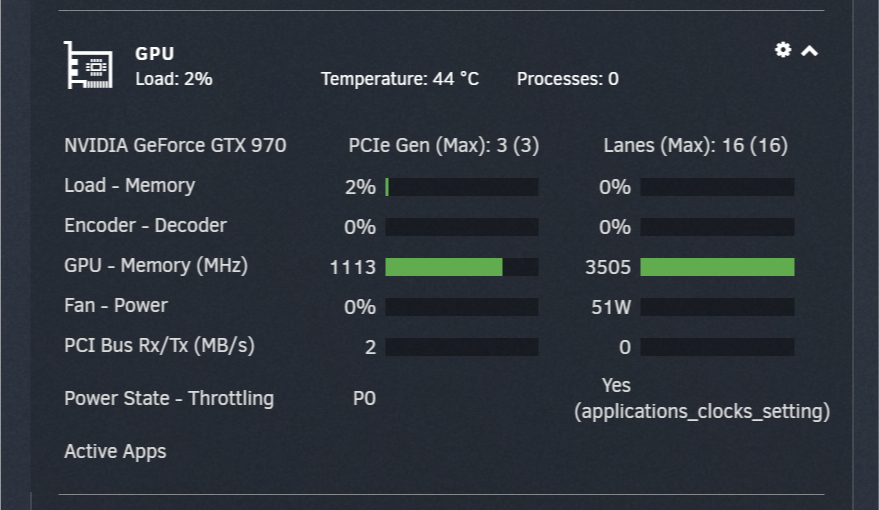
Hi, could this be fixed? Instead of this text "applications_clocks_setting" sitting next to the " Yes" it sits underneath. Something like this, or something similar? I just don't want the text to cross over the line.
-
You're very welcome
-
Don't use notepad++ as sycotix did in his video guide, use the unraid webterminal, won't error out. /mnt/cache/appdata/Authelia# nano configuration.yml
-
Well i couldn't sleep so i worked on my reverse proxy.conf for the invoiceninja container, and i managed to get it working. I also bashed into the invoiceninja container in cd /var/www/app and added following to the .env file Getting a few header errors in my console but it's just header issues & I'm pretty sure I can fix that tomorrow. Access to manifest at... & has been blocked by CORS policy: The 'Access-Control-Allow-Origin' header has a value 'domain' that is not equal to the supplied origin Damn now I want this themed, hope GilbN has plans for theming invoiceninja If anyone wants the reverse proxy.conf i'll add it here. Please note that i use Organizr as my http authentication so you gotta comment that out if this does not work for you. # Invoiceninja Reverse Proxy ## Version 2021/09/13 server { listen 443 ssl http2; listen [::]:443 ssl http2; server_name invoice.*; # Custom Error Pages include /config/nginx/errorpages.conf; # Organizr Authentication include /config/nginx/auth.conf; # Maxmind Geographic IP Block # include /config/nginx/geoblock.conf; # SSL Settings include /config/nginx/ssl.conf; location / { auth_request /auth-0; proxy_pass http://IP:PORT/; proxy_set_header Host $http_host; proxy_set_header X-Real-IP $remote_addr; proxy_set_header X-Forwarded-For $proxy_add_x_forwarded_for; proxy_set_header X-Forwarded-Proto $scheme; proxy_set_header X-Forwarded-Host $http_host; } }

-
If i find a way i will let you know. Usually i would agree with you when it comes to encryption, but not in this case. I am actually using swag, and i get my LE cert's from swag container so i was planing on doing a reverse proxy just like i do for many of my other applications. The way the config is for invoiceninja container will make it very hard to reverse proxy to my domain. Perhaps it would be possible to symlink the cert from swag to invoiceninja, but i'll have to test that later. I was planing on trying v5 when it's released. Update. Scratch that, I got it working with reverse proxy, and symlinks would not have worked on local.
-
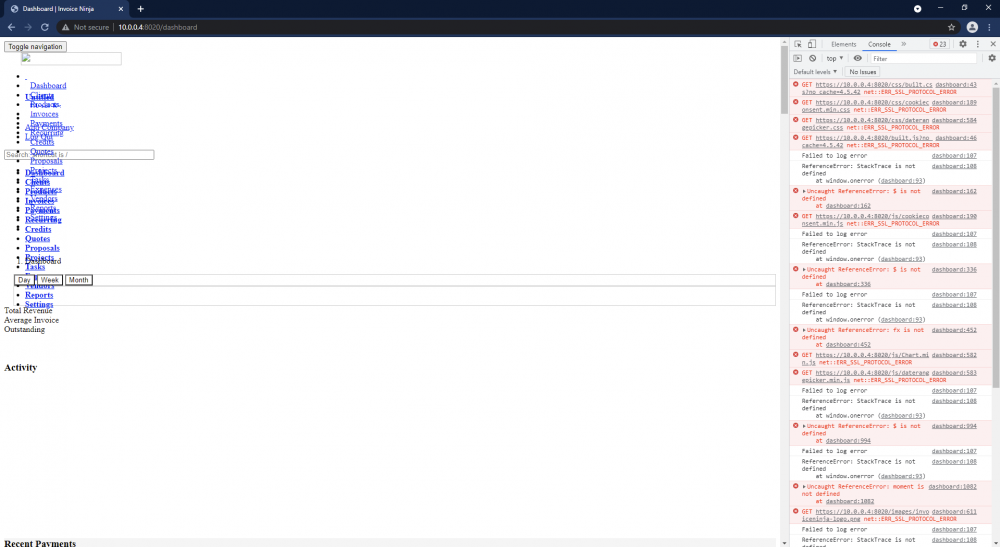
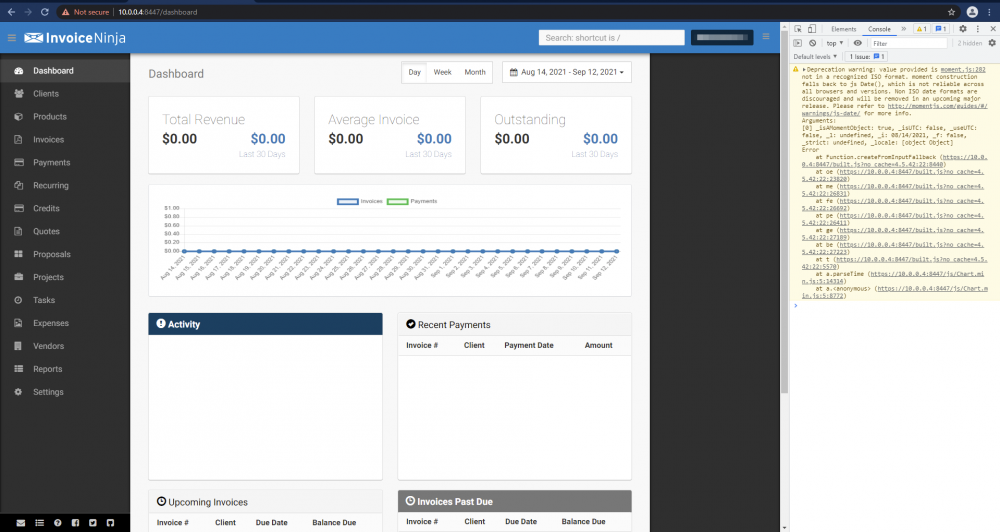
Hi Thanks for the container. I managed to get this container (anojht/invoiceninja) to work but, It won't be possible for me to RP this as long as the container has syntax settings for auto https with self signed cert. Would it be possible to remove the self signed cert in the container & change the config so it works over http? (local http broken) (local https working perfect)
-
After a server restart my cache drive turned into this, not sure if it's possible to save any of the data that was on the disk, any advice / help is appreciated. Unraid Version: 6.8.3 Here is my servers diagnostics eclipse-diagnostics-20210423-0435.zip My cache drive has following Disk Log Information. My cache drive now sits like this. I have never had anything like this happen before. Kinda worried that the data on the drive is gone...


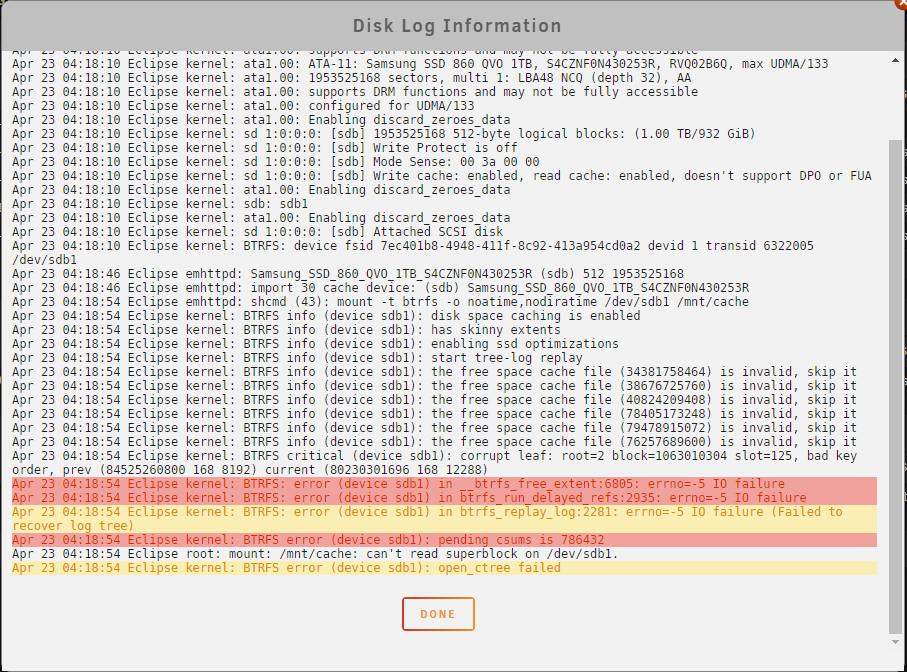
-
Thank you Aceriz
-
Hey guys, i've just made a detailed guide / tutorial for bitwarden_rs with cloudflare & fail2ban integration + admin portal protection Hope this helps someone
-
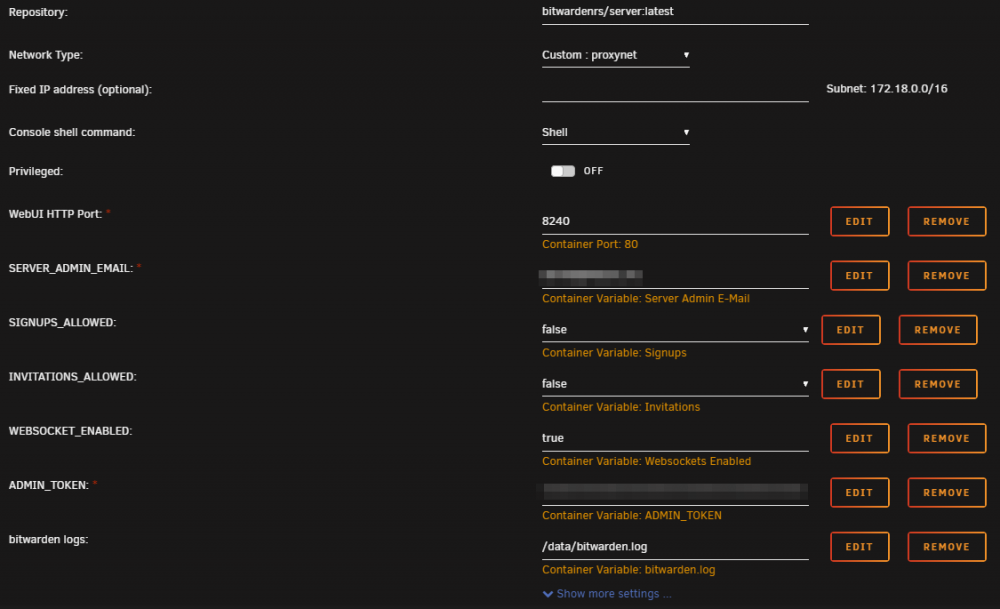
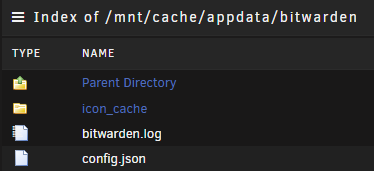
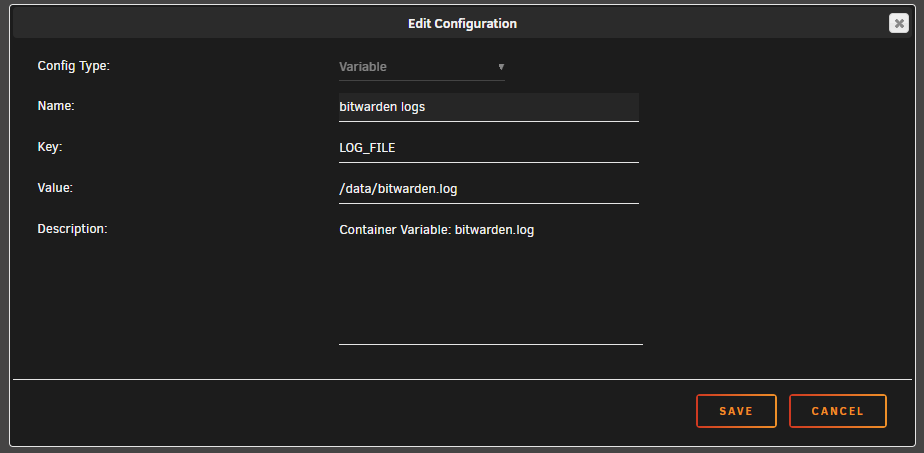
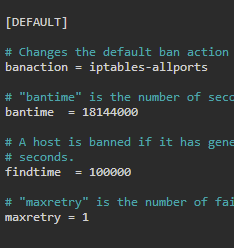
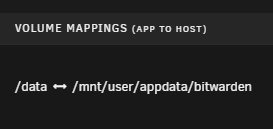
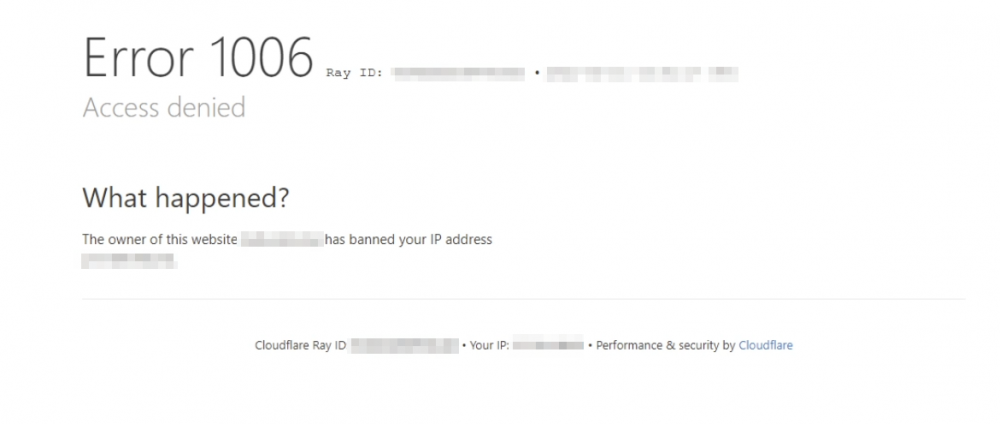
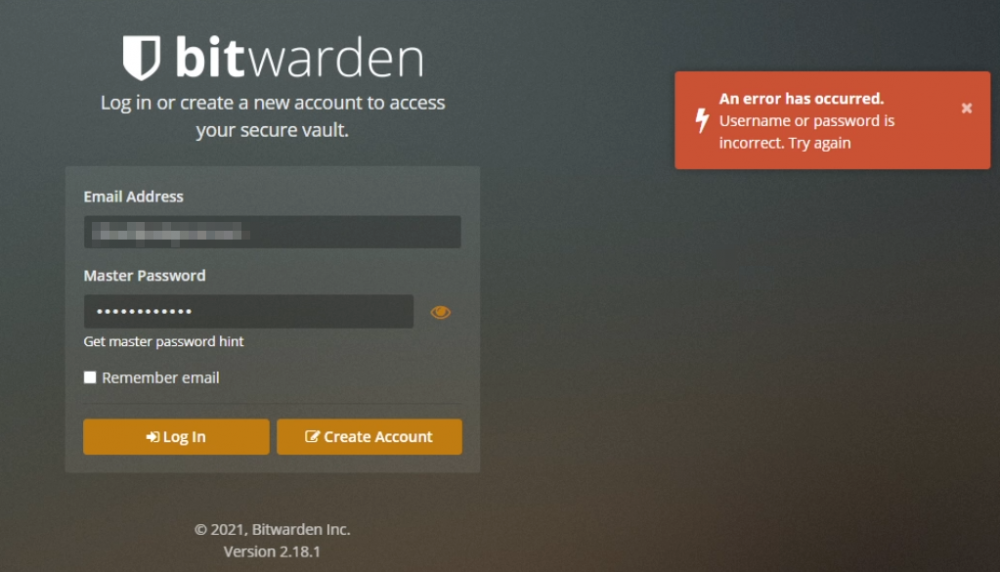
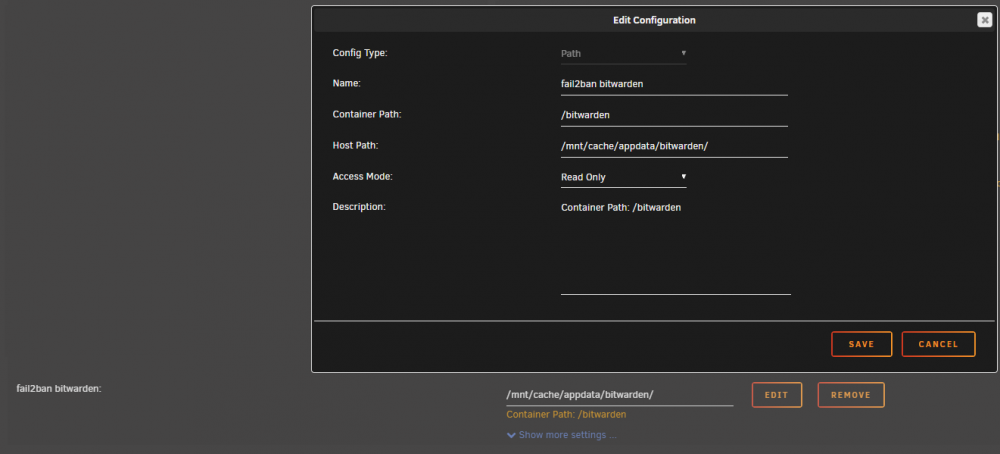
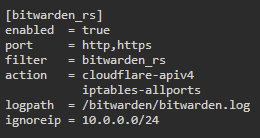
Hi let me first start of by saying, that i would have liked to contribute to unraid community a long time ago, but time has been getting in my way. And now that lastpass has decided to limit their free service, which force many users to change password manager and a lot of people is turning to bitwarden, i thought it would be a good idea for me to share in detail exactly how to protect your selfhosted bitwarden (bitwarden_rs) with fail2ban and connect it to cloudflare IP Access Rules. And also protect /admin 😋 So in this guide we are going to be using the following. 1. Swag from linuxserver/swag 2. Bitwardenrs from bitwardenrs/server 3. GilbN's cloudflare-apiv4 template So let's say some unknown user comes along and tries to login with unauthorized credentials / start hammering the portal 30 seconds ~ 1 min and poff banned via cloudflare. Here is how we set this up. (my bitwardenrs container is named bitwarden) First we go into the settings of bitwardenrs container and we edit the template like I have in the images below. And inside bitwarden logs you add this. The /data/ is equal to /mnt/cache/appdata/bitwarden/ Now it's important to know that the bitwarden.log I have there is not going to be generated untill you add the varaibles in the container, then restart the container. Once this is done the .log will show up in /appdata/bitwarden/ Lets now head into the fail2ban folder that is located inside /mnt/cache/appdata/swag/fail2ban And let's open jail.local (your might be different) but these are the settings i use for my fail2ban if we scroll down below to the very end, and we add our own jail for bitwarden this is what you type. (ofc you add your own IP) Save the jail and cd into, /mnt/cache/appdata/swag/fail2ban/filter.d Create a new file in here called bitwarden_rs.conf In this file you type this, Then save it. Now cd into /mnt/cache/appdata/swag/fail2ban/action.d Create a new file in here called cloudflare-apiv4.conf inside this file you copy the excellent template from GilbN which you can find on his blog here https://technicalramblings.com/blog/cloudflare-fail2ban-integration-with-automated-set_real_ip_from-in-nginx/ Not much needs to be changed in here just at the bottom, cfuser = and cftoken = and you can find those from https://dash.cloudflare.com/profile/api-tokens (Global API Key) Next let's head into Swag container, and add a path like i have done in the image below. And same thing here, the /bitwarden/ is equal to /mnt/cache/appdata/bitwarden/ Next you save and restart swag Following commands should now work. In unraid webui > webterminal type > docker exec -it swag bash > cat bitwarden/bitwarden.log A tail should work also, webterminal > docker exec swag tail -f /bitwarden/bitwarden.log Don't know if you need it but, this is how my volume mapping looks for bitwarden. Yours should look the same. I wanted to add this section. As I have CF Real IP in my nginx.conf located in /mnt/cache/appdata/swag/nginx/nginx.conf ## # CF Real IP ## include /config/nginx/cf_real-ip.conf; real_ip_header X-Forwarded-For; right under my Gzip Settings If i do a simple cat on cf_real-ip.conf it looks like this. :~# cat /mnt/cache/appdata/swag/nginx/cf_real-ip.conf ## Version 2021/02/06 set_real_ip_from 103.21.244.0/22; set_real_ip_from 103.22.200.0/22; set_real_ip_from 103.31.4.0/22; set_real_ip_from 104.16.0.0/12; set_real_ip_from 108.162.192.0/18; set_real_ip_from 131.0.72.0/22; set_real_ip_from 141.101.64.0/18; set_real_ip_from 162.158.0.0/15; set_real_ip_from 172.64.0.0/13; set_real_ip_from 173.245.48.0/20; set_real_ip_from 188.114.96.0/20; set_real_ip_from 190.93.240.0/20; set_real_ip_from 197.234.240.0/22; set_real_ip_from 198.41.128.0/17; set_real_ip_from 2400:cb00::/32; set_real_ip_from 2606:4700::/32; set_real_ip_from 2803:f800::/32; set_real_ip_from 2405:b500::/32; set_real_ip_from 2405:8100::/32; set_real_ip_from 2c0f:f248::/32; set_real_ip_from 2a06:98c0::/29; When it comes to the reverse proxy for some reason i could not get the default template from linuxserver.io to work for me. So i decided to add my reverse proxy and my ssl.conf that i use for bitwarden. (gives A+ on securityheaders.com) It's based on Roxedus template (i think...) ## Version 2020/12/09 server { listen 443 ssl http2; listen [::]:443 ssl http2; server_name bw.FQDN.TLD; # TLS settings include /config/nginx/bitssl.conf; # Organizr Authentication include /config/nginx/auth.conf; # Custom Error Pages include /config/nginx/errorpages.conf; # Maxmind Geographic IP Block # include /config/nginx/geoblock.conf; client_max_body_size 128M; location /{ proxy_pass http://IP:PORT; proxy_redirect off; proxy_set_header Host $http_host; proxy_set_header X-Real-IP $remote_addr; proxy_set_header X-Forwarded-For $proxy_add_x_forwarded_for; proxy_set_header X-Forwarded-Proto $scheme; proxy_set_header X-Forwarded-Protocol $scheme; proxy_set_header X-Url-Scheme $scheme; proxy_hide_header X-Frame-Options; proxy_hide_header "x-webkit-csp"; proxy_hide_header "content-security-policy"; proxy_set_header Accept-Encoding ""; sub_filter '</head>' '<link rel="stylesheet" type="text/css" href="https://gilbn.github.io/theme.park/CSS/themes/bitwarden/plex.css"> </head>'; sub_filter_once on; } location /admin { auth_request /auth-0; include /config/nginx/proxy.conf; resolver 127.0.0.11 valid=30s; set $upstream_app bitwarden; set $upstream_port 8242; set $upstream_proto http; proxy_pass http://IP:PORT; } location /notifications/hub/negotiate { proxy_pass http://IP:PORT; } location /notifications/hub { proxy_pass http://IP:PORT; proxy_set_header Upgrade $http_upgrade; proxy_set_header Connection "upgrade"; } } Error pages can be found from here https://docs.organizr.app/books/setup-features/page/custom-error-pages Here is my bitssl.conf ## Version 2019/06/19 - Changelog: https://github.com/linuxserver/docker-letsencrypt/commits/master/root/defaults/ssl.conf # session settings ssl_session_timeout 1d; ssl_session_cache shared:SSL:50m; ssl_session_tickets off; # Diffie-Hellman parameter for DHE cipher suites ssl_dhparam /config/nginx/dhparams.pem; # ssl certs ssl_certificate /config/keys/letsencrypt/fullchain.pem; ssl_certificate_key /config/keys/letsencrypt/privkey.pem; # protocols ssl_protocols TLSv1.2 TLSv1.3; ssl_prefer_server_ciphers on; ssl_ciphers 'ECDHE-ECDSA-AES256-GCM-SHA384:ECDHE-RSA-AES256-GCM-SHA384:ECDHE-ECDSA-CHACHA20-POLY1305:ECDHE-RSA-CHACHA20-POLY1305:ECDHE-ECDSA-AES128-GCM-SHA256:ECDHE-RSA-AES128-GCM-SHA256:ECDHE-ECDSA-AES256-SHA384:ECDHE-RSA-AES256-SHA384:ECDHE-ECDSA-AES128-SHA256:ECDHE-RSA-AES128-SHA256'; # OCSP Stapling ssl_stapling on; ssl_stapling_verify on; resolver 127.0.0.11 valid=30s; # Docker DNS Server ## Header security settings to reach A+ Grade on, htbridge.com/websec | securityheaders.io | ssllabs.com add_header Content-Security-Policy "form-action 'self' https://xy.FQDN.TLD https://FQDN.TLD; base-uri 'self'; upgrade-insecure-requests; block-all-mixed-content; frame-ancestors https://xy.FQDN.TLD https://yx.FQDN.TLD https://FQDN.TLD"; add_header "Content-Security-Policy-Report-Only" "report-uri https://xy.report-uri.com/r/d/csp/reportOnly"; add_header Expect-CT max-age=604800,enforce,report-uri="https://xy.report-uri.com/r/d/ct/reportOnly"; add_header Expect-Staple "max-age=31536000; includeSubDomains; preload"; add_header Referrer-Policy "no-referrer-when-downgrade" always; add_header Strict-Transport-Security "max-age=63072000; includeSubDomains; preload" always; add_header X-Content-Type-Options "nosniff" always; add_header X-Frame-Options "ALLOW-FROM https://yx.FQDN.TLD"; add_header X-Robots-Tag none; ##/SSL SETTINGS And since i'm using organizr as my http authentication i'll include that .conf too Now if the bitwarden.conf fails just # the auth out or ask here in comments and i'll do my best to help out # Version 2020/12/09 # ###################### # Organizr Auth v2 # ###################### # auth_request /auth-0; #=Admin # auth_request /auth-1; #=Co-Admin # auth_request /auth-2; #=Super User # auth_request /auth-3; #=Power User # auth_request /auth-4; #=User # auth_request /auth-8; # logged in # auth_request /auth-9; #=Guest location ~ /auth-([0-9]+) { internal; include /config/nginx/proxy.conf; resolver 127.0.0.11 valid=30s; set $upstream_organizr organizrv2; proxy_pass http://IP:PORT/api/v2/auth?group=$1; proxy_set_header Content-Length ""; } After this restart swag. And that's it 🙂 Everything should now be working as intended. This guide was written & created by me Zidichy on February 21, 2021. ~ Fin

-
Happy Birthday Unraid Love the software, fast, stable, secure. Perfect as a server OS! 😊






