





t33j4y
Members
-
Joined
-
Last visited
Everything posted by t33j4y
-
After reading the link, I upgraded server #2 to 7.3.0-rc.2 and the behavior is now on par with server #1 Thanks!
-
I'm running two Unraid servers, both of which I just upgraded to 7.2.5. Server #1 (plain media server, no dockers, onboard 1G NIC, Xeon E3-1225V6, 32GB) GUI is as snappy as it was before upgrading Server #2 (personal file server, 9 dockers, 10G card, AMD Ryzen 5 PRO 4650G, 64GB) GUI is slow - takes up to 5 seconds to switch between tabs. Both are accessed on local IP (no redirect) I've tried stopping all dockers but to no avail. The only error the log shows is webGUI: error: /plugins/dynamix.my.servers/include/unraid-api.php - wrong csrf_token but I don't have the Unraid Connect app installed. I'm at a loss as to where to look for issues, so any pointers would be greatly appreciated! Thanks in advance.
-
While looking through my Appdata Backup files, I found that xml files for dockers that I have long since uninstalled are still being backed up. There are no folders in my Appdata for said dockers, so I am wondering where these residuals are coming from. Can anyone shed a light on this? There is no sign of residuals when running Cleanup Appdata or Fix Common Errors Thanks in advance! EDIT: Found it! Turns out that templates (XML files) are still stored in /boot/config/plugins/dockerMan/templates-user/
-
Any chance that Gigabyte motherboards will get some love? Running a MC12-LE0 and would really like a better way to control fan speed than the awful Fan Profiles in the BMC :-(
-
Just did this. The flexibility and robustness of Unraid never ceases to amaze me :-)
-
So, I did this and it worked. However, I expanded the step-by-step instructions to hopefully help others looking for this information. I guess for those who do a lot of server maintenance, things are obvious but it kind of threw me for a bit with the old user script apparently not working and the docs.unraid.net article not having a revision timestamp (so I wasn't able to verify if it was up to date) Also, I removed the unmount part as it didn't make sense, since the disks weren't mounted after removing the file system. So, here goes: To use the parity-preserve method Start the array in maintenance mode Click on the disk you want to remove, and then click Erase. This erases the file system from the device while maintaining parity, then stop the array. Start the array again and record array assignments Start the array in Normal mode. The disk won't mount, but the remaining disks are online. Record array assignments, especially the parity drive (take a screenshot and save it) Optionally enable 'Reconstruct Write' for faster zeroing (but only if all drives are healthy): Go to in Settings → Disk Settings (look for 'Tunable (md_write_method)' and change to 'Reconstruct Write' Zero out the disk using the dd command from a terminal window: Open a terminal window on the Unraid server Tip: If opening terminal from Unraid GUI, as the first thing, type 'tmux' to persist the terminal window as the dd command will abort if the terminal is closed - you can later connect to the same terminal window by typing 'tmux attach') Then enter the appropriate command: For Unraid 6.12 or later: dd bs=1M if=/dev/zero of=/dev/mdXp1 status=progress For Unraid 6.11 or earlier: dd bs=1M if=/dev/zero of=/dev/mdX status=progress (Replace X with the specific number of the data disk you're removing. If in doubt, use 'lsblk' command in terminal window to identify disks and number. The 'mdXp1' overview will be at the end of the command output) Once the clearing is complete, close the terminal windows and stop the array (from the Unraid GUI) Reset the array configuration, retaining all current assignments: Go to 'Tools' and select the 'New Config' function. Under 'Preserve current assignments', select 'All' Unassign the disk you want to remove Go back to 'Main' windows and unassign the disk you want to remove Remember to double-check all assignments - especially the parity drive (this is where the screenshot of your assignments comes in handy) Scroll down to the section where you can start the array Check the box indicating "Parity is already valid." Start the array to finish the removal. Finishing up If you enabled 'Reconstruct Write), remember to set it back to 'Auto' Optionally run a correcting parity check afterward to ensure parity integrity. Shut down your server, physcially remove the disk and restart the server. Let me know if this is helpful, anything should be changed or optimized.
-
Seems the link is broken - assuming it is now this: Removing disks from array | Unraid Docs Is the "Preserving parity" option still valid for 7.2.3 ?
-
One of my servers is on 7.0.1 - should I shoot for 7.1.3 directly or go 7.1.2 -> 7.1.3?
-
Hi, yes this is the mobo I am using. While I had a number of issues as this thread shows, I don't remember any issues regarding booting. Assuming you have ensured that you have latest BIOS - have you tried - disabling secure boot? - fiddling around with BIOS boot modes (CSM or UEFI) ? - booting into GUI mode (you'll need a keyboard, mouse and monitor connected)? - another USB stick
-
I think it would benefit resolution if you posted your hardware specs - there might be others with the same gear (specifically mobo) who can post their experience. If someone else on 6.12.14 with the same mobo is getting more like your 11W @ idle, you will already have narrowed it in quite a bit to be something local to you. On the other hand, if others with same mobo - or chipset - report the same ~24W, you will be know where to look more.
-
Wanted to wrap this up, so here goes. 1. I never managed to get the script for method 2 to complete. So while it seemed a good way, either I was doing something wrong that made the script complete prematurely and without any errors in log or it is not mature enough for general use? 2. After considering that I had enough backup and safety net, I ended up doing what I stated in option B (see quote below) and then weathered the parity rebuild time and the (slightly) higher exposure to risk. Everything went well 🙂
-
Yes, everything was done within unraid.
-
@bmartino1 Before the clear, the drive had approx 500GB on it, which was written over the last couple of months after a preclear. Data was moved away, the drive was reformatted (stop array, swap to XFS encrypted, start array and wait for format. Then the same, swapping back to XFS) Then created the 'clear-me' folder and that was it.
-
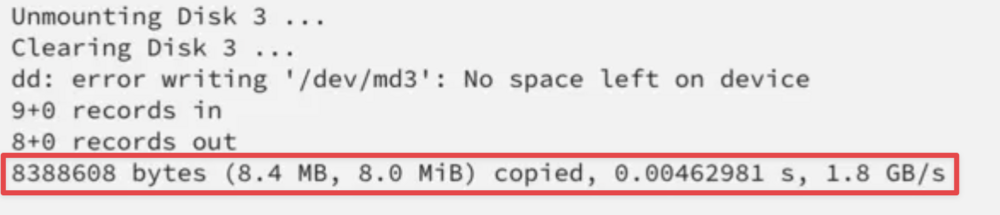
Unsure what you mean by "I wnat to know how much space was written to it." - if you mean as a result of running the script: I'm not concerned per se, I just want to make the right choice to proceed and not botch things and make more work for myself than necessary :-)
-
Hmm... so do I: A. Try running the script again? B. Ditch method 2 and go to method 1 (which means rebuild parity) and jump in at step 3? Make sure that the drive or drives you are removing have been removed from any inclusions or exclusions for all shares, including in the global share settings. Shares should be changed from the default of "All" to "Include". This include list should contain only the drives that will be retained. Make sure you have a copy of your array assignments, especially the parity drive. You may need this list if the "Retain current configuration" option doesn't work correctly Stop the array (if it is started) Go to Tools then New Config Click on the Retain current configuration box (says None at first), click on the box for All, then click on close Click on the box for Yes I want to do this, then click Apply then Done Return to the Main page, and check all assignments. If any are missing, correct them. Unassign the drive(s) you are removing. Double check all of the assignments, especially the parity drive(s)! Do not click the check box for Parity is already valid; make sure it is NOT checked; parity is not valid now and won't be until the parity build completes Start the array to commit the changes; system is usable now, but it will take a long time rebuilding parity
-
Thanks - I have attached diagnostics - hopefully that can reveal something. hesiod-diagnostics-20241118-1553.zip
-
Ok 🙂 So where does that leave me in terms of deciding whether zeroing of my 3TB was either extremely fast, still ongoing or something third?
-
I'd assume that zeroing out a 3TB drive takes the same time, regardless of what level of utilization it was before (even zeros get zeroed)? Everything needs to be forcefully flipped to a zero, right?
-
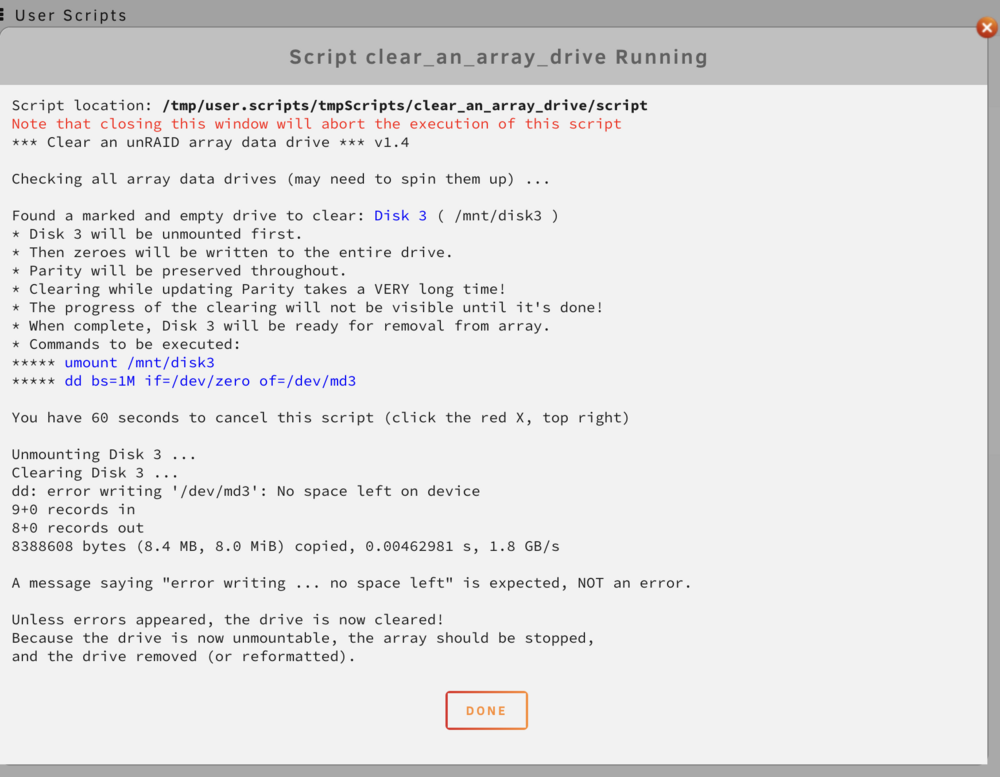
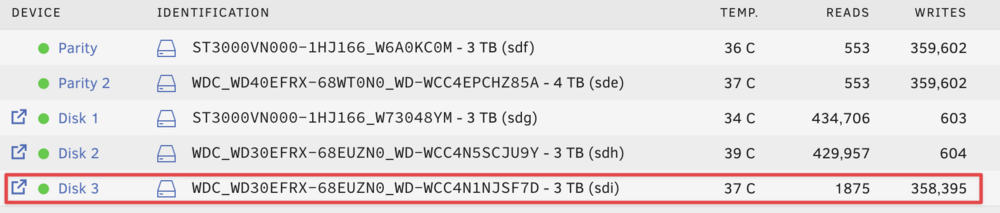
I ran the 'clear an array drive' but I am really unsure if it has completed as I read it would take a long time to zero out the drive - and iif it has indeed completed, it did not take very long time. I did reformat the drive first. This is what is says right now: Looking at the main screen, the write count is stopped at 358.395 and is just sitting there. Unsure whether it's still running as the instructions state: "While the script is running, the Main screen may show invalid numbers for the drive, ignore them." So am I seeing invalid numbers or has it really completed? Do I click done, stop the array and proceed as per the instructions to do New Config and so on?
-
Thank you very much for your detailed and good comments - they are much appreciated and will help tighten up the process! I will add your suggestions to my playbook and get ready for digging in this weekend!
-
Sorry for the long description but I wanted to make sure that I provided a detailed breakdown 🙂 -- I've set up a dedicated unraid server (Starter license, 6.12.13) to serve files, photos and other important data to the household. Disk layout is dual parity (3+4TB drive), three (xfs) data drives (3TB each) and one SSD (250GB) cache drive (btrfs) I've figured out that I can rearrange data so I need only two data drives. That brings me down to 5 out of 6 disks allocated. I'd like to use the now free slot to add an extra SSD to the cache pool - and go from 1x250GB to 2x500GB in RAID1, to get the added robustness for apps as well. I feel pretty prepared but have a few questions I'd like some input on. I've added them in my work step descriptions in red. All of this would involve a Shrink array part and an Expand cache pool part, for which I have detailed the as I see them. Shrink array Consolidate data on two drives (I'm thinking of using unBalance for this) Shrink array following either Method 1: "Remove Drives Then Rebuild Parity" (https://docs.unraid.net/legacy/FAQ/shrink-array/#the-remove-drives-then-rebuild-parity-method) which violates parity that must rebuild; or Method 2: "Clear Drive Then Remove Drive" method (https://docs.unraid.net/legacy/FAQ/shrink-array/#the-clear-drive-then-remove-drive-method) which maintains parity but has notes about being not fully tested - and has several more steps Questions: Is this the best way to go about shrinking the array? Which is the better method of the two listed? Should I favour Method 2 (maintaining parity) over Method 1 (lower complexity, but rebuild of parity) Expand cache pool Add 500GB SSD (info from FAQ for unRAID v6) Shut down server, add one 500GB SSD Start server, add 500GB SSD to cache pool Start array, wait for pool to balance Replace 250GB SSD with 500GB SSD (info from FAQ for unRAID v6) Shut down server, replace 250GB SSD with 500GB SSD Start server, replace missing entry in cache pool with 500GB SSD Start array, wait for pool to balance May need to stop/start array as new device is larger Questions: Is this correct, overly complicated or is there something I've forgotten about? Preparation already made Both 500GB SSDs have been precleared Using the AppData Backup plugin, I have a backup of my flash drive to a backup folder on the array a backup of my dockers and settings to a backup folder on the array I have full backup of all my data shares on a cloud drive I have a full backup of all array shares (including aforementioned backup folder) on an external USB disk Thanks in advance for thoughts, comments and suggestions.
-
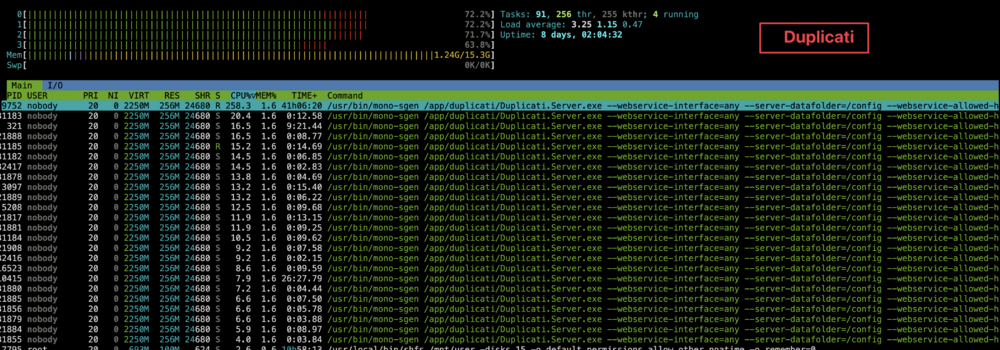
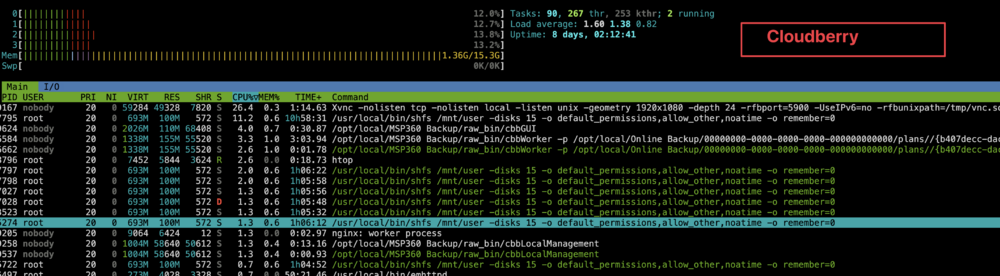
@Kilrah So, I set up two backup scenarios of the same folder with AES256 encryption - one using Duplicati and one using Cloudberry (now MSP360) and monitored in htop. Both have a bucket on Backblaze B2 as the destination. There's a definite difference in CPU usage.
-
Haven't thought of that - will check!
-
I'm running Duplicati in a docker and wondering if it takes advantage of the AES-NI instruction set in the i5-6500T powering my unraid server. When doing encrypted backups using the AES256 (built in) option, CPU spikes a lot on all cores, leading me to believe that AES-NI is not utilized. If I run grep -o aes /proc/cpuinfo I get a response of aes aes aes aes indicating that all four cores support AES-NI lsmod | grep aes however returns aesni_intel 393216 0 crypto_simd 16384 1 aesni_intel leading me to believe that it is not activated ('0') Anyone have any insights?
-
Seems like this an annual fee?




