John_M
Members
-
Joined
-
Last visited
Everything posted by John_M
-
Thanks for that. The document suggests, as an alternative to disabling IOMMU, and gives instructions on how to do it. Maybe someone with affected hardware and who is prepared to take a risk could give that a try?
-
Watching from the sideline because my Gen8 still has its original non VTd-capable Celeron processor, but wouldn't a better solution be to disable VT-d automatically via syslinux.cfg when the problematic configuration is detected instead of disabling the NIC? It would still take some users by surprise, of course, but at least they'd still be able to connect to their servers.
-
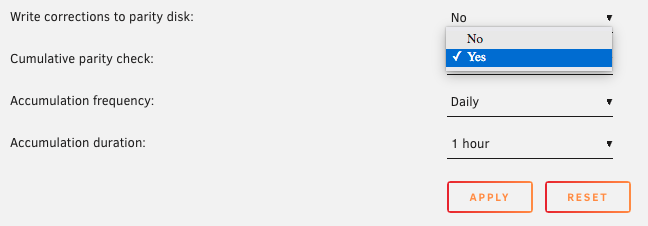
Unraid 6.10 has built-in support for splitting the scheduled parity check into multiple shorter periods. See Settings -> Scheduler
-
It's Disk Utility, in the /Applications/Utilities folder.
-
You're trying to rebuild Disk 2 but your Parity disk is disabled (see the red cross next to it in your screenshot) so the array can't start because there are too many missing disks. Do you still have your old Disk 2? Is it completely dead? Unfortunately, your new Disk 2 isn't particularly healthy, either. Do you have backups of your important data?
-
Your containers are working in host mode. TCP port mappings are ignored in host mode. You need to ensure they get different IP addresses, which currently isn't the case.
-
Every additional core you add (even if they are not pinned, and therefore potentially shared with other processes) will bring a performance increase to your VM if the workload can make use of the extra cores. If the workload can't use the extra cores then you'll probably see a slight increase in latency as the cores on one chiplet can't access the L3 cache on the other chiplet. It's a question of balance. Yes, by dedicating an entire chiplet to your VM you have something similar to a 5800X running bare metal. It isn't quite the same because the base and boost core frequencies are different between the 5800X and the 5950X due to the power budget per core being less for the latter, which is only partly offset by the higher binned silicon, and because the resources of the I/O chiplet are shared between the VM and the host.
-
Post your diagnostics.
-
Is the affected card the one that the server uses by default for its own output - the BIOS screen and Unraid boot menu, for example? I don't see the 10700K's iGPU listed in your diagnostics - is it disabled? You could set it as the primary GPU in the BIOS, which should avoid the problem of the GT 710 not detaching.
-
I'm not sure why you chose the isolate those four (virtual) cores. The 3700X has eight actual cores, each of which can run two threads, giving 16 virtual cores. For each core you want to dedicate to a VM you need to specify the two virtual cores for maximum efficiency. The GUI helps you with this. For the 3700X you'll see that physical core 0 is represented by virtual cores 0 (labelled "CPU" in the GUI) and 8 (labelled "HT" in the GUI), physical core 1 is represented by virtual cores 1 and 9, and so on, finishing with physical core 7 being represended by virtual cores 7 and 15. So isolating virtual cores 2, 3, 6 and 7 isn't optimal. If you want to isolate two physical cores 2 and 3, you should isolate virtual cores 2, 3, 10 and 11. If you want to isolate four physical cores 2, 3, 6 and 7, you should isolate virtual cores 2, 3, 6, 7, 10, 11, 14 and 15. It is constructed differently, with two core chiplets instead of one but the same principle applies. The 5950X has 16 actual cores, each of which can run two threads, giving 32 virtual cores. Again the GUI helps you when it comes to allocating the pairs of virtual cores. For the 5950X you'll see that physical core 0 is represented by virtual cores 0 (labelled "CPU" in the GUI) and 16 (labelled "HT" in the GUI), physical core 1 is represented by virtual cores 1 and 17, and so on, finishing with physical core 15 being represended by virtual cores 15 and 31. That is not optimal. If you want to isolate four actual cores you need to specify eight virtual cores, such as 2, 3, 4, 5, 18, 19, 20 and 21. If you want to isolate eight actual cores you need to spacify 16 virtual cores and in the case of the 5950X you will get a little bit of extra performance by specifying all the cores on the same chiplet, like this: 8, 9, 10, 11, 12, 13, 14, 15, 24, 25, 26, 27, 28, 29, 30 and 31. The following tables might help 3700X: Physical Virtual Cores Core "CPU" "HT" 0 0 8 1 1 9 2 2 10 3 3 11 4 4 12 5 5 13 6 6 14 7 7 15 5850X: Physical Virtual Cores Core "CPU" "HT" 0 0 16 1 1 17 2 2 18 3 3 19 4 4 20 5 5 21 6 6 22 7 7 23 8 8 24 9 9 25 10 10 26 11 11 27 12 12 28 13 13 29 14 14 30 15 15 31
-
That file contains rules that determine which of several NICs is used as eth0, which as eth1, etc. You can change the rules in the GUI and doing so creates that file. If you want to reset networking fully, deleting both files is the thing to do, as you discovered. Yes, that's a SuperIO chip with temperature/voltage/fan speed sensors. Your old motherboard probably had one and your new motherboard probably has a different chip. It's associated with the Dynamix System Temperature plugin (and possibly also the Auto Fan Speed plugin, though I don't use that one). So you'll need to reconfigure the plugin - unload the it87 module and scan for sensors. It has nothing to do with networking.
-
The only relevant file that I can see is the /boot/config/ident.cfg file. That's where the NTP configuration is stored on the USB flash device. You could try deleting (or renaming) yours and replacing it with the one from the fresh config that you know to work. Maybe the file is corrupt in some way - an illegal character, possibly.
-
Don't do both. Re-enable the Global C States. See above. The kernel panic is not caused by the CPU failing to wake up from the C6 state. If that happens the sever just freezes, but the Power Supply Idle Control setting fixes that. As mentioned above (twice), the panic is likely related to docker networking.
-
It's the Power Supply Idle Control setting. You'll find it under the extensive AMD CBS section of the BIOS. The default setting is Low Current Idle (or maybe Auto). Change it to Typical Currrent Idle and leave the C states options at their default values. However, this is only effective against freezes when idle, not re-boots.
-
What's the device in question? Other people might have them too so would be useful to know, in case it does have buggy firmware.
-
Pending sectors are ones that have failed a read operation and are waiting to be processed (hence, "pending"). Even if subsequent reads are successful, their pending status can only be cleared by a write operation, when the new content is either successfully written to the existing sectors (decrementing the pending sector count) or reallocated to spare sectors (decrementing the pending sector count and incrementing the reallocated sector count). A non-correcting parity check (there's no such thing as a non-correcting parity sync) is, by definition, read-only so there's no opportunity to deal with them there. If Unraid detects a read error it will reconstruct the missing data from parity and the remaining data disks and attempt to write it back to the disk that showed the error. If Unraid detects a write error the offending disk is disabled and its contents emulated, using parity and the remaining data disks. Pending sectors may or may not be readable and that uncertainty is a problem. As mentioned, the ability to emulate disabled disks relies on the ability to read all the remaining disks so it's never a good thing to have a disk with pending sectors in your array. I suspect you disturbed something while cleaning out the dust. If you haven't already rebooted, your diagnostics will shed some light. I think the result of the extended SMART test is reassuring but I would want to replace first one of the disks with a spare and then the other, if only to get rid of the pending sectors. After replacing the first disk I'd run a utility that writes then reads every sector, such as badblocks or preclear, and if the disk turns out to be good, I'd use it as the replacement for the second disk. Then run the same utility on the second disk. A few reallocated sectors is not necessarily a bad thing, as long as the number doesn't keep increasing.
-
It's entirely possible to build your own 10Gbe switch, and with excellent performance. This man did it in 2016, when the economics made more sense. Now, they don't. His solution would be much more expensive than an off-the-shelf switch at today's prices. There's even an operating system that's optimised for this kind of work - VyOS. It wouldn't be feasible to use an Unraid server for this purpose though.
-
That's ok! I'm really curious as to why this isn't working. There's little to configure and it doesn't use any specific hardware. It should just work! All your configuration settings are stored in the config directory on the USB flash drive. Once you shut down and unplug it they are saved until you plug it back in and boot the server. You can use a trial licence on a different USB stick to do some testing of ntp and if you don't try to assign any of your disks they will simply be ignored.
-
Are you still getting the "unable to create socket" error? If so, is something else using port 123? A docker container, perhaps? You might have a bad port mapping.
-
That's a very unusual and somewhat humorous error message. Did you try a web search? It crops up several times over nearly 20 years and appears to be related to spurious PCIe interrupts. More information would be needed to investigate further. You could try unplugging all cards and seeing if it goes away, then re-installing them until you find the problem one.
-
Yes, the maximum* capacity of any user share is the sum of the capacities of the included disks. The more you include, the greater the capacity. *Note: It's the maximum because very often a given disk is included in more than one user share, though you're free to configure that however you wish.
-
SMB is a network protocol. It has no knowledge or preferences about the underlying file system.
-
Here's mine for comparison: root@Mandaue:~# cat /etc/ntp.conf # Sample /etc/ntp.conf: Configuration file for ntpd. # # Undisciplined Local Clock. This is a fake driver intended for backup # and when no outside source of synchronized time is available. The # default stratum is usually 3, but in this case we elect to use stratum # 0. Since the server line does not have the prefer keyword, this driver # is never used for synchronization, unless no other other # synchronization source is available. In case the local host is # controlled by some external source, such as an external oscillator or # another protocol, the prefer keyword would cause the local host to # disregard all other synchronization sources, unless the kernel # modifications are in use and declare an unsynchronized condition. # server 127.127.1.0 # local clock fudge 127.127.1.0 stratum 10 # # NTP server (list one or more) to synchronize with: #server 0.pool.ntp.org iburst #server 1.pool.ntp.org iburst #server 2.pool.ntp.org iburst #server 3.pool.ntp.org iburst # # Full path of a directory where statistics files should be created # statsdir /var/lib/ntp/stats # # Location of an alternate log file to be used instead of the default system syslog(3) facility # #logfile /var/log/ntp # # Drift file. Put this in a directory which the daemon can write to. # No symbolic links allowed, either, since the daemon updates the file # by creating a temporary in the same directory and then rename()'ing # it to the file. # driftfile /var/lib/ntp/drift # # Location of PID file # pidfile /var/run/ntpd.pid # # Uncomment to use a multicast NTP server on the local subnet: #multicastclient 224.0.1.1 # listen on default 224.0.1.1 # Set an optional compensation for broadcast packet delay: #broadcastdelay 0.008 # # Keys file. If you want to diddle your server at run time, make a # keys file (mode 640 owned by root:ntp) and define the key number to # be used for making requests. # PLEASE DO NOT USE THE DEFAULT VALUES HERE. Pick your own, or remote # systems might be able to reset your clock at will. # #keysdir /etc #keys /etc/ntp.keys #trustedkey 65535 #requestkey 65535 #controlkey 65535 # # Don't serve time or stats to anyone else by default (more secure) restrict default limited kod nomodify notrap nopeer noquery restrict -6 default limited kod nomodify notrap nopeer noquery # # Use these lines instead if you do want to serve time and stats to # other machines on the network: #restrict default limited kod nomodify notrap nopeer #restrict -6 default limited kod nomodify notrap nopeer # # Trust ourselves. :-) restrict 127.0.0.1 restrict ::1 # Generated entries follow: interface ignore wildcard interface listen br0 server 0.uk.pool.ntp.org iburst server 1.uk.pool.ntp.org iburst server 2.uk.pool.ntp.org iburst server 3.uk.pool.ntp.org iburst I don't notice any significant difference, but I haven't compared the line by line. You could try booting from another USB stick with a temporary licence and default configuration, as I suggested earlier. Don't try to assign any disks or start the array. Just boot, set up your timezone, use the default servers and leave it for a while to see if it syncs the time. That would at least indicate if you have a configuration problem. It would only cost you a USB stick and a few hours to try it and everything would be back as it was when you boot from your original USB.
-
Unraid works best if you have a parity disk. It makes replacing data disks much easier and offers some protection against disk failure. If you don't have a parity disk you can add one but it can not be smaller than your largest data disk. So, if your largest data disk is 4 TB, you can add a parity disk of 4 TB or more. You don't need to try to find a 25 TB disk! If you want to replace a data disk with a bigger one and have a parity disk, the new disk can not be bigger than the parity disk. So, choose your parity disk carefully. If you want to replace a data disk with a bigger one but have no parity disk, you must copy all the files from the old disk to the new one manually. You can use the command line or mc (Midnight Commander, which is built in to Unraid) or a docker container, such as Krusader to access the disk instead of the share. The best solution would be to add a parity disk first. Then replace your data disk.
-
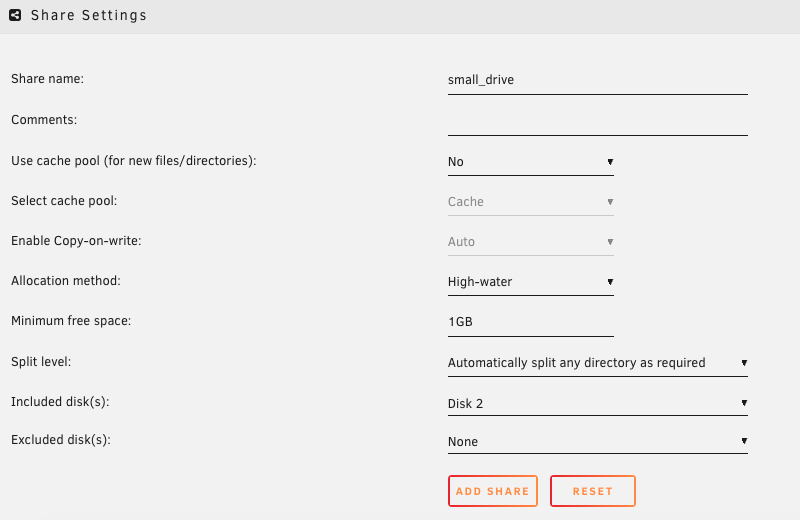
Not partitioning, but you could make a user share called, say, small_drive and include only that one 100 GB disk, like this: and you'd want to exclude it from other shares. It would have the advantage of being protected by parity, along with the rest of the array disks.