






bmartino1
Members
-
Joined
-
Last visited
Everything posted by bmartino1
-
its is only if we manual edit the smb config to use the interface and vlan.
-
Your symptoms line up with two classic gotchas on Unraid: you have two L3 interfaces in the same /24 (192.168.42.0/24), so Linux will pick the “wrong” egress sometimes (policy routing needed if you insist on this), and host ↔ macvlan/ipvlan access quirks when you try to reach containers/VMs living on VLAN bridges from the host. Below is a clean, repeatable layout that fixes both and matches your goal: eth0 only for Unraid GUI, eth1 for services on VLANs 1,10,20. (Potental fix - action order)Give br0/eth0 the only IP in 192.168.42.0/24 (192.168.42.100/24 gw .1). Put br1.1, br1.10, br1.20 → IPv4 None (no gateways). On the switch, make eth1 a trunk with VLANs 1/10/20 to your router. Use ipvlan docker networks bound to br1.1 / br1.10 / br1.20 with the proper subnets/gateways. (Optional) If the host must reach those VLANs directly, use the small shim + ip rule script above. That’ll give you: GUI only on 192.168.42.100 (eth0), and containers/VMs cleanly reachable on eth1 VLANs without iproute fights. Switch / Router (make sure first)The switch port for eth1 is a trunk/tagged port carrying VLAN 1,10,20 (VLAN 1 can be native/untagged or tagged; just be consistent with Unraid). Your router has SVIs / gateways: VLAN 1 → 192.168.42.1/24 VLAN 10 → 192.168.20.1/24 (and VLAN 20 → whatever you plan, e.g. 192.168.30.1/24) Unraid – Network Settings (stable “one L3 per subnet” design)Goal: Only br0 (eth0) holds an IP in 192.168.42.0/24 for management. The service VLANs live on br1 VLANs with no IPs on the host—so the kernel won’t fight you on routes. eth0 IPv4: Static 192.168.42.100/24 Gateway: 192.168.42.1 Bridging: Yes (br0) VLANs on br0: No eth1 IPv4: None Bridging: Yes (this creates br1) VLANs on br1: Yes br1.1 (VLAN 1) → IPv4 None (do not give the host an IP here) br1.10 (VLAN 10) → IPv4 None br1.20 (VLAN 20) → IPv4 None No gateway on br1 or any br1.x This makes Unraid itself reachable only at 192.168.42.100 via eth0/br0, and it keeps the kernel from creating competing routes for the same /24 on br1.1. Docker – use IPvlan and pin each VLAN to its parentUsing ipvlan avoids the macvlan host-call-trace mess and is simple for L3 separation. In Settings ▸ Docker: Docker custom network type: ipvlan Parent interface for custom networks: choose none here (we’ll create per-VLAN networks manually), or set one then override with -o parent below. # VLAN 1 (containers in 192.168.42.0/24 on br1.1) docker network create -d ipvlan \ --subnet=192.168.42.0/24 --gateway=192.168.42.1 \ -o parent=br1.1 pub42 # VLAN 10 (containers in 192.168.20.0/24 on br1.10) docker network create -d ipvlan \ --subnet=192.168.20.0/24 --gateway=192.168.20.1 \ -o parent=br1.10 pub20 # VLAN 20 (example) docker network create -d ipvlan \ --subnet=192.168.30.0/24 --gateway=192.168.30.1 \ -o parent=br1.20 pub30 *Attach each container to the correct network (pub42, pub20, pub30). From other LAN clients, you’ll reach them normally through your router (SVIs). VMs – attach to br1 VLANsFor VMs that should live on VLAN 10 and 20: Add a virtio NIC and select br1.10 or br1.20 as the bridge. Configure the VM’s guest IP/gateway inside the VM (e.g., 192.168.20.x with gw 192.168.20.1). Host container/VM access (optional, from Unraid shell itself)Because the host (192.168.42.100 on br0) is not on br1.1 anymore, the kernel won’t “hairpin” traffic for you. If you want Unraid itself to reach containers on those VLANs: Option A (recommended): Let routing do it—your router already has the VLAN SVIs. The host will hit 192.168.42.1 and the router forwards to the container subnets. No extra config needed. Option B (direct shim on the VLAN): Add a tiny “shim” IP on each VLAN using a macvlan/ipvlan sub-iface plus policy routing so replies go back out the same VLAN. Here’s a single-VLAN example for VLAN 10; adapt for others as needed: *Recommend / minor ip rule route fixes #!/usr/bin/env bash set -euo pipefail PARENT="br1.10" # the VLAN bridge SHIM="mac10" # shim iface name SHIM_IP="192.168.20.10/24" # a free IP in VLAN 10 just for the host GW="192.168.20.1" TABLE="110" # Create shim if missing ip link show "$SHIM" &>/dev/null || ip link add "$SHIM" link "$PARENT" type macvlan mode bridge ip addr show dev "$SHIM" | grep -q "${SHIM_IP%%/*}" || ip addr add "$SHIM_IP" dev "$SHIM" ip link set "$SHIM" up # policy routing: packets FROM the shim IP use table 110 via the shim ip rule del pref 10110 2>/dev/null || true ip rule add from ${SHIM_IP%%/*}/32 table ${TABLE} pref 10110 ip route flush table ${TABLE} ip route add 192.168.20.0/24 dev ${SHIM} table ${TABLE} ip route add default via ${GW} dev ${SHIM} table ${TABLE} # rp_filter relaxed to allow asymmetric return if needed sysctl -w net.ipv4.conf.${SHIM}.rp_filter=2 >/dev/null Now the host can curl 192.168.20.x using source 192.168.20.10 and replies will return the same path. Explanation:Why you could reach 192.168.42.10 but not br1.10With br1.1 (VLAN 1) in the same /24 as br0 you created an ambiguous ARP/routing situation; sometimes it works, sometimes it hairpins the wrong bridge. For br1.10, if the bridge exists but the host has no L3 route (no IP) and the switch port isn’t trunking VLAN 10, you’ll see exactly “containers unreachable.” The above layout fixes both: L2 present (trunk), L3 via router, and no duplicate subnets on the host. Sanity - Quick health checklistRun these from the Unraid shell after applying: # The host should have exactly ONE default route via br0/eth0 ip -4 route # You should NOT see a host route for 192.168.42.0/24 via br1.1 # (only via br0). VLAN 10/20 shouldn't appear unless you added shims. # Docker networks bound to right parents: docker network ls docker network inspect pub42 | grep Parent docker network inspect pub20 | grep Parent # A container on VLAN 10 should ARP its gateway on br1.10: # (replace veth name as needed) bridge link | grep br1.10 If still stuck, grab and share plese: ip -4 a ip -4 route ip rule show docker network inspect pub42 pub20
-
proxmox vm settings. are you passing the intell gpu? as it sounds like your no longer passing the intel gpu to the vm. Virtualizing Unraid View Proxmox VM Unraid Guide
-
your fighting ip routes as eth0 and eth1 are on the same subnet. ip route i need the output of ip a and ip route. you have to edit the ip route for the vlan and/or attach additional ip route rules... I'm still testing stuff on unraid. in debain: #!/usr/bin/env bash set -euo pipefail PARENT="br1" SHIM="mac0" SHIM_IP="192.168.2.10/24" GW="192.168.2.1" TABLE="100" # Create shim if missing if ! ip link show "$SHIM" &>/dev/null; then ip link add "$SHIM" link "$PARENT" type macvlan mode bridge fi # Bring it up with IP (idempotent) ip addr show dev "$SHIM" | grep -q "${SHIM_IP%%/*}" || ip addr add "$SHIM_IP" dev "$SHIM" ip link set "$SHIM" up # Relax rp_filter for asymmetric return paths sysctl -w net.ipv4.conf.${SHIM}.rp_filter=2 >/dev/null # Policy routing: traffic FROM the shim IP uses table 100 via mac0 # Clear old rules for this table/ip first (idempotent) ip rule | awk -v t="table ${TABLE}" '$0 ~ t {print $1}' | xargs -r -n1 ip rule del pref ip rule add from ${SHIM_IP%%/*}/32 table ${TABLE} pref 10010 ip rule add to 192.168.2.42/32 table ${TABLE} pref 10011 # optional fast-path to the container # Routes in table 100 (replace existing) ip route flush table ${TABLE} ip route add 192.168.2.0/24 dev ${SHIM} table ${TABLE} ip route add default via ${GW} dev ${SHIM} table ${TABLE} exit 0 #adatiional scripting # 1) Loose reverse-path filtering so asymmetric paths aren’t dropped sysctl -w net.ipv4.conf.mac0.rp_filter=2 #macvlan shim bridge sysctl -w net.ipv4.conf.br0.rp_filter=2 #Main interface eth0 sysctl -w net.ipv4.conf.all.rp_filter=0 # 2) Policy routing: traffic FROM 192.168.2.10 uses table 100 via mac0 ip rule add from 192.168.2.10/32 table 100 pref 10010 2>/dev/null || true ip route replace 192.168.2.0/24 dev mac0 table 100 ip route replace default via 192.168.2.1 dev mac0 table 100 # (optional but nice) also route traffic TO the container via mac0 ip rule add to 192.168.2.42/32 table 100 pref 10011 2>/dev/null || true you may need to setup adational ip routes and ip rules for vlan traffic. but essential your vlan due to iproute is tying to use eth0 as eth0 and eth1 share a subnet
-
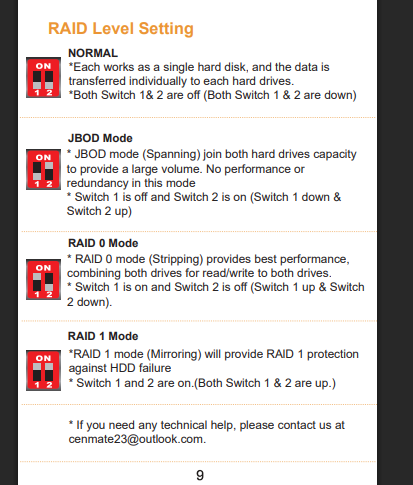
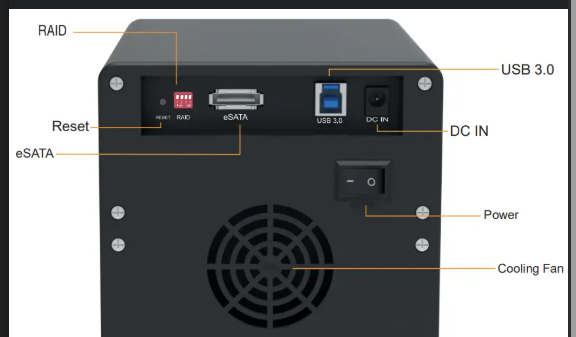
esata should work and would be better. but the enclouse onteh back need to be set to normal mode: needing a better tech spec page. https://www.cenmate.com/index.php?m=home&c=View&a=index&aid=58
-
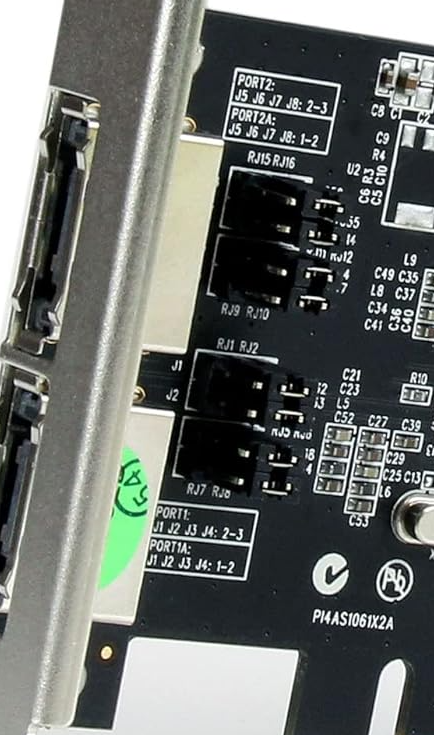
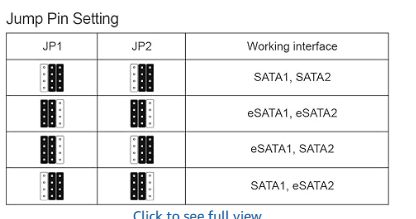
Thank you for this data. on the star card wht is the pin layout and whats pluged into what. as this card similar with the above has pin configuration and may need moved over to use the esata ports. per amazon picture If i'm reading that corectly(kind of hard as its tilted and cant get a good read/count.. by defualt interanl sataports look like they are enabled... Looking for a comparable USB PCI adapter that would work with Unraid/Linux configuration. kerneal unraid slackware for this doent' mean much and that not correct. since your using a 10 bay disk shelf and that 10 bay disk shelf uses usb 3.0 you need to use the unasinged disk plugin. the cenmax device is using mutiport which unraid done't support. again you would need to use a HBA in it mode to conect that disk shelf. as this Hard Drive Enclosure is already doing disk operations for a raid. Unraid will not be able to use this device efectively. each of the 10 disk would need to be passed example of a HBA https://a.co/d/3q2WW44 as the disk shelf you links conect via usb to shar its jbod based on other raid configurations. Unraid done't support sas mutiport. unraid is slackware linux. ther is no adatila 3rd party or usb devcie I could recomend to fix or make your hardware work due ot the disk enclouse type and setup you have. due to linux and chips I usualy look for usb 3.0 contorler with a VIA chip. example: https://www.newegg.com/p/17Z-00AP-000B5?item=9SIA4RED688390&utm_source=google&utm_medium=organic+shopping&utm_campaign=knc-googleadwords-_-add-on%20cards-_-corn%20electronics-_-9SIA4RED688390&source=region&srsltid=AfmBOorUy8uUIiPvymThfeNa_nvw-qDIJBqwogT8E1d_0x3yTE8IjikMFlQ again unraid needs the disk passed indvidaul though a controler your hardware case already has a contoler and is using usb mutiport. so the only way to see and interact with that disk enclouse is vai USB and the unasigned disk plugin.
-
i've had good luck with disk sata device like these https://a.co/d/c32V1am but you have to note the connections I'm assuming you have this and are looking to use it with unraid: https://a.co/d/dpXxEeM
-
eSATA is fine as long as it's not paired with port multiplication. One drive per eSATA port on the PC works identically as an internal SATA. RAID Level Setting nees to be set to normal. unraid will use a software raid to control the disk. page 9 of manual: https://www.cenmate.com/uploads/soft/20250210/1-25021010193a30.pdf with out knowing more of what type or version of the Cenmate external hard drive chassis you have. model number, product number etc... Can't really help nor assist. your usialy looking at HBA in "IT MODE" at that level. I don't recomend trying to use thuderbolt or usb atached disk with unraid. which Startech esata. esata is only a data connection you may need to also supply seperate power to turn on the disk. can't say your esata device is not the problem... example: esat for the disk dat speed usb for the 12 volt power: https://www.newegg.com/p/2S7-08SH-005K8?item=9SIB7Y1KHH7579&utm_source=google&utm_medium=organic+shopping&utm_campaign=knc-googleadwords-_-gadgets-_-smugdesk-_-9SIB7Y1KHH7579&source=region&srsltid=AfmBOoq_hljxItc9Rm3y-mlVNT2sl_-0pGcHnCDmXWZwKHXKcl6ilTu0Pcw&com_cvv=8fb3d522dc163aeadb66e08cd7450cbbdddc64c6cf2e8891f6d48747c6d56d2c
-
That docker is missing needed packages and it's not installed. You may need to add a extar line and have them installed with The linuxserver/mods:universal-package-install is a Docker Mod provided by LinuxServer.io adding -e DOCKER_MODS=linuxserver/mods:universal-package-install -e INSTALL_PACKAGES=ca-certificates|jq|wget as your hook script errored. bind 9 is a dns server you could use a different dns server...
-
These are excellent questions. I need to know if you are going to forgo unraid in favor of poratiner per your pictures. As this may dictate areas and explanations on what may have happened... so yes: Create your own /24 networks up front; don’t let Docker auto-assign. Add a daemon.json with default-address-pools under /boot/config/docker so Unraid/Docker never touches 192.168.x.x again. Keep DBs and internal services on private bridge nets; only expose what needs to talk across sites. Use Portainer stacks, but pin their networks explicitly. *That’ll prevent the VPN “hijack” from ever happening again and give you predictable container addressing going forward. You’ve got the mechanism exactly right now, but Docker wasn’t “bugging,” it just fell back to grabbing a 192.168.x.x block once it thought your 172.16/12 pool was “used up.” A few points that should clear up your next questions: 1. Why Docker hands out big /16 (or bigger) subnetsBy default, Docker assumes new bridge networks may host many containers, so it allocates a /16. That’s overly generous for most home labs. Nothing stops you from constraining it — you can explicitly create a /24 per stack or service. Example: docker network create \ --driver=bridge \ --subnet=172.20.10.0/24 \ my_stack_net Portainer will happily attach stacks to that network if you define it first. 2. Preventing overlaps permanentlyOn Unraid, you can define a custom IPAM pool in /boot/config/docker/daemon.json. Example: { "default-address-pools":[ {"base":"172.30.0.0/16","size":24}, {"base":"172.31.0.0/16","size":24} ] } That tells Docker: “When auto-allocating, only hand out /24s carved out of 172.30/16 or 172.31/16.” On Unraid you’ll need to reboot or restart the Docker service for this to apply. The file is persistent if you keep it under /boot/config/docker/daemon.json. If you don’t see it now, it just means Unraid hasn’t needed one yet. You can create it safely. 3. Bridge vs. macvlan vs. parent interfacebridge: good for intra-stack/service communication; simplest default. macvlan: puts containers directly on your LAN/VLAN with their own MACs. Good if you need them to look like first-class hosts, but beware Unraid host > container traffic quirks (sometimes requires ipvlan workaround). interface-attached bridge: common for stacks where you want all containers to live in a segment but not have their own MACs. Most people keep “internal-only” services (databases, redis, workers) on an isolated bridge network, then attach just the front-end / reverse proxy to a LAN-facing network. That keeps routing simple. Bridge vs. macvlan vs. subinterface networksBridge network (per-stack): Good for “internal plumbing” like webserver > DB > redis. Containers resolve each other by name automatically within that bridge. With Portainer stacks you can declare the bridge explicitly so you always know what subnet it’s in. Macvlan/ipvlan: Useful when you want a container to look like a first-class host on your LAN/VLAN (e.g. Plex, Pi-hole, reverse proxy). Downsides: Unraid host > container traffic is tricky unless you use ipvlan mode. Unraid interface/subinterface attachment: This is mostly for when you want containers to be bound to a specific VLAN. It can make sense if you already segment by function (IoT, DMZ, Server). A common pattern: keep stacks on their own bridge for internal communication, then expose only the front-end container (proxy, API, etc.) on a LAN-facing macvlan 4. Managing multiple stacks with shared servicesIf you want a single database instance to serve multiple apps, put both stacks on the same custom bridge. If you want complete isolation per app, spin up one DB per stack. There’s no wrong answer — it’s a tradeoff between resource use vs. security/isolation. 5. Automation and labelsYou’re on the right track with Watchtower + labels. Combine that with named networks and backups, and you’ll avoid surprises. phpIPAM is also a solid idea to keep address planning organized, especially since you’re already spanning multiple /24s. You’re asking all the right questions — this is exactly the “next layer” of Docker/Unraid once the basics work. A few clarifications that may help you settle on a structure: 6. Hostnames and DNSYou’re right that hostnames make life easier. A couple of approaches: Inside each Docker network, container names already resolve (db resolves to db:3306 inside the same bridge). Across stacks or across your LAN, let Unbound/dnsmasq do the work. Just make sure each container that needs to be reachable is on a LAN-facing macvlan with a static IP or DHCP reservation, then publish a DNS record for it. For reverse proxy setups (nginx, Traefik, Caddy), you can lean on labels in Portainer stacks to automatically publish hostnames → container IPs. 7. One database vs. manyIt comes down to isolation vs. efficiency: Single shared instance (e.g. one MySQL, one Postgres): lighter on resources, easier to back up, but every app shares the same DB server (upgrade risk, permission complexity). Per-app DB instances: more isolated, easier to snapshot/restore independently, but heavier on RAM/CPU, and you end up with lots of small DBs. Most home-labbers do “one DB engine per type, multiple databases inside it” unless they have security/isolation concerns. 8. Portainer stacks and backupsYou’re right — stacks make upgrades and rollbacks safer. A practical workflow: Define explicit bridge networks in Portainer templates (no auto-assignment). Use labels for Watchtower to update only the containers you’ve marked. Always back up your stack config (docker-compose.yml) and DB volumes before update. I would advise you use portainer or unraid to mange not both.
-
Please post a diag file.... This isn’t Unraid “bugging out” — Docker created a network that overlapped your VPN routes, and the kernel routing table dutifully sent your packets there. Constraining Docker’s address pool should fix it permanently. As this looks like a reuse of a subnet and issues with ip routes and confusion between mutiple networks... It doesn’t look like a bug in Unraid itself, but rather Docker picking network subnets that overlap/confuse your site-to-site routing. Why Docker picked 192.168.48.0/20By default, when Docker creates new bridge networks, it will try to pick from private address ranges. If it finds that the usual 172.17.x.x / 172.18.x.x pools are “taken” (or it thinks they are), it will fall back to other RFC1918 ranges — including 192.168.x.x. That’s how you ended up with 192.168.48.0/20. Since your VPN tunnel and remote site are also in the 192.168.x.x space, Docker unintentionally created an overlapping route. Why pings returned from 192.168.48.1Once that bridge network came up, the Unraid host added a kernel route for 192.168.48.0/20 pointing into the docker bridge. So when you pinged 192.168.50.10, your kernel looked at the routing table and decided “that lives on the 192.168.48.0/20 subnet → send to Docker.” The ARP reply you saw (192.168.48.1) was just Docker’s virtual gateway answering because it owned that subnet, even though the real destination was across the VPN. *In other words, the Docker network route “hijacked” traffic meant for your remote site. Why it worked when you tore the stack downWhen you removed that stack, the conflicting route (192.168.48.0/20) was deleted. The kernel then fell back to the correct VPN route, and your cross-site traffic worked again. When the stack later came up using 192.168.32.0/20, there was no overlap with your real subnets, so routing worked fine. SO? how to fix-- How to fix it long-termYou want to stop Docker from ever using the 192.168.x.x ranges that overlap with your LAN/VPN. A few options: *Hard to do on unraid to survie a reboot. Global default pool: Edit /etc/docker/daemon.json (create it if missing) and add something like { "default-address-pools": [ {"base":"172.30.0.0/16","size":24} ] } This forces Docker to allocate new bridge networks from 172.30.0.0/16 instead of randomly choosing from 192.168.x.x. What I recommend: Per-network control: When you create a custom network (via Portainer, compose, or CLI), explicitly set the subnet: *Make a docker netowrk before hand... example: docker network create \ --driver=bridge \ --subnet=172.31.1.0/24 \ mynet As a general rule of thumb ipv4 has private address blocks. don't use 192.x opr 10.x networks... (these should be used for comute and device network connecitons. ISP etc) use teh 172.x private address sapce... So General rule: Avoid using the same private ranges for Docker bridges that you’re using for LAN, VLANs, or VPNs (192.168.x.x / 10.x.x.x). Stick with non-overlapping blocks (172.16.0.0/12 is usually the safest). review:
-
jdownlaoder with access to the http web links of content.... Build your own docker. https://github.com/jlesage/docker-baseimage-gui if you have something that works and its a linux app based, you can make your own docker. Then use a Dockerfile that uses another docker as its base. Example Docker file # syntax=docker/dockerfile:1.7 FROM jlesage/baseimage-gui:ubuntu-24.04-v4.8.0 # ----- Locale ----- ENV LANG=en_US.UTF-8 \ LC_ALL=en_US.UTF-8 \ DEBIAN_FRONTEND=noninteractive RUN add-pkg locales \ && sed-patch 's/# en_US.UTF-8 UTF-8/en_US.UTF-8 UTF-8/' /etc/locale.gen \ && locale-gen # ----- GUI base image env ----- ARG APP_ICON="picture.png" ARG APP_VERSION="0.1.0" RUN set-cont-env APP_NAME "Application name" \ && set-cont-env DISPLAY_WIDTH "1280" \ && set-cont-env DISPLAY_HEIGHT "800" \ && set-cont-env APP_VERSION "${APP_VERSION}" # ----- Install deps + VLC + common tools ----- # (keep it in ONE layer for smaller images) RUN apt-get update \ && apt-get install -y --no-install-recommends \ libfontconfig1 \ libxcb1 \ libxrender1 \ libxcb-icccm4 \ libxkbcommon-x11-0 \ libxext6 \ libxfixes3 \ libxi6 \ build-essential \ autoconf \ libssl-dev \ libboost-dev \ libboost-chrono-dev \ libboost-filesystem-dev \ libboost-program-options-dev \ libboost-system-dev \ libboost-test-dev \ libboost-thread-dev \ qtbase5-dev \ libprotobuf-dev \ protobuf-compiler \ libqrencode-dev \ libdb5.3++-dev \ libdb5.3-dev \ unattended-upgrades \ xdg-utils \ apt-utils \ curl jq tar gnupg ca-certificates git xz-utils \ bash mc nano vim sudo \ vlc \ && apt-get upgrade -y \ && apt-get autoremove -y \ && apt-get clean \ && rm -rf /var/lib/apt/lists/* /tmp/* /var/tmp/* # ----- Optional: copy an icon used by the web UI ----- # Place picture.png next to this Dockerfile when building. COPY ${APP_ICON} /usr/share/icons/hicolor/256x256/apps/app.png RUN set-cont-env APP_ICON "/usr/share/icons/hicolor/256x256/apps/app.png" # ----- (Optional) sudo for app user ----- # jlesage baseimage runs your app as the non-root "app" user already. # This adds passwordless sudo IF you really need it. RUN mkdir -p /etc/sudoers.d \ && echo "app ALL=(ALL) NOPASSWD: ALL" > /etc/sudoers.d/90-app-nopasswd \ && chmod 0440 /etc/sudoers.d/90-app-nopasswd # ----- Provide the startup wrapper expected by the base image ----- # Replace the VLC command with your own app binary/launcher. # The script must be executable and live at /startapp.sh COPY startapp.sh /startapp.sh RUN chmod +x /startapp.sh # ----- Healthcheck (checks the built-in web UI) ----- HEALTHCHECK --interval=30s --timeout=10s --start-period=30s \ CMD wget -qO- http://127.0.0.1:5800/ >/dev/null 2>&1 || exit 1 # ----- Volumes & ports used by jlesage GUI base ----- VOLUME ["/config"] EXPOSE 5800 # NOTE: ENTRYPOINT/CMD handled by base image; don't override. This will make a ubnutu os like docker that has a vnc web ui at docker ip port 5800 to access a web ui screen that runs vlc as an example. "Latest" exampleis is a debain vnx web ui docker where you can install a linnux app that needs a gui and use the gui on unraid via a web Ui link... Due to copyright, licensing and what your accessing is the question when in regrds to aquireing music. I personaly use a widnwos VM and paid software like tune lab and any video converotor to pull content from apple music and youtube. In regards for files 16b/44.1khz and up due to the sound frequency your most likely going to be dealing with publishers and orginal source audio. or ilegaly accessed via torrents ... so to much of a grey area to really get involved only that its possble. most would use a *arrs setup for media content. https://trash-guides.info/ I belive its called lidarr for music. https://wiki.servarr.com/lidarr/community-guide
-
found one of my earlier communications that went over commands proof of concepts and attempts at assisting other with similar setups... there is another lost of the forum... Please review the entire forum post. https://forums.unraid.net/topic/184619-i-have-two-physical-networks-eth0-and-eth1-but-only-eth0-is-available-for-docker-containers/#findComment-1511799 and Where we can assign multiple ip address to the bridge. https://forums.unraid.net/topic/185418-cant-access-containers-through-browser/#findComment-1514753
-
What I need is clear object goal. what hardware. interfaces. the output of ip a and ip route a unraid daig. and the vms XML code. web ui picture of you settings > network for is bridging enabled is bondign enabled. and vm settign picture to see what your VM hyperv switch is set to where VM default get internet access. XML code can be used that goes agisn the setting and skip/bypass it as we may want to use something else in libvcirt domain xml format to tell th vm what we doing and how to use the interface... Example. I have a single nic unriad os. I want a software bridge router VM to act as a firewall. I will lan connect a softwre bridge to a docker network. this way my docker networking is on a isolate ip subnet. all internet coming in will be thought the uinriad host eth0 and we will leverage br0 br1 as a docker network with a different ip address and subnet. router > ?switch > unraid machine > VM Router(ill use ipfire) > unraid br interface for a lan > docker network that can access internet through the VM...
-
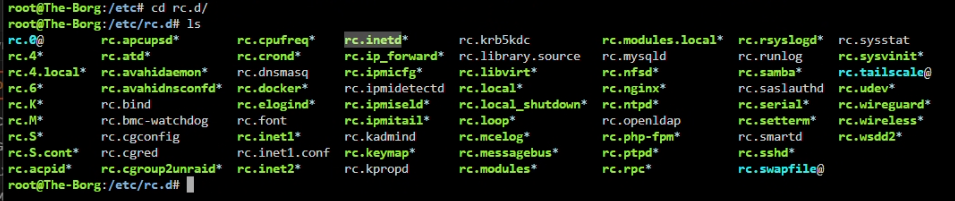
Some rants, notes and tangets to assit... thats not quite correct... as I do have unraid created interfaces and a router VM and testings done within a docker network... more as a proff of concept not having a actual used for pratcaltiy... to Clarify, your claim of defaulting to a interfaces is due to a inet script and defualt behavior. thats because a conflict in the iproute between the 2 bridges. you made and how to force a route over another. So lets go over some advance linux stuff... since you get the warrning and now to explan and go over the proff of concept and whats happening... Slackware unraid uses systemvar and a networking inet rc convoluted net rc script found in the rc.d shich is the equilvent to the orgianl ubnut/debain servicers and daemons. before systemd was a thing. (where systemd esentail thorws stuf all over such as the home user folder for apps and server/daemons...) I do not like systemd... go check it out ALSO! you can even forgo unraids creation of br0 and bond0 and work directly with other web ui / config changes and based on these webui changes runs different aspects of the inet system var script. (as this dictates network settings)... per example remove br0 by turning off bridging: This to prove the point that Unriad doesn't force chose the dev device as mentioned earlier... its a issue that unraid can't use multiple devices on the same subnet and this is a layer 2 layer 3 issues where you are trying to direct traffic over one interface over the other. ther is a ip route that force the use to your eth0 and you falsly came to the conclusion that it defuatls to that... Per another example... you could edit the ip route and remove the iproute of the other device and use br1... (Tangent on macvlan shim bridge a default behavior that works and is shipped but is a problematic feature/bug) Macvlan seperates the host form the docker network. the docker has a a static ip its own mac address and terminal on the host is not able to talk to that ip(even though its routing and on the same subnet of the host! another device, not the host can talk and connect to the docker) So An example of some unriad host commands to edit interfaces and fix the macvlan shim (a fix for the bug -ish) as a bridge was made that uses the ip address at 2 different macs (more to help s***up unifi and fix a bridge iproute issue on unraid itself a we need to treat the shim interface like a docker needing its own static ip and NOT DUPLICATE THE IP ADDRESS FORM BR0) most rouoters will ignore it unfi sees it being enterpirse ish equipment and sees the issues with the same ip on 2 seperate mac address... as br0 duplicates the eth0 interface mac address... ################################# Side review notes off topic just a memory... this reminds me of a old class project for networking where we build our own routers in Debian linux: https://gridscale.io/en/community/tutorials/debian-router-gateway/ https://tongkl.com/building-a-router-from-scratch-part-1/ Build it your self don't use a premade router os... ... ################################ So lets review an exmple of eth1 and br1 something we can make... Hers an One-time (immediate) setup example... lets say we have another nick eth1 and lets make our own br1 interface.... *as I find it easeier to set a static ip address then use dhcp when one manual created interfaces... but the premise and info / heart of the issues remains. # 1) make sure eth1 is up ip link set dev eth1 up # 2) create the bridge ip link add name br1 type bridge # 3) add eth1 to the bridge ip link set dev eth1 master br1 # 4a) give br1 an IP via DHCP (Unraid uses dhcpcd) dhcpcd -n br1 # OR set a static IP (pick your subnet/gateway) # 4b) static example # ip addr add 192.168.2.10/24 dev br1 # ip link set dev br1 up # ip route replace default via 192.168.2.1 # 5) bring the bridge up (if you didn’t do 4b) ip link set dev br1 up # 6) sanity checks ip -d link show br1 bridge link ip addr show br1 *dhcpd can break stuff.... (static ip set script later this is example comands code and lets say we have xyz....) But, This creates a br1 and ties it to eth1 interface since you have eth0 you can tie eth0 the same way br0 does... (multiple bridges can be tied to the same eth interface...) you can make a br1 tied to eth0 ... So, now then take a look at ip route. (*I will use the shim bridge for this example... as i told the ship br0 to be set to 192.168.201.101) root@The-Borg:~# ip route default via 192.168.201.1 dev br0 metric 1005 172.17.0.0/16 dev docker0 proto kernel scope link src 172.17.0.1 192.168.122.0/24 dev virbr0 proto kernel scope link src 192.168.122.1 linkdown 192.168.201.0/24 dev shim-br0 proto kernel scope link src 192.168.201.101 192.168.201.0/24 dev br0 proto kernel scope link src 192.168.201.100 metric 1 root@The-Borg:~# as noted here in the shim bridge (which exist more for the host to interact and communicates from host to the macvlan docker network...) *but all traffic will default and use the iproute to br0 even though a bridge interface exist to talk to the router over the shim-br0 interface... Thus the shim-br0 or br1 per the example will never be used! as it shares the same subnet! The issues is how unriad will default and define a ip route to the first subnet device that is usable. How to fix this since we have 2 interfaces on the same subnet now... well, that usualy called a bond and is used for failover. when 1 nic stops, use this interface!... This is where we would go into bonds. as 2 interfaces sharing the same subnet and I've found unraid to be able to make and use the bond but breaks and will prefer the first interface(eth0 or eth1) as thats the first to have a iproute... thus even when bonded it will default and use eth0 until eth0 is no longer connected and making a link... thus a issues is in routes and a layer 2 layer 3 router. Not with a individual interface! This is why i say UNRAID IS NOT NETWORKING EQUIPMENT! as a router would be able to edit these routes and has rules to dictate the traffic to use a interface over another. (you can edit and use ip routes you define!) Further (Tangent on unraid VMS domain xml vm configurations...) see https://libvirt.org/formatnetwork.html so if using the software links with a vms xml. your passing br1 or another interface... there are even inet rc scripts due to some vm settings that can chage how ip routes and interfaces interact... as this will change some inner communication. (tangent on older hardware/software limitations with nics) By default unraid ships with br0 bridging enabled as it is best practice to tie things to a bridge interface due to hardware nic limitations. not all nic support routing features and option roms on the nic for use. creating a software brdige and having a br0 intefaces makes up the differece. (this was a big issues in the past that not much of a issues now)... (tangent to ahv unraid webui netowork config make the br1 eth1 dhcp)I do not recomend editing the config only here as a refference! you can also edit the unraid netowk conig.. persists network settings in /boot/config/network.cfg example adding: # existing br0 section likely uses index [0] # add a new section for br1 using index [1] BRNAME[1]="br1" BRSTP[1]="no" BRFD[1]="0" BRNICS[1]="eth1" BONDING[1]="no" # choose DHCP or static for br1: USE_DHCP[1]="yes" # (for static instead) # USE_DHCP[1]="no" # IPADDR[1]="192.168.2.10" # NETMASK[1]="255.255.255.0" # GATEWAY[1]="192.168.2.1" MTU[1]="" # or set e.g. "1500" / "9000" ... then reboot or restart netowrking /etc/rc.d/rc.inet1 stop && /etc/rc.d/rc.inet1 start #Heart of the issue: # The ip / bridge commands (part of iproute2) Review the manpages for commands form iproute2 https://manpages.debian.org/stretch/iproute2/ip.8.en.html I prefer to static assign.. use static IP example # make sure eth1 is up ip link set dev eth1 up # create br1 bridge ip link add name br1 type bridge # add eth1 to br1 ip link set dev eth1 master br1 # assign static IP ip addr add 192.168.2.7/24 dev br1 # bring up br1 ip link set dev br1 up # set default gateway if needed (adjust gateway IP to match your network) ip route replace default via 192.168.2.1 a router usually require ipv4 and ipv6 forwarding. by default unraids system ctl done't have ipv6 enable due to other issues... (Tangent on ipv4 forwarding and ipv6 forwarding) (Linux bug ish on ipv6 RA vs dhcp and issues using ipv4 for iner communications),,, we can re-enable them... #!/bin/bash # Delay before starting sleep 10 # Apply sysctl settings apply_sysctl_settings() { echo "Applying sysctl settings..." sysctl -w net.ipv6.conf.all.forwarding=1 sysctl -w net.ipv6.conf.br0.accept_ra=2 sysctl -w net.ipv6.conf.br0.accept_ra_rt_info_max_plen=64 sysctl -w vm.overcommit_memory=1 echo "Verifying sysctl settings..." sysctl net.ipv6.conf.all.forwarding sysctl net.ipv6.conf.br0.accept_ra sysctl net.ipv6.conf.br0.accept_ra_rt_info_max_plen sysctl vm.overcommit_memory } apply_sysctl_settings As I said I've gone over this a lot with others(lost on the forum but they exist...) ... and its my recommendation to go another route... to guarantee and get the wanted functionality. BU, Since you're serious in trying to learn or accomplish this... see the other area please review other commands and data here. (can't seem to find some major commands and back and forth with others on how, where the gotchas are and why... will post separately if i find it..) But here's other examples: https://forums.unraid.net/topic/184619-i-have-two-physical-networks-eth0-and-eth1-but-only-eth0-is-available-for-docker-containers/#findComment-1517509 and review the videos found here: https://forums.unraid.net/topic/147455-support-unifi-controller-unifi-unraid-reborn/page/11/#findComment-1385625 and a side note to change the interface namve via the macaddrss of a interface... we can even force the interface of eth0 or eth1 name via the mac address with a udev rule https://forums.unraid.net/topic/180430-networking-help/#findComment-1489685 ... so back to The Point! as I'm tyring to show exmpaln and go over alot of data..... To me, Your misunderstanding default behavior and what's actually happened based on misconfiguration and not asking questions nor giveing data on what you did where... As I often find others on this forum after going into great lengths with endusers not folowing the info and sytems run stuff willy nilly. and not asking why xyz and not having the goal... etc. and S***t hits the fan especal when it doent' work nor work as intended / configured. Which is why the OG post and warning. I will gladly go over commands, xml, and areas. Just note that as i've done this for mutiple users, that there is a reason why no and why its doing what its doing. but that doent' mean we can't work around it... So. because I have pulled it off and understand whats happening due to the scripts, web ui settings, other network conifgs and OS commans. What router its using and how to control and dictate the routes.... Is FALSE! unraid is doing what it was told and ip route dictates that eth0 has and was the first route thus all trafic will use that interface UNTIL A ip route is told and fixed! also try other rotuers OS. you mentioned openwrt... Loook at pfsense, ipfire, opensen, etc.. As this is a convloute mess and has underlying isseus as well. ipfire just works and is what I would recomend for testing.... Ipfire is based off of an orginal project in freebsd called ip cop. ipfire is rebuilt from the gorund up in scratch linux. and from my testing when I built the unraid VM router and went down this rabit hole the isues always came from how unriad had iproute to the interface and the need/want to use a different interface due to default scripts and exisitng ip route rules. dictacted via the inet rc script. Also worth a watch: https://www.youtube.com/watch?v=zstdOS_6ajY https://www.youtube.com/watch?v=Gy2g1ciJRqA


-
Unraid ZFS Ghost Pool Cleanup Script #!/bin/bash # Unraid ZFS Ghost Pool Cleanup Script # This script will: # 1. Verify the healthy pool (orion) is present # 2. Backup plugin configs # 3. Clear stale ZFS plugin metadata # 4. Rebuild zpool.cache with only the healthy pool # 5. Optionally wipe old labels from a removed SSD (if attached) POOL_NAME="orion" GOOD_POOL_ID="64182623996842760" PLUGIN_DIR="/boot/config/plugins/zfs" BACKUP_DIR="${PLUGIN_DIR}.bak.$(date +%F-%H%M)" echo "=== Step 1: Checking current pools ===" zpool import echo echo "=== Step 2: Backing up ZFS plugin configs to $BACKUP_DIR ===" mkdir -p "$BACKUP_DIR" cp -r $PLUGIN_DIR/* "$BACKUP_DIR"/ 2>/dev/null echo echo "=== Step 3: Clearing stale plugin metadata ===" rm -f $PLUGIN_DIR/zpool.cache rm -f $PLUGIN_DIR/*.dat rm -f $PLUGIN_DIR/*.cfg echo echo "=== Step 4: Re-exporting and re-importing healthy pool ===" zpool export "$POOL_NAME" 2>/dev/null zpool import -f -o cachefile=$PLUGIN_DIR/zpool.cache $GOOD_POOL_ID "$POOL_NAME" echo echo "=== Step 5: Verifying pool status ===" zpool status "$POOL_NAME" echo echo "=== Done! Reboot Unraid to reload the UI. ===" echo echo " If you still have the old read-cache SSD attached and want to clear its ZFS labels, run:" echo " zpool labelclear -f /dev/sdX" echo "Replace /dev/sdX with the correct device for the REMOVED cache SSD ONLY." echo "Do NOT run on your RAIDZ2 data drives." How to Use (user script plugin preferred)Copy this script into your Unraid terminal, e.g.: nano /boot/config/plugins/zfs/fix_zfs.sh Make it executable chmod +x /boot/config/plugins/zfs/fix_zfs.sh Run it /boot/config/plugins/zfs/fix_zfs.sh When it finishes, reboot Unraid. The UI should only show your healthy pool (orion). *This won’t touch your data drives — it only clears plugin metadata and regenerates the correct zpool.cache
-
I asume you also have some unriad plugins insalled like the zfs master plugin Some Best Practices for a ZFS only Setup: View ZFS Forum Info ZFS Unraid Docs Unraid caches ZFS pool configs separately from the normal /etc/zfs/zpool.cache. That’s why you’re seeing the “ghost” pool in the UI even though the CLI import is fine. so we may need to clear the plugin data for teh ghost pool... Make Sure the Good Pool Is Healthy (Post above) First confirm you can import and mount the good pool (ID 641826…): zpool export orion zpool import -f 64182623996842760 orion zpool status orion You should see all ONLINE drives and be able to browse /mnt/orion. Backup Unraid’s ZFS Plugin Config Before deleting anything: cp -r /boot/config/plugins/zfs /boot/config/plugins/zfs.bak.$(date +%F) That way if the UI gets upset, you can roll back. Remove the Stale Pool EntriesInside /boot/config/plugins/zfs/ you’ll likely find: zpool.cache Possibly per-pool config files (orion.cfg, orion*.dat etc.) Do this: rm /boot/config/plugins/zfs/zpool.cache rm /boot/config/plugins/zfs/*.dat rm /boot/config/plugins/zfs/*.cfg (Leave the directory itself — just clear the stale metadata.) Re-Export and Re-Import to RegenerateNow regenerate the correct config: zpool export orion zpool import -o cachefile=/boot/config/plugins/zfs/zpool.cache orion This creates a fresh plugin cache with only the good pool. Reboot and VerifyAfter reboot, the Unraid UI should now only see the healthy pool. Check: if unraid ui doens't see it user script plugin and zpool import zpool status Warrning: !!!!!Do NOT run zpool labelclear on your data drives. Only the old cache SSD.!!!!! Optional: Disable Ghost Discovery zpool labelclear -f /dev/sdX *on the removed read-cache SSD (if you still have it attached somewhere). That wipes the leftover ZFS label so it won’t ever advertise itself as part of orion. telling zfs that that disk is no longer the read cache...
-
so, just to clarify so I'm understanding you correctly... as it looks like you messed up a special disk without informing zfs of the edit or changes... see warning at the end! What HappenedYou had a RAIDZ2 pool (orion) and attached an SSD as a special read-cache device. When you physically swapped that SSD and manually removed it from the pool, ZFS left stale metadata device references in the pool config. Now zpool import shows two pools with the same name: Healthy pool (ID 6418…) → imports fine, all files accessible. Broken ghost pool (ID 2517…) → marked UNAVAIL with “corrupted data / insufficient replicas” because the missing special vdev destroyed its internal config. The ghost pool is confusing Unraid’s UI, which expects only one importable orion. Some Key ObservationsYour data pool is intact — proven by the fact you can zpool import 641826… orion and access /mnt/orion. The invalid pool is just a stale configuration entry, not another real set of disks. It references corrupted/nonexistent metadata replicas. The Unraid UI is choking because it sees both references. so lets review a potential recover plan. as we may need to invoke parts of the new config to erase the old ID and what unraid is tryign to do.... first lets Identify the Good Pool. you should know/have this given that you can mount the zfs array. zpool import Note the good pool ID (641826…). That’s the one to keep... as not all data is in the diag file. the daig help but i don't have enoth info to give full commands. Next we need to Force Import the Good Pool If it’s not already imported: zpool import -f -o cachefile=/etc/zfs/zpool.cache 64182623996842760 orion *If the 6#### id is the good one... This writes a fresh zpool.cache containing only the working config. As we willb e dealign with zfs acl and cofig first... Then you will need to Clear the Ghost Pool Reference The “bad” pool is only metadata. To drop it: Make sure the good pool is imported. zpool import -D Should show destroyed pools or corrupted entries If the bad ID appears, you can remove its ghost reference with zpool import -D -f <bad_pool_id> Or, safer: let the system rebuild the cache file (next step). as the system may do a scrub or resync... Finally we fix zfs with a cache rebuild with the new disk. Rebuild ZFS Cache Sometimes Unraid/ZoL just holds onto the stale entry. Refresh the cache: zpool set cachefile=/etc/zfs/zpool.cache orion or zpool export orion zpool import -o cachefile=/etc/zfs/zpool.cache orion This ensures only the good pool is seen. Once the sync is finished... now we can look at unraid and its UI... Reboot after the above so Unraid reloads the single valid pool. If the UI still shows broken references, remove /boot/config/plugins/zfs/zpool.cache (Unraid keeps its own copy) and let it regenerate after next import. then on the next boot the array should work as intended... Try the zpool export / import sequence with a rebuilt zpool.cache, then reboot Unraid. That should leave you with only the healthy pool (ID 6418…). Warnings!!!Do NOT attempt to import the corrupted pool (2517…). That pool truly has missing devices (special vdev) and importing it risks confusion. Do NOT run zpool clear or zpool replace on the bad entry. It won’t fix it — it’s not a real pool anymore. Your data is safe in the good pool. The goal is just cleaning up stale metadata so Unraid stops seeing two.
-
https://docs.unraid.net/unraid-os/using-unraid-to/manage-storage/shares/#primary-and-secondary-storage
-
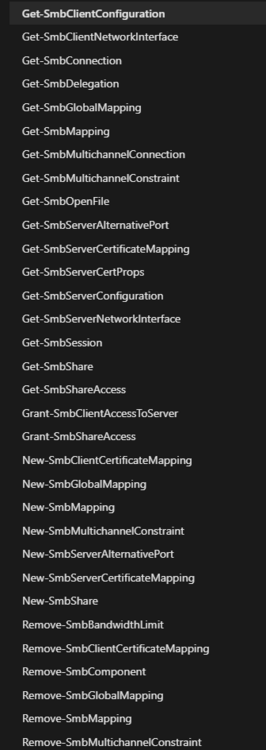
to much back and forth, this is general information not a support post... SMB Windows settings available through Power Shell... and Linux Samba Tools--- Informational Posting RE-READ Title! Most of what your dealing with as I see it, is default windows samba behavior and linux samba settings that has been answered in other forum posts and have other pins... as example in the general post chat Which Is a Support area! https://forums.unraid.net/topic/77442-cannot-connect-to-unraid-shares-from-windows-10/ So, Please make a general post with your diag and what PowerShell commands you used as i'd use the net map command as example to map the network share... a cmd command no PS, but PS can run... net use z: \\<unraid IP>\sharename as example to make a path drive and permeant connection and saved between reboots and curent user sessions. TO me, as you misunderstand the powershell commands this post and the info in the learn documentation... https://learn.microsoft.com/en-us/powershell/module/smbshare/?view=windowsserver2025-ps as theses would be used with GPO(Group Policy windows server) and scripted in a AD for when clients connect and are only active for the current user windows session of when the script that ran did what it did... Your use case and issues are on how you expected something to work when its not designd in that capacity... with out any other data what you ran what your tryign to do and in the wrong area about it... So Make a post (NOT HERE!) and @ me and I'll or another will help you else where.
-
I Highly recommend reviewing the Microsoft learn docs... its also on the Microsoft learn page and documentation for Windows server, and windows client samba setups... Get-SmbClientConfiguration (SmbShare)Use this topic to help manage Windows and Windows Server technologies with Windows PowerShell.Yeah Documentation! Now if we can get windows form breaking Linux samba that would be great to :p
-
didn't affect users using passkey logins with other web services like login in with facebook/apple/google account. (known as SSO login) What you must doIf you use a password to sign into Plex: We kindly request that you reset your Plex account password immediately by visiting https://plex.tv/reset. When doing so, there’s a checkbox to “Sign out connected devices after password change,” which we recommend you enable. This will sign you out of all your devices (including any Plex Media Server you own) for your security, and you will then need to sign back in with your new password. If you use SSO to sign into Plex: We kindly request that you log out of all active sessions by visiting https://plex.tv/security and clicking the button that says ”Sign out of all devices”. This will sign you out of all your devices (including any Plex Media Server you own) for your security, and you will then need to sign back in as normal. Then had issues and had to reclaim my plex serever... Went though the steps anyway and had to reclaim my server and edit the preference plex config to reclaim. https://www.reddit.com/r/PleX/comments/1nc6ox6/for_those_having_extreme_difficulty_reclaiming/ https://www.reddit.com/r/PleX/comments/wwfjqm/how_to_reclaim_your_server_after_resetting_your/ https://www.reddit.com/r/PleX/comments/1nc5wyc/reclaiming_linuxserver_plex_servers/ I had to remove some lines get a new claim key and reclaim my server with the old database data and libray no data loss after using the logout link at plex security to sign out and reset there... I appreciate you at least informing, as I would expect and would have expected Plex to send an email and not first hear it from a 3rd party area. I did my reset the 9th. When post the September 8 But, Thank you SpencerJ for bring this to our attention! I got the unraid announcement form before plex...
-
yes and no. GitHubGitHub - amd/xdna-driverContribute to amd/xdna-driver development by creating an account on GitHub. as somewhat explained here for intell. https://forums.unraid.net/topic/183499-intel-npu-drivers-installed/#findComment-1579038 Essentially your cpu has a onboard npu. This npu devices are still being developed and may or may not be in the kernel... You will need to find the ai npu lspci device and pass that into the docker/vm on unraid to use those additional chipset features.... you would be apart of some trial and error. or install a distro like debain and install the necessary drivers. Which is running on a different os like Debian linux/ubuntu and other AI oriented distros like proxmox lxc helpers etc.. to use other parts of the amd on board cpu/gpu, yes you will need the amd Radeon top drivers. https://github.com/ollama/ollama/issues/7882 https://www.reddit.com/r/Proxmox/comments/1ml4zea/amd_ryzen_9_ai_hx_370_igpu_passthrough/ I can't say it will or will not support the chip in regard to the NPU, NPU are still fairly new and may not be apart of the main upstream kernel. However, the CPU and onboard GPU for cpu and gpu is still part of the amd ryzen driver group and will function with unraid. That said I wouldn't recommend unriad and that hardware for an AI setup. https://digitalspaceport.com/how-to-setup-an-ai-server-homelab-beginners-guides-ollama-and-openwebui-on-proxmox-lxc/ per post: in time as more npu and streamline generics this will become more mainline and in linux kernels. NPU are the new GPU for specific chipset instructions.
-
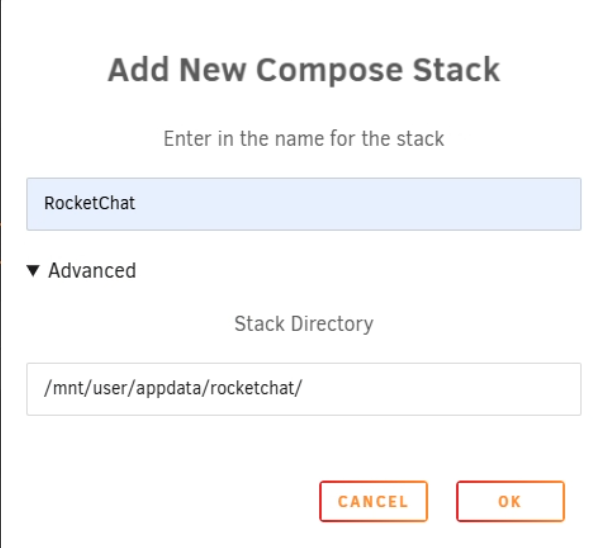
its easier to use a compose for this.... Volume bind mount needs folder to exist first. mkdir -p /mnt/user/appdata/rocketchat/mongodb Compose file #version: "3.9" name: rocketchat services: rocketchat: image: ${IMAGE:-registry.rocket.chat/rocketchat/rocket.chat}:${RELEASE:-latest} restart: always depends_on: - mongodb environment: ROOT_URL: ${ROOT_URL:-http://localhost} PORT: ${PORT:-3000} DEPLOY_METHOD: docker DEPLOY_PLATFORM: compose # REG_TOKEN is optional for Cloud registration; leave blank if not using REG_TOKEN: ${REG_TOKEN:-} # Required: MongoDB RS connection string MONGO_URL: ${MONGO_URL:-mongodb://mongodb:27017/rocketchat?replicaSet=rs0} # No TRANSPORTER set => monolith mode (no NATS) ports: - "${BIND_IP:-0.0.0.0}:${HOST_PORT:-3000}:${PORT:-3000}" labels: net.unraid.docker.webui: "http://[IP]:[PORT:3000]" net.unraid.docker.icon: "https://raw.githubusercontent.com/bmartino1/unraid-docker-templates/refs/heads/main/images/rocketchat.png" folder.view: "rocketchat" net.unraid.docker.managed: "composeman" #"com.centurylinklabs.watchtower.enable=true" networks: - rocketchat mongodb: image: docker.io/bitnami/mongodb:${MONGODB_VERSION:-6.0} restart: always environment: # Single-node replica set so Rocket.Chat can start MONGODB_REPLICA_SET_MODE: ${MONGODB_REPLICA_SET_MODE:-primary} MONGODB_REPLICA_SET_NAME: ${MONGODB_REPLICA_SET_NAME:-rs0} MONGODB_PORT_NUMBER: ${MONGODB_PORT_NUMBER:-27017} MONGODB_INITIAL_PRIMARY_HOST: ${MONGODB_INITIAL_PRIMARY_HOST:-mongodb} MONGODB_INITIAL_PRIMARY_PORT_NUMBER: ${MONGODB_INITIAL_PRIMARY_PORT_NUMBER:-27017} MONGODB_ADVERTISED_HOSTNAME: ${MONGODB_ADVERTISED_HOSTNAME:-mongodb} MONGODB_ENABLE_JOURNAL: ${MONGODB_ENABLE_JOURNAL:-true} # For quick start; replace with proper root/password secrets later ALLOW_EMPTY_PASSWORD: ${ALLOW_EMPTY_PASSWORD:-yes} volumes: - mongodb_data:/bitnami/mongodb:rw ports: - "${MONGODB_BIND_IP:-127.0.0.1}:${MONGODB_PORT_NUMBER:-27017}:${MONGODB_PORT_NUMBER:-27017}" labels: net.unraid.docker.icon: "https://raw.githubusercontent.com/bmartino1/unraid-docker-templates/refs/heads/main/images/rocketchatmongo.png" folder.view: "rocketchat" net.unraid.docker.managed: "composeman" #"com.centurylinklabs.watchtower.enable=true" networks: - rocketchat networks: rocketchat: volumes: # Unraid bind mount into appdata mongodb_data: driver: local driver_opts: type: none device: /mnt/user/appdata/rocketchat/mongodb o: bind env file: # Web #ROOT_URL=http://localhost ROOT_URL=http://192.168.1.254:3000 #set me to unirad ip address HOST_PORT=3000 PORT=3000 BIND_IP=0.0.0.0 # Rocket.Chat image IMAGE=registry.rocket.chat/rocketchat/rocket.chat RELEASE=latest REG_TOKEN= # Mongo connection (single-node RS) MONGO_URL=mongodb://mongodb:27017/rocketchat?replicaSet=rs0 # MongoDB (bitnami) basics MONGODB_VERSION=6.0 MONGODB_BIND_IP=127.0.0.1 MONGODB_PORT_NUMBER=27017 MONGODB_REPLICA_SET_MODE=primary MONGODB_REPLICA_SET_NAME=rs0 MONGODB_INITIAL_PRIMARY_HOST=mongodb MONGODB_INITIAL_PRIMARY_PORT_NUMBER=27017 MONGODB_ADVERTISED_HOSTNAME=mongodb MONGODB_ENABLE_JOURNAL=true ALLOW_EMPTY_PASSWORD=yes for a quick bare min off and running
-
yes appdata/mariadb/ is needed! This is where the file database write itself. if the docker image becomes corrupt or delete you lose the entire mysql database... this is why its important to map and volume map docker data to a physical file path so it doesn't bloat the docker image, and you don't lose everything in your docker for use else where. to remove a docker and its data complete you need to stop the docker. Delete the docker and check the box to remove the docker image. and if volume mounts and data paths were used clear out any existing configurations.







