Leaderboard


Popular Content
Showing content with the highest reputation on 06/23/22 in all areas
-
Application Name: Nextcloud Application Site: https://nextcloud.com/ Docker Hub: https://hub.docker.com/r/linuxserver/nextcloud/ Github: https://github.com/linuxserver/docker-nextcloud Note: Requires MariaDB or MySQL, please note the issues with binlogging detailed here. This is a Nextcloud issue which we have no control over. https://info.linuxserver.io/issues/2023-06-25-nextcloud/ For setup guide please see the article on our website here. Image is now upgrading Nextcloud internally For upgrading the Nextcloud version there are 3 options. 1. Update via the webui when the upgrade shows as available. 2. Update from the terminal when the upgrade shows as available with: docker exec -it nextcloud updater.phar 3. Manual upgrade using occ. ##Turn on maintenance mode docker exec -it nextcloud occ maintenance:mode --on ##Backup current nextcloud install docker exec -it nextcloud mv /config/www/nextcloud /config/www/nextcloud-backup ##Grab newest nextcloud release and unpack it docker exec -it nextcloud wget https://download.nextcloud.com/server/releases/latest.tar.bz2 -P /config docker exec -it nextcloud tar -xvf /config/latest.tar.bz2 -C /config/www ##Copy across old config.php from backup docker exec -it nextcloud cp /config/www/nextcloud-backup/config/config.php /config/www/nextcloud/config/config.php ##Now Restart docker container docker restart nextcloud ##Perform upgrade docker exec -it nextcloud occ upgrade ##Turn off maintenance mode docker exec -it nextcloud occ maintenance:mode --off ## Now Restart docker container docker restart nextcloud Once all is confirmed as working: ##Remove backup folder docker exec -it nextcloud rm -rf /config/www/nextcloud-backup ##Remove Nextcloud tar file docker exec -it nextcloud rm /config/latest.tar.bz2 Please post any questions/issues relating to this docker you have in this thread. If you are not using Unraid (and you should be!) then please do not post here, instead head to linuxserver.io to see how to get support.1 point
-
我在6.92版本中使用任何虚拟机添加我的独显GTX650TI都能完美的直通并安装显卡驱动,升级到6.10版本后,MAC OS和Ubuntu可以正常驱动显卡,唯独Windows出现了问题。 症状:安装Windows虚拟机,使用独显可以输出画面,分辨率很低的那种,在系统内安装显卡驱动后,设备管理器提示43的错误,无法驱动显卡! 于是我便在论坛寻求帮助,在得到版主他们的关注后,于今天得到解决的办法。此问题貌似只有老款显卡才出现,受到影响的显卡型号为:" GT740, GT710, GTX650TI, GTX670 "等老款显卡,如果你有同样的问题,请看下面临时的解决办法,后续版本更新,官方可能会修复这个bug。 首先打开Windows虚拟机的编辑 进到虚拟机配置选项,将当前页面更改为XML代码形式 编辑 XML 并在下面的功能部分中</ hyperv> 添加这串代码: <kvm> <hidden state='on'/> </kvm> 如图所示: 添加完代码点击更新,开启虚拟机,如果这个虚拟机是你之前安装好的,首次开启后还是不能加载显卡驱动,你需要在Windows内重启该虚拟机,注意是重新启动,不要关机在开机。 如果你是全新安装的Windows,或许可以省去上面重新启动虚拟机的步骤。我还没尝试全新安装。 如果你添加完代码,后续重新配置该虚拟机,例如分配内存,调整CPU,或者添加USB设备等会导致该代码消失,需要你重新添加此代码 再次感谢官方重视此问题,希望在下个版本中能够修复此问题!


 1 point
 -
Sure, i will try it out and give you feedback.1 point
-
THANK YOU. That worked. All is back to normal. You have no idea how grateful I am for you for taking the time to walk a noob like me though that.

 1 point
 -
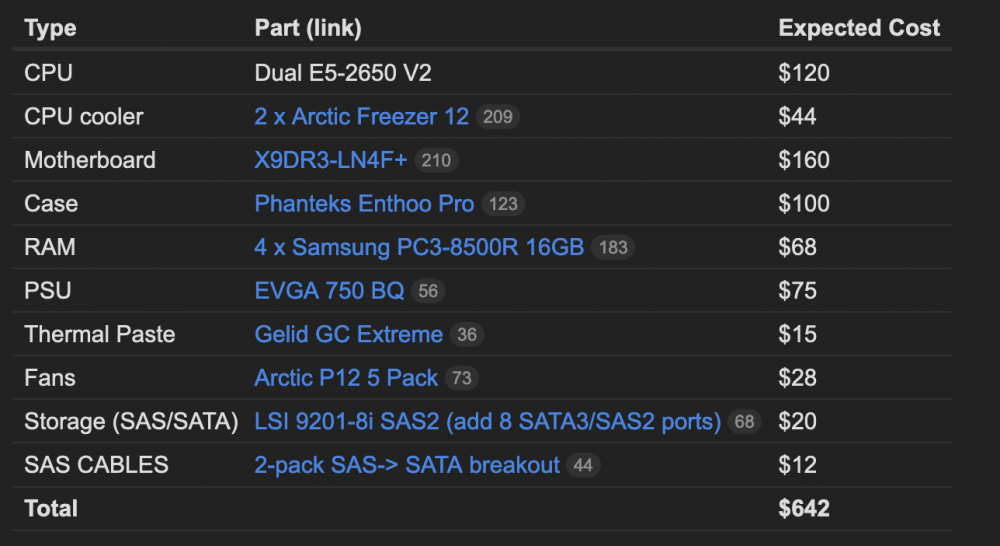
I didn't have time to find my spreadsheet, but creating something like this will help you with your homework of "create a build plan".
 1 point
 -
Well, I'm glad some of that info helped you out. And yes, there are many options and tricks to learn...but really, it's more important to understand your individual needs and how to execute them. There is a FANTASTIC youtube channel you need to follow/watch to expand your knowledge! https://www.youtube.com/channel/UCZDfnUn74N0WeAPvMqTOrtA/videos (this guy is a legend!!!!!) Regarding building your own setup: There is a builds section in this forum and there are specific forum areas just for hardware https://forums.unraid.net/forum/9-hardware/ https://forums.unraid.net/forum/15-motherboards-and-cpus/ https://forums.unraid.net/forum/33-storage-devices-and-controllers/ ^^this last one, "storage devices and controllers, will be pretty helpful for you regarding the HDD connections. If you would like a little info from a different source, I used this website/group a TON, because they are more interested in used datacenter and small office server parts vs new and off the shelf consumer parts. I know you have a decent starting budget, but the reason this is helpful, is because server parts are usually built to last longer, have more customizations and built for large scale setups. https://forums.serverbuilds.net/c/builds/18 https://forums.serverbuilds.net/t/guide-anniversary-2-0-starter-kit/1075/8 (lots of helpful info like this) Example: My motherboard can handle 14x Sata/Drive connections directly from the motherboard, no HBA/LSI card required. Here's your homework before buying your components: -Watch a ton of SpaceInvaders videos, especially the ones that sound a little more basic. you will learn many things even if its repetitive. -Have a "build plan". Watch the video below, 320TB video editing server. This is a real world scenario with a game plan. -Focus on your personal needs: how much space do you have, how many drives will you need to fit in the case, do you need to be energy efficient, do you need it to be super quiet, is heat an issue??? All of this will change the components you will use. -Will your UnRaid box be for storage only, or will you try and use the VMS and Docker functions? big difference in components. -RESEARCH your Motherboard/cpu combo!!!!!! this will be the limiting factor to your set-up scale/potential. Example: My current motherboard has 2x 10GB ethernet built-in, 14x sata connections, LOTS of ram upgradeability, Lots of PCIE lanes, etc.. (I wanted 10GB ethernet on-board, I wanted to avoid an LSI card so that I had more PCIE slots for GPUs and PCIE storage AND I wanted to be able to have lots of CPU options) PS: I think you will be fine with a 10GB ethernet connection. It doesn't sound like your use case will need more than that and 10GB = LESS HEAT than 40GB. (if you are doing big transfers from drives that already have info on them, you can add/mount those drives inside the server as a separate "unassigned device" and copy that data internally) i did this when i first setup my raid and needed to copy 4x 4TB HDDs into the UnRaid volume, vs connecting them from my computer and transferring them via 10G ethernet/SMB file share.1 point
-
Got it. Thanks anyways for your help!1 point
-
I've just tried that and I always get the same ffmpeg crash. By the way I was already using VA-API when I got that error message about "QSV to OpenCL mapping not usable", while I don't get it in the default container, so that's why I think that might be the issue.1 point
-
I've tried many files and I always get the same error but I haven't tried the official Jellyfin container yet. I'm going to try that and let you know if it works. Thanks a lot!1 point
-
BIE is no problem and neither should be V+ if only the DLL is downloaded to the correct folder: ./BepInEx/plugins/ The 1.4.4 (Labour of love / Final Update) should be released in a few weeks (hopefully)! But you never know with ReLogic... I wouldn't keep my hopes up for the summer but IF does drop and if I remember I will post an update!1 point
-
It should just be a case of stopping the array and restarting in Normal mode. At that point everything should be OK, but if not ask for advice.1 point
-
I see and I completely understand! Thank you for your quick response. As long as BIE is supported I can toss in V+ on the side. Even it it means a slight manual manouver.1 point
-
Completely understandable. Thanks for the prompt reply - Unfortunately I'm not in the position at the moment to be able to donate the game and appreciate WINE potentially adds more complication to the whole thing. Nonetheless, thanks for considering it and if/when I'm in a position to donate the game, I'll be happy to revisit the idea providing you're willing 🙂 Again, thank you for your contributions 😇1 point
-
yes please.1 point
-
You should not edit the go file at all for gpu passthrough. General steps are: - bind to vfio in system devices all the components of the gpu - setup the vm by passing through all the bounded devices in a multifunction device - for blackscreen/garbage screen additional entries in the syslinux configuration, for example video=efifb:off1 point
-
Jun 14 10:00:47 172.18.0.1 kernel: macvlan_broadcast+0x116/0x144 [macvlan] Jun 14 10:00:47 172.18.0.1 kernel: macvlan_process_broadcast+0xc7/0x110 [macvlan] Macvlan call traces are usually the result of having dockers with a custom IP address, switching to ipvlan should fix it (Settings -> Docker Settings -> Docker custom network type -> ipvlan (advanced view must be enable, top right)), or see below for more info. https://forums.unraid.net/topic/70529-650-call-traces-when-assigning-ip-address-to-docker-containers/ See also here: https://forums.unraid.net/bug-reports/stable-releases/690691-kernel-panic-due-to-netfilter-nf_nat_setup_info-docker-static-ip-macvlan-r1356/1 point
-
If it seems strange and you are unsure of what to do : breath do nothing ask on the forums (and attach your diagnostics)1 point
-
almost any major app like apache, mysql, SMB and even TCP/IP itself have a builtin oder plugin "autotuning feature". Those incorporate the network speed into their calculations. Usually this is not visible to the user or even the admin. Its hidden inside the code. And, what is helpful in most cases, can be very bad if feeded with the wrong values. But QEMU is not alone with this problem, Hyper-V for instance presented a 10G connection to the guests from the beginning on. The backening host mostly ran on 1G only. This resulted in new transfers starting blazing fast, then stopping (buffer overflow), then pacing down. TCP/IP by design is able to adopt to slower speeds quite fast, but reacts quite slowly if speed is going up again. It's a builtin safety feature to prevent too many ups and downs. So the Hyperv 10 to 1 is visible, but rather harmless, the 1 to 10 on the other hand is very noticable and annoying. It takes quite long until you get to the highest possible speed. Short transfers never get there. (but of course, at the end, everything works, its just a feature of optimization) You may read more details of this if you look for instance of the "Nagle - Algorithm". A very old and simple way to increase network througput. It takes the link speed into account to predict the needed timeouts for sending a packet or to wait for more data to create bigger packets. If the base speed is wrong, obviously the algorithm produces wrong timeouts too. (which are corrected later on after it came to a emergeny situation)1 point
-
You got answers from 2 pretty experienced members. nice! maybe you'd like to hear some feedback from someone that was in your position not too long ago... Before i do, I would like to make sure your understanding and expectation of data read/write speed is on the same page of different raid set-ups and how your storage is connected/managed. I only say this because I run LARGE 80TB+ storages in both of the following setups. DAS is "direct attached storage". NAS is "network attached storage". It seams like you are trying to create a NAS that works as a DAS. BOTH a DAS and NAS can run a traditional raid set-up, but I am only aware of a NAS being able to run other methods of raids. The basic "storage" foundation of UnRaid (this OS) is as follows: you can have multiple HDDs of mixed capacity and speeds all work in unison, while still having 1 or 2 drives as Parity you can add more drives and substitute drives at any time, with minimal work a file is written entirely to one drive only, meaning that drive can be read individually without needing the other drives from your system you can create a faster drive pool/cache for higher speed volumes Let's pretend you only have 10x 18TB Seagate Exos in your UnRaid system and you choose 1x of those drives as parity. (we'll save the SSD's and cache for later) Your Raw storage is 180TB, but your Volume/Usable storage would be 162TB. (-1x 18TB drive used for parity) Imagine you had a folder called "Movies" with 999 files/folders in them, each one around 65GB. Although you would see the "Movies" Folder and everything in it like a traditional single HDD/SDD, the folder would actually be physically across all the drives without "splitting" the individual files; an easy hypothetical would be: 999 movie files split between 9 drives (because the parity doesn't store the useable date)... meaning each drive would have around 111 movies stored on it. Cool? Have we understood the basics of it? Let's say you want to transfer/read/copy one of those movies files: The main limiting speed will be the drive that it is stored on. Yes, a Seagate Exos can do upto 260MB/s, but that is only a portion of the HDD that can read/write that fast. In the real world, some parts of that same Seagate Exos will only get around 50-80MB/s. Different areas of a HDD have different read/write speeds (depending on how full it is). A good SSD on the other hand, can read/write almost the same speed on any part of the drive. Good practice for users new to UnRaid: Not all storage needs to be wicked fast! But even if you do want higher speed storage, UnRaid has other tricks up it's sleeve, like cache pools, being able to mix in SSDs, creating folders that only use the faster storage array and other folders being stored only on the "slower" HDD setup. Example from my setup: (Notice how there are 3 levels of speed/importance) I have 8x 8TB of HDDs. I store pictures, videos and back-ups on there. Especially older files that i don't need regularly. (ski vacation pictures from 8 years ago) I have an 4TB SSD that only has 1 folder in it and the data in that folder doesn't get split to the HDDs. This is where I keep recent pictures that i don't need on my laptop. I have a 800GB PCIE/NVME storage that is used as a write cache. If i transfer 50GB of new pictures and drone footage to my Unraid, this storage is the fastest at receiving it, and then transfers it to the SSD or HDD (depending what folder I choose) at a pace that suits it. If I were to transfer the 50GB of new files directly to the HDD volume, my transfer speed would be limited by the write speeds of my drives. (They're around 88% full, so its around 100MB/s UnRaid is awesome, but understanding it's core functions are pretty important when it comes to your expectations and usage. BUT you're right. there is a learning curve to being a confident user. there are lots of functions, settings and best-practices that will improve or make your server work best for you! If you build your own system, you will learn more about system bottlenecks (when one component is slowing everything else down) and solving this. PS, I built both my systems from used server parts one bay (from reliable vendors). the first system was great, i learned a lot. but i then built a second system because i saw the bottlenecks/limits of my first system and was more informed on how to build a more up to date one.1 point
-
If you carried out the earlier listed step to check that the contents of the emulated disk looked OK then I would expect the final result will be fine. The advantage of doing this in Maintenance mode is that nothing else can write to the array while the rebuild is running which maximises speed. The disadvantage is that you cannot use the array in the meantime and until you return to normal mode cannot see what the contents of the disk being rebuilt will look like. I will edit the instructions to make this clearer.1 point
-
JorgeB, Thanks for looking into this. After upgrading and disabling things are looking better. I was able to recreate my array and have had no errors with 10.3.1 point
-
Yes! It is covered here in the online documentations accessible via the ‘Manual’ link at the bottom of the GUI.1 point
-
Aha! I see what changed. If you had an unraid.net cert installed in Unraid 6.9.2, it would be used for urls that did not match the cert, such as https://ipaddress. Unraid 6.10 has a big focus on security, so it will only use the unraid.net certificate for urls that actually match the certificate. For other urls, like https://ipaddress and https://tower.local it uses a self-signed certificate. So the change is that your browser is now seeing a self-signed cert for https://ipaddress and apparently Chrome on Mac thinks that is riskier than using a proper cert with the wrong url. I'd disagree, but anyway we can't control what Chrome on the Mac does. I'd suggest you have the same 3 options available to you.1 point
-
In my opinion, if you truly need VM primary drives larger than 265GB, then I would add the 1TB (1gb typo?) as an additional pool, dedicated to just the VM(s) primary vdisk(s). (domains share) Then you can use your current cache drive as storage for appdata and system shares, and as a temporary home for work in progress. Use the storage array for finished work, archives, and reference materials.1 point
-
Noted! As for what I'm moving, it's anything between folders. So if I want to move a download from my downloads to its MergerFS home on a local mount, I get permission denied. If I use Krusader to try to move the files between downloads and , I get a permission denied. If I try to modify content on my laptop via file sharing, I get permission denied. This is all I get in Sonarr: Access to the path "<file>" is denied. EDIT: This issue is resolved (for the time being) because of the fixes here.1 point
-
bug report done1 point
-
看看是不是这个影响:https://www.acwifi.net/21188.html1 point
-
I got this in CA now. Both server and relay1 point
-
Ja Wegen TRIM: Ist grundsätzlich im Array deaktiviert. Denke mal auch ohne Parität.1 point
-
Don´t work with Unraid 6.9.2 and macOS Monterey 12.0.11 point
-
So, Sonarr v3 is FINALLY here, its out of beta and is now the latest release, if you want to switch from Sonarr v2 to v3 then simply pull down the 'latest' tagged image. However, if you want to stick on Sonarr v2 then please do the following:- Go to unRAID Web UI/Docker/left click Sonarr/Edit and change the value for 'Repository' to:- binhex/arch-sonarr:2.0.0.5344-1-04 Click apply to pull down v2 image. Note:- There will be NO further development on v2 going forward. If you are using the tag name of 'v3' then please do the following to switch back to 'latest' (now v3):- Go to unRAID Web UI/Docker/left click Sonarr/Edit and change the value for 'Repository' to:- binhex/arch-sonarr:latest Note:- the 'v3' tag is now deprecated and will NOT be updated.1 point
-
Update: Since Unraid version 6.11.5 (maybe earlier, but seems to do with Slackware 15.0) the keymap settings have been greatly simplified and there is no longer a X11 folder present. (Because of Wayland? I'm not very educated on this.) Now one can add the line loadkeys en-latin9 to the end of the /boot/config/go file and it will boot with the Colemak layout. If you want an other layout, take a look at the filenames in the maps under /usr/share/kbd/keymaps/ and just run the command loadkeys [filename] and it will load the layout from the right map. From: http://docs.slackware.com/slackware:localization#loading_a_custom_console_keymap Out of date: I needed Colemak as my keyboard layout for the GUI boot mode interface. And the following should work for other keyboard languages and layouts as well. Don't know if this post is effective on an "old" thread and I am happy to start a new one to be of better service to others. (Please, let me know!) So I experimented with putting "setxkbmap us colemak" in the /boot/config/go file, putting the same line in script in the User Scrips plugin with added custom Cron command @reboot, and in the 'soft' terminal (the one started from the "terminal" button in the top bar of the webGUI), but all of those won't stick. In the "soft" terminal it gives the following error: Cannot open display "default display" Couldn't figure that out why it does that. Then I noticed when I started the terminal from the Lime Technology "start" button, outside Firefox, it did stick/work! Copied (cp) the /usr/share/X11/xorg.conf.d/90-keyboard-layout-evdev.conf to the /boot/custom folder and edited it with nano to add "colemak" in the quotes on the -Option "XkbVariant"- line, so it looks like this: Section "InputClass" Identifier "keyboard-all" MatchIsKeyboard "on" MatchDevicePath "/dev/input/event*" Driver "evdev" Option "XkbLayout" "us" Option "XkbVariant" "colemak" Option "XkbOptions" "terminate:ctrl_alt_bksp" EndSection and added the "cp /boot/custom/90-keyboard-layout-evdev.conf /usr/share/X11/xorg.conf.d" line to the /boot/config/go file, shown below: !/bin/bash #Set the keyboard layout to US Colemak cp /boot/custom/90-keyboard-layout-evdev.conf /usr/share/X11/xorg.conf.d # Start the Management Utility /usr/local/sbin/emhttp & cp /boot/custom/docker-shell /usr/local/bin Not sure if it makes a difference to add it before the "emhttp" commandline. Now when the boot GUI starts you can immediately use the new keyboard setting in the login and password box!1 point
-
If you want to read: https://www.kernel.org/pub/linux/kernel/people/hpa/raid6.pdf1 point
-
Hi, I had the same problem. Searched the Virtio cd drive for a better driver. It then installed: Red Hat QXL controller I can now select 1920x 1080 as resolution. That’s god enough for me1 point


