Leaderboard


Popular Content
Showing content with the highest reputation on 09/06/20 in all areas
-
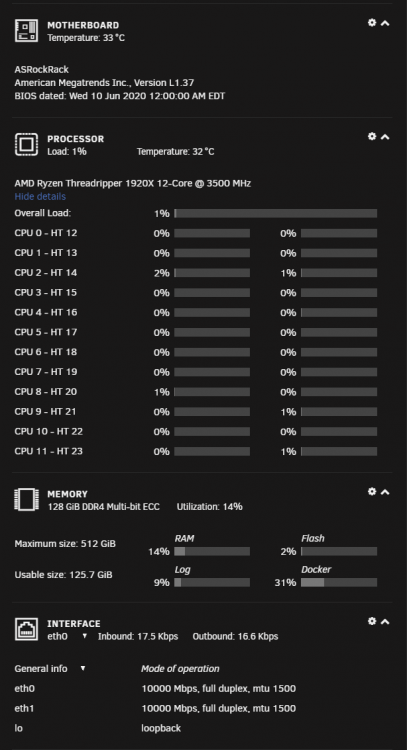
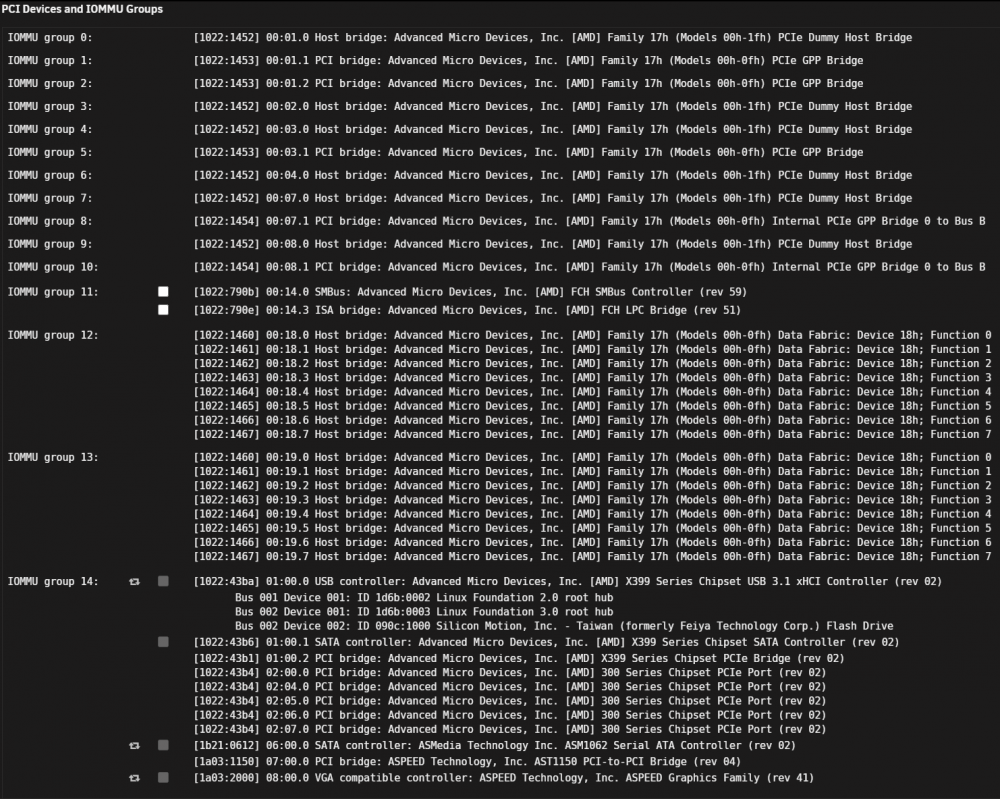
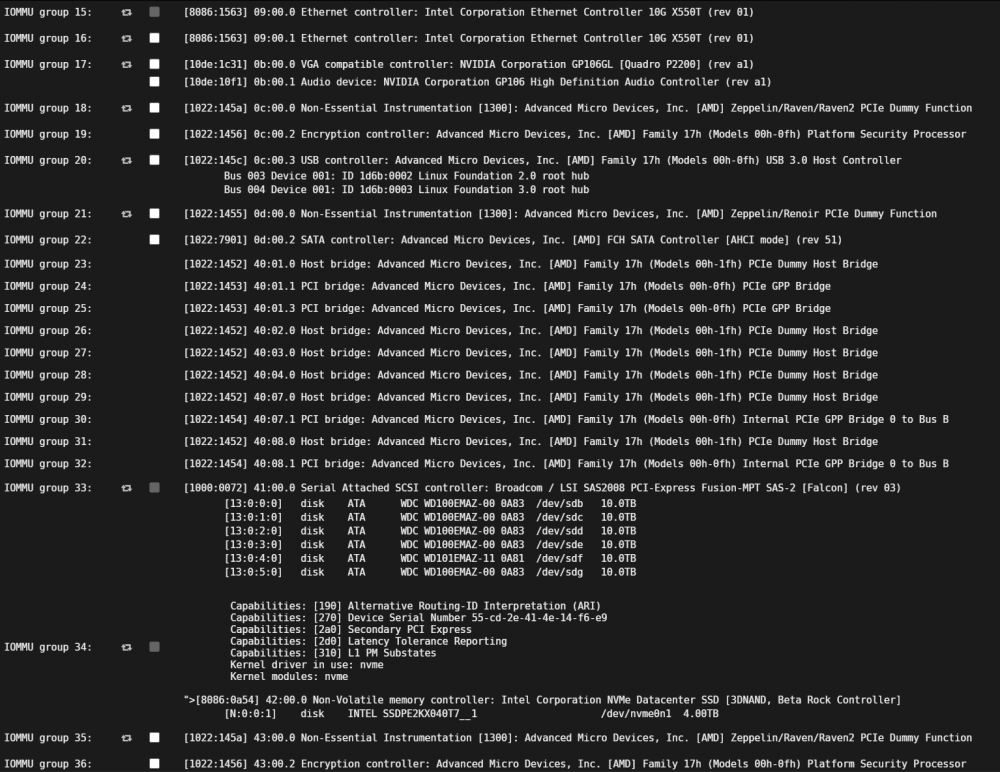
Been running it for a few months now and love it, it's been super stable (disabled C states and set power supply idle control to typical in BIOS). Both Intel NIC's work out the box and register as 10Gb and the IOMMU groupings are nice as well. Details of my system are in my signature. I am on the latest 6.9.0Beta25 using a recompiled Kernel to add Nvidia Drivers from @ich777 's nice docker tool - Here For BIOS and BMC: BMC Version - 1.30.00 - Download BIOS Version - L1.37 (BETA BIOS I requested from Support) - Download For the BETA BIOS, it's been rock solid. The difference with this one is not only (current release bios doesn't even have bifurcation) does it allow you to set bifurcation, but it does so on a per PCIe slot basis. BETA BIOS prior had PCIe slots setup in groups. So if you wanted to set one slot to x4x4x4x4, then you got two slots as x4x4x4x4, I didn't like that. I am posting it in my onedrive for you since I find it a requirement.
 3 points
 -
I was answering the last line. There will be a new template when we get around to it. The container still works, so no need to panic.2 points
-
Hi guys this week i have made a tutorial about how to add a cache drive to your server. It also shows how to upgrade or replace an existing cache drive without loosing data Also you will see how to create a raided btrfs cache pool. Hope you find it useful! How to add a cache drive, replace a cache drive or create a cache pool1 point
-
If you look at the instructions about dumping the bios here on the forum, you should find a command to unbind the card from modules. Hopefully that is enough. I don't remember which thread it was in, so you will need to search for it. Probably best doing it on Google.1 point
-
no. It just cancels the script Flushing all the writes from RAM to the hard drive. Akin to "Safely Eject" on Windows for USB.1 point
-
I had to have 2 gpu unless you block it on boot1 point
-
Hmm, you could try passing the vbios through as I've had issues before without doing that. I'm not sure past that as I've not had the best of luck myself with VM's.1 point
-
@binhex Would it be possible to have the script run through a list of .ovpn files after failing to port forward with one? Use case would be, CA-Montreal is having port-forward API issues right now, and as it is the first in the list alphabetically (I assume), the script only chooses it to retry with. Could it instead take a list of all .ovpn files in the config/openvpn directory and try them each in succession until a successful API call is made? As always, thanks for your work!1 point
-
As I understand it you want to passthrough the NVME and use it as primary disk for the VM, then you should set the option "Primary vDisk Location:" to "none" instead.1 point
-
all 3 gpu's are selectable for bind to vfio driver, only the amd vega64 is stubbed, only the GPU that unRAID use for it's GUI has problems (the GT710) the 1050ti which is in use for plex transcode, works fine. if i switch in the bios from the gt710 to the 1050ti, then bold gpu stayed at P0 state and gui issues.1 point
-
Thank you, sir! That was exactly it.1 point
-
Most free is generally bad for performance since parity writes will overlap when switching disks, this can be somewhat mitigated by using some split level, if not recommend using high-water or fill-up for best performance. Most free can be good for an SSD array with faster parity, e.g. I have a small SSD array and since parity is much faster NVMe device and can keep up with multiple disk writes I use most free for best performance.1 point
-
1 point
-
Interestingly they seem to be the same template, at least when I click through to them. And yes my SMTP settings work but I'm using gmail not yahoo.1 point
-
Well, first thing, the description does not match the product. This is a Dell RAID card (which was made by LSI) which has been cross-flashed to the corresponding LSI firmware. The delivery time seems long for a Product that is in stock in the USA. The vendor has had only four reviews in the past 90 days and none for the item... BTW, Amazon is not noted for vetting the claims of many of the vendors who just sell on their site. You do get a good protection is for product "fulfilled and shipped by Amazon" but shipments direct from a vendor I don't believe has this level of protection. I recently bought one of these from this vendor: https://www.ebay.com/itm/Dell-VGXKD-LSI-9207-8i-6Gbps-SAS-PCIe-3-0-HBA-P20-IT-Mode-ZFS-FreeNAS-unRAID/162862201664?hash=item25eb57fb40:g:kmQAAOSwwste8S8V and also found that he has these: https://www.ebay.com/itm/Fujitsu-D2607-A21-6Gbps-SAS-HBA-w-LSI-9211-8i-P20-IT-Mode-ZFS-FreeNAS-unRAID/163243700697?hash=item26021531d9:g:ZuoAAOSw9xJcAI9Z While they are used, they are genuine LSI product (made under an OEM contract) which some/most of the 'new' LSI cards are not. (Most of them are salvaged when server farms were decommissioned.) Undoubtedly, some of the counterfeit manufacturers may be providing quality products, you can't tell which is which since they all look alike because they even copied the artwork on the PC boards right to the paper labels!1 point
-
I didn't bother to look at your user share settings. I am guessing they are default because the fact that disk1 is so much larger than your other disks is enough to explain what you are seeing. The default Allocation Method is High-Water. It is the default for a good reason. High-Water is a compromise between using all disks (eventually) without constantly switching between disks just because one disk temporarily has more free space than another. There is Help in the webUI. You can toggle Help on/off for everything in the webUI by clicking the Help (?) button. You can also toggle Help for a specific setting by clicking on its label. Go to Shares - User Shares and click on one of your User Shares to get to its Settings page, then click on the Allocation Method label. Based on the disks you have installed, 12TB disk1 is chosen until it gets to 6TB remaining, then since it still has the most free, it is chosen until it gets to 3TB remaining. Then disk2 will be chosen until it gets to 2TB remaining, and so on. Currently, disk1 still has some way to go before another disk will be chosen. You can adjust the Disk Utilization Warning for specific disks by going to Main - Array Devices and clicking on the disk to get to its Settings page.1 point
-
This is an old thread but nobody else is using it so you can have it now. There are several settings for each user share that control how Unraid chooses which disk to write. Sounds like you must have not used the defaults, which would have (eventually) began using other disks long before filling any. Go to Tools - Diagnostics and attach the complete Diagnostics ZIP file to your NEXT post in this thread.1 point
-
What exactly happens when you try to pass through the GPU? Try setting the machine type to Q35 if you haven't already as AMD drivers don't like i440fx. This patch isn't specific to AMD CPU's, it just has patches which help with CPU's that are based on Zen2.1 point
-
As I discovered custom docker network is apparently kept in docker.img, so when you recreate docker.img you must recreate custom network. It is a simple one line command best done before reinstalling containers.1 point
-
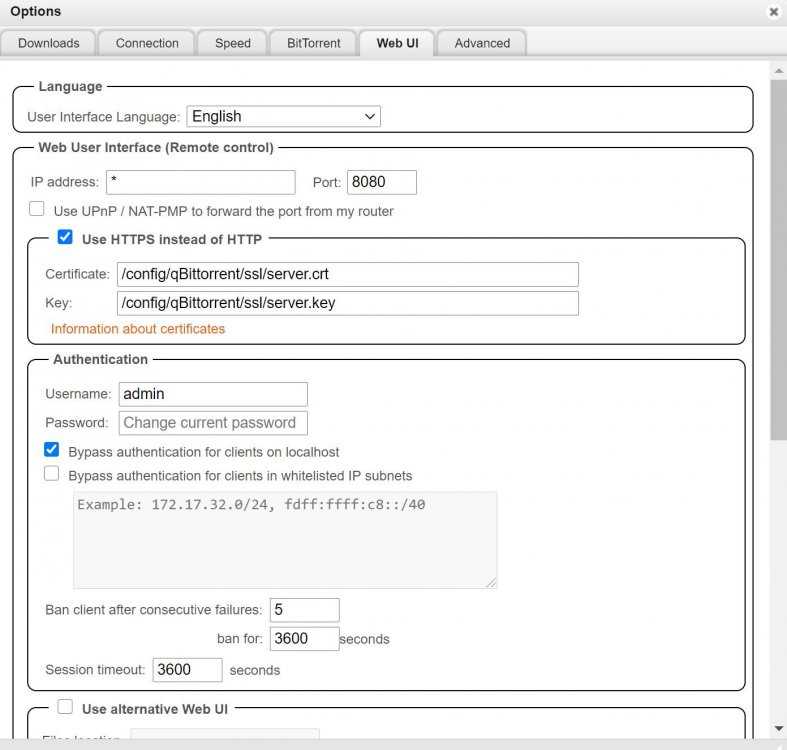
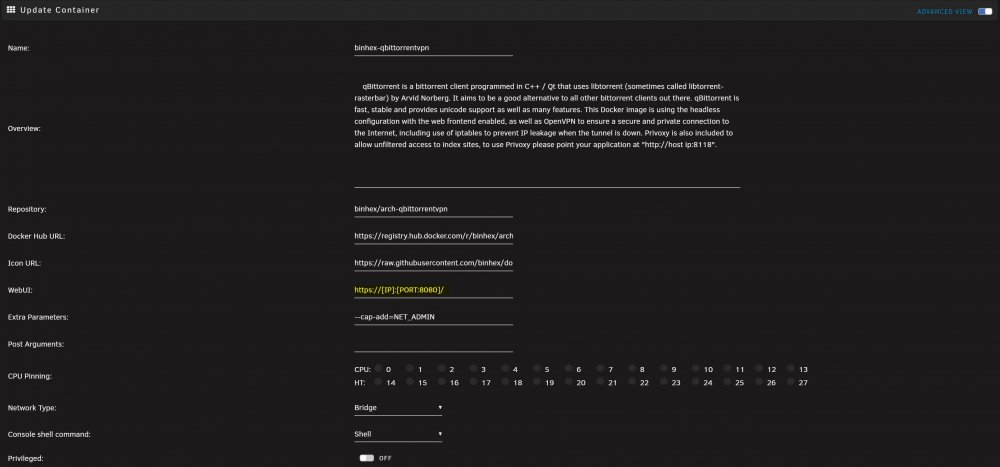
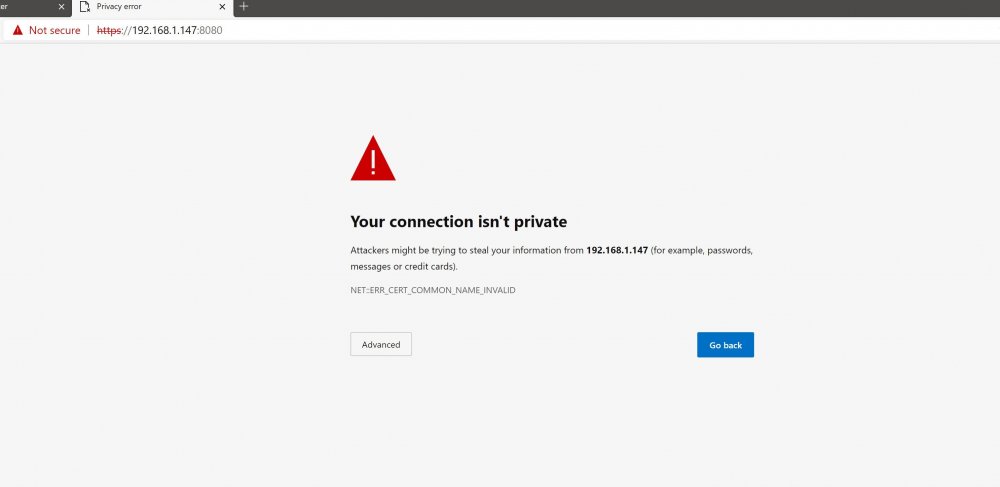
Create a necessary folder in \\yourservername\appdata\binhex-qbittorrentvpn\qBittorrent Create a folder called ssl Open up terminal and type, cd /mnt/user/appdata/binhex-qbittorrentvpn/qBittorrent/ssl This will make it so the directory is now active. Now we can generate the self signed key and certificate pair. In terminal add this command. openssl req -new -x509 -nodes -out server.crt -keyout server.key Answer the questions or press enter to leave blank. You should now have two files in your ssl folder. server.crt server.key Now go to your qbittorrent web-interface then open the Tools -> Options... in the menu bar (or click the screwdriver or cogwheel icon depending on your version), and click on the tab labelled WebUI. Enable HTTPS and add the location of the files. Add to the boxes, /config/qBittorrent/ssl/server.crt /config/qBittorrent/ssl/server.key Close the page and edit the qbittorrent container in advance mode and on the line WebU: Change http://[IP]:[PORT:8080] / to https://[IP]:[PORT:8080]/ when you go to the docker webui you will now see this page. Select advanced and proceed to the docker login page, you will notice it still says not secure ( https:// ) don't worry thats because of the self signed certificate. Because its self signed its not been verified by a third party, so will show not secure ( to my knowledge ) Now when you click on register to handle magnets a pop up box will apper. Click allow, A pop up box ( user account control ) will open click yes to continue you can now open magnets, that will open qbittorrent stright away with the necessary URL Have tested this with Google Chrome and Microsoft Edge. Hope this makes sense.

 1 point
 -
Hi ezhik, Temps are fine! I have given the WS2019 & Exchange2019 VM all Cores and sometimes when a CU needs to be applied while theres plus 30° C in my office., the MoBo realizes that the CPU is getting to hot (above 80° C), beeps and cycles the CPU down until the reboot. That happened as well when the missus put arround 5000+ 4K-Photos in the PhotoPrism-Share after our vacation, letting it render thumbnails in various resolutions until <BEEP> 🙂 Despite that: Wether the CPU nor the Seagate Hdds ever got too hot during patity check, but unfortunatly for me, tests indicate that they don't last very long: HDD reliability test The Samsung nvme never exceeded its temperature limit. Nonetheless i would love to have a CPU-threshold for VMs and Dockers in percentage instead of simply reducing cores in UnRaid but that belongs somwhere else 🙂 But anywho: When the cube gets too hot for a few minutes: Cold blow of a Hairdryer will do 🙂 Best, Ron
 1 point
 -
Can't speak to the X570 taichi, but I just recently upgraded to a used X370 taichi and it's been great. stable, overclocked the memory just fine, 10 sata ports (none of which get deactivated when using either of the M2 slots). Only thing I can't attest to is passthrough, as I'm not running any VM's yet, but i've read others saying it wasn't an issue. I couldn't justify the new price tag for an X570 version when I came across the $85 used x370. Pcie 4.0 and 2 less SATA ports for $200 extra.1 point
-
For me it was very straighforward with no need to create records in the DC, just set the DNS to the domain controller, use an AD admin to join it and voila it works!, to clarify the domain controller is running Windows Server 2012 R2 and the schema level if for the same OS.1 point
-
Then you should know, not all repeaters are created equal. If the backhaul has a dedicated isolated channel, repeaters can be just as fast as wireless in general. Which still isn't fast or reliable enough for a server, but still usable.1 point
-
@bonienl - it seems that this does the trick for me. (see log) I'll validate this within the next days to be sure that my server is going to sleep reliably and will give an update here. If I can validate this, it would be nice (for others) if you extend your help description of the parameter "Device activity monitoring" with a short note, that in case of troubles users should try "counters only". Thanks again - update follows. Jun 3 00:03:26 UNRAID s3_sleep: All monitored HDDs are spun down Jun 3 00:03:26 UNRAID s3_sleep: Extra delay period running: 0 minute(s) Jun 3 00:03:26 UNRAID s3_sleep: Check TCP/SSH/TTY/IP activity Jun 3 00:03:26 UNRAID s3_sleep: Communication state is idle Jun 3 00:03:26 UNRAID s3_sleep: Enter sleep state now Jun 3 00:03:26 UNRAID kernel: PM: suspend entry (deep) Jun 3 00:03:26 UNRAID kernel: PM: Syncing filesystems ... done. Jun 3 10:00:10 UNRAID kernel: Freezing user space processes ... (elapsed 0.001 seconds) done. Jun 3 10:00:10 UNRAID kernel: OOM killer disabled. Jun 3 10:00:10 UNRAID kernel: Freezing remaining freezable tasks ... (elapsed 0.000 seconds) done. Jun 3 10:00:10 UNRAID kernel: Suspending console(s) (use no_console_suspend to debug) Updates: Jun 4th -> going to sleep at 00:03 - wake up at 10:00 - verified ✔️ Jun 5th -> going to sleep at 00:03 - wake up at 10:00 - verified ✔️ Jun 6th -> going to sleep at 00:03 - wake up at 09:50 due to manual WOL - verified ✔️ Jun 7th -> going to sleep at 00:03 - wake up at 10:00 - verified ✔️ Jun 8th -> going to sleep at 00:03 - wake up at 10:00 - verified ✔️ @bonienl - as you can see in my updates, I happily can verify that changing the setting to "counters only" is the solution. So it appreciatly you can change the help note and add the information that changing to counters only will solve problems with the sleep Thanks and have a nice day.1 point
-
Personally I would love to see the use of Podman over docker eventually.1 point
-
With a macOS vm it has custom things in the xml. If you look at the end of the first xml you posted and the second you will see. Because of this any changes that you need to do to the template cant be done in the Unraid template manager as it removes custom edits at present. So edit the xml and put this in its place. <?xml version='1.0' encoding='UTF-8'?> <domain type='kvm' xmlns:qemu='http://libvirt.org/schemas/domain/qemu/1.0'> <name>MacinaboxMojave</name> <uuid>fe4cdace-a7b4-456d-9885-c28ea78fde83</uuid> <description>MacOS Mojave</description> <metadata> <vmtemplate xmlns="unraid" name="MacOS" icon="/mnt/user/vms/MacinaboxMojave/icon/mojave.png" os="Mojave"/> </metadata> <memory unit='KiB'>4194304</memory> <currentMemory unit='KiB'>4194304</currentMemory> <memoryBacking> <nosharepages/> </memoryBacking> <vcpu placement='static'>2</vcpu> <cputune> <vcpupin vcpu='0' cpuset='0'/> <vcpupin vcpu='1' cpuset='1'/> </cputune> <os> <type arch='x86_64' machine='pc-q35-3.1'>hvm</type> <loader readonly='yes' type='pflash'>/mnt/user/vms/MacinaboxMojave/ovmf/OVMF_CODE.fd</loader> <nvram>/mnt/user/vms/MacinaboxMojave/ovmf/OVMF_VARS.fd</nvram> </os> <features> <acpi/> <apic/> </features> <cpu mode='host-passthrough' check='none'> <topology sockets='1' cores='2' threads='1'/> </cpu> <clock offset='utc'> <timer name='rtc' tickpolicy='catchup'/> <timer name='pit' tickpolicy='delay'/> <timer name='hpet' present='no'/> </clock> <on_poweroff>destroy</on_poweroff> <on_reboot>restart</on_reboot> <on_crash>restart</on_crash> <devices> <emulator>/usr/local/sbin/qemu</emulator> <disk type='file' device='disk'> <driver name='qemu' type='qcow2' cache='writeback'/> <source file='/mnt/user/vms/MacinaboxMojave/Clover.qcow2'/> <target dev='hdc' bus='sata'/> <boot order='1'/> <address type='drive' controller='0' bus='0' target='0' unit='2'/> </disk> <disk type='file' device='disk'> <driver name='qemu' type='raw' cache='writeback'/> <source file='/mnt/user/vms/MacinaboxMojave/Mojave-install.img'/> <target dev='hdd' bus='sata'/> <address type='drive' controller='0' bus='0' target='0' unit='3'/> </disk> <disk type='file' device='disk'> <driver name='qemu' type='qcow2' cache='writeback'/> <source file='/mnt/user/vms/MacinaboxMojave/macos_disk.qcow2'/> <target dev='hde' bus='sata'/> <address type='drive' controller='0' bus='0' target='0' unit='4'/> </disk> <controller type='usb' index='0' model='ich9-ehci1'> <address type='pci' domain='0x0000' bus='0x00' slot='0x07' function='0x7'/> </controller> <controller type='usb' index='0' model='ich9-uhci1'> <master startport='0'/> <address type='pci' domain='0x0000' bus='0x00' slot='0x07' function='0x0' multifunction='on'/> </controller> <controller type='usb' index='0' model='ich9-uhci2'> <master startport='2'/> <address type='pci' domain='0x0000' bus='0x00' slot='0x07' function='0x1'/> </controller> <controller type='usb' index='0' model='ich9-uhci3'> <master startport='4'/> <address type='pci' domain='0x0000' bus='0x00' slot='0x07' function='0x2'/> </controller> <controller type='sata' index='0'> <address type='pci' domain='0x0000' bus='0x00' slot='0x1f' function='0x2'/> </controller> <controller type='pci' index='0' model='pcie-root'/> <controller type='pci' index='1' model='pcie-root-port'> <model name='pcie-root-port'/> <target chassis='1' port='0x10'/> <address type='pci' domain='0x0000' bus='0x00' slot='0x02' function='0x0' multifunction='on'/> </controller> <controller type='pci' index='2' model='pcie-root-port'> <model name='pcie-root-port'/> <target chassis='2' port='0x11'/> <address type='pci' domain='0x0000' bus='0x00' slot='0x02' function='0x1'/> </controller> <controller type='pci' index='3' model='pcie-root-port'> <model name='pcie-root-port'/> <target chassis='3' port='0x12'/> <address type='pci' domain='0x0000' bus='0x00' slot='0x02' function='0x2'/> </controller> <controller type='pci' index='4' model='pcie-root-port'> <model name='pcie-root-port'/> <target chassis='4' port='0x13'/> <address type='pci' domain='0x0000' bus='0x00' slot='0x02' function='0x3'/> </controller> <controller type='virtio-serial' index='0'> <address type='pci' domain='0x0000' bus='0x02' slot='0x00' function='0x0'/> </controller> <interface type='bridge'> <mac address='52:54:00:c8:13:3a'/> <source bridge='br0'/> <model type='vmxnet3'/> <address type='pci' domain='0x0000' bus='0x01' slot='0x00' function='0x0'/> </interface> <serial type='pty'> <target type='isa-serial' port='0'> <model name='isa-serial'/> </target> </serial> <console type='pty'> <target type='serial' port='0'/> </console> <channel type='unix'> <target type='virtio' name='org.qemu.guest_agent.0'/> <address type='virtio-serial' controller='0' bus='0' port='1'/> </channel> <input type='tablet' bus='usb'> <address type='usb' bus='0' port='1'/> </input> <input type='mouse' bus='ps2'/> <input type='keyboard' bus='ps2'/> <graphics type='vnc' port='-1' autoport='yes' websocket='-1' listen='0.0.0.0' keymap='en-us'> <listen type='address' address='0.0.0.0'/> </graphics> <video> <model type='qxl' ram='65536' vram='65536' vgamem='16384' heads='1' primary='yes'/> <address type='pci' domain='0x0000' bus='0x00' slot='0x01' function='0x0'/> </video> <memballoon model='virtio'> <address type='pci' domain='0x0000' bus='0x03' slot='0x00' function='0x0'/> </memballoon> </devices> <qemu:commandline> <qemu:arg value='-usb'/> <qemu:arg value='-device'/> <qemu:arg value='usb-mouse,bus=usb-bus.0'/> <qemu:arg value='-device'/> <qemu:arg value='usb-kbd,bus=usb-bus.0'/> <qemu:arg value='-device'/> <qemu:arg value='isa-applesmc,osk=Taken out as not allowed on the forums'/> <qemu:arg value='-smbios'/> <qemu:arg value='type=2'/> <qemu:arg value='-cpu'/> <qemu:arg value='Penryn,kvm=on,vendor=GenuineIntel,+invtsc,vmware-cpuid-freq=on,+pcid,+ssse3,+sse4.2,+popcnt,+avx,+aes,+xsave,+xsaveopt,check'/> </qemu:commandline> </domain> Please note i have changed one line that you will need to change back <qemu:arg value='isa-applesmc,osk=Taken out as not allowed on the forums'/> This should container the osk key. You can see it in your first post with the xml (but please edit your post to remove it due to forum rules..thanks)1 point
-
Hi Guys this is a tutorial on how to setup and use Duplicati for encrypted backups to common cloud storage providers. You will also see how to backup from your unRAID server to another NAS/unRAID server on your network. You will also see some of the common settings in Duplicati and how to also restore backups etc. Hope its useful How to easily make encrypted cloud or network backups using Duplicati1 point
-
came here asking me the same but i figured it out. So in case anyone else is wondering how to do this: When you have the webinterface open press alt + ctrl + shift, this opens a sidebar where you can edit the clipboard. Paste your links there and jdownloader will find them.1 point