Leaderboard


Popular Content
Showing content with the highest reputation on 12/14/22 in all areas
-
Hi guys. Do you think someone can help to add a container for Tidal Media Downloader PRO. https://github.com/yaronzz/Tidal-Media-Downloader-PRO It is a great tool for offline listening to music and download (subscribers only) [ Although a docker exist I haven't managed to install it. https://hub.docker.com/r/rgnet1/tidal-dl/ Thank you in advance for your help.1 point
-
Hi, I have enabled "Host access to custom networks" in Docker settings which normally creates the shim-br0 macvlan bridge on boot. But, if the physical network link is down (e.g. cable unplugged), the shim-br0 is not created on boot, causing routing problems between the containers (e.g. when using Nginx Proxy Manager reverse proxy logs report "No route to host") I would understand this issue if I my Unraid would use DHCP, but my Unraid's network address, DNS and gateway is configured with STATIC addresses. To fix, I would suggest to not start docker service on boot until physical network link is up (e.g. network cable is plugged in). Any suggestions for a work-around in the meantime ? Thanks for any help. Edit: I found some code in the forum to manually create the shim-br0 bridge, but I am reluctant to use it because of the hard-coded IP ranges and implementation via cron. A more elegant approach to this problem would be nice. ip link add shim-br0 link br0 type macvlan mode bridge ip link set shim-br0 up ip route add 192.168.1.0/25 dev shim-br0 ip route add 192.168.1.128/25 dev shim-br01 point
-
https://prnt.sc/sxdEQ2N0i8v- Okay.. after i have add radpg=15 in right place and found another Vbios file (Attached) from TechPowerUP issue solved, now i can use the XFX Ghost Edition AMD HD 7770 in Monterey thank you verry mutch ghost82 for assist cYa BUSTER XFX.GHOST.HD7770.1024.121106.rom1 point
-
You're a scholar and a pal - thank you for the help - Sent you some beer money on paypal! Merry Christmas1 point
-
Post the contents of the Backup/Restore Status tab.1 point
-
Reinstalling (two times) helped. It seems that Node.js binary was not downloaded completely or could not be decompressed. Thank you very much!1 point
-
InjectAMD is a boot-arg you can add into the config.plist, but it's deprecated. Not all 7770 work in mac os, enable logging to file in opencore config.plist and maybe you will find where/why it hangs. Check that your gpu has uefi rom, or if you are using a vbios file check that the rom file has the uefi part. Apply multifunction for gpu in the xml.1 point
-
erledigt --> Klick cYa BUSTER1 point
-
Aha, is there a resource somewhere with controllers that are known to be working? The controller is new so I should be able to return it. Edit: did some googling and found the post with recommended controllers myself Thanks for the help and info!1 point
-
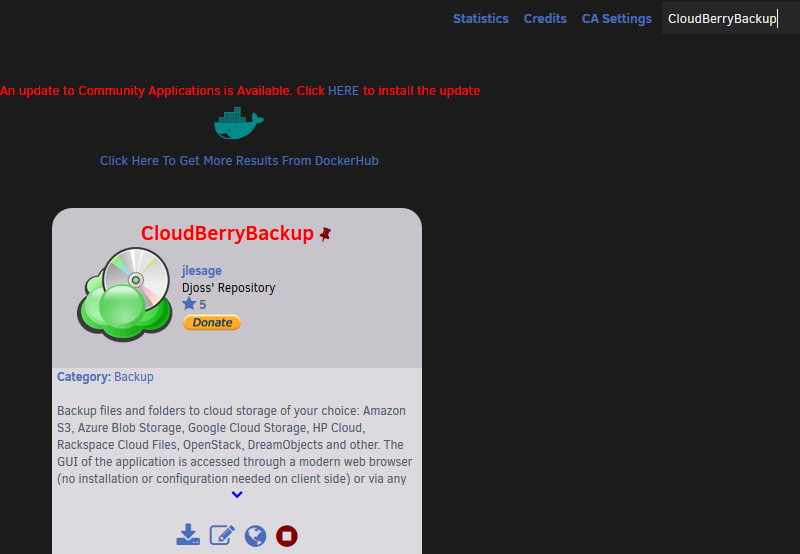
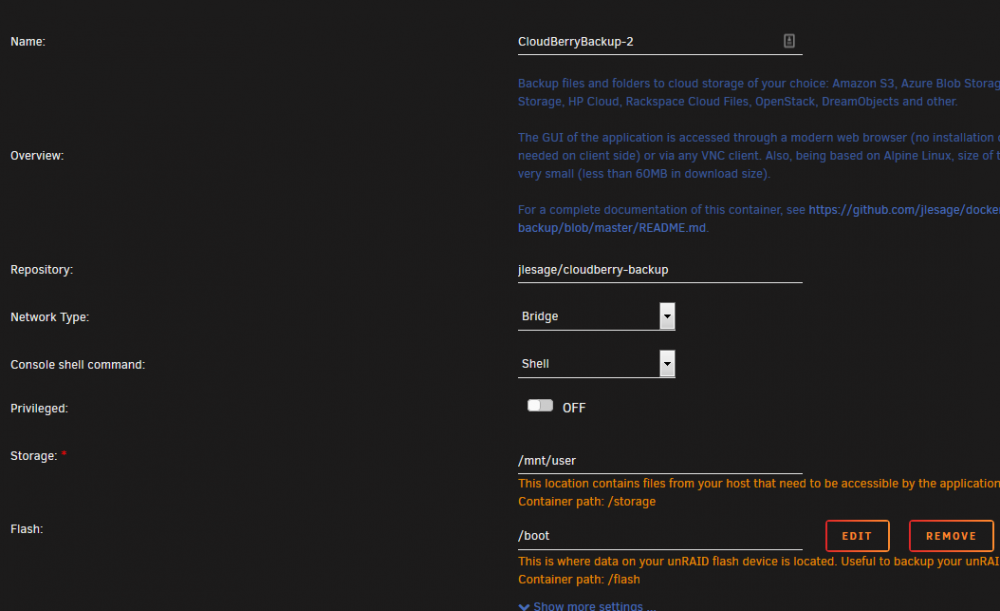
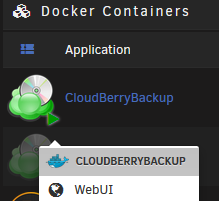
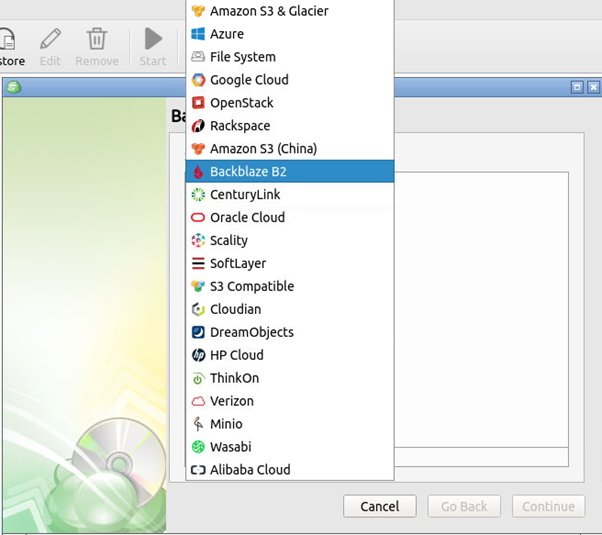
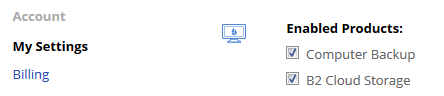
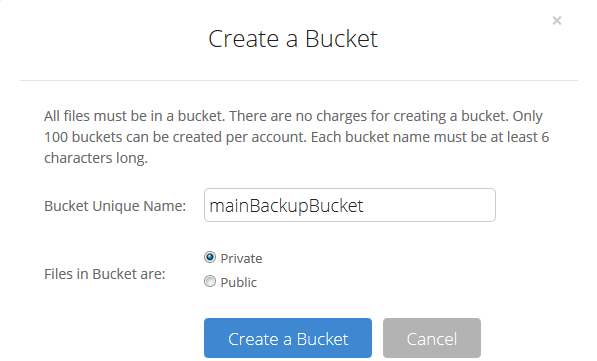
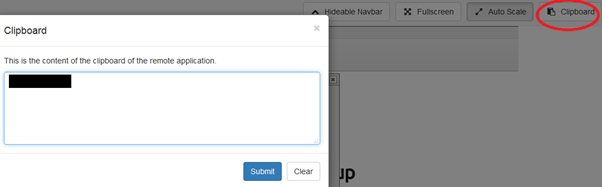
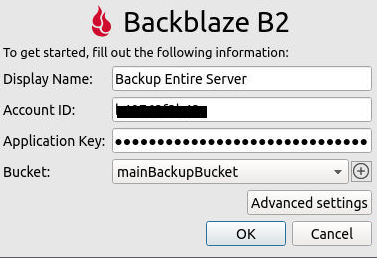
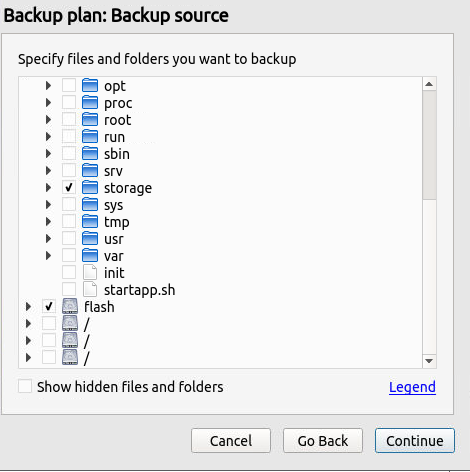
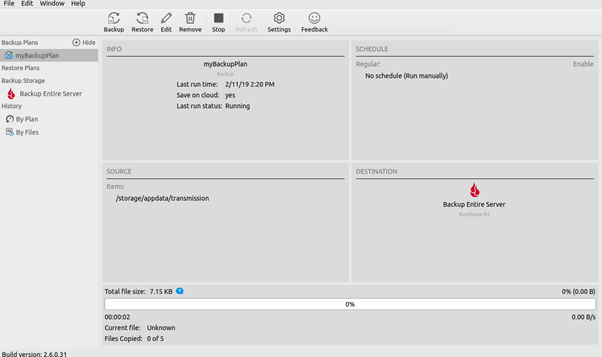
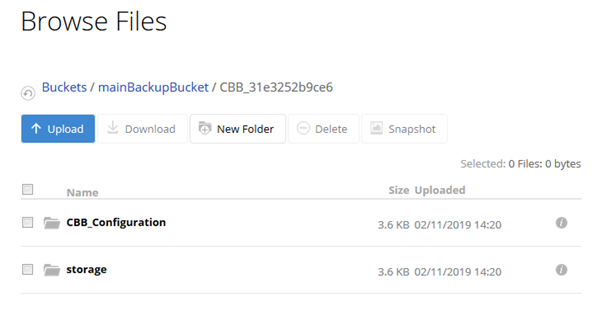
This tutorial is for a simple Backup solution for your entire unRAID box, flash drive and all. Please note, it will involve paying money for things. I'm aware this can be accomplished with tools like rclone and @SpaceInvaderOne has done a brilliant tutorial on how to do that. However, my requirements were as follows: I just wanted a GUI solution that will offer the same fine grained control with minimum setup. I wanted something reliable as my data in invaluable. I didn't want to risk losing anything because I cheaped out on something. Both the application I chose and the storage provider offer trial / free tier options so you can try this tutorial out. If it's not for you, no harm no foul. Some of you will also be averse to "Handing your data over to the corporations". I respect that, but I can't risk losing a lifetime of family photos so i'm willing to pay for a little piece of mind. The Cost 1. CloudBerry Backup This is the application that will be used to initiate, schedule, monitor, and track the backup. It's a $29.99 one off cost and in my mind was well worth it. They are reputable and have a great suite of products. If you don't want to use BackBlaze as I have, you can also connect CloudBerry to a host of other storage providers. It also caters for encryption and in the event of a disaster it has restore functionality as well. CloudBerry offer a 15 Day trail so you can test out the functionality and see if it fits your use case. EDIT: After some great sleuth work by @charlescc1000 , looks like the personal edition of CloudBerry is limited to 5TB worth of data. so this guide will work well if you're under that limit. Looks like if you're above that limit you will need to buy the Linux Ultimate Version which is $149.99. Please bear this in mind. Might be extortionate for some, but personally I think it's okay as a one off cost. You're able to upgrade and pay the difference once you hit the limit as well. 2. BackBlaze Another reputable company in the backup business, BackBlaze was my provider of choice. It will cost you $0.005/GB/month so $5/TB/month. It is much faster compared to offerings from CrashPlan and is cheaper than S3 (non-glacier), Azure, and Google Cloud. There is no fee for getting your data into BackBlaze but there is a 0.01/GB cost for download. They also integrate with many other vendors such so if you decide to switch to another NAS solution you can get your data onto there as well. It's pay for what you use so I won't be capped / paying for anything I'm not using. BackBlaze give you the first 10GB Free for you to test. The Solution 1. Buy CloudBerry The variant you need to buy is CloudBerry Desktop Backup for Linux. After you've purchased it they will email you an activation code. We'll keep this handy for the next step. 2. Install CloudBerry container. Head over to the APPS tab in unRAID. If you can't see it you need to install the Community Applications plugin. Search for CloudBerry and click the install button under it. You can keep all the default values and click apply. Head to the Docker tab in unRAID, click the play icon on CloudBerryBackup followed by WebUI. Choose Activate (If you've purchased) or Trial Enter your details and click finish. Congratulations you've installed CloudBerry! Click the Backup / Backup Files Button which will open the Cloud Storage window. Click on the little plus icon followed by BackBlaze B2. We can leave this window as is and come back to it after we've setup BackBlaze. 3. Create BackBlaze account You can sign up to BackBlaze free of charge and You can use a google account to sign in if that makes it easier. In your account click on Settings on the left and scroll down to Enabled Products. Next to B2 Cloud Storage, Click on the Link to Verify your Mobile Number. Once your number is verified enable B2 Cloud Storage. 4. Create a Bucket and Get the Keys A bucket is just a container for keeping files or like a top level folder. Why would you want more than 1 bucket? In the case that you wanted a different set of rules for backup schedules and wanted to keep your data separate this is how you'd do it. Also if you wanted to backup more than one device to it's own bucket you could create multiple buckets to do so. For me I just wanted all my data stored in a single bucket (your folder structure will remain in the bucket so not to worry). Click on create Bucket. Chose a unique name (this will need to be globally unique, meaning no one else in the world can have this bucket name) Click Create. Now that we've created the bucket that will hold all the data we need the keys to it. For this we click on Show Account ID and Application Key. Here again you have quite fine grained control over your bucket via multiple Application Keys. So if you had one of your friends backup up to your bucket. you'd create an application key for them and not give them the master one. In the event you'd like to revoke access / change certain permissions without affecting other keys you could do that. For me, I've just got a single device backing up so I'm going to use the Master Application Key. Please note that Master Keys are only displayed once. So once you click Create New Master Application Key keep the window open we're going to use it immediately. Copy your application ID to your clipboard for bonus efficiency points. 5. Create The Backup Schedule Head back to our CloudBerry Container WebUI and choose a display name for this Backup plan. You can create multiple backup Plans if you wish but we're just creating a single one for now to backup the entire server. The thing to note here is that we're VNCd into the containers WebUI so your computers clipboard isn't shared with it. The way we use the containers clipboard is with the clipboard button on the top right in the Navbar. Click on the Clipboard button, paste your application ID into the box and click submit. You can now paste your Application ID into the CloudBerry dialog box. Now Do the same for the Master Application Key. Click the drop down box next to Bucket. After 1 or 2 seconds you will see the Bucket name that we created in the previous step. Hoorah! Under Advanced Settings you can choose a prefix that this backup plan will use in the bucket. This is useful if you have more than one backup plan. So in the BackBlaze you will see the structure: Bucket > Prefix name > Folders-that-are-backed-up Select Okay and click on the Plan we've just created and click Continue. Choose a Backup Plan Name and click Continue. The next window shows a few drives. The one's you're interested in are the first two. The first one of which will just show up as "/". If you'd like to backup the contents of your flash drive click the tick box next to it. Expand the first drive and scroll down to the folder labeled "storage" This should immediately look familiar to you. Yes! They are your shares. Select the folders you want to backup or choose "storage" if you want to backup everything followed by Continue. Now the next settings namely: Advanced Filters Encryption Retention Policies Schedule Notifications Are best answered by you alone. I personally Backup all the files in the storage folder, with encryption on, retain all the files, and backup daily at midnight. The backup is an incremental backup so only files that have been added or changed will make their way up to BackBlaze. That being said your options may vary. To manually start your backup click on your backup plan in CloudBerry (myBackupPlan) and click Start. Your backup should immediately begin. To see the fruits of your work head back to BackBlaze, Under B2 Cloud Storage click on Browse Files. You should see your bucket there and all your files under it. Don't forget to set your container to AutoStart and you should be golden


 1 point
 -
My apologies, as I did get this fixed and going within two weeks of the suggested post. Thank you for the support, it's one of the reasons why I decided on Unraid. I ran QNAP's for the last 16 years. Quite happy with the move over so far, want stability and less too touch. Take care.1 point
-
ich würde im support thread anfangen1 point
-
Here is the script with my modifications for backing up four shares: #!/bin/bash PATH=/usr/local/sbin:/usr/sbin:/sbin:/usr/local/bin:/usr/bin:/bin ## Available variables: # AVAIL : available space # USED : used space # SIZE : partition size # SERIAL : disk serial number # ACTION : if mounting, ADD; if unmounting, UNMOUNT; if unmounted, REMOVE; if error, ERROR_MOUNT, ERROR_UNMOUNT # MOUNTPOINT : where the partition is mounted # FSTYPE : partition filesystem # LABEL : partition label # DEVICE : partition device, e.g /dev/sda1 # OWNER : "udev" if executed by UDEV, otherwise "user" # PROG_NAME : program name of this script # LOGFILE : log file for this script case $ACTION in 'ADD' ) # # Beep that the device is plugged in. # beep -l 200 -f 600 -n -l 200 -f 800 sleep 2 if [ -d $MOUNTPOINT ] then if [ $OWNER = "udev" ] then beep -l 100 -f 2000 -n -l 150 -f 3000 beep -l 100 -f 2000 -n -l 150 -f 3000 logger Started -t$PROG_NAME echo "Started: `date`" > $LOGFILE logger Pictures share -t$PROG_NAME rsync -a -v /mnt/user/Pictures $MOUNTPOINT/ 2>&1 >> $LOGFILE logger Videos share -t$PROG_NAME rsync -a -v /mnt/user/Videos $MOUNTPOINT/ 2>&1 >> $LOGFILE logger Movies share -t$PROG_NAME rsync -a -v /mnt/user/Movies $MOUNTPOINT/ 2>&1 >> $LOGFILE logger Family Videos share -t$PROG_NAME rsync -a -v /mnt/user/FamVideos $MOUNTPOINT/ 2>&1 >> $LOGFILE logger Syncing -t$PROG_NAME sync beep -l 100 -f 2000 -n -l 150 -f 3000 beep -l 100 -f 2000 -n -l 150 -f 3000 beep -r 5 -l 100 -f 2000 logger Unmounting Backup -t$PROG_NAME /usr/local/sbin/rc.unassigned umount $DEVICE echo "Completed: `date`" >> $LOGFILE logger Backup drive can be removed -t$PROG_NAME /usr/local/emhttp/webGui/scripts/notify -e "Unraid Server Notice" -s "Server Backup" -d "Backup completed" -i "normal" fi else logger Backup Drive Not Mounted -t$PROG_NAME fi ;; 'REMOVE' ) # # Beep that the device is unmounted. # beep -l 200 -f 800 -n -l 200 -f 600 ;; 'ERROR_MOUNT' ) /usr/local/emhttp/webGui/scripts/notify -e "Unraid Server Notice" -s "Server Backup" -d "Could not mount Backup" -i "normal" ;; 'ERROR_UNMOUNT' ) /usr/local/emhttp/webGui/scripts/notify -e "Unraid Server Notice" -s "Server Backup" -d "Could not unmount Backup" -i "normal" ;; esac I just added these lines for each share I wanted to backup to the Unassigned Devices USB drive: logger {name of share} share -t$PROG_NAME rsync -a -v /mnt/user/{name of share} $MOUNTPOINT/ 2>&1 >> $LOGFILE You just make the script the device script that is run when the USB drive is connected and mounted by Unassigned Devices. Email notifications are not controlled by the script. This is just part of the Settings-->Notification Settings configuration in the GUI. Here are my email settings to get unRAID to email notifications to me for the events selected in the Notification Setting section:

 1 point
 -
Wenn du den Container bearbeitest, dann siehst du unterhalb des Pfades /mnt/user/papermerge die Info "/data" Dh der Containerpfad /data ist mit dem Unraidpfad /mnt/user/papermerge verlinkt. Also im Betriebssystem des Containers existiert nur der Pfad /data, der den Inhalt von /mnt/user/papermerge hat. Greift also die App in dem Container auf den Pfad /data/import zu, sieht sie alles was in /mnt/user/papermerge/import liegt. Du könntest auch hingehen und /import im Container direkt auf /mnt/user/papermerge/import verlinken. Wäre natürlich doppelt gemoppelt. Aber einfach damit du verstehst, dass du beliebige Pfade miteinander verlinken kannst.1 point
-
Hallo Allerseits. Die Wahl der PCIe basierten SATA Kontroller für unraid (Stand April 2024). Ist zwar schon (sehr) oft durchgekaut worden, aber da immer wieder entsprechende Fragen auftauchen hier einmal ein paar Grundlagen. (Diese spiegeln meine aktuelle Meinung und Erfahrung wieder. Verbesserungsvorschläge willkommen.) Hier incl. PCIe und SATA Grundlagen, damit man hier ggf. drauf verweisen kann und es nicht immer wieder neu tippen muß. Zuerst die übliche Schnittstelle auf dem Mainboard, die diese Kontroller versorgt - PCIe: Zuerst ist es interessant, welchen PCIe Standard das Mainboard bei den zu benutzenden Slots unterstützt, damit man auch abschätzen kann, was ein SATA Kontroller darauf maximal leisten kann: - PCIe 1.0 ist stark veraltet und liefert pro Lane rund 250MByte/s. Das ist nicht zu empfehlen. - PCIe 2.0 ist veraltet und liefert pro Lane rund 500MByte/s. Wenn es nicht anders geht, kann man es nutzen. PCIe SAS-Kontroller mit PCIe 2.0 sind aber oft etwas stromsparender als PCIe 3.0. - PCIe 3.0 ist aktuell (&) gut und liefert pro Lane knapp unter 1Gbyte/s. - PCIe 4.0 oder gar 5.0 sind zu neu. Speziell dafür sind mir aktuell keine SATA Kontroller bekannt. Da PCIe abwärtskompatibel ist, kann man in einem sehr neuen Mainboardslot mit Standard 4.0 oder gar 5.0 dennoch auch Kontroller verwenden, welche beispielsweise nur PCIe 2.0 oder 3.0 beherrschen. Leider ist man dann aber eben auch auf die Geschwindigkeit von PCIe 2.0 oder eben 3.0 pro Lane reduziert. Dafür wird bei der langsamen Taktung oft auch etwas weniger elektrisch Energie benötigt. Dann ist es relevant welche PCIe Steckplätze das Mainboard hat. - Einerseits gibt es die normalen PCIe Slots in verschiedenen Längen und intern unterschiedlich viel belegbaren (elektrisch verbundenen) Lanes. Mechanisch lange Slots (bis x16) können so ausgeführt sein, daß sie elektrisch dennoch nur weniger Lanes verbinden (x1, x4, x8). - Andererseits gibt es seit einiger Zeit M.2 Steckplätze (alt auch NGFF bezeichnet), die entweder selber nur einen einzigen SATA Anschluß bieten oder evtl. (zusätzlich oder exklusiv) den NVMe Standard beherrschen und dadurch auch PCIe Lanes haben. Diese sind mit 1, 2 oder 4 Lanes zu finden. Diese sind mechanisch nicht ganz so robust/stabil, aber mit etwas Vorsicht immer noch gut nutzbar. Nun zu SATA: Der aktuelle SATA-3 Standard kann Datenträger mit bis zu ca. 600MByte/s (6GBit/s) ansprechen. - Große und schnelle Festplatten mit der Drehzahl von ca. 7200 Rpm schaffen heutzutage in der kurzzeitigen Spitze etwas mehr als 280MByte/s von ihrem Scheiben. Im normalen Dauerbetrieb sackt diese Geschwindigkeit über die Festplatte hinweg ab, so daß ich pauschal pro Festplatte von ungefär 250MByte/s ausgehe. - SATA-SSD hingegen schaffen aufgrund ihres Aufbaus in der Spitze durchaus weit höhere Geschwindigkeiten. 550MByte/s sind keine Seltenheit und da kommt man so langsam an die SATA-3 Limitierung ran. Weniger Peformante SATA-SSD sacken nach sehr kurzer Spitze auch gerne schon mal auf 300 MByte/s oder sogar viel weniger ab. Hier nun zu den Kontrollern für SATA-Festplatten und SATA-SSD: Die Kontroller sind in der Regel mit einem (oder mehreren) Chip bestückt, welcher den PCIe Slot (Eingang) nutzt und dann SATA Ports für Festplatten/SSD (Ausgang) bereit stellt. Die Leistungsfähigkeit (und Kompatibilität zu unraid) eines Kontrollers hängt stark von dem verwendeten Chip auf dem Controller ab, weshalb es meist egal ist, wer der Kartenhersteller ist, da dieser meist nur die Funktion des Chips nach außen anbindent. (Deshalb werde ich im weiteren eher von Chiptypen, als von Kontrollerherstellern schreiben). - Einerseits gibt es SATA Kontroller, welche meist nicht so viel Strom verbrauchen, dafür aber auch nur wenige SATA-Anschlüsse (bis 6) haben und passiv gekühlt werden (bei einfachen Chips ist nicht einmal ein Kühlkörper nötig). - Andererseits gibt es SAS Kontroller, welche auch zu SATA kompatibel sind. Diese benötigen mehr elektrische Energie, gibt es aber dafür auch mit hoher SAS/SATA-Portzahl (bis 28). Aufgrund des hohen Stromverbrauches sind bei SAS Kontrollern mindestens Kühlkörper nötig und diverse Hersteller sehen eine zwingende Belüftung mit vorgegebener Luftmenge als notwendig an. Hier sind HBA Kontroller im IT Mode für Unraid in der Regel kompatibel. Raid Kontroller ohne IT Modus sind bei Unraid nicht anzuraten. - Dann gibt es noch eher exotische Lösungen, bei denen verschiedene Chips mit SATA-Multipliern hinter dem eigentlichen SATA Chip oder gar PCIe-Switche dem SATA Chip vogeschaltet sind. (Beide Varianten sind nicht optimal!) Deshalb ganz kurz zu diesen beiden Zusatzkomponenten: - SATA Multiplier sind Verteiler, die die maximalen 600MByte/s eines SATA (Eingangs-)Ports auf bis zu 5 SATA (Ausgangs-)Ports verteilen. Man hat also weitaus mehr Ports gleichzeitig zur Verfügung um Datenträger anzuschließen, aber wenn man alle Datenträger gleichzeitig ansprechen will, teilen sie sie die maximale Bandbreite des einen Ports. Somit schafft man dann pro SATA Port theoretisch maximal ca. 120MByte/s. In der Praxis kommen noch ein paar bremsende Details hinzu. - PCIe-Switche sind vergleichbar mit Netzwerkswitchen. Man hat auch hier einen Eingang (evtl. mit mehr als einer Lane), der versucht die zu transportierenden Datenpakete auf mehrere Ausgänge zu verteilen. Da PCIe weitaus performanter ausgelegt ist und so auch mehrere Eingangslanes gleichzeitig auf verschiedene daran angeschlossene SATA Kontroller mit je einer Lane gesplittet werden können, ist das eine interessante Methode mehrere stromsparende SATA Chips performant an einen breiteren PCIe Slot (beispielsweise mit 4 Lanes) anzubinden. Leider hat die Sache einen großen Haken: die PCIe Switches selber sind auch Stromschlucker und damit macht man die Energiebilanz des nachgeschalteten sparsamen SATA Chips wieder zunichte. Dann kann man gleich überlegen einen SAS Kontroller oder mehrere einfache SATA Kontroller zu nehmen. Und endlich: die SATA Chips auf den Kontrollerkarten (egal ob Standardbauweise oder M.2). Aktuell steht auf dem Markt folgendes zur Verfügung (was auch in unraid gut funktioniert, aber ggf. die vom Mainboard erreichbaren Stromsparzustände (C-States) verändern/verschlechtern kann): ASM1062 Chip – Eingang PCIe 2.0 x2; Somit hat man also rund 1GByte/s Bandbreite (wenn dieser Chip eben zum Mainboard mit mindestens PCIe 2.0 x2 Lanes angebunden ist), die hier auf bis zu 2 SATA Ports verteilt werden. Bei gleichzeitige Nutzung aller 2 Ports sind knapp unter 500MByte/s pro Port nutzbar, wodurch sich dieser Kontroller sich gut anbietet bei älteren PCIe 2.0 basierten Mainboards bis zu 2 SATA Festplatten oder aus SATA-SSD gleichzeitig zu betreiben. Diese Kontroller sind aber auch auf PCIe Steckkarten mit nur einer (x1) Lane Anbindung zu finden. Hier stehen dem Chip also nur maximal rund 500MByte/s zur Verfügung und damit würde es bei 2 guten SATA-SSD gleichzeitig schon wieder zu eng mit der Gesamtbandbreite. JMB582 Chip - Dieser hat baulich 1 eine PCIe 3.0 Lane. Dieser Chip bietet 2 SATA Ports, die sich dann die maximale Bandbreite von rund 1GByte/s teilen, wodurch dann bei gleichzeitiger Nutzung knapp unter 500MByte/s pro SATA Port drin sind. Das reicht auch für gute SATA SSDs. Diese 582 Chips werden sehr gerne für die Nischenlösung der M.2 Key A/E Steckkarte eingesetzt um in solch kurzen A oder E Slots, welche eigentlich für WiFi Karten gedacht sind und auch PCIe 3.0 x1 enthalten, einen zusätzlichen SATA Kontroller einzusetzen. In reinen CNVI M.2 Slots funktionieren diese Kontroller nicht. Nicht unerwähnt sollte sein, daß die JMB 582 (und siehe unten auch 585) kein vernünfitiges ASPM beherrschen und somit der PC in der Regel nicht mehr in tiefere Stromsparmodi wechseln kann. Das kann dann schon einmal einen Unterschied von ein paar Watt im einstelligen Bereich ausmachen. ASM1064 Chip – Eingang PCIe 3.0 x1; Somit hat man also rund 1GByte/s Bandbreite, die hier auf bis zu 4 SATA Ports verteilt werden. Bei gleichzeitige Nutzung aller 4 Ports sind knapp unter 240MByte/s pro Port nutzbar, wodurch sich dieser Kontroller gut anbietet bis zu 4 SATA Festplatten gleichzeitig zu betreiben. Bei performanten SATA-SSD sollten nicht mehr als 2 Stück gleichzeitig benutzt werden, da diese sonst ggf. ausgebremst werden. Edit: Diese Chips haben aber gezeigt, daß Sie beim Einsatz von Powertop im auto tune Modus ggf. die SATA Links verlieren. Diese sind ebenfalls keine gute Empfehlung mehr für unraid. ASM1164 Chip – Eingang PCIe 3.0 x2; Somit hat man also rund 2GByte/s Bandbreite, die hier auf bis zu 4 SATA Ports verteilt werden. Bei gleichzeitige Nutzung aller 4 Ports sind fast 500MByte/s pro Port nutzbar, wodurch sich dieser Kontroller gut anbietet bis zu 4 SATA-SSD gleichzeitig zu betreiben. Steckkarten mit diesem Kontroller sind aber sehr selten, weil sie preislich vergleichbar dem unten erwähnten ASM1166 liegen und dieser sogar 6 SATA Ports bietet. Auch dieser Kontroller ist vereinzelt auch auf x1 Steckkarten zu finden, wobei er sich von der Geschwindigkeit her dann nicht mehr von der ASM1064 Variante unterscheidet. Nicht unerwähnt sollte sein, daß es für die ASM11.. Chips ein Firmweareupdate gibt, welches bei einigen Zusatzsteckkarten evtl. vorhandene Probleme mit den Energiesparmodi verringern. Ob dieses Firmwareupdate bei allen ASM11.. basierten Steckkarten funktioniert kann ich nicht sagen. JMB585 Chip - Dieser hat baulich 2 Stück PCIe 3.0 Lanes, wodurch man seine maximale Bandbreite nur in einem Slot 3.0 mit x2 Lanes (oder mehr) erreichen kann. Dieser Chip bietet 5 SATA Ports, die sich dann die maximale Bandbreite von rund 2GByte/s teilen, wodurch dann bei gleichzeitiger Nutzung knapp unter 400MByte/s pro SATA Port drin sind. Das ist mehr als die aktuell flotteste SATA HDD schafft und auch nicht übel, wenn man SATA SSD verwenden will. Es wird dann bei gleichzeitiger Nutzung performanter SATA-SSD zwar immer noch etwas Transfergeschwindigkeit beschnitten, aber das muß man selber entscheiden, ob man das akzeptieren kann und ob die SSD soweiso nicht selber schon langsamer ist. Auch hier der Hinweis: daß die JMB 585 (und siehe oben auch 582) kein vernünfitiges ASPM beherrschen und somit der PC in der Regel nicht mehr in tiefere Stromsparmodi wechseln kann. Das kann dann schon einmal einen Unterschied von ein paar Watt im einstelligen Bereich ausmachen. ASM1166 Chip – Auch dieser hat baulich 2 Stück PCIe 3.0 Lanes und somit auch maximal 2GByte/s. Er verteilt dies auf bis zu 6 SATA Ports, wodurch dann bei gleichzeitiger Nutzung rund 330MByte/s drin sind. Immer noch mehr als eine Festplatte und auch bei SATA-SSD für den einen oder anderen User interessant. Wenn man nur 4 Ports beschaltet hat man eigentlich das Selbe wie bei einen ASM1164 Chip (siehe oben) nur eben für ggf. zukünftige Erweiterungen oder Umplanungen 2 SATA Ports mehr. Hier gilt auch der Hinweis zu der Firmware bei Stromsparproblemen. EDIT: in den letzten Monaten sind aber auch viele (billige) ASM1166 basierte Zusatzkontroller auf den Markt gekommen, die zwar nicht (wie der ASM1064) die Links verlieren, aber dennoch in den Stromsparmodi (selbst mit angepaßter Silverstone Firmware) nicht mehr so ganz gut mit den Mainboards harmonieren und somit die C-States negativ beeinflußen. Selbst, wenn der Kontroller selber nur so um die 2W schluckt, kasnn es sein, daß das Mainboard dann von sich aus einiges mehr an Energie benötigt. Es ist also hier ein bisschen Glückssache. Diverse LSI Chips (des aktuellen Inhabers Broadcom) – Das sind dann die SAS Chips. Hier gibt es sehr viele Varianten. Am verbreitetsten sind die Chips, welche PCIe x8 zum Mainboard hin anbinden und daraus 8 oder mehr SAS/SATA-Ports machen. Wie schon geschrieben: im IT Mode sind diese für unraid gut nutzbar, aber aufgrund des höheren Strombedarfes, aktiver Kühlung und zur Verfügung stehender PCIe Slots des Mainboard muß man abschätzen, ob man lieber einen SAS Kontroller mit 4, 8 oder mehr Ports oder einen oder mehrere SATA Kontroller mit jeweils weniger Ports einsetzt um die gesamt gewünschte SATA-Portanzahl zu erreichen. Es gibt solche SAS Kontroller die gerne Spitzenwerte von 20-30Watt erreichen. Die aktive Kühlung ist dabei definitiv zwingend! Hier sei ergänzt, daß es auch neuere SAS-Chipentwicklungen gibt, die durch komplett neues Design und Reduzierung ihrer SAS Fähigkeiten wieder etwas weniger Energie benötigen sollen. Aber das Zeugs ist eben noch recht neu und kostet somit einiges mehr. Hier sei ein Broadcom 9500-8i genannt, der nur noch 240 SAS/SATA Festplatten ansteuern kann, dafür auch auf der Deviceseite NVMe/PCIe beherrscht und laut Broadcom mit unter 6W angegeben ist. https://www.broadcom.com/products/storage/host-bus-adapters/sas-nvme-9500-8i oder sein größerer Bruder: HBA 9500-16i mit 8.9W Hier sei angemerkt: Man hat die Steckverbinder zu den Vorgängern wieder einmal geändert SFF-8654 (SlimSAS). Kleine Randnotiz zu den Kontrollern, welche PCIe 3.0 x2 verwenden: Es gibt im breiten Markt keine Standard PCIe x2 (mechanisch) Slots. Aus dem Grund sind diese Kontrollerkarten für maximale Performance immer in Slots einzusetzen, welche länger sind und ggf. sogar mehr Lanes bieten. Ob man nun wirklich bei einem PCIe x4 Slot eine x2 Karte einsetzen will und somit x2 Lanes unbenutzt bleiben, muß jeder User für sich selber entscheiden. EDIT (früher waren ASm1064 angegeben, aber die sind nicht mehr empfehlenswert): Wenn es um 5-6-SATA Ports geht bevorzuge ich 2 Stück PCIE 3.0 x1 ASM1166 (oder wenn billig zu haben ASM1164) in gesamt 2 PCIe x1 Slots eines Mainboards einzusetzen, als nur einen JMB585 (PCIe 3.0 x2) oder ASM1166 (PCIe 3.0 x2) zu verwenden, wodurch ein ganzer PCIe x4 (oder mehr) Slot ver(sch)wendet wird. Aber das ist sehr individuell und nur meine persönliche Meinung. Aufgrund der oben erwähnten stromsparenderen Firmware mag man auch einen oder mehrere ASM1166 oder ASM1164 (ggf. sogar nur als x1 Steckkarte) bevorzugen und darauf hoffen, daß sie sich bei dem eigenen Kontroller einspielen läßt und den Kontroller gesamt noch etwas sparsamer macht. Natürlich sollte man dennoch mit bedacht überlegen wieviele SATA Ports man dann belegt und gleichzeitig nutzen wird. An der PCIe Bandbreite der Steckkarte ändert sich nichts.1 point
-
https://web.archive.org/web/20220616040234/https://forums.unraid.net/topic/96895-ultimate-unraid-dashboard-uud/1 point
-
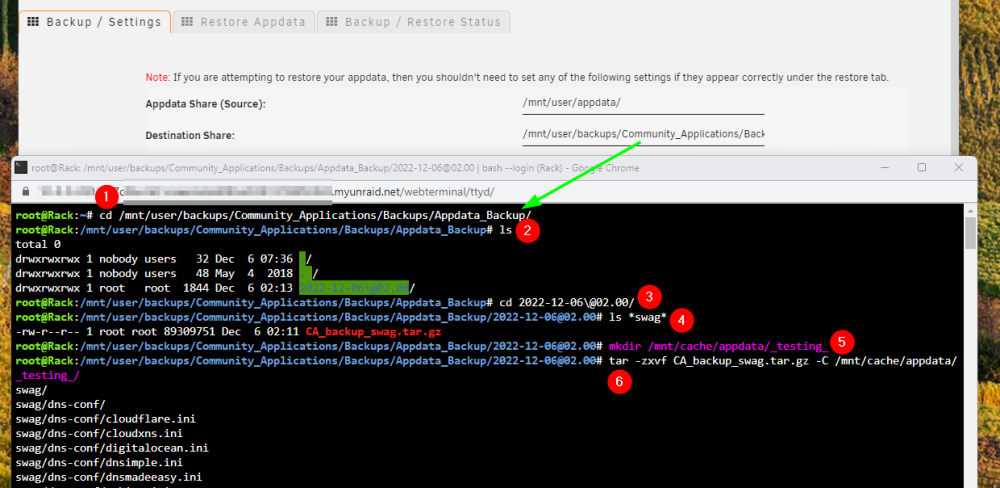
I can help here. Open the unRAID terminal and go to your backup Destination Share: cd <Destination_Share> Find the backup you are looking for: ls Go into the directory of the backup you want to restore from: cd <backup_directory> Find the backup file you are looking for. In my example I am looking for <any>swag<any>: ls *swag* [Used only for demo purposes, don't do this.] I created a temp directory that I'll later delete: mkdir /mnt/cache/appdata/_testing_ Extract the backup file from step 4 into your appdata directory [I used my temp directory.]: tar -zxvf <backup_filename> -C /mnt/cache/appdata/
 1 point
 -
This plugin has now been forked by @KluthR and the original version by myself has been deprecated. I'd suggest to uninstall my version and then reinstall the fork. NOTE: Some display aberrations *might* appear within the Apps tab while the original is installed where CA gets confused as to which one is installed. Just uninstall the original via Installed Apps (or the Plugins tab) and then reinstall appdata backup
 1 point
 -
I have not tested but I have put a link to multi instance doc here1 point
-
Click on the boot device on the Main tab and change the SMB setting to export the share. The default is now that no shares are exported until you make this change.1 point
-
Unraid is slackware, so let's use a slackware package. # Download libffi from slackware.uk to /boot/extra: wget -P /boot/extra/ https://slackware.uk/slackware/slackware64-15.0/slackware64/l/libffi-3.3-x86_64-3.txz # Install the package: installpkg /boot/extra/libffi-3.3-x86_64-3.txz Once you have the package placed into /boot/extra it will be re-installed as needed each time you boot. During boot, Unraid installs all the packages I have in /boot/extra except this one (my best guess is because it thinks it's superseded by libffi-3.4.4 bundled with base Unraid install, provides libffi.so.8 instead of libffi.so.7). You'll probably need to invoke the "installpkg ..." command after every reboot, e.g. by adding it to your /boot/config/go file. I don't know if Nerd Tools will remove/replace outdated packages that have been manually downloaded, so leave yourself a reminder to check on this after libffi is added to nerd tools to make sure you're not hanging on to an outdated version.1 point
-
Por si le sirve a alguien en un futuro, ya lo he solucionado. He instalado el docker "timemachine" y este funciona como toca, el share tipo "timemachine" que ofrece nativamente UnRaid no ha terminado de funcionar, pero con el docker ya lo tengo funcionando y las copias de mis dispositivos de Apple funcionan correctamente. Saludos.1 point
-
I usually prefer buiyng used server pulls, they are about the same price or cheaper than a new Chinese LSI and much more likely to be genuine.1 point
-
Backups auf UADs Ich mache meine Backups immer nachts um 2:00 Uhr, damit ich sie am Tage jederzeit wechseln kann ohne vorher ins System zu gehen zum unmounten etc. Heißt was aus dem Keller holen oder Wäsche machen = Festplatte wechseln am Server. zum Einrichten in Luckybackup müssen die Unassigned Devices jedoch erst einmal gemountet werden. hierfür meine mount / unmount Skripts: Mount UAD - skript \#!/bin/bash \# 1TB Crucial SSD MX500 /usr/local/sbin/rc.unassigned mount /dev/disk/by-id/ata-CT1000MX500SSD1_xxxxxxxxxxxx \# 8TB Western Digital WD White /usr/local/sbin/rc.unassigned mount /dev/disk/by-id/ata-WDC*WD80EDAZ-xxxxxxxxxxxx \# 5TB Seagate 2,5" Portable /usr/local/sbin/rc.unassigned mount /dev/disk/by-id/ata-ST5000LM000-xxxxxxxxxxxx sleep 10s Die genaue Bezeichnung lässt sich ja auf der Main Page kopieren und hier einsetzen, anschließend im Hintergrund ausführen Natürlich lässt sich auch auf der Main Page per Mausklick mounten, aber wir brauchen das sowieso für das backup-skript gleich und so können wir das gleich Stück für Stück ausprobieren. Anschließend ist die / sind die Platte/n für Luckybackup sichtbar und ihr könnt ein neues Profil anlegen, bei mir ext_backup: . Hier habe ich bereits einige Backups für verschiedene Platten mit auch unterschiedlichen Inhalten angelegt. Anschließend analog zum 1.Post verfahren: - Backups anlegen - Zeitplan erstellen, in Cron-Datei eintragen - Inhalt Kopieren / mit dem Skript hier abgleichen - Zeitplan löschen, in Cron-Datei eintragen - Backup erstmalig ausführen in Luckybackup Nach dem erfolgreichen Backup, Luckybackup wieder schließen und das User-Skript zum unmounten erstellen und im Hintergrund ausführen: #!/bin/bash sync -f /mnt/disks/CT1000MX500SSD1_2xxxxxxxxxx sync -f /mnt/disks/WDC_WD80EDAZ-xxxxxxx_xxxxxxx sync -f /mnt/disks/ST5000LM000-xxxxxx_xxxxxxxxxx sleep 10s /usr/local/sbin/rc.unassigned umount /dev/disk/by-id/ata-CT1000MX500SSD1_xxxxxxxxxxxx /usr/local/sbin/rc.unassigned umount /dev/disk/by-id/ata-WDC_WD80EDAZ-xxxxx_xxxxxxx /usr/local/sbin/rc.unassigned umount /dev/disk/by-id/ata-ST5000LM000-xxxxxx_xxxxxxxx Jetzt legen wir das komplette Backup User-skript an: #!/bin/bash # 1TB Crucial SSD MX500 /usr/local/sbin/rc.unassigned mount /dev/disk/by-id/ata-CT1000MX500SSD1_20xxxxx # 8TB Western Digital WD White /usr/local/sbin/rc.unassigned mount /dev/disk/by-id/ata-WDC_WD80EDAZ-11xxxxxx # 5TB Seagate 2,5" Portable /usr/local/sbin/rc.unassigned mount /dev/disk/by-id/ata-ST5000LM000-2Axxxxxxxxxxx sleep 10s #luckybackup als root user ausführen #docker exec -i luckyBackup /usr/bin/luckybackup -c --no-questions --skip-critical /root/.luckyBackup/profiles/ext-backup.profile #luckybackup als luckybackup user ausführen docker exec -i --user luckybackup luckyBackup /usr/bin/luckybackup -c --no-questions --skip-critical /luckybackup/.luckyBackup/profiles/ext-backup.profile sync -f /mnt/disks/CT1000MX500SSD1_20xxxxxxxxxxxxxxx sync -f /mnt/disks/WDC_WD80EDAZ-1xxxxx-xxxxxx sync -f /mnt/disks/ST5000LM000-xxxxx_Wxxxxxxxx sleep 30s /usr/local/sbin/rc.unassigned umount /dev/disk/by-id/ata-CT1000MX500SSD1_2xxxxxxxxxxxxx /usr/local/sbin/rc.unassigned umount /dev/disk/by-id/ata-WDC_WD80EDAZ-1xxxxx_Vxxxxxxx /usr/local/sbin/rc.unassigned umount /dev/disk/by-id/ata-ST5000LM000-2xxxxxxxxx_xxxxxx Bei jedem Ausführen versucht nun Luckybackup alle UADs zu mounten, das backup zu machen und zu unmounten. Sollte eine UAD nicht zur Verfügung stehen, so wird das Backup dieser einen Platte mit einem Fehler übersprungen. Einmal im Hintergrund ausführen und nach den Logs schauen. Wichtig ist dass ihr während die Platten gemounted sind, nichts separat dort kopiert oder in Unterordner geht, dann wird die Platte u.u. nicht mehr automatisch geunmounted. Nun noch Zeitplan beim User-Skript hinterlegen und das war es schon. Funktioniert bei mir sehr zuverlässig, mit Abstand das schnellste Backup, dass ich probiert habe und dazu ist es sehr Platzsparend und einfach zu bedienen.
 1 point
 -
edit /boot/config/plugins/dynamix/dynamix.cfg and in the "system" entry near the bottom of the file, give it an appropriate cron entry Then from the command prompt, update_cron Note that changing other settings (theme, etc) will probably revert that setting.1 point
-
When is there going to be an automatic procedure for this? Like a "prepare drive for removal" button, a "prepare drive for decommissioning" button and then also a "securely erase decommissioned drive" button. Is there a feature request that is already being worked on? At this point it could alert you that you have useful data on the "decommissioning" drive and do this for you... (and by doing this for you, I mean moving the data to free space on the array for you, maintaining data safety)1 point
-
When I try and map a path to /tmp in the docker i get an error as is mounted but not a share. Im away from my home network at the moment but ill upload a screen shot later. If i change the plex transcode directory to "/TRAN_DIR" that is set to key1 variable "/tmp" would that make it transcode to ram? The settings i have about are from a tutorial that i believe was put out by spaceinvaderone but i cant seem to find it again to link it here. Or should i just scrap everything I've tried and do like it says here? https://forums.serverbuilds.net/t/guide-plex-transcoding-and-ram-disks/625#unraid Or finally just realize that i only have 8gb of ram, the "save the SSD wear" is probably crap, and just let it fill the docker image as it sees fit. After making the docker image 100GB I haven't gotten an email complaining about it being full.1 point
-
To be clear, I am a penetration tester that does this for a living, not some script-kiddie trying to "pwn the interwebz". I understand your concern, but there is nothing strictly illegal in cracking hashes. This is also more for research purposes, as I use AWS for cracking client hashes. I don't want to play around on AWS because I have to pay for that. I already have usable (albeit, not extremely fast) NVIDIA cards that aren't purposed elsewhere anymore that would be "cheaper". So, any ideas on a method of facilitating the installation of the proprietary NVIDIA drivers? "activities that could be hurtful to persons or entities" Ummm...but usenet and bit-torrent dockers are perfectly acceptable? That seems silly. If cracking hashes is "potentially harmful", shouldn't pirating media also be "potentially harmful" and unacceptable?1 point