Leaderboard


Popular Content
Showing content with the highest reputation on 06/21/21 in all areas
-
Wer gerade eine NVMe sucht, die sind beide günstig: https://www.mydealz.de/deals/crucial-p5-1tb-m2-nvme-ssd-bis-r3400w3000-3d-tlc-1gb-dram-aes-5-jahre-garantie-1817745 https://www.mydealz.de/deals/prime-day-crucial-p5-ct2000p5ssd8-2-tb-solid-state-laufwerk-3d-nand-nvme-pcie-m2-2280ss-18173112 points
-
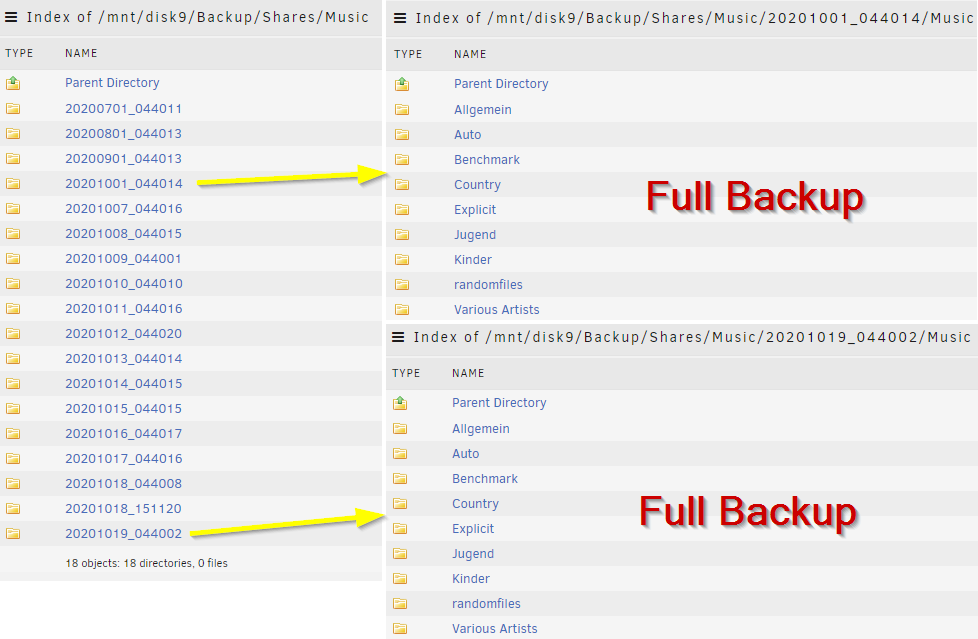
The following script creates incremental backups by using rsync. Check the settings to define your own paths. Donate? 🤗 https://codeberg.org/mgutt/rsync-incremental-backup > incbackup.sh Explanations All created backups are full backups with hardlinks to already existing files (~ incremental backup) All backups use the most recent backup to create hardlinks or new files. Deleted files are not copied (1:1 backup) There are no dependencies between the most recent backup and the previous backups. You can delete as many backups as you like. All backups that are left, are still full backups. This could be confusing as most incremental backup softwares need the previous backups for restoring the data. But this is not valid for rsync and hardlinks. Read here if you need more informations about links, inodes and files. After a backup has been created the script purges the backup dir and keeps only the backups of the last 14 days, 12 month and 3 years, which can be defined through the settings logs can be found inside of each backup folder Sends notifications after job execution Unraid exclusive: Stops docker containers if the source path is the appdata path, to create consistent backups Unraid exclusive: Creates a snapshot of the docker container source path, before creating a backup of it. This allows an extremely short downtime of the containers (usually only seconds). How to execute this script? Use the User Scripts Plugin (Unraid Apps) to execute it by schedule Use the Unassigned Devices Plugin (Unraid Apps) to execute it after mounting a USB drive Call the script manually (Example: /usr/local/bin/incbackup /mnt/cache/appdata /mnt/disk6/Backups/Shares/appdata) How does a backup look like? This is how the backup dir looks like after several month (it kept the backups of 2020-07-01, 2020-08-01 ... and all backups of the last 14 days): And as it's an incremental backup, the storage usage is low: (as you can see I bought new music before "2020-08-01" and before "2020-10-01"): du -d1 -h /mnt/user/Backup/Shares/Music | sort -k2 168G /mnt/user/Backup/Shares/Music/20200701_044011 4.2G /mnt/user/Backup/Shares/Music/20200801_044013 3.8M /mnt/user/Backup/Shares/Music/20200901_044013 497M /mnt/user/Backup/Shares/Music/20201001_044014 4.5M /mnt/user/Backup/Shares/Music/20201007_044016 4.5M /mnt/user/Backup/Shares/Music/20201008_044015 4.5M /mnt/user/Backup/Shares/Music/20201009_044001 4.5M /mnt/user/Backup/Shares/Music/20201010_044010 4.5M /mnt/user/Backup/Shares/Music/20201011_044016 4.5M /mnt/user/Backup/Shares/Music/20201012_044020 4.5M /mnt/user/Backup/Shares/Music/20201013_044014 4.5M /mnt/user/Backup/Shares/Music/20201014_044015 4.5M /mnt/user/Backup/Shares/Music/20201015_044015 4.5M /mnt/user/Backup/Shares/Music/20201016_044017 4.5M /mnt/user/Backup/Shares/Music/20201017_044016 4.5M /mnt/user/Backup/Shares/Music/20201018_044008 4.5M /mnt/user/Backup/Shares/Music/20201018_151120 4.5M /mnt/user/Backup/Shares/Music/20201019_044002 172G /mnt/user/Backup/Shares/Music Warnings Its not the best idea to backup huge files like disk images that changes often as the whole file will be copied. A file change while copying it through rsync will cause a corrupted file as rsync does not lock files. If you like to backup for example a VM image file, stop it first (to avoid further writes), before executing this script! Never change a file, which is inside a backup directory. This changes all files in all backups (this is how hardlinks work)! Do not use NTFS or other partition formats, which do not support Hardlinks and/or Linux permissions. Format external USB drives with BTRFS and install WinBTRFS, if you want to access your backups through Windows. Do NOT use the docker safe perms tool if you backup the appdata share to the array. By that all file permissions are changed and can not be used by your docker containers anymore. Docker safe perms skips only the /mnt/*/appdata share and not for example /mnt/disk5/Backups/appdata!
 1 point
 -
Application Name: NordVPN Application Site: https://github.com/bubuntux/nordvpn Docker Hub: https://hub.docker.com/r/bubuntux/nordvpn1 point
-
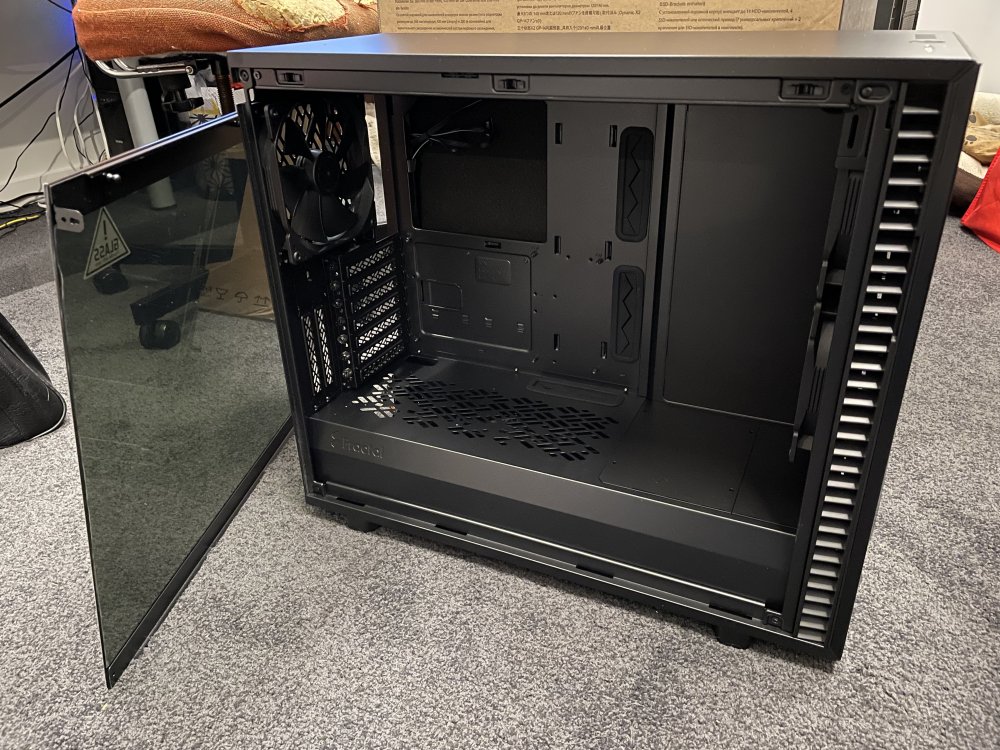
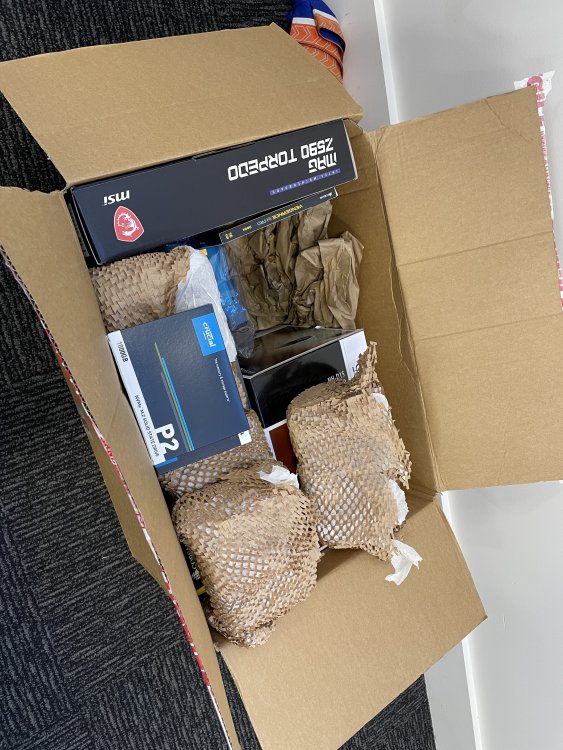
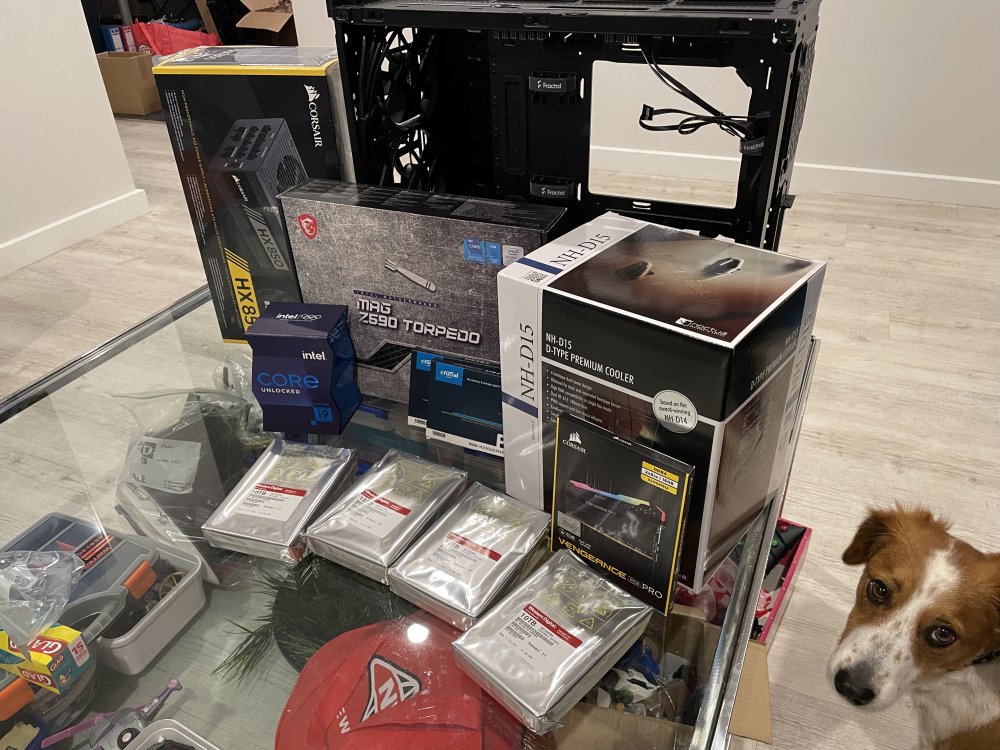
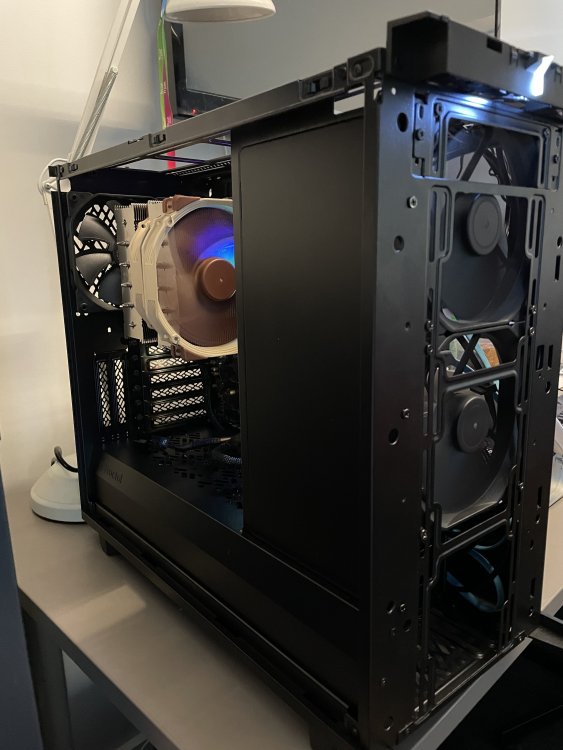
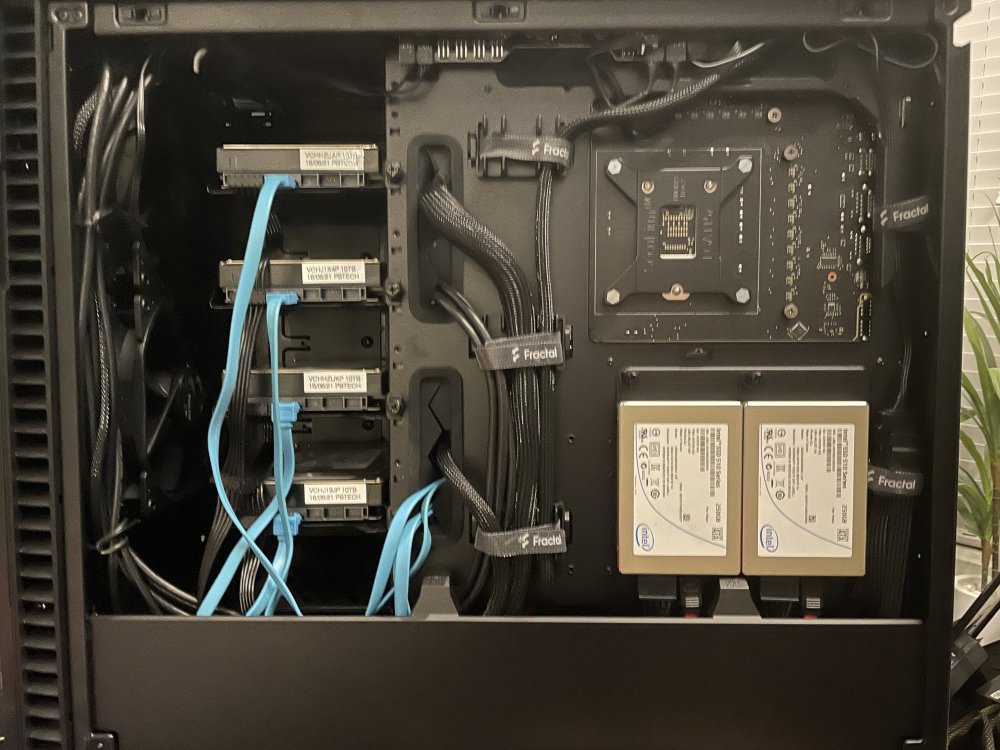
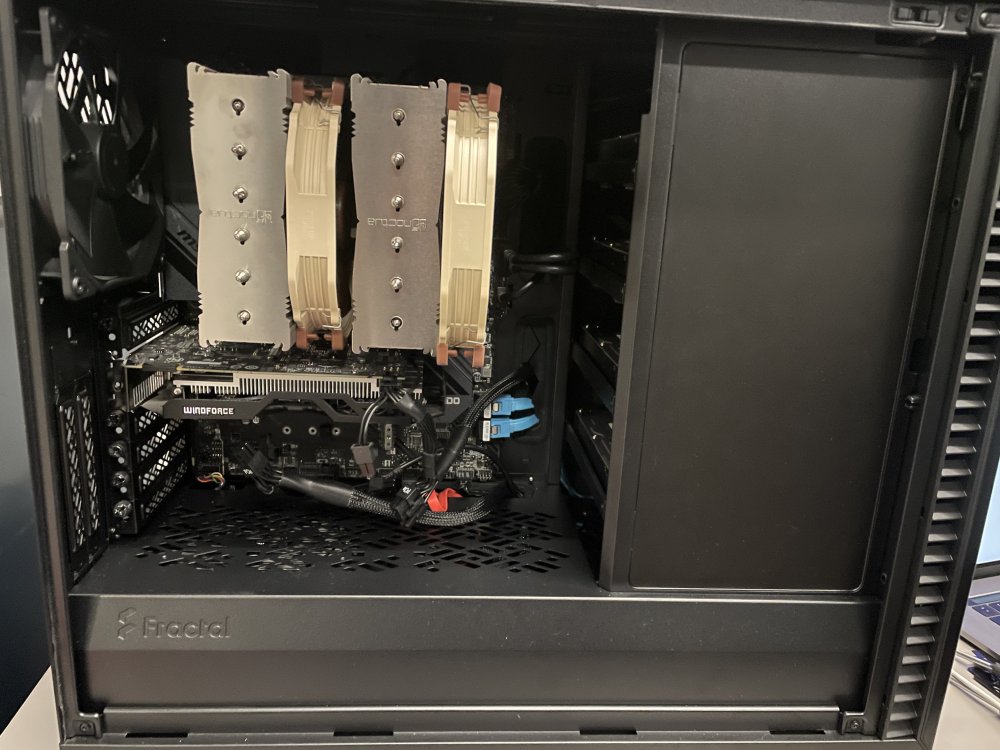
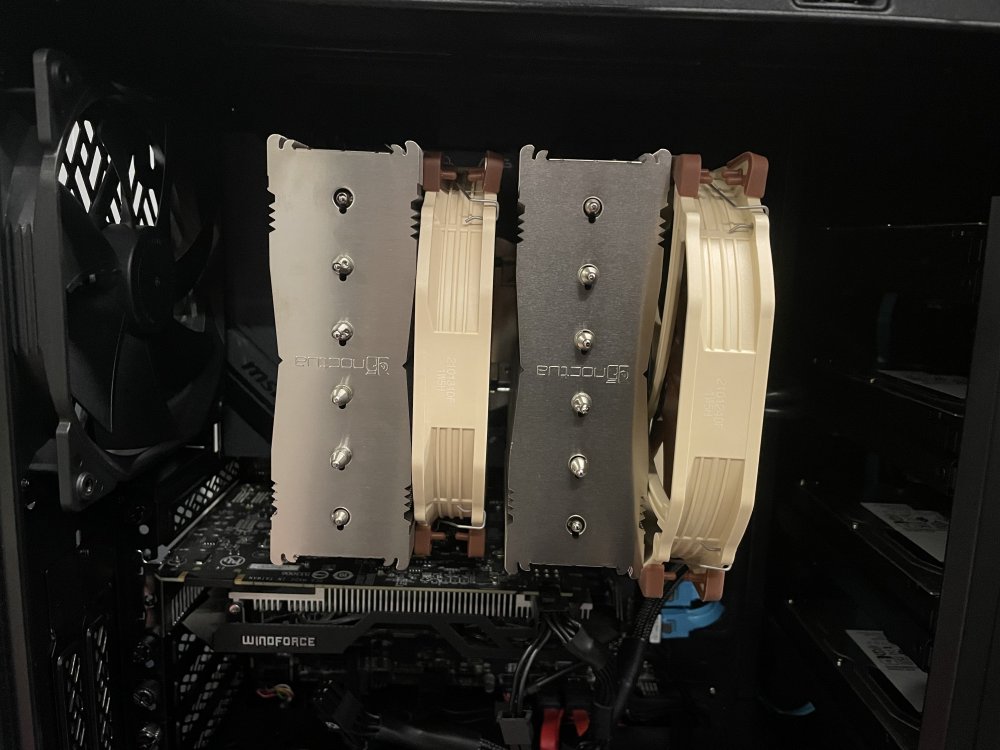
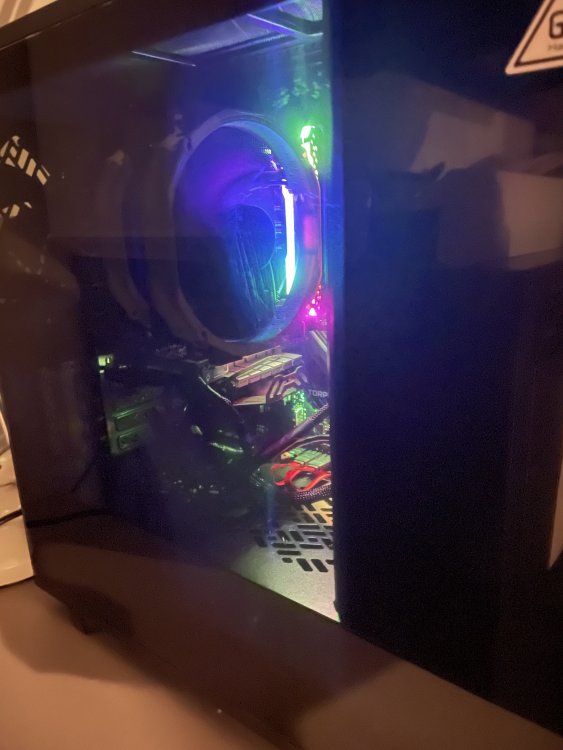
After my trusty old NAS started throwing errors (the drives did have a run time of around 7.5 years so they had done okay) I did some emergency backing up to a QNAP I acquired, but ran unRaid on it as a trial. It went so well that I brought Pro within days, and planned a new server to allow me to decommission that NAS and ~12 year old box (my last custom build) that did little more than create noise and draw power, and almost as a secondary function ran Plex) both of which were maxed out for storage space and lacked much transcoding ability. The QNAP had 20TB with all the drives I cobbled into it (most of which were probably approaching failure also), and emptying both the old NAS and server left around 300GB, so that wasn't going to cut it, and it was a rack mount noisy beast that at night had a hum that could be heard in the other end of the house with no virtualisation support! The plan was for a new build to not only expand the storage I had, and up the specs to handle more transcoding, but that also: Was quiet enough to live in the office instead of the garage Would run a Windows VM with GPU passthrough to be a new daily driver for some light gaming (I am otherwise typically a Mac laptop user) Could run home automation bits, Zabbix, and some other dockers which would also allow me to decommission a 3rd computer (linux box) I had running as a bit of management server. Would hopefully use less overall power than those 3 machines combined. This is yet to be tested, but when I started speccing options, my debate was either quiet enough to live in the office and replace all 3 machines, or low power oriented (and maybe noisy) in the garage but requiring another new daily driver; obviously quiet won out. Build updated with additions up to 21-08-19 OS at time of building: unRAID 6.9.2 Pro CPU: Intel Core i9-11900K 3.5GHz 8-Core [Intel Ark | PBTech | Benchmark] CPU Cooler: Noctua NH-D15 82.5 CFM CPU Cooler [Noctua] Motherboard: MSI MAG z590 Torpedo ATX LGA1200 MB [MSI] RAM: Corsair Vengeance RGB Pro 48GB (2 x 16GB, 2 x 8GB) DDR4-3200 CL16 [Corsair] GPU: Gigabyte GeForce GTX 950 2 GB WINDFORCE 2X Video Card (from parts on hand, while the bank balance recovers) [Gigabyte] Case: Fractal Design Define 7 Dark ATX Mid Tower Case [Fractal Design] Power Supply: Corsair HX Platinum 850W 80+ Platinum Certified Fully Modular ATX PSU [Corsair] Fans: 3 stock fans with the case plus 2 on the Noctua. Parity Drive: 1x Western Digital Red Pro 10TB 3.5" 7200RPM [WD] Data Drives: 5x Western Digital Red Pro 10TB 3.5" 7200RPM [WD] Cache Drives: 2x Crucial P2 1TB M.2-2280 NVME SSD [Crucial] Other: Fan Controller: iCue Commander Pro [Corsair] (Comments on my experience on this in a post below) In-Case Lighting: iCUE LS100 Smart Lighting Strip Starter Kit [Corsair] Primary Use: Plex and friends (Radarr, Sonarr, qBittorrent, SABnzbd, Overseerr, Gaps), general file store/backup, and Windows gaming (lite) VM (Windows VM shut down while I'm preclearing some disks that its storage is being moved to, but otherwise It's been running well) Likes: Very quiet, should have plenty of power to experiment with. And I like the look. Also, I was worried that the z590 and 19-11900K might be too new to be well supported by unRaid, so I quite like that it actually works!! Dislikes: Other than my cabling skills to work with the available space, not a thing! Actually, it's just that as I've added things, I've not shut down and cabled nicely, I've tried to keep downtime minimum at the cost of tidiness. Future Plans: [Done] Get hardware transcoding going [Done] Trying to get a Win10 VM with GPU passthrough going (Result: It worked easily and well. I did have to set power settings to not turn off otherwise I'd have to use other machine to power it on from Unraid again which makes sense but I didn't consider first boot) [Still todo] Also getting back to Home Automation [Done] Need to see how the temp's go and determine if more cooling is required (Result: More not "needed" but looking to add some for redundancy and future proofing) [Still todo] Probably move my website back to internal hosting [In Progress] Lighting has never really been my thing, but this case was cheaper with the glass, so perhaps I'll get some more RGB fans or something to brighten it up (Update: Lighting Strips don't position particularly well around the edges of the case. Still playing with layouts that hide the lights but light the case. More to be done, possibly use more top-of-case RGB fans to assist) [New/In Progress] Good authenticated/authorised external access portal to expose the likes of Overseer to specific friends. [New/todo] Setup mail services so I can move all my accounts from GSuite/Office365 (I have a number of accounts) possibly based on Mailcow [New/todo] Migrate my old Zabbix config and get it running in docker form [New/todo] Start researching expansion cards. I'm filling space fast and don't have any more usable on-board SATA, so expansion will require a card and that's an area I'm just not familiar enough in yet so I expect more research than I'd really like 🤣 Power Consumption: (Still needs to be both measured better, and updated for latest additions) Boot (peak): 156W (very briefly. Mostly about 123W) Idle (avg sample): 97W with drives running, 82W with 2 drives sleeping (3rd was too active to get a decent read with it down). Both with 13 various docker containers running. Active (avg sample): 130W to 250W, average around 170W running a Windows 10 VM with GPU passthrough, playing Starcraft 2. Light use (avg sample): Samples between 82W and 130W, mostly around 92W watching a movie with Plex. Measured with a rather crappy TP-Link smart plug so subject to my poor sampling.

 1 point
 -
OK very cool, I'm glad we were able to get it working!1 point
-
That's the way everything works. While originaloddities may be your custom template, the dockerHub repository exists within CA, so the description etc is pulled from it. However, when reinstalling it from Previous Apps, your custom template is the one which is used. I will have to play around some more with multiple apps from the same repository (named differently) and how it works within Previous Apps. It's been quite a while since I've done any testing under that circumstance.1 point
-
I think you need just copy the file 'nut-2.7.4.1.20210620-x86_64-1.txz' attached in my message to folder /boot/config/plugins/nut And reboot server, it may use latest version of nut instead of old one. If it not works this way, replace existing nut-2.7.4... file in folder /boot/config/plugins/nut by my file and reboot1 point
-
OK, finally the problem I see two options: 1) Setup Unraid to use your normal gateway. Then the www.hash.unraid.net DDNS will point at your router and the port forward will send the traffic to your server. This is the option we support. 2) Work with your VPN provider to forward port 4443 to your router. Then convince your router to push incoming VPN traffic on port 4443 to Unraid on port 4443. You might be able to get this working, but it is way out of scope for what I can help with.1 point
-
root@Monster:~# cd ~ root@Monster:~# pwd /root Yeah this is the root user's home directory, in RAM1 point
-
Makes sense, since even though the file is identical, inotifywait doesn't actually look at changes made to files only requests to open / close / write on the particular path / file you specify1 point
-
@SpencerJ1 point
-
I think ~ is the home directory of the logged in user, which for Unraid is the root user. And it is in fact in RAM (rootfs). Filling rootfs will definitely make things crash since the OS can't work with its internal files when it is full.1 point
-
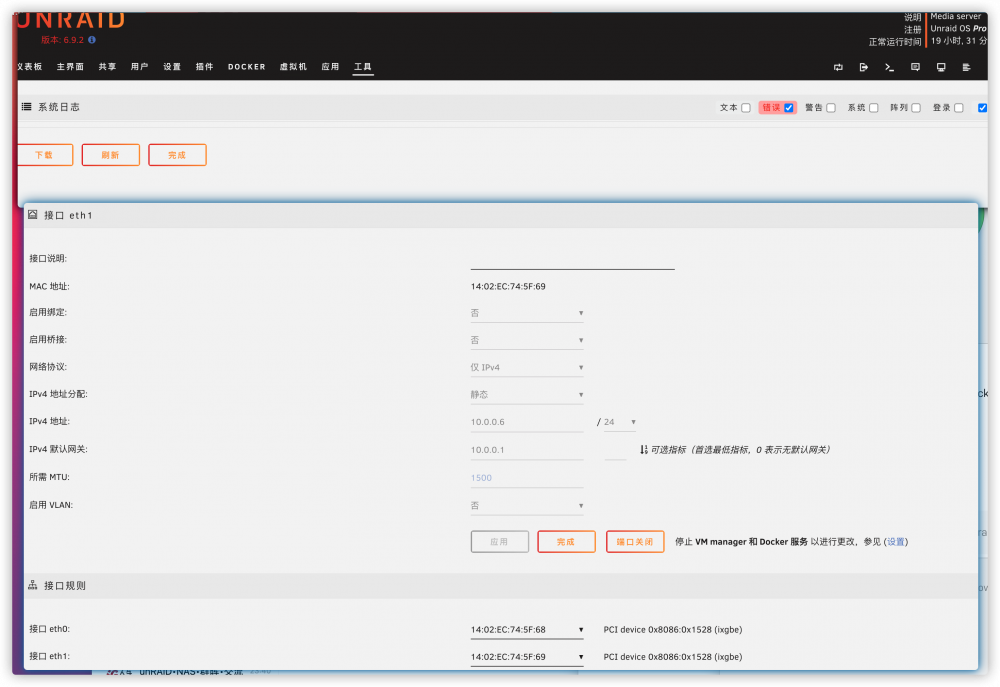
我给docker单独分配了一个网口,19个小时暂时没有报错
 1 point
 -
Dankeschön, es läuft erstmal 🙂 Der neue ist ein Verbatim 16GB 2.0 Stick und wurde sofort erkannt. Die Lizenz musste ich allerdings kaufen, da hat er gemeckert.. Aber das wollte ich ja sowieso... Also alles gut..
 1 point
 -
That mce is harmless and came during initialization of the CPU cores and happens to many people. I'd look at mirroring the syslog if the problems continue. https://forums.unraid.net/topic/46802-faq-for-unraid-v6/page/2/?tab=comments#comment-7816011 point
-
Thanks again for the update and once we have more information for Intel, I shall update this thread. It would be interesting to know why, rather than just saying its incompatible!1 point
-
Ok, solved it: https://forums.unraid.net/bug-reports/stable-releases/empty-disk-slots-break-default-spin-down-delay-r1487/1 point
-
Ich habe jetzt über die Kommandozeile im Live-Betrieb den Stick überschrieben. Mal sehen ob das geklappt hat ^^ Also erst per cp /boot/config gesichert, dann die ZIP drüber gebügelt, config wieder zurück gespielt, EFI- umbenannt und Neustart.... EDIT: Hat tatsächlich funktioniert 😅 Dann schaue ich jetzt mal ob die Disks in 6.9.1 runterfahren... EDIT: Genau das selbe Spiel 😞 Dann wieder Update auf 6.9.2... EDIT: Auch keine Änderung. Mal sehen ob es vielleicht daran liegt, dass ich zwischendrin Disk Slots leer gelassen habe (vielleicht ein Programmierfehler in einer Schleife, die mit leeren Slots nicht klar kommt)... EDIT: Da scheint meine Vermutung wohl einen Volltreffer gelandet zu haben ^^
 1 point
 -
Da ich davon ausgehe, dass du nur einen Internetanschluss hast, ist das auch logisch. Du hast nur eine öffentliche IP pro Internetanschluss. Mehrere Domains nutzt man nur, wenn man über einen Proxy verschiedene Dienste pro Domain darstellen möchte. Die dahinterliegende IP-Adresse ist aber immer gleich. Nein. Die IP bekommt dein Router von deinem Internetanbieter und der DDNS übernimmt sie einfach nur 1:1. Die kannst du dir sparen. Du kannst einfach die Domain von no-ip.com nehmen. Dies gilt für beide DDNS. Alle Anfragen über deine öffentliche IP-Adresse, egal über welche Domain sie auf deinen Router zielen, haben nun die Freigabe über 51820. Deine Fritz!Box interessiert sich nicht für irgendwelche Domains. Die sieht nur "ah eine Anfrage aus dem Internet, darf ich die durchlassen? Moment, auf Port 51820.. ja darf durch". Ja, weil dieser Container ziemlich primitiv ist. Der ruft einfach nur alle 5 Minuten einen Link von DuckDNS auf um die öffentliche IP-Adresse von deinem Anschluss zu aktualisieren. Da geht also kein Internetverkehr oder sowas durch. Wenn du zB den Port 51820 auf die IP deines Servers freigegeben hast, dann geht der Internetverkehr zu Unraid selbst bzw zu dem Wireguard Daemon, der auf diesem Port auf eingehende Anfragen wartet. Wenn du zB den Port 80 freigeben würdest (machst du nicht ^^), würdest du sowohl über die http://DuckDNS- also auch über die http://NoIP-Domain die Unraid WebGUI sehen.1 point
-
Hallo @ich777 Geklärt wäre meiner Meinung nach das falsche Wort. Ich weis nun aber das, wonach ich gefragt habe. Meine Frage war technischer Natur: Unraid kann einiges anonymisieren und den Rest müßte man von Hand machen. Die daraus erwachsene, aber nicht beabsichtigte Diskussion um Datenschutz generell und die diversen unterschiedlichen Meinungen dazu sind sehr persoenlich und waren nicht meine Intention. "Das Internet vergisst nie"1 point
-
That's expected since sdc is the old disk1 that is now mounted with UD.1 point
-
yeah its a sickchill issue, im hoping they will push out a fixed release soon. link to issue:- https://github.com/SickChill/SickChill/issues/71801 point
-
I used this tutorial and it appears to be working well https://www.reddit.com/r/unRAID/comments/ejeo20/how_to_pass_any_docker_container_through_a_vpn_on/ A lot simpler than I thought it would be1 point
-
Then it seems like there is a problem with Plex. Try to create a ticket on the Plex forums that you've got artifacts when you are transcoding with your 11th gen CPU. Yes, I aslo think Jellyfin is a really nice application but on some edges it needs polishing... It's basically a fork from Emby and they went in two different directions some day in the past.1 point
-
If there was a conflict on port 443 you probably wouldn't be able to take these screenshots. What url are you using to generate these screenshots? (feel free to obfuscate your personal hash in the url) Is Nextcloud working? What url are you using to access it? I am not sure how to interpret this. For your initial tests you should put the PC and Unraid on the same network (and not directly connected to the Internet) so you can access Unraid and Nextcloud directly, without any kind of VPN software or port forwarding required.1 point
-
Yes, because you've bound the card to VFIO and if you bind it to VFIO it is exclusively reserved for VMs and strictly speaking the host, or better speaking in this case the driver that runs on the host, can't see it.1 point
-
The plugin is mainly for that use case if you want to use the card for example in your Docker container for transcoding, foldingathome, boinc, mining,... (there are many use cases) No, this plugin does nothing if you are using it like in your case in a VM and bound it to VFIO, no you can't get the stats of it if it's passed through to the VM because the VM has exclusive access to it.1 point
-
I've looked at the screenshot again and this seems really weired, can you test my Jellyfin container too and see if it also has this artifacts?1 point
-
NO, this should be OK on client side. ...this is with pfsense? I have no clue how routes are defined or even worse, firewall rules....BSD-style is something that never got sticky in my head, sorry. This is the required logic...if an alais will help, just do/use it. You need, in your pfsense firewall, to (if not allowed by default): - allow forwarding of packets originating from zt_net_plex (state=new, incoming over vlan-100) to plex/media, IP 10.1.30.1. - allow forwarding packets originating (state=established, =related, not=new, not=invalid) from plex/media to zt_net_plex Also, in your pfsense routing table: - create a static route to zt-net_plex 192.168.191.0/24 with gateway 10.1.100.201 (unraid-zt-docker). because each connection needs a path towards its destination and for returns as well. See my remarks above....at least that static route via zt-docker seems to be missing in pfsense. ...that looks OK now. Every zt-client trying to reach plex will direct the connection via zt-docker interface ... just make sure, that this IP 192.168.191.2 is allocated as static in zt-centtal here you can see, that on the unraid host, there is no known route to zt-network (192.168.191.0/255.255.255.0). Hence you need to route traffic via your pfsense...create the static route as described above....plex and zt-clients will, based on that routing table on your unraid host, direct outgoing traffic to your pfsense (the default gateways 10.1.30.254 / 10.1.100.254). these are default interfaces/IP-nets for Docker and Virtual-Machines, for when no custom network is used ... don't worry. ....looks like you "only" need to get your pfsense setup updated. Unfortunately, I am not familiar with these, sorry.1 point
-
...so, this has moved since last time. Nevertheless, this means that from inside your ZT-network, each ZT-client will have to use IP 192.168.191.2 as gateway for any host or network you would like to access via the ZT-docker. just to clarify...vlan-90 also resides somewhere in your network and this client will connect, when on a premise local to that network i.e. via WLAN to vlan-90 or will it use a VPN as well when abroad? When abroad, what networks will it connect to simultaneously - vlan-90 via VPN *PLUS* ZT via zt-client or only one at a time? When connected to vlan-90 only, do you wish it to be able to connect to plex as well? OK, this is the one parent, with a remote devioce that should be able to access plex, right? ...good. OK, see me remark regarding clients in vlan-90 above. Also: ZT is not doing NAT, so ZT clients will connect to any service with IPs from the 192.-168.191.0/24 range. So you want pfsense to allow traffic originating from 192.168.191.0/24 and destination 10.1.30.1 (plex) ...then, in ZT central add a single route to the plex host 10.1.30.1/32 with gateway 192.168.191.2 (which is your zt-docker). Note: since plex-docker and zt-docker do reside on the same unraid box, unraid (might) have a direct/local route available. See my next response, below. please Check the routes on unraid host (what is the output of "route -n" via command line)? We need to find out which path packets from zt-clients go when trying to reach plex and also which way return packets from plex go, trying to get back to a zt-client. Here the correct gateway is 10.1.100.201 (the "iunraid"-side/IP of your zt-docker). All will depend on the routing table if unraid can identify the route/path locally or will use the default gateway (your pfsense).1 point
-
Thank you very much!!1 point
-
Yes, You can't have the same filesystem mounted twice, after it's wiped/formatted it's no longer the same filesystem, UUID will be different.1 point
-
You can't mount both at the same time, you can stop the array and mount the UD disk.1 point
-
I forgot that since some time ago you can't change the fs on emulated disks, this was done to avoid users thinking that they can use that to change the filesystem of a disk while keeping the data, you can do this instead, start the array in maintenance mode then type: wipefs -a /dev/md1 Then re-start array in normal mode and format the disk.1 point
-
This is covered here in the online documentation that can be accessed via the Manual link at the bottom of the Unraid GUI.1 point
-
Stop the array, click on the disk and change filesystem to a different one, start array, format then go back to xfs and format again.1 point
-
Yes, you need to format the emulated disk before mounting the other one, it will be slow and the array will be unprotected during the procedure but you should have backups of anything important anyway so it's a way to avoid buying a new disk.1 point
-
Those look more like a xfs bug to me, you'd need to post in the xfs mailing list (or re-create that filesystem by formatting the disk).1 point
-
*Should*, difficult to have more than 1 bad DIMM at the same time, but of course not impossible.1 point
-
It will keep running until you stop, if one pass found the error it should be enough, at least for now.1 point
-
Ich habe xfs_repair mit -n ausgeführt, das bringt natürlich nichts. xfs_repair ohne -n und die Daten waren wieder da. Mein Dank geht an JorgeB. Ich schulde Ihm ein Bier.🍺 Gruss1 point
-
I would confirm that your Docker is connecting through the VPN . the point of the local_network variable is to allow your local network access to the VPN subnet.... Personally i use Check my VPN IP ....1 point
-
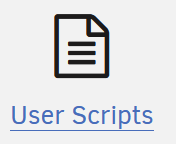
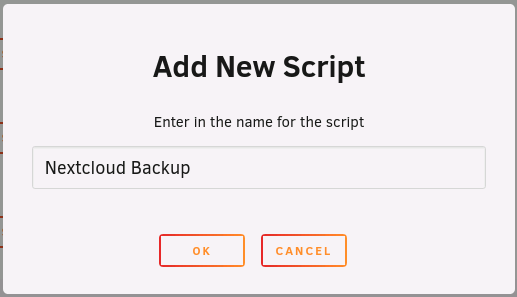
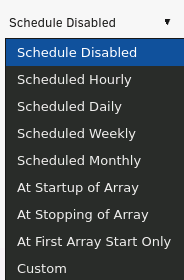
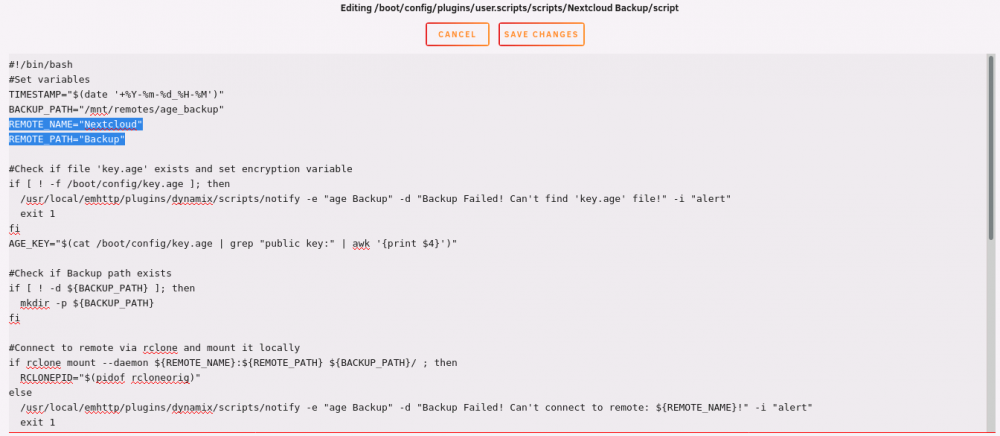
Example: with the rclone, Nextcloud and with a Cron job in the User Scripts plugin: This is a complete step by step tutorial. Download the rclone plugin from the CA App: Open up a Unraid Terminal and type in 'rclone config' It will ask what to do next, press 'n' to configure a new remote Enter your preferred name in this example name it 'Nextcloud' and press Return It now asks which protocol that you want to use, enter '37' for Webdav since Nextcloud uses Webdav Now enter the address of your Nextcloud with the inclusion of '/remote.php/webdav' instance in this case 'https://nextcloud.example.org/remote.php/webdav/' Now enter '1' to choose Nextcloud Enter you username for the Nextcloud instance and press Return Press 'y' to choose to enter your password Enter your password twice and press Return Leave the barer_tooken empty by simply press Return At Edit advanced config press 'n' Press on 'y' to accept the configuration And finally press 'q' to exit the rclone configuration Next download this script to your local computer (it contains a basic backup from your USB Boot device and your appdata directory, please see the steps from the first post how to exclude files and folders): Go to your Settings page in Unraid and click on User Scripts: rclone.script Click on Add new Script: Type in your preferred script name and click on OK: Hover over the little gear icon and click on Edit Script: Copy the contents from the downloaded script from Step 15 in the textbox: (Please first read trough the script and see if it fit your needs! NEVER BLINDLY COPY A SCRIPT FROM THE INTERNET OR SOMEWHERE ELSE AND EXECUTE IT ON YOUR SERVER READ FIRST THROUGH IT AND MAKE SURE IT FIT YOUR NEEDS AND IS CONFIGURED PROPERLY) : (You don't need to change the BACKUP_PATH since this path is used to mount your cloud storage to your server, this path should be empty and is created if it doesn't exists!) Make sure to modify the REMOTE_NAME to the name that you specified in Step 4 in this case 'Nextcloud' and also make sure to modify the REMOTE_PATH to a directory that exists in the root of your Nextcloud or create a folder in the root of your Nextcloud named 'Backup' like in this example (if you want to sync to a subfolder you have to modify the REMOTE_PATH to something like this: 'Backup/MyUnraidServer') : Click on Save Changes: Select a schedule from the drop-down menu or create a custom one (if you create a custom one I recommend looking into crontab.guru) : After you've selected a schedule don't forget to click on Apply on the bottom: Now you can click on Run Script to see the actual output from the script (keep in mind if you close this window the script will be aborted!) or you can click on Run in Background to run it in the Background now. Note: This script is only a example and it will keep the backups from the last x days defined in the DELETE_BACKUP_DAYS variable within the script. This script will basically create a directory in /mnt/remotes/age_backup and uses this directory to mount your Cloud storage to the folder to create backups for your USB Boot device and appdata, upload the files to your Nextcloud share and remove old backups that are x days old (by default keep the files that are not older than 14 days), unmount the above created directory and notify you when the backup is finished.


 1 point
 -
This cannot be solved with unraid network settings. In order for other clients in your IP-Segment, their gateway (aka your router, 192.168.1.1), needs to know the route back to the zt-transfer net and the zt-client on unraid as the gateway to the "other side"..1 point
-
Currently i'm running the reverseproxy docker with duckDNS docker for updating my IP and it's working great. I can access both dockers on my 2 local unraid boxes through a duckdns domain that gets authenticated through Organizr 2FA. With Wireguard VPN Manager i can access my network through the "Remote tunneled access" if i need to access any of the unraid webUI's for any reason or anything else on my network. it also works as a VPN for my remote location where it looks like i am connecting from my home address. Now recently i decided i wanted to setup tunnels on my 2 local unraid boxes to route all of their traffic through my VPN provider but for now it does not seem to be possible. Firstly it seems like you can only use EITHER the remote tunneled access OR the VPN tunneled access, you cannot use them both at the same time so im either unable to access my local network from remote OR my local unraid box will not go through the VPN. Secondly it doesnt appear that i can use the reverseproxy when the "VPN tunneled access" is turned on because i would have to forward port 443 and 80 through my VPN provider which doesnt seem feasible. So i sort of have 2 questions. Is there a way to enable both "VPN tunneled access" AND "Remote tunneled access" at the same time? or a function that works similarly? Is there a way to use reverseproxy if the host is connected to a VPN that cannot forward ports?1 point


.thumb.jpg.ab833aa6ff7fda4cd621beb2767ce537.jpg)


