Leaderboard


Popular Content
Showing content with the highest reputation on 03/09/24 in all areas
-
I had to chime in, this hit a nerve. I agree with 1812, they want everything for free. Even downloading movies. They will spend the money for hardware but software they want for free or next to nothing. Take a look at the users that rant the most. They are fairly new members. I doubt they have experienced a hard disk failure. This is where Unraid shines. If they complain about pricing, I doubt they use parity drive(s). I say let them leave and go to an alternative. I chose Unraid 14 years ago. Back then the biggest concern was LT’s risk management since Tom was a one man show. I wanted a system to be expandable, I wanted to use my various sized hard disks. I wanted the disk to spin down and I liked the idea that you could still access a disk by itself. It had to be an unconventional server, Unraid fit the bill. I went with the pro license at that time since it was the only one that covered my hard disk count. I just checked my email invoice from “Tom” and it was on sale for $109 ($10 discount) at that time. I spent more for a UPS. Soon I was maxed out and bought two 1TB drives, then larger drives and survived through the 2TB limit! I have experienced the introduction of Joe L.’s creations; cache_dirs, unMENU and preclear. We endured a number of LT re-locations. Unraid has come along way. Thanks Tom! Sorry, I haven’t been active on this forum lately, I been busy doing other things and frankly, Unraid just works. I have recovered through a number of hard disk failures, parity swaps, array up sizing and array down sizing. All painlessly. BTW, I still have the original flash drive. I didn’t cheap out on that. I’ve recommended and help setup Unraid using the Pro license to lots of people and not one complained about the cost. When my kids finally move out, we will happily pay for the “Lifetime” license no matter what the cost.4 points
-
Du musst dich auf jeden Fall für einen "Weg" entscheiden, erst dann kannst du diesen best möglich absicher... Ich bin auch kein freund von externen Diensten, egal ob Cloudflare oder sonstige Remote Proxy. Vor allem wenn es um den privaten zweck geht. Wenn es jetzt um das veröffentlichen für Weltweit geht, ist das private Hosten des Servers sowieso die flasche Wahl, also geht es hier um den Privaten zweck und das teilen mit Familie/Freunde/eine kleine Community und diesen Weg kann man natürlich absichern. Um dir einen kleinen Leitfaden anzubieten: 1. Firewall Alles beginnt mit einer guten Firewall... Gute Hardware-Firewall kann schnell in die hohen Kosten gehen deshalb beziehe ich mich lieber auf Software-Firewall. Ganz oben an der Spitze liegt hier OpnSense / pfSense, möglich wäre natürlich auch ein Flashen mit der richtigen Hardware von OpenWRT. Wichtig ist nur was die Firewall an möglichkeiten bietet. Aufgabe: Über vernünfigte Firewall Informieren, besorgen, einrichten. Ich persönlich verwende OpnSense und nutze nichts anderes mehr. 2. Netzwerk Das segmentieren von Netzwerken ist quasi Pflicht. Egal ob VLAN oder Physische Trennung. Wähle entweder Virtuelle oder Physische Trennung. Jenachdem was deine Hardware hergibt. Ich bevorzuge eine Kombination aus beiden, ein VLAN Switch und an Unraid eine physische Trennung durch 2 Netzwerkanschlüsse (oder mehr) und Performance zu bieten. Dienste die aus dem Internet aus erreichbar sind, befinden sich in einem eigenen Netzwerk. Aufgabe: Erstelle 2 Netzwerke mit eigenen IP Bereich. 1. Netzwerk: LAN/Home 2. Netzwerk: DMZ/Server Jetzt muss das Netzwerk noch konfiguriert werden. Das sollte einfach sein den wichtig ist nur eines: LAN hat vollen zugriff auf DMZ. DMZ sind alle Ports gesperrt nach LAN. 3. Unraid Wie schon erwähnt was gibt die Hardware her? VLAN oder Physich. Im primzip beides gleich. Wichtig ist jetzt zuerst die Netzwerkkonfiguration von Unraid: Aufgaben: 1. Netzwerkeinstellungen > Schnitstellenregeln richtig wählen. (Wenn VLAN nicht gewählt wird) eth0 = MAC Adresse von LAN eth1 = MAC Adresse von DMZ Neustarten von Unraid nicht vergessen. 2. Ganz WICHTIG ist jetzt das erste Netzwerk ist LAN, das zweite Netzwerk ist DMZ! DMZ MUSS zusätzlich die Netzwerkbrückung aktiviert werden (br1). 3. Unter Schnittstellen Extras wird br1 (DMZ Bridge) ausgeschlossen. Damit kein Unraid zugriff möglich ist für die DMZ Dienste. 4. Proxy mit LetsEncrypt SSL Jetzt wird ein Proxy installiert und zwar als custom Bridge im br1 Netzwerk. Wähle eine schöne IP Beliebt ist hier der Nginx Proxy Manager mit WebGUI und SSL. Erstelle eine Portfreigabe auf deiner Firewall mit 80+443 die auf deine Nginx custom IP zeigt. Nicht vergessen in Nginx Proxy Manager unter Settings die Default Site auf "No Response" stellen. PS: Nicht vergessen in deinem DNS Server die IP für deine Domain auf die Proxy IP umschreiben. 5. Zusatz Dienste Hier wird einen bewust das die meisten Firewalls sehr begrenz sind und kaum Sicherheit bieten für zusätzliche absicherungen... Die möglichkeiten sind hier endlos aber ein kleiner Leitfaden der auf jeder OpnSense / pfSense funktioniert: 1. IP Table Blocker aktivieren Im Internet findet man Listen von gefährlichen IP-Adressen die das WWW "snifen" und nach offnen Ports schnüffeln oder sonstige unseriöse Angriffe auf offene Systeme vornehmen. Bekannt hier sind Listen von spamhaus.org oder abuse.ch. Es gibt viele weitere Listen. Dieser Blocker sollte an deiner Firewall auf Nr. 1 stehen über der Portfreigabe von 80/443. Dann ist für diese Snifer Netzwerke auch die Ports gesperrt. 2. GeoIP Blocker einrichten Mit einer kostenlosen API von maxmind.com bekommst du die möglichkeit GeoIP Blocking zu betreiben. Hier kannst du eine Alias erstellen mit Länder die generell von deiner Firewall gesperrt werden soll. Zb zu empfehlen alle Länder außer Europa / USA. Damit wird jede Anfrage aus Russland, China, und jeden anderen gesperrten Land sowieso zu 100% an deiner Firewall blockiert trotz geöffneter Ports. HINWEIS: Wenn du in den Urlaub fährst. zb nach Thailand, musst du zuvor das Land an deiner Firewall freigeben sonst hast du keinen Zugriff auf deine Firewall/Dienste. Diese Regel kommt auf Nr. 2 ebenfall trotzdem ÜBER der Portfreigabe von 80+443. Wenn du dir nicht sicher bist was du sperren sollst und was nicht, nimm die üblichen verdächtigen und sperr Russland, Afrika, Asien. Warum ganz Europa und USA freigegeben bleibt hat den einfachen Grund da oft einige Dienste / Internetseiten evtl. auch für dich dann nicht mehr Aufrufbar sind. Wenn du diese 2 offen lässt, habe ich bisher nie einschrönkungen erlebt, außer du treibst dich in sehr "exotischen" Teilen des Internets herum. 3. CrowdSec einrichten Am besten direkt auf der OpnSense installieren die für verdächtige IPs eine direkte Firewall Sperre zu erwirken. CrowdSec ist ein trolles Projekt und lässt sich einfach als App auf der Firewall installieren, wieder etwas das unter üblichen Firewall-Routern nicht möglich ist... Also jetzt sind wir schon an einem Punkt der recht einfach um zu setzten ist und man ultimativen Schutz vor Hacker und WWW Snifer hat. Für komische fremde Lände erscheinst du sowieso offline als würde es dich nicht existieren. Das ganze ohne VPN / Cloudflare Tunnel. Desweiteren gibt es Software für Einbruchserkennung etc die zb OpnSense ebenfalls zu verfügung stellt. Weiteres gebe es die möglichkeit für innere Sicherheit einen DNS-Blocker zu installieren wie AdGuard (Ebenfalls direkt als OpnSense App) / PiHole und das interne Tracking und versenden von Telemetriedaten zu verhindern. Bis zu diesen Punkt schafft das jeder der zumindest eine OpnSense / pfSense im einsatz hat ganz easy wenn man nur ein bisschen IT/Netzwerk Expertise hat. Jetzt könnte man noch an die Hardcore abhärtung weiter gehen. Das werde ich aber jetzt hier nicht weiter erleutern da die möglichkeiten endlos sind. Erwähnen könnte man hier noch den einsatz von Fail2Ban, erkennung von DDoS und Brutforce, absicherung von WLAN gegen lokale Angriffe etc. Persönliche empfehlung sind die 3. Punkte mit IP-Tabel + GeoIP + CrowdSec. Die installation der drei Punkte dauert 5 Minuten und laufen ab dann vollständig automatisch für immer auf deiner Firewall. Als kleiner Tipp wenn du dir keine teuere Hardware für OpnSense zulegen möchtest gibt es noch den TP-Link ER605 v2 (WICHTIG ist hier "v2" zu bekommen) Darauf lässt sich OpenWRT installieren als Firewall. Als reine "Firewall" bzw Router ist der richtig gut. Alternativ wenn du Firewall + Wlan in einem benötigst, musst du dir einen geeigneten Router in der OpenWRT liste aussuchen. Wichtig ist hier der RAM und FLASH Speicher, nur wenn der Speicher groß genug ist lässt sich auf einen kleinen Router auch CrowdSec installieren. Für OpnSense im Einsatz als Router benötigst du natürlich ein WLAN-Router im AccessPoint Modus.2 points
-
I was a version behind in my bios. Updated and everything is working as expected. Thank you very much ich777.2 points
-
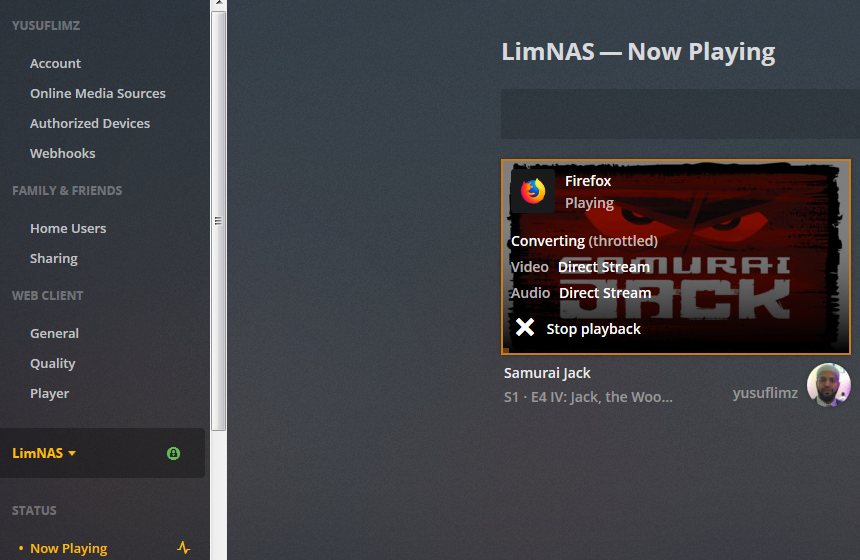
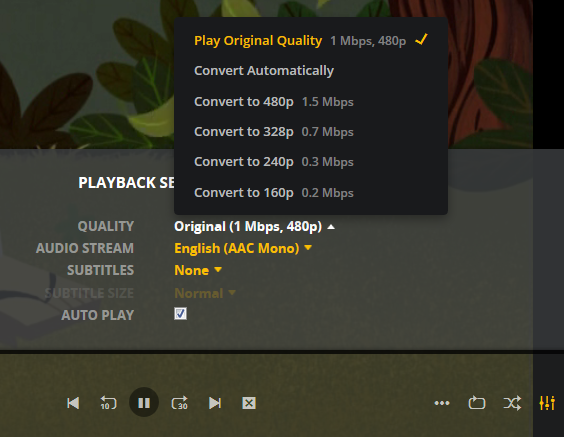
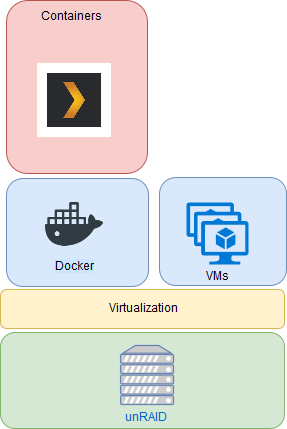
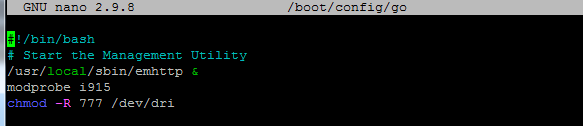
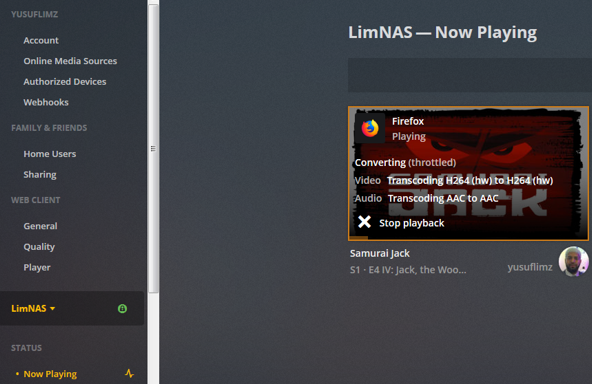
***Update*** : Apologies, it seems like there was an update to the Unraid forums which removed the carriage returns in my code blocks. This was causing people to get errors when typing commands verbatim. I've fixed the code blocks below and all should be Plexing perfectly now Y =========== Granted this has been covered in a few other posts but I just wanted to have it with a little bit of layout and structure. Special thanks to [mention=9167]Hoopster[/mention] whose post(s) I took this from. What is Plex Hardware Acceleration? When streaming media from Plex, a few things are happening. Plex will check against the device trying to play the media: Media is stored in a compatible file container Media is encoded in a compatible bitrate Media is encoded with compatible codecs Media is a compatible resolution Bandwith is sufficient If all of the above is met, Plex will Direct Play or send the media directly to the client without being changed. This is great in most cases as there will be very little if any overhead on your CPU. This should be okay in most cases, but you may be accessing Plex remotely or on a device that is having difficulty with the source media. You could either manually convert each file or get Plex to transcode the file on the fly into another format to be played. A simple example: Your source file is stored in 1080p. You're away from home and you have a crappy internet connection. Playing the file in 1080p is taking up too much bandwith so to get a better experience you can watch your media in glorious 240p without stuttering / buffering on your little mobile device by getting Plex to transcode the file first. This is because a 240p file will require considerably less bandwith compared to a 1080p file. The issue is that depending on which format your transcoding from and to, this can absolutely pin all your CPU cores at 100% which means you're gonna have a bad time. Fortunately Intel CPUs have a little thing called Quick Sync which is their native hardware encoding and decoding core. This can dramatically reduce the CPU overhead required for transcoding and Plex can leverage this using their Hardware Acceleration feature. How Do I Know If I'm Transcoding? You're able to see how media is being served by playing a first something on a device. Log into Plex and go to Settings > Status > Now Playing As you can see this file is being direct played, so there's no transcoding happening. If you see (throttled) it's a good sign. It just means is that your Plex Media Server is able to perform the transcode faster than is necessary. To initiate some transcoding, go to where your media is playing. Click on Settings > Quality > Show All > Choose a Quality that isn't the Default one If you head back to the Now Playing section in Plex you will see that the stream is now being Transcoded. I have Quick Sync enabled hence the "(hw)" which stands for, you guessed it, Hardware. "(hw)" will not be shown if Quick Sync isn't being used in transcoding. PreRequisites 1. A Plex Pass - If you require Plex Hardware Acceleration Test to see if your system is capable before buying a Plex Pass. 2. Intel CPU that has Quick Sync Capability - Search for your CPU using Intel ARK 3. Compatible Motherboard You will need to enable iGPU on your motherboard BIOS In some cases this may require you to have the HDMI output plugged in and connected to a monitor in order for it to be active. If you find that this is the case on your setup you can buy a dummy HDMI doo-dad that tricks your unRAID box into thinking that something is plugged in. Some machines like the HP MicroServer Gen8 have iLO / IPMI which allows the server to be monitored / managed remotely. Unfortunately this means that the server has 2 GPUs and ALL GPU output from the server passed through the ancient Matrox GPU. So as far as any OS is concerned even though the Intel CPU supports Quick Sync, the Matrox one doesn't. =/ you'd have better luck using the new unRAID Nvidia Plugin. Check Your Setup If your config meets all of the above requirements, give these commands a shot, you should know straight away if you can use Hardware Acceleration. Login to your unRAID box using the GUI and open a terminal window. Or SSH into your box if that's your thing. Type: cd /dev/dri ls If you see an output like the one above your unRAID box has its Quick Sync enabled. The two items were interested in specifically are card0 and renderD128. If you can't see it not to worry type this: modprobe i915 There should be no return or errors in the output. Now again run: cd /dev/dri ls You should see the expected items ie. card0 and renderD128 Give your Container Access Lastly we need to give our container access to the Quick Sync device. I am going to passively aggressively mention that they are indeed called containers and not dockers. Dockers are manufacturers of boots and pants company and have nothing to do with virtualization or software development, yet. Okay rant over. We need to do this because the Docker host and its underlying containers don't have access to anything on unRAID unless you give it to them. This is done via Paths, Ports, Variables, Labels or in this case Devices. We want to provide our Plex container with access to one of the devices on our unRAID box. We need to change the relevant permissions on our Quick Sync Device which we do by typing into the terminal window: chmod -R 777 /dev/dri Once that's done Head over to the Docker Tab, click on the your Plex container. Scroll to the bottom click on Add another Path, Port, Variable Select Device from the drop down Enter the following: Name: /dev/dri Value: /dev/dri Click Save followed by Apply. Log Back into Plex and navigate to Settings > Transcoder. Click on the button to SHOW ADVANCED Enable "Use hardware acceleration where available". You can now do the same test we did above by playing a stream, changing it's Quality to something that isn't its original format and Checking the Now Playing section to see if Hardware Acceleration is enabled. If you see "(hw)" congrats! You're using Quick Sync and Hardware acceleration [emoji4] Persist your config On Reboot unRAID will not run those commands again unless we put it in our go file. So when ready type into terminal: nano /boot/config/go Add the following lines to the bottom of the go file modprobe i915 chmod -R 777 /dev/dri Press Ctrl X, followed by Y to save your go file. And you should be golden!


 1 point
 -
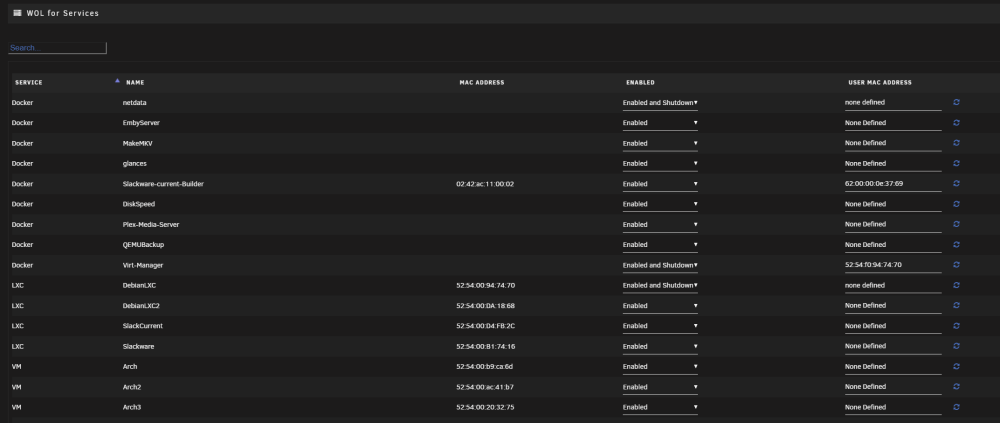
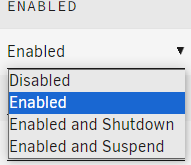
This was a function being developed for the next release but was decided best to be a plugin to start with to allow better interations for changes. Currently this is a beta release. the is an existing plugin called virtwold this expands on it to include dockers and LXC. I am in the process to complete changes to make it work fully under 6.12 but currently the search function and help text don't work or don't exist. Two pages are created, first is the settings. Within the settings you can specify which servers are enabled. The interface name needs to be a physical NIC. By default shutdown actions are disabled. The second page is in tools. It allows you to specify the actions allowed. To be able to start dockers you need to have a user defined mac address as one is not assigned until the docker starts and changes. Values for the enabled field are

 1 point
 -
After watching the recent interview as well as the general direction, it seems the intention is to have ZFS be the new filesystem for arrays in Unraid? If so, I am rather hesitant, because even though I'm sure it will not be mandatory, I still don't think ZFS is a good fit. There are a lot of ZFS fans used to enterprise level hw and sw and obviously it has many great things, but IMO it fundamentally doesn't really follow the basis ethos and tenets of a home server fs - - data disks should remain in native format and independently readable - only the disk with data needed spins up - you can mix and match disks of any size The basic issue is that a striping implementation such as traditional Raid, ZFS or btrfs can have none of these. And ZFS is also notoriously 'heavy', it will eat up ram, it needs bigger caches etc. Honestly I think for its intended audience, btrfs is a much better solution, except it doesn't have the mind share or history. The other big feature of course is checksumming, snapshots etc, totally lacking in Unraid. I think the best way to add this would be to be pragmatic - doing these in a realtime system is impossible without block level striping. What Snapraid does is IMO perfect - periodic checksums, snapshots, backups, bitrot protection, undelete, dedup and so many other features become possible with very little overhead, with the only caveat being its not realtime - which if you think about it is actually better for an array since most media is RO anyway. I know this has been discussed before but there was never any real conclusion and it would be nice to get a fresh discussion and official thoughts?1 point
-
yep, working fine here, must be something different im using it in my main VM Mashine iGPU UHD630 gvt-g NV GTX1060 Docker & VM (either or, NOT recommended) NV RTX3080ti Docker & VM (either or, NOT recommended) none are vfio bound and i always tested vice vers with transodings in dockers too, so all is working as expected.1 point
-
Please post in the respective support topic instead:1 point
-
ja, da irrst du dich 10 Antworten, 10 Meinungen ... vielleicht um den direkten RP Weg überhaupt offen zu halten, du hast einen Dual Stack Anschluss mit öffentlicher ipv4, wenn ja, dann hast du alle Optionen ... Anmerkungen meinerseits 1/ klassisch RP, mein Weg, direkte Verbindung ist meiner Meinung nach immer die beste Lösung, einlesen, einarbeiten, dann ist das auch sicher genug für alle Privatuser ... 2/ Cloudflare Tunnel, ist ne Alternative, aber die "free" Variante schließt streaming aus ... sollte man wissen, bezahlt sicher ne gute Lösung, für mich persönlich kein echter Mehrwert außer dem bissel ddos Schutz inkl. ... ein sauber konfigurierter RP inkl. f2b, geo block, ... reicht mMn aus. 3/ Notfall Plan, wenn kein dual stack anliegt die beste Alternative, nutze ich auch als Fallback (LTE) falls mein Anschluss mal aussetzt, geht ja über diverse Wege, VPN (Bsp. wg9, SSH, FRP, Tailscale, ... was auch immer man mag. prüf ob 1/ überhaupt geht, wenn ja hast du immer noch die Wahl, wenn Nein wird es eh klarer1 point
-
all worked, thank you for your help, much appreciated!!1 point
-
Yes, in config.php put it somewhere in that section.1 point
-
thank you, i appreciate the help! for the maintenance, i put this in the config.php file that is in my appdata>nextcloud>congfig.php? do i put it in the section with dbtype, version, dbname, etc? database indices worked and cleared the error, thank you! I switched to cron and set the command in the scripts plugin.1 point
-
Mir listet www.gh.de viele verschiedene Boards auf, die auch diese Bezeichnung haben (Screenshot unten). Welches meinst Du denn? Kann man nehmen, wenn man meint die Leistung zu brauchen und das Geld auszugeben. Aber das hängt eben davon ab, was Du wirklich mit dem System machen willst. Das es nicht mehr zum "zocken" ist, sondern Du 2 getrennte System nutzen willst hatte ich gedacht aus dem vorherigen Verlauf entnommen zu haben. Somit wird das hier nur noch ein NAS. Warum dafür soviel Rechenpower? Was soll man zu dieser Präzisen Aussage sagen? Aber das hängt eben davon ab, was Du wirklich mit dem System noch machen willst. Wenn Du sie noch hast und sie in Ordnung ist: okay. Leider wissen wir ja nicht, was Du mit dem System machen willst. Als Cache für >500GB schreibend ist sie logischerweise ungeeignet. Als Cache/Pool für die eher anspruchslosen systemshares und eben kleine schreiboperartionen auf unraid ist sie okay. Sind diese beiden Festplatten alles? Und welche Modelle sind es/welche Parameter haben sie? Wenn es nur eine 8TB und eine 3TB sind, ist ein Array mit Parity für maximal 3TB Nutzdaten geeignet. Ist es das, was Du willst? Hat eine der Festplatten SMR oder 5400Rpm? Aber ob das sinnvoll und geeignet ist hängt eben wirklich davon ab, was Du wirklich mit dem System machen willst und wieviel Platz Du dafür brauchst (und ob Du Parity willst). Für nur die paar Komponenten (wenn es wirklich nur 2 Festplatten, eine NVMe, das Mainboard, die CPU und etwas RAM ist) ist es geeignet und bietet so einiges an Reserven. Energetisch sparsamer/drunter geht es vermutlich aktuell nur noch mit einem Pico +Netzteil oder so. Auch hier: das hängt eben davon ab, was Du wirklich mit dem System machen willst. Bei einem NAS mit Festplatten ist es absolut schnurz ob Du Dualchannel oder Single nimmst. Der Unterschied ist nur, daß die CPU/Ram etwa mehr Zyklen hat um auf die erheblich langsameren Festplatten oder SSDs zu warten. Ob sie also für das Schreiben eines Datenblocks 10mal Däumchen dreht oder 11mal ist in einem NAS unerheblich. Willst Du hingegen in einer VM oder Docker den Urknall mit allen Auswirkunegn berechnen kann sich über die Jahre, die das läuft, jede eingesparte Mikrosekunde schon in Summe auswirken. Vielleicht ist die Berechnung dann in rund 10-15 Jahren eine Woche früher fertig. Kann man machen und ist bei einem NAS, welches nichts anspruchsvolles machen soll auch gut. In einem NAS, welche aufgebaut wird um Jahre stabil und zuverlässig zu arbeiten ist das Recycling der Module ziemlich egal. Daß DDR5 mit seinen höheren Taktraten und ggf. sogar ECC on Die sparsamer sein soll höre ich zum ersten Mal. Vorteil von DDR5 ist, daß man (teure) größere Speichermodule verwenden kann und somit in Summe mehr Speicher auf (dafür geeignete Mainboards) bringen kann. Ich glaube aktuell ist bei DDR5 48GB pro Speichermodul möglich. Bei dem genannten Suchstring meldet mir www.gh.de:
 1 point
 -
thank you for help. I've enabled 4g and now its working!1 point
-
zu 1/ ja, wenn Sie im Array oder als cache verwendet werden soll, dann formatieren zu 2/ einbinden als UAD (unassigned device) geht, aber ist dann halt eine "separate" disk und hat nichts mir cache / array zu tun generell, externe Festplatten (USB) sind sehr fehleranfällig, daher auch nicht empfohlen diese dafür zu verwenden, das nur vorweg ... sprich, über Geschwindigkeiten, Ausfälle, merkwürdiges Verhalten bei Neustarts, usw usw ... du weißt jetzt warum USB ...1 point
-
Hardware is probably too new for the kernel, it may work with the driver once v6.13 is out.1 point
-
Thank you very much for your quick Help. Your solution solved the problem immediately.1 point
-
Try blacklisting the amdgpu driver: https://docs.unraid.net/unraid-os/release-notes/6.10.0#linux-kernel1 point
-
No absolutely, i think sadly everything implies faulty UPS. It is what it is, unfortunately its just a bad purchase for me. atleast on the bright side, i can repurpose it for a non smart usecase - battery backup my router or something (the UPS is still very functional, just not the data). Thank you for all the sanity checks and suggestions1 point
-
Short answer is you need these module parameters: Register_ClockSource=1 Register_Governor=1 Register_CPU_Idle=1 Register_CPU_Freq=1 Apply the Linux standards to add them as an `options` line into `/etc/modprobe.conf` or `/etc/modprobe.d/modprobe.conf` Somehow, you will also switch the System to CoreFreq Clock Source: this can be achieved in system `profile` or `init` file echo "corefreq_tsc" > /sys/devices/system/clocksource/clocksource0/current_clocksource Fyi, you can get all possible parameters using command: modinfo corefreqk.ko1 point
-
For maintenance window just paste this line into config.php file: 'maintenance_window_start' => 1, If you set it to 1, the maintenance window will be set between 1 and 5 am. With the database thing just try to run the command it tells you to use. If you're using nextcloud official image just go to the Unraid terminal and paste this command: docker exec -u 99 nextcloud php ooc db:add-missing-indices And with the background jobs change AJAX to Cron and if you have User Scripts plugin just add a new script and paste this command: docker exec -u 99 nextcloud php cron.php Save and set it to run every 5 minutes with custom schedule */5 * * * *.1 point
-
TBH I never heard from someone that the web app crashes the whole server or makes it unusable… only that it stays black and the transcode never starts.1 point
-
Thanks! That seemed to work and let me unlock C2 idle states. Is there anything I need to do to make the settings persist across reboots? I had to reregister CoreFreq after I rebooted and change the idle limit to C6 again.1 point
-
i guess you are in the wrong thread, this plugin doesnt create any widgets. may take a look at GPU Statistics plugin1 point
-
The Plex Web Client is known to have issues for quite some time.1 point
-
Für das Problem hatte ich mal einen Fix gefunden, der zumindest bei NFS in der fstab funktioniert. In der Auflistung der Mount-Parameter fügst du ein "local_lock=all" ein. Achtung, keine Leerzeichen verwenden. Könnte für SMB evtl. auch funktionieren? Z.B. <ip adresse>:/mnt/pool/share /media/username/Share nfs rw,user,auto,local_lock=all 0 0 Ansonsten habe ich gerade einen Vergleich zwischen NFS und SMB durch und bin mit beidem nicht ganz glücklich. Ich nutze nur Linux für die Freigaben. Vorteile von SMB: - Benutzerverwaltung - Wenn mal einer mit Windows kommt, kann er mitspielen. Kommt bei uns aber eigentlich nicht vor. Vorteile von NFS: - bei mir zumindest minimal schnellere Datenübertragung mit Standardeinstellung, könnte aber sein, dass man bei beiden Freigabearten noch tunen kann. - WESENTLICH robuster. Wenn ich während eines Dateikopiervorgangs zum Test mal die Netzwerkleitung am Server abziehe und wieder stecke hält die Übertragung an und setzt anschließend fort. SMB schmiert beim selben Test total ab, manchmal ist der Mount dann verloren/nicht mehr synchron und muss neu gemountet werden und einmal war dadurch sogar das Cache-Laufwerk angeblich korrupt. Netzwerkstörungen können immer vorkommen und müssen überstanden werden. Mit NFS kann ich während des Kopiervorgangs sogar Unraid neu booten und anschließend läuft alles weiter. Die Dateien sind hinterher immer bitidentisch.1 point
-
That worked. Thank you so much.1 point
-
Thank you thank you!1 point
-
I was finally able to replace my power supply. I ordered a 650W EVGA that was on the A-Tier of the PSU list. First one took 2 weeks to arrive from Amazon. Then due to work I was unable to rewire my Unraid server for a while. Finally got the replacement PSU in, but one of the SATA ports on the PSU was bad which limited me to powering only 4 drives, so off to order another replacement. Turns out they sent me a returned PSU. The 2nd replacement arrived and I was able to quickly get it installed. I was able to start the array, perform a new config to get rid of the red X on my "bad" drive and run a full parity check which took a couple of days. The parity drive completed, but oddly I received an error message that there were x number of errors (it was alot). But after running a smart report I found no errors with any of the drives. So far the drives have not turned bad. I assume the error I saw very breifly had to do with the parity drive being in a error state during the parity check. I think it is too early to say for certain it was the power supply, but for now it is working fine. I plan on running another parity check in a week or so to see if the issue returns. For now, I am backing up the data just in case it happens again. I want a full backup before I run the parity check. I wanted to thank everyone who chimed in on this. I was getting pretty frustrated with UnRaid, and was considering switching to another storage solution. Glad I didn't have to switch.1 point
-
And here, I stop to raise a glass to Mr. M. Munford and his WIDR rule. I guess something was lingering in the background, or maybe because the server was in GUI mode, but after a normal reboot, I have been watching the writes, and after some initial noise, all seems clear. One of the dockers (Sonarr i think) seems to be scanning folders, because I see a bunch of reads right now. I'm sure that will calm down once whichever docker is feeling insecure after the reboot decides everythign is really OK after all. Sorry for the false alarm, but maybe someone else will find this sometime and it will help them.1 point
-
For the nginx errors try booting in safe mode and/or closing any browser windows open to the GUI, only open when you need to use it then close again. Also this can make the server hang: Error: Macvlan and Bridging found Change the docker network to ipvlan. Finally, disk1 appears to be failing, run an extended SMART test to confirm.1 point
-
Warning: I bought both products from those links and got this GUID-used-or-blacklisted error when I tried to apply my activation code: So much for "appears to provide unique GUIDs for Unraid." I emailed Limetech support and am awaiting their response. I suggest that people hold off on buying these pending some sort of resolution.
 1 point
 -
for some reason sftp is no longer a supported option? is this going to be this way for the future or will sftp come back? the ver i am on is 2.8.0 "a new day" according to the about section1 point
-
You could check the unraid version then define the location based on the minimum version required for the change. mover_path="/usr/local/bin/" if awk "BEGIN {exit !($(cat cat /etc/unraid-version | grep -Po '([0-9]+\.?)+') >= 6.12.6)}"; then mover_path="/usr/local/sbin/" fi if [[ ! -f "${mover_path}/mover.old" ]]; then mv "${mover_path}/mover" "${mover_path}/mover.old"; fi or run a function to return a boolean if changes are required for multiple parts of the script. function min_unraid_version { local min_version="6.12.6" if awk "BEGIN {exit !($(cat cat /etc/unraid-version | grep -Po '([0-9]+\.?)+') >= $min_version)}"; then true; return fi false } if min_unraid_version; then echo "/usr/local/sbin/" else echo "/usr/local/bin/" fi1 point
-
From my running macOS Monterey i've updated to Sonoma 14.3.1. With the help of @ghost82 I updated all the necessary OpenCore kext and config.plist to the newest version, replaced the old OpenCore image and was able to boot in Sonoma.1 point
-
Hey all. I just noticed that failed backup jobs won't be deleted if they are older than specified in the configuration. Is this an expected or unexpected behaviour?1 point
-
所以说到底,还是因为插件不能完美的与unraid的docker组件搭配,不知道什么时候unraid官方能自己推出compose,感觉这个并不困难。 omv都支持docker compose,不知道unraid为什么一直不集成进来,其实docker的安装管理还是compose最方便了1 point
-
may reduce them to 1 ... but i guess wont help Feb 29 12:24:05 lstation root: ---Setting VFs to: 4--- Feb 29 12:24:05 lstation kernel: i915 0000:00:02.0: not enough MMIO resources for SR-IOV Feb 29 12:24:05 lstation kernel: i915 0000:00:02.0: [drm] *ERROR* Failed to enable 4 VFs (-ENOMEM) Feb 29 12:24:05 lstation root: Feb 29 12:24:05 lstation root: ------------------------------------------------- Feb 29 12:24:05 lstation root: ---Installation from SR-IOV plugin successful!--- Feb 29 12:24:05 lstation root: ------------------------------------------------- Feb 29 12:24:05 lstation root: Feb 29 12:24:06 lstation root: plugin: i915-sriov.plg installed root cause is rather your mainboard ... may try some BIOS lookups, above 4g, uefi, latest bios installed, last try, syslinux startup parameter ... https://access.redhat.com/solutions/373761 point
-
这个只是 docker-compose 插件的显示问题,根据开发者描述,由 docker-compose 所创建出来的容器,它们的“应用更新”状态提示并不集成到 DockerMan 的 UI 中(也就是 Docker 原本的管理界面),所以会一直提示你镜像可以进行更新: 另外我看到某些网友表示可以通过修改一些配置文件来解决一直提示更新的问题,但是我没有试过,你可以参考这里的资料去了解看看:
 1 point
 -
New years eve is currently noon in my timezone (12:40 CET) and i have three little kids (1/1/3) so I'm babysitting and messing around with my server 🙂 You have the same issue I had: vhost0 is missing in the routing table. I show you my config and my issues and how I solved it: The Network settings should be: - Network, Bridging off - Network, bonding off (optional, if not really needed ...) - Docker, host access on - Docker, macvlan - VM, vhost0 AND thet here is the kicker: This was my routing table without vhost0 in it....like yours After - enabling docker Services AND -Setting IP Custom Network to my standard Ip settings in the Docker Setting: - Vhost0 showed up in the routing table: Right after that I restarted the VM and everything is working as expected I personally think this is a dseign flaw in the current network settings.


 1 point
 -
Thanks @JorgeB. You made me recheck and you are right. If other noobs like me come around I made it even clearer with adding the following image:
 1 point
 -
Even with macvlan support, using a central DHCP management solution for all clients and hosts in your network is not possible for Dockers in unraid. This is a docker plugin, that promises to solve that: https://github.com/devplayer0/docker-net-dhcp ...from the readme.md: docker-net-dhcp docker-net-dhcp is a Docker plugin providing a network driver which allocates IP addresses (IPv4 and optionally IPv6) via an existing DHCP server (e.g. your router). When configured correctly, this allows you to spin up a container (e.g. docker run ... or docker-compose up ...) and access it on your network as if it was any other machine!1 point
-
You're on 6.12, click the green padlock on the top right row of icons to unlock reordering.1 point
-
For Radeon cards you do not have to use a VBIOS file. First Steps: Set your machine in UEFI to CSM mode "enabled". Set your Unraid to Legacy mode. In "Main" klick on "Flash" right next to the Unraid usb drive this will bring you to Unraid settings, in the settings uncheck "Allow UEFI boot". Open "Settings", "VM Manger" and set "PCI ACS Override" to "Both", set "Allow unsafe interrupts" to "Yes", reboot Unraid, go to "Tools" "System devices" and set the VFIO passthrough devices, then click "Bind selected devices to VFIO", click "Done", install the AMD Vendor reset plugin. Go to "Main", "Flash", "Syslinux Configuration", the section "Unraid OS" should look something like this: kernel /bzimage append pcie_acs_override=downstream,multifunction vfio_iommu_type1.allow_unsafe_interrupts=1 initrd=/bzroot after "append" add this: video=efifb:off,vesafb:off it should now look like this: kernel /bzimage append video=efifb:off,vesafb:off pcie_acs_override=downstream,multifunction vfio_iommu_type1.allow_unsafe_interrupts=1 initrd=/bzroot Reboot again. Create a VM. Edit the VM in GUI, the first gpu should be "Virtual" for the VNC card, the second GPU should be your Radeon card. As first soundcard set Radeon HDMI passthrough, click "Update", then edit the VM again in XML. In the XML File go to <features> and edit <features> <acpi/> <apic/> <hyperv mode='custom'> <relaxed state='on'/> <vapic state='on'/> <spinlocks state='on' retries='8191'/> <vendor_id state='on' value='1234567890ab'/> <---- with Vendor ID set to 'none' you get error 43 </hyperv> <kvm> <hidden state='on'/> <--- set this for kvm, if you do not do it, you get error 43 </kvm> </features> . . For the graphics card edit the following lines: <hostdev mode='subsystem' type='pci' managed='yes'> <driver name='vfio'/> <source> <address domain='0x0000' bus='0x0a' slot='0x00' function='0x0'/> </source> <alias name='hostdev0'/> remove the vbios <address type='pci' domain='0x0000' bus='0x04' slot='0x00' function='0x0' multifunction='on'/> </hostdev> <hostdev mode='subsystem' type='pci' managed='yes'> <driver name='vfio'/> <source> <address domain='0x0000' bus='0x0a' slot='0x00' function='0x1'/> </source> <alias name='hostdev1'/> <address type='pci' domain='0x0000' bus='0x04' slot='0x00' function='0x1'/> </hostdev> . . . After you set everthing, you have to set your VM to autoboot and reboot Unraid. Don´t forget do pass through a keyboard for pressing the any key to boot from the Windows Image. During the reboot process Unraid will launch the VM at start and you will not be able to get any screen output. Just keep pressing the space bar when the keyboard lights up a second time during VM boot. When the VM starts you can install Windows, reboot, install VirtIO drivers, reboot, then configure Windows using the vnc connection. Usually when i am in the process of configuring Windows the video card will get installed in the background after some minutes of runnig the VM. A second "Microsoft Basic Dispay Adapter" will appear in the windows device manger, reporting Code 31, which means you did not install drivers yet. At this point your screen connected to the Radeon card should light up. A critical step will be preventing Windows from loading driver updates through Windows Update. If that happens, your VM will be borked and you have to reinstall it again because the standard Windows Update driver for Radeon does not work. BEFORE you install the VIRTIO drivers you have to configure Windows Update. Run "gpedit.msc" and select "Computer configuration", "Administrative templates", "Windows components", "Windows Update", "Do not allow driver updates through Windows Update" and set this rule to "Active". ALSO check System Properties, Hardware, Device installation settings, set it to "No, do not download apps and device symbols". There will be a warning wich can be accepted clicking "OK". During the whole process do NOT shutdown your VM through the Unraid GUI. The VM should be working and you should reboot the VM using the Windows start menu every time you have to manually reboot the guest. Do not install the latest video drivers. Install WHQL 22.5.1 drivers. I tried latest drivers wich resulted in slow video performance and black screen. For some reason the installation of the virtio drivers fails everytime in a Windows 10 VM when i run the setup for the first time. Just rerun the installer and it will work the second time. Then open the virtio driver folder on the virtio driver disk and navigate to "qemu system agent" and install that on top of the drivers. Do not install anything else from the virtio drivers disk. I tried installing the guest agent using the "virtio-win-guest-tools.exe" in the main folder and that borked my vm. Do not use that. A lot of errors in dealing with VM are solved when you realise that when you make changes to the VM template in the GUI all former changes you made in the XML template get discarded. As soon as you click the "Update" button in the GUI the current XML gets overwritten by a standard template and you have to edit your XML setting again.1 point
-
after a ton of research i have figured it out. under <os> put <smbios mode='host'/> directly below that put this under <features> <kvm> <hidden state='on'/> </kvm> under <cpu mode ='host-passthrough'....... put <feature policy='disable' name='hypervisor'/> and i also deleted any lines pertaining to hyper-v hope this helps anyone in the future1 point
-
So I had the same issue but the solution made me feel like an absolute idiot....spent a good 20-30 minutes trying to figure this out but eventually got it: 1. Enable advanced config options on your UPS via the on screen display 2. Open configuration options and scroll down until you find ModBus 3. Change ModBus to Enabled. It is disabled by default on all APC UPS units. 4. In unRAID UPS Setting menu, set the "UPS Cable" to USB and set "UPS Type" to ModBus. No additional settings like /dev/tty** are required. It may take a minute or two for the info to load but it will. ***Make sure you use the USB-A to USB-B cable to connect your UPS to the server, not the RJ-45 to USB-A. ModBus does not seem to work with the RJ-45 port on the UPS***
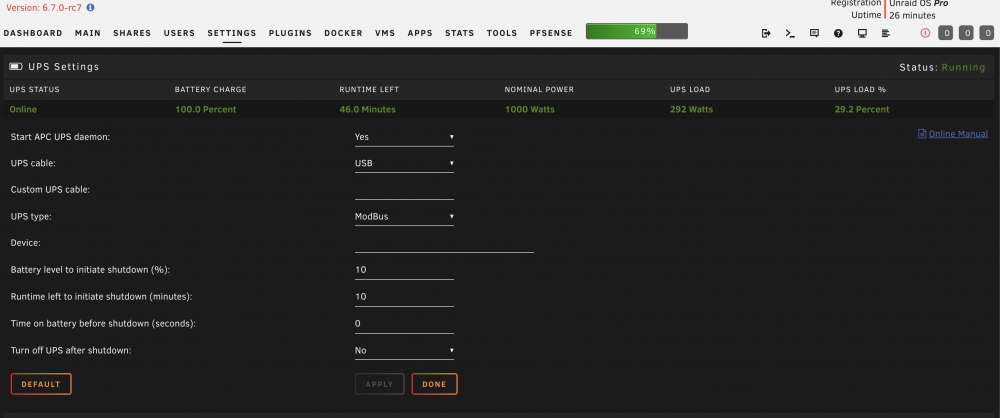 1 point


.thumb.jpg.15d158039cb566ddee9b77f92ecb4bd3.jpg)
