Leaderboard


Popular Content
Showing content with the highest reputation on 01/09/20 in all areas
-
When this bug is sorted I'll produce a 6.9 release which is exactly same as 6.8 except for latest stable kernel (and omission of out-of-tree drivers which don't build with this kernel):5 points
-
I bet a beer the answer is Soon™. 😅2 points
-
Overview: Support for Docker image arch-plex in the binhex repo. Application: Plex - https://plex.tv/ Docker Hub: https://hub.docker.com/r/binhex/arch-plex/ GitHub: https://github.com/binhex/arch-plex Documentation: https://github.com/binhex/documentation If you appreciate my work, then please consider buying me a beer For other Docker support threads and requests, news and Docker template support for the binhex repository please use the "General" thread here1 point
-
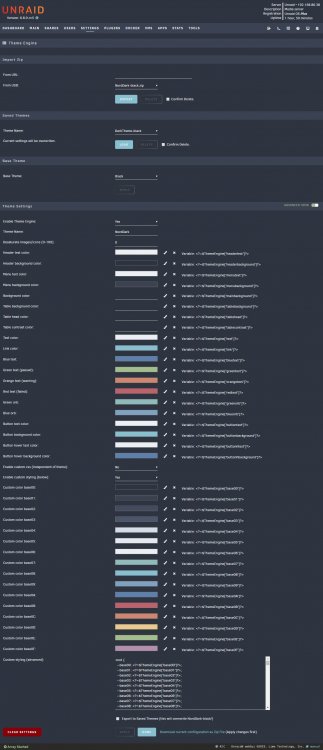
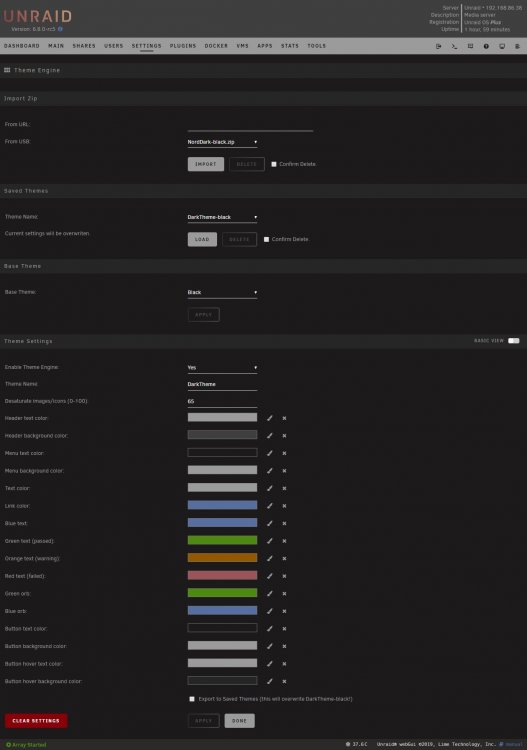
**Beta** Theme Engine A plugin for the unRAID webGui Theme Engine lets you re-style the unRAID webGui. Instead of creating a whole new theme, it adjusts settings that override the theme you are already using. You can adjust as few or as many settings as you like. Mixing and matching the base themes with Theme Engine settings creates endless possibilities. Import one of the included styles, or remix and export your own. --- How to install Search for Theme Engine on Community Applications. -OR- the URL to install manually: https://github.com/Skitals/unraid-theme-engine/raw/master/plugins/theme.engine.plg --- How to use To load an included theme, select it under Saved Themes and hit Load. To import a theme (zip file) from the community, paste the url under Import Zip and hit Import. The theme is now available to Load under Saved Themes. To import a theme (zip file) from usb, place the zip file in the folder /boot/config/plugins/theme.engine/themes/ select it under Import Zip and hit Import. The theme is now available to Load under Saved Themes. Note that when you Apply changes to a theme, it applies to your current configuration but does not overwrite the Saved Theme. If you want to update the saved theme, check the checkmark next to "Export to Saved Themes" before hitting Apply. To save it as a new theme, change the Theme Name, check the checkmark, and hit Apply. To export your theme as a zip file, hit Apply to save any changes, toggle on Advanced View, and click "Download current confirguration as Zip File" at the bottom of the page. --- Screenshots Basic View: Advanced View: --- Advanced / Hidden Options You can inject custom css by creating the following files and enabling custom.css under advanced view. The files, if they exist, are included on every page just above `</style>` in the html head. The custom.css files are independent of the theme engine theme you are using. If custom.css is enabled, it will be included even if theme engine is disabled. /boot/config/plugins/theme.engine/custom.css Will be included in all themes. /boot/config/plugins/theme.engine/custom-white.css /boot/config/plugins/theme.engine/custom-black.css /boot/config/plugins/theme.engine/custom-gray.css /boot/config/plugins/theme.engine/custom-azure.css Will only be included when using the corresponding base theme.
 1 point
 -
Hi Shane, I have been running Samsung SSD Drives for 4+ years as part of a cache pool and recently just added my fourth Samsung SSD to the pool without any issues. Prior to that I had used a single spinner for the cache drive. I also use a Samsung SSD Pro Drive through unassigned devices for my Plex transcodes and for VM's. Transcoding creates a lot of writes to a drive and can burn through a warranty & lifespan pretty quickly on the lower grade SSD models. Perhaps others have had issues with Samsung SSD's, but for myself I have not. I've had an Unraid server running for 8+/- years now and have always funneled everything through the cache drives before dumping onto the storage drives. As a result I feel I get a longer lifespan out of my drives because they don't have to spin up every time something is added ... a few of my old drives have 60,000+ hours and are still chugging along. I've been using the forum for years without posting to search and solve any dilemmas that I got myself in to, so this is the first time posting on the forum. I thought I would quickly give you a reply since I have a similar setup to what you are planning to do. Have fun setting up your new server!1 point
-
Hey brill it worked and I finally get it, I am essentially creating a link between the container and the unraid? Well anyway its important lets see how we get on! Thanks for your help1 point
-
Updated previous post with useful commands and monitoring.1 point
-
privoxy is a separate application running in the same container as deluge, it has the same protection as deluge via iptables, including blocked access for name resolution over the LAN (aka dns leakage) so that is fully protected too.1 point
-
I forgot to read the comments below the video..... SOLVED: Netherland does not support port forwarding - so changed it to switzerland and now I can start deluge :-)1 point
-
There is some benefit to having appdata cache-prefer, since it is possible that some applications might have appdata grow to the point of needing to overflow to the array. But just be aware that if it does overflow to the array, there is no way for Mover to move it back to cache with the docker running since Mover can't move open files. I just always make sure that cache has plenty of room. There is no benefit to making system share cache-prefer since that shouldn't grow anyway. I think the reason those shares default to cache-prefer is because some people might install cache after setting them up, but it doesn't really help since nobody knows that they have to stop Docker and VM services to get them moved. More important than all that though, is making sure that cache has Minimum Free set appropriately in Settings - Global Share Settings. In order for anything to overflow, Unraid must decide that cache doesn't have enough room. Unraid has no way to know how large a file will become when it begins to write it. If cache has less than Minimum, Unraid will choose another disk before it begins to write the file. You must set Minimum Free to larger than the largest file you expect to write to cache. Each User Share also has a Minimum Free setting that works in a similar manner. If Unraid sees a particular disk has less than Minimum, it will choose another disk, unless Include/Exclude or Split Level prevent it from doing so. You can always see which disks each of your User Shares is using by going to Shares - User Shares and clicking Compute... for the share, or just use the Compute All button at the bottom of that page.1 point
-
Great work @Skitals !! I've always wished for something like this in Unraid. Playing around with it now.. now to find a colour scheme1 point
-
its the most supported vpn provider for this images, yes, the port forwarding is all done for you so its fairly painless, see here for quick guide if you are a newbie to this image:- https://github.com/binhex/documentation/blob/master/docker/guides/vpn.md1 point
-
Just weird /mnt/user0 was missing, if all is working well now now it doesn't matter.1 point
-
you should be able to skip "-d" as this is the debug option hence all the other stuff on your terminal. and you can use lftp like: lftp sftp://user:password@server:/path -c "mirror folder" lftp sftp://user:password@server:/path -c "get file" And for security's sake, use keyfiles to login to your seedbox. You can refer to this thread for passwordless logins to other servers - its a bit long but cover all the cases people have encountered so far to allow unattended ssh logins from unraid to any other server.1 point
-
No. Not necessarily. I have a mix of devices and also I share my library with family and they have a tendency to use whatever flavor box/tv that supports Plex, hence the need for the P2000 card for transcoding. Also I find the P2000 helps tremendously with transcoding the UHD/4K media I have and that continues to grow in selection. If all I was dealing with was 720p/1080p media then yes I could possibly just tell my family to upgrade to a slightly better device, but for them to be able to support 4K they would need to be on my network and 4K conversions need a dedicated GPU to assist with that workload versus offloading to a few cores on the CPU.1 point
-
Parity never has a filesystem format.1 point
-
@scott4740 Awesome, glad to hear it! In reference to @tallguydirk's issue, it was a Thymeleaf/Spring Boot post issue. Tested on multiple machines, merging to master, and deploying. v0.1.41 point
-
No, I've never known that to be necessary and due to the init system used in the container, it's probably futile.1 point
-
When you ssh to your seedbox, do you keep getting prompted to save the fingerprint like above? Because if lftp tries to connect to via sftp and a prompt about the fingerprint tries to show, the lftp session will get stuck. you can try lftp -d sftp://.... command and see how the underlying ssh connection is having issues.1 point
-
I will look into this but give me a little bit of time since i'm switching all my existing containers to a new baseimage and debian buster. EDIT: Zabbix should be no problem, keep in mind that you need an extra database container. I will try that when i got back from work and report back.1 point
-
Just migrated to RS and it was painless. First I logged in and exported my Vault. Then stopped the container. Opened a new unRAID tab. Started adding the new RS container. Copied the same port number and app data. Removed the old container. Clicked Done and created the RS container. Reverse proxy, vault password, and apps all continued to work.1 point
-
I don't use wildcard certs so I can't fully test this myself, but give this a shot: SSH to the server (don't use the web console for this, either use SSH or an actual console) Type this to temporarily modify rc.nginx: sed -i '/HOSTSSL=$(openssl/a HOSTSSL=${HOSTSSL/\\*/$HOSTNAME}' /etc/rc.d/rc.nginx This adds a new line to the script that says if the HOSTSSL variable contains a '*', replace '*' with the server's HOSTNAME. If it doesn't contain a '*', do nothing. That should change '*.home.insanegenius.net' to 'server-2.home.insanegenius.net' Type this to restart nginx with the new config file (again, don't issue this command if you are using the web console): /etc/rc.d/rc.nginx restart Once that is done, please let me know the output of these commands, just to verify it did what I expect: hostname -s grep HOSTSSL /etc/rc.d/rc.nginx grep 302 /etc/nginx/conf.d/emhttp-servers.conf If everything worked, when you visit either of these: http://server-2.home.insanegenius.net http://<IP Address> It should redirect you to: https://server-2.home.insanegenius.net If you want to undo the change at this point, just reboot. Up until now, the change we made will not survive a reboot. To make the change permanent, edit the /config/go file in the "flash" share (use a good editor that understands Unix line endings, like Notepad++ on Windows) and add these lines to the top of the file: # fix wildcard certificates sed -i '/HOSTSSL=$(openssl/a HOSTSSL=${HOSTSSL/\\*/$HOSTNAME}' /etc/rc.d/rc.nginx Reboot and confirm that the redirects still work properly Note that if this functionality is ever added to stock Unraid you'd want to remove those two lines from your go script.1 point
-
Sure, I don't know much about qBittorrent, but here's my setup for rtorrent. 1. I have a watch folder, an incomplete folder and a complete folder, each with a bunch of subdirectories, e.g.: /watch /tv /movies /bonus /... /incomplete /tv /.... /complete /tv /... 2. /watch should be monitored by pyrotorque's Watch Job (see: https://pyrocore.readthedocs.io/en/latest/advanced.html#rtorrent-queue-manager). I'm still using old school rtorrent watched directories (https://github.com/rakshasa/rtorrent/wiki/Common-Tasks-in-rTorrent#watch-a-directory-for-torrents) because I'm too lazy to upgrade, but pyrotorque is certainly easier and more powerful to use. 3. /incomplete is where rtorrent keeps data from downloads in progress (see 2). 4. /complete is where downloads are moved after they are done. 5. To automatically delete torrents I do two things. a) All of my important trackers have aliases configured: (see https://pyrocore.readthedocs.io/en/latest/setup.html#setting-values-in-config-ini) b) I have a cron job that deletes properly seeded torrents. It uses a bunch of rcontrol --cull commands - one rule per tracker, plus a general overall rule. It's a slight variation of: https://pyrocore.readthedocs.io/en/latest/usage.html#deleting-download-items-and-their-data 6. autodl-irssi is set to download stuff from the trackers where I want to build ratio, it monitors IRC Channels and add a certain number of filtered torrent files to the watched folder every week (see: https://autodl-community.github.io/autodl-irssi/configuration/overview/ ) 7. I can add a torrent manually just by dropping it in the watch folder. I can delete torrents manually with rcontrol and I can use rtorrent-ps (CLI tool) instead of ruTorrent to check how things are going. 8. I use Downloads Router (tohttps://www.google.com/url?sa=t&source=web&rct=j&url=https://chrome.google.com/webstore/detail/downloads-router/fgkboeogiiklpklnjgdiaghaiehcknjo%3Fhl%3Den&ved=2ahUKEwiAs93ujPPmAhXAUxUIHWzsAZAQFjADegQIBBAB&usg=AOvVaw2Fwk4fqI4MValYtWgVXOrE) go save torrent files to the most appropriate watched subfolder according to the tracker from where I'm downloading stuff (e.g., if the private tracker is specialized in in movies, any torrent files that I download will end up in watch/movies by default). I can always override where torrent files are saved or move them to a different folder later. 9. My Plex libraries are configured to read from suvolders of /complete That's pretty much it for torrenting. I have Sonarr and Radarr but I only use them with Usenet (they can quickly destroy your buffer on private trackers if you are not careful with what you are doing). You will have no problems running a few torrent containers in your NAS. Yes, theoretically more processes means more things to manage, but from personal experience, it's easier to split the load. If you reach an OS or hardware limit you will know when it happens, but I know for a fact that quite a few seedbox providers are running dozens of rtorrent clients per VM with very happy and satisfied paying customers. Cheers,1 point
-
that's right, i forward it to Apple Home. and use Siri or the Home App for launching the VM. I don't have experience with an arduino or similiar but i don't expect it to be too hard to forward it to a physical switch. but i guess many routes leading to the goal. depens on what one need1 point
-
No; it just sends a request to the Unraid server. It doesn't utilize the Unraid Electric Brain API or whatever it's called. But if you wanted to PM me your discord (for easier method of communication) I can give you a shopping list of stuff that you'll need, or whether you already have the necessary items.1 point
-
From what you have described so far, you have 2 set of uses: "backing up my PC (time machine backup type), my phone's and using it as home automation and Plex server." <-- this is typically done by Unraid Windows PC <-- obviously Windows So for your normal uses, are you looking to do BOTH (1) and (2) at the same time? e.g. will you be working on a Word doc on your Windows PC while another member of the household watches a movie via Plex? If the answer is "yes" then you will be looking to run Windows as a VM and your hardware will have to support virtualisation for it to work (i.e. you might want to clarify what other hardware you have before proceeding). If the answer is "no" then you can choose between dual boot (dual boot = booting either Win OR Unraid any one time - yes confusing terms) or use VM. What you have described in your reply is a dual boot AND VM scenario which is OK. Just be mindful that repeated booting between VM and baremetal MAY cause Windows to ask you to reactivate. It's hard to say if x GB is enough for cache without knowing what exactly will be stored on the cache. 250GB is generally sufficient as cache if all you do is docker, appdata, libvirt and light write activities. If you are downing multiple 50GB+ Linux iso's simultaneously then obviously 250GB isn't enough. For Windows, 1TB NVMe is generally enough for most uses. Ask yourself if you actually need 1.25TB instead of 1TB? "Certified Frustration-Free Packaging" = cardboard envelope. Padding is entirely optional. You don't need 3 drives to have a parity. You have 2 drives with 1 parity and 1 data.1 point
-
Really easy solution: Just change the path in your template from /mnt/user/... to /mnt/cache/... and everything is working! I update the template shortly so you can download a fresh copy from the CA App. Thanks to @Squid1 point
-
Hey guys! Any ideas on how to create a RAM share? My intentions are to test a new 10GB/20GB link between my server and another PC. Thanks1 point
-
You should never paste random code from the Internet into your computer without understanding what it does... but that aside, if you open up a terminal and paste in the following line: wget https://gist.githubusercontent.com/ljm42/74800562e59639f0fe1b8d9c317e07ab/raw/387caba4ddd08b78868ba5b0542068202057ee90/fix_docker_client -O /tmp/dockfix.sh; sh /tmp/dockfix.sh Then the fix should be applied until you reboot.1 point
-
It appears that the docker images --digests --no-trunc command is showing, for whatever reason, the digest of the manifest list rather than the manifest itself for containers pushed as part of a manifest list (https://docs.docker.com/engine/reference/commandline/manifest/#create-and-push-a-manifest-list). I'm not sure if that's always been the case, or is the result of some recent change on the Docker hub API. Also not sure if it's intentional or a bug. This causes an issue since in DockerClient.php (/usr/local/emhttp/plugins/dynamix.docker.manager/include), the request made to get the comparison digest is /** * Step 4: Get Docker-Content-Digest header from manifest file */ $ch = getCurlHandle($manifestURL, 'HEAD'); curl_setopt( $ch, CURLOPT_HTTPHEADER, [ 'Accept: application/vnd.docker.distribution.manifest.v2+json', 'Authorization: Bearer ' . $token ]); which retrieves information about the manifest itself, not the manifest list. So it ends up comparing the list digest as reported by the local docker commands to the individual manifest digests as retrieved from docker hub, which of course do not match. Changing the Accept header to the list mime type: 'application/vnd.docker.distribution.manifest.list.v2+json' causes it to no longer consistently report updates available for these containers. Doing this however reports updates for all containers that do not use manifest lists, since the call now falls back to a v1 manifest if the list is not available and the digest for the v1 manifest doesn't match the digest for the v2 manifest. If the Accept header is instead changed to 'application/vnd.docker.distribution.manifest.list.v2+json,application/vnd.docker.distribution.manifest.v2+json' docker hub will fallback correctly to the v2 manifest, and the digests now match the local output for both containers using straight manifests and those using manifest lists. Until docker hub inevitably makes another change. /** * Step 4: Get Docker-Content-Digest header from manifest file */ $ch = getCurlHandle($manifestURL, 'HEAD'); curl_setopt( $ch, CURLOPT_HTTPHEADER, [ 'Accept: application/vnd.docker.distribution.manifest.list.v2+json,application/vnd.docker.distribution.manifest.v2+json', 'Authorization: Bearer ' . $token ]);1 point
-
Copy the img file from server a to server b. On server b, create a new vm and put your settings as whatever. If the img was ovmf, use that (same as seabio). When you get to the part about hard drive/img, switch to manual and specify the location of the img you copied over. Finish setting anything else. Then start. thsts it. I do it all the time. note: if you drop into the shell, type exit (iirc) which will bring you tj the boot/bios menu. Specify the img file to boot from and then you’ll be on your way.1 point
-
Thanks for the response. At this stage i'm just wanting to set up ram drives on my Win10 HTPC and my unRaid server to check out network transfer speeds of my 10gb cards, (and keep hdd speeds out of the equation). And i've read that a ram drive can save a lot of SSD work during certain activities eg torrenting. I'm using Softperfect Ramdisk on Windows c1 point
-
Posting to confirm the smoothness of this process. I changed the motherboard, CPU and kept the order of the HDDs. Push power on, everything working like nothing changed. Cool stuff.1 point
-
For anyone trying to set up zfs-auto-snapshot to use Previous Versions on Windows clients: I placed the zfs-auto-snapshot.sh file from https://github.com/zfsonlinux/zfs-auto-snapshot/blob/master/src/zfs-auto-snapshot.sh in /boot/scripts/zfs-auto-snapshot.sh and made executable with chmod +x zfs-auto-snapshot.sh I found that no matter which way I set the 'localtime' setting in smb.conf, the snapshots were not adjusting to local time and were shown in UTC time. To fix this, I removed the --utc parameter on line 537 of zfs-auto-snapshot.sh to read: DATE=$(date +%F-%H%M) I then created cron entries by creating /boot/config/plugins/custom_cron/zfs-auto-snapshot.cron with the following contents: # zfs-auto-snapshot.sh quarter hourly */15 * * * * /boot/scripts/zfs-auto-snapshot.sh -q -g --label=04 --keep=4 // # zfs-auto-snapshot.sh hourly @hourly ID=zfs-auto-snapshot-hourly /boot/scripts/zfs-auto-snapshot.sh --quiet --syslog --label=00 --keep=24 // # zfs-auto-snapshot.sh daily @daily ID=zfs-auto-snapshot-daily /boot/scripts/zfs-auto-snapshot.sh --quiet --syslog --label=01 --keep=31 // # zfs-auto-snapshot.sh weekly @weekly ID=zfs-auto-snapshot-weekly /boot/scripts/zfs-auto-snapshot.sh --quiet --syslog --label=02 --keep=8 // # zfs-auto-snapshot.sh monthly @monthly ID=zfs-auto-snapshot-monthly /boot/scripts/zfs-auto-snapshot.sh --quiet --syslog --label=03 --keep=12 // Edit: I switched the cron entries to use specific times of day, days of the week, etc. primarily due to the effect of reboots on unRAID's cron handling. I would get inconsistently spaced apart snapshots with the above cron configuration. # zfs-auto-snapshot.sh quarter hourly */15 * * * * /boot/config/scripts/zfs-auto-snapshot.sh -q -g --label=04 --keep=4 // # zfs-auto-snapshot.sh hourly 0 * * * * ID=zfs-auto-snapshot-hourly /boot/config/scripts/zfs-auto-snapshot.sh --quiet --syslog --label=00 --keep=24 // # zfs-auto-snapshot.sh daily 0 0 * * * ID=zfs-auto-snapshot-daily /boot/config/scripts/zfs-auto-snapshot.sh --quiet --syslog --label=01 --keep=31 // # zfs-auto-snapshot.sh weekly 0 0 * * 0 ID=zfs-auto-snapshot-weekly /boot/config/scripts/zfs-auto-snapshot.sh --quiet --syslog --label=02 --keep=8 // # zfs-auto-snapshot.sh monthly 0 0 1 * * ID=zfs-auto-snapshot-monthly /boot/config/scripts/zfs-auto-snapshot.sh --quiet --syslog --label=03 --keep=12 // Run 'update_cron' to immediately enable the custom cron entries. The labels differ from the zfs-auto-snapshot default labels for better compatibility with Samba. For the Samba shares, I placed the below in /boot/config/smb-extra.conf: [data] path = /mnt/zfs/data browseable = yes guest ok = yes writeable = yes read only = no create mask = 0775 directory mask = 0775 vfs objects = shadow_copy2 shadow: snapdir = .zfs/snapshot shadow: sort = desc shadow: format = zfs-auto-snap_%S-%Y-%m-%d-%H%M shadow: localtime = yes Run 'samba reload' to refresh your Samba config. After the first scheduled snapshot is taken, you should now be able to see the snapshots in the Previous Versions dialog on a connected Windows client. You'll need to modify this with your desired snapshot intervals, retention, and path names. This configuration is working well for me. I hope this helps anyone else out there trying to get ZFS snapshots working with shadow copy for Windows clients.1 point
-
im afraid i have no idea how emby integrates with kodi, having never really played with emby for any length of time so not sure how this is configured, are you using something like this? https://github.com/MediaBrowser/plugin.video.emby/wiki1 point
-
Windows doesn't automatically install drivers for devices it doesn't have. Windows won't boot from a storage device that it doesn't have the drivers installed. Those two statements sum up your (and everyone else's) issue with moving an existing windows installation to a foreign hard drive controller type. You can solve this several ways. The wiki outlines one way, which is to temporarily set the boot drive to a slow compatible controller, and add a secondary volume using the fast virtio controller. Windows boots from the normal drive, sees the new hardware, and installs the drivers. Now that the drivers are installed, you can change the boot drive to virtio, and remove the temporary 2nd volume, as the necessary drivers are now installed in windows. Another way is to add the drivers manually into the windows install on the physical pc before you image it, or you can manually install them after booting the vm using the compatible controller. Adding the drivers manually is faster if you know how to do it, instead of futzing around with a second image.1 point
-
Have done this very thing myself about a month ago I can tell you it was a very pain free experience. The most important thing I can say is check and triple check your bios settings before you first boot to unraid as this can save you many hours of trying to work out why its not right. My VM didnt mind the transfer to a new mobo and cpu but yes disable auto start just to make sure your network settings and core assignments are correct. And dont worry about having to re-register your VM O/S as you will not need to.1 point