Leaderboard


Popular Content
Showing content with the highest reputation on 05/09/20 in Posts
-
console into app vi /home/nobody/start.sh change the last line to read; cd /usr/lib/nzbhydra2 && /usr/lib/nzbhydra2/nzbhydra2wrapperPy3.py --datafolder /config/nzbhydra2 restart The image has changed to python3, but the startup script is referring to a wrapper that is nolonger in the image - I assume this will be fixed in the container by the maintainer Dave5 points
-
I will take a look at the issue tonight guys. If you want to roll back then see link to documentation in first post, then unraid faq. Sent from my CLT-L09 using Tapatalk2 points
-
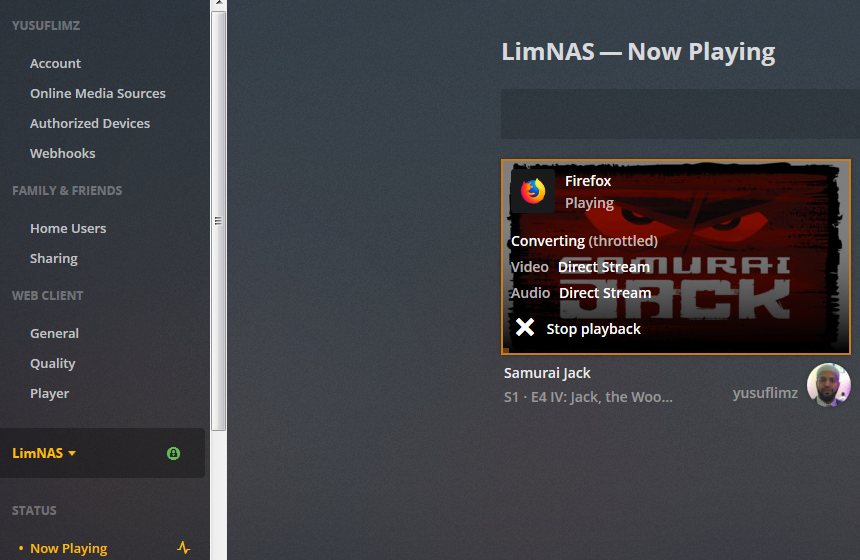
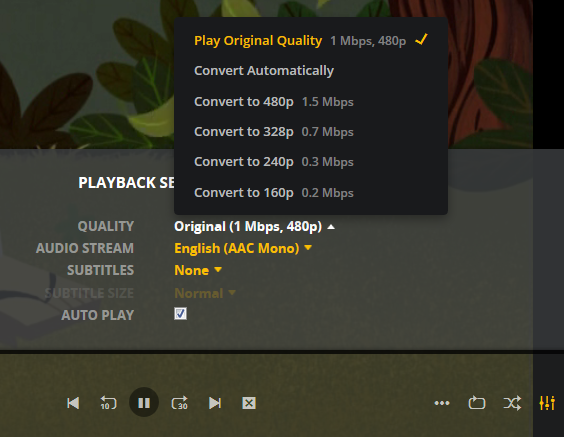
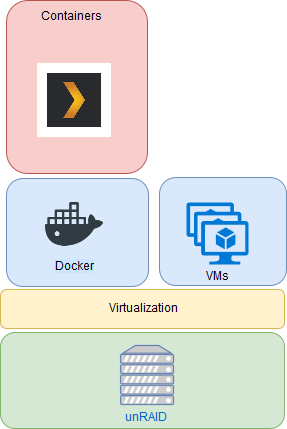
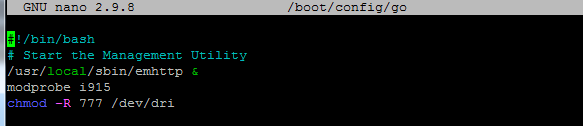
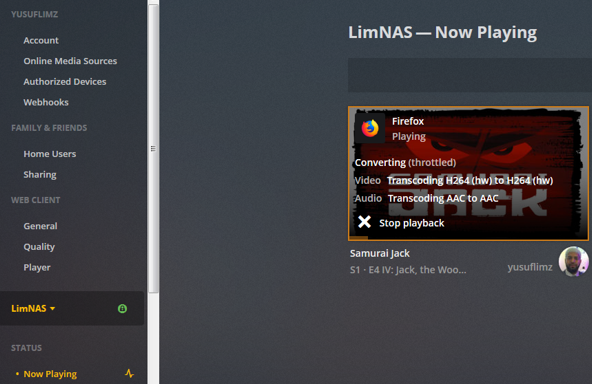
***Update*** : Apologies, it seems like there was an update to the Unraid forums which removed the carriage returns in my code blocks. This was causing people to get errors when typing commands verbatim. I've fixed the code blocks below and all should be Plexing perfectly now Y =========== Granted this has been covered in a few other posts but I just wanted to have it with a little bit of layout and structure. Special thanks to [mention=9167]Hoopster[/mention] whose post(s) I took this from. What is Plex Hardware Acceleration? When streaming media from Plex, a few things are happening. Plex will check against the device trying to play the media: Media is stored in a compatible file container Media is encoded in a compatible bitrate Media is encoded with compatible codecs Media is a compatible resolution Bandwith is sufficient If all of the above is met, Plex will Direct Play or send the media directly to the client without being changed. This is great in most cases as there will be very little if any overhead on your CPU. This should be okay in most cases, but you may be accessing Plex remotely or on a device that is having difficulty with the source media. You could either manually convert each file or get Plex to transcode the file on the fly into another format to be played. A simple example: Your source file is stored in 1080p. You're away from home and you have a crappy internet connection. Playing the file in 1080p is taking up too much bandwith so to get a better experience you can watch your media in glorious 240p without stuttering / buffering on your little mobile device by getting Plex to transcode the file first. This is because a 240p file will require considerably less bandwith compared to a 1080p file. The issue is that depending on which format your transcoding from and to, this can absolutely pin all your CPU cores at 100% which means you're gonna have a bad time. Fortunately Intel CPUs have a little thing called Quick Sync which is their native hardware encoding and decoding core. This can dramatically reduce the CPU overhead required for transcoding and Plex can leverage this using their Hardware Acceleration feature. How Do I Know If I'm Transcoding? You're able to see how media is being served by playing a first something on a device. Log into Plex and go to Settings > Status > Now Playing As you can see this file is being direct played, so there's no transcoding happening. If you see (throttled) it's a good sign. It just means is that your Plex Media Server is able to perform the transcode faster than is necessary. To initiate some transcoding, go to where your media is playing. Click on Settings > Quality > Show All > Choose a Quality that isn't the Default one If you head back to the Now Playing section in Plex you will see that the stream is now being Transcoded. I have Quick Sync enabled hence the "(hw)" which stands for, you guessed it, Hardware. "(hw)" will not be shown if Quick Sync isn't being used in transcoding. PreRequisites 1. A Plex Pass - If you require Plex Hardware Acceleration Test to see if your system is capable before buying a Plex Pass. 2. Intel CPU that has Quick Sync Capability - Search for your CPU using Intel ARK 3. Compatible Motherboard You will need to enable iGPU on your motherboard BIOS In some cases this may require you to have the HDMI output plugged in and connected to a monitor in order for it to be active. If you find that this is the case on your setup you can buy a dummy HDMI doo-dad that tricks your unRAID box into thinking that something is plugged in. Some machines like the HP MicroServer Gen8 have iLO / IPMI which allows the server to be monitored / managed remotely. Unfortunately this means that the server has 2 GPUs and ALL GPU output from the server passed through the ancient Matrox GPU. So as far as any OS is concerned even though the Intel CPU supports Quick Sync, the Matrox one doesn't. =/ you'd have better luck using the new unRAID Nvidia Plugin. Check Your Setup If your config meets all of the above requirements, give these commands a shot, you should know straight away if you can use Hardware Acceleration. Login to your unRAID box using the GUI and open a terminal window. Or SSH into your box if that's your thing. Type: cd /dev/dri ls If you see an output like the one above your unRAID box has its Quick Sync enabled. The two items were interested in specifically are card0 and renderD128. If you can't see it not to worry type this: modprobe i915 There should be no return or errors in the output. Now again run: cd /dev/dri ls You should see the expected items ie. card0 and renderD128 Give your Container Access Lastly we need to give our container access to the Quick Sync device. I am going to passively aggressively mention that they are indeed called containers and not dockers. Dockers are manufacturers of boots and pants company and have nothing to do with virtualization or software development, yet. Okay rant over. We need to do this because the Docker host and its underlying containers don't have access to anything on unRAID unless you give it to them. This is done via Paths, Ports, Variables, Labels or in this case Devices. We want to provide our Plex container with access to one of the devices on our unRAID box. We need to change the relevant permissions on our Quick Sync Device which we do by typing into the terminal window: chmod -R 777 /dev/dri Once that's done Head over to the Docker Tab, click on the your Plex container. Scroll to the bottom click on Add another Path, Port, Variable Select Device from the drop down Enter the following: Name: /dev/dri Value: /dev/dri Click Save followed by Apply. Log Back into Plex and navigate to Settings > Transcoder. Click on the button to SHOW ADVANCED Enable "Use hardware acceleration where available". You can now do the same test we did above by playing a stream, changing it's Quality to something that isn't its original format and Checking the Now Playing section to see if Hardware Acceleration is enabled. If you see "(hw)" congrats! You're using Quick Sync and Hardware acceleration [emoji4] Persist your config On Reboot unRAID will not run those commands again unless we put it in our go file. So when ready type into terminal: nano /boot/config/go Add the following lines to the bottom of the go file modprobe i915 chmod -R 777 /dev/dri Press Ctrl X, followed by Y to save your go file. And you should be golden!


 1 point
 -
I posted this on the serverbuilds.net forums, and noticed that several users here were interested, so cross-posting! This a somewhat complex yet in-demand installation, so I figured I'd share my steps in getting a Riot.im chat server syndicated through a Matrix bridge that supports a Jitsi voip/video conference bridge. The end result is a self-hosted discord-like chat server where any chat room can become a video conference with a single click! It has some other neat features like end-to-end encryption and syndication with other matrix server AND other types of chat servers (you can have a chat room that links to a discord room, irc channel, etc). We'll do almost all of this using apps from the Unraid Community Applications repo! Summary: We'll setup some domains for each of our components, then use a LetsEncrypt proxy to generate certificates. Matrix will run the back-end, Riot Chat will run the front-end, and Jitsi will handle the A/V. DNS Setup: You're gonna want a few subdomains, even if you have a dyndns setup pointing to your host. Then can all point to the same IP, or you can use CNAME or ALIAS records to point to the root domain. A DNS setup for somedomain.gg might look like this: Type - Host - Value A - @ - 1.2.3.4 (Your WAN IP) CNAME - bridge - somedomain.gg CNAME - chat - somedomain.gg CNAME - meet - somedomain.gg In the above-the `@` A-record will set the IP for your domain root, and the CNAME-records will cause the 3 subdomains to resolved to whatever domain name you point them at (the root domain, this this case). Each domain will host the following: bridge: matrix - The core communications protocol chat: riot - The chat web UI meet: jitsi - The video conferencing bridge Firewall Setup: You'll need the following ports forwarded from you WAN to you Unraid server: LetsEncrypt: WAN TCP 80 -> LAN 180 , WAN TCP 443 -> LAN 1443, WAN TCP 8448 -> LAN 1443, all on your Unraid server IP - 80: Used by LetsEncrypt to validate your certificate signing request -- this can be disabled after setup, then only enabled when you need to renew a certificate. - 443: LetsEncrypt proxy for encrypted web, duh - 8448: Matrix Integrations port for enabling plugins. Also proxied via LetsEncrypt. Make sure this points to 1443, not 8443! STUN: TCP and UDP 3478 on WAN -> 3478 on Unraid (or changed to suit your needs) Jitsi: UDP Port 10000 -> 10000 on Unraid We'll be assuming you used these ports in the rest of the guide, so if you needed to change any, compensate as needed! Docker Networking: This is a fairly complex configuration that will use at least 7 docker containers. To make this easier we'll create a custom docker network that these containers will all live on, so that they can communicate between each other without having to worry about exposing unnecessary ports to your LAN: 1. In Unraid, go to Settings->Docker. 2. Disable docker so you can make changes: set `Enable Docker` to `No` 3. Set `Preserve user defined networks` to `Yes` 4. Re-enable Docker 5. Open the Unraid console or SSH in. 6. Create a new Docker network by executing `docker network --subnet 172.20.0.0/24 create sslproxy` or whatever subnet works for you (adjusted below as needed). We're now done with the pre-install stuff! I'd suggest testing your DNS and that the ports are all open on your FW and are getting directed to the right places. If everything looks good, then lets get some dockers! LetsEncrypt Install: Before proceeding, wait for your DNS server to update and make sure you can resolve the 3 subdomains remotely. This is REQUIRED for LetsEncrypt to validate the domains! LetsEncrypt will need listen on port 80 and port 443 of your WAN (public-facing) interface so that it can validate your ownership of the domains. We're going to use a Docker from the Unraid Community Applications docker. But before we do, we need to enabled user defined networks in our Docker settings. But first, 1. In Community Applications, search for `LetsEncrypt` and install the container from `linuxserver` 2. Set the `Network Type` to `Custom: ssl proxy` 3. Set the `Fixed IP address` to `172.20.0.10` (or whatever works for you) 4. Make sure `Privileged` is set to `On` 5. Set the `http` port to `180` and the `https` port to `1443` 6. Supply an email 7. Enter your domain name, ie `somedomain.gg` 8. Enter your subdomains: `chat,bridge,meet` (and any others you want to encrypt) 9. Optional: set `Only Subdomains` to false if you want the root domain to also have a cert! The rest of the options should be fine as-is. If you do NOT have a domain, but use a dynamic dns service, you can still mange but might be limited to a single domain. Make sure `Only Subdomains` is set to `True`, otherwise your install will fail as LetsEncrypt will expect you have be running on your dyndns services web server! The following steps will also require you to do some nginx subdirectory redirection instead of domain proxying. SpaceInvader has a great video that demonstrates this in detail. Once you've created the docker instance, review the log. It might take a minute or two to generate the certificates. Let it finished and make sure there are no errors. It should say `Server ready` at the end if all goes well! Try browsing to your newly encrypted page via https://somedomain.gg (your domain) and make sure all looks right. You should see a letsencrypt landing page for now. If all went well, your LetsEncrypt certificates and proxy configuration files should be available in /mnt/user/appdata/letsencrypt/ LetsEncrypt Proxy Configuration: LetsEncrypt listens on ports 80 and 443, but we also need it to listen on port 8448 in order for Riot integrations via the public integration server to work property. Integrations let your hosted chatrooms include bots, helper commands (!gif etc), and linking to other chat services (irc, discord, etc). This is optional! If you're happy with vanilla Riot, you can skip this. Also, you can run your own private Integrations server, but I'm not getting into that here. So assuming you want to use the provided integrations, we need to get nginx listening on port 8448. To do that, edit `/mnt/user/appdata/letsencrypt/nginx/site-confs/default` and make the following change: Original: New: Next, we are going to need 3 proxy configurations inside LetsEncrypt's nginx server (one for matrix, riot and jitsi). These live in `/mnt/user/appdata/letsencrypt/mnt/user/appdata/letsencrypt/`. Create the following file: matrix.subdomain.conf: riot-web.subdomain.conf: jitsi.subdomain.conf: ^^^ NOTE!!! Make sure you saw the `CHANGE THIS` part of the `$upstream_app` setting. This should be the LAN IP of your Unraid server! Done! To test, trying visiting https://<subdomain>.somedomain.gg/ and you should bet a generic gateway error message. This means that the proxy files attempted to route you to their target services, which don't yet exist. If you got the standard LetsEncrypt landing page, then something is wrong! Matrix A Matrix container is available from avhost in Community Applications. 1. In Community Applications, search for `Matrix` and install the container from `avhost` 2. Set the `Network Type` to `Custom: ssl proxy` 3. Set the `Fixed IP address` to `172.20.0.30` or whatever works for you 4. Set the `Server Name` to `bridge.somedomain.gg` (your domain) 5. The rest of the settings should be fine, and I suggest not changing the ports if you can get away with it. Create the container and run it. Now we need to edit our Matrix config. 1. Edit `/mnt/user/appdata/matrix/homeserver.yaml` 2. Change `server_name: "bridge.somedomain.gg"` 3. Change `public_baseurl: https://bridge.somedomain.gg/"` 4. Under `listeners:` and `- port: 8008` change `bind_address: ['0.0.0.0']` 5. Change `enable_registration: true` 6. Change `registration_shared_secret: xxxx` to some random value. It doesn't matter what it is, just don't use the one from the default config! 7. Change `turn_uris` to point to your domain, ie `"turn:bridge.somedomain.gg:3478?transport=udp"` 8. Set a good long random value for `turn_shared_secret` If you have errors at start-up about your turnserver.pid file or database, you can try editing your /mnt/user/appdata/matrix/turnserver.conf file and adding: pidfile=/data/turnserver.pid userdb=/data/turnserver.db There are a ton of other settings you can play with, but I'd wait until after it working to get too fancy! Now restart the Matrix container, and check that https://bridge.somedomain.gg/ now shows the Matrix landing page. If not, something's wrong! Riot Chat Riot Chat servers as we web front-end chat interface. There's also a great mobile app called RiotIM. For the web interface, there's an Community Applications image for that! 1. Before we start, we need to manually create the config path and pull in the default config. So open a console/SSH to your server. 2. Create the config path by executing `mkdir -p /mnt/user/appdata/riot-web/config` 3. Download the default config by executing `wget -O /mnt/user/appdata/riot-web/config/config.json https://raw.githubusercontent.com/vector-im/riot-web/develop/config.sample.json` (**NOTE**: This is a different URL than the one suggested in the Docker!) 4. In Community Applications, search for `riot web` and install the container from `vectorim`. Watch you, there are two -- use the one with the fancy icon, which doesn't end with an asterisk (`*`)! 5. Set the `Network Type` to `Custom: ssl proxy` 6. Set the `Fixed IP address` to `172.20.0.20` (or whatever) 7. The rest of the settings should be fine. Create the container and run it. Now lets edit our Riot config. It's a JSON file, so make sure you respect JSON syntax 1. Edit ` /mnt/user/appdata/riot-web/config/config.json` 2. Change `"base_url": "https://bridge.somedomain.gg",` 3. Change `"server_name": "somedomain.gg",` 4. Under the `"Jitsi:"` subsection near the bottom, change `"preferredDomain": "meet.somedomain.gg"` If all went well, you should see the Riot interface at http://chat.somedomain.gg! If not, figure out why... Now lets create our first account! 1. From the welcome page, click `Create Account` 2. If the prior config was correct, `Advanced` should already be selected and it should say something like `Create your Matrix account on somedomain.gg`. If the `Free` option is set, then your RiotChat web client is using the public matrix.org service instead of your private instance! Make sure your `base_url` setting in your config.json is correct. Or just click Advanced, and enter `https://bridge.somedomain.gg` in the `Other Servers: Enter your custom homeserver URL` box. 3. Set your username and password 4. Setup encryption by following the prompts (or skip if you don't care). This may require that you whitelist any browser script blockers that you have running. Done! You now have a privately hosted Discord-alternative! Lets add some voice and video chat so we can stop using Zoom 😛 Jitsi This part doesn't have a solid Docker image in the Community Application store, so there's a few more steps involved. We're gonna need to clone their docker setup, which uses docker-compose. 1. Open a console/SSH to your server 2. Install docker-compose by executing `curl -L "https://github.com/docker/compose/releases/download/1.25.5/docker-compose-$(uname -s)-$(uname -m)" -o /usr/local/bin/docker-compose` 3. Make it executable: `chmod u+x /usr/local/bin/docker-compose` 4. Move to your appdata folder : `cd /mnt/user/appdata` 5. Make and enter a folder for you docker-compose projctes: `mkdir docker-compose; cd docker-compose` 6. Clone and enter the `docker-jitsi-meet` repo: `git clone https://github.com/jitsi/docker-jitsi-meet ; cd docker-jitsi-meet` 7. Create an install environment: `cp env.example .env` 8. Populate some random secrets in your environment: `./gen-passwords.sh` 9. Edit the install environment (I'm using nano, but edit however you want): nano .env 10. Change `CONFIG=/mnt//mnt/user/appdata/jitsi-meet/` 11. Set TZ to your timezome, ie `TZ=America/Denver` 12. Change `PUBLIC_URL=https://meet.somedomain.gg` 13. Change `DOCKER_HOST_ADDRESS=192.168.0.1` or whatever the LAN address of your Unraid server is 14. Create the CONFIG path that you defined in step 10: `mkdir /mnt//mnt/user/appdata/jitsi-meet/` 15. Create and start the containers: `docker-compose -p jitsi-meet -f docker-compose.yml -f etherpad.yml up -d` 16. This will create 4 Jitsi containers are part of a Docker Stack -- see your list of dockers. You can't edit them, but take note of the `jitsi-meet_web_1` ports, which should be `8000` and `8443`. If you got any errors, it's likely a port conflict somewhere, so find the corresponding setting in your `.env` file and adjust as needed, reflecting any relevant changes in the next step. When we were setting up our Nginx proxy configs, you'll recall that the Jitsi config `$upstream_app` had to be set manually, rather than relying on the internal DNS. That's because the docker-compose stack names are not 100% predicatble, so it's better to just hard-code it. You might want to double-check that setting if you have in uses from here on. To test Jitsi, go to https://meet.somedomain.gg/ and hopfully you see the Jitsi page. Try to create a meeting. In the future, it may be wise to enable Authentication on your Jitsi server if you dont want any random person to be able to host conferences on your sever! See the docs (or SpaceInvader's video) for details on that. Now find a friend and get them to register a Riot account on your server at https://chat.somedomain.gg (or use the mobile app and connect to the custom host). Get in a chat room together, then click the Video icon next to the text input box and make sure it works. It's worth noting that Jitsi works differently when there are only 2 people chatting -- they'll communicate directly. With 3 or more, they'll communicate with the Jitsi server and use the TURN service. So it's a good idea to try to get a 3rd person to join as well, just to test out everything. Thats it, hope this helps! Enjoy! To Do: * Custom Integrations Server * Etherpad Integration Edit: While I was making this guide, SpaceInvader came out with a great video covering the Jitsi part! It covers some authentication options that I didn't get into, but would highly suggest. Check it out!1 point
-
This is a container running ngixn and serving up a custom homepage develped by jeroenpardon. I've forked it to fix a few minor issues and create a working docker container and unraid template. Original repo is here: https://github.com/jeroenpardon/sui My fork is here: https://github.com/CorneliousJD/SUI-Startpage This should be quick to setup and use, just edit the apps.json and links.json files. You can also add new search providers if you wish by editing the provider.json file. When first starting this container it will determine your appdata folder for this is empty and copy in the basic template files that you are then free to modify yourself. If you ever want to "start over" with the container, just empty the appdata folder and restart or force-update the container and it will give you a fresh set of files to work with again. Enjoy!1 point
-
If you put music1 and music2 as subfolders under music, then music1 and music2 become folders within the music share. and music1 and music2 will no longer be user shares themselves. Don't know if that is what you intend or not.1 point
-
Depends on the root folder for source and destination. As long as you stay inside /mnt/user you can move things around however you want.1 point
-
1 point
-
There's general instructions and scripts linked to from earlier posts in various threads that can serve as general guidelines for your own attempts.1 point
-
Flubster fixed worked like a charm and thanks to sloppy I was able to get through it no prob! Woke up to the issue and within 20 mins had it fixed thanks to all of your support! Couldn't do it without yall and hope everyone is doing well in these weird and crazy times. Your support is appreciated more than ever! ❤️1 point
-
Is there any instructions how to build DVB kernel for 6.8.3?1 point
-
holy smokes... that docker is crazy! way more info that I need/was expecting. Fantastic. thank you.1 point
-
Thank you for this. If anyone else is like me and needs instructions on how to edit in vi mode this article helped me: https://staff.washington.edu/rells/R110/1 point
-
If the MakeMKV ripped DVDs are .ts files then Recordings-autoconverter will convert them. If they are not .ts files, you will have to use a different program like unmanic, handbrake, tdarr, or H265ize. I believe there are others but these I know for sure are in Unraid's CA Apps.1 point
-
Hmm.... You could try to set a startup delay for jellyfin and see if that helps. Not sure if you need a plugin for that or it's a default thing.1 point
-
@marcusone1 Have a look into the the Netdata Docker. You can get the required infos you want for each docker or VM you're running. You can find it in the Community Applications.1 point
-
@cdn_bacon Uploading your diagnostics could help if someone is willing to dig deeper into what happened to you. But on default Unraid didn't record file access or which files are exfiltrated. If that intruder really had root access to your box, he had access to all files and settings on your server. Any not encrypted file could be accessed by him. So if you had sensitive login data stored to whatever account in plain text, you better quickly change passwords for any platform that might be affected. Also make sure you change logins for every self hosted applications like Bitwarden, Nextcloud, Plex etc. Make sure for every service you use no extra users are been created that might have access to your data. How other devices on your network might be affected is the next question? Are there any devices with old software running on your network with possible security flaws? Hard to say and difficult to provide help with no deeper look in your whole network setup. The safest way in my opinion is to start over with a fresh unraid setup to get rid of a maybe persistant access to your server has been added that dials back home. I know it's a lot of work to reconfigure everything if you for example have setup a couple of dockers. But I would feel better to start fresh. Hopefully some other users have a opinion on that and also have a couple tips for you.1 point
-
How did you access the root user? open up the noVNC webgui open the terminal type in 'su' type in your password set in the template (no screen output is shown when you enter a password in linux) press enter now you should see root@HOSTNAME If that doesn't work please type in the terminal 'printenv' and look if the variable 'ROOT_PWD' is set to 'secret' (this is an indicator that you are using the latest version of the container). Also you don't have to delete and install the container every time, the root password is set on every start of the container. I've also tried to change the password and it works just fine1 point
-
2.21.0-2-01 works. latest doesn't load for me.1 point
-
Just wanted to share that PLOP is not needed to boot to newer versions of UNRAID that are being virtualized. UNRAID officially supports booting from U/EFI based OpROM. I am currently booting to an UNRAID USB on a VM running under ESXi 6.7 without issues. If there is interest I can create an entire guide on this, but for now basic configuration steps are below. To make this work without PLOP do the following 1. Configure a USB host device on your UNRAID VM. If you are already boot UNRAID from USB in a VM on ESXi then this is already done You can use USB 2.0 or 3.x for the USB controller that is added to the VM Select your UNRAID usb boot drive from the available host USB devices 2. Go to the VM options and configure the boot options Inside of the VM boot options change the firmware mode to EFI In this same area check the box to force EFI setup During the next boot DO NOT ENABLE SECURE BOOT 3. Change the boot order or disable the other boot options completely Boot the VM and it will enter the EFI setup screen Enter the setup menu and configure the boot order so USB at the top of the list Alternately you can disable the other boot options completely Commit your changes and reset/reboot the VM General Considerations when Virtualizing UNRAID in VMware ESXi Make a backup of your UNRAID boot usb. Try this at your own risk on existing UNRAID installs. Changing the boot mode for some operating systems can cause them to not boot properly afterward. I have changed it without issues on multiple existing UNRAID installs, but your mileage may vary. Your underlying hardware needs to support U/EFI boot firmware. I've only tested with ESXi 6.7 and 7.x but this should work with any version of ESXi that supports EFI (ESXi 5.0 or above). Direct pass-through of the underlying USB controller to UNRAID is not needed. It may provide slightly faster boot speeds and possibly better compatibility overall. Note that not all hardware platforms support I/O MMU virtualization for Intel VT-d or AMD VT-vi directed I/O functionality. This should also work with UNRAID on other hypervisors without issues. I've transitioned from a physical UNRAID box to being virtualized using this boot method and it works great. When virtualizing UNRAID it is fairly annoying needing to recompile openvm tools after every update to the Linux Kernel that UNRAID uses. This is only needed if you want to manage UNRAID fully as a virtual machine and/or depend on VMXNET3 NIC drivers. Beyond the NIC drivers it won't take away from normal operation in any way. I think LimeTech should seriously consider providing a pre-compiled OpenVM tools like most major Linux distros are doing already. EDIT: Added a few more General considerations1 point
-
Thanks for reporting this, I just modified the starup script to modify the permissions of the files that get copied into appdata. I'd recommend clearing out your /appdata/suistartpage/ folder entirely and checking for updates or forcing an update on the container, as I just published an update that should fix this for you. Along with that update I fixed it so you now have to manually specify http vs https in your URLs as before it was forcing https as a base URL. Now that it's changed you should see a new example apps.json file being populated into the appdata folder as long as it's an empty folder when you update. From here you should be able to specify and point to local http or https items or even web URLs that you might be reverse proxying. If you run into more problems let me know and I'll see what I can do about getting them fixed up!1 point
-
I'm no pro, but here's how I'm doing updates. You will need docker-compose, so get it as is shown in the video or via nerd tools 1) Get and replace (appdata/jitsi/github/docker-jitsi-meet) the edited docker compose file. I labeled the containers and set the network name (proxynet) as shown in the video. If using a different network, just change the name (very last line). You won't have to fiddle around in portainer anymore. 2) Pop open a terminal and cd to the github repo you pulled down which should be something like /mnt/cache/appdata/jitsi/github/docker-jitsi-meet/ cd /mnt/cache/appdata/jitsi/github/docker-jitsi-meet/ 3) Time to pull the new images. In console, run: docker-compose pull 4) Set up the new containers: docker-compose up -d --remove-orphans 5) Optional - remove old images docker image prune 6) You will need to setup authentication again if you so desire, as it appears to be stored in the container (and so is lost when replaced by the update). Open a terminal to the xmpp.meet.jitsi container: prosodyctl --config /config/prosody.cfg.lua register username meet.jitsi password Unfortunately unraid will still show an update available, not sure what to do about that. Hope this helps, good luck! docker-compose.yml1 point
-
I believe that is expected. I did not change the code around that part of the plug-in, as the button press probably still directs to the original mover bash script.1 point
-
There is a docker for a lot of things. I don't even run any VMs because dockers do everything I want my server to do.1 point
-
🤔 You know what it might. Looking closer at the free tier I actually dont think you get knocked for storage but rather emails sent and parsed. So it should be fine. Sorry for the confusion haha. Thanks again!1 point
-
If you store your docker appdata share and the VM ISO and System shares on an SSD (highly recommended) your array drives will not spin up just because dockers/VMs are in use unless they are configured to use array drives in some way. When accessing media with Plex for example, the necessary drives will be spun up, but, they can be configured to spin down when not in use while Plex still runs as a docker container on an SSD. See above as these shares could be cache only shares using the cache drive. Also, you could put them on an unassigned devices SSD. If you intend to use the cache drive for write caching of share data (configurable by share), how much benefit you would get from that depends on how often and how much data you write the array. Yes, if so configured. It will run periodic checks and let you know of problems through the notification system and GUI. Only you can fully answer that question, but, media storage, management and playback is a primary unRAID use case. Parity protection is a nice safeguard against disk drive failure, but, it is not a backup solution. You should also make plans to keep important data backed up.1 point
-
If docker and/or VMs are enabled, but not actually utilized, the drives will still spin down. But in your case, if you're not using them, then don't even enable them. It does improve write speed. But, for many users (myself included), I only use the cache drive for applications (ie: VMs / docker apps), and all writes for media go straight to the array. For me, the write speed is good enough, and most of the writes are all automated (new downloads etc), so I don't even notice if it's slower than if I wrote directly to the cache drive. Yes. Just enter in the appropriate info in Notification settings1 point
-
Have been following this with interest. I primarily use SAS disks in my system due to a very affordable source! *touchingwood* also the long term 24/7 reliability of these drives to date has been fantastic - I've got drives which have been in constant operation for 5 years in a production environment before I put them into my unraid server and ran them for another 2 years so far - however with the age of them and the massive waste of power, I am very keen to find a solution to spinning them down!1 point
-
Update: Custom configuration support is now enabled. See the netdata configuration guide for details. /mnt/user/appdata/netdata/override is mapped to /etc/netdata. The nvidia-smi plugin is now enabled in the stock configuration so GPU support will still work with a blank override directory. Note: /mnt/user/appdata/netdata/override will be empty by design. Stock configuration files are loaded from /usr/lib/netdata/conf.d/ If you'd like to alter one of these config files, you can copy it to the /etc/netdata directory and make edits. Edit: I've done some work on the image so files from /etc/netdata will appear in the volume mount /mnt/user/appdata/netdata/override. Please reach out if you have any problems. Also, side note in regards to custom dashboards: It appears netdata is working on a react dashboard, so I'm probably not going to put much time into custom dashboards for the current implementation.1 point
-
I had same problems with another docker for observium, perhaps is too late for answer, but the fix is to add volume for /etc/localtime: volumes: - /etc/localtime:/etc/localtime:ro With this the datetime shows correctly on graph. Hope it helps1 point
-
This too coming in 6.9 release.1 point
-
Thanks to @bonienl this is coming in 6.9 release!1 point
-
I bought a full license just to run a single docker & 2 VMs on a ingle M.2 drive, but the purchase wasn't for the purpose functionality rather to contribute more to the UNRAID development. I thought a reduced price with reduced functionality would be nice but in the end this is a one time payment for a lifetime support AFAIK.1 point
-
Multiple cache pools being internally tested now. Multi array pools not in the cards for this release.1 point
-
If you really need to access your server remotely, you should be using a VPN. Either openVPN or wireguard.1 point


(Small).thumb.png.b884b0484e848c502a315fc27b995f59.png)