Leaderboard


Popular Content
Showing content with the highest reputation on 05/23/21 in all areas
-
Thanks! Worked well.2 points
-
You need to connect by ssh, or open the web console for this container. Then type: venv/bin/chia wallet show Then you can press S to skip. The wallet will by synced after some hours.2 points
-
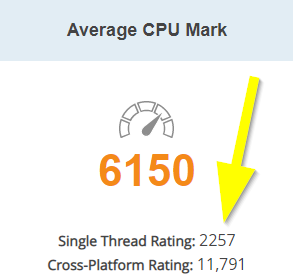
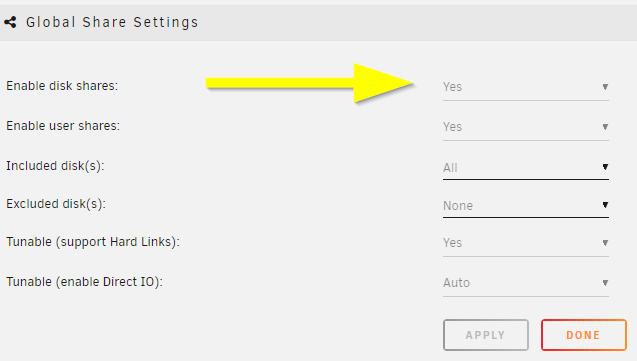
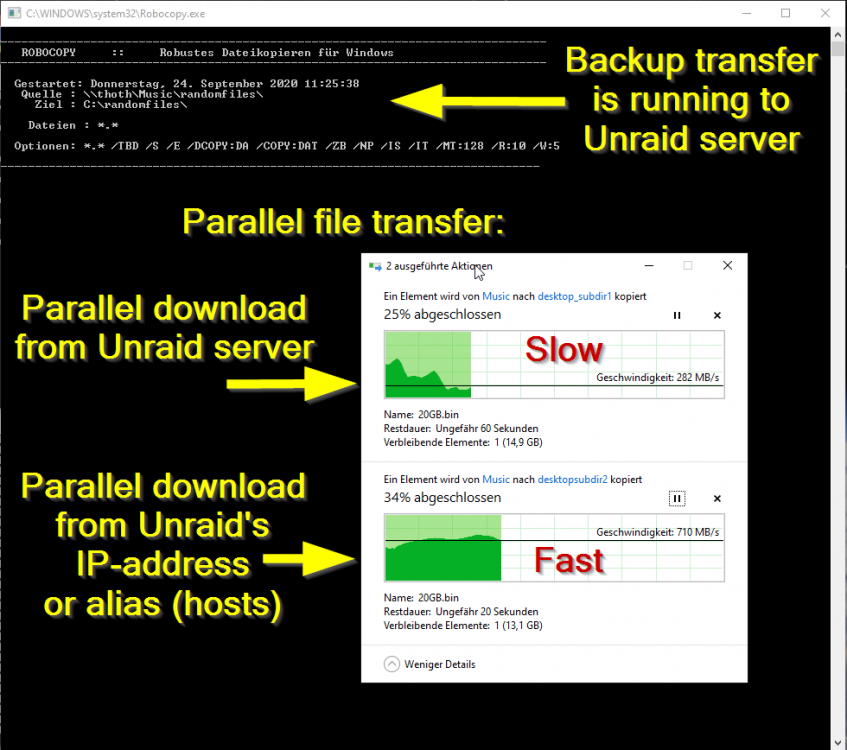
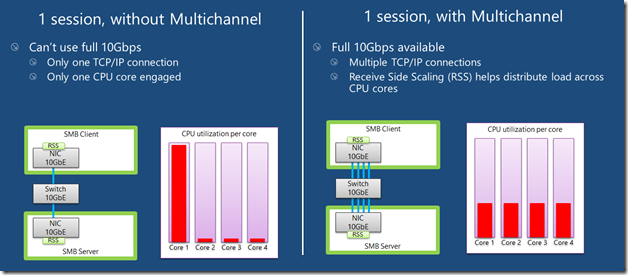
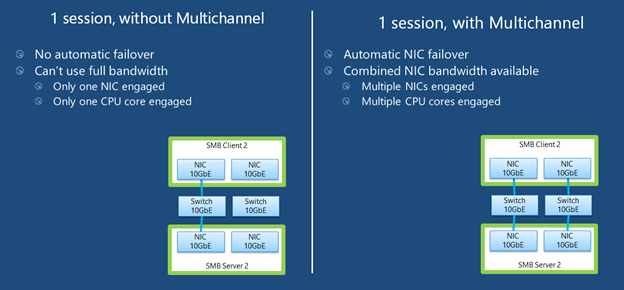
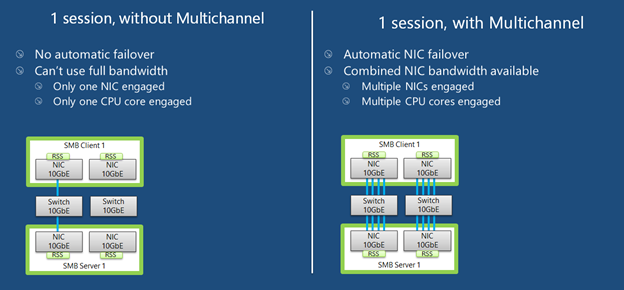
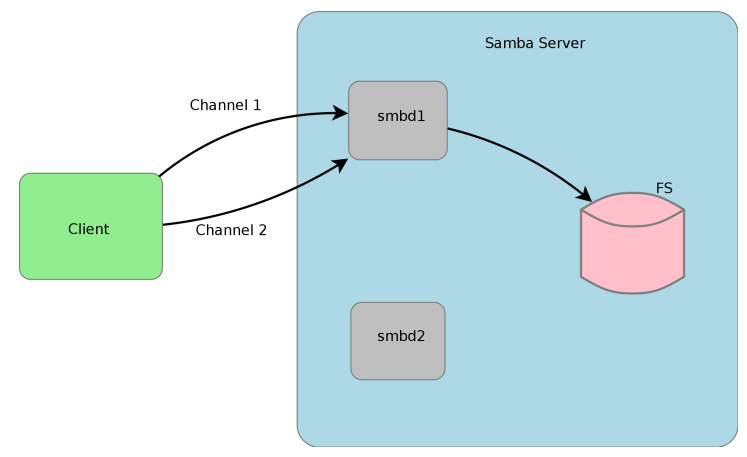
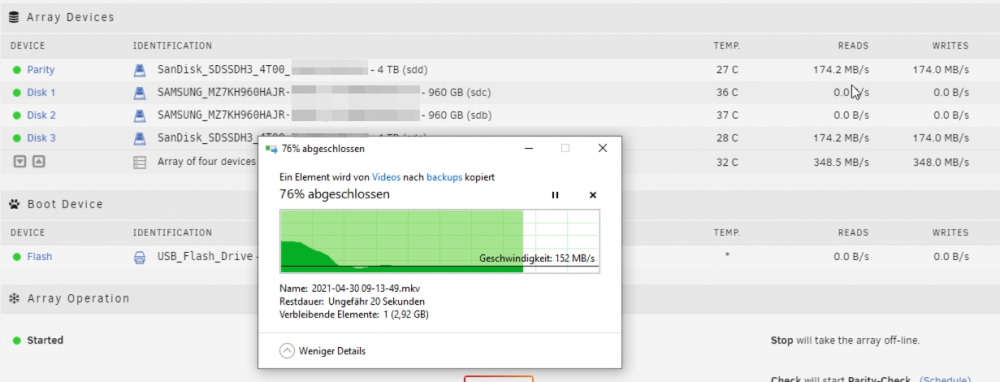
I'm using Unraid for a while now and collected some experience to boost the SMB transfer speeds: Donate? 🤗 1.) Choose the right CPU The most important part is to understand that SMB is single-threaded. This means SMB uses only one CPU core to transfer a file. This is valid for the server and the client. Usually this is not a problem as SMB does not fully utilize a CPU core (except of real low powered CPUs). But Unraid adds, because of the ability to split shares across multiple disks, an additional process called SHFS and its load raises proportional to the transfer speed, which could overload your CPU core. So the most important part is, to choose the right CPU. At the moment I'm using an i3-8100 which has 4 cores and 2257 single thread passmark points: And since I have this single thread power I'm able to use the full bandwith of my 10G network adapter which was not possible with my previous Intel Atom C3758 (857 points) although both have comparable total performance. I even was not able to reach 1G speeds while a parallel Windows Backup was running (see next section to bypass this limitation). Now I'm able to transfer thousands of small files and parallely transfer a huge file with 250 MB/s. With this experience I suggest a CPU that has around 1400 single thread passmark points to fully utilize a 1G ethernet port. As an example: The smallest CPU I would suggest for Unraid is an Intel Pentium Silver J5040. P.S. Passmark has a list sorted by single thread performance for desktop CPUs and server CPUs. 2.) Bypass single-thread limitation The single-thread limitation of SMB and SHFS can be bypassed through opening multiple connections to your server. This means connecting to "different" servers. The easiest way to accomplish that, is to use the ip-address of your server as a "second" server while using the same user login: \\tower\sharename -> best option for user access through file explorer as it is automatically displayed \\10.0.0.2\sharename -> best option for backup softwares, you could map it as a network drive If you need more connections, you can add multiple entries to your windows hosts file (Win+R and execute "notepad c:\windows\system32\drivers\etc\hosts"): 10.0.0.2 tower2 10.0.0.2 tower3 Results If you now download a file from your Unraid server through \\10.0.0.2 while a backup is running on \\tower, it will reach the maximum speed while a download from \\tower is massively throttled: 3.) Bypass Unraid's SHFS process If you enable access directly to the cache disk and upload a file to //tower/cache, this will bypass the SHFS process. Beware: Do not move/copy files between the cache disk and shares as this could cause data loss! The eligible user account will be able to see all cached files, even those from other users. Temporary Solution or "For Admins only" As Admin or for a short test you could enable "disk shares" under Settings -> Global Share Settings: By that all users can access all array and cache disks as SMB shares. As you don't want that, your first step is to click on each Disk in the WebGUI > Shares and forbid user access, except for the cache disk, which gets read/write access only for your "admin" account. Beware: Do not create folders in the root of the cache disk as this will create new SMB Shares Safer Permanent Solution Use this explanation. Results In this thread you can see the huge difference between copying to a cached share or copying directly to the cache disk. 4.) Enable SMB Multichannel + RSS SMB Multichannel is a feature of SMB3 that allows splitting file transfers across multiple NICs (Multichannel) and create multiple TCP connection depending on the amount of CPU Cores (RSS) since Windows 8. This will raise your throughput depending on your amount of NICs, NIC bandwidth, CPU and used settings: This feature is experimental SMB Multichannel is considered experimental since its release with Samba 4.4. The main bug for this state is resolved in Samba 4.13. The Samba developers plan to resolve all bugs with 4.14. Unraid 6.8.3 contains Samba 4.11. This means you use Multichannel on your own risk! Multichannel for Multiple NICs Lets say your mainboard has four 1G NICs and your Client has a 2.5G NIC. Without Multichannel the transfer speed is limited to 1G (117,5 MByte/s). But if you enable Multichannel it will split the file transfer across the four 1G NICs boosting your transfer speed to 2.5G (294 MByte/s): Additionally it uses multiple CPU Cores which is useful to avoid overloading smaller CPUs. To enable Multichannel you need to open the Unraid Webterminal and enter the following (the file is usually empty, so do not wonder): nano /boot/config/smb-extra.conf And add the following to it: server multi channel support = yes Press "Enter+X" and confirm with "Y" and "Enter" to save the file. Then restart the Samba service with this command: samba restart Eventually you need to reboot your Windows Client, but finally its enabled and should work. Multichannel + RSS for Single and Multiple NICs But what happens if you're server has only one NIC. Now Multichannel is not able to split something, but it has a sub-feature called RSS which is able to split file transfers across multiple TCP connections with a single NIC: Of course this feature works with multiple NICs, too: But this requires RSS capability on both sides. You need to check your servers NIC by opening the Unraid Webterminal and entering this command (could be obsolete with Samba 4.13 as they built-in an RSS autodetection ) egrep 'CPU|eth*' /proc/interrupts It must return multiple lines (each for one CPU core) like this: egrep 'CPU|eth0' /proc/interrupts CPU0 CPU1 CPU2 CPU3 129: 29144060 0 0 0 IR-PCI-MSI 524288-edge eth0 131: 0 25511547 0 0 IR-PCI-MSI 524289-edge eth0 132: 0 0 40776464 0 IR-PCI-MSI 524290-edge eth0 134: 0 0 0 17121614 IR-PCI-MSI 524291-edge eth0 Now you can check your Windows 8 / Windows 10 client by opening Powershell as Admin and enter this command: Get-SmbClientNetworkInterface It must return "True" for "RSS Capable": Interface Index RSS Capable RDMA Capable Speed IpAddresses Friendly Name --------------- ----------- ------------ ----- ----------- ------------- 11 True False 10 Gbps {10.0.0.10} Ethernet 3 Now, after you are sure that RSS is supported on your server, you can enable Multichannel + RSS by opening the Unraid Webterminal and enter the following (the file is usually empty, so do not wonder): nano /boot/config/smb-extra.conf Add the following and change 10.10.10.10 to your Unraid servers IP and speed to "10000000000" for 10G adapter or to "1000000000" for a 1G adapter: server multi channel support = yes interfaces = "10.10.10.10;capability=RSS,speed=10000000000" If you are using multiple NICs the syntax looks like this (add RSS capability only for supporting NICs!): interfaces = "10.10.10.10;capability=RSS,speed=10000000000" "10.10.10.11;capability=RSS,speed=10000000000" Press "Enter+X" and confirm with "Y" and "Enter" to save the file. Now restart the SMB service: samba restart Does it work? After rebooting your Windows Client (seems to be a must), download a file from your server (so connection is established) and now you can check if Multichannel + RSS works by opening Windows Powershell as Admin and enter this command: Get-SmbMultichannelConnection -IncludeNotSelected It must return a line similar to this (a returned line = Multichannel works) and if you want to benefit from RSS then "Client RSS Cabable" must be "True": Server Name Selected Client IP Server IP Client Interface Index Server Interface Index Client RSS Capable Client RDMA Capable ----------- -------- --------- --------- ---------------------- ---------------------- ------------------ ------------------- tower True 10.10.10.100 10.10.10.10 11 13 True False In Linux you can verify RSS through this command which returns one open TCP connection per CPU core (in this case we see 4 connections as my client has only 4 CPU cores, altough my server has 6): netstat -tnp | grep smb tcp 0 0 192.168.178.8:445 192.168.178.88:55975 ESTABLISHED 3195/smbd tcp 0 0 192.168.178.8:445 192.168.178.88:55977 ESTABLISHED 3195/smbd tcp 0 0 192.168.178.8:445 192.168.178.88:55976 ESTABLISHED 3195/smbd tcp 0 0 192.168.178.8:445 192.168.178.88:55974 ESTABLISHED 3195/smbd Note: Sadly Samba does not create multiple smbd processes, which means we still need a CPU with high single thread performance to benefit from RSS. This is even mentioned in the presentation: If you are interested in test results, look here. 5.) smb.conf Settings Tuning I did massive testing with a huge amount of smb.conf settings provided by the following websites and really NOTHING resulted in a noticable speed gain: https://wiki.samba.org/index.php/Performance_Tuning https://wiki.samba.org/index.php/Linux_Performance https://wiki.samba.org/index.php/Server-Side_Copy https://www.samba.org/~ab/output/htmldocs/Samba3-HOWTO/speed.html https://www.samba.org/samba/docs/current/man-html/smb.conf.5.html https://lists.samba.org/archive/samba-technical/attachments/20140519/642160aa/attachment.pdf https://www.samba.org/samba/docs/Samba-HOWTO-Collection.pdf https://www.samba.org/samba/docs/current/man-html/ (search for "vfs") https://lists.samba.org/archive/samba/2016-September/202697.html https://codeinsecurity.wordpress.com/2020/05/18/setting-up-smb-multi-channel-between-freenas-or-any-bsd-linux-and-windows-for-20gbps-transfers/ https://www.snia.org/sites/default/files/SDC/2019/presentations/SMB/Metzmacher_Stefan_Samba_Async_VFS_Future.pdf https://www.heise.de/newsticker/meldung/Samba-4-12-beschleunigt-Verschluesselung-und-Datentransfer-4677717.html I would say the recent Samba versions are already optimized by default. 6.) Choose a proper SSD for your cache You could use Unraid without an SSD, but if you want fast SMB transfers an SSD is absolutely required. Else you are limted to slow parity writes and/or through your slow HDD. But many SSDs on the market are not "compatible" for using it as an Unraid SSD Cache. DRAM Many cheap models do not have a DRAM Cache. This small buffer is used to collect very small files or random writes before they are finally written to the SSD and/or is used to have a high speed area for the file mapping-table. In Short, you need DRAM Cache in your SSD. No exception. SLC Cache While DRAM is only absent in cheap SSDs, SLC Cache can miss in different price ranges. Some cheap models use a small SLC cache to "fake" their technical data. Some mid-range models use a big SLC Cache to raise durability and speed if installed in a client pc. And some high-end models do not have an SLC Cache, as their flash cells are fast enough without it. Finally you are not interested in SLC Cache. You are only interested in continuous write speeds (see "Verify Continuous Writing Speed") Determine the Required Writing Speed But before you are able to select the right SSD model you need to determine your minimum required transfer speed. This should be simple. How many ethernet ports do you want to use or do you plan to install a faster network adapter? Lets say you have two 5G ports. With SMB Multichannel its possible to use them in sum and as you plan to install a 10G card in your client you could use 10G in total. Now we can calculate: 10G * 117.5 MByte/s (real throughput per 1G ethernet) = 1175 MByte/s and by that we have two options: buy one M.2 NVMe (assuming your motherboard has such a slot) with a minimum writing speed of 1175 MByte/s buy two or more SATA SSDs and use them in a RAID0, each with a minimum writing speed of 550 MByte/s Verify Continuous Writing Speed of the SSD As an existing "SLC Cache" hides the real transfer speed you need to invest some time to check if your desired SSD model has an SLC cache and how much the SSD throttles after its full. A solution could be to search for "review slc cache" in combination with the model name. Using the image search could be helpful as well (maybe you see a graph with a falling line). If you do not find anything, use Youtube. Many people out there test their new ssd by simply copying a huge amount of files on it. Note: CrystalDiskMark, AS SSD, etc Benchmarks are useless as they only test a really small amount of data (which fits into the fast cache). Durability You could look for the "TBW" value of the SSD, but finally you won't be able to kill the SSD inside the warranty as long your very first filling of your unraid server is done without the SSD Cache. As an example a 1TB Samsung 970 EVO has a TBW of 600 and if your server has a total size of 100TB you would waste 100TBW on your first fill for nothing. If you plan to use Plex, think about using the RAM as your transcoding storage which would save a huge amount of writes to your SSD. Conclusion: Optimize your writings instead of buying an expensive SSD. NAS SSD Do not buy "special" NAS SSDs. They do not offer any benefits compared to the high-end consumer models, but cost more. 7.) More RAM More RAM means more caching and as RAM is even faster than the fastest SSDs, this adds additional boost to your SMB transfers. I recommend installing two identical (or more depening on the amount of slots) RAM modules to benefit from "Dual Channel" speeds. RAM frequency is not as important as RAM size. Read Cache for Downloads If you download a file twice, the second download does not read the file from your disk, instead it uses your RAM only. The same happens if you're loading covers of your MP3s or Movies or if Windows is generating thumbnails of your photo collection. More RAM means more files in your cache. The read cache uses by default 100% of your free RAM. Write Cache for Uploads Linux uses by default 20% of your free RAM to cache writes, before they are written to the disk. You can use the Tips and Tweaks Plugin to change this value or add this to your Go file (with the Config Editor Plugin) sysctl vm.dirty_ratio=20 But before changing this value, you need to be sure to understand the consequences: Never use your NAS without an UPS if you use write caching as this could cause huge data loss! The bigger the write cache, the smaller the read cache (so using 100% of your RAM as write cache is not a good idea!) If you upload files to your server, they are 30 seconds later written to your disk (vm.dirty_expire_centisecs) Without SSD Cache: If your upload size is generally higher than your write cache size, it starts to cleanup the cache and in parallel write the transfer to your HDD(s) which could result in slow SMB transfers. Either you raise your cache size, so its never filled up, or you consider totally disabling the write cache. With SSD Cache: SSDs love parallel transfers (read #6 of this Guide), so a huge writing cache or even full cache is not a problem. But which dirty_ratio value should you set? This is something you need to determine by yourself as its completely individual: At first you need to think about the highest RAM usage that is possible. Like active VMs, Ramdisks, Docker containers, etc. By that you get the smallest amount of free RAM of your server: Total RAM size - Reserved RAM through VMs - Used RAM through Docker Containers - Ramdisks = Free RAM Now the harder part: Determine how much RAM is needed for your read cache. Do not forget that VMs, Docker Containers, Processes etc load files from disks and they are all cached as well. I thought about this and came to this command that counts hot files: find /mnt/cache -type f -amin -86400 ! -size +1G -exec du -bc {} + | grep total$ | cut -f1 | awk '{ total += $1 }; END { print total }' | numfmt --to=iec-i --suffix=B It counts the size of all files on your SSD cache that are accessed in the last 24 hours (86400 seconds) The maximum file size is 1GiB to exclude VM images, docker containers, etc This works only if you hopefully use your cache for your hot shares like appdata, system, etc Of course you could repeat this command on several days to check how it fluctuates. This command must be executed after the mover has finished its work This command isn't perfect as it does not count hot files inside a VM image Now we can calculate: 100 / Total RAM x (Free RAM - Command Result) = vm.dirty_ratio If your calculated "vm.dirty_ratio" is lower than 5% (or even negative), you should lower it to 5 and buy more RAM. between 5% and 20%, set it accordingly, but you should consider buying more RAM. between 20% and 90%, set it accordingly If your calculated "vm.dirty_ratio" is higher than 90%, you are probably not using your SSD cache for hot shares (as you should) or your RAM is huge as hell (congratulation ^^). I suggest not to set a value higher than 90. Of course you need to recalcuate this value if you add more VMs or Docker Containers. #8 Disable haveged Unraid does not trust the randomness of linux and uses haveged instead. By that all encryptions processes on the server use haveged which produces extra load. If you don't need it, disable it through your Go file (CA Config Editor) as follows: # ------------------------------------------------- # disable haveged as we trust /dev/random # https://forums.unraid.net/topic/79616-haveged-daemon/?tab=comments#comment-903452 # ------------------------------------------------- /etc/rc.d/rc.haveged stop
.png.9a4f708867a76b362eeaac6a578d6d21.png)
 1 point
 -
If you have multiple USB devices with the same Vendor and Product then the passthrough does not work as the UI currently builds the XML file with USB based on the Vendor / Product and not the Address Bus= Device= syntax. Since this is the case if you attempt to passthrough any usb devices that have duplicate Vendor/Product you will not be able to start your VM. The workaround is to manually edit the xml to the Address syntax. Examples: Bus 011 Device 003: ID 08bb:2704 Texas Instruments Audio Codec Bus 011 Device 002: ID 08bb:2704 Texas Instruments Audio Codec Current Syntax: <hostdev mode='subsystem' type='usb' managed='yes'> <source > <vendor id='0x08bb'/> <product id='0x2704'/> </source> </hostdev> This will result in a non booting VM Fixed Syntax: <hostdev mode='subsystem' type='usb' managed='yes'> <source> <address bus='11' device='2'/> </source> </hostdev>1 point
-
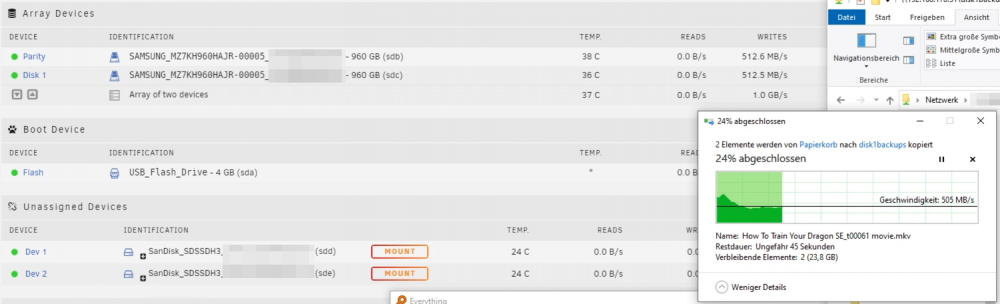
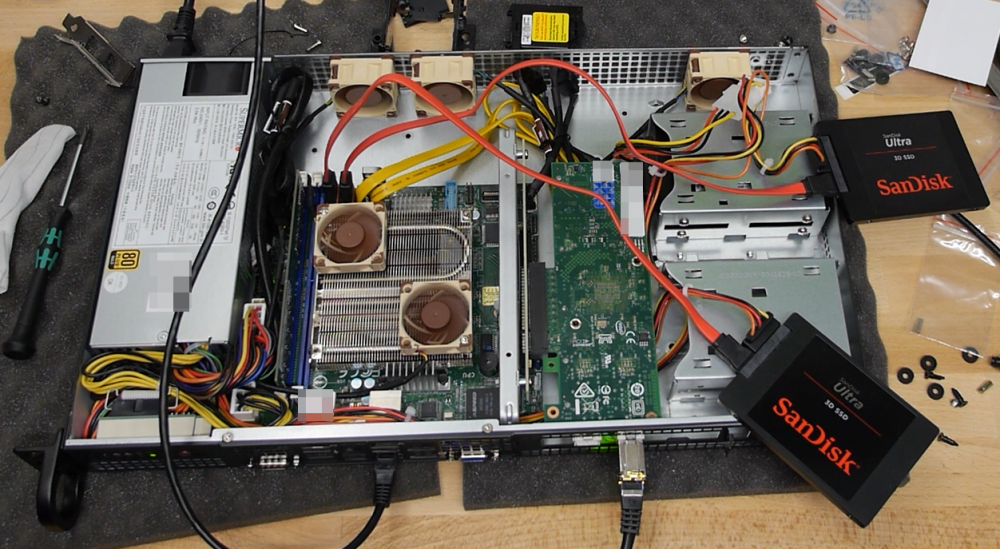
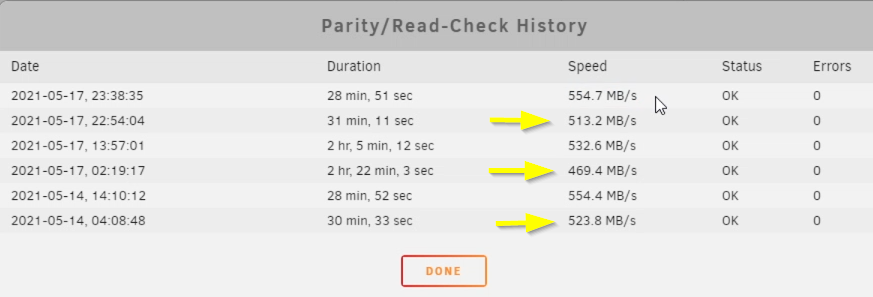
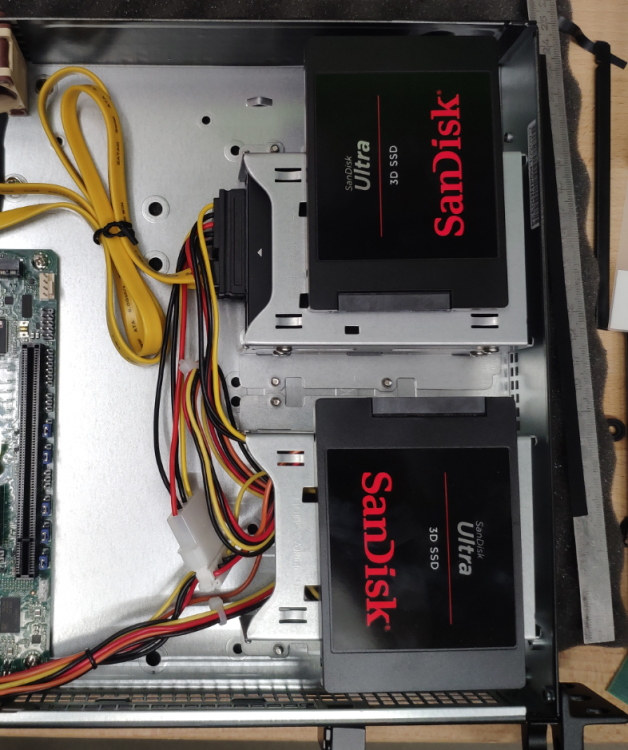
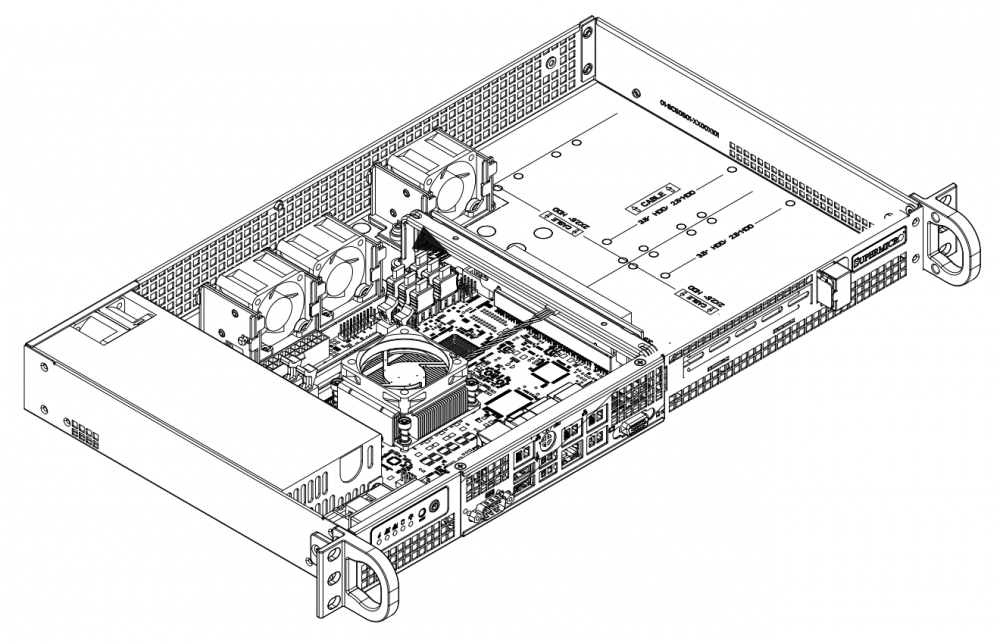
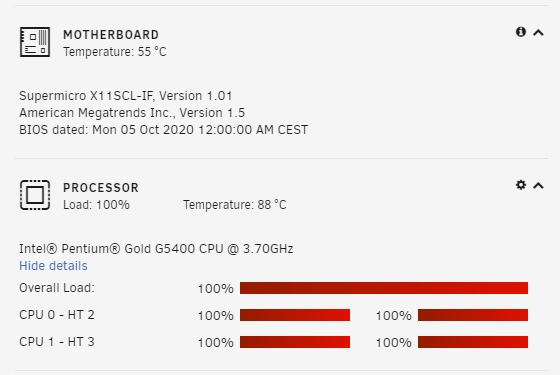
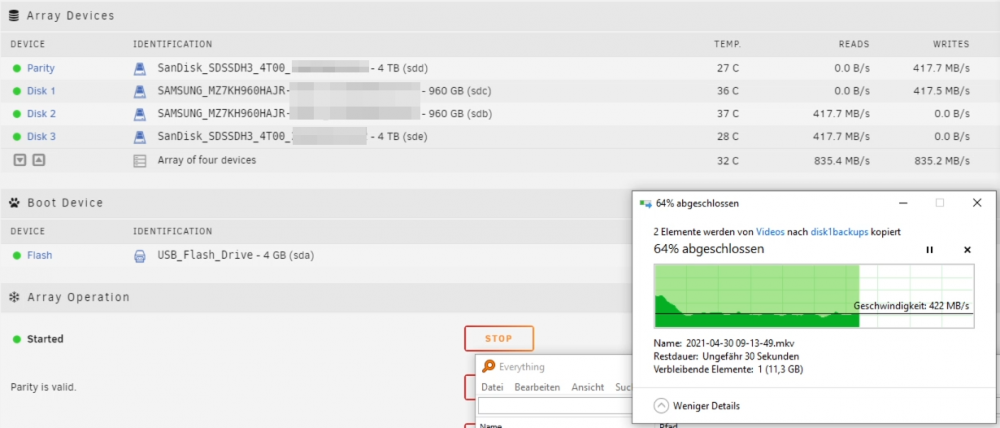
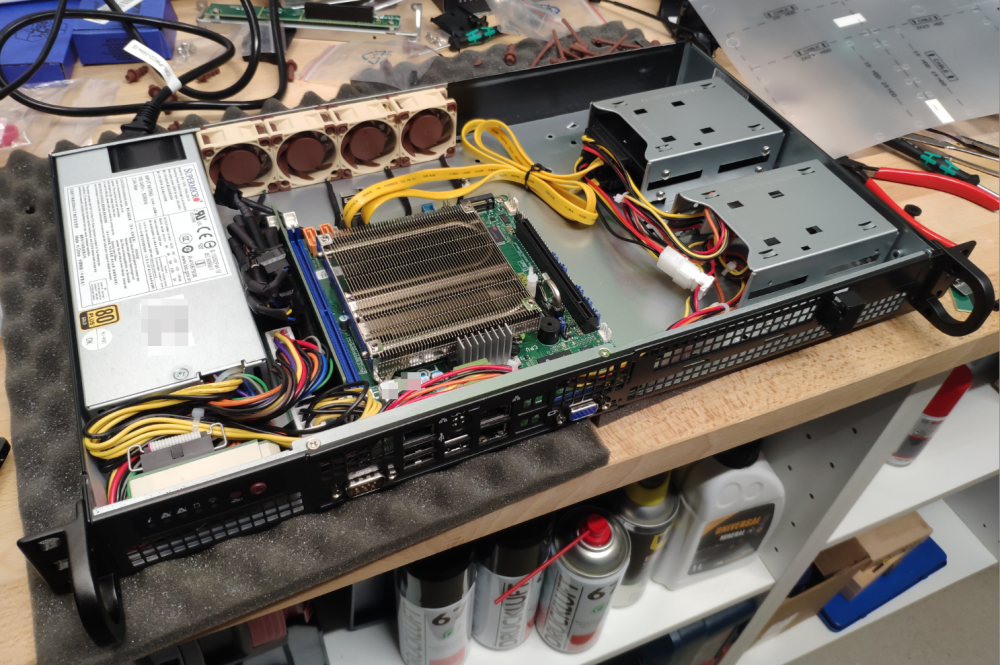
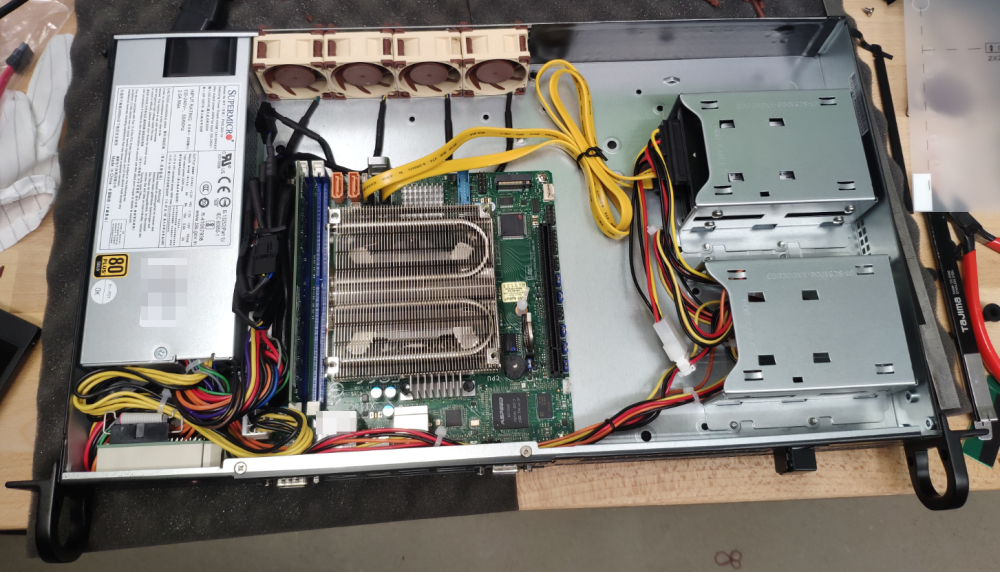
Die Tage habe ich einem Kunden einen Unraid Server mit dem SuperChassis 505-203b gebaut (19 Zoll 1HE Gehäuse): Als Basis ist das ein schönes Gehäuse, allerdings gibt es Kritik, die ich bei einem Supermicro-Produkt nicht erwartet hätte: 1.) Keine werkzeuglosen Festplatten-Käfige. Man muss sie von unten abschrauben um dann die Schrauben der SSDs lösen zu können?! 2.) Nur Platz für 4 SSDs. Hätte man die Käfige andersherum realisiert und vor allem nicht so platzverschwenderisch, könnte man locker 8, wenn nicht sogar 12 SSDs verbauen. Auf Kundenwunsch würde ich daher eigene Käfige realisieren. Vom Platz her ist das jedenfalls kein Problem: 3.) Es gibt kein Lüftungskonzept. Einfach nur viele Löcher. Supermicro sieht das so vor, dass man mitten im Gehäuse Lüfter platziert, was schlicht keinen Airflow ermöglicht, sondern einfach nur Luft herumwirbelt: Stattdessen habe ich 4 Noctua direkt an der Rückwand platziert und alle übrigen Löcher an der Rückwand verschlossen. Nur so bekommt man einen gezielten Luftstrom von vorne nach hinten über das ganze Board und den CPU Kühler hinweg. Nach einem 30-minütigen Stresstest kam ich so in der Spitze auf 88 bzw 55° C das Supermicro Motherboard X11SCL-IF (der Pentium Gold G5400 darf bis zu 100° C erreichen): Mit einem entsprechenden TDP Limit sollte man auch problemlos einen i3 verwenden können. Ich habe mir natürlich nicht nehmen lassen das SSD Only System mit einer Intel X710 Dual 10G Karte und zwei zusätzlichen SSDs zu testen: Ohne Turbo-Write: Mit Turbo-Write: Nur die Enterprise-SSDs: Die Historie aller Parity-Checks ist auch sehr ansehnlich ( 30 Minuten dauerte es bei den 1TB Enterprise SSDs, die Pfeile zeigen den jeweiligen Parity-Build ) Nach meinen gemachten Modifikationen bin ich doch sehr zufrieden mit dem Ergebnis. Das Superchassis ist übrigens günstiger als man denkt. Es liegt bei 130 € und ein leises 200W Gold (!) Netzteil ist bereits verbaut. Allerdings muss man die Festplatten-Käfige nachkaufen. Wen das nicht stört, kann aber genauso gut selbst was bauen bzw die SSDs mit Klett auf dem Gehäuseboden platzieren. Wäre sogar praktischer.
 1 point
 -
Salut! Si vous aimez Discord, consultez le serveur de @superboki! https://discord.superboki.fr Peut-être que vous pouvez voir un peu de mon mauvais français? 😉1 point
-
Then I have to find out the file system - btrfs or xfs. I don't think I can find out the file system until it is mounted. I'll have to put some time into experimenting with it.1 point
-
I'm having trouble updating Wordpress. Every time I try to update the website, it asks for FTP credentials. Searching for this issues shows problems with the access rights to the web directory. I've set a separate web directory for the "/var/www/html" path. Do I need to change anything on the permissions there? As I understand, the docker runs under the root user and should have access? 🤔 (Page runs behind HA Reverse-Proxy if that should be an issue?) Update: I was able to fix this by adding the following line to the wp-config.php file: define('FS_METHOD','direct');1 point
-
If you're in advanced view, switch to Basic. Less intensive.1 point
-
the problem was TCG protection once I removed it withe the tools in Seachest they are god to go. the command i used was SeaChest_Security_x86_64-linux-gnu -d /dev/sgXX --revertSP --confirm this-will-erase-data --psid "your psid writen on the lable" if you want to check if protection is active on not run SeaChest_Security_x86_64-linux-gnu -d /dev/sgXX -i thank you all for the help /Clint451 point
-
Vielen Dank dafür. Genau so habe ich das gemacht. Erschien mir eleganter als über das Go-File. Ergebnis: Es hat wunderbar funktioniert! Seit der Umstellung zu HPET sowohl in der OPNsense-VM als auch in Unraid läuft die Zeit dauerhaft perfekt synchron mit dem NTP-Server! Danke nochmal allen für die Unterstützung!!1 point
-
I will check to see if this can be added to a repo.1 point
-
That was indeed the problem. Thanks! I have fixed the name of the config files and everything is working now. Thanks for the help and keep up the great work you do here!1 point
-
Can you post what your share config files are listed as? There is a mis-match somewhere between the config files (Case) and the share names. ls -ltr /boot/config/shares If that doesn't fix it can you post your debug file? original mover loops through the directory on the cache, where I have to loop through by config files.1 point
-
Thank U1 point
-
Normally in the system agent section. Examples here https://us.informatiweb.net/tutorials/it/bios/enable-iommu-or-vt-d-in-your-bios.html1 point
-
Tu das .... das NT hat die SFX auf ATX Adapter-Blende sogar schon im Paket....hatte ich garnicht auf dem Schirm Edit: @i-B4seder boxed Kühler des Pentium sollte aber eigentlich ausreichen...so viel hat er ja garnicht zu tun. Ich habe in meinem 24x7 unraid den i3-8100 mit boxed kühler und den hört man nicht....eher noch Gehäuselüfter für das 2HE nachrüsten (weiss garnicht, welche drin sind)1 point
-
Kurz und knapp: Nein1 point
-
...denke das sollte passen. Das NT sitzt hinter den 5.25er bays...da sollte es mit den Stromanschlüssen des Boards auch nicht kollidieren Gesendet von meinem SM-G960F mit Tapatalk1 point
-
Docker/VMs are known to write constantly, though much better with v6.9.x, also helped if the SSD was reformatted with the new partition layout. This is basically meaningless, you can check SMART for the total TBW, then check 24H later to see if it is something to worry about.1 point
-
SFX ab 450W, bis max 130mm und ab 6x SATA: https://geizhals.de/?cat=gehps&xf=13164_vollmodular~14874_130~360_450~395_6~4174_SFX~4174_SFX-L Mit der oben verlinkten Blende kein Thema mehr. Edit: @i-B4se ..wobei ein vollmodulares mit 130mm, wie das be-quiet evtl ein Problem sein könnte...die 130mm sind ohne Stecker...vollmodular ist etwas grösser im Aufbau und das 2HE sagt max 140mm...kann knapp werden1 point
-
...bei yakkaroo auf der Seite selbst sparst Du aber einiges an Geld, gegenüber i-bäh und die nehmen auch paypal. Das be-quite würde für den 2HE nicht gehen...Abluft nach unten, press aufs Blech ist shice.....aber NT mit 80mm Lüfter nach hinten gibt es: https://geizhals.de/?cat=gehps&xf=14874_140~17399_92~364_aktiv~4174_ATX (hier ist bis 92mm ausgewählt, weil es die 80mm Kategorie da nicht gibt....also Obacht) Edit: mit einer SFX -> ATX Blende könntest Du SFX NT nehmen: https://www.amazon.de/SilverStone-SST-PP08-Netzteiladapterblende-SFX-schwarz/dp/B01AWFVKRO/ref=pd_sbs_4/258-6055720-2908504?pd_rd_w=T1CQ2&pf_rd_p=a0a2bb41-2b9d-47ea-9dff-8a3ade3a13d6&pf_rd_r=H4K7X7VBCTN1PBVWMMVJ&pd_rd_r=eb42e854-19c3-4f79-844b-c72170b0ef64&pd_rd_wg=25opy&pd_rd_i=B01AWFVKRO&psc=1 ....an die 140mm Tiefe für das 2HE denken. Edit2: das Gigabyte hat nur 1x M2....würde ich heute nicht mehr nehmen. Das ASRock hat 2xM2 die wohl auch bei Nutzung NVME PCIe-SSDs kein SATA abschalten (bitte aber vorher Anleitung konsultieren): https://geizhals.de/asrock-b460m-pro4-90-mxbcv0-a0uayz-a2305952.html?hloc=at&hloc=de1 point
-
Also worth noting, your 3tb USB hard drive won’t be included in the array. That will have to be mounted using the “unassigned devices” plug-in (that I speculate 99% of all UnRaid users use). So if you keep anything crucial on it, as you said grab & go for emergencies, you should also plan for a backup process to the main array so it’s covered by parity.1 point
-
Eine ziemliche Fehlkonstruktion (Display schlecht ablesbar und Batteriefach nur mit Gewalt zu öffnen), aber nach wie vor das günstigste und genaueste ist das Brennenstuhl: https://gutt.it/strommessgeraete-im-test/ Denk aber dran, dass beim Vergleichen meist nur eine SSD für die Messung angeklemmt wurde. Also jetzt keine 5 HDDs etc. Also 50W hast du dann wieder schnell erreicht.1 point
-
Thanks for pointing me in the right direction, I changed settings as showed in the guide and other posts here in the forum, now it works without hanging. next..Ram upgrade1 point
-
Entweder so oder in der syslinux.cfg (am besten einen zusätzlichen Eintrag machen) als Zusatz einfügen: clocksource=hpet Muss mit in die zeile Fertig müsste dass dann also so aussehen: append clocksource=hpet initrd=/bzroot1 point
-
Ok, so after removing the .bak file, it worked ty very much1 point
-
Zoneminder 1.36 has been released. I am going to update the zoneminder docker in the next few days to update zoneminder to 1.36. This will be an automatic update to 1.36. If you aren't ready for 1.36, don't update the docker. I've done some initial testing and it looks to work fine with no glitches that I've seen yet. Edit: Home Assistant doesn't appear to be ready for Zoneminder 1.36. My HA doesn't want to log into Zoneminder properly. It seems to be working now. Not sure why though.1 point
-
In fact it's a general issue of crappy versioning and/or repo management. On a baremetal Ubuntu, when trying to upgrade from 1.1.5 to 1.1.6 following the official wiki how-to it also built 1.1.7.dev0. And deleting the .json file is of no effect for building the main stuff, maybe the Linux GUI, I don't use it. And I think the docker image build process simply suffers from the same problem. The only solution so far to build a "real" (?) 1.1.6 in Ubuntu is to delete the ~/chia-blockchain directory and make a fresh install. No a problem, as all static data are stored in ~/.chia/mainnet, but still irritating. They will improve over time, hopefully ...1 point
-
Put the 2 256GB in one cache pool, put the 1TB in another cache pool, assign the system and appdata shares to the 1TB cache pool1 point
-
Not a mac user but IIRC there was an issue with osx that treated SMB writes as sync writes, google "osx smb strict sync".1 point
-
@coupas does this new release address your issue? https://github.com/benbusby/whoogle-search/releases/tag/v0.5.01 point
-
Can anyone that has upgraded to 6.9.2 confirm that upgrading alone is supposed to fix the problem? I just upgraded and the problem persists. EDIT: Fixed. In case anyone else comes along and has the same question / issue that I did, hit the "Check for Update" button on your docker tab. (Not sure if it matters if the dockers are running or not, mine were when I hit it)1 point
-
@coupas looks like that might be related to issue #311 with this potential workaround to fix it? Either way this definitely an issue with whoogle rather than the unraid template so you'll get more help posting in the github issues for whoogle than here, I think.1 point
-
Hardware transcoding doesn't work in this container, reported by many people. Switch to the official one or the linuxserver one and you should be good.1 point
-
Just pushed an update that allows SVGs1 point
-
Solution is to add a new Variable called DISABLE_AUTH and set the value TRUE. I also deleted the 2 GUAC parameters. Read morehttps://guacamole.apache.org/doc/0.9.6/gug/configuring-guacamole.html1 point
-
I just pushed an update that will allow you to upload files as you want. It should be available for update now. The site uses the filename as the dropdown listing. So for example deluge icon is named Deluge.png. For best results use a 256x256 png with transparent background1 point
-
Highly recommend retrofitting a 40mm cooling fan on this card. After just a few minutes the heatsink was at 75C. Quickly got a fan on it. See https://www.youtube.com/watch?v=IdqC8PWJxg8 for a guide. The heatsink's holes line up perfectly with a 40mm fan. I used M3 x 30 screws with nylon m3 bolts to secure it.1 point
-
I have the OEM version too. Tried flashing the card today using the method outlined here - https://forums.serverbuilds.net/t/guide-updating-your-lsi-sas-controller-with-a-uefi-motherboard/131 The FW file includes HBA_9207_4i4e_IT and HBA_9217_4i4e_IR, FW v 20. Simple and straight forward. Used a PC I know worked flashing before. Switched over to IT mode with little effort. Tested it - works (well, I can see drives in the SAS config). I need to test the external port next, then finally in Unraid (will get a trial USB setup).1 point


.png.9a4f708867a76b362eeaac6a578d6d21.png)


