Leaderboard

Popular Content
Showing content with the highest reputation on 01/10/22 in Posts
-
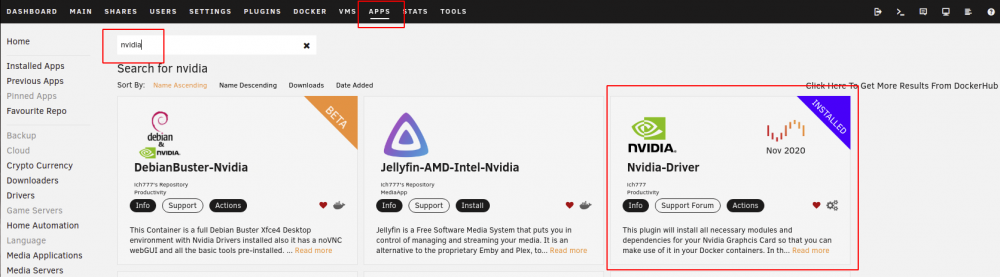
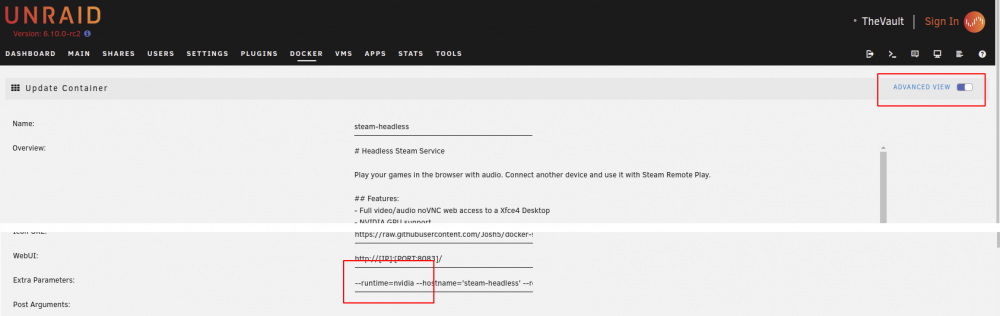
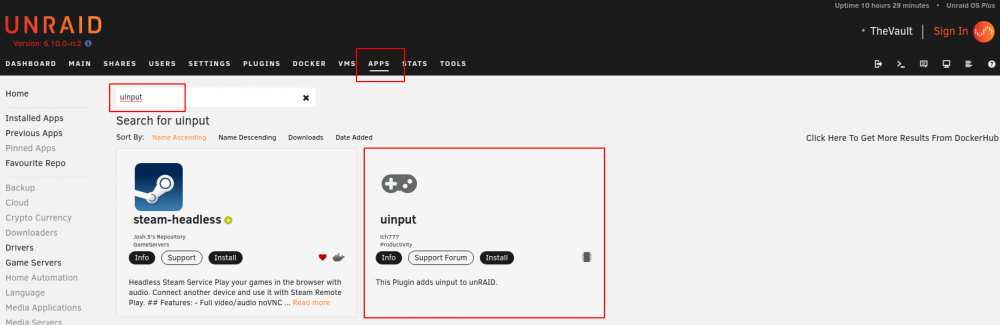
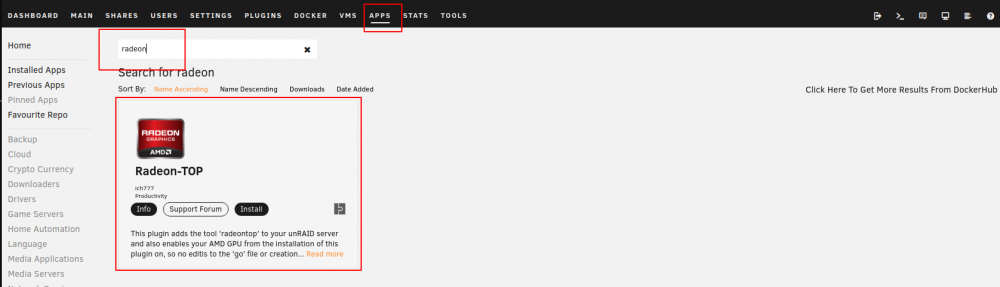
Application Name: Steam (Headless) Application Site: https://store.steampowered.com/ Docker Hub: https://hub.docker.com/r/josh5/steam-headless/ Github: https://github.com/Josh5/docker-steam-headless/ Discord: https://unmanic.app/discord (Not just for Unmanic...) Description: Play your games in the browser with audio. Connect another device and use it with Steam Remote Play. Features: NVIDIA GPU support AMD GPU support Full video/audio noVNC web access to a Desktop Root access Support for Flatpaks and Appimages Compatible with EmuDeck installer (not supplied) Notes: ADDITIONAL SOFTWARE: If you wish to install additional applications, you can generate a script inside the "~/init.d" directory ending with ".sh". This will be executed on the container startup. STORAGE PATHS: Everything that you wish to save in this container should be stored in the home directory or a docker container mount that you have specified. All files that are store outside your home directory are not persistent and will be wiped if there is an update of the container or you change something in the template. GAMES LIBRARY: It is recommended that you mount your games library to `/games` and configure Steam to add that path. AUTO START APPLICATIONS: In this container, Steam is configured to automatically start. If you wish to add additional services to automatically start, add them under Applications > Settings > Session and Startup in the WebUI. NETWORK MODE: If you want to use the container as a Steam Remote Play (previously "In Home Streaming") host device you should set the Network Type: to "host". This is a requirement for controller hardware to work and to prevent traffic being routed through the internet since Steam thinks you are on a different network. Setup Guide: CONTAINER TEMPLATE: Navigate to "APPS" tab. Search for "steam-headless" Select either Install or Actions > Install from the search result. Configure the template as required. GPU CONFIGURATION (NVIDIA): This container can use your GPU. In order for it to do this you need to have the NVIDIA plugin installed. Install the Nvidia-Driver Plugin by @ich777. This will maintain an up-to-date NVIDIA driver installation on your Unraid server. Toggle the steam-headless Docker Container template editor to "Advanced View". In the "Extra Parameters" field, ensure that you have the "--runtime=nvidia" parameter added. (Optional - This step is only necessary if you only multiple NVIDIA GPUs. If you have a single GPU, then leaving this as "all" is fine.) Expand the Show more settings... section near the bottom of the template. In the Nvidia GPU UUID: (NVIDIA_VISIBLE_DEVICES) variable, copy your GPU UUID (can be found in the Unraid Nvidia Plugin. See that forum thread for details). GPU CONFIGURATION (AMD): Install the Radeon-Top Plugin by @ich777. Profit ADDING CONTROLLER SUPPORT: Unraid's Linux kernel by default does not have the modules required to support controller input. Steam requires these modules to be able to create the virtual "Steam Input Gamepad Emulation" device that it can then map buttons to. @ich777 Has kindly offered to build and maintain the required modules for the Unraid kernel as he already has a CI/CD pipeline in place and a small number of other kernel modules that he is maintaining for other projects. So a big thanks to him for that! Install the uinput plugin from the Apps tab. The container will not be able to receive kernel events from the host unless the Network Type: is set to "host". Ensure that you container is configured this way. WARNING: Be aware that this container requires at least 8083, 32123, and 2222 available for the WebUI, Web Audio, and SSH to work. It will also require any ports that Steam requires for Steam Remote Play No server restart is required, however. Ensure that the steam-headless Docker container is recreated after installing the uinput plugin for it to be able to detect the newly added module.


 3 points
 -
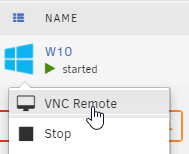
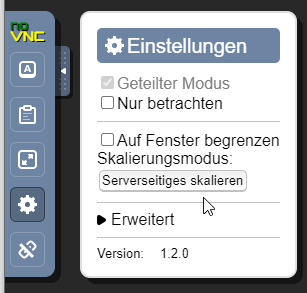
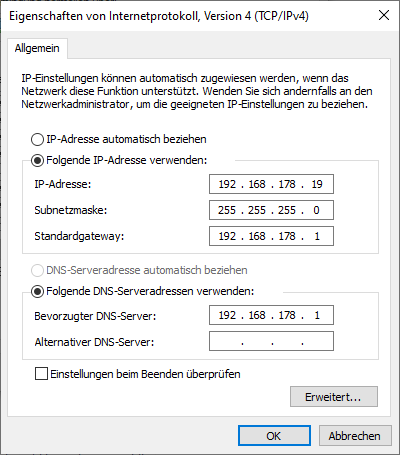
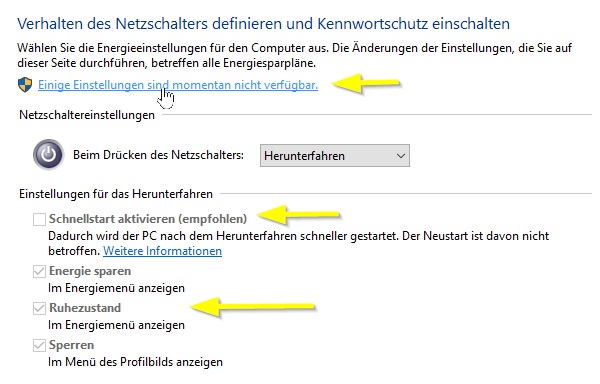
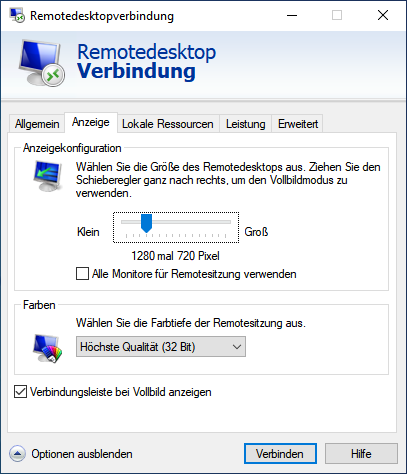
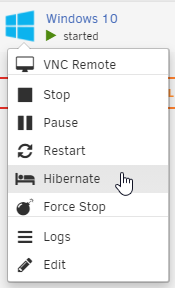
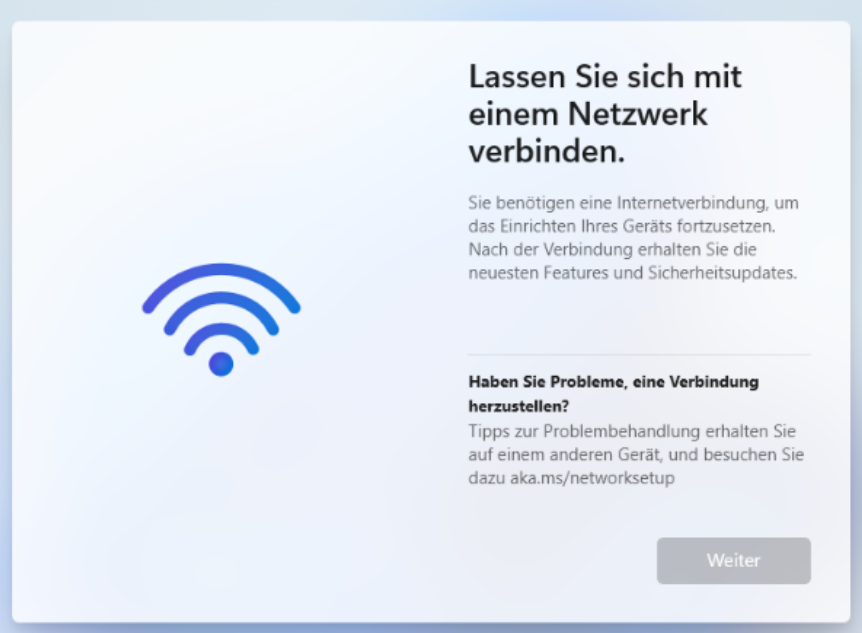
VM erstellen Windows Home / Pro ISO über das Media Creation Tool oder die Windows Enterprise ISO über UUP Dump erstellen. Settings > VM Manager > aktuellstes "Default Windows VirtIO driver ISO" auswählen und herunterladen Optional: Wer eine Grafikkarte durchschleifen möchte (nicht iGPU!): Tools > System Devices > Alle Einträge (VGA, Audio, USB, etc) der Grafikkarte anklicken und an VFIO binden > Unraid Server neu starten Optional: Wer nicht der CPU die Last-Verteilung überlassen möchte, der isoliert über Settings > CPU Pinning > CPU Isolation die Kerne der VM VMS > Add VM > Windows 10 Entweder: Alle Kerne auswählen und der CPU die Last-Verteilung überlassen, Oder: Die isolierten Kerne zuweisen 4096MB RAM, min und max Werte gleich, da unterschiedliche Werte zu Problemen führen können (2GB sind das offizielle Minimum) aktuellste Q35 als Machine, weil es von Intel GVT-g empfohlen wird. Info: Bei Windows 10 brauchte ich Q35-5.1, damit ich den Netzwerktreiber zum Laufen bringen konnte, ansonsten gab es den Fehler Code 56. über "OS Install ISO" die Windows ISO-Datei auswählen 32G vdisk oder größer (32G ist mittlerweile das offizielle Minimum, früher waren es 20G). Hinweis: vdisk.img sind Sparse-Dateien und belegen daher auf dem Datenträger weniger als angezeigt. Man muss aber was tun, damit das so bleibt. VNC Graphics Card auf German stellen Optional: Grafikkarte über das Plus-Symbol hinzufügen Optional: Sound Card auswählen, wer lokal am Server Lautsprecher / Kopfhörer anschließen möchte, bei Grafikkarten den Audio Controller der Grafikkarte auswählen Network Model: Wer keine Docker im "br0" Netzwerk verwendet, sollte für die bessere Performance "virtio" wählen, da "virtio-net" deutlich langsamer ist. Info: Ab Unraid 6.12.4 soll man das Bridge-Netzwerk deaktivieren. In dem Fall wählt man "vhost0" und "virtio" bei einer VM. Optional: Haken bei "Start VM after creation" raus und über GVT-g der VM eine vGPU zuweisen VM erstellen Optional: Über das GVT-g Plugin eine vGPU zuweisen und die VM starten Installation VMS > VM Logo > VNC Remote Wenn man "Press any Key" verpasst hat, dann einfach "reset" in der UEFI Shell eingeben um neu zu starten Am linken Rand "Serverseitiges Skalieren" aktivieren Benutzerdefinierte Installation > Treiber laden > Virtio CD Laufwerk > amd64\w10\ auswählen um den SCSI Controller Treiber für die virtuelle Festplatte zu laden Windows 11: Wer bei dem folgenden Bildschirm hängt, drückt SHIFT + F10, gibt "OOBE\BYPASSNRO" ein und bestätigt den Befehl mit ENTER. Die VM startet neu und nach Auswahl des Tastaturlayouts könnt ihr mit "Ich habe kein Internet" fortfahren. Nach der Installation Optional: Wer möchte aktiviert den Ruhezustand (Hibernate), damit er die VM über das Unraid Menü nicht nur herunterfahren kann. Dazu das Windows Logo klicken > "cmd" eintippen > Rechte Maustaste als Administrator ausführen: powercfg.exe /hibernate on powercfg /h /type full Rechte Maustaste aufs Windows Logo > Ausführen > powercfg.cpl Dann "Auswählen was beim Drücken..." > "Einige Einstellungen sind..." > Schnellstart deaktivieren und wer sich für den Ruhezustand entschieden hat, diesen einschalten Der Schnellstart muss deaktiviert werden, da es sonst zu Problemen kommt, falls man zB die Anzahl der CPU Kerne verändert etc Über das Virtio CD Laufwerk die virtio-win-gt-x64.msi ausführen, was die folgenden Treiber installiert: Balloon, Network, Pvpanic, Qemufwcfg, Qemupciserial, Vioinput, Viorng, Vioscsi, Vioserial, Viostor, Viofs Erst jetzt hat also die VM Internet Über das VirtIO CD Laufwerk die virtio-win-guest-tools ausführen, welches dann auch den VNC Grafiktreiber installiert, so dass wir nun ebenfalls die Auflösung ändern können. Dadurch können wir die VM nun über das Unraid Menü bequem Herunterfahren (Stop) oder in den Ruhezustand (Hibernate) versetzen: Unten rechts rechte Maustaste auf das Netzwerk-Symbol > "Netzwerk-..." > Adapteroptionen ändern > rechte Maustaste Ethernet > Internetprotokoll, Version 4... > Eigenschaften > Feste IP-Adresse vergeben Rechte Maustaste auf das Windows Logo > System > Remotedesktop > Remotedesktop aktivieren Optional: Bei Intel (vGPU) oder Nvidia (Grafikkarte) oder AMD (Grafikkarte) den Treiber herunterladen und installieren Das aktuelle Fenster schließen, auf einem Windows PC nach "Remote..." suchen und "Remotedesktopverbindung" (RDP) öffnen. IP-Adresse und Windows Username hinterlegen. Außerdem unter "Anzeige" die Auflösung anpassen, damit die VM nicht wie euer PC zB in 4K gestartet wird, was eine sehr hohe CPU Last auf dem Server verursachen kann: Hinweis: RDP läuft deutlich flüssiger als NoVNC im Browser und unterstützt auch Sound. Alternativ geht auch Parsec. Optional: PowerShell als Admin öffnen und folgendes ausführen um Windows von Bloatware zu befreien: iwr -useb https://git.io/debloat|iex Optional: Direkter Login-Bildschirm: Rechte Maustaste auf das Windows Logo > Ausführen > regedit KEY_LOCAL_MACHINE > Software > Policies > Microsoft > Rechte Maustaste auf Windows > Neu > Schlüssel > Personalization als Name eingeben > Rechte Maustaste auf Personalization > Neu > DWORD > NoLockScreen > Doppelklick > 1 als Wert > OK Alle Updates installieren (also auch bei Bedarf mehrmals neu starten) Herunterfahren Optional: ISO-Datei und virtio CD Laufwerk aus der VM Konfiguration entfernen Ein Backup von unserer Vanilla Windows vidks1.img erstellen. Das geht über Krusader (Apps), SMB (falls Netzwerkfreigabe vorhanden) oder über das Unraid WebTerminal (">_" oben rechts) mit dem folgenden Befehl (Pfade bei Bedarf anpassen): cp -a --reflink --sparse=auto "/mnt/user/domains/Windows 10/vdisk1.img" "/mnt/user/domains/Windows 10/vdisk1-backup.img" Video

 1 point
 -
Hello Everyone, I wanted to give a big thanks to all that are involved with Unraid. I have been running a Plex server since Plex started back in 2008. I used Windows Server to start with. Then migrated to Ubuntu, the back to Windows Server. Been doing a lot of reading on Unraid. I have to said Unraid is well worth the money. It just works. The migration from Windows Server to Unraid was very painless and quicker than I had planned. Everyone's had work on this product is very much appreciated. I love it.1 point
-
have a look at this thread.1 point
-
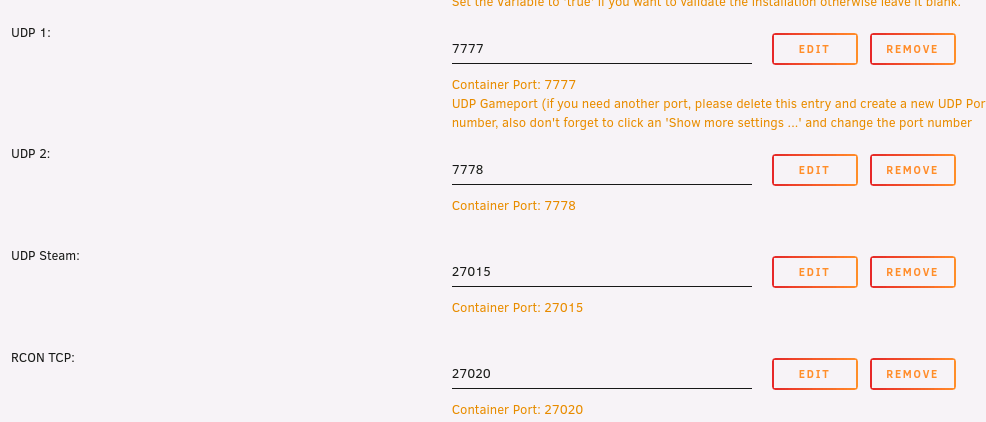
The ports that you see in the template otherwise the container won't work in your local network (the RCON port is optional): Either trough your public IP, domain name or on the server list (keep in mind if you try to connect through the in game server list all check boxes and options have to be checked correctly, otherwise your server won't be displayed in the list). Yes with an if... If your NAT reflection is working properly you can do that, otherwise you won't be able to connect internally to your public IP. It would be better to create a hotspot with your mobile phone connect a laptop or another computer to that and try if you can get a connection through the Steam Server Browser (if you try it through the Steam Server browser your should use YOURpublicIP:27015). He is talking about another game server (7DaysToDie).
 1 point
 -
Yeah, it seems that this was not the best choice... Ok, I will give it a try to avoid errors. In regard to the bios update, it doesnt change anything, but ok. The only GPU in the system is the iGPU and this is set to enabled in bios. I struggle a bit with the overall power consumption of the system. When all drives spins down and docker is running (no vms, no additional pci-cards) I have 18W consumption, but ok. Thanks a lot for your help.1 point
-
Kudos for this, what an excellent surprise to find your container in the apps tab today! I didn't read "Option path to your games. This path will need to also be configured in Steam after the first boot." and installed a game to the /home/default/.steam directory, but that was fixed shortly thereafter. Thank you very much for this excellent container!1 point
-
In all honesty, at this point I don't have an answer to this yet. Up until now I have only been using it headless and with controllers connected through the steam remote play. Getting usb devices to be recognised should not be too difficult right? Yea, this is what I am working on currently. I keep getting the errors that the other people have reported here when starting x while running another container. But I believe that this should be possible. I was going to say before, part of the reason for creating this container was because I wanted something that was 100% focused on being run headless for steam remote play. I wanted the container to not have any configuration requirements that may bloat it for people who are not wanting to connect hardware or output to a monitor. I wanted this container to be able to easily reboot in seconds back to Steam. So it was my intention to palm any people who wanted to setup hardware I/O for a Steam docker to your Buster container... But then here you came and ruined that plan. 😆 I guess at this point I want to focus on getting the container to run real smooth as a headless and no direct hardware I/O solution, and then later on look at either forking it for that use-case or implementing it if it does not mean adding a lot of configuration to the the template.1 point
-
Thank you , no luck with Linuxserver docker container , but I got it working with binhex version , not sure what's the issue is but everything is working now1 point
-
Just wanted to say thanks again @JorgeB. I reseated all of my power cables and I've been CRC free for a few days now. Disk4 is rebuilt and back in the array. Cheers!1 point
-
I'm gonna have to buy you your drink of choice for all this knowledge you're slapping me with. 😄 Very much appreciated, sir! I'll be putting all this to use this evening! Well, most of it anyway. 🙂1 point
-
Correct Yes, imacpro1,1 is the best choice you can have, especially if you will want to have hevc decoding on hardware level. It's not a must, a bootloader can work for months, even a year, it can even work with different major oses, but usually having the most recent version of the bootloader only helps to not have an unbootable system. Yes, but remember that if you replace the whole img you will loose your custom changes (if any), included the smbios data. A second way to update the bootloader is within the vm: just mount the efi partition from within the vm (your actual bootloader), download latest opencore stable (debug version should be preferred), from here: https://github.com/acidanthera/OpenCorePkg/releases Extract it from the zip, and replace all the files with the .efi extension. The same for the kexts: https://github.com/acidanthera/lilu/releases https://github.com/acidanthera/whatevergreen/releases https://github.com/acidanthera/applealc/releases https://github.com/acidanthera/virtualsmc/releases Your settings are saved in the /EFI/OC/config.plist file ATTENTION: before upgrading the files of the bootloader (the .efi files) validate your config.plist with ocvalidate, which is included in the zip package you will download in the Utilities/ocvalidate folder. For example, from your mac os vm, in a terminal: cd /path/to/ocvalidate ./ocvalidate /path/to/your/config.plist This will validate your config.plist file and you could see if the new version of the bootloader requires new entries in the config.plist or it requires to delete old entries. Each version of opencore has its own ocvalidate.1 point
-
Not black screen, but I was in contact with another user having issues with opencanopy (opencanopy is the name of the picker with the icons). You can read about this issue here: https://github.com/acidanthera/bugtracker/issues/1876 The solution was to upgrade the ovmf files, with the attached one, for example. Just point in the xml the paths to the new files: <loader readonly='yes' type='pflash'>/path/to/OVMF_CODE.fd</loader> <nvram>/path/to/OVMF_VARS.fd</nvram> edk2-OVMF-202011-Stable-RELEASE-GCC5-Kali.zip1 point
-
Thanks @ich777. I had inspiration from your Buster container. You are maintaining a lot of containers, so totally fine with you doing that if you want and if that helps you out with your stuff.1 point
-
In that directory there's only one file that is .env (no filename, just .env extension) \appdata\heimdall\www\.env1 point
-
Since v6.9+ allows multiple pools, each pool has its own settings. Click on the first disk of the pool.1 point
-
I was literraly just uploading the new builds as you posted this. So you can update the docker now to get the latest version.1 point
-
This Docker image is targeting games played in the browser or via Steam Remote Play (as you say using something like Seam Link). I've tested Steam Link pretty extensively and it works really well. I have tested it on my TV (Android TV), my phone and my MS Surface. All three devices work perfectly with a wireless Xbox controller. The phone also has the options for touch controls. I've tried to make this container super simple to setup with Steam. From scratch I can install it and setup Steam for remote playback in about 10 mins. I don't currently own an AMD GPU, so I may need help from someone else or I may need to go buy one to get that working. But it is definitely something I want to try. I'm also looking at adding Epic Games, Retroarch, Lutris, etc. And I am looking at adding the ChimeraOS app for remotely managing steam/retroarch/etc. if possible.1 point
-
Genau. Du musst auch die GPU UUID eintragen, aber das ist wie gesagt ein Thema für einen anderen Thread. Schau auch mal in meinem Nvidia Driver Support Post vorbei, im zweiten Post ist alles genau erklärt auch mit Bildchen. Nicht falsch verstehen, ich will nicht in diesem Thread ein andere Thema behandeln zwecks Übersichtlichkeit...1 point
-
is this with a new blank appdata/pihole directory? try a different name name to make sure (I had issues with permissions from an old installation). Is 192.168.1.99 already in use elsewhere? ... thats all I can think of at the moment1 point
-
Oh right... I also see these template errors. Going through and fixing up these for this and my other container templates.1 point
-
Thanks. I got confused with kernel/dtb files. I fixed that accordingly and now it is booting up. Many thanks!1 point
-
Bonjour, donc installation carte PCIe pour le nvme et tout me semble OK 😁 Seul inconvénient le proc. actuel, suis passé sur une Asrock QC-5000-itx en attendant que ma config. revienne du SAV .... peux pas dire que c'est un foudre de guerre, mais les services (applis) essentielles tournent et ca c'est la bonne nouvelle. Désolé d'avoir spolié le forum avec un post pour (presque) rien1 point
-
You are a god my friend. Thank you so much. The MSI thing did the trick. I created a file as root in the libreelec config directory: config/modprobe.d/snd-hda-intel.conf and added this line: options snd-hda-intel enable_msi=1 Sound is working now I read somewhere that I should passthrough the motherboard audio aswell when passing through video and sound from my gpu? Isn't that necessary?1 point
-
No need to sync parity before following the procedure, since the procedure requires you to sync parity after removing the drives.1 point
-
Yes. I follow that link without any issue. Still have question regarding disk number skipping after shrinking the drive.1 point
-
I have now upgraded my system from 5.14 to 6.55 which completes my upgrade path of 5.12>5.14>6.55. It took a few minutes for my system to come online as it appeared that it had to re-adopt my devices, or do some other setting up the first time they ran in 6.55. I still have EOLed UAPs in my system and they appear to be fully functional and configurable in 6.55, which is not supposed to be the case with Controller versions released after March 1, 2021. This was what other had also noticed and pointed out in this thread.1 point
-
Hello, I have added a UNRAID_IP variable. It will allow to set the IP address of the server by default. So if a container does not have the same IP then it will not replace it with HOST. The template has changed.
 1 point
 -
Most probably it's a parse error; I'm planning a new version with a couple of new features, let met check that bug and get back when it's fixed. Thanks for using the plugin, by the way.1 point
-
I have set it to run at first array start only. The script itself runs in a infinite loop and has a 1 second long pause between checks (the "sleep 1" part at the end).1 point
-
Thanks for reporting, l will check this.1 point
-
I updated all the "foreign" translation repos to the latest English (en_US) source files.1 point
-
I use this script, which checks if Plex has started transcoding and stops Trex if that is true. It starts Trex after Plex has finished transcoding. It is for Nvidia cards only. Feel free to use it and modify it to your needs. #!/bin/bash # Check if nvidia-smi daemon is running and start it if not. if [[ `ps ax | grep nvidia-smi | grep daemon` == "" ]]; then /usr/bin/nvidia-smi daemon fi sleep 300 # Wait until array is online and all dockers are started. Comment this out if you are testing the script. TREX=`docker container ls -q --filter name=trex*` while true; do if [[ `/usr/bin/nvidia-smi | grep Plex` == "" ]]; then # If Plex is not transcoding, start the trex-miner container if it is not running. if [[ `docker ps | grep $TREX` == "" ]]; then echo "No Plex, starting Trex." docker start $TREX fi else # If Plex is transcoding, stop the trex-miner container if it is running. if [[ `docker ps | grep $TREX` != "" ]]; then echo "Plex running, stopping Trex." docker stop $TREX fi fi sleep 1 done1 point
-
Hum, it's complicated, so I did not vote. I generally use Chrome, but I access Unraid through Firefox so that I keep my general web-browsing and Unraid management separate.1 point
-
Go to the Plugins tab and check for updates. You'll want to make sure you are running the latest version of the My Servers plugin, which is currently 2021.09.15.1853. If you are still having issues, open a webterminal and type: unraid-api restart1 point
-
I'm guessing this would require changes to the upstream docker images and probably isn't going to happen. I realise there's not many using ZFS in unraid, but in case anyone else comes across this problem, I've "fixed" it with a disgusting user scripts hack. I have this running in User Scripts every 5 minutes, it will: Check if lancache-bundle docker is running If so, it will check the "sendfile" setting in nginx.conf inside the docker If nginx.conf is set to "sendfile on", it will change this to "sendfile off" and then restart lancache-bundle. lancache-bundle-nginx-fix-for-zfs #!/bin/bash if docker ps | grep -q lancache-bundle then echo "lancache-bundle is running, checking for sendfile setting in nginx.conf" docker cp lancache-bundle:/etc/nginx/nginx.conf /tmp/lancache-bundle-nginx.conf if grep -Pxq '\tsendfile on;' /tmp/lancache-bundle-nginx.conf then echo sendfile is on, fixing nginx.conf sed -i '/\tsendfile on;/c\\tsendfile off;' /tmp/lancache-bundle-nginx.conf echo copying fixed nginx.conf to lancache-bundle docker docker cp /tmp/lancache-bundle-nginx.conf lancache-bundle:/etc/nginx/nginx.conf echo restarting lancache-bundle docker docker restart lancache-bundle else echo sendfile is off, nothing to do. fi else echo "lancache-bundle is not running" fi1 point
-
Well, you can use this on the command line. It's quick and dirty: watch grep \"cpu MHz\" /proc/cpuinfo1 point
-
Wow! This Docker page really lacks instructions! but thanks to you guys, I finally figure out how to use this wait functionality!1 point
-
I too am also getting spammed with: May 13 09:44:28 Tank kernel: caller _nv000908rm+0x1bf/0x1f0 [nvidia] mapping multiple BARs May 13 09:44:31 Tank kernel: resource sanity check: requesting [mem 0x000c0000-0x000fffff], which spans more than PCI Bus 0000:00 [mem 0x000c0000-0x000dffff window] but, I tried to uncheck some of the polling options to see if a particular one maybe causing it, but no matter how many I uncheck or which ones, it automatically goes back to all of them being checked. UPDATE: Ok I figured it out, it has to do with power states and this query waking up the display. Setting nvidia-smi --persistence-mode=1 will fix the issue, to keep the gpu initialized. I noticed when looking at the state, it was always in a P0, state with persistent mode on, it allowed it to drop to P8. (This is for a quadro p2000, btw)1 point
-
I know this post is a little old, but since there are new posts in this thread, I thought it needed some elaboration in case someone is trying to follow it. This "classic method" is missing some important details. It seems to imply that there are only 2 possible Use cache settings, but there are 4, and which you use at each step is critical. Here is the more complete information. Instead of stopping all VMs/Dockers (that is not enough): Go to Settings - Docker and disable Dockers. Go to Settings - VM Manager and disable VMs. Stop all writing to all user shares by anything. Set all user shares to cache-yes. This is the only setting which will move from cache to array. Run mover to get everything moved from cache to array. Swap cache drive. Set shares you want to stay on cache to cache-prefer. This is the only setting which will move from array to cache. Typically, you want appdata, domains, and system shares on cache. Set other user shares to whichever Use cache setting you prefer. Run mover to get those shares you want to stay on cache moved back to cache. Enable Dockers and VMs. Also, don't do this:1 point
-
Thanks for not completely trashing the thread.1 point
-
I would love to be able to view the cpu thread pairs from the vm templates like this1 point
-
How do I replace/upgrade my single cache device? (unRAID v6.2 and above only) This procedure assumes that there are at least some dockers and/or VMs related files on the cache disk, some of these steps are unnecessary if there aren't. Stop all running Dockers/VMs Settings -> VM Manager: disable VMs and click apply Settings -> Docker: disable Docker and click apply For v6.11.5 or older: Click on Shares and change to "Yes" all cache shares with "Use cache disk:" set to "Only" or "Prefer" For v6.12.0 or newer: Click on all shares that are using the pool you want to empty and change them to have the pool as primary storage, array as secondary storage and mover action set to move from pool to array Check that there's enough free space on the array and invoke the mover by clicking "Move Now" on the Main page When the mover finishes check that your cache is empty (any files on the cache root will not be moved as they are not part of any share) Stop array, replace cache device, assign it, start array and format new cache device (if needed), check that it's using the filesystem you want For v6.11.5 or older: Click on Shares and change to "Prefer" all shares that you want moved back to cache For v6.12.0 or newer: Click on Shares and change the mover action to move from array to pool for all shares that you want moved back to cache On the Main page click "Move Now" When the mover finishes re-enable Docker and VMs1 point


(Small).thumb.png.b884b0484e848c502a315fc27b995f59.png)