Leaderboard


Popular Content
Showing content with the highest reputation on 11/11/23 in all areas
-
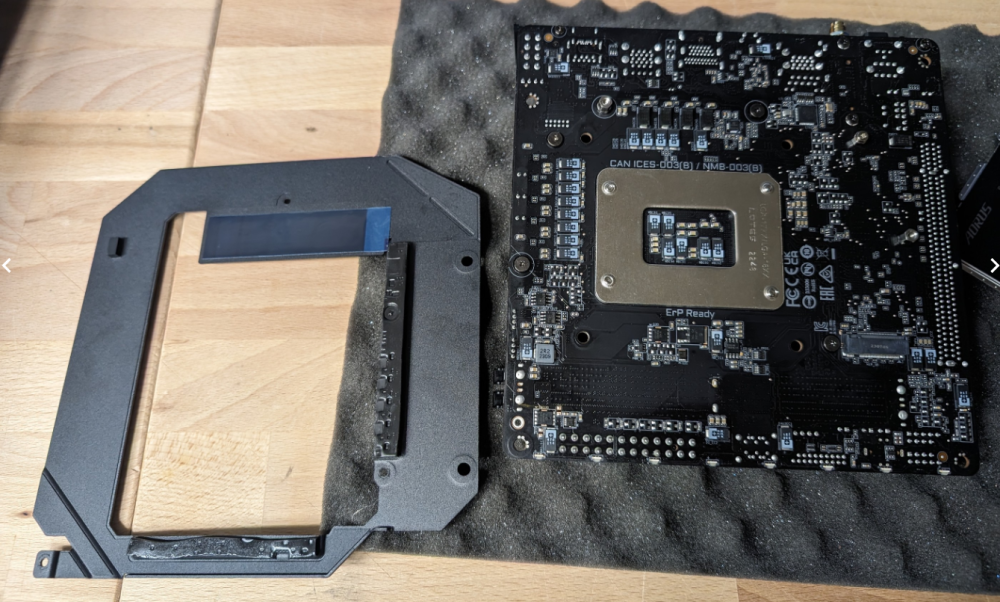
Ich bin immer noch auf der Suche nach einem sparsamen ITX Board mit Intel 1700 Sockel und mit möglichst viel SATA und/oder M.2 Anschlüssen, wo ich dann ASM1166 M.2 Adapter verbauen würde. Zwischenzeitlich habe ich zwei in die Hände bekommen und hier nun die Messergebnisse: Gigabyte B760i Aorus Pro Das ist ein ITX Board mit 2.5G LAN und 2x M.2 (eine unter dem Board). Kleiner Chipsatz und eher minimale Ausstattung sollten ja in der Lage sein ein B760M zu schlagen, aber denkste. Nach allen üblichen Tweaks komme ich auf C8 mit 9,3W mit einer NVMe. Das ist für ein ITX Board ein eher schlechter Wert (ein Gigabyte C246N-WU2 mit 8x SATA und 1x M.2 liegt inkl aktiver Monitorausgabe und zusätzlichem Tastatur USB Dongle.bei 6W) und würde durch die notwendige Erweiterung der SATA Slots nur noch viel schlechter werden. Hier vom Messaufbau ein Foto: Richtig Banane und damit ein absolutes No-Go war aber folgendes: - nur 2 SATA Buchsen bei der DDR5 Version. Ich dachte ich seh' falsch. Da bin ich nämlich prompt auf ein paar Beschreibungen im Internet hereingefallen, wo was von 4 SATA Buchsen stand, aber das gilt nur für die DDR4 Variante, wie ich jetzt weiß. Und der Witz schlechthin: Der ist wirklich der einzige Unterschied zur DDR4 Version. Einfach 2 SATA-Buchsen weniger, ansonsten alles andere absolut identisch. - was soll der Schwachsinn mit der Heatpipe bei dem M.2 Slot? Der Slot hat selbst bei der DDR5 Variante nur PCIe 4.0. Hier macht sich Gigabyte einfach nur lächerlich (oben auf dem Foto fehlt noch der massive "Eisenblock", der wohl als "Kühlkörper" fungieren soll. - auf der Rückseite wird es dann aber noch lächerlicher. Statt der Luftzirkulation nicht im Weg zu stehen, hat man eine "Backplate" verbaut. Auf den Fotos ging ich dann naiv davon aus, dass man die M.2 durch Lösen einer Schraube tauschen könnte. Aber denkste. Dieser Rahmen ist ein Teil und dazu bestückt mit Wärmeleitpads. Da hat das Heatpipe-Design der Oberseite wohl nicht ausgereicht. Man muss auch nur unter dem Board irgendwie Wärme "ableiten"?! ASRock Z790 Phantom Gaming-ITX/TB4 Das Board hat eine super Ausstattung mit 3x M.2, 3x SATA und 2.5G LAN. Außerdem gäbe es sogar noch Thunderbolt für eine externe Erweiterung. Da Asrock aber schon lange kein sparsames Board mehr gezeigt hat, habe ich nichts erwartet und wurde auch nicht entäuscht. Nur C3, obwohl laut BIOS C7 möglich sein sollte und mit 17,80 Watt, obwohl ich Audio, WLAN und Thunderbolt deaktiviert hatte und ASPM weitestgehend aktiv war, taugt dieses Board echt überhaupt nicht für ein sparsames Setup. Messaufbau: Die beiden M.2 unter dem Board sind gut zu erreichen: BIOS-Einstellungen: Beide Boards erkannten übrigens problemlos 2x 48GB Module.


 3 points
 -
Hm ok, mit Durchschnittswerte kann ich nicht dienen. Aber falls es wen interessiert: - Intel Core i3 12100 - MSI B760I ITX Edge Wifi DDR4 - 2x 16GB Crucial DDR4-2666 - 1x Kingston A2000 500GB NVMe - EIST/C1E (C10) - ASPM - ErP aktiv (Turbo / Speedshift deaktiviert) - Sound & WLan deaktiviert - Arctic P12 PWM (300U/Min) - nur Netzwerk angeschlossen Edit: zusätzlich 3 Toshiba MG08ACA16TE HDDs angeschlossen (Spindown). Edit2: div. Docker wie HomeAssistant, MQTT, Plex, SABnzbd, Heimdall etc aktiv


 3 points
 -
https://forums.unraid.net/topic/98978-plugin-nvidia-driver/?do=findComment&comment=9132502 points
-
I'm a little confused with the new primary and secondary storage and how the mover will work with these. In unRAID it states this Does this still work the same way it used to? I want new files to be written to the cache drive then when the mover gets invoked the files get written to the array and stay there. The way I read the new descriptions it sounds like you pick where you want the files stored primarily and moved back and forth between primary and secondary based on disk space. This sounds like the old "Prefer Cache", where the files are stored on the cache drive unless the cache is full then moves to array, then when there is room on the cache drive again it moves back.1 point
-
it to enforcer docker root access to write when starting a new docker. it is not always needed. it more permission setting and controls. Will need to re look at squids info on that option for more info. https://github.com/binhex/documentation/blob/master/docker/faq/unraid.md more to grant the docker otehr host access such as network devices or gCards need for other use within the docker unRAID Docker FAQ Q1. What does the Privileged check-box do? A1. The Privileged checkbox allows the Docker Container to perform certain privileged activities, these are typically required for additional networking functions, such as creating/editing virtual adapters1 point
-
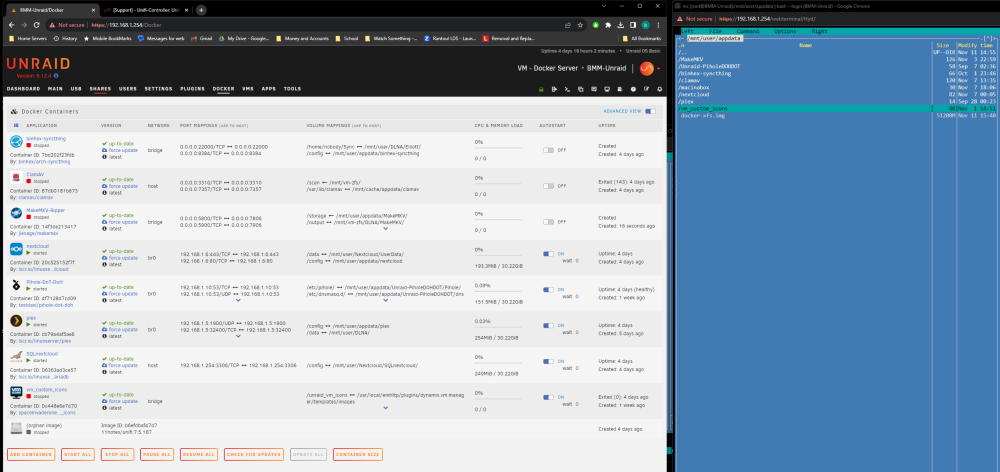
Purged folders in appdata. Removed docker and images. Removed template: *Kept old img of working to restore to for testing as this is also a test for updates to come in the future. To the app install page: with my added changes to add mac hostname and use custom br0 instead of bridge gets me a webpage: Will now test for restore. Restore stilll breaks and stops docker: lets see if it restored? Rstore sucessfull: so in changing tags / updates may need to do the backup restore method to move. If editing outside the XML! now to stop docker and readded old firmware and backups. and it boots and I see my backups and firmware... so now the question if there is existing data for future build release and updates how to maintain and update to move?


 1 point
 -
For what it's worth, while the standard email response to any inquiry to Support might say up to 48 hours, in truth our response time worst case averages up to about 3 hours 24 hours a day. The goal is one hour response. Majority of tickets are handled within an hour ish. Licensing (ie: key transfers) are the priority tickets. For what its worth, our support department is staffed 365 days a year. This includes the major holidays. EG: If you email support because your server needs a license transfer on Christmas day you will get a replacement that day. By and large, the automated system for transferring does work well for 99% of the users, and further improvements are also in the works.1 point
-
If I'm reading this correctly. You want us to use the unraid tag so change repository from 11notes/unifi:7.5.187 to 11notes/unifi:7.5.187-unraid getting ready to move tag container to remain in stable branch.1 point
-
Das kannst Du selbst ganz einfach herausfinden: Guck in der ZIP Datei in den SMART Ordner und öffne die Datei der gewünschten Platte. Suche die o.a. Zeile mit den CRC Werten.1 point
-
Just got my first UniFi access points and installed your container. So, nothing to restore, but worked absolutely perfectly. Thank you very much for creating this easy-to-use container, it's much appreciated!1 point
-
Ich habe mit SFF auf SATA Krakenkabeln ab ca. 14 Euro aufwärts nie diese Probleme gehabt. Egal ob nun Neuware von Delock oder gebraucht oder auch neu beim ebay Händler (immer nach Preisen sortiert). Wenn Du Qualitaet haben willst, sind gebrauchte Kabel von prof. Serversystemen eine gute Wahl (von entsprechenden Secondhand Händlern). Da sind dann auch einige ungewöhnliche Stecker und Längenkombinationen möglich, die man sonst auf dem Markt nicht günstig bekommt. Wenn Du schon mehrere (korrekt verdrahtete) durchprobiert hast und bei allen diese Fehler ansteigen, liegt das Problem nicht direkt in den Kabeln. Kontaktschwierigkeiten bei den Steckverbindern?1 point
-
oder du hast auch das mover tuning plugin installiert und Regeln eingestellt das erst ab xy % sich was bewegt ...1 point
-
diagnostics The zip file will be saved into /logs on the flash drive1 point
-
I installed it this afternoon and so far it works without problems. I had the same version 7.5.187 on unifi-controller which I restored from a 60 day backup. Great work!
 1 point
 -
Thanks for the quick fix, awesome work as always!1 point
-
+1+1 已解决1 point
-
Install per directions without any issues. Restored from backup, waited 5 minutes and restarted, came up just like the old one. Looks good so far no issues and everything seems to be working. Great Job!1 point
-
This is not a supported scenario unfortunately. I think the closest you will get is if you are using a ZFS pool and the ZFS arc is being used to cache recently accessed files. However the ZFS support is new and still evolving with Unraid so no idea if there are 'gotchas' that I am not aware of.1 point
-
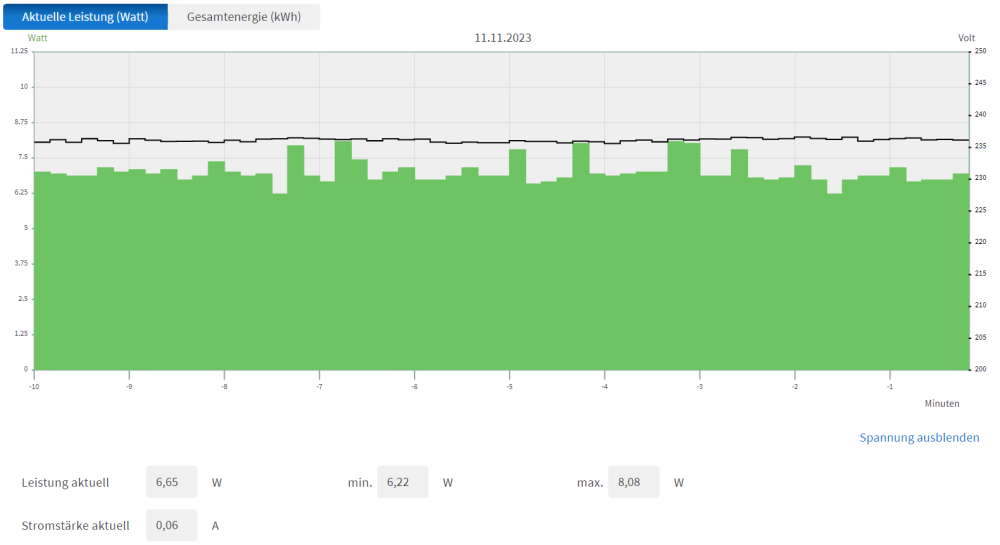
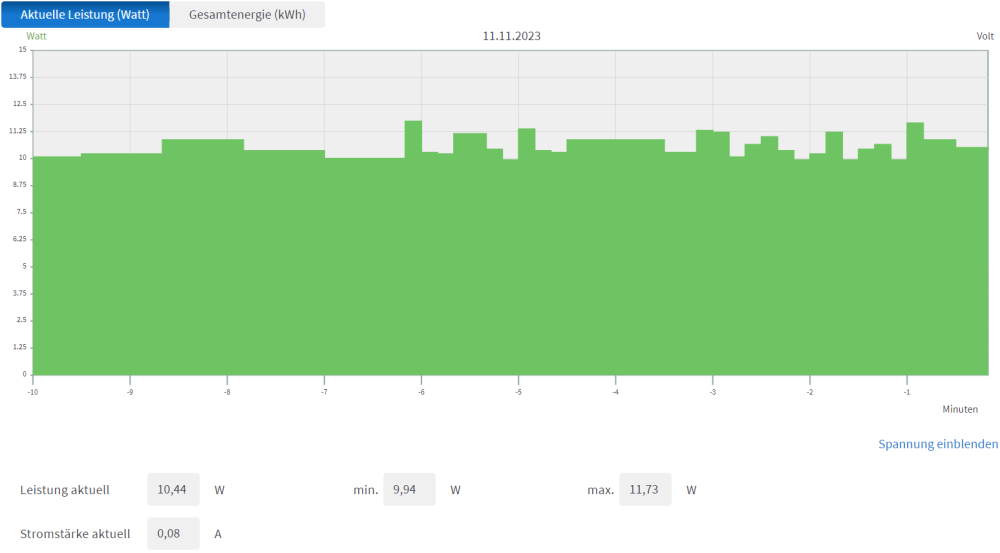
Ich warte immer 5 Minuten und der Durchschnitt, der dann anliegt, ist mein Messwert. Also ich nehme nicht die kleinste Zahl, die irgendwann zufällig erreicht wurde.1 point
-
Already added by @Findthelorax.1 point
-
The should not cause any issues. I take it one step further. I have a share for each media type so my host paths are mnt/user/movies, mount/user/photos, mount/user/tv, etc. Of course, this requires a host path --> container path mapping for each share/media type. In the case you presented, you could have just one host--->container mapping like /mnt/user/media-->/media and then in Plex your library mappings would be /media/[media type folder name] e.g. /media/movies for movie content.1 point
-
Just wanted to offer a word of thanks for putting this together. I had a reasonable SMB extras config, but hadn't done the nsmb.conf on the Mac side, and the combination is helping with some large directory issue I've been dealing with in a couple of cases. So - thanks - great work!1 point
-
Thanks for the explanation @Rysz and the hints with your settings @tormi. A reboot, reset config and then start the service with manual config worked for me. It runs as expected now. Thank you again 🙂1 point
-
jetzt funktioniert es. 👍 Danke für die Hilfe. Lages vielleicht an dem nicht vorhandenem Ordner? Jedenfalls klappt es.1 point
-
Same for me on 6.10.3!1 point
-
Thanks a lot for sending me the NUT debug packages with your respective configurations. I've just compared the two configurations and it seems the NUT Scanner (= "Auto Config") misdetected either your USB port's information or UPS device's information. As a consequence, particularly by writing that wrong information into the configuration file, the UPS driver then only tried connecting to a UPS with said wrong information (and not all other possible UPS combinations it otherwise knows). That's unfortunately one of the pitfalls when using "Auto Config". It aids detection, but makes the UPS driver "blind" to any other UPS devices it would usually otherwise know. I'll have to put this as a warning message somewhere, for more tricky UPS devices or UPS detection scenarios like yours. To further illustrate this, here we have the old ups.conf configuration (with "Auto Config"): driver = "usbhid-ups" port = "auto" vendorid = "06DA" productid = "FFFF" product = "Offline UPS" serial = "000000000" vendor = "PPC" bus = "001" device = "029" busport = "009" And this is the working new ups.conf configuration (without "Auto Config"): driver = usbhid-ups port = auto When all those vendorid, productid, bus, device, ... parameters are not given to the UPS driver it basically starts lock-picking all possible other combinations of any UPS devices it otherwise knows, instead of just trying that one UPS device that NUT Scanner (= "Auto Config") has given to it. That seems to have been successful in your case, by not pinning the UPS driver onto a specific USB port or UPS device it managed to autodetect it somehow else straight away. But in other cases it would need exactly that information we've now dropped to detect the UPS in the first place - so it remains a double-edged sword. So in your case please do not use "Auto Config" for that UPS (it doesn't seem to work well in this specific case) and best don't change any of the UPS Driver Settings anymore now that it works. It should then continue working even after a system reboot. 🙂 Users with similar troubles I would recommend to attempt "Reset Config" and then not use "Auto Config" straight away, but instead try their respective UPS Driver with UPS Port set to auto first.1 point
-
I am using an i7-9700 and the HW-transcoding performance (iGPU) under Plex is excellent - also for 4K 👍 Power consumption is not high (45W-70W) See my signature for the whole setup1 point
-
Hmm was digging around a bit and happen to come across this post on reddit:- which then lead me to this repo, as you can see it was last updated 2 days ago and looks like the guy has releases working correctly:- https://github.com/nzbgetcom/nzbget1 point
-
Do you have a parity disk?1 point
-
Ich hatte nur dem Thread-Ersteller geantwortet. So unter uns: Ich hatte auch anfangs über MD5 Verfahren nachgedacht. Als alter Entwickler hätte ich das aber selbst gebaut. Später habe ich mich dagegen entschieden. Bisher - ToiToiToi - nach 15 Jahren, 3 Servern, knapp 80 Festplatten, ist noch nicht eine Differenz beim Sync aufgetreten, die sich nicht durch Stromausfall oder defekte Kabel erklären ließen. Mittlerweile bin ich, was das Thema angeht, völlig entspannt.1 point
-
Nur zur Vollständigkeit: Ich meinte wirklich Checksummen nicht die Quersumme. Ich meinte nicht die Funktion der Parität, sondern die Information ob eine/viele Datei/en noch dem gewünschten Zustand/Original entsprechen. unraid selber hat keine Möglichkeit mitzuteilen ob sich eine Datei zu einem vorherigen Zustand verändert hat. Das kann man schnell mit Checksummen machen. Stichworte: Bitrot, Verschluesselungstrojaner, Bedienfehler, etc... Viele Backupprogramme und auch diverse Packer erzeugen Checksummen um den Inhalt schnell zu prüfen und einen defekten Daten/Imagestand zu testen/erkennen.1 point
-
Mit Ausfall meinte ich den Ausfall einer (bzw. 2) Festplatten/Datenträger im Array. Thema Checksummen: Checksummen können aber nur zeigen, ob es dem gechecksummten Zustand entspricht. Nicht reparieren! Somit weiß man wenigstens ob die Dateien okay oder verändert sind. a) im Appstore gibt es dazu ein Plugin, bei dem ich aber auch 'bedenkliche Anzeigen' gestoßen bin, die mir vom Autor nicht erklaert werden konnten/wollten. Wodurch ich dem Plugin nach längeren Tests nicht mehr vertraute und es wieder entfernt habe. b) ich erstelle von meinen Dateisammlungen (die mir wichtig sind) per Windowsbatch checksummen (md5) und lege sie auch auf der jeweiligen Festplatte mit ab. Sporadisch, bei fraglichem Datenstand der Festplatten oder nach Hardwareumbauten lasse ich die Checksummen auch überprüfen. So finde ich recht schnell ob sich zu dem vorher gechecksummten Zustand eine Veränderung ergeben hat. Sollte das der Fall sein, schlägt die Stunde der Backups um dort die (hoffentlich noch unveränderten) Dateien zu nehmen und dem Datenbestand wieder zuzufügen. Hier ein Screenshot, wie das dann in dem jeweiligen Verzeichnis mit einer Checksummendatei aussieht: Und hier das Plugin, welches sich selbstständig um sowas kümmern will, bei der ich aber zu viele unbeantwortete Fragen erlebt habe (trotz Anfragen im Supportbereich dazu):

 1 point
 -
Also um den "Fehler" erstmal weg zu bekommen, hilft nur ein Parity Check (mit aktivierter Korrektur). Dabei werden nicht die Daten geschrieben, sondern nur die Parität. Geht also nichts bei kapput. Das andere Problem ist das "kann nicht runterfahren" und "erzwungener Neustart". Bei "kann nicht runterfahren" ist normalerweise irgendeine Datei blockiert. Du sagst, Du hast keine VMs und nur einen Docker? Dann versuche beim nächsten Mal den Docker vorher von Hand zu beenden und schaue dann. Auch hilft das Plugin "open Files", es zeigt Dir an, welche Dateien gerade in Benutzung sind. Wie schon von anderen empfohlen sollte man das Zeitlimit vom erzwungenen Neustart hochsetzen zur Sicherheit. Und zu guter Letzt: es gibt auch SATA Controller, mit denen Unraid so seine Probleme haben. Sie verändern die Daten noch nachdem die Parität geschrieben wurde und erzeugen bei jedem Neustart Paritätsfehler. Aber meist nur so 5 bis 8 und auch meist immer dieselben Sektoren. Überprüfe, ob Deine Hardware von dem Problem betroffen ist.1 point
-
mal den timeout erhöht ? wenn die Platten älter sind ... brauchen die ggf. etwas länger ... und wenn dann noch mehrere drin sind ... steht Standard auf 90 Sekunden oder so ...
 1 point
 -
非常感谢,问题已经解决,高兴😄1 point
-
Yes, but the definite answer can give @domrockt1 point
-
If you have checksums that is the way to confirm whether any files that are corrupt. If you are using btrfs or ZFS as the format of drives in the array these format have built-in check-summing of files. However XFS is more frequently used on array drives as it is more performant and less prone to file system corruption.1 point
-
No practical way to find what files might be affected (if any). Since the write order is data drives before parity then as long as you do not have a hardware error you have to assume it is the parity drives that are out of sync. The remedial action is to run a correcting parity check. This should report the same number of ‘errors’ but it corrects them so that subsequent checks should find 0 errors.1 point
-
More specifically it was meant to prepare for an eventual change where the "Array" will no longer be a separate required thing. Instead what is now the "Array" will be just another type of "pool" that can be created along side the existing BTRFS, ZFS, and XFS "cache pool" types. Ideally when implemented the mover will be able to move files between any two pools, essentially allowing any pool to cache data for any other pool. It also makes it clearer that pools are not just for caching data, that they can be used for other things where data lives only on the pool.1 point
-
It was changed to make it easier to underatand for new users.1 point
-
So, you’re saying you will not go into the go file & add the short script that’ll take you a couple seconds? If you can’t do that. Then okay. Not be rude or anything, we can’t help you if don’t add it in. All of us were able to get working & it’s great! I, myself, suggest adding it in, but again. It’s up to you if want to or not.1 point
-
I would suggest a better solution is: copy across the config/plugins/dockerMan/templates-user/*.xml files for the moved containers to the flash on the new server. This means you can now restore these containers via Apps->Previous Apps with previous settings copy across the appdata container folders for the containers to be moved to the appdata share on the new server. use Apps->Previous Apps to re-install the containers. You can check for each one that the settings are still correct for the new server.1 point
-
Yes had been using flubsters repo since shrmn/gsdock had this bug (https://github.com/shrmnk/gsdock/issues/93). I was not able to activate my account. Now flubster has a very old version of gsdock. Hence I have crated my own docker "sonnyck/gsdock" just replace this in the repo and then let it update. The image is the most recent one released by GoodSync. Git Link: https://github.com/cksonny/gsdock Docker Link: https://hub.docker.com/r/sonnyck/gsdock/1 point
-
Thanks for the feedback. That's a beefy CPU and should never be maxed out when all VMs are just idling. I wish unraid team just implemented these fixes into the image, but VMs is probably not the main focus of unraid.1 point
-
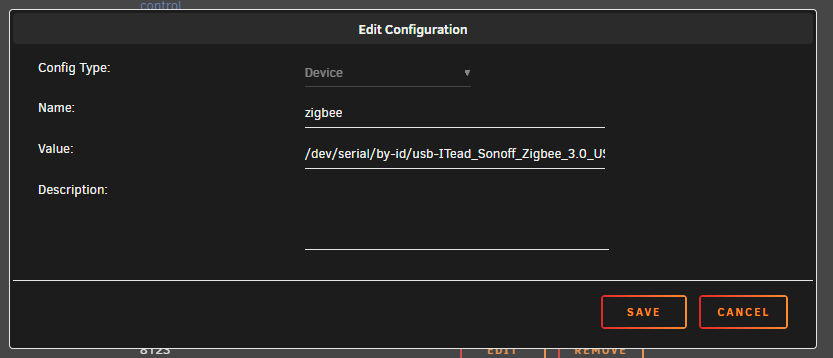
the best method to passthrough usb to docker is via device by-id open unraid terminal type ls -l /dev/serial/by-id you will get output of your devices with names copy the whole BLUE name of your device go to your docker and edit config add /dev/serial/by-id/ before pasting the name from above. eg /dev/serial/by-id/usb-ITead_Sonoff_Zigbee_3.0_USB_Dongle_Plus_dcf756dbb712ec118bca20c7bd930c07-if00-port0 then add :/dev/zigbee to the end - this is the container mount point so you end up with this in your Docker Host config: /dev/serial/by-id/usb-ITead_Sonoff_Zigbee_3.0_USB_Dongle_Plus_dcf756dbb712ec118bca20c7bd930c07-if00-port0:/dev/zigbee if anywere inside your docker program it asks for the device location you would set it to : /dev/zigbee

 1 point
 -
+1 and API for remotely managed server seems like it should be a core feature!1 point
-
Can you post the VM's xml? I always edit the xml directly as the UI is making changes that aren't proper, I only use the UI for the initial VM setup. There is an issue in 6.9.2, not sure in newer versions of Unraid, that the video and audio parts are not passed properly via the UI, you need to manually edit the xml. Here's mine: <hostdev mode='subsystem' type='pci' managed='yes'> <driver name='vfio'/> <source> <address domain='0x0000' bus='0x85' slot='0x00' function='0x0'/> </source> <rom file='/mnt/user/isos/vbios/HP.RTX3090.24576.210310.rom'/> <address type='pci' domain='0x0000' bus='0x00' slot='0x04' function='0x0' multifunction='on'/> </hostdev> <hostdev mode='subsystem' type='pci' managed='yes'> <driver name='vfio'/> <source> <address domain='0x0000' bus='0x85' slot='0x00' function='0x1'/> </source> <address type='pci' domain='0x0000' bus='0x00' slot='0x04' function='0x1'/> </hostdev> You will need to edit the xml, add "multifunction='on'/>" on the 1st device, which is the video portion of the card, and note the slot and function. You then modify the 2nd device, which is the audio portion of the card, to the same slot but with function '0x1'. So "bus='0x85' slot='0x00' function='0x0'" translates to 85:00.0. And "bus='0x85' slot='0x00' function='0x1'" translates to 85:00.1. Is the VM stable when you don't pass the GPU?
 1 point
 -
This indicates a CRC error, 9 times out of 10 it's a bad SATA cable.1 point
-
Hi Rilles, go to /boot/config/go if your on windows open it with notepad++ Then add this cp /boot/config/keyfile /root/keyfile then save it then when the server boots it should copy the key file to /root/keyfile to check you can open a terminal and type "ls" it should say keyfile if so you are good to go also make sure your USB Unassigned device drive has the same encryption key as your array other wise it won't mount hope this helps....JP1 point


.thumb.png.be164f033db8d95a276f87ef63ff8430.png)