Leaderboard


Popular Content
Showing content with the highest reputation on 03/11/21 in Posts
-
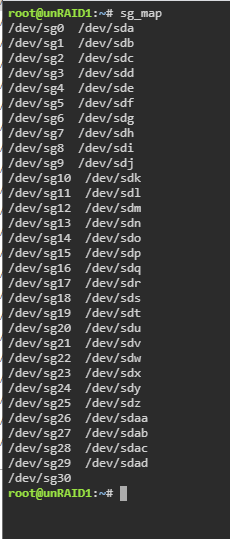
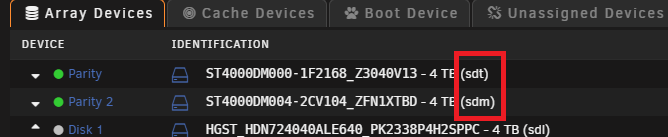
NOTE: There's a TL;DR section at the end of this post with required steps People with specific Seagate Ironwolf disks on LSI controllers have been having issues with Unraid 6.9.0 and 6.9.1. Typically when spinning up the drive could drop off the system. Getting it back on would require checking, unassigning, reassigning and rebuilding its contents (about 24 hours). It happened to me three times in a week across two of my four affected drives. The drive in question is the 8TB Ironwolf ST8000VN004, although 10TB has been mentioned, so it may affect several. There have been various comments and suggestions over the threads, and it appears that there is a workaround solution. The workaround is reversible, so if an official fix comes along you can revert your settings back. This thread is here to consolidate the great advice given by @TDD, @SimonF, @JorgeB and others to hopefully make it easier for people to follow. This thread is also here to hopefully provide a central place for those with the same hardware combo to track developments. NOTE: Carry out these steps at your own risk. Whilst I will list each step I did and it's all possible within Unraid, it's your data. Read through, and only carry anything out if you feel comfortable. I'm far from an expert - I'm just consolidating valuable information scattered - if this is doing more harm than good, or is repeated elsewhere, then close this off. The solution involves making changes to the settings of the Ironwolf disk. This is done by running some Seagate command line utilities (SeaChest) explained by @TDD here The changes we will be making are Disable EPC Disable Low Current Spinup (not confirmed if this is required) The Seagate utilities refer to disks slightly differently than Unraid, but there is a way to translate one to the other, explained by @SimonF here I have carried out these steps and it looks to have solved the issue for me. I've therefore listed them below in case it helps anybody. It is nowhere near as long-winded as it looks - I've just listed literally every step. Note that I am not really a Linux person, so getting the Seagate utilities onto Unraid might look like a right kludge. If there's a better way, let me know. All work is carried out on a Windows machine. I use Notepad to help me prepare commands beforehand, I can construct each command first, then copy and paste it into the terminal. If you have the option, make these changes before upgrading Unraid... Part 1: Identify the disk(s) you need to work on EDIT: See the end of this part for an alternate method of identifying the disks 1. Go down your drives list on the Unraid main tab. Note down the part in brackets next to any relevant disk (eg, sdg, sdaa, sdac, sdad) 2. Open up a Terminal window from the header bar in Unraid 3. Type the following command and press enter. This will give you a list of all drives with their sg and sd reference sg_map 4. Note down the sg reference of each drive you identified in step 1 (eg, sdg=sg6, sdaa=sg26, etc.) There is a second way to get the disk references which you may prefer. It uses SeaChest, so needs carrying out after Part 2 (below). @TDD explains it in this post here... Part 2: Get SeaChest onto Unraid NOTE: I copied SeaChest onto my Flash drive, and then into the tmp folder. There's probably a better way of doing this EDIT: Since writing this the zip file to download has changed its structure, I've updated the instructions to match the new download. 5. Open your flash drive from Windows (eg \\tower\flash), create a folder called "seachest" and enter it 6. Go to https://www.seagate.com/gb/en/support/software/seachest/ and download "SeaChest Utilities" 7. Open the downloaded zip file and navigate to Linux\Lin64\ubuntu-20.04_x86_64\ (when this guide was written, it was just "Linux\Lin64". The naming of the ubuntu folder may change in future downloads) 8. Copy all files from there to the seachest folder on your flash drive Now we need to move the seachest folder to /tmp. I used mc, but many will just copy over with a command. The rest of this part takes place in the Terminal window opened in step 2... 9. Open Midnight Commander by typing "mc" 10. Using arrows and enter, click the ".." entry on the left side 11. Using arrows and enter, click the "/boot" folder 12. Tab to switch to the right panel, use arrows and enter to click the ".." 13. Using arrows and enter, click the "/tmp" folder 14. Tab back to the left panel and press F6 and enter to move the seachest folder into tmp 15. F10 to exit Midnight Commander Finally, we need to change to the seachest folder on /tmp and make these utilities executable... 16. Enter the following commands... cd /tmp/seachest ...to change to your new seachest folder, and... chmod +x SeaChest_* ...to make the files executable. Part 3: Making the changes to your Seagate drive(s) EDIT: When this guide was written, there was what looked like a version number at the end of each file, represented by XXXX below. Now each file has "_x86_64-linux-gnu" so where it mentions XXXX you need to replace with that. This is all done in the Terminal window. The commands here have two things that may be different on your setup - the version of SeaChest downloaded (XXXX) and the drive you're working on (YY). This is where Notepad comes in handy - plan out all required commands first 17. Get the info about a drive... ./SeaChest_Info_XXXX -d /dev/sgYY -i ...in my case (as an example) "SeaChest_Info_150_11923_64 -d /dev/sg6 -i" You should notice that EPC has "enabled" next to it and Low Current Spinup is enabled 18. Disable EPC... ./SeaChest_PowerControl_XXXX -d /dev/sgYY --EPCfeature disable ...for example "SeaChest_PowerControl_1100_11923_64 -d /dev/sg6 --EPCfeature disable" 19. Repeat step 17 to confirm EPC is now disabled 20. Repeat steps 17-19 for any other disks you need to set 21. Disable Low Current Spinup...: ./SeaChest_Configure_XXXX -d /dev/sgYY --lowCurrentSpinup disable ...for example "SeaChest_Configure_1170_11923_64 -d /dev/sg6 --lowCurrentSpinup disable" It is not possible to check this without rebooting, but if you do not get any errors it's likely to be fine. 22. Repeat step 21 for any other disks You should now be good to go. Once this was done (took about 15 minutes) I rebooted and then upgraded from 6.8.3 to 6.9.1. It's been fine since when before I would get a drive drop off every few days. Make sure you have a full backup of 6.8.3, and don't make too many system changes for a while in case you need to roll back. Seachest will be removed when you reboot the system (as it's in /tmp). If you want to retain it on your boot drive, Copy to /tmp instead of moving it. You will need to copy it off /boot to run it each time, as you need to make it executable. Completely fine if you want to hold off for an official fix. I'm not so sure it will be a software fix though, since it affects these specific drives only. It may be a firmware update for the drive, which may just make similar changes to above. As an afterthought, looking through these Seagate utilities, it might be possible to write a user script to completely automate this. Another alternative is to boot onto a linux USB and run it outside of Unraid (would be more difficult to identify drives). *********************************************** TL;DR - Just the Steps I've had to do this several times myself and wanted somewhere to just get all the commands I'll need... Get all /dev/sgYY numbers from list (compared to dashboard disk assignments)... sg_map Download seachest from https://www.seagate.com/gb/en/support/software/seachest/ Extract and copy seachest folder to /tmp Change to seachest and make files executable... cd /tmp/seachest chmod +x SeaChest_* For each drive you need to change (XXXX is suffix in seachest files, YY is number obtained from above)... ./SeaChest_Info_XXXX -d /dev/sgYY -i ./SeaChest_PowerControl_XXXX -d /dev/sgYY --EPCfeature disable ./SeaChest_Configure_XXXX -d /dev/sgYY --lowCurrentSpinup disable Repeat first info command at the end to confirm EPC is disabled. Cold boot to make sure all sorted.
 3 points
 -
Came from 6.9-beta-35 I had some issues where my drives wouldn't spin down using 6.9.0 with Auto Fan. Updated to 6.9.1 and I haven't had any issues that I can notice. I made sure all my dockers and plugins are up to date along with the Nvidia plugin and shut everything down, rebooted and so far everything is green or spun down just like I like it.2 points
-
Again not Asus, if you are man enough then go pfsense, I'm using a Qotom silent passively cooled unit and it is simply fantastic! I believe it can do symmetrical gigabit encrypted, best £280 aid I've ever spent £180.12 16%OFF | Qotom Mini PC with Core i3 i5 i7 processor and 4 Gigabit NICs, AES-NI, RS232, Fanless Mini PC PFSense Firewall Router https://a.aliexpress.com/_m0fcObV Sent from my iPlay_40 using Tapatalk2 points
-
To second this, I tried it last night and it seems to be going well. It was easier than I was expecting. I'm just creating a General Support post collating the entries spread across the 6.9.0 & 6.9.1 topics and including the resulting step-by-steps that I took if you don't mind.2 points
-
After doing some digging I believe I have solved my issue. It seems like it is somewhat a known bug on Asus X99 motherboards. Mine is an Asus X99-WS/IPMI. I am on the latest BIOS so updating was not an option. The solution was to add "pcie_aspm=off" to my syslinux configuration. After a reboot I appear to no longer be getting errors. Fingers crossed it stays fixed. If anyone has anything to add feel free to chime in. If I don't have any errors tomorrow morning I'll mark this solved.2 points
-
Done and done. And yeah - totally a 1% problem to have. It's just such a pretty card though...
 2 points
 -
You have a old template and it will always add the ports on a container update. Eventually try to delete the container (note your existing settings down) and pull a fresh copy from the CA App and set it to the same values as before so this won't happen any more...1 point
-
Well, carp. It appears that my front-of-case USB3 ports are non-functional. I plugged the dock into the USB2 port and it showed right up. Now to wriggle around behind the case and plug it in the back - I am not waiting for an 8TB drive to preclear via USB2...1 point
-
This has not been working since 6.4.0 at least (when bzmodules was introduced). I put some effort into retrofitting it to 6.8 but it ended up not being feasible. With the changes in 6.9 it might be feasible again - I may have a look when I have some time (assuming no one does it sooner 🙂 ). EDIT: I misspoke. I don't see that the 6.9 changes make this approach more feasible. bzmodules is still separate and needs to be pulled from the USB drive before hard drives can be accessed. This means that the only thing that can be read from HDD during bootstrap is the bootstrap code and the kernel data set (bzimage). Since no HDD access is built into that set, further bootstrap must read from USB. If anyone wants to further play with that, there's an unfinished version at https://github.com/doron1/unRAID-bzoverlay . Play at your very own risk 🙂1 point
-
Updating my PuTTY client from 0.62 to 0.74 seems to have done the trick. I guess that makes the SSH updates a GoodThing™.1 point
-
I'd heard of unRAID from various places, but had been rocking a Synology NAS since about 2016. It suited my needs absolutely fine, but I had been pushing it more and more as of late. The final straw came when some docker containers stopped working due to the kernel being too old. I had thought about building a new NAS myself off and on over the years, but this felt like the right time. I looked into several solutions and settled on giving unRAID a go. The trial made it an easy choice. I built my new machine and fired up unRAID last night to play about with it. This evening I bought a license. I have never been more impressed with how easy and how seamless everything has been so far. I'm actually a little bit in shock at how well everything has worked, from assembling my hardware to getting things like Plex hardware transcoding working. I thought DSM was impressive for ease of use, but unRAID is next level. Easiest $129 I've ever spent.1 point
-
Es gab Lesefehler auf sdf. Welches Laufwerk das ist, siehst du in der Übersicht.1 point
-
...ziemlich sicher, zB https://www.google.com/url?sa=t&source=web&rct=j&url=https://forums.servethehome.com/index.php%3Fthreads/supermicro-x11sc-f-igpu-support.23410/&ved=2ahUKEwin6ITj7qjvAhUCzaQKHeiSBh8QjjgwAXoECAYQAg&usg=AOvVaw2hJLakB1O4WIM1Ddd57eil Gesendet von meinem SM-G960F mit Tapatalk1 point
-
Bonjour, Olivier , 51 ans / romans sur isère responsable réseau pour une communauté religieuse. Je découvre Unraid et cela donne pas mal d'idées. Merci pour ce forum francophone. A très vite😀1 point
-
@ich777 Okay so i figured out the issue so plex was working the whole time its only the some of my stuff was being transcoded and some was not depending on codec.1 point
-
cool ill give that a try1 point
-
I'm not running a b550, but a x570 board. It's my second x570 board. I also had a few conversations with b550 users. From my expierence, take a look on different boards and look for the ones that do seperate the devices in iommu groups in a good way. But keep in mind that a bios update can change everything in that matter. Also I don't recommend to bind usb controllers to vfio on boot. Just leave them as they are and attach your usb devices as you want. Then, take a look on the site for system devices and make sure that all devices needed for vm's are seperated from the controller handling the unraid stick. You maybe need to switch certain devices to different ports. Finally add the controller(s) to your vm's and enjoy. There should be no problem as the controllers do support flr.1 point
-
Never noticed. But, any/all files I've got that are over 4GB would be media files, and I'm not too worried about anything infecting them since it would simply cause display corruption. I do worry about executable files, and if they're over 4GB in size then there's obviously something very wrong with how they're programmed.1 point
-
Yeah, there is a partial outage over the last 2 days.1 point
-
Ich werd mir das dann gleich ansehen.1 point
-
Thank you for this plugin!1 point
-
Au final c'est ok : L'erreur était là : Https 192.168.0.5 : 8123 Le S était en trop Et j'ai viré de mon fichier de config les lignes ssl key et certificat.... En tous cas, ça fonctionne ! Merci pour l'aide 🙂1 point
-
You also have to install ValheimPlus to your local game installation, instructions on how to that are here: Click1 point
-
Thanks for the response, the docker engine was actually stopped already as well as vm manager per the guide. I did manage to overcome this and regain access by shutting down the server. removing the flash drive and finding the network.cfg file and playing with that. Eventually i downloaded the Unraid 6.9.1 package and restored the default editing the ip address for the server as defined by the network. This gave me access again to the GUI.1 point
-
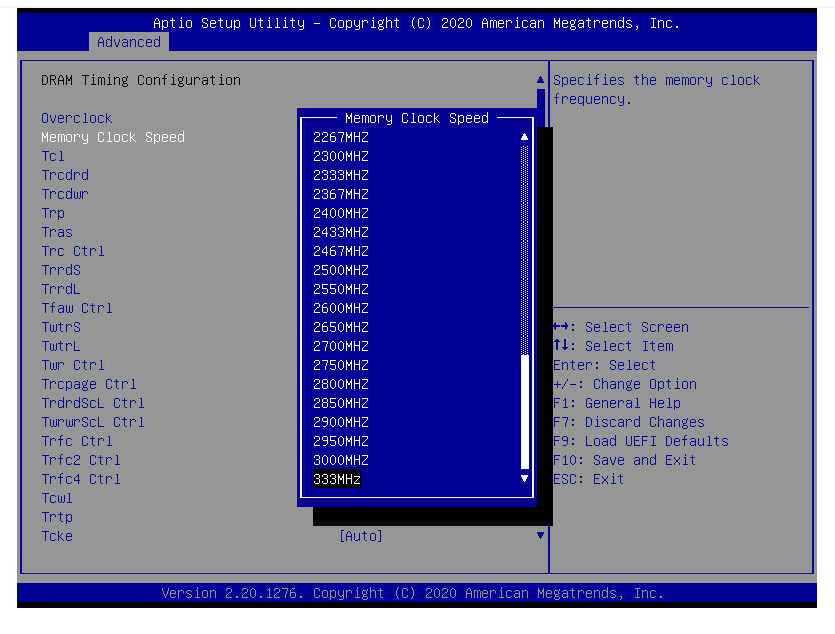
Memory Speed settings in Bios: Since the system is super stable I dont mind to change these settings. However, the memory is recognized as DDR4-3200 in the Bios main screen. Regarding SSDs - I'll try to explain it simple, but if you have more general questions I suggest you post the the general support section. As you can see in my earlier post I have 6 SSDs in two "pools". The small pool is a raid 1, the large pool a raid 10. Once I had my harddisk up and running I created several shares like you can see below. For each share I configured how to make use of the SSD caches. For some shares I dont need caching (NO), for some I want the data to "preferably" reside on the SSD if there is enough space on the SSD (e.g. for my VMs). And for some shares I decided to first write on cache, but once the mover kicks in at night the data gets moved to the harddisks and will be removed from the cache (Yes: Cache or XCache). There is also a "Only" option which means you keep data only on the cache but I see a risk here, should you run out of cache space, especially when the cache drive is shared between shares hence I changed that to "prefer" so data can overflow to the harddisk if a cache runs out of space. So, depending on the purpose you can configure your shares to make use of an SSD cache or not and to what extend. If you have two shares (VM and Data), you could configure the VM share to keep the data on the SSD (Prefer:Cache) and for example to only keep new files on the SSD for the Data share, until the mover gets invoked (Yes:Cache). However, this probably will only benefit you when you copy large amount of data to your UnRaid host over a network connection that can exceed the harddisk write speed (More than 100 - 130MB/Sec). There might be also other reasons to cache data drives, but that could be explored in a separate post :). My network is Gbit / Gbit WIFI and the UnRaid is bonded with 2x1GBit to the network. I dont use a special router since my Internet connection is just a 100Mbit connection. Hope that helped.
 1 point
 -
Or just disable the built-in nic in the BIOS, unless your switches support failover, bonding etc.1 point
-
In another forum a user reports, that above P16 SATA1-Speed-Drives aren't detected. That explains why my old Fujitsu setup worked (not flashed at all). Doesn't bother me except the time I've invested, since the old 2,5 drives are test-drives to learn about ZFS.1 point
-
I didn't know SATA1 wasn't supported, good catch though. Make sure to try all the breakout cable ports, check the drive works in both 2 SAS ports and each breakout sata works. If it does then the SBR you've got flashed is the correct one.1 point
-
Alright, yesterday's version was a bit overkill, I turned it down a little and ended up with this: #!/bin/bash for ((N=0; N<5; N++)) do dd if=/dev/sdc of=/dev/null skip=$(($RANDOM % 4*1024*1024*1024)) bs=$((1024 + $RANDOM % 1024)) count=10 &> /dev/null dd if=/dev/sde of=/dev/null skip=$(($RANDOM % 4*1024*1024*1024)) bs=$((1024 + $RANDOM % 1024)) count=10 &> /dev/null done So 5 rounds (per disk) of reading 10 random blocks of a size between 1 and 2 kb, skipping up to 4*2^9 blocks, so that should if I'm not mistaken cover the first 8tb of my 10tb disks, way too much to be cached, with relatively little read activity. Works perfectly fine so far.1 point
-
Unfortunately, I don't have another Nvidia card lying around. This was the only graphics unit in my unraid build, since I opted for a cpu without iGPU. It turns out that after trying the card on a windows machine, none of the Nvidia drivers actually work, even when going back as far as v353, they just turn a black screen, so unless I'm misunderstanding, there is probably something fundamentally wrong with the card. Installing the drivers just throws errors and doesn't actually run other than a rudimentary display via microsoft compatible drivers. I remember a few years back the card used to work properly on that machine, so the card probably got messed up since then. But the card is still good to use to watch unraid booting and changing bios settings so there's that. Thanks for all your help in diagnosing this with me. I should have caught that the graphics card itself was problematic by testing it with the nvidia drivers in Windows beforehand rather than assuming it worked because it was detected by windows and unraid. Hopefully I'll be able to get a new Nvidia card soon so I can finally make use of your awesome plugin!!1 point
-
Die Auflösung von VNC erhöhst du, in dem du den Treiber installierst. Der ist in dem libvirt Paket, was du vermutlich als CD Laufwerk siehst.1 point
-
My TVs are connected to 5 GHz wireless, there is enough bandwidth for direct streaming. On another note, I have decided not to bother doing the hardware upgrade later, so I ordered new Motherboard, CPU, PSU and RAM. Motherboard: ASRock X570 Phantom Gaming 4 CPU: AMD Ryzen 5 2400G (I wanted a 3400g but it's nowhere to be found where I live) PSU: Corsair RM850 2019 - 12 SATA connectors RAM: Corsair Vengeance LPX 32GB (2x16), DDR4, 3000MHz A couple USB 2.0 sticks for Unraid. They should all arrive tomorrow. This way I will be able to use both nVME SSDs as well as the 2x 500 GB SATA SSDs I bought. The SSDs as well as the new HDDs are already installed in the case. The LSI controllers also arrived at customs yesterday, waiting for processing. I'm pretty excited about the whole thing, it's my first time using Unraid, and I guess I'll mess up a few things, but in the end it's a learning process. Thank you all for your replies, I appreciate it, you've helped me clarify quite a few things!1 point
-
When you say it's running beautifully .... Have you been able to separate the IOMMU groups out so you can individually pass through selectively what you want? I.e. what are the chances of running a VM with usb, gpu1, sata ssd off main board, M2 off main board all passed through, whilst Unraid used gpu2, sata HDDs off main board as well as off a hba card in pcie slot?1 point
-
1 point
-
i was thinking through what you said and you might get away with just the rebuild! after the rebuild completes the contents of the rebuilt data drive will agree with what parity plus all the other data drives contain, but the contents are likely to be badly corrupt at best. However since you said you were not worried about preserving the drives contents, if you now follow the procedure for Reformatting a drive the fact that the contents may currently be invalid is not relevant as the format operation will create a new empty file system and update parity accordingly. Note that this is a rather a special case where you are definitely going to discard the contents of the rebuilt drive.1 point
-
You catch more flies with honey. craigr1 point
-
Yup, also worked without configuration changes for me as well.1 point
-
Thank you very much! It works pertfectly! Problem solved for me.1 point
-
If the nvme was disk1, then adding parity and letting it build will allow you to replace disk1 with a spinner and let it rebuild then nvme will be free and you can use it as cache and add other spinners to the array as needed. The parity array does not do raid5 or 6, see here for an idea of how Unraid differs from traditional RAID: https://wiki.unraid.net/Overview1 point
-
1 point
-
v3 is still not 'latest' release, its still marked as beta, and until this changes im afraid it will stay tagged as v3, as soon as it gets tagged as 'latest release' then i will merge the change from v3 branch to master and latest will then be v3, make sense?.1 point
-
I like to request Signal-server It is for a private Messenger applications on Android, Desktop, and iOS.1 point
-
Fixed the issue. Not sure if this is already documented somewhere. The /storage mount point is strictly configured to be read-only (and a safe thing to do for security). In order to restore files back, you need to create a new mount point in the container configuration. In my case, I just added /restore and mapped to /mnt/user/scratch/restore. Provided destination /restore to restore job and it worked just fine.1 point
-
Bifurcation while possible is a bit of a lash up. Better to buy a board designed for 3x pcie x8 electrical. Benefits of PCIE gen 4 bandwidth. Asus Pro WS X570-ACE1 point
-
This can work. The issue is the third PCIE slot on most x570 or B550 boards uses the Chipset. If you do want to do this I would suggest PCIE Bifurcation of a single X16 slot into multiple slots. Now for this to work the board will need to support this and you will need to do your research. But you can find the parts for this at the following link: https://riser.maxcloudon.com/en/1 point
-
Im not gonna lie... the performance of this would be terrible. The 3900x and 3950x both have a very limited amount of PCIe lanes... so after the 2nd GPU your performance will suffer horribly even if the motherboard has 3 full x16 slots. Most of the AM4 motherboards when you plug 3 GPUs into them, they will drop the first GPU to 8x, 2nd GPU to 4x, and last one to 2x or 4x only.1 point
-
Great write up. Thanks for taking the time for posting what worked for you.1 point
-
Fix Common Problems is telling me that Write Cache is disabled on a drive. What do I do? This test has nothing to do with any given unRaid version. For some reason, sometimes hard drive manufacturers disable write cache on their drives (in particular shucked drives) by default. This is not a problem per se, but you will see better performance by enabling the write cache on the drive in question. To do this, first make a note of the drive letter which you can get from the Main Tab Then, from unRaid's terminal enter in the following (changing the sdX accordingly) hdparm -W 1 /dev/sdm You should get a response similar to this: /dev/sdm: setting drive write-caching to 1 (on) write-caching = 1 (on) If write caching stays disabled, then either the drive is a SAS drive, in which case you will need to utilize the sdparm commands (google is your friend), or the drive may be connected via USB in which case you may not be able to do anything about this. 99% of the time, this command will permanently set write caching to be on. In some rare circumstances, this change is not permanent, and you will need to add the appropriate command to either the "go" file (/config/go on the flash drive), or execute it via the user scripts plugin (with it set to run at first array start only) It should be noted that even with write-caching disabled this is not a big deal. Only performance will suffer. No other ill-effects will happen. NOTE: If this does not work for you, then you will either need to contact the drive manufacturer as to why or simply ignore the warning from Fix Common Problems
 1 point
 -
I also recently had this issue, right as i was about to try the manual way, i renamed the usb to "UNRAID" as per what it requires, i had forgot to close the usb installer, and as soon as i renamed it, it worked. In my case, the usb drive had no name at all, and adding a name fixed it. hope this helps someone!1 point
-
Array start means that all plugins, etc are installed, so that would be the best. An alternative to only run at boot is to manually add the command to the /boot/config/go file1 point


.thumb.jpg.25529a82ec4a0fb3d47782b36a1a7049.jpg)


.thumb.png.aa09a3d0090786d55082f16dc6b875da.png)