Leaderboard


Popular Content
Showing content with the highest reputation on 07/21/21 in all areas
-
Besorg dir den 3770 oder den Xeon E3-1275 v2. Nur der 3770K kann das nicht. Und wenn du nicht gerade übertakten wolltest, geben die sich alle eh nichts: https://www.cpubenchmark.net/compare/Intel-i7-3770K-vs-Intel-i7-3770-vs-Intel-Xeon-E3-1275-V2/2vs896vs11932 points
-
Disable Security Mitigations Thanks to @cybrnook's research (https://forums.unraid.net/topic/80235-disabling-spectremeltdownzombieload-mitigations/), this plugin will disable the OS mitigations for Spectre, Meltdown, and Zombieload (MDS) to possibly give you better CPU performance. Note that these mitigations are valid security concerns, and depending upon your workload you may want them mitigated. Myself, I'm not running a bank out of my house, and I don't think that the odds are too great that Plex would ever implement a Meltdown hack on my server to try and figure out my passwords (which doesn't exist anywhere on the server in the first place), so I'd just as soon have my CPU power back. That, and spectre et al are all proof of concept hacks. But disabling these mitigations is definitely one of the "Use at your own risk" type of thing. If your lawyer gets hauled before a FISA court, and can't tell you why, and you've wound up being transported off to another country where all sorts of things can be done to you simply because it's not on American soil all without due process, then don't blame me. Find it in the Apps tab by searching for Disable Security Mitigations, and then go to the Settings Tab (User Preferences), Mitigation Settings (6.7.0+ only) Note that the plugin will only disable the mitigations for your default boot mode. All other boot modes are left untouched (ie: Safe Mode will have all mitigations enabled). Also, while the plugin isn't required per se to be installed once the mitigations are disabled, uninstalling the plugin will automatically re-enable all of the mitigations.
 1 point
 -
1 point
-
Ja das hätte ich auch gerne. Kommen sollen es in jedem Fall. Wann ist die andere Frage. Aktuell behelfen sich die Leute mit VMs. Also Unraid als VM in Unraid.1 point
-
Because the config you posted expose it on organizr.domain.com, not domain.com. That's why I asked, and waited for a answer To clarify, domain.com in this context is supposed to be substituted with your real domain1 point
-
Has anyone figured out how to restore a VM from backup yet? I just had a cache drive crash and trying to restore a Debian VM that was created from a physical disk using p2v so the VM was on 256G or thereabout. Now when I try to manually replace the vdisk.img it is about 1G and when I try to boot the vm it fails to boot with a lot of errors like: Device /dev/vda5 has size of 1584128 sectors which is smaller than corresponding PV size of 249567232 sectors. Was device resized? I have tried to increase the VM disk size from unraid gui but then it first gives a lot of errors: Failed to connect to lvmetad. Falling back to device scanning. Then ends on: /dev/mapper/debian--vg-root: UNEXPECTED INCONSISTENCY; RUN fsck MANUALLY. After I ran fsck on debian--vg-root it found and fixed a lot of errors and now ends on failed to mount /dev and /run with "No such file or directory" So it fails to find init Also my backup folder for this VM contains tar.gz from each of the backup dates with vdisk1.img and the xml but also a vdisk.img in the root directory unzipped that has the exact same timestamp and name but is a lot smaller. Does anyone have any clue on what I need to do to restore or is the backup file broken? Many thanks! //Zilched1 point
-
ok, so ... it turns out i do have sound, but not as i want it. I dont have sound on splashtop. Its not a deal breaker for me but would be handy. I have a hdmi cable from my passed through gpu to one hdmi port on my monitor - when im on that port the sound works fine, which i suppose makes sense. Just need to figure out why there is no sound on linux via splashtop. Im going to guess its to so with the splashtop streamer now rather than the hardware.1 point
-
Edit the template (click on icon, edit) then in the repository instead of :latest (if it's there) change it to :4.4.7 (or add it)1 point
-
I found this in the documentation files: https://wiki.unraid.net/Manual/Changing_The_Flash_Device It says that the trial license will not work or even copied to the new replacement USB stick, but will remain forever on the old stick (although expire) Now , booting the fully configured Unraid server (during the trial period) from the new USB stick will not start the array, until I have bought a license ... So it seems to me, that the backup-configuration of the flash drive from the trial back-up (zip file) will work and start up the disk array with the new purchased license and the disks will not been reset to a blank status ... Is this correct ?1 point
-
My OpenVPN is also not working (along with DelugeVPN being broken), so this likely is the culprit. Extremely frustrating that they can't implement something like this without breaking everyone's VPN's that have been rock solid... If I still have issues after updating my config files tonight I'll report back, but seems that is the fix for most. Update: Downloading new config file fixed it... Odd problem but thankfully simple solution.1 point
-
Das ist ein Switch und kein Router. Mit RouterOS v7 (noch Alpha Status und wird es noch lange bleibe) können die CRS3xx auch einige L3 Features in der Hardware-Beschleunigung nutzen, leider erst ab Modell CRS309 - https://help.mikrotik.com/docs/display/ROS/L3+Hardware+Offloading Wenn Du also eine Firewall und NAT brauchst, was ja bei I-Net Pflicht ist, haben die CRS3xx aktuell nicht genug Bumms....1 point
-
Diags after rebooting are not much help for this, you can setup syslog mirror to flash or a remote syslog and if it crashes again post that.1 point
-
yep this is 99% of the time the issue, if there hasnt been a change to the docker image then the normal cause is either vpn provider or the end user changing something :-), this is why i get frustrated with 'me too!, i cant access the web ui', oh well i get why people post out of sheer frustration, but more helpful would be to post log with debugging on, glad your issue is solved. p.s. not having a go at you, just saying this post shows a typical 'fix' being out of my control.1 point
-
I fixed mine by downloading new openvpn files and putting them in the docker image. On Saturday or Sunday I couldn't use the VPN on my other devices. I believe they changed the server I used. But not sure.1 point
-
I started having issues yesterday. Unable to access my web-gui and other apps were not accessing the proxy, then I saw this on my VPN providers site. OpenVPN compression phaseout is in progress and will be completed by August 3rd 2021. If you downloaded configs from this page before you saw this message, you need to re-download them now, or simply remove the compress or comp-lzo flags from the config that you downloaded after July 20th 2021. Re-downloading the config file fixed it for me.1 point
-
According to the screenshot of the container settings the path of the transcode folder inside the container should be /transcode.1 point
-
Just updated the container, and woop! We got ourselves a new GUI! After the update, the cron-it! button started working. I set it to run this night, so I'll report tomorrow if it worked or not. But so far, looks promising! (I also did check the "console" button in there) Thanks for keeping me in loop!1 point
-
I can confirm that the schedule ran overnight as expected Regarding a test, I set the cron job for a few minutes in the future and restarted the container. Again the scheduler ran as expected. So it looks like that's working nicely now! It seems the key is to make sure the "console" option is ticked. Thanks for all your work on the various dockers you maintain, they make life much easier!1 point
-
Eine kurze Rückmeldung von mir: Ich habe gebraucht ein günstiges Bundle mit i3-9100 und einem Gigabyte Z390M Gaming erstanden (kann auch 2* M.2 und hat cec2019) Sollte die Cpu-Leistung nicht ausreichen, kann ich immernoch kostengünstig auf einen 9400 upgraden Sollte die Gpu-Leistung nicht ausreichen, kaufe ich mir eine RX550 (aber hier habe ich wenig Bedenken) Danke für die Unterstützung!1 point
-
PEG is the pci express graphic slot. It's the same slot as pcie but with some differences to enhance the connection to the pcie graphic card (some mbs have a "dedicated" peg slot).1 point
-
Das mache ich, vielen Dank für deine Hilfe!1 point
-
If you chose "Remote access to server" then you need to connect to the server using the tunnel IP address as mentioned on the Wireguard settings page. You should see something like this: So if the remote client is a Windows box you would go to the search bar and type: \\10.252.1.1 and Windows would use SMB to connect to that IP address.
 1 point
 -
Thank you for taking the time to reply, that's really useful. I set the crontab and it all worked earlier with a test within luckybackup itself. I know it wasn't generating the crontab a couple of versions ago but it seems to now. Ticking the option for "console mode" in the scheduler seemed to make it work. I'll check if it runs overnight and if so I'll report back to confirm. Cheers!1 point
-
Das kann ich aber mal sowas von unterschreiben. Ich bekomme ja schon Stress, wenn Plex ruckelt, weil ich gerade Dateien verschiebe ^^1 point
-
Good idea, because here I am today, looking again for how to do this because I want to upgrade my cache disk! lol ** These steps are for my Adaptec 51245 controller ** Step 1: arcconf getconfig 1 This prints a list of all drives connected to controller #1 Step 2: find your new drive in the list, it will most likely be the only one that doesn't say "JBOD" next to its state. Note the "Reported Channel,Device(T:L)" (example : 0,11 this is channel 0, device 11) Step 3 : create a JBOD drive out of the new drive : arcconf CREATE 1 JBOD 0 11 (still using the example from above). This create a JBOD drive, on controller 1, channel 0, drive 11) Step 4 : you should now see the new drive in your MAIN section of Unraid. If you dont, stop the array and it should be in the list. ============ Here's my controller configuration if that can help. You can find that with "arcconf getconfig 1 ad" Controllers found: 1 ---------------------------------------------------------------------- Controller information ---------------------------------------------------------------------- Controller Status : Optimal Channel description : SAS/SATA Controller Model : Adaptec 51245 Controller Serial Number : 1D4211CB859 Temperature : 82 C/ 179 F (Normal) Installed memory : 512 MB Copyback : Disabled Background consistency check : Disabled Automatic Failover : Disabled Global task priority : High Performance Mode : Default/Dynamic Stayawake period : Disabled Spinup limit internal drives : 0 Spinup limit external drives : 0 Defunct disk drive count : 0 Logical devices/Failed/Degraded : 0/0/0 SSDs assigned to MaxCache pool : 0 Maximum SSDs allowed in MaxCache pool : 8 MaxCache Read Cache Pool Size : 0.000 GB MaxCache flush and fetch rate : 0 MaxCache Read, Write Balance Factor : 3,1 NCQ status : Enabled Statistics data collection mode : Enabled -------------------------------------------------------- Controller Version Information -------------------------------------------------------- BIOS : 5.2-0 (18948) Firmware : 5.2-0 (18948) Driver : 1.2-1 (50983) Boot Flash : 5.2-0 (18948) -------------------------------------------------------- Controller Battery Information -------------------------------------------------------- Status : Not Installed Also interesting information: if you want to be able to view the SMART data from the Unraid devices pages, you need to set the "SMART Controller Type" to "SAT" with nothing in the 2 fields on the same row as SAT.1 point
-
How is that relevant to their array/disk/connection issues?1 point
-
No ! Cache pools can be XFS (only single drive) and Array can be BTRFS. Please stop providing inaccurate information. People come to the forum with problems and generally stressed out. This is not helpful. @JWMutant, I am not sure for your data. However I think the guys will need to see your diagnostics to understand what happened and advise on the next steps. Go to Tools / Diagnostics and attach the full zip.1 point
-
I'd recommend you go through the first two posts in the quickstart guide: Change the slider from basic to advanced, that will enable the Delete Tunnel button.1 point
-
It has been a long time hasn't it... I do plan to continue and have been working on some of the oldest requests! But the truth of the matter is that working from home for over a year now has put a bit of a damper on me. Sitting alone in front of the computer all day and then continue in the evening has been a bit of a tough sell for me. The cases are coming, just not very fast1 point
-
Hey everyone. I just wanted to shout out @ich777 and his great work on some Prometheus plugins for Grafana. These will most likely be included in the UUD 1.7 someday… @SpencerJ1 point
-
Hello, I get the error below 2021-06-07T17:15:06Z ERR error="Unable to reach the origin service. The service may be down or it may not be responding to traffic from cloudflared: x509: certificate is not valid for any names, but wanted to match ******.**" cfRay=hfsfhkfhkfh-FRA originService=https://192.168.178.42:4443 When I use this config and disable TSLVerify it works. tunnel: <my_UUID> credentials-file: /home/nonroot/.cloudflared/<my_UUID>.json ingress: - service: https://192.168.1.100:1443 originRequest: noTLSVerify: true On the GitHub post is mentioned to use: host.my.domain, where host is a subdomain you have valid DNS records for. But what does that mean? Have some one an example for me, because I am not so familiär with DNS records.1 point
-
There has been an issue raised on GitHub related to tracker announce request IP leakage under certain circumstances, after careful review of iptables i have tightened up the rules to prevent this. A new image has now been rolled out for all vpn enabled docker images (25th Feb 2021) i produce with the fix in place, i would encourage everyone to update to the recently created 'latest' tagged image. You can force the upgrade by toggling 'basic view' to 'advanced view' and then clicking on 'force update' link for each container, or by clicking on the 'check for updates' button at the bottom and then click on 'update all'. for transparency, here is the link to the (now closed off) issue:- https://github.com/binhex/arch-qbittorrentvpn/issues/80 IMPORTANT As part of the tightening up if you run multiple containers through a single vpn container and are encountering issues then please read Q25 from the following link:- https://github.com/binhex/documentation/blob/master/docker/faq/vpn.md As part of the tightening up if you run privoxy and are encountering issues then please read Q26 from the following link:- https://github.com/binhex/documentation/blob/master/docker/faq/vpn.md1 point
-
Small update on case modding for better cooling The provided fans are really of poor quality in term of air-flow. In non-conditioned room the drives in case get's up quickly to more than 40`C (even 44'C for the Hitachi's 2TB). What I did is the following modification: Replacing 3 internal 120mm fans with used fans: Delta AFB1212SH (each 4$ on Allegro.pl, making 12$ in total) Replacing 2 back 80mm fans with used fans: Delta FFB0812EHE (each 4$ on Allegro.pl, making 8$ in total) there are holes on both sides where the air get's into the case without cooling the disks, those are now covered by some aluminum sticky tape: The result: Parity - WDC_WD30EFRX-68EUZN0_WD-WCC4N0TLA4LN (sds) - active 23 C [OK]Parity2 - WDC_WD30EFRX-68EUZN0_WD-WCC4N0TLATRF (sdt) - active 24 C [OK]Disk 1 - WDC_WD30EFRX-68EUZN0_WD-WCC4N6THYSUN (sdv) - active 22 C [OK]Disk 2 - WDC_WD30EFRX-68EUZN0_WD-WCC4N1FDKYXK (sdu) - active 24 C [OK]Disk 3 - WDC_WD30EZRZ-00WN9B0_WD-WCC4E4FZ5HEH (sdy) - active 26 C [OK]Disk 4 - WDC_WD30EZRZ-00WN9B0_WD-WCC4E5JV4DH0 (sdw) - active 26 C [OK]Disk 5 - WDC_WD30EZRZ-00WN9B0_WD-WCC4E1HSRU8K (sdx) - active 26 C [OK]Disk 6 - WDC_WD30EZRZ-00WN9B0_WD-WCC4E1HSRJ41 (sdz) - active 26 C [OK]Disk 7 - WDC_WD30EZRZ-00Z5HB0_WD-WCC4N0HZKXPS (sdk) - active 25 C [OK]Disk 8 - WDC_WD30EZRZ-00Z5HB0_WD-WCC4N7UL623H (sdl) - active 25 C [OK]Disk 9 - WDC_WD30EZRS-11J99B1_WD-WMAWZ0329521 (sdm) - active 26 C [OK]Disk 10 - WDC_WD30EZRS-11J99B1_WD-WMAWZ0275664 (sdn) - active 26 C [OK]Disk 11 - Hitachi_HUA723020ALA641_YFGJLM8A (sdo) - active 29 C [OK]Disk 12 - Hitachi_HUA723020ALA641_YGHW07MA (sdp) - active 29 C [OK]Disk 13 - Hitachi_HUA723020ALA641_YFGWAYXA (sdq) - active 28 C [OK]Disk 14 - Hitachi_HUA723020ALA641_YGG51DJA (sdr) - active 29 C [OK]Disk 15 - Hitachi_HUA723020ALA641_YFHYNSTA (sdc) - active 28 C [OK]Disk 16 - Hitachi_HUA723020ALA641_YGGSVSNA (sdd) - active 29 C [OK]Disk 17 - Hitachi_HUA723020ALA641_YGHX7YZA (sde) - active 29 C [OK]Disk 18 - Hitachi_HUA723020ALA641_YGJ02KUA (sdf) - active 29 C [OK]Disk 19 - Hitachi_HUA723020ALA641_YGGP93HA (sdg) - active 27 C [OK]Disk 20 - Hitachi_HUA723020ALA641_YGJ3TK9A (sdh) - active 27 C [OK]Disk 21 - Hitachi_HUA723020ALA641_YGG5UEWA (sdj) - active 27 C [OK]Disk 22 - Hitachi_HUA723020ALA641_YFHY90KA (sdi) - active 28 C [OK]Cache - Samsung_SSD_850_EVO_250GB_S2R6NX0J168639Y (sdb) - active 26 C [OK] So final conclusion - 20$ spend (30$ including shipping) what is about 5% of the price of the case and the temperatures of the drives has been lowered by 15'C on average. Pretty awesome !!!
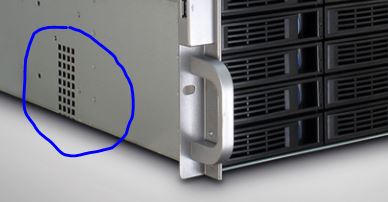 1 point