Leaderboard


Popular Content
Showing content with the highest reputation on 04/28/21 in all areas
-
3 points
-
Hi! I think this is the issue. Normally when I do this I don't put a passphrase on the key. It's not the password of the server, it's a special passphrase to make your key more secure. If you want automation, redo your key generation and press enter when you get prompted for a passphrase. You can also test with the verbose flags -v through -vvv in your ssh command to give you a little more feedback about what is failing. Try something like: # ssh -vvv [email protected] That should sort this out. Del3 points
-
There are faster and more risky ways of achieving the same result but the one I've described is safe and makes sense to me and has the advantage of keeping the old parity disk intact until after the new parity disk has been built, which might be very useful if a disk happened to fail during the process.2 points
-
Remove the "SSH Config Tool" plugin, it is likely what is overwriting your files. It hasn't been updated since 2019 so it doesn't know about the changes in 6.9. TBH your system has more plugins than I have ever seen installed at once I'd highly recommend removing as many as you can, the fewer plugins you have the better. Less potential conflicts like this one, less that can go wrong. Also, you should run touch /boot/config/modprobe.d/i915.conf and remove these lines from your go script: modprobe i915 chmod -R 777 /dev/dri per https://wiki.unraid.net/Manual/Release_Notes/Unraid_OS_6.9.0#GPU_Driver_Integration2 points
-
You need understand the bottleneck, as you mention, docker / VM will access array, due to array overload then all relate service will got problem no matter you have how much CPU resources. Usually we setting docker and VM run in dedicate NVMe / SSD by Unassigned device as standalone storage. Array usually form by mechanical disk, it only suitable for single session I/O per disk, for example, I transfering files ( large file ) to non-parity array, single session per each disk for max transfer efficient.
 2 points
 -
I think you are correct. I set this up over three years ago and forgot the passphrase should be [enter] for automation. I will have time to test this later, but am fairly certain you have identified the problem. UPDATE: Confirmed and fixed. This was the problem, I had entered a passphrase when creating the keys instead of leaving them blank. I confused that with the requirement that the root account have a password.2 points
-
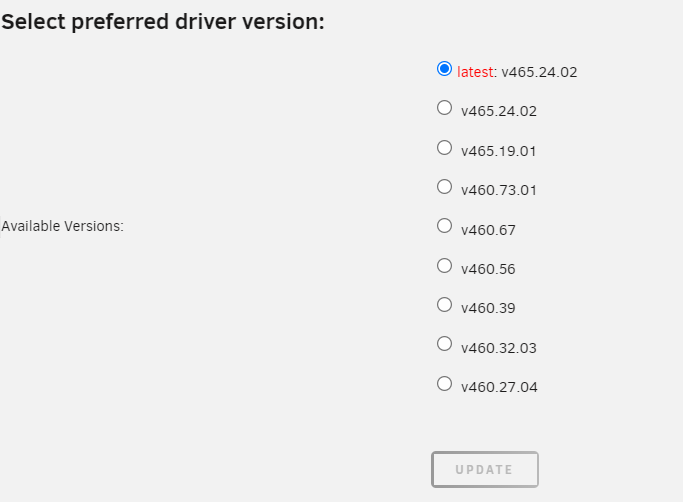
@ich777 add krsort <td>Available Versions:</td> <td> <p><input type="radio" name="drv_version" value="latest" <?php echo ( $selected_v == "latest") ? 'checked="checked"'> <?php krsort($eachlines) ; foreach($eachlines as $lines){ $arr = explode(" ", $lines); $lines2 = implode(" ", $arr); for:
 2 points
 -
This is the support thread for multiple Plugins like: AMD Vendor Reset Plugin Coral TPU Driver Plugin hpsahba Driver Plugin Please always include for which plugin that you need help also the Diagnostics from your server and a screenshots from your container template if your issue is related to a container. If you like my work, please consider making a donation
 1 point
 -
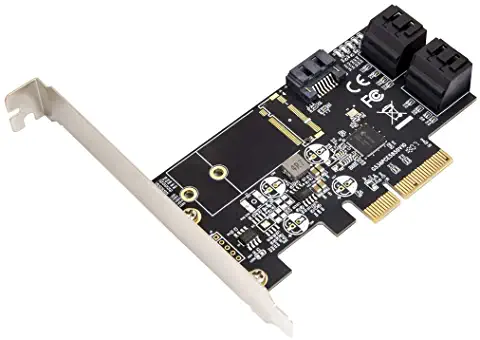
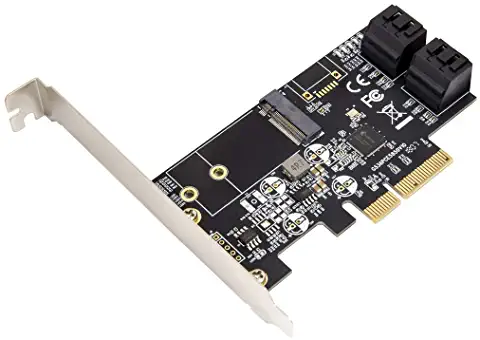
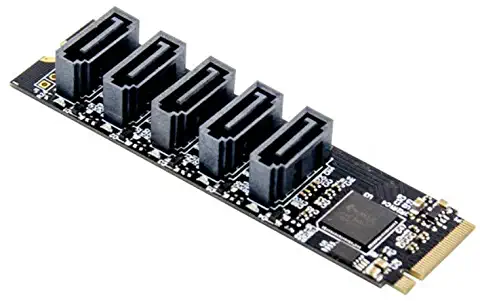
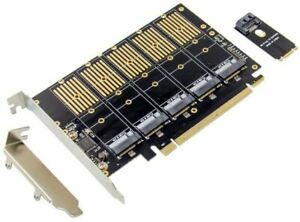
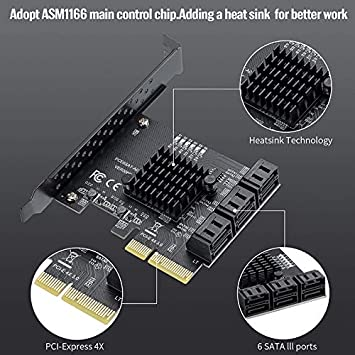
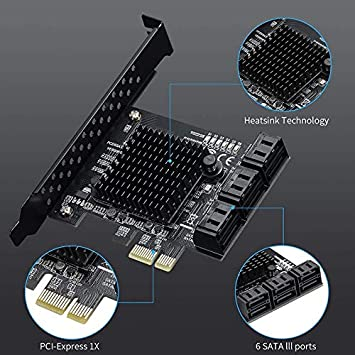
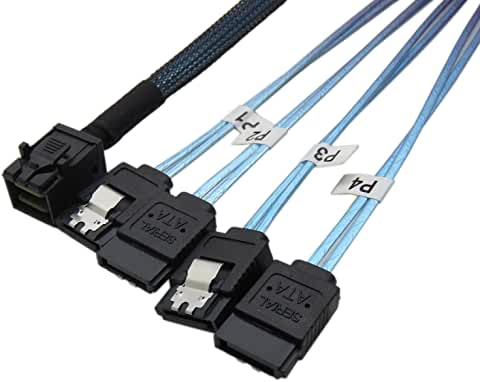
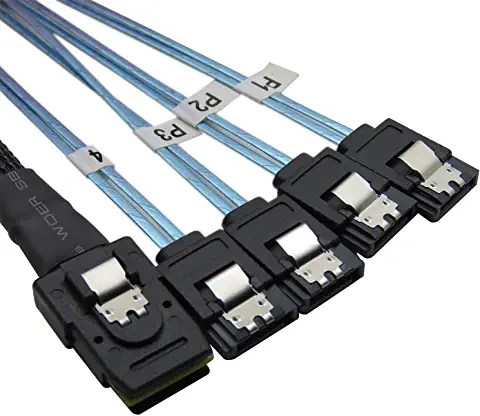
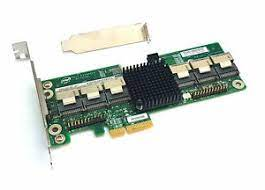
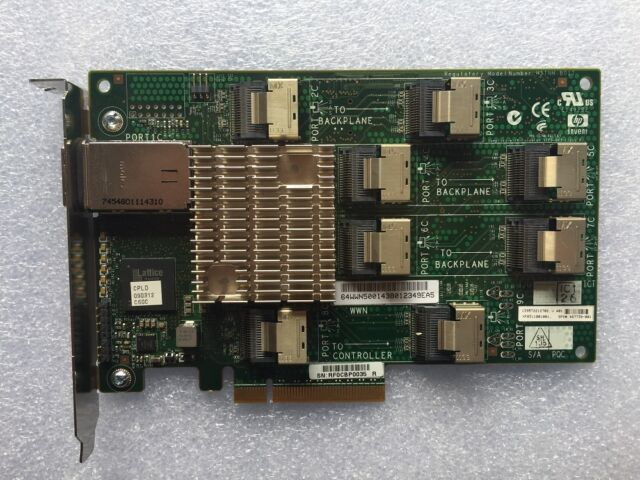
This thread is meant to replace the now outdated old one about recommended controllers, these are some controllers known to be generally reliable with Unraid: Note: RAID controllers are not recommended for Unraid, this includes all LSI MegaRAID models, doesn't mean they cannot be used but there could be various issues because of that, like no SMART info and/or temps being displayed, disks not being recognized by Unraid if the controller is replaced with a different model, and in some cases the partitions can become invalid, requiring rebuilding all the disks. 2 ports: Asmedia ASM1061/62 (PCIe 2.0 x1) or JMicron JMB582 (PCIe 3.0 x1) 4 ports: Asmedia ASM1064 (PCIe 3.0 x1) or ASM1164 (PCIe 3.0 x4 physical, x2 electrical, though I've also seen some models using just x1) 5 ports: JMicron JMB585 (PCIe 3.0 x4 - x2 electrically) These JMB controllers are available in various different SATA/M.2 configurations, just some examples: 6 ports: Asmedia ASM1166 (PCIe 3.0 x4 physical, x2 electrical) * * There have been some reports that some of these need a firmware update for stability and/or PCIe ASPM support, see here for instructions. These exist with both x4 (x2 electrical) and x1 PCIe interface, for some use cases the PCIe x1 may be a good option, i.e., if you don't have larger slots available, though bandwidth will be limited: 8 ports: any LSI with a SAS2008/2308/3008/3408/3808 chipset in IT mode, e.g., 9201-8i, 9211-8i, 9207-8i, 9300-8i, 9400-8i, 9500-8i, etc and clones, like the Dell H200/H310 and IBM M1015, these latter ones need to be crossflashed (most of these require a x8 or x16 slot, older models like the 9201-8i and 9211-8i are PCIe 2.0, newer models like the 9207-8i, 9300-8i and newer are PCIe 3.0) For these and when not using a backplane you need SAS to SATA breakout cables, SFF-8087 to SATA for SAS2 models: SFF-8643 to SATA for SAS3 models: Keep in mind that they need to be forward breakout cables (reverse breakout look the same but won't work, as the name implies they work for the reverse, SATA goes on the board/HBA and the miniSAS on a backplane), sometimes they are also called Mini SAS (SFF-8xxx Host) to 4X SATA (Target), this is the same as forward breakout. If more ports are needed you can use multiple controllers, controllers with more ports (there are 16 and 24 port LSI HBAs, like the 9201-16i, 9305-16i, 9305-24i, etc) or use one LSI HBA connected to a SAS expander, like the Intel RES2SV240 or HP SAS expander. P.S. Avoid SATA port multipliers with Unraid, also avoid any Marvell controller. For some performance numbers on most of these see below:
 1 point
 -
A plugin to create and modify vfio-pci.cfg from the unRAID webGui. Allows you to bind PCI devices by address to the vfio-pci driver. Also displays IOMMU groupings and which devices support reset. Unbound USB controllers display USB devices connected to them. Bound devices will be available to pass through to your VMs under "Other PCI Devices" in the Edit VM Form View. Please see the release notes for 6.7.0-rc1 for more information on this binding method. Search for "VFIO-PCI Config" in Community Applications Github repository: https://github.com/Skitals/unraid-vfio-pci/ URL for manual plugin install: https://raw.githubusercontent.com/Skitals/unraid-vfio-pci/master/plugins/vfio.pci.plg
 1 point
 -
And you wouldn't want to run the Memtest that comes with Unraid as (due to licencing) it won't find ECC errors as they'll be corrected. The latter versions of Memtest will find errors. Google Memtest1 point
-
Your system event log should hopefully have more information.1 point
-
Memory errors Apr 25 17:11:38 unraidserver kernel: EDAC MC2: 7 CE memory read error on CPU_SrcID#1_Ha#1_Chan#1_DIMM#0 (channel:1 slot:0 page:0x15116f3 offset:0xc40 grain:32 syndrome:0x0 - OVERFLOW area:DRAM err_code:0001:0091 socket:1 ha:1 channel_mask:2 rank:0)1 point
-
Yes I realize that. Just wanted to make sure. I would hate to have buy new drives.1 point
-
Ahh, the good old days for me.1 point
-
I was finnaly able to use another USB, USB 2.0 this time. No errors this time!1 point
-
Yes. To support the iGPU I, and a bunch of others in these forums, had to get a special BIOS (started with L2.21a and is now up to L2.34 which is what I am running) from ASRock as the regular BIOS does not allow the iGPU to be enabled. BMC is version 1.80 Yes, they are well aware. I don't think they plan to fix it. Many SuperMicro boards have the same problem. There is a recent thread in these forums about a way to work around it with certain SuperMicro BIOS versions, but recent BIOS updates seem to have broken it again.1 point
-
Since you can't have a data disk that's bigger than your parity disk you must upgrade parity first. Stop the array. Unassign the old parity disk. Assign the new one. Start the array and let parity build. Then, stop the array. Assign the 8 TB disk to a new data disk slot in the array. Start the array and let the disk clear. Confirm that you want to format the newly added disk. This page of the on-line manual has a lot of information on the subject: https://wiki.unraid.net/Manual/Storage_Management1 point
-
5-11 can be simplified to 2 commands if you don't care for (or even better backed up) the original files. 1: Needs to be done once to generate the json. Don't need after you have fans showing up unless you want to re-configure. curl -o '/usr/local/emhttp/plugins/ipmi/scripts/ipmi2json' -L 'https://raw.githubusercontent.com/lucasteligioridis/IPMI-unRAID/master/source/ipmi/usr/local/emhttp/plugins/ipmi/scripts/ipmi2json' && chmod 755 '/usr/local/emhttp/plugins/ipmi/scripts/ipmi2json' 2: This is the one that needs on every restart + stop the fan control and start it again curl -o '/usr/local/emhttp/plugins/ipmi/scripts/ipmifan' -L 'https://raw.githubusercontent.com/lucasteligioridis/IPMI-unRAID/master/source/ipmi/usr/local/emhttp/plugins/ipmi/scripts/ipmifan' && chmod 755 '/usr/local/emhttp/plugins/ipmi/scripts/ipmifan' I also just keep a copy of ipmifan and cp it over & chmod using User Scripts plugin on start.1 point
-
Looks like there is a patch to cover a similar issue for QEMU 6.0, its currently in rc. But there is no timeframe on 6.0 in Unraid, we are currently running 5.1 https://github.com/qemu/qemu/commit/ba4c735b4fc74e309ce4b2551d258e442ef513a51 point
-
You have ECC Memory. The Memtest that comes with Unraid will not find any memory errors. You need to create a boot stick with the updated one (google search. Licensing prevents LT from including it in the OS)1 point
-
Once the data rebuild was complete I shutdown the server and then restarted it. When it came back up everything was back to the way it should be so it's all good now. I think maybe I just switched screens too fast in the GUI and it just got stuck somehow. Been using UNRAID for about 12 years and this was the first time I had seen anything like this occur so I thought I'd share it with the rest of the class.1 point
-
Nothing being logged about the crash usually points to a hardware problem, one more thing you can try it to boot the server in safe mode with all docker/VMs disable, let it run as a basic NAS for a few days, if it still crashes it's likely a hardware problem, if it doesn't start turning on the other services one by one.1 point
-
@JorgeB, Thank you very much for the fast response! That indeed fixed everything and I'm currently running everything again!1 point
-
Cache device dropped offline earlier: Apr 27 15:52:31 Xionas kernel: nvme nvme0: Device not ready; aborting reset, CSTS=0x1 Apr 27 15:52:31 Xionas kernel: nvme nvme0: Removing after probe failure status: -19 Apr 27 15:53:02 Xionas kernel: nvme nvme0: Device not ready; aborting reset, CSTS=0x1 Unless it died, power cycling the server (not just rebooting) should bring it back.1 point
-
Syslog starts over after every reboot, if it happens again enable this and post that log.1 point
-
Erstelle mit dem Creator eine neuen Unraid Stick (dadurch wird er bootfähig) überschreib alles mit deinem Backup (wo die Lizenz mit drin ist) Boote mit dem neuen Stick und ein Assistent generiert dir einen neuen Lizenzschlüssel Das geht 1x pro Jahr und deaktiviert die Lizenz des alten USB Sticks.1 point
-
Try to remove these commands from the go file or wherever you have put them to enable the module and install the Intel-GPU-TOP plugin from the CA App it would basically do the same and also installs intel_gpu_top so that you can use the GPU Statistics plugin from @b3rs3rk to show real time stats from the iGPU. This shouldn't happen are you sure that it kills the video output? It should only switch to a higher resolution since it's enabling the iGPU. Have you installed a dedicated GPU too? As said above this should not be a problem and GVT-g wouldn't solve this, I think there is some other problem when you enable the i915 module.1 point
-
Yes, I no longer have anything in the 'go' file related to i915 drivers. I used the 'touch' method to create a blank i915.conf file as explained in the link and have no problem with QSV working for Plex and HandBrake.1 point
-
Both good points. I've removed the plugin along with 7 or 8 others that I know for sure I don't use. Unfortunately, I'm currently running a preclear on a new disk so I won't be able to check until tomorrow, but crossing my fingers this is it!1 point
-
Agree, we also pinning CPU to optimize when CPU resources also a bottleneck, or make system have better overall response for different service.1 point
-
On top of @Vr2Io's suggestions, it can be useful to limit the cores (cpu pinning) for downloaders such as deluge, particularly to exclude the cores primarily used by Unraid i.e. cores 0+12 in your case. I've noticed deluge will use all resources available when moving files, I've seen it spin up 32 cores on my 1950X when I've moved multiple torrents. Here is how my deluge instance is now configured As mentioned, I also have a separate disk off the array dedicated to downloads. Only the finished product (i.e. unzipped movie file) gets moved to array, while the torrrent and associated files stay on downloads HDD. I set this up long ago on an unassigned device, but if your on 6.9+, setting up on a pool makes more sense.
 1 point
 -
I haven't. I actually forgot about it as I finally got the system to stop freezing. However just this week I encountered another freeze. Can't get to it tonight but I'll try to see if it's still posting those to the log tomorrow. Things I've done since though that may have changed things - updated the nvidia driver. Updated the gpustat addon. Turned on iommu in the bios (that was a pain to find) and passed through the GTX 950 to plex docker for transcoding. I have no idea what the lockup was about this time but it had been up over a week this time.1 point
-
great interview @spencerJ and it was so good getting to know our favorite tutorial star. thanks for sharing1 point
-
I decided to uninstall this plugin. However, now anytime I go to tower.local or the IP addres, it always redirects to the xxx.unraid.net URL which requires a functioning internet and DNS which isn't always true when I reboot the server. This seems like a bug. When I uninstall this plugin and reboot the server, I don't expect any remnants of the xxx.unraid.net to exist. How do I completely remove this redirection and go back to using my IP address directly? Update, well I looked at the /etc/nginx/conf.d/emhttp-servers.conf file and found the offending line here: server { # # Redirect http requests to https # listen *:80 default_server; listen [::]:80 default_server; return 302 https://xxxxx.unraid.net:443$request_uri; } However commenting it out just breaks the webUI and reverting the whole file to a backup and rebooting results in it being regenerated again. I can't find where to turn it off. I've already uninstalled the plugin so I can't go into any settings and turn things off. I even tried re-installing the plugin, turning off the remote access etc and then uninstalling but still have the same problem. Also, it is still using the WebUI SSL certificate that it installed for use with the unraid.net plugin. How do I remove that too? I just want it to go back to the way it was without any of the unraid.net stuff. I was able to locate the certificate here: /boot/config/ssl/certs/certificate_bundle.pem and the original one is in the same folder here: /boot/config/ssl/certs/Tower_unraid_bundle.pem but not sure what to do with them. _____________________________ Final Update -> Solved Under Settings -> Management Access -> Use SSL/TLS. When I hit the ? symbol, I saw this useful help page: The path is actually /boot/config/ssl/certs. In there I found the offending certificate, certificate_bundle.pem. I moved it somewhere else for safekeeping and rebooted the server and then it finally went back to normal. 🔍 Mystery solved.1 point
-
Hey everyone, in case you're interested I figured out the issue. A while back I was messing around with let's encrypt certificates and must have set it up wrong. After finding the nginx cert error, and searching through the forums some more, I came across this post that said: Deleting config/ssl/* and rebooting solved the issue. nginx -t ran successfully, and I was able to access the webGUI again. Long story short, it seems to have been a certificate issue. Thank you for all the help.1 point
-
I believe the mapping is created at vm start taking vendor:product and mapping their corresponding bus and devid. As the device seems to disconnect qemu will just remove from guest. There is no recovery process as far as i know. @PeZet have you tried libvirt hotplug to reattach rather than reboot.1 point
-
It's a linux thing, not specifically Unraid. Marvell still operates under the assumption that microsoft rules the computer world.1 point
-
Die *.key Dateien im /config Ordner des USB-Sticks enthalten Deine Lizenzen. Üblicherweise sichert man den ganzen Stick über die Unraid Web-Oberfläche: Auf den Flash auf der Main Seite klicken. Dann kommt eine Seite mit Flash-Backup Möglichkeit. Zumindest den kompletten /config Ordner solltest Du schon sichern. Es schadet auch nix beide Backup Varianten auf Seite zu legen. Unraid auf dem Stick ist nur ein paar 100 MB groß. Man kann aber auch einen nackten USB-Stick vorbereiten und den gesamten /config Ordner drüber kopieren. Bei einem neuen Stick muss dann aber die Lizenz übertragen werden. Auch das geht Online. Ich sichere immer den kompletten Stick und verwahre mehrere Kopien.1 point
-
I understand that you would only buy your batteries locally, but there are probably some battery sellers in Sweden who can help you. I cannot advise about alternative UPS brands to be honest. I have only used APC due to the compatibility. Support for APC is already provided in Unraid and it is normally quite easy to configure. My recommendation would be to find a used APC UPS in Sweden that may need new batteries, but then you could find a local supplier for those. I have zero Swedish language skill, but will Google translate I was able to find this battery supplier, for example... https://www.batteripoolen.se/produkter/industribatterier/standbybatterier1 point
-
Ecc 2x16gb 26661 point
-
Finally got it working on my Asrock X570D4U-2L2T board. Step by step guide. Login to your ASRockRack IPMI web ui (BMC) Go to Settings -> FAN Settings -> FAN Mode In the lower section "Set Fan Control Mode" set all fans to "Manual" and press the "Save control mode" button Open a ssh session to your unraid server or use the unraid web terminal Go to the following directory by entering the command cd /usr/local/emhttp/plugins/ipmi/scripts Download the custom ipmi2json file wget https://raw.githubusercontent.com/lucasteligioridis/IPMI-unRAID/master/source/ipmi/usr/local/emhttp/plugins/ipmi/scripts/ipmi2json Set the permission for the file chmod 755 ipmi2json.1 Exchange the original file with the custom one mv ipmi2json ipmi2json.ori && mv ipmi2json.1 ipmi2json Download the custom ipmifan file wget https://raw.githubusercontent.com/lucasteligioridis/IPMI-unRAID/master/source/ipmi/usr/local/emhttp/plugins/ipmi/scripts/ipmifan Set the permission for the file chmod 755 ipmifan.1 Exchange the original file with the custom one mv ipmifan ipmifan.ori && mv ipmifan.1 ipmifan Login to your unraid web ui Go to Settings -> IPMI -> Fan Control Set "Fan Control" to "No" and press the button "APPLY" Press now the "CONFIGURE" button and wait until its finished When finished, press the "DONE" button Configure now your "Fan Settings" which fan should be linked to which temperature sensor, e.g. HDD Temperature Start the fan control again by setting "Fan Control" to "Yes" and press the "APPLY" button Enjoy NOTES What is missing is to make the files persistent, so with this guide your would need to repeat step 5-11 every time you restart your unraid server and then stop the fan control and start it again to load the activate the changed files If you do not set in the BMC your fan control mode to manual, the configure script in unraid will not work properly. Many thanks again to @cakes044 who made effort to get the raw ipmi values for the board. cheers, Horfic1 point
-
Your flash drive is failing and needs to be replaced. If you setup the Unraid.net flash backup you can follow the steps here: https://wiki.unraid.net/My_Servers#Restoring_Flash_Backup It sounds like you have setup local SSL access, which means http://ipaddress redirects to https://yourpersonalhash.unraid.net . If that isn't working for some reason (probably related to the flash drive issues) then try https://ipaddress and ignore any browser warnings.1 point
-
I'm currently looking into this and this will take some time since I'm really busy at the moment, the permission issue is actually because I tried a workaround and that did not fix it, anyways you can ignore that for now. EDIT: In one word, Cron isn't working for now with luckyBackup.1 point
-
See if this helps: https://forums.unraid.net/topic/76066-vm-settings-change-stuck-at-updating/?do=findComment&comment=7054201 point
-
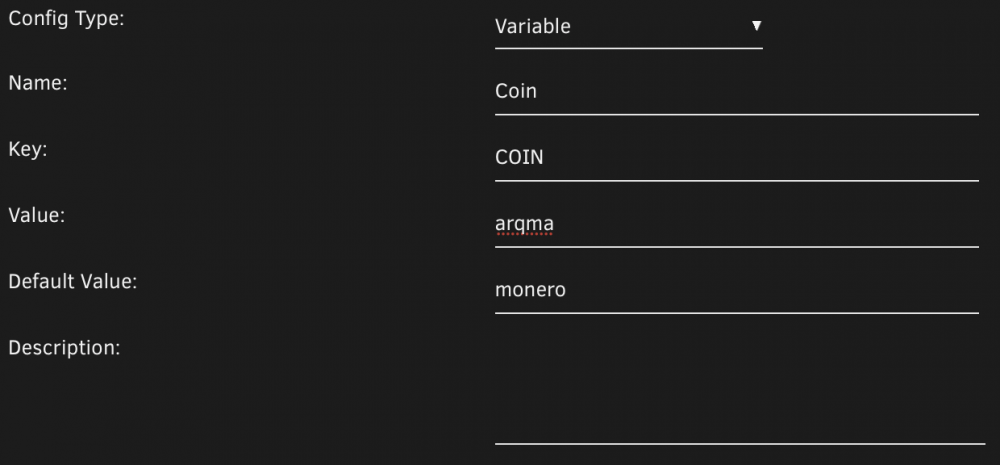
Hey @horphi, this is quite difficult to set up but possible. Ravencoin uses the kawpow algorithm which is a GPU algorithm. To use XMRig you will need to go on the latest-root tag and re-install it from CA to get the new GPU options, and configure those. Then you will need to follow the instructions I'm giving for @tsakodim below but set the Coin variable to an unsupported option like x instead. Then you will need to add --algo kawpow to additional arguments and update the pool & wallet details per the Nanopool website. PS. there is a typo in your Additional Arguments: --random-1gb-pages should be --randomx-1gb-pages Hey @tsakodim, At the moment there is a hidden variable for COIN. The --algo option wasn't working with the container in 6.10.1 so I hardcoded COIN instead. If you set COIN it will default to the most optimised algorithm for mining that coin. It supports monero, arqma and dero. Like I said to @horphi above, if you set it to an unsupported option (like x) you can effectively disable it and use --algo in additional options instead. Example: Edit the container > click Add another Path, Port, Variable, Label or Device > Set Config Type to Variable > enter the following and press Add. Here are my logs starting to mine Ravencoin: Driver installation finished. Project: xmrig Author: lnxd Base: Ubuntu 20.04 Target: Unraid 6.9.0 - 6.9.2 Donation: lnxd-fee 1% Driver: 20.20 Running xmrig with the following flags: --url=rvn-au1.nanopool.org:12433 --coin=x --user=84e8UJvXHDGVfE5HZDQfhn3Kh3RGJKebz31G7D4H24TLPMe9x7bQLBw8iyBhNx9USXB8MhvhBe3DyVW1LcuVAf4jBiADNLw.Unraid --randomx-wrmsr=-1 --randomx-no-rdmsr --no-color --algo kawpow --tls --keepalive --opencl * ABOUT XMRig/6.10.0 gcc/9.3.0 * LIBS libuv/1.41.0 OpenSSL/1.1.1j hwloc/2.4.1 * HUGE PAGES supported * 1GB PAGES disabled * CPU Intel(R) Core(TM) i5-10500 CPU @ 3.10GHz (1) 64-bit AES L2:1.5 MB L3:12.0 MB 6C/12T NUMA:1 * MEMORY 29.8/31.1 GB (96%) DIMM_A1: 8 GB DDR4 @ 2400 MHz KHX3200C16D4/8GX DIMM_A2: 8 GB DDR4 @ 2400 MHz KHX3200C16D4/8GX DIMM_B1: 8 GB DDR4 @ 2400 MHz KHX3200C16D4/8GX DIMM_B2: 8 GB DDR4 @ 2400 MHz KHX3200C16D4/8GX * MOTHERBOARD ASUSTeK COMPUTER INC. - PRIME Z490-P * DONATE 1% * ASSEMBLY auto:intel * POOL #1 rvn-au1.nanopool.org:12433 algo kawpow * COMMANDS 'h' hashrate, 'p' pause, 'r' resume, 's' results, 'c' connection * ADL press e for health report * OPENCL #0 AMD Accelerated Parallel Processing/OpenCL 2.1 AMD-APP (3110.6) * OPENCL GPU #0 05:00.0 Radeon RX 580 Series (Ellesmere) 1200 MHz cu:36 mem:4048/8186 MB * CUDA disabled [2021-04-12 09:27:58.454] net use pool rvn-au1.nanopool.org:12433 TLSv1.2 139.99.156.30 [2021-04-12 09:27:58.454] net fingerprint (SHA-256): "c38886efdee542ebd99801b75c75d3498d97978bbcdec07c7271cb19729e014f" [2021-04-12 09:27:58.454] net new job from rvn-au1.nanopool.org:12433 diff 600M algo kawpow height 1707112 [2021-04-12 09:27:58.454] opencl use profile kawpow (1 thread) scratchpad 32 KB | # | GPU | BUS ID | INTENSITY | WSIZE | MEMORY | NAME | 0 | 0 | 05:00.0 | 9437184 | 256 | 2884 | Radeon RX 580 Series (Ellesmere) [2021-04-12 09:27:58.454] net use pool rvn-au1.nanopool.org:12433 TLSv1.2 139.99.156.30 [2021-04-12 09:27:58.454] net fingerprint (SHA-256): "c38886efdee542ebd99801b75c75d3498d97978bbcdec07c7271cb19729e014f" [2021-04-12 09:27:58.454] net new job from rvn-au1.nanopool.org:12433 diff 600M algo kawpow height 1707112 [2021-04-12 09:27:58.454] opencl use profile kawpow (1 thread) scratchpad 32 KB | # | GPU | BUS ID | INTENSITY | WSIZE | MEMORY | NAME | 0 | 0 | 05:00.0 | 9437184 | 256 | 2884 | Radeon RX 580 Series (Ellesmere) [2021-04-12 09:27:58.540] opencl GPU #0 compiling... [2021-04-12 09:27:58.676] opencl GPU #0 compilation completed (135 ms) [2021-04-12 09:27:58.676] opencl READY threads 1/1 (222 ms) [2021-04-12 09:27:58.958] opencl KawPow program for period 569037 compiled (283ms) [2021-04-12 09:27:59.257] opencl KawPow program for period 569038 compiled (298ms) [2021-04-12 09:28:02.113] miner KawPow light cache for epoch 227 calculated (3149ms) [2021-04-12 09:28:02.113] miner KawPow light cache for epoch 227 calculated (3149ms) [2021-04-12 09:28:12.723] opencl KawPow DAG for epoch 227 calculated (10594ms) [2021-04-12 09:28:21.413] opencl accepted (1/0) diff 600M (297 ms) [2021-04-12 09:28:23.914] net new job from rvn-au1.nanopool.org:12433 diff 600M algo kawpow height 1707112 [2021-04-12 09:28:32.938] net new job from rvn-au1.nanopool.org:12433 diff 600M algo kawpow height 1707113
 1 point
 -
I apologise for the necro, but came across this thread when I was trying to do the same. This command worked for me on 6.9.0: ifconfig br0 down && ifconfig br0 up I also noted there is /sbin/dhcpcd. So that could also be used but haven't tried it.1 point
-
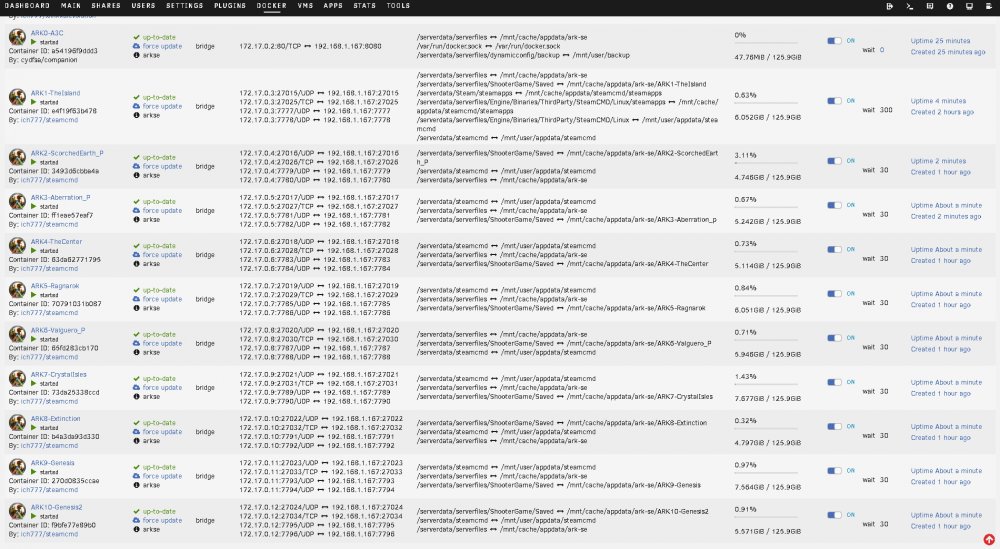
This will hopefully shed some light on the underside working bits of building a cluster of servers for ARK:SurvivalEvolved. With the inspiration (read thievery) from @growlith I present the A3C (ARK Cluster Companion Container). It and the accompanying XLM files should allow for a fairly simple stand up of a new ARK server cluster. https://github.com/CydFSA/A3C Go to the github, fetch the XMLs for however many servers you want to use in your new cluster, salt them to taste with your information (server names, cluster name, passwords, adminpasswords, ect...). Good Luck and Happy Hunting! historical information left below (really go get the newer stuff from github) ------------------------------ We are going to start with getting -UseDynamicConfig working and talking to our config file rather than the Official one out at http://arkdedicated.com/dynamicconfig.ini , I know it feels like that should come last but bear with me. First we have a simple http server running by itself serving up the "dynamicconfig.ini" on port 80 on its container, this is mapped out to the host on 8080 and is not really needed but makes it easy to take a quick glance at tower:8080 to see what the settings are. I ran this container first so that it would receive a predictable IP address (172.17.0.2:80) that is then used in the configurations of the remaining containers to add an entry to the hosts file (--add-host=arkdedicated.com:172.17.0.2) so that requests to http://arkdedicated.com/dynamicconfig.ini in the game servers are pointed to the container running at 172.17.0.2. If you don't want or care to use the dynamic configs, omit the ARK0 container and remove -UseDynamicConfig from the "Extra Game Parameters" of all subsequent ARK's you deploy. Next I deployed 10 ARK server instances, why 10 when there are only 9 maps? Well, I assume that Wild card will have another map for Genesis Part 2 coming in the spring so I added a container to house it, currently it is configured as a 2nd Genesis1 map with all the correct ports and paths. If they do release a new map it will only require changing the map name in the config and starting the container. The ports are mapped sequentially so you will only need to insert three port forward blocks into your gateway router (UDP 7777-7796, UDP 27015-27024, TCP 27025-27034) You do not need anything forwarded to ARK0 as it is only there to talk to ARKs 1-10. ARK0-dynamicconfig tcp 80:8080 ARK1-TheIsland Udp1 7777 UDP2 7778 UDPSteam 27015 TCPRCON 27025 ARK2-ScorchedEarth_P Udp1 7779 UDP2 7780 UDPSteam 27016 TCPRCON 27026 ARK3-Aberration_P Udp1 7781 UDP2 7782 UDPSteam 27017 TCPRCON 27027 ARK4-TheCenter Udp1 7783 UDP2 7784 UDPSteam 27018 TCPRCON 27028 ARK5-Ragnarok Udp1 7785 UDP2 7786 UDPSteam 27019 TCPRCON 27029 ARK6-Valguero_P Udp1 7787 UDP2 7788 UDPSteam 27020 TCPRCON 27030 ARK7-CrystalIsles Udp1 7789 UDP2 7790 UDPSteam 27021 TCPRCON 27031 ARK8-Extinction Udp1 7791 UDP2 7792 UDPSteam 27022 TCPRCON 27032 ARK9-Genesis Udp1 7793 UDP2 7794 UDPSteam 27023 TCPRCON 27033 ARK10-Genesis2 Udp1 7795 UDP2 7796 UDPSteam 27024 TCPRCON 27034 Path mappings are slightly more complex. SteamCMD is in its original location per @ich777's standard and the binary data for ARK is also in the default location. Having the server binaries shared also means that when there is an update to ARK (and/or SteamCMD) it only has to be downloaded one time rather than 10. The update procedure is to bring all of the ARKs down then start ARK1 let it update and initialize then bring the others back up en mass, as a precaution I have the wait timer on ARKs 2-10 set to 600 seconds so that if the Tower host gets rebooted ARK1 has time to pull any updates and initialize. The ARK savegame data and Server Config files are mapped into the proper location on a per container basis. This prevents each server instance from mucking up the servers config .inis (which they liked to do), this also means that you can use different options on each ark and makes managing the SavedArks less hair pully outy. The clustering function is done with a shared resource directory and a ClusterID (-clusterid=arkStar under "Extra Game Parameters") Dynamiccimfig data: /dynamicconfig<>/mnt/cache/appdata/ark-se/dynamicconfig SteamCMD: /serverdata/steamcmd<>/mnt/user/appdata/steamcmd ARK data: /serverdata/serverfiles<>/mnt/cache/appdata/ark-se Cross ARK cluster data: /serverdata/serverfiles/clusterfiles<>/mnt/cache/appdata/ark-se/cluster ARK configs and Save Data: /serverdata/serverfiles/ShooterGame/Saved<>/mnt/cache/appdata/ark-se/ARK1-TheIsland /serverdata/serverfiles/ShooterGame/Saved<>/mnt/cache/appdata/ark-se/ARK2-ScorchedEarth_P /serverdata/serverfiles/ShooterGame/Saved<>/mnt/cache/appdata/ark-se/ARK3-Aberration /serverdata/serverfiles/ShooterGame/Saved<>/mnt/cache/appdata/ark-se/ARK4-TheCenter /serverdata/serverfiles/ShooterGame/Saved<>/mnt/cache/appdata/ark-se/ARK5-Ragnarok /serverdata/serverfiles/ShooterGame/Saved<>/mnt/cache/appdata/ark-se/ARK6-Valguero_P /serverdata/serverfiles/ShooterGame/Saved<>/mnt/cache/appdata/ark-se/ARK7-CrystalIsles /serverdata/serverfiles/ShooterGame/Saved<>/mnt/cache/appdata/ark-se/ARK8-Extinction /serverdata/serverfiles/ShooterGame/Saved<>/mnt/cache/appdata/ark-se/ARK9-Genesis /serverdata/serverfiles/ShooterGame/Saved<>/mnt/cache/appdata/ark-se/ARK10-Genesis2 The XML files are attached below, if you chose to use them please make sure to edit them to your taste; server names, passwords, clusterIDs, ect. They can be used by placing them in /boot/config/plugins/dockerMan/templates-user then going to "Docker/Add Container" then choosing from the "Template:" drop down. Or maybe @ich777 will do us all a favor and decide to add them to his already impressive XML collection
 1 point
 -
ok, figured a solution for me, just in case someone else needs an tip 1st, make a backup of your vdisk file ... just in case in windows 10 (1703+) there a new tool added, mbr2gpt so, i used powershell in admin mode mbr2gpt /validate /allowFullOS <-- if ok then mbr2gpt /convert /disk:0 /allowFullOS now your win10 VM disk is prepared for EFI boot,.shut the VM down. create a new win10 VM with your same settings (exept use OVMF instead seabios), pointing to your existing and edited vdisk1.img (or whatever name it has). That was it ... enjoy when all is good your can remove your backup from your vdisk ..1 point
-
I figured it out. I needed to specify the byte offset of where the partition begins. For anyone who might have the same question in the future, here is what I did. From the unRAID command console, display partition information of the vdisk: fdisk -l /mnt/disks/Windows/vdisk1.img I was after the values in red. The output will looks something like this: [pre]Disk vdisk1.img: 20 GiB, 21474836480 bytes, 41943040 sectors Units: sectors of 1 * 512 = 512 bytes Sector size (logical/physical): 512 bytes / 512 bytes I/O size (minimum/optimal): 512 bytes / 512 bytes Disklabel type: dos Disk identifier: 0xda00352d Device Boot Start End Sectors Size Id Type vdisk1.img1 * 2048 206847 204800 100M 7 HPFS/NTFS/exFAT vdisk1.img2 206848 41940991 41734144 19.9G 7 HPFS/NTFS/exFAT[/pre] To find the offset in bytes, multiply the sector start value by the sector size to get the offset in bytes. In this case, I wanted to mount vdisk1.img2. 206848 * 512 = 105906176 Final command to mount the vdisk NTFS partition as read-only: mount -r -t ntfs -o loop,offset=105906176 /mnt/disks/Windows/vdisk1.img /mnt/test1 point