Leaderboard


Popular Content
Showing content with the highest reputation on 03/12/24 in all areas
-
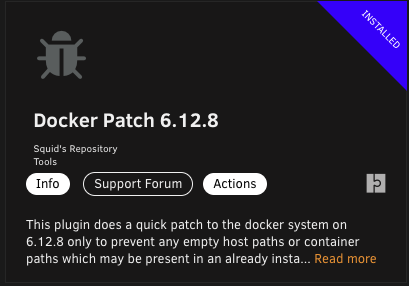
This plugin does a quick patch to the docker system on 6.12.8 only to prevent any empty host paths or container paths which may be present in an already installed template (or on a new installation) from triggering an error (and creating an orphan image) when updating the application. This is NOT fixing any bug in Unraid at all. Previously, the docker run command (eg: on 6.12.6) would not return an error if there was no container path specified. The docker system in 6.12.8+ does return an error (which is the proper operation). This quick patch simply has the docker system not add in to the docker run command any paths which has either the container or host side of it blank. If you did update an application and then had it orphan due to an empty path, then simply installing this plugin and then going to Apps, Previous Apps and reinstalling will get you back and running without changing the template to how it should be set up
 1 point
 -
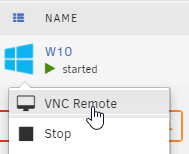
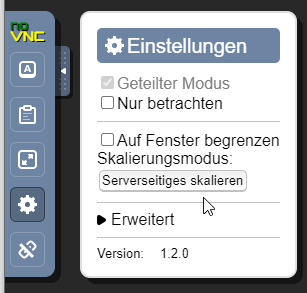
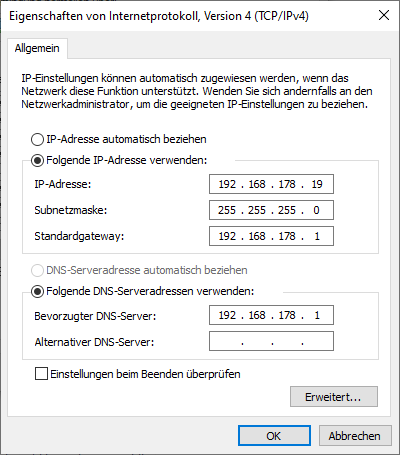
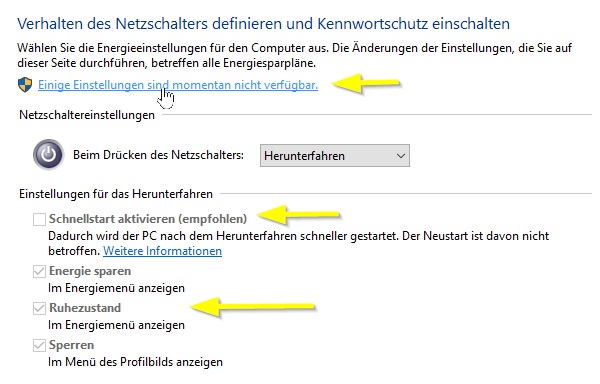
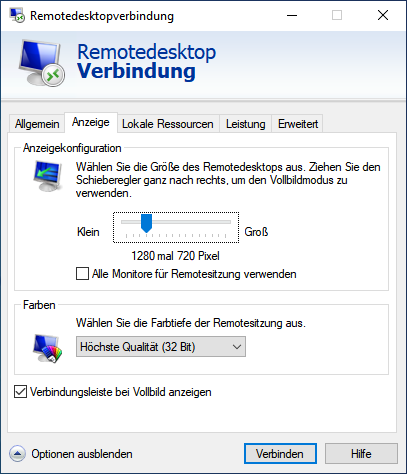
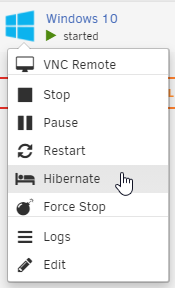
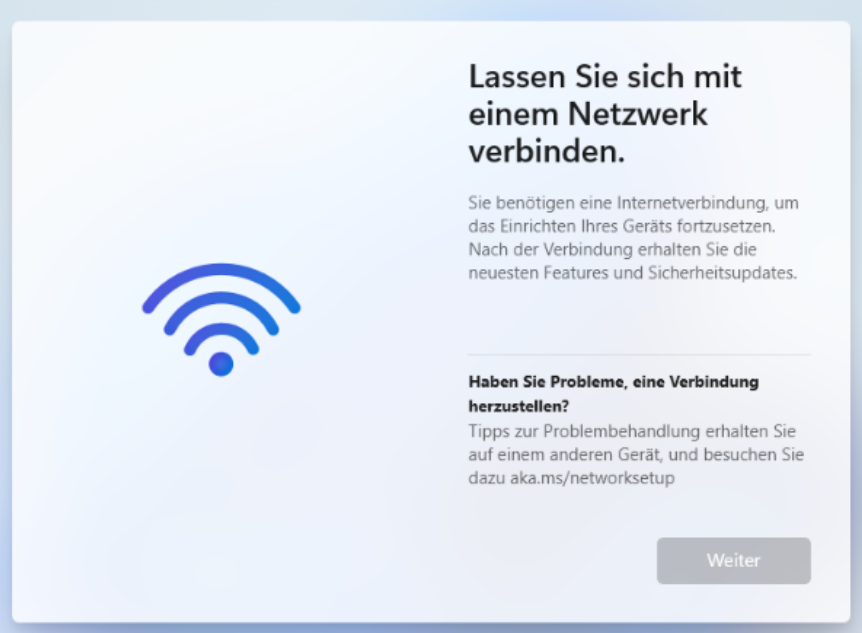
VM erstellen Windows Home / Pro ISO über das Media Creation Tool oder die Windows Enterprise ISO über UUP Dump erstellen. Settings > VM Manager > aktuellstes "Default Windows VirtIO driver ISO" auswählen und herunterladen Optional: Wer eine Grafikkarte durchschleifen möchte (nicht iGPU!): Tools > System Devices > Alle Einträge (VGA, Audio, USB, etc) der Grafikkarte anklicken und an VFIO binden > Unraid Server neu starten Optional: Wer nicht der CPU die Last-Verteilung überlassen möchte, der isoliert über Settings > CPU Pinning > CPU Isolation die Kerne der VM VMS > Add VM > Windows 10 Entweder: Alle Kerne auswählen und der CPU die Last-Verteilung überlassen, Oder: Die isolierten Kerne zuweisen 4096MB RAM, min und max Werte gleich, da unterschiedliche Werte zu Problemen führen können (2GB sind das offizielle Minimum) aktuellste Q35 als Machine, weil es von Intel GVT-g empfohlen wird. Info: Bei Windows 10 brauchte ich Q35-5.1, damit ich den Netzwerktreiber zum Laufen bringen konnte, ansonsten gab es den Fehler Code 56. über "OS Install ISO" die Windows ISO-Datei auswählen 32G vdisk oder größer (32G ist mittlerweile das offizielle Minimum, früher waren es 20G). Hinweis: vdisk.img sind Sparse-Dateien und belegen daher auf dem Datenträger weniger als angezeigt. Man muss aber was tun, damit das so bleibt. VNC Graphics Card auf German stellen Optional: Grafikkarte über das Plus-Symbol hinzufügen Optional: Sound Card auswählen, wer lokal am Server Lautsprecher / Kopfhörer anschließen möchte, bei Grafikkarten den Audio Controller der Grafikkarte auswählen Network Model: Wer keine Docker im "br0" Netzwerk verwendet, sollte für die bessere Performance "virtio" wählen, da "virtio-net" deutlich langsamer ist. Info: Ab Unraid 6.12.4 soll man das Bridge-Netzwerk deaktivieren. In dem Fall wählt man "vhost0" und "virtio" bei einer VM. Optional: Haken bei "Start VM after creation" raus und über GVT-g der VM eine vGPU zuweisen VM erstellen Optional: Über das GVT-g Plugin eine vGPU zuweisen und die VM starten Installation VMS > VM Logo > VNC Remote Wenn man "Press any Key" verpasst hat, dann einfach "reset" in der UEFI Shell eingeben um neu zu starten Am linken Rand "Serverseitiges Skalieren" aktivieren Benutzerdefinierte Installation > Treiber laden > Virtio CD Laufwerk > amd64\w10\ auswählen um den SCSI Controller Treiber für die virtuelle Festplatte zu laden Windows 11: Wer bei dem folgenden Bildschirm hängt, drückt SHIFT + F10, gibt "OOBE\BYPASSNRO" ein und bestätigt den Befehl mit ENTER. Die VM startet neu und nach Auswahl des Tastaturlayouts könnt ihr mit "Ich habe kein Internet" fortfahren. Nach der Installation Optional: Wer möchte aktiviert den Ruhezustand (Hibernate), damit er die VM über das Unraid Menü nicht nur herunterfahren kann. Dazu das Windows Logo klicken > "cmd" eintippen > Rechte Maustaste als Administrator ausführen: powercfg.exe /hibernate on powercfg /h /type full Rechte Maustaste aufs Windows Logo > Ausführen > powercfg.cpl Dann "Auswählen was beim Drücken..." > "Einige Einstellungen sind..." > Schnellstart deaktivieren und wer sich für den Ruhezustand entschieden hat, diesen einschalten Der Schnellstart muss deaktiviert werden, da es sonst zu Problemen kommt, falls man zB die Anzahl der CPU Kerne verändert etc Über das Virtio CD Laufwerk die virtio-win-gt-x64.msi ausführen, was die folgenden Treiber installiert: Balloon, Network, Pvpanic, Qemufwcfg, Qemupciserial, Vioinput, Viorng, Vioscsi, Vioserial, Viostor, Viofs Erst jetzt hat also die VM Internet Über das VirtIO CD Laufwerk die virtio-win-guest-tools ausführen, welches dann auch den VNC Grafiktreiber installiert, so dass wir nun ebenfalls die Auflösung ändern können. Dadurch können wir die VM nun über das Unraid Menü bequem Herunterfahren (Stop) oder in den Ruhezustand (Hibernate) versetzen: Unten rechts rechte Maustaste auf das Netzwerk-Symbol > "Netzwerk-..." > Adapteroptionen ändern > rechte Maustaste Ethernet > Internetprotokoll, Version 4... > Eigenschaften > Feste IP-Adresse vergeben Rechte Maustaste auf das Windows Logo > System > Remotedesktop > Remotedesktop aktivieren Optional: Bei Intel (vGPU) oder Nvidia (Grafikkarte) oder AMD (Grafikkarte) den Treiber herunterladen und installieren Das aktuelle Fenster schließen, auf einem Windows PC nach "Remote..." suchen und "Remotedesktopverbindung" (RDP) öffnen. IP-Adresse und Windows Username hinterlegen. Außerdem unter "Anzeige" die Auflösung anpassen, damit die VM nicht wie euer PC zB in 4K gestartet wird, was eine sehr hohe CPU Last auf dem Server verursachen kann: Hinweis: RDP läuft deutlich flüssiger als NoVNC im Browser und unterstützt auch Sound. Alternativ geht auch Parsec. Optional: PowerShell als Admin öffnen und folgendes ausführen um Windows von Bloatware zu befreien: iwr -useb https://git.io/debloat|iex Optional: Direkter Login-Bildschirm: Rechte Maustaste auf das Windows Logo > Ausführen > regedit KEY_LOCAL_MACHINE > Software > Policies > Microsoft > Rechte Maustaste auf Windows > Neu > Schlüssel > Personalization als Name eingeben > Rechte Maustaste auf Personalization > Neu > DWORD > NoLockScreen > Doppelklick > 1 als Wert > OK Alle Updates installieren (also auch bei Bedarf mehrmals neu starten) Herunterfahren Optional: ISO-Datei und virtio CD Laufwerk aus der VM Konfiguration entfernen Ein Backup von unserer Vanilla Windows vidks1.img erstellen. Das geht über Krusader (Apps), SMB (falls Netzwerkfreigabe vorhanden) oder über das Unraid WebTerminal (">_" oben rechts) mit dem folgenden Befehl (Pfade bei Bedarf anpassen): cp -a --reflink --sparse=auto "/mnt/user/domains/Windows 10/vdisk1.img" "/mnt/user/domains/Windows 10/vdisk1-backup.img" Video

 1 point
 -
I have a 10GbE network at home, it's just the NAS I built doesn't have 10GbE on the MB. "Need" well that's subjective ... but my need comes from copying large files from the PCs used to convert my BD/DVDs to MKV files (and/or upscales lower quality ones with Topaz Video AI to mp4 files) ... 50-80GB for 4K movies (with future plans for 8K content). When going thru 1GbE my xfers from PCs to NAS are: When going thru 10GbE my xfers from PC to NAS are: Pretty close to 10X faster ... when doing xfers with a lot of 50-80GB files, can make a big difference. Finding a mini-ITX motherboard with 10GbE port is not trivial ... and finding one that UnRaid supports is even more a challenge ... suggestions welcome, prefer for LGA 1700 but all welcome?1 point
-
First question is do you need a 10 gig NIC, and the issue among other things is B-series may at best have a TB header but it still requires a MATCHED TB card which will cost hundreds. If you want 10 gig it will be cheaper to just buy a new Mobo (you should consider Z-series) in the future as it has general better connectivity OR there are some mobo out there that have native TB3 in the mid $250+ range. So money wise it is definitely better and for compatibility to upgrade the mobo first, I'm pretty sure you cannot use TB on this board in the config you have. You could consider a mITX which has dual 2.5 and you could bond them and use scalable CIFS if that is a reason, then of course there is upgrading your entire network apparatus. 5 Gig should be enough and if you need critical work consider direct connection first.1 point
-
Here is my repo if you want to use for examples. https://github.com/SimonFair/unraid-lcd plan is to create a client to show Unraid specific info, but not built yet. client.php is my starter for 10 based on a pfsense plugin.1 point
-
I tried again with a new error. Seems to be steamcmd related. Any tips on how to fix that? I know its not really your topic /opt/scripts/start-server.sh: line 62: 56 Bus error wget -qO ${SERVER_DIR}/Pal/Saved/Config/LinuxServer/PalWorldSettings.ini https://github.com/ich777/docker-steamcmd-server/raw/palworld/config/PalWorldSettings.ini ln: failed to create symbolic link '/serverdata/serverfiles/Engine/Binaries/Linux/steamclient.so': No such file or directory cp: cannot stat '/serverdata/serverfiles/linux64/*': No such file or directory ---Ensuring UID: 99 matches user--- ---Ensuring GID: 100 matches user--- ---Setting umask to 000--- ---Checking for optional scripts--- ---No optional script found, continuing--- ---Taking ownership of data...--- ---Starting...--- ---Update SteamCMD--- tid(34) burning pthread_key_t == 0 so we never use it Redirecting stderr to '/serverdata/Steam/logs/stderr.txt' Logging directory: '/serverdata/Steam/logs' minidumps folder is set to /tmp/dumps [ 0%] Checking for available updates... [----] Verifying installation... [ 0%] Downloading update... [ 0%] Checking for available updates... UpdateUI: skip show logo[----] !!! Fatal Error: Steamcmd needs to be online to update. Please confirm your network connection and try again. src/tier0/threadtools.cpp (3710) : Assertion Failed: Illegal termination of worker thread 'Thread(0x0x56bec850/0x0x2a5ffb' ---Update Server--- tid(47) burning pthread_key_t == 0 so we never use it Redirecting stderr to '/serverdata/Steam/logs/stderr.txt' Logging directory: '/serverdata/Steam/logs' minidumps folder is set to /tmp/dumps [ 0%] Checking for available updates... [----] Verifying installation... [ 0%] Downloading update... [ 0%] Checking for available updates... UpdateUI: skip show logo[----] !!! Fatal Error: Steamcmd needs to be online to update. Please confirm your network connection and try again. src/tier0/threadtools.cpp (3710) : Assertion Failed: Illegal termination of worker thread 'Thread(0x0x56c30850/0x0x2a5ffb' ---Checking if configuration is in place--- ---Configuration not found, downloading...--- ---Checking if PublicIP is in place--- ---No PublicIP found in PalWorldSettings.ini, trying to obtain it...--- ---Sucessfully obtained PublicIP: MYIP, adding to PalWorldSettings.ini ---Prepare Server--- ---Server ready--- ---Starting Backup daemon--- ---Start Server--- ---Something went wrong, can't find the executable, putting container into sleep mode!--- EDIT: ok it was steamcmd. The ol' "delete the folder and start again" did work this time. Deleted the steamcmd Folder in Appdata. Now the container downloaded just fine. I will have to put the backuped Save into it but I expect it to work just fine. Sorry for the confusion!1 point
-
Thanks for all your help!1 point
-
With slot 4 in use, slot 7 will also be x8, so it doesn't really matter which card is where, as long as both work together when you get the GPU.1 point
-
Unfortunately there's nothing relevant logged in the persistent syslog, one thing you can try is to boot the server in safe mode with all docker containers/VMs disabled, let it run as a basic NAS for a few days, if it still crashes it's likely a hardware problem, if it doesn't start turning on the other services one by one.1 point
-
Perfect, it´s working!1 point
-
Try this:1 point
-
Had a quick glance into the code base. Honestly not sure if I want to do it - C++ or Qt aint my strongest contenders and they come with a lot of uglyness in that specific code base (many external dependencies, originally based on Qt5 which is Out-of-Support already). Specifically speaking from a low-level the customization features are also tailored for the Raspi-Bootloader - should be U-Boot as most SBCs as far as I remember. But then again this topic interests me quite a bit (in terms of learning) so I decided to create something from scratch in Rust (yesh): https://github.com/thiscantbeserious/usb-creator-rs Upside is I charge 0,00 - if you want to help with the planning and design feel free to contribute by feature requests. If it turns out useful / works as intended then I'll gladly rebrand / customize it for Unraid too. But no promises - I was initially planning to keep quite about it but here we are ... no pressure!1 point
-
Der Planka Docker ist jetzt nicht so aufgesetzt, dass er einfach läuft, da muss man noch extra Hand anlegen und Vorwissen mitbringen. Habs jetzt nicht installiert, aber in der Community Applications Beschreibung zu Planka allein steht schon additional requirements Postgres drin. Was bedeutet das Planka eine Postgres Datenbank benötigt um zu funktionieren. Ich seh jetzt auf Anhieb nicht, dass es eine Anforderung gäbe eine bestimmte Postgres Version zu nutzen, also würde ich jetzt einfach die aktuellste verfügbare nehmen. In den Community Applications ist glaub ich version 15 verfügbar? Nachdem Postgres installiert ist, benötigst du noch einen Weg, mit der Datenbank Software interagieren zu können, damit sie für Planka vorbereitet werden kann, so etwas wie Adminer z.B. als Datenbank Management Werkzeug, oder irgendwas anderes, mit dem du SQL Befehle absetzen kannst. Es sollte in Postgres eine Datenbank für Planka erzeugt werden (und idealerweise auch ein eigener Datenbank Benutzer, der Rechte besitzt, mit der Datenbank zu interagieren, aber wenn die Datenbank eh alleine nu für Planka sein soll, dann könnte man auch beim Standard postgres Benutzer bleiben). Und dann muss man vom Planka Docker die Einstellungen editieren und den Postgres URL Eintrag entsprechend setzen, ein spezieller Link zu deinem Postgres Docker, inklusive dem Datenbank Benutzer und dessen Passwort und auf welche Datenbank er zugreifen soll.1 point
-
I did some digging in the kernel commits (never done that before and I also don't have experience with the internals of Linux), but I found this: https://git.kernel.org/pub/scm/linux/kernel/git/stable/linux.git/commit/?id=8d6ef26501b97243ee6c16b8187c5b38cb69b77d If I read this correctly our issue actually is a feature instead of a bug (if this actually IS the cause). As far as I can tell it correlates with the kernel timeline in the Unraid releases. I have seen that there has been further development on the module/driver afterward but it would be interesting to see if this has been fixed or if it will stay that way from now on. This would suck because it takes away a lot of functionality. I can see this comment which gives me at least some hope https://git.kernel.org/pub/scm/linux/kernel/git/stable/linux.git/tree/drivers/gpu/drm/ast/ast_mode.c?id=8d6ef26501b97243ee6c16b8187c5b38cb69b77d#n1784 * FIXME: Remove this logic once user-space compositors can handle more * than one connector per CRTC. The BMC should always be connected. If I have the time, I will also boot up a live distro with a later kernel. However, as far as I can tell ALL boards with a BMC that is adressed with the ast driver (probably all ASPEED BMCs?) should run into this problem - not only this board. This should pop up in the whole server world? I have started a dedicated thread for that topic here:1 point
-
I will try to connect when I got home from work (in about 5 to 6 hours).1 point
-
Oh, I am well aware that I am playing with edge cases... Your driver works like a dream, far less hassle to setup than a plain Debian install... Kudos to you! Thanks! EDIT: Have resolved my issues with the new container... all working nicely.1 point
-
Hi again. System finished rebuilding. Looks like everything is back to normal. Again, thank you very much for your help! btw: Not sure if I can mark one reply as 'solution' as there were lots of steps to follow. Any suggestions to help the next user?1 point
-
Fair enough, as I said, this is still a work in progress, and your feedback is very much welcome. @d3m3zs As the other disks are sleeping and the last refresh date doesn't change, I suggest you post the problem on the unassigned devices plugin thread.1 point
-
When I went to run that command, it failed with an error of not having enough space, this lead me to investigate the minimum free space setting of the share. Once I corrected that issue I was able to run the backup successfully! Thank you for pointing me in the in the right direction!1 point
-
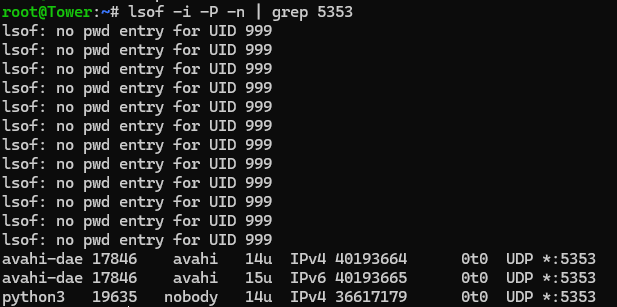
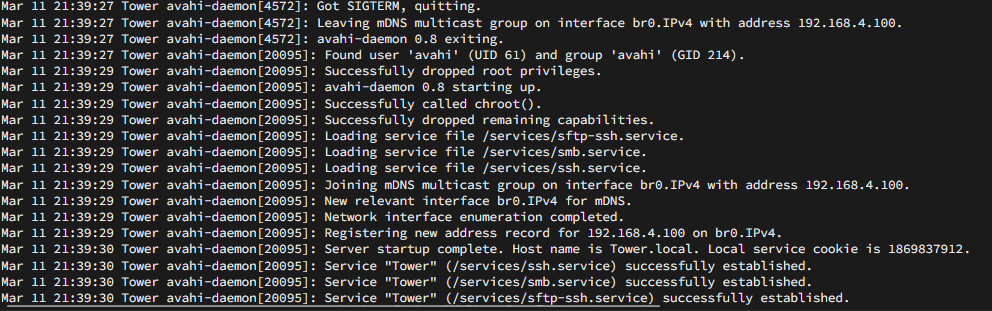
I think I found the culprit maybe? nobody 19635 0.8 2.3 1609296 388820 ? Ssl 10:06 5:39 python3 -m homeassistant -c /config Before and After stopping HA docker and restarting unraid mDNS: After, clearly homeassinstant is what I think is the source for the mDNS conflicting issue

 1 point
 -
Take a look at these plugins https://github.com/dcflachs/compose_plugin https://github.com/dcflachs/swapfile_plugin particularly the pkg_build.sh as an example of how to build a .plg Its something I was asking for a long time ago, but it never happened.1 point
-
DG2可以用大佬的替换原先内核来开箱即用, Thor2002ro - https://github.com/thor2002ro/unraid_kernel/releases DG1可以追一下这位大佬的进度 皮蛋熊本熊的个人空间-皮蛋熊本熊个人主页-哔哩哔哩视频 (bilibili.com)[https://space.bilibili.com/328544505]1 point
-
Short answer is you need these module parameters: Register_ClockSource=1 Register_Governor=1 Register_CPU_Idle=1 Register_CPU_Freq=1 Apply the Linux standards to add them as an `options` line into `/etc/modprobe.conf` or `/etc/modprobe.d/modprobe.conf` Somehow, you will also switch the System to CoreFreq Clock Source: this can be achieved in system `profile` or `init` file echo "corefreq_tsc" > /sys/devices/system/clocksource/clocksource0/current_clocksource Fyi, you can get all possible parameters using command: modinfo corefreqk.ko1 point
-
Read the first post in the Docker Patch support thread - should get you back up and running.1 point
-
Docker Inc. was the first company to give the users an easy-to-use way to isolate processes through Linux namespaces, cgroups etc. But its implementation came with a lot to desire when it comes to security and stability. docker runs as a daemon with root access, which means that the daemon is a single point of failure and the security has been applied as an add-on. Since docker was released other companies has implemented similar kind of easy-to-use way of isolating processes, but have taken the lessons learned from Docker Inc.s' implementation and done more stable and secure implementations. The most common one being podman. Podman is created as a drop-in replacement for docker. You can create an alias "docker" that points to the podman binary and most things will work right out of the box. Unlike docker, podman doesn't use a daemon and can run completely rootless. By giving the users of unraid the ability to use rootless podman instead of docker, you will give the users a more secure and stable platform than the alternative while still giving use the ability to run containerized workloads.1 point
-
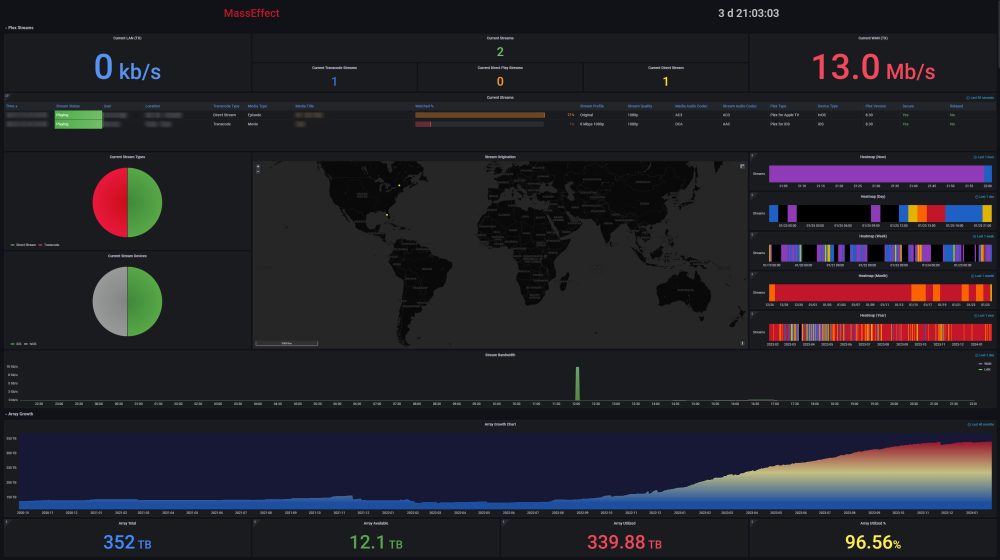
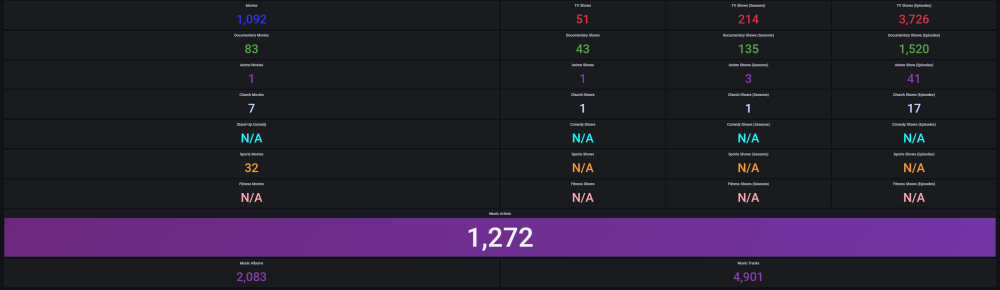
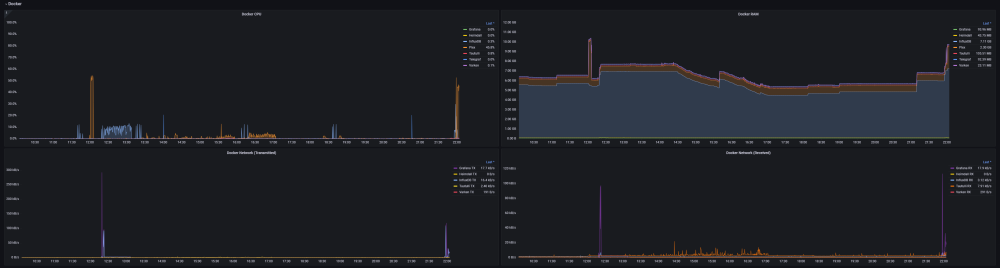
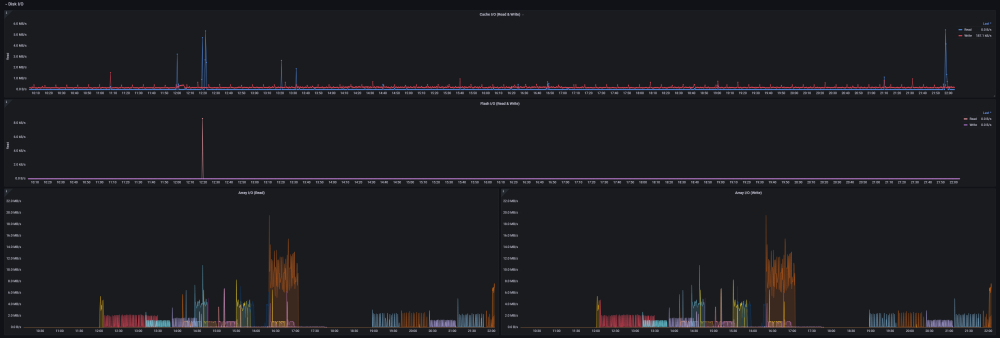
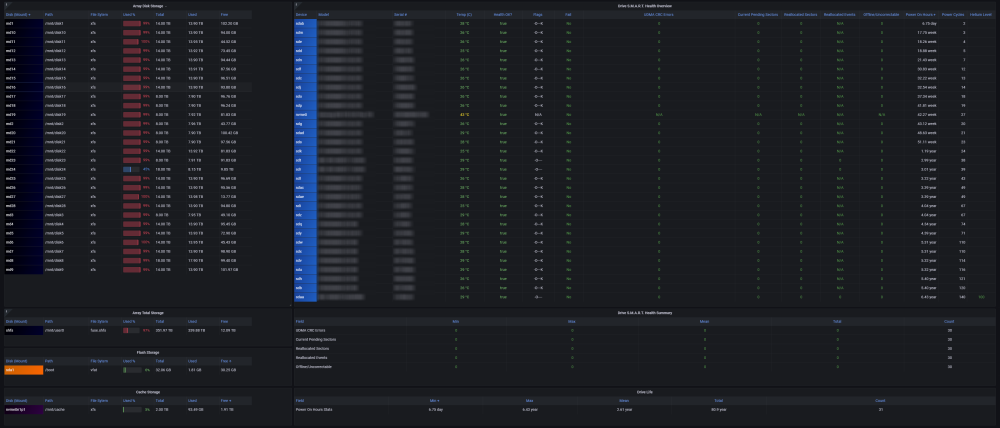
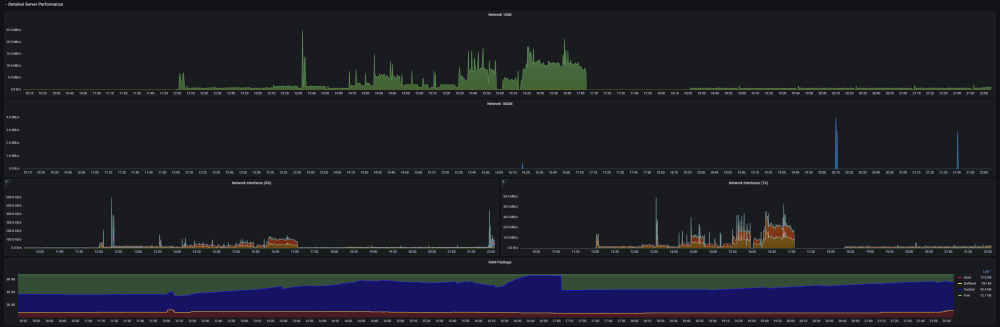
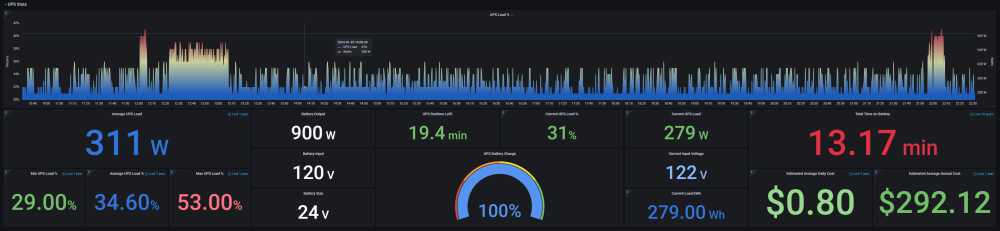
Alright, everyone. Here is the UUD 1.7 preview. It looks pretty different from 1.6, and since I made this version, I haven't really changed it much. It is the most fined tuned and refined version that I have developed, and there isn't much more that I need for me personally. I'm pretty pleased with the way it turned out. Let me know your thoughts and/or if you have any questions! @SpencerJ ULTIMATE UNRAID DASHBOARD Version 1.7 (Click Each Image for 4K High Resolution)
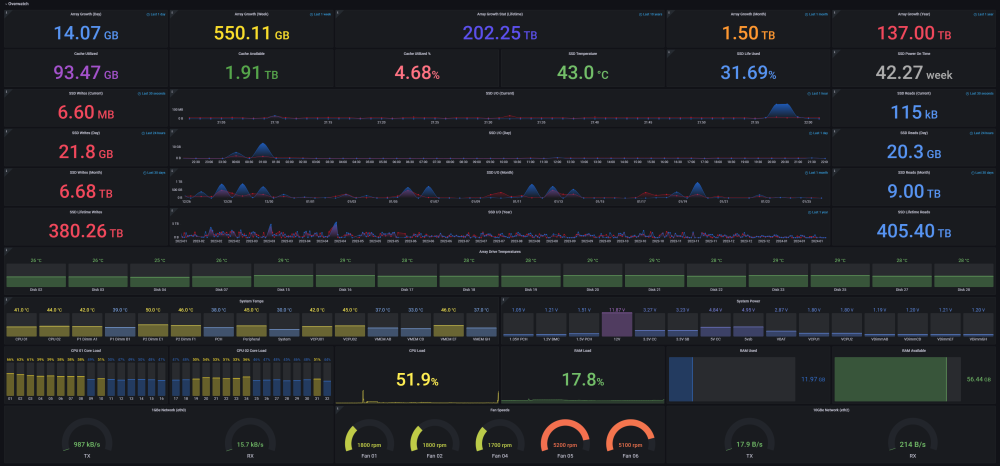
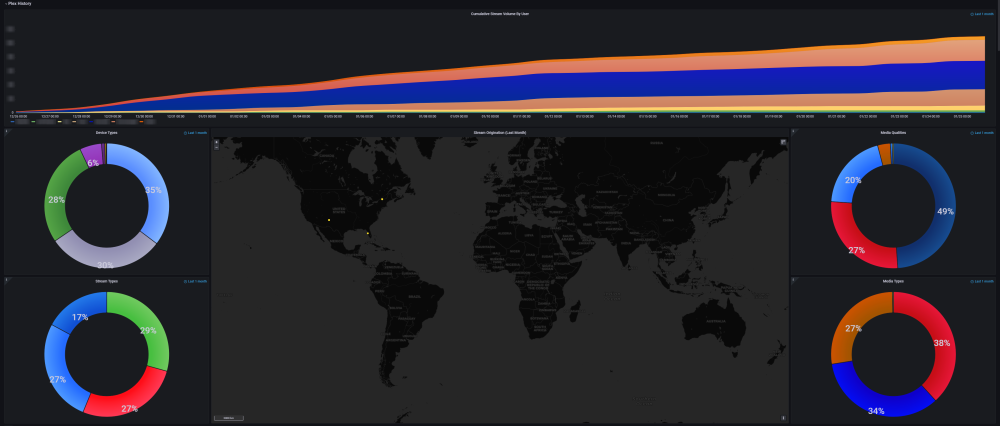
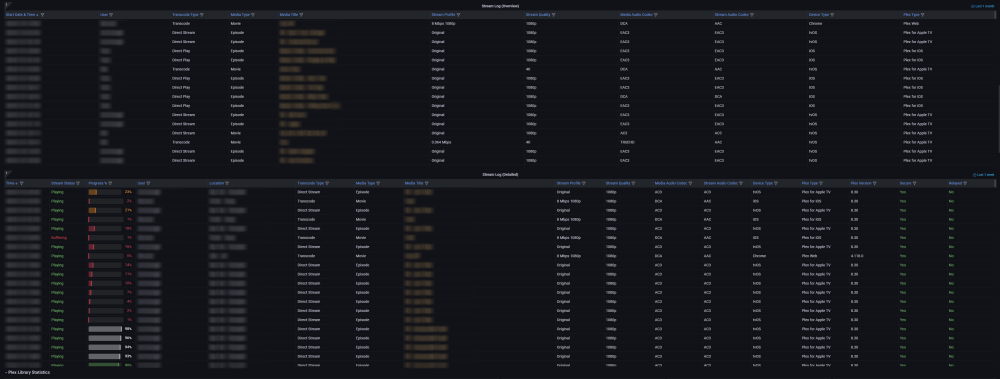
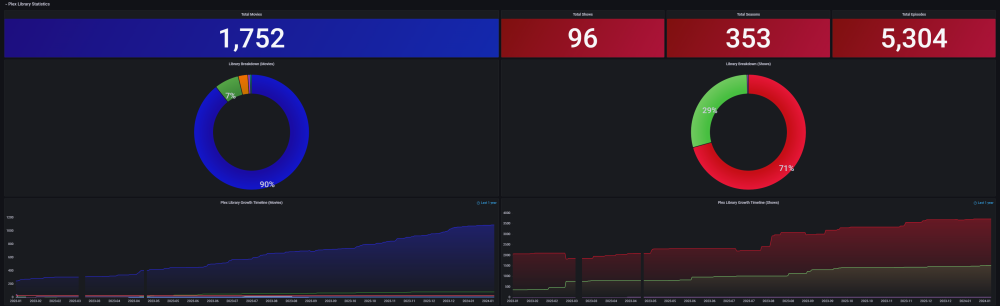


 1 point
 -
It is possible in unRAID to end up with files with the same name on more than one array disk. In particular this could happen when moving files around the system between disk shares (typically at the command line level) if you make a copy and forget to delete the source. This can be an issue on an unRAID system as if you are using unRAID user shares (as I expect most unRAID users would be) as unRAID only shows the first occurrence in such a case so it may not be obvious that you have duplicate files on the system. As well s potentially wasting space this can lead to unexpected behaviour such as deleting a file on a user share and finding it appears to still be there (because unRAID is now showing you the other copy that was previously hidden). Please note that we are talking about files with the same name that are present in more than one location and are thus wasting space. This utility does not try and detect files with different names that have the same content. If you want to try and detect such files then Joe L (of pre-clear and cache-dirs fame) has developed a script that will do this as described in this post). It is possible to see that such duplicate filenames exist by browsing via the GUI, but this has to be done on a case-by-case basis and there is no easy way to get a consolidated list of all duplicates. To get around this I created the attached script for my own use that is reasonably comprehensive and that others may find useful. The script runs very quickly (as it is working purely off directory information) so it is not much of chore to run it at regular intervals as part of your system housekeeping. LimeTech have on the Roadmap an item to include duplicate checking utility as a standard feature at some point. I thought that this script might be a useful stopgap (NOTE: I am more than happy if Limetech want to include this script (or a derivative) in any standard unRAID release). I modelled this on the style of script that is used in cache-dirs. I hope that Joe L. does not mind that I borrowed some of the coding techniques that he used. The following shows the usage information built into the script. Hopefully it is enough to get anyone interested started successfully. I would recommend that you try the -v (verbose) option at least initially. NOTE:. If using this script with Unraid 6.8.0 or later then due to a tightening of the security on the flash drive you need to precede the script with the ‘bash’ command:. E.g. bash ./unRAIDFindDuplicates.sh -v Usage: ./unRAIDFindDuplicates.sh [-v] ]-q] [-b ] [-c] -d exclude_disk] [-o filename] [-i dirname] [-e dirname] [-f/F] [z|Z] -b = If duplicate names found, do a binary compare of the files as well If omitted, then only a compare on file name is done NOTE. Using this option slows things down A LOT as it needs to read every byte of files whose names match to compare them -c = Ignore case when checking names. This can help with the fact that linux is case sensitive on filenames, whereas Windows, and by implication Samba, is case independent. This can lead to unexpected filename collisions. -d exclude_disk (may be repeated as many times as desired) The default behavior is to include all disks in the checks. Use this to exclude a specific disk from being included in the checks -D path Treat the given path as if it was an array disk (may be repeated as many times as necessary). Can be useful to test if files on an extra disk already exist in the array. -e exclude_dir (may be repeated as many times as desired) Use this to exclude a particular share/directory from being included in the checks -f List any empty folders (directories) that are duplicates of non-empty folder on another disk. These can be left behind when you remove duplicate files, but notg their containing folder. However empty folders are also possible in normal operation so finding these is not necessarily an issue. -F List any empty folders even if they are not duplicated on another drive. This may be perfectly valid but at least this helps you decide if this is so. -i include_dir (may be repeated as many times as desired) Use this to include a particular share/directory to be included in the checks If omitted, then all top level folders on each disk (except for those specifically excluded via the -e option(s)) will be included in the checks -o filename Specify the output filename to which a copy of the results should be sent. If omtted then the results are sent to the file duplicates.txt on the root of the flash drive e.g. /boot/duplicates.txt from linux -q = Quiet mode. No console output while running. Need to see results file for output. -v = verbose mode. Additional Details are produced as progress proceeds -V = print program version -x = Only report file mismatches on time/size (default) or content (if -b also used) Does not simply report the fact that there is a duplicate if they appear identical. -X path = Check the array against the given disk and report if files on the array are either missing or appear to be different size. Use the -b option as well if you want the file contents checked as well. Useful for checking whether you have files on a backup disk that are not also on the main array. It is assumed that the path specified conatins files in the same folder structure as is present on the array. z Report zero length files that are also duplicates. These are not necessarily wrong, but could be a remnant of some previous issue or failed copy Z Report xero length files even when they are not duplicates. EXAMPLES: To check all shares on all disks except disk 9 ./unRAIDFindDuplicates.sh -d 9 To check just the TV share ./unRAIDFindDuplicates.sh -i TV To check all shares except the Archives share ./unRAIDFindDuplicates.sh -e Archives TIP: This program runs much faster if all drives are spun up first Note: This script still works unchanged on the newest Unraid releases such as the 6.12.x releases. # CHANGE HISTORY # ~~~~~~~~~~~~~~ # Version 1.0 09 Sep 2014 First Version # Version 1.1 10 Sep 2014 Got the -b option working to identify files where # the names are the same but the contents differ. # Added -q option to suppress all console output while running # Added warning if file sizes differ # Version 1.2 13 Sep 2014 Added the -D option to check extra disk # Version 1.3 01 Oct 2014 Added -f and -F options to list empty (duplicated) directories. # Added -z and -Z options to list zero length (duplicated) files. # Fix: Allow for shares that have spaces in their names. # Version 1.4 07 Oct 2014 Fix: Use process ID in /tmp filenames to allow multiple copies of # the script to be run in parallel without interfering with each other. # Version 1.5 07 Mar 2016 Fix: Incorrect reporting of file size mismatches when sparse # files involved. If you find any issues with the script or have suggestions for improvement please let me know and I will see if I can incorporate the feedback. unRAIDFindDuplicates_v1.5.zip1 point
-
这个问题很经典,正好借助这个话题来给看到这个帖子的朋友们分享一下其中的逻辑。 1. 起因 使用 SMB 去编辑文件提示没有权限的情况,很多时候都是由于用户组没有可编辑权限导致,而如果你访问的这些文件属于某一个 Docker 应用所创建,那么很有可能是由于 UMASK 变量所设置的值不包含用户组的可编辑权限,从而导致了 SMB 用户所属的用户组权限不足,进而无法编辑文件。 首先,大家需要对 Linux 的文件权限有一个大概的了解,这里我提供一些参考的资料给大家自行去学习——参考资料-1,参考资料-2(你也可以自行搜索资料去了解)。 其次,当我们使用 SMB 协议去访问 UNRAID 上的文件时,我们需要有相应的权限才能够对文件进行增删改查,很多时候这个权限主要取决于使用 SMB 的这个用户的所属用户组权限,用户组权限不够就会有权限不足的提示。 接着,如果你需要编辑的文件是某一个 docker 应用所创建出来,那么你就需要首先考虑安装这个 docker 应用时有没有配置 UMASK 变量(并不是所有的 docker 都会需要配置 UMASK 变量)。如果有配置的话,那么你需要检查变量的值是能让用户组有编辑的权限(关于 UMASK 的简单解释可以看这里,同样的你也可以自行搜索资料去了解)。另外对于新手朋友,我也推荐你了解一下 UNRAID 上正确安装 Docker 的步骤,具体的文章请看本末尾的参考资料。 2. 实际例子 这里我以 qBittorrent 为例进行讲解,因为这个应用绝大多数的 NAS 用户都会进行安装。下面是一个从 APPS 安装的 QB 应用的配置参数(Linuxserver/qbittorrent),大家需要重点关注的是 UMASK 这个设置(关于 PUID/GUID 的说明请看末尾的参考资料): UMASK 设置为 022 这个值之后,假设我利用 QB 下载一个文件,那么文件被创建出来后的默认权限是: 文件夹:rwxr-xr-x 文件:rw-r--r-- 也就是说,只有文件拥有者有完整的【读写】权限(rwx),组或者其他用户只有【读】权限(r--),这也就意味着当你通过 SMB 尝试去对 QB 所创建出来的文件进行编辑的时候是没有权限的,因为使用 SMB 协议的用户所在的组权限不足(如下图),原因就是由于 UMASK 的值导致: 如果我此时使用以下命令,为 QB 下载目录内的所有文件/文件夹添加所属组可编辑权限(w): chmod -R g+w ./downloads 然后我再进行编辑的时候就没有权限不足的提示了: 如果我将 UMASK 的值设置为 002 ,那么此时所属组的权限包含了读写的权限(rw): 此时使用 SMB 协议去编辑也没有权限不足的提示: 所以,当我们通过 SMB 去对 UNRAID 上的文件进行编辑时如果出现权限不足的情况,很多时候就是由于用户组权限不够导致。 3. 解决办法 首先,你可以将 Docker 变量中的 UMASK 的值设置为 002 ,这样 docker 应用创建出来的文件可以被 SMB 的用户进行编辑。 接下来,如果你需要对现有文件的权限进行调整,那么你可以借助 Fix Common Problem 插件处理,参考这里。 另外,你也可以使用 chmod 命令进行单独的处理,此方式比较适合处理 appdata 内的文件。因为默认情况下 appdata 内存储着各种 docker 应用的配置文件夹,有些 docker 应用需要有特定的用户权限才能正常运行,所以不能随便利用工具对所有 appdata 内的文件进行统一的改动,具体的说明看这里。 4. 其他参考资料 关于 PUID/GUID、PID/GID 这些变量的作用大家可以参考这篇《新手教程:如何在 unRAID 上正确安装 Docker》,顺便也了解一下如何正确安装 docker 应用和解决文件权限问题。 关于 UNRAID 上 SMB 用户认证的相关资料大家可以参考我前些年我的一篇文章《unRaid SMB 共享:基于Windows 10 下的 SMB 问题深入分析及解决方式》。 关于 UNRAID 上配置 SMB 的内容可以参考《新手教程:unRAID 开启 SMB 的其他方法》。 除开 UNRAID,你也可以参考我的另一篇关于 SMB 的文章《Windows 10/ 11 下安全并正确地使用 SMB 共享》。


 1 point
 -
I would really like to have a plugin to defrag the XFS drives, anyone willing to make one?1 point
-
You can do it with the current tailscale version by 0. install tailscale plugin on your unraid server 1. go into your unraid console and enter this command tailscale up --login-server=https://headscale.yourdomain.com --accept-dns=false it will give you this result To authenticate, visit: https://headscale.yourdomain.com/register/nodekey:5967f578ac……dc937a4757b6e164707a28f1c3a95ea0a 2. open the generated url link in your browser, it will generate a headscale command with key for you to register your unraid server with your headscale server 3. enter into your headscale docker console, copy and paste the generated headscale command in step 2 , but before pressing enter, change the username in the command to your own one then press enter, and you are done; your unraid tailscale node is now registered and connected with your headscale server. You may want to change some other settings in tailscale too.1 point
-
The auto-start order is determined by the order the containers are listed on the docker page, from top to bottom. Pre 6.12 you can just drag and drop to change the order, Post 6.12 you need to hit the little lock icon on the right hand side of the menu bar before youre able to do so.1 point
-
Oh @SimonF, look what you've made me do... This is a HD44780 2004 display hooked up to a Arduino Nano that I had lying around connected via USB to unRAID (sorry for the poor contrast but I had no suitable variable resistor at home so I was forced to set the contrast to 100%). I think the parts, without the variable resistor and the wires are around Eur. 15,- For anyone interested I've attached the Arduino Sketch and the config file for LCDd: hd44780.inohd44780.conf I think this should be also doable with a ESP32 and a HD44780 2004 display @JonathanM, if you want something like that over WiFi. Anyways this Arduino setup should be also work over USBIP if I'm not mistaken. EDIT: You should be also able to use ser2net but I'm unsure if it's supported on Unraid and if there is somewhere a binary for Slackware around.


 1 point
 -
If the duplicates are in the same place on various data drives then the script on this posting may help1 point
-
because already included in Unraid 6.11+ https://wiki.unraid.net/Unraid_OS_6.11.0#Base_distro:1 point
-
This should do it: /etc/rc.d/rc.nginx reload FYI - Unraid 6.10 is a bit more strict with making sure your certificate matches your settings. I'd recommend running the Fix Common Problems plugin, it will warn you if your certificate is actually valid or not before you upgrade.1 point
-
Not a super advanced user so take all of this at your own risk I also have a Gigabyte board - gigabyte z270mx gaming So using sensors-detect this is the only module detected other than coretemp ITE IT8686E Super IO Sensors (address 0xa40, driver 'to-be-written') I used this command to force load the it87 driver under a different an ID which it recognised which works correctly with the IT8686 chipset (for me) modprobe it87 force_id=0x8628 This got my PWM fans working and detected by Unraid I was then able to see the fans in Dynamix System Temp and enable the fans so that Unraid can see them and display them on the dashboard You then need to put that last command into your go file so it gets loaded at boot I used 'Config Editor' by Squid to edit this easily Using pwmconfig or pwmcontrol in the console just ended up messing with things and I had to reboot to get it all fixed Dynamix Fan Auto Control was then able to see the chipset and PWM fans It could see the fans in this fan control fine before my reboot but it wasn't able to control any of my fan speeds After the reboot Fan Auto Control was able to correctly detect my 4 fans and detect the minimum PWM value (min PWM detect was a particular issue before reboot) I was still having trouble before I realised that you have to enable the fan control function individually for each of the PWM fans Finally success, I have conquered this Gigabyte board! You may need to add this line below to syslinux.cfg to get this to work on some boards acpi_enforce_resources=lax Here are some links to key resources that helped me: In reality all of this is just saying that Squid's advice just below works for Gigabyte boards https://hwmon.wiki.kernel.org/device_support_status_g_i https://forum.level1techs.com/t/i-patched-the-it87-temperature-monitoring-driver-need-some-help-testing-it/132675 https://github.com/lm-sensors/lm-sensors/issues/1541 point
-
Solved! Looks like in the boot setting I had the boot priority's flipped. First boot should be Scandisk NOT UEFI Scandisk. I also wanted to note, booting from UEFI Scandisk will cause Unraid from booting up. I got a black screen with a curser and as soon as I plugged in a mouse or keyboard it would boot. Also, this solved the gui issue I was having. GUI now works like normal, no more black screen with a blinking curser. Thanks everyone for you help1 point
-
Darf ich hier kurz zwischendurch was einwerfen @sanobi & @Ford Prefect. Ich würde auf keine fall die Firewall auf Unraid virtualisieren da aufgrund der neuen Plugins (Nvidia, DVB,...) nicht nur von mir ihr ein Problem haben könntet wenn ihr Unraid upgradet. Die Plugins checken nämlich beim Serverstart ob eine neue Version/Treiber für das Plugin vorhanden ist, wenn das fehlschlägt ist noch nichts verloren wenn du aber ein Upgrade von beispielsweise 6.9.0 auf 6.9.1 durchgeführt hast braucht/muss das Plugin einen neue Version/Treiber für den neuen Kernel herunterladen und da stehst du dann vor dem Problem wenn du deine Firewall auf Unraid virtualisierst hast du zu dem Zeitpunkt noch kein Internet und somit schlägt die installation fehl und das Plugin ist ein einem Error state. Wenn es im Error state ist und du zB Nvidia installiert hast und im Emby/Jellyfin/Plex Docker nutzt oder DVB im TVHeadend Docker startet 1. der Docker nicht und 2. du musst das Plugin zuerst auf der Plugin Page im Error Tab deinstallieren und dann musst du es neu aus der CA App installieren und evtl. nochmal neustarten. ...auch wenn du die Plugins noch nicht verwendest, wer weiß was noch geplant ist nicht nur von mir im bezug auf Plugins aber auch von Limetech im bezug auf Unraid selbst. Außerdem bin ich sowieso ein gegener von Firewall virtualisierungen hier mal was wenn es IPFire/pfSense/OPNsense sein soll: Klick oder Klick1 point
-
Since your appdata and system (and domains) shares have files on the array, and mover can't move open files, you will have to go to Settings and disable Docker and VM Manager service to get those moved. If you also want to move domains to cache you will have to set it to cache-prefer before moving. I really question the idea of running mover so often. Mover is intended for idle time. If your system isn't really idle then you might as well be writing that share directly to the array.1 point
-
Just an Update: I've stresstested the onboard Aquatic 10G Card (Mobo: ASUS Proart 670 WiFi), but it did not long until she freaked out, reseted line and finally blocked the port completely. Did not even took an hour to kill her. It "works" until you put heavy load (100Gig+ Files) on her. Will be disabled and replaced by a just ordered "new" Mellanox X3 with SFP+0 points
-
I cant recommend this cards because the cheap ones are old and used. I would use 2x TP-Link TX401 and a propper cable. This card is similar to the Asus XG-C100C what i use but with a WOL-function. The Asus 10GBit-NIC is working since Oct.2019 without issues.0 points
-
If you make this a subscription service you've lost a customer.0 points