Leaderboard


Popular Content
Showing content with the highest reputation on 12/19/19 in all areas
-
⚠️ NOTICE: I currently do not have the time to do more than maintain this project for myself at the moment. I will eventually do more work on it as my life permits, but for now development will be sporadic at best. I am more happy to add someone else to the project to maintain it, or even accept some PRs as that is much easier for me to find time for Mod note: this plugin has multiple known issues, use with care. This is a beta version of a plugin I am working on to replace the unraid-vmbackup script I have been maintaining here and here. It is based off the latest version of the script (v1.3.1), and I will be maintaining both for now as there are some use-cases for the script that the plugin cannot currently replace. This is provided as-is with no guarantees. That said, and without further ado, the current version of the plugin can be found here: https://github.com/JTok/unraid.vmbackup/tree/v0.2.8 -JTok Feel free to buy me a beer (or two 😋)4 points
-
It is official! I finally have the first beta version of the plugin available here: -JTok2 points
-
Fyi, you change the management port via settings - management's doing it via the parameter is deprecated and may not even still work2 points
-
Overview: Support for Docker image Shinobi Pro Documentation: https://shinobi.video/docs/ Video Guide: Showing how to setup and configure Shinobi Pro. If you want to run Shinobi Pro through a reverse proxy then below is a config file that you can edit. Save it as shinobi.subdomain.conf # make sure that your dns has a cname set for Shinobi server { listen 443 ssl; listen [::]:443 ssl; server_name shinobi.*; include /config/nginx/ssl.conf; client_max_body_size 0; location / { include /config/nginx/proxy.conf; proxy_pass http://IP-OF-CONTAINER:8080; proxy_set_header Upgrade $http_upgrade; proxy_set_header Connection 'upgrade'; proxy_set_header Host $host; } } If you appreciate my work, then please consider buying me a beer
 1 point
 -
I've spent the last 2 days trying to learn everything I can how to setup GNS3 on Unraid VM. Get a drink, this could take a while. Shutdown all of your VMs. Yes, this is needed. Install User Scripts if you don't have it already. Once installed, go to settings > User Scripts Add 2 new scripts - One "Enable Nested VMs" and another one, "Disable Nested VMs" Go here and grab the snippets for these. if you have AMD cpu, you'll need to adjust the scripts. Read the snippets, takes 2 seconds to adjust for AMD. Once done, run the Enable Nested VMs script via RUN IN BACKGROUND. It'll take about 5-10 seconds to run. click show log to verify that it was successful. Look for... Nested vms are enabled for intel cpus Script Finished blah blah blah Warning - if you have a Windows VM and AV on it, turning on these nesting settings can cause issues. My suggestion, turn off the AV for the vm. Download the GNS3 VMware workstation VM. (Yes, I know other posts have said download the virtual box one, but just humor me) Open the zip, extra the OVA file. Using Winrar or 7zip, open the OVA file, and extract the .vmdk files rename and remove any spaces out of the name of the vmdk files Login via ssh to your unraid box. I use mobaXterm to make this process easier as you'll need to get the domains folder and upload the .vmdk files we just extracted. path to the domains share Open your unraid gui and start creating an Ubuntu vm. Change your initial memory to whatever you think is best. I used 4096 for my box. Machine - Q35-2.12 Bios - SeaBIOS leave the rest the default. Make sure your Network Bridge is set (your VM needs an interface) Click Create, but do not start it. This will create the folder under the domains share. open the newly created folder in SSH (mine was GNS3), and then upload/scp files to this folder. Once these have been uploaded, we HAVE to convert them to raw. Yes, unraid does support vmdk, but in my experience over the past 48 hours has shown me, that not all things work the way they should. use these commands to convert them. Obviously, adjust your file names to what your files are named. qemu-img convert -f vmdk -O raw GNS3VM-disk1.vmdk GNS3VM-disk001.img qemu-img convert -f vmdk -O raw GNS3VM-disk2.vmdk GNS3VM-disk002.img This WILL expand the files... ALOT. Mine expanded to 117Gbits from 339MB. Thanks GNS3 for over killing the vmdk space :eyeroll: delete the other .img file that was created when you created the vm. Back in the Unraid gui, edit the newly created GNS3 vm. Primary vDisk Location - change to manual - path to your newly created disk001.img is (mine ended up being /mnt/user/domains/GNS3/GNS3VM-disk001.img) Add another vDisk location - change to manual - repeat - (/mnt/user/domains/GNS3/GNS3VM-disk002.img) Change BOTH of these to SATA. If you leave this as VirtIO, the vm will start to boot, but won't finish booting (the lizard will never get the bug) Once you change to SATA, save the changes and boot the vm, and connect to it via the VNC console. You might see an Ubuntu screen first, press enter and continue the boot. Voila! GNS3 vm has booted. However, it's might be complaining about KVM support (Nested Virtualization). Did you do Step 3? If GNS3 isn't complaining about KVM and it showing "KVM support available: True" then you're set to setup the network portion. Configure the network as you see fit. I personally statically assign all my vms, but if you have DHCP on your bridged network, it'll already have an IP. Finish that drink! P.S. Attached is my XML for this VM if you need to break it down for some reason. You'll need to reconfigure the GNS3 client app to use the VM. Open GNS3, edit, preferences, server, un-tick Enable local server, enter the IP of your GNS3 vm. I had to uncheck auth, but too tired to experiment anymore. Done. NOTE: If you've created any specific devices from templates... you'll probably have to recreate those as the devices you've saved were pointing a local VM (VMWare Workstation or Virtual Box). As a MIkrotik guy, this made me sad as I had 10 versions of RouterOS saved which had to be recreated. GNS3_XML.xml1 point
-
oh, you're right, i missed that; nobody 13716 8.7 92.7 92190640 91863428 ? Sl 06:34 66:18 | | \_ /usr/bin/python -u /app/bazarr/bazarr/main.py --no-update --config /config okay, killing it for now then, I guess it's some memory leak, never seen it use that much/ Thanks1 point
-
Bazarr is using ~90GB ram in your diagnostics output1 point
-
Check our blog on linuxserver.io for the Customizing our containers post. Then it will survive an update. Can you add a github issue for the request. Knowing myself, I will most likely forget it when I wake up tomorrow.1 point
-
Sorry can't resist... 😉 "Home assistant dead" Somebody died?1 point
-
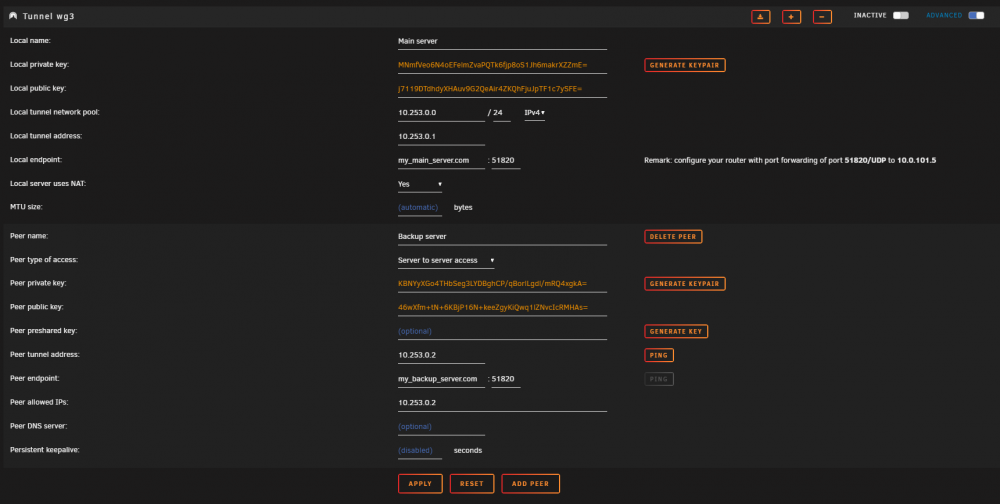
Below an example configuration It is mandatory to define a local endpoint (main server) and a peer endpoint (backup server). These endpoints can be a URL or a (public) IP address of the server. When the main server is behind a NAT router then port forwarding must be set on the router. The same is true for a NAT router used at the backup server (peer) side.
 1 point
 -
I hadn’t really thought about it, but I probably should lol. I’ll put that on my to-do list, but that’s probably a post-beta feature right now. Sent from my iPhone using Tapatalk1 point
-
@Slverfox Mods are now working, just put your list of mods, separated by [SPACE], in the Workshop Content line in the Docker template and the Container does the rest, even creates the modlist.txt and fills it with the specified mods. Just delete and redownload the container or you can check for updates on the Docker page in Unraid and update.1 point
-
Very cool, can't wait to give it a whirl. Quick question: do you plan to add restore capability at some point?1 point
-
I'm sure the trailing Slash was there. Will try again and report back Sent from my iPhone using Tapatalk1 point
-
That's interesting! This was the last release that was on the 5.4 kernel before 6.8-RC releases were reverted to the 4.19 kernel. So, maybe, the CPU monitoring patches have already been applied, but not all the appropriate patches for temperature monitoring of the x470/x570 boards were incorporated. Even more reason for this feature request! @juan11perez thanks for sharing! -JesterEE1 point
-
@JesterEE Im using a 3900X with an Asus x470-f gaming. With unraid 6.8.0rc7 i get cpu temp but no motherboard. With 6.8 stable nothing.1 point
-
You should post your system diagnostics zip file (obtained via Tools->Diagnostics) to your NEXT post so we can see what is going on. If you have added the disk to the Unraid array then try clicking on the drive on the Main tab anb selecting the option to run a File System check. Post the results of such a check.1 point
-
This is decrepated since Unraid version 6.41 point
-
EDIT: I believe this is specific to x570/Zen 3000 units. If your sig is current, this will not apply to your system. No joy. Loading both drivers in the System Temperature plugin results in no entries being added in the sensors pull downs. Running sensors -s from the CLI results in a "No sensors found" message. I migrated from a i7 with Unraid 6.7.2/6.8.0 and this was not an issue with that architecture (obviously, different sensors apply to this build, so not apples to apples). Additional references: https://forum.level1techs.com/t/temperature-system-monitoring-for-ryzen-3000-and-x570-motherboards-in-linux/145548 https://github.com/ocerman/zenpower -JesterEE1 point
-
I'll update to 6.8 tonight and see if i have the same issue1 point
-
tried changing the unraid management port to something else? cd /boot/config/ nano go add -p to default below; /usr/local/sbin/emhttp -p 8008 & change 8008 to whatever unique on your host1 point
-
No, each parity disk (1 or 2) must be at least as large as any single data disk. As mentioned parity is not a backup so why would you think it needed to be as large as the total capacity? To add to what has already been said about parity not being a backup. Parity doesn't contain any of your data. Parity by itself cannot rebuild anything. Parity just contains parity bits that, together with the corresponding bits on ALL other disks, allows the data for a missing disk to be calculated. Here is the wiki on parity: https://wiki.unraid.net/UnRAID_6/Overview#Parity-Protected_Array If you understand parity a lot of things about how Unraid works with the disks, and how you work with Unraid to manage the disks, makes a lot more sense.1 point
-
Parity 1 >= max size of Data Drive(s) Parity 2 >= max size of Data Drive(s) Parity drive(s) must be greater than or equal to the max size of any data drive. In @Goodboy428 situation, you can simply use a 4TB or larger for Parity since your max data drive is 4TB.1 point
-
Technically you can. 1. Install all the required dependencies. 2. Recompile the Linux kernel including any OOT drivers 3. Install more dependencies, including compiling some Nvidia dependencies from source like Go, which takes an age. 4. Compile the Nvidia drivers, there's a tiny bit of hackery here as there's no desktop environment by default in Unraid so it fails without (iirc it's something to do with the GTK toolkit, I can't remember how I fixed it in the end, I think I removed part of the Slackbuild to skip that bit as we don't need it) 5. Compile the Nvidia docker runtime and libseccomp 6. Change the docker daemon json config 7. Pull apart Unraid to it's component files, install all the bits and bobs then put it back together. Before we made this everyone was asking for the Nvidia drivers, problem is, that doesn't solve the problem of utilising them in the docker containers, actually compiling the drivers and making Slackware packages is the easy bit of the whole thing, problem is if you install at boot time like many other slackware packages you get a kernel panic. (Probably because it's too late in the boot process) In fact, when I started this process, that was the approach I initially took, install everything at boot time. To put it into perspective, we have scripted this whole process and using 24 threads on my server, with 32GB of RAM, it still takes ~ 30-40 minutes to get through the whole thing.1 point
-
1. Yes 2. If Disk1 is part of the array, it will constantly be writing to the Parity drive. You might look into the Unassigned Devices plugin to add a disk outside of the array (you'll need another spare disk for this) and then move your completed download to the array. 3. Edit the docker, then click "Add another Path, Port, Variable, Label or Device" Change Config Type to "Path" Enter a Container Path, ex. /new_download_location Enter a Host Path, ex. /mnt/Disk1/Downloads Click save The path /new_download_location will show up inside of the container and it points to /mnt/Disk1/Downloads. Go into the qBittorent webui, Tools > Options > Downloads. Change Default Save Path to /new_download_location.1 point
-
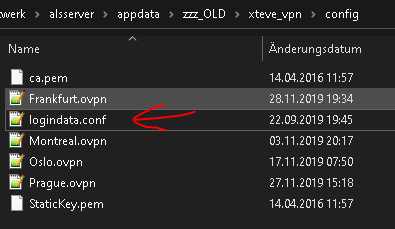
from the docker info readme xteve, in docker with ovpn ### docker runs in bridge mode ### put your ovpn file in /config edit your ovpn credentials in /config set your LOCAL_NET to fit your netmask access xteve webui ip:34400/web/ you should have a logindata.conf in your /config folder to add username and password, where also your ovpn files are placed
 1 point
 -
If he does, it's possibly because no one that is looking for help ever bothers to read the pinned messages before posting. The practice of posting Diagnostics has been standard fare for years already.1 point
-
A private tracker I use has not yet white listed the 4.2.X release. This may take up to a month. I forgot to check this prior to updating my docker. Thank you for your input though. Edit: Digged the info i needed. Docker / Edit Repository: linuxserver/qbittorrent:4.1.9.99201911190849-6738-0b055d8ubuntu18.04.1-ls54 APPLY1 point
-
Just thought I'd write a quick update. I was expecting to have HW encoding sorted by end of October, but now that we are getting into the warmer months I'm using all my free time to carry out some much needed maintenance on my house. I probably will not get back to working on Unmanic until February/March. If you find issues, feel free to put them on GitHub, I will get around to it eventually. Hope everyone has a Merry Christmas (or whatever other holidays you celebrate at this time of year) and thanks for using Unmanic. Sent from my ONEPLUS A6000 using Tapatalk1 point
-
To clarify my answers, I took "Multiple Array Pools" as literally multiple array pools. You might want to add in multiple cache pools as another option. For my usage, I'd like multiple arrays, not multiple cache pools.1 point
-
@Djoss, Is there a way to get the autoripper to set the output directory based on the disc type? i.e. DVD -> /output/DVD/ BR -> /output/BR/ UHD -> /output/UHD/ I'm trying to use your handbrake docker as well to automate the process but I don't really want to apply a blanket preset for all content but rather have one for DVDs, one for BR, and one for UHD. I figure I can use the multiple watch folder option with handbrake but I still need a way to sort the incoming files by origin type. Thanks and really appreciate the work!1 point
-
I'm doing a similar setup, one docker will be navezgane and one docker will be randomgen. My host is a surplus Dell R720 with 12cores/24threads, 64gb mem. I am consolidating all of my pet projects to one host, 7days docker is a big one as I had a linux box just for it. Does not seem to be very popular, also surprised to see it here. Been lurking threads and learning as I go since joining unRAID.1 point
-
I've got this in my nginx config (in proxy-confs/gitlab-ce.subdomain.conf): server { listen *:80; server_name registry.subdomain.duckdns.org; server_tokens off; return 301 https://$http_host:$request_uri; access_log /config/log/nginx/gitlab_registry_access.log; error_log /config/log/nginx/gitlab_registry_error.log; } server { listen *:443 ssl; server_name registry.subdomain.duckdns.org; server_tokens off; include /config/nginx/ssl.conf; client_max_body_size 0; chunked_transfer_encoding on; access_log /config/log/nginx/gitlab_registry_access.log; error_log /config/log/nginx/gitlab_registry_error.log; location / { include /config/nginx/proxy.conf; proxy_pass http://gitlab:9381; } location /v2/ { include /config/nginx/proxy.conf; add_header 'Docker-Distribution-Api-Version' 'registry/2.0' always; proxy_pass http://gitlab:9381; } } and this as the container's extra parameters (minus setup for email, backups and container registry): --env GITLAB_OMNIBUS_CONFIG="external_url 'https://git.subdomain.duckdns.org';registry_external_url 'https://registry.subdomain.duckdns.org';gitlab_rails['gitlab_ssh_host']='git.subdomain.duckdns.org';nginx['listen_port']=9080;nginx['listen_https']=false;nginx['hsts_max_age']=0;registry_nginx['listen_port']=9381;registry_nginx['listen_https']=false;registry_nginx['enable']=true;registry['enable']=true;" If you want to use ssh rather than https for cloning/pushing, you'll need to add a port to the container for it: host port 9022 (or whatever you like that isn't being used), container port 22. I then add this in ~/.ssh/config: Host gitlab HostName git.subdomain.duckdns.org Port 9022 User gitlab although I have to say that, while this works for Mac and Linux/BSD, I have no idea what the equivalent is for Windows!1 point
-
Perfectly normal. The IP showing is in fact the IP of the docker container. As you found out, you need to use your unraid IP address and the port you mapped to the docker.1 point
-
There are instructions for installing it as a VM:1 point
-
As I was finalizing the debug information for the above post I was able to solve the issue and considered not posting. On the other hand, I've read far too many threads where the author solves their own problem and abandons the thread. So, just in case someone finds themselves in a similar situation in the future, the resolution to this particular problem was to change directory in my active bash session out of the /mnt/user path...1 point
-
1. On Linux or Mac, use ssh-keygen to generate a key pair, there'll be 2 files generated, a private key file (e.g. id_rsa) and a public key file (e.g. id_rsa.pub); 2. On your unRAID server, enter folder /root/.ssh (create the folder if it doesn't exist), then edit the file /root/.ssh/authorized_keys (create the file if it doesn't exist), and copy/paste the contents of public key file (id_rsa.pub) into authorized_keys. If you have multiple Linux/Mac computers, you may put multiple public keys into authorized_keys, one in a line; 3. Change permission of authorized_keys to 600: chmod 600 /root/.ssh/authorized_keys Now you can ssh into unRAID w/o entering password. However, after reboot, you'll lose everything in /root folder, so you need to find a way to keep everything during a reboot. Here's how I made it: 1. Create a script /boot/config/ssh/setup_ssh_client.sh: #!/bin/bash SSH_DIR=/root/.ssh mkdir ${SSH_DIR} chmod 755 ${SSH_DIR} cp /boot/config/ssh/authorized_keys ${SSH_DIR}/authorized_keys chmod 600 ${SSH_DIR}/authorized_keys make it executable: chmod 755 /boot/config/ssh/setup_ssh_client.sh 2. Copy the previously created authorized_keys into /boot/config/ssh folder cp /root/.ssh/authorized_keys /boot/config/ssh/ 3. Edit /boot/config/go and add the following line at the end, so that our setup script can be called during reboot: /boot/config/ssh/setup_ssh_client.sh All done. Now your ssh settings will be setup automatically at reboot.1 point
-
After successfully bricking the Fujitsu D2607 by downflashing it I'm proud to be able to contribute to this thread and hereby report: LSI MegaRAID with SAS2008 chipsets 3) DELL Perc H310 as well as H200 Flashed successfully to LSI9211-8i IT (P20) 3TB Drive Support with this card: YES (UPDATE: 5.0Beta7 added 3TB Drive support) Drive Spin Down support: YES (UPDATE: Added as of 5.0Beta7) Drive Temp Readings: YES Toolset_PercH310 to LSIMegaraid.zip (DOS, via bootable usb key) http://www45.zippyshare.com/v/51016808/file.html (for some reason I can't embed the link...) MD5:80174075959fb7d1ff8c6362f7241bfe Update on 06.08.2014 Included the P19 firmware http://www21.zippyshare.com/v/9541812/file.html Update on 01.12.2014 Possible issues with P20 firmware! See this post and this. Update on 23.10.2015 There is an new version of Avago (former LSI) P20 (20.00.04.00) which seems to be OK with unRAID. See this post. Update on 15.09.2015 User opentoe found out that the DELL IT firmware is also working with unRAID. It's your decision what to flash. Flashing DELL firmware is easier and supported by DELL! opentoe's verdict on DELL IT or Avago (former LSI). Update on 07.06.2016 There is a new firmware from Avago. P20.00.07.00 The toolset has been updated accordingly. First impressions. http://www3.zippyshare.com/v/xZKIOHaz/file.html https://www.mediafire.com/?8f82hx4c032a929 MD5: 24f7d428292e00f9dee6f715d8564202 Update on 30.12.2016 Firmware is still P20.00.07.00 Switch to RUFUS for bootdisk creation. Added alternative ways to extract controller info if MegaCli is not working. https://www.mediafire.com/?9cbklh4i1002n23 MD5: 7d90f84c831e8b939c5536d9eb03ba81 Update on 23.02.2017 Firmware is still P20.00.07.00 Uses sas2flsh through the whole process. Tested on a "backflashed" H200, to be confirmed on a stock H200 card and on H310's. Card backup is now dumping the full flash. This can be used to restore the initial condition of the card. Added script for automatic SAS address extraction. No reboot necessary any more. https://www.mediafire.com/?0op114fpim9xwwf MD5: 2fbe3d562846e493714a9e8ac3f15923 Due to missing UEFI environment, no changes nor testing with UEFI shell. Update on 30.03.2017, v2 Firmware is still P20.00.07.00 Spiced up the routines with some checks to automatically select the right tool if one is not working. Tested on a stock H310 as well as a H200 - works for me. Post your experience in the forum. https://www.mediafire.com/?6b77v4s7czluvs2 MD5: 6cb92336ff537aeb838085a028aa6601 Update on 11.04.2017, v3 Firmware is still P20.00.07.00 Added files for use in an EFI environment. Untested due to missing hardware. Post your experience in the forum. https://www.mediafire.com/?9ovj2rxuaf43wv4 MD5: t.b.d. Update on 17.04.2017, v4 <--- this is the latest, use this one! Firmware is still P20.00.07.00 Corrections for EFI environment. Untested due to missing hardware. Post your experience in the forum. https://www.mediafire.com/?py9c1w5u56xytw2 MD5: t.b.d. If you experience the "failed to initialize PAL" error somewhere in step 5, you have to boot from UEFI shell and try again or use another mainboard. See here how to use UEFI shell (Kudos 2 Maglin). Make sure you read and understand the __READMEFIRST.txt before starting! If you experience troubles or something is not clear, don't hesitate to ask for help. You can help improving the howto by doing so. Chances are small but you can brick the controller!1 point