Leaderboard


Popular Content
Showing content with the highest reputation on 01/23/21 in all areas
-
@Ford Prefect Danke. Die Befehle aus dem Link sind mir bekannt. Die Reihenfolge halte ich auch ein. scrub kann ich aber leider vergessen, weil ich nicht schreibend mounten kann. Was ich noch herausgefunden habe und was wohl durch den Wechsel auf Single passiert sein muss, dass "data" auf Single steht und nicht auf RAID1: btrfs fi us /mnt/nvme0n1p1 Overall: Device size: 1.82TiB Device allocated: 136.06GiB Device unallocated: 1.69TiB Device missing: 931.51GiB Used: 112.67GiB Free (estimated): 1.71TiB (min: 884.98GiB) Data ratio: 1.00 Metadata ratio: 2.00 Global reserve: 78.56MiB (used: 0.00B) Multiple profiles: no Data,single: Size:134.00GiB, Used:112.50GiB (83.96%) /dev/nvme0n1p1 67.00GiB missing 67.00GiB Metadata,RAID1: Size:1.00GiB, Used:87.02MiB (8.50%) /dev/nvme0n1p1 1.00GiB missing 1.00GiB System,RAID1: Size:32.00MiB, Used:16.00KiB (0.05%) /dev/nvme0n1p1 32.00MiB missing 32.00MiB Unallocated: /dev/nvme0n1p1 863.48GiB missing 863.48GiB Und der Fehler mit der Missing Disk kommt wohl durch den erste Chunk-Fehler: Jan 23 12:02:06 nas kernel: BTRFS warning (device nvme0n1p1): chunk 360832827392 missing 1 devices, max tolerance is 0 for writable mount Jan 23 12:02:06 nas kernel: BTRFS warning (device nvme0n1p1): writable mount is not allowed due to too many missing devices Durch rsync wurde quasi jede 2. Datei in jedem Ordner gesichert. Es ist also nicht ein Ordner vollständig wiederhergestellt worden. Der nächste Versuch ist nun btrfs restore. Dummerweise kann ich dieses Kommando wohl nicht unbeaufsichtigt ausführen lassen. Das wird zwar bei manchen Seiten behauptet, aber das ist nicht der Fall, da man zwischenzeitlich Fragen beantworten muss: btrfs restore -i /dev/nvme1n1p1 /mnt/disk2/nvme1n1p1_restore No valid Btrfs found on /dev/nvme1n1p1 Could not open root, trying backup super We seem to be looping a lot on /mnt/disk2/nvme1n1p1_restore/domains/Win10/vdisk1.img, do you want to keep going on ? (y/N/a) Da dies aber eine unwichtige Datei ist, habe ich den restore davon abgelehnt, was den Vorgang etwas beschleunigen dürfte. Wenn das durch ist, mache ich noch einen restore von der ersten SSD. Dann habe ich die erste mit rsync und btrfs restore und die zweite nur mit btrfs restore wiederhergestellt. EDIT: Ok schon fertig. Also alle Dateien wurden wiederhergestellt. Witzigerweise von der zweiten SSD, die kein gültiges Dateisystem mehr besaß. Die erste hat auch beim BTRFS Restore nur Fehler produziert. Ich habe dann abschließend mit rsync dry-run die gemountete SSD1 (konnte ich ja noch mounten) mit dem BTRFS restore von SSD2 verglichen und alle Dateien sind mit der gleichen Dateigröße noch da, nur das Dateidatum ist nicht mehr gleich. Aber damit kann man denke ich leben4 points
-
Implemented next release. Selectable to start on new installs. Edits start automatically if container was already running.3 points
-
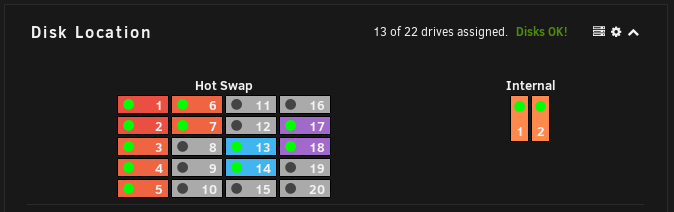
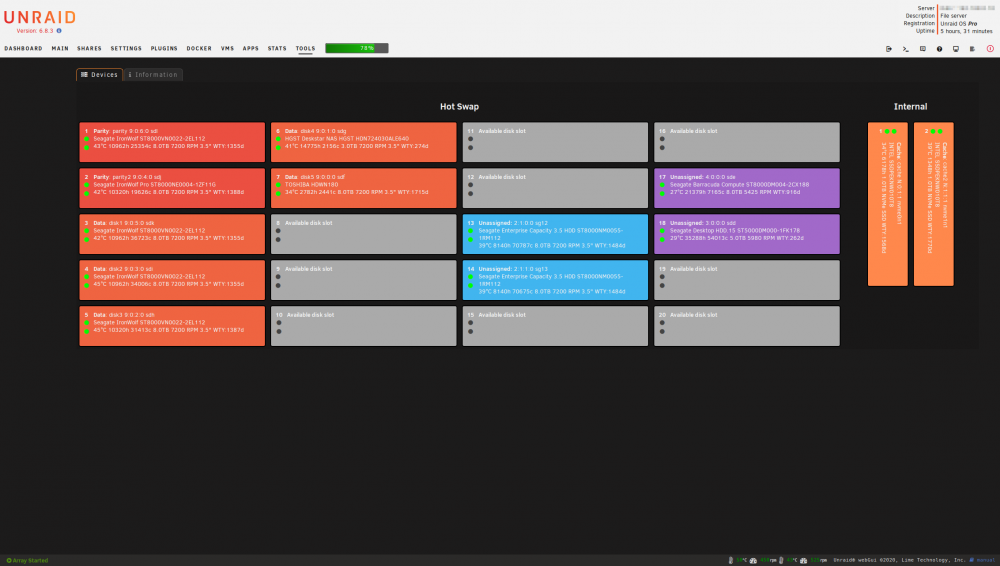
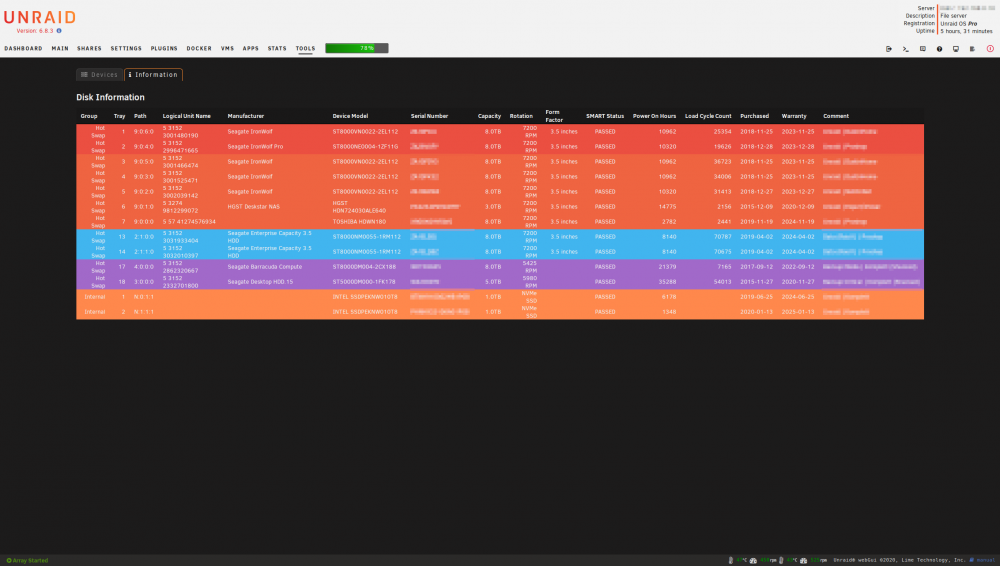
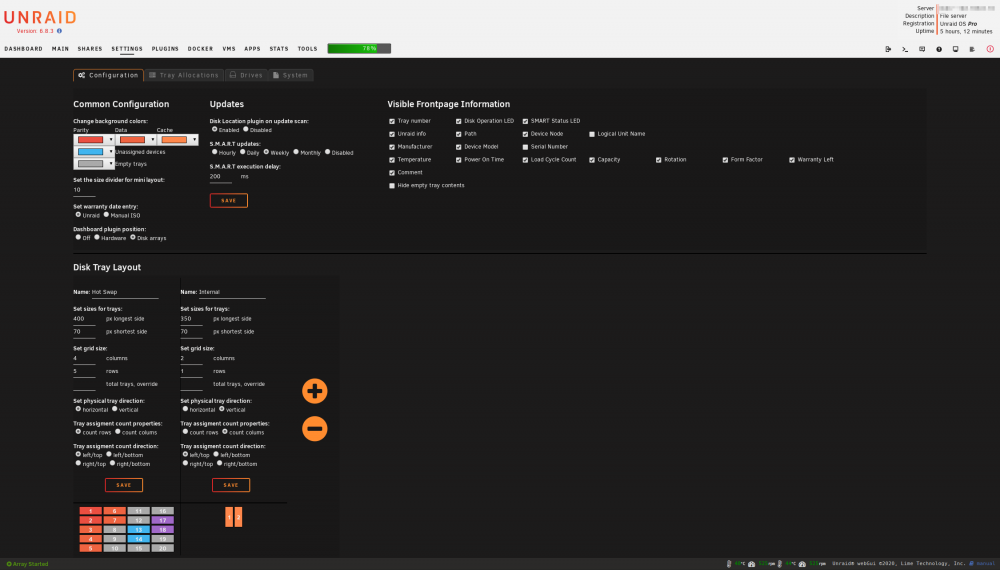
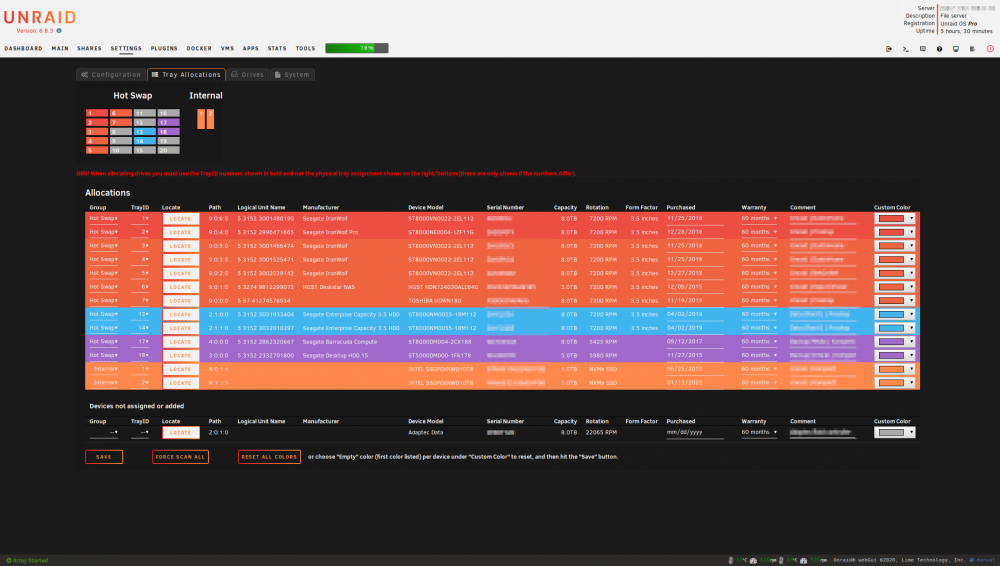
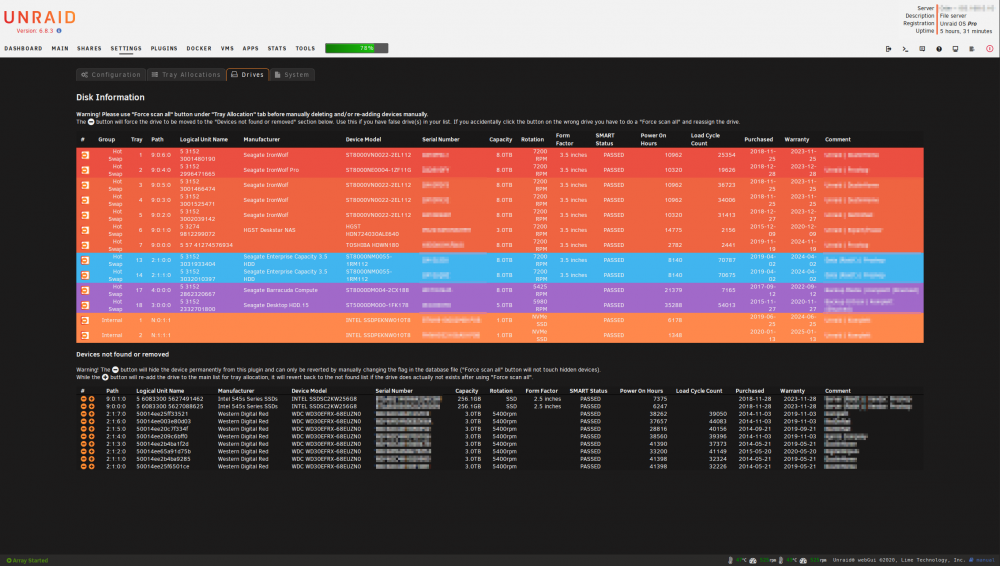
Disk Location is a different disk tray layout plugin which uses the harddisk path to locate the drives. It supports only drives found by the SCSI Generic drivers, which is usually SATA and nVME including devices attached to hardware storage/raid cards. This also include a handy "Locate" function which help you allocate the tray from where the disk is installed in, if you have hotswap trays with their own HD-activity LED (or made your own custom ones). This might not work on SSD's or maybe even some other types of harddrives. You can change the direction of the trays horizontal and vertical as well as the numbering direction of the trays, make some override to add more storage "not included in the hotswap tray area", change the background colors of the different type of storage (unraid, unassigned and empty), and more. Doing changes will not delete or clear any configuration and values are mainly stored based upon serial number and model name of the harddisk. For more information and help, use the inline Help function from Unraid (this will solve most of the questions asked): It might take some time to install and update the plugin as it goes trough all your drives, more you have, longer it will take. For me it takes about 5-10 seconds with 15 harddisks, but upto 30-60 seconds if they need to wake up from standby. The plugin is primarily developed for the current stable Unraid branch and might lag a bit behind for new releases with new functions. Disk Location will be installed under "Settings" (as of Unraid 6.12 and onwards). Download plugin using this link here: https://raw.githubusercontent.com/olehj/disklocation/master/disklocation-master.plg Or install it via "Community Applications" plugin, search for "Disk Location" under "Apps" For unstable development build, check next post. Screenshots: Please report bugs and feature requests at github: https://github.com/olehj/disklocation

 1 point
 -
Welcome to the "new" new method of working around HP's RMRR problem on unRaid. For the previous/deprecated method which was no longer working, see: https://forums.unraid.net/topic/72681-unraid-hp-proliant-edition-rmrr-error-patching/ Additionally, for 6.9 there was a way to compile the patch yourself using the now deprecated kernel helper. This method starting with 6.10 is more streamlined as the patch is pre-built into unRaid now. First the disclaimer: This patch been tested with no negative attributes observed by myself and many others. . Many have been running an RMRR patched version since mid 2018 when we first started producing them, and so far have had no reported issues. In 2021 I sold my last proliant, so as new releases of unRaid are made public, it will be on the users to report any issues as they may (or may not) arise.. As the patch only omits RMRR checks, it should not affect any other core function of the OS. But as a general notice, neither Limetech or myself, or any contributors are responsible/liable for any loss of data or damage to hardware in enabling this patch in unRaid, or on any other system you install it. The "New" New unRaid HP Proliant Edition - RMRR Error Patching Description/Problem It is well documented that many HP Proliant servers have RMRR issues using certain BIOS versions after about 2011 when trying to passthrough devices in a linux environment. Device passthrough fails and the onscreen error will show: vfio: failed to set iommu for container: Operation not permitted And a look further into the logs show: Device is ineligible for IOMMU domain attach due to platform RMRR requirement. Contact your platform vendor. HP is aware of this problem and is not updating older machines. There are some bios options to try to fix this on newer models with some success. On unRaid, the problem is addressed by patching out the RMRR check. As of 6.10 the patch is now built into unraid, but off by default. Information regarding the patch can be found here: https://github.com/kiler129/relax-intel-rmrr Note: the patch author states: ------------------ --->>>A big thanks to @ich777 for creating the ability for users to previously easily compile the patch themselves, and to @limetech for now incorporating it into unRaid itself. <<<--- ------------------ Previously, @AnnabellaRenee87 and I maintained and provided the patched file for users. But now you will be able to easily enable the patch as it is included in unRaid starting with 6.10. Installation/Enable Procedure valid starting with 6.10 For users already using a previously patched version of unRaid, follow these steps: 1. Make a backup of your flash device by clicking on the main tab, then scroll down to your boot device section, click flash, then click flash backup and wait for the download. 2. Modify your syslinux.cfg by going to the main tab>boot device>flash in the "Unraid OS" section. Modify to the following: append intel_iommu=relax_rmrr initrd=/bzroot The patch is off by default and requires this to enable it. 3. Update to at least 6.10 of unRaid, reboot. 4. After the server has booted up, open a terminal and enter dmesg | grep 'Intel-IOMMU' If the patch is active you will get the following response DMAR: Intel-IOMMU: assuming all RMRRs are relaxable. This can lead to instability or data loss For users already running 6.10 and above follow these steps: 1. Make a backup of your flash device by clicking on the main tab, then scroll down to your boot device section, click flash, then click flash backup and wait for the download. 2. Modify your syslinux.cfg by going to the main tab>boot device>flash in the "Unraid OS" section. Modify to the following: append intel_iommu=relax_rmrr initrd=/bzroot The patch is off by default and requires this to enable it. 3. Reboot. 4. After the server has booted up, open a terminal and enter dmesg | grep 'Intel-IOMMU' If the patch is active you will get the following response DMAR: Intel-IOMMU: assuming all RMRRs are relaxable. This can lead to instability or data loss Disable To disable the patch, remove the modification to syslinux.cfg and reboot. Other Proliant Problems Check this thread for fixes to other common Proliant problems: https://forums.unraid.net/topic/59375-hp-proliant-workstation-unraid-information-thread/ Happy unRaiding!1 point
-
Das kommt durch einen Parity-Check, der Änderungen festgestellt hat. Dh die Parität war nicht in Ordnung bei diesen Sektoren. Das kann bei einem Crash durchaus passieren, darf aber nicht im laufenden Betrieb auftreten. Denk dran, dass wenn du das Plugin aktualisierst, deine Änderung nicht mehr vorhanden ist. Die müsste man dann erneut einbauen.1 point
-
A new version of my qbittorrent-vpn Docker has been pushed (should be available within 1 hour after posting this message). Most of these changes won't be noticeable, since qBittorrent still is qBittorrent 😉 However some background work has been done. The issue that @tmor2 had, should be fixed with this new version. Together with resolving that issue, the other new big change is the decision to switch to Libtorrent 2.0 instead of Libtorrent 1.2.xx. Hereby the changelog: * Switch to the Libtorrent RC_2_0 tag instead of RC_1_2. * Self-compilation of Boost to stay up to date with the newest software. * Forcing a fix of the IPv6 Issues people were reporting with certain VPN providers. This is done by adding `--pull-filter ignore route-ipv6 --pull-filter ignore ifconfig-ipv6` to the openvpn command when running it. Code cleanup: * Fixed 'if... then;' consistency in the the SSL Certificate section of the qbittorrent start.sh script * Removal of an unnecessary `wg-quick down` message (Contribution of @Cassidy) * Removal of obsolete info in README.md Mullvad was kindly enough to provide me with a short trial of their service so I could look more in depth into the IPv6 issues and test multiple scenarios of which I thought would be able to fix these issues. To everyone using Mullvad, or any one that did modify their OpenVPN config files by adding 'pull-filter ignore route-ipv6' and 'pull-filter ignore ifconfig-ipv6', please revert it back to it's original state and check if the updated version of my Docker qbittorrentvpn works as desired.1 point
-
@KrisMin Thank you for pointing this out. I tested it and it seems that indeed something has changed in unraid docker implementation since I last created a node. This argument is now necessary on the first run. I added this info to the template and the topic.1 point
-
Sorry, I removed the API and cookie because I couldn't get them to make a difference. What does make a difference is changing the IP the container is going through every couple days whenever I get 429'd, typically every 36 to 48 hours. I'm already using a VPN container, so I just changed this container to network none and added --net=container:<name of vpn container> to the extra parameters line. Whenever I restart the vpn container it gets a new external IP. It's a little inconvenient, but it works. I suppose if I get too irritated I'll script something that watches for 429 in the log, and restarts both containers. I asked the container author to code a modification that would stop hammering the servers after the first few 429's, but that didn't seem to get any traction. Ideally it would watch for a 429, pause and show a notification in the app for a short interval, restart, if there was a 429 again, pause for double the interval, etc. Reset whenever the container is restarted. Apparently there aren't very many heavy users that get frequent 429s.1 point
-
dont bother with the wizard, your adapters are there so it looks all good when the tuners work.1 point
-
Ganz ganz lieben Dank an dieser Stelle, echt super! So ein dummer Fehler passiert mir nicht nochmal. Und bitte nicht nachmachen! 😂1 point
-
Fehler scheint behoben zu sein. Der Wechsel der Knopf Batterie auf dem MB hat die alle MB Einstellungen resetet und jetzt gehts und der Bootvorgang ist auch viel schneller. Ob es nun an der Batterie lag (die Zeit lief im Bios aber weiter, wenn ich das Netzkabel entfernt hatte. also leer war die Batterie nicht) oder einfach nur eine Einstellung nicht ganz koscher war, obwohl ich alle Einstellungen so häufig kontrolliert habe und auch das Handbuch gewälzt habe, weiß ich nicht. Tatsache ist, dass ich wohl mir "default" Einstellungen im Bios und der neuen Knopf Batterie endlich eine Sorge weniger habe. Den neuen USB-Stick hatte ich zwar schon für UNRAID vorbereitet, kam aber nicht mehr zum Einsatz. Jetzt habe ich halt einen Ersatz Stick Zuhause, falls dieser mal den Geist aufgibt. Vielen Dank für die ganzen Tipps!1 point
-
Danke für die Info. Dann werde ich die Daten einfach mal löschen. Ich hab alles noch auf einem separaten Backup. Wäre also kein Problem wenn die Dateien in Unraid weg wären. 👍1 point
-
You don't have to do this anymore, you can also do this by installing the Plugin Intel-GPU-TOP from the CA App so no edits to the go file are required and you also have the benefit of having the tool 'intel_gpu_top' installed natively to Unraid to watch the usage of your iGPU or you additionally install the GPU Statistics Plugin from @b3rs3rk to see the usage of the iGPU on the Dashboard page. Please make sure that you set the iGPU to the Primary Graphics adapter in the BIOS.1 point
-
Doch, der Grund steht da. "File exists". Die Datei existiert also auf der SSD und HDD. Die Frage ist warum. Ich tippe darauf, dass du diese Dateien 2x auf Unraid kopiert hast. 1x als der Share Homeserver die Cache-Einstellung "No" hatte und einmal als sie auf "Yes" stand. Oder du hast sie mit rsync synchronisiert?! Jedenfalls ist nun Vorsicht geboten. Die einzige Lösung ist nämlich löschen. Je nachdem ob die von der SSD oder HDD bleiben sollen muss man sie vorher auf die HDD kopieren oder einfach nur von der SSD löschen. Mehr dazu in diesem Post: https://forums.unraid.net/topic/101628-cache-drive-defekt-was-nun/page/2/?tab=comments#comment-937996 Diese Eigenheit vom Mover niemals zu überschreiben/löschen, sondern nur zu verschieben, ermöglicht übrigens einen Trick. Man kann gezielt einzelne Dateien auf die SSD kopieren, so dass der Zugriff auf diese niemals die HDD dahinter hochfahren lässt. Also wie bei der Cache Einstellung "Prefer", nur dass man das eben für einzelne Dateien machen kann. Hatte ich hier mal beschrieben: https://forums.unraid.net/topic/100398-erster-unraid-server-hilfe/page/5/?tab=comments#comment-9296481 point
-
Sorry for my confusion. To install p7zip: Install the NerdPack plugin. Go to SETTINGS and click on Nerd Pack. Turn on p7zip-16.02-x86_64-1sl.txz. Then click on APPLY at the bottom. You may have to reboot for it to take effect if the apply doesn't work.1 point
-
Yes that is possible, you can enter the ID of the GPU: '0,1,2,3,4' or you can simply type in 'all'1 point
-
I don't believe it's as random as I'm thinking. It seems to reset every time this error pops up in the logs: usbhid-ups[3459]: nut_libusb_get_report: Input/Output Error. I cannot find much on google about this. What I've done for now is setup a raspberry pie to be the netserver and I've had no issues so far. Thanks for the tutorial. It helped me get to where I needed to go!1 point
-
Ach das steckt einfach in mir drin. Wenn man Backup sagt, dann sollte man es auch richtig machen. Die Abwägung, ob ein Datum wichtiger als ein anderes ist, blockiert nur und im Zweifel ärgert man sich dann doch. Und der Aufwand ist lächerlich gering. Wie gesagt: Keine 10 Zeilen, und saubere Backups lassen ruhig schlafen.1 point
-
Baumberger hat mich nun offiziell beauftragt das zu regeln. Wen es interessiert: Er hat ZeroTier installiert und ich bin nun Remote mit seinem Server verbunden. Aktuell lasse ich Images von den beiden SSDs erstellen und dann versuche ich das Dateisystem zu reparieren bzw Daten dort zu retten. Wir werden sehen ob das von Erfolg geprägt sein wird Aktuell setze ich meine Hoffnungen in ein btrfs check + repair bzw falls eine noch als RAID1 konfiguriert ist in eine Konvertierung in eine Single Disk. Die letzte Möglichkeit wäre eine Datenrettung mit btrfs restore. Seine disk.cfg.bak war übrigens von vor dem Upgrade auf die Beta35. Die aktuelle sieht nun aus wie bei Jojo. Keine Ahnung wo die SSD Info nun bei der 6.9.0 abgespeichert wird. Das checke ich dann, wenn es soweit ist.1 point
-
So you certainly have a lot of information already.. I can't really tell you anything useful but I can comment on my experiences thus far. I don't know about the headers and such and if or why you'd need/want to back them up. My experience is that the encryption can be a pain in the ass... Unraid's encryption system -- in my opinion - was implemented like it was an afterthought and not designed or implemented correctly to make using it easy. I have not used the passphrase option, only the key file, and perhaps that's the real issue. Any attempt at creating a secure keyfile -- i.e. removing the keyfile from /root where it resides at all times (meaning if someone accessed your server they would have access to the keyfile and could start the array without your interaction) introduces problems at being able to start the array with a remotely located keyfile -- there's no native solution to any sort of secure keyfile (the keyfile itself is stored in plaintext). My personal experience is that if the keyfile is not already in /root and I attempt to start the array in the GUI by selecting the keyfile --- it will not start. It fails 100% of the time saying invalid keyfile or something along those lines. Using the GUI to start the array with a keyfile does not work, period. For me. Remotely downloading the keyfile upon reboot/Unraid start from the Go file generally works --- but still does not start the array. Fails. Thus far I've only been able to manually download the keyfile and/or manually creating the keyfile then manually starting the array from command line in probably not the best method --- but again, no method from the GUI works... [code]echo -n 'MY KEY' > /root/keyfile && CSRF=$(cat /var/local/emhttp/var.ini | grep -oP 'csrf_token="\K[^"]+') && curl -k --data "startState=STOPPED&file=&csrf_token=${CSRF}&cmdStart=Start&luksKey=/root/keyfile" http://localhost/update.htm[/code] I don't know if the passphrase option works any better. I'm actually, probably, most likely, maybe considering UN-encrypting my drives to get around all these problems... not sure on that yet.. but if I'm dead then good luck to any family members trying to start the server.....1 point
-
@ich777 and @alturismo I got it! FYI: The new extension did unfortunately not bring the solution, but extension of the USB cable did. So no I have the cable from the satellite directly plugged in the usb adapter and the usb cable from the adapter is extended to the server. Now, all channels work as expected.1 point
-
Dafür müsste man aktuell selbst Hand anlegen und die rsync Kommandos anpassen. Filtern steht aber auf der Todo ^^1 point
-
If the container does not establish a connection to the VPN then the UI will not load. Sent from my CLT-L09 using Tapatalk1 point
-
If the docker can’t connect it won’t start.1 point
-
I had a same issue. Apparently when running the first time -e SETUP=true --mount type=bind,source="/mnt/user/storj/<identityfolder>/",destination=/app/identity --mount type=bind,source="/mnt/user/storj/<datafolder>/",destination=/app/config is needed.1 point
-
https://wiki.unraid.net/Shrink_array1 point
-
This thread made me try out unRAID on a newly purchased QNAP TS-453D. I hooked up a monitor and keyboard, held down F2 during startup to enter BIOS, changed boot order to make 'UEFI: my usb drive" first and it worked beautifully. As far as I can tell unRAID recognizes all hardware correctly, except for the fan, but that is set to "auto" in BIOS (and it's spinning), so I think it doesn't matter. I'm very pleasantly surprised!1 point
-
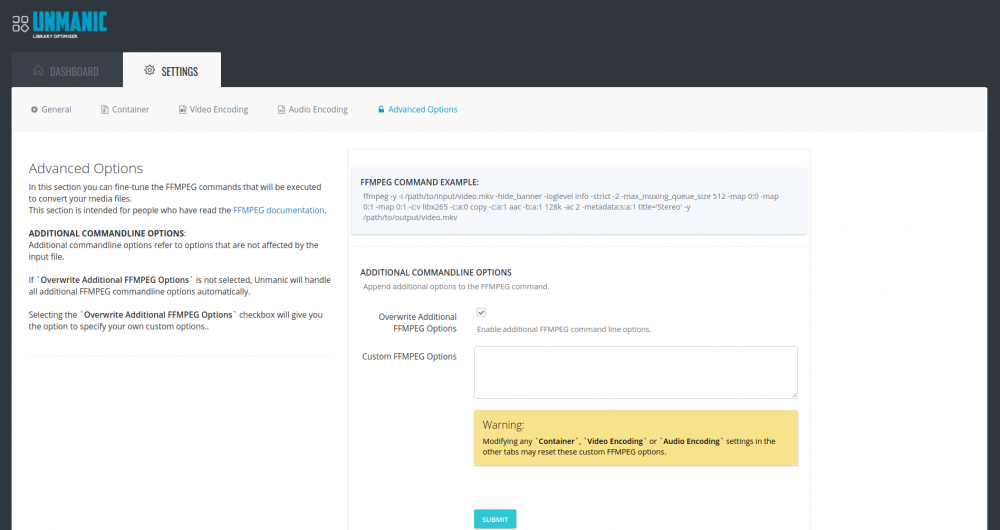
New Zealand. So, I've pushed x3 new features today... Quicksync HW Encoding (VAAPI) support. Quicksync was not fully enabled after the NVIDIA encoding feature was added a few months back. It was missing some testing and additional configurations. I finally managed to get my hands on an Intel laptop a couple of months back, so I was able to finally finish that part off. There are no configuration options at the moment for HW decoding, but I think I would like to get around to that some time also. However, there is now a way you can configure Intel decoding and encoding if you know what you are doing (keep reading below) Task lists are now read from the database. This is a big update. If anyone's install breaks because of this change... sorry. Basically, all the "lists" are now inserted and selected from the SQLite DB. This change required a decent overhaul of the way the application passes tasks around to the workers and post-processor etc. Now that this change has been implemented, it will be possible to add features to move items around in the task list or set priority on items. This is what I want to move onto next. This was the last big change that I had to implement before moving from "beta". It is the last change that I have on my milestones that would break anyone's configuration and cause them to need to delete the database and start fresh. So now that this is done, I should be moving this out of beta and expanding it to other forums. Advanced FFMPEG Options. This is something that users that want to get their hands dirty may particularly enjoy. I often see posts wishing Unmanic could give them more control over how it was transcoding their library. Even recently I have seen a post here wondering what the FFMPEG arguments were that Unmanic were executing. In settings you will now find a fifth tab - "Advanced Options". This tab will give you a print out example of what FFMPEG will be run on your video files as well as a text input box for adding your own custom FFMPEG Options. For those of you who can be bothered reading the FFMPEG docs, you may find some ways to further improve the command. For now, this "Custom FFMPEG Options" field will also be a requirement to get the Intel VAAPI encoders working. It requires these two params to be added: -vaapi_device /dev/dri/renderD128 -vf format=nv12|vaapi,hwupload If this is to difficult for people, I will eventually come up with a way for these to be automatically populated when one of the vaapi encoders is selected. But that is a low priority. It's time to get onto some front-end improvements. I will add instructions on the first post for setting this up. Sorry for the seemingly lack of development people. I have far from given up on this application. I quite enjoy it. I have been slowly working on it this year. Unfortunately, earlier this year when we finished our lock-down here in NZ, my workload increased as we went into catch-up mode at my day job. Its been the busiest year form me. My next goal is to give us some ability to sort the pending tasks list and blacklist any files that are constantly failing. Hopefully some people get some good use out of this last update with quicksync. Cheers
 1 point
 -
I have a 7700K, 64GB, 2xNVME in Raid-0 cache drive, GTX1070 passed through to Win10... I run the VM's off the Unraid Cache... Make sure the VM is set to Q35-3.1.0 in the Unraid 6.7.0-rc2 or Q35-3.0.0 if you want the Unraid 6.6.6... I had several issues when using the Unraid default of i440fx, some are performance related, some compatibility issues... This is because the i440fx was an ancient chipset for the old Pentium 1+2 that knew about old PCI and AGP slots... and so has to translate everything PCIe into PCI, and other translation overhead... The Q35 chipset actually knows about PCIe, and so skips all this... Not as major as that sounds, it is still fairly fast, but it is noticeable, and as I said, it had compatibility issues for me, especially with UWP apps... Also minor, but I set my VM "Drives" to use the SCSI driver, this allows a "Discard" setting which is the Linux version of SSD TRIM... <disk type='file' device='disk'> <driver name='qemu' type='raw' discard='unmap'/> <source file='/mnt/user/domains/.................... ........ This is a minor speed up, and on some file operations actually slows things down, but allows Windows to pass the TRIM commands all the way down to the actual SSD you are running on... This also shrinks VM image files, which for me actually speeds things up quite a bit... Full SSD's start slowing down alot, and so this is mainly a slowdown prevention measure... Edit: Also avoid QCOW2 at all costs... Probably the main thing is knowing how your processor works, and making sure you pass CPU cores in a way that makes sense for your CPU... Let Unraid as well as the overhead from running KVM/Qemu run on its own core (Core 0)... Don't do something silly like passthrough only the hyper-threading cores and all the main cores to a different VM or something else like that... Edit: I don't have one, but I understand this is especially important with current AMD chips, because they have NUMA nodes as well to make sure they get right... Some other manual edits I made to mine: <cputune> ... ... <emulatorpin cpuset='0'/> </cputune> <cpu mode='host-passthrough' check='none'> ... </cpu> <os> ... <smbios mode='host'/> </os> These make sure that KVM/Qemu share the primary core with the rest of Unraid, tell windows about what your CPU can do (potentially some good improvements here) and the info from your Motherboard BIOS and not the fake info from KVM/Qemu... That is where I am at with my personal training on the subject...1 point
-
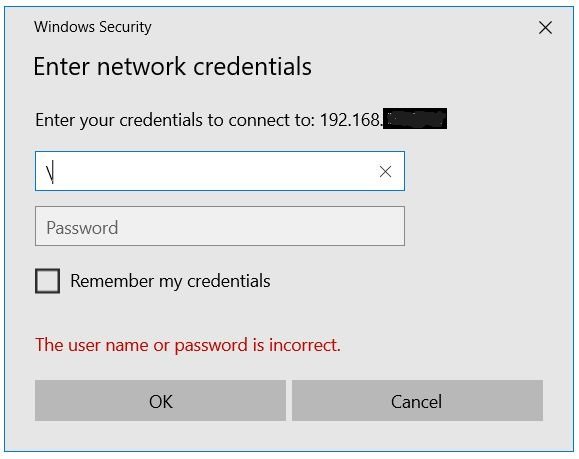
If as you try to access unsecure unRAID, you see this panel, insert \ backslash for user ID and click OK, your in.
 1 point