Leaderboard


Popular Content
Showing content with the highest reputation on 04/26/21 in all areas
-
Ich führe #!/bin/bash docker exec -u www-data Nextcloud php -f /var/www/html/cron.php exit 0 alle 5 Min. aus. Funktioniert wunderbar.3 points
-
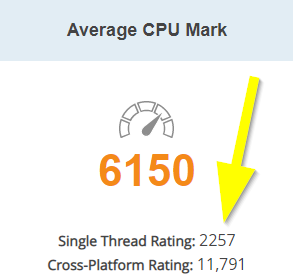
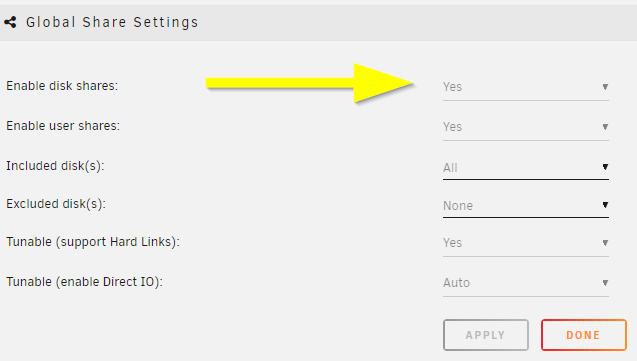
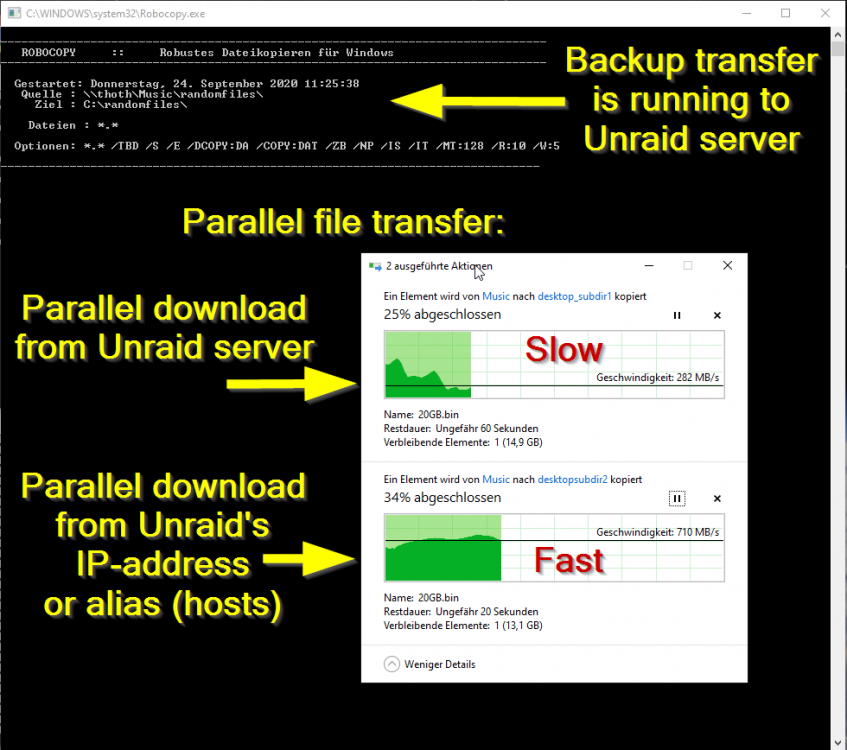
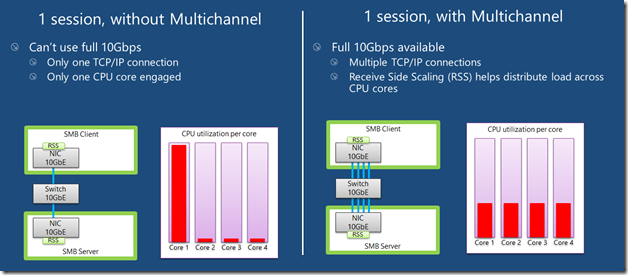
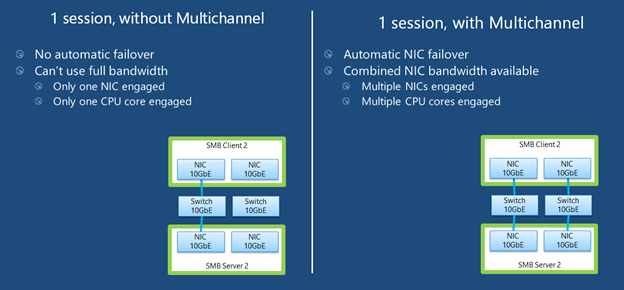
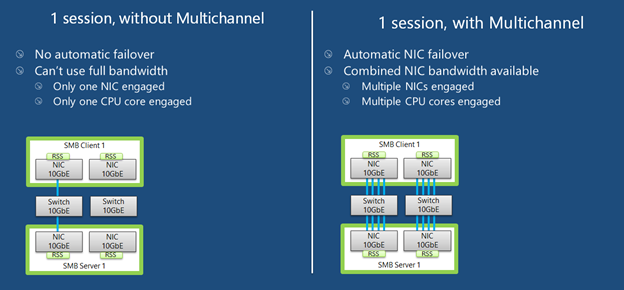
I'm using Unraid for a while now and collected some experience to boost the SMB transfer speeds: Donate? 🤗 1.) Choose the right CPU The most important part is to understand that SMB is single-threaded. This means SMB uses only one CPU core to transfer a file. This is valid for the server and the client. Usually this is not a problem as SMB does not fully utilize a CPU core (except of real low powered CPUs). But Unraid adds, because of the ability to split shares across multiple disks, an additional process called SHFS and its load raises proportional to the transfer speed, which could overload your CPU core. So the most important part is, to choose the right CPU. At the moment I'm using an i3-8100 which has 4 cores and 2257 single thread passmark points: And since I have this single thread power I'm able to use the full bandwith of my 10G network adapter which was not possible with my previous Intel Atom C3758 (857 points) although both have comparable total performance. I even was not able to reach 1G speeds while a parallel Windows Backup was running (see next section to bypass this limitation). Now I'm able to transfer thousands of small files and parallely transfer a huge file with 250 MB/s. With this experience I suggest a CPU that has around 1400 single thread passmark points to fully utilize a 1G ethernet port. As an example: The smallest CPU I would suggest for Unraid is an Intel Pentium Silver J5040. P.S. Passmark has a list sorted by single thread performance for desktop CPUs and server CPUs. 2.) Bypass single-thread limitation The single-thread limitation of SMB and SHFS can be bypassed through opening multiple connections to your server. This means connecting to "different" servers. The easiest way to accomplish that, is to use the ip-address of your server as a "second" server while using the same user login: \\tower\sharename -> best option for user access through file explorer as it is automatically displayed \\10.0.0.2\sharename -> best option for backup softwares, you could map it as a network drive If you need more connections, you can add multiple entries to your windows hosts file (Win+R and execute "notepad c:\windows\system32\drivers\etc\hosts"): 10.0.0.2 tower2 10.0.0.2 tower3 Results If you now download a file from your Unraid server through \\10.0.0.2 while a backup is running on \\tower, it will reach the maximum speed while a download from \\tower is massively throttled: 3.) Bypass Unraid's SHFS process If you enable access directly to the cache disk and upload a file to //tower/cache, this will bypass the SHFS process. Beware: Do not move/copy files between the cache disk and shares as this could cause data loss! The eligible user account will be able to see all cached files, even those from other users. Temporary Solution or "For Admins only" As Admin or for a short test you could enable "disk shares" under Settings -> Global Share Settings: By that all users can access all array and cache disks as SMB shares. As you don't want that, your first step is to click on each Disk in the WebGUI > Shares and forbid user access, except for the cache disk, which gets read/write access only for your "admin" account. Beware: Do not create folders in the root of the cache disk as this will create new SMB Shares Safer Permanent Solution Use this explanation. Results In this thread you can see the huge difference between copying to a cached share or copying directly to the cache disk. 4.) Enable SMB Multichannel + RSS SMB Multichannel is a feature of SMB3 that allows splitting file transfers across multiple NICs (Multichannel) and create multiple TCP connection depending on the amount of CPU Cores (RSS) since Windows 8. This will raise your throughput depending on your amount of NICs, NIC bandwidth, CPU and used settings: This feature is experimental SMB Multichannel is considered experimental since its release with Samba 4.4. The main bug for this state is resolved in Samba 4.13. The Samba developers plan to resolve all bugs with 4.14. Unraid 6.8.3 contains Samba 4.11. This means you use Multichannel on your own risk! Multichannel for Multiple NICs Lets say your mainboard has four 1G NICs and your Client has a 2.5G NIC. Without Multichannel the transfer speed is limited to 1G (117,5 MByte/s). But if you enable Multichannel it will split the file transfer across the four 1G NICs boosting your transfer speed to 2.5G (294 MByte/s): Additionally it uses multiple CPU Cores which is useful to avoid overloading smaller CPUs. To enable Multichannel you need to open the Unraid Webterminal and enter the following (the file is usually empty, so do not wonder): nano /boot/config/smb-extra.conf And add the following to it: server multi channel support = yes Press "Enter+X" and confirm with "Y" and "Enter" to save the file. Then restart the Samba service with this command: samba restart Eventually you need to reboot your Windows Client, but finally its enabled and should work. Multichannel + RSS for Single and Multiple NICs But what happens if you're server has only one NIC. Now Multichannel is not able to split something, but it has a sub-feature called RSS which is able to split file transfers across multiple TCP connections with a single NIC: Of course this feature works with multiple NICs, too: But this requires RSS capability on both sides. You need to check your servers NIC by opening the Unraid Webterminal and entering this command (could be obsolete with Samba 4.13 as they built-in an RSS autodetection ) egrep 'CPU|eth*' /proc/interrupts It must return multiple lines (each for one CPU core) like this: egrep 'CPU|eth0' /proc/interrupts CPU0 CPU1 CPU2 CPU3 129: 29144060 0 0 0 IR-PCI-MSI 524288-edge eth0 131: 0 25511547 0 0 IR-PCI-MSI 524289-edge eth0 132: 0 0 40776464 0 IR-PCI-MSI 524290-edge eth0 134: 0 0 0 17121614 IR-PCI-MSI 524291-edge eth0 Now you can check your Windows 8 / Windows 10 client by opening Powershell as Admin and enter this command: Get-SmbClientNetworkInterface It must return "True" for "RSS Capable": Interface Index RSS Capable RDMA Capable Speed IpAddresses Friendly Name --------------- ----------- ------------ ----- ----------- ------------- 11 True False 10 Gbps {10.0.0.10} Ethernet 3 Now, after you are sure that RSS is supported on your server, you can enable Multichannel + RSS by opening the Unraid Webterminal and enter the following (the file is usually empty, so do not wonder): nano /boot/config/smb-extra.conf Add the following and change 10.10.10.10 to your Unraid servers IP and speed to "10000000000" for 10G adapter or to "1000000000" for a 1G adapter: server multi channel support = yes interfaces = "10.10.10.10;capability=RSS,speed=10000000000" If you are using multiple NICs the syntax looks like this (add RSS capability only for supporting NICs!): interfaces = "10.10.10.10;capability=RSS,speed=10000000000" "10.10.10.11;capability=RSS,speed=10000000000" Press "Enter+X" and confirm with "Y" and "Enter" to save the file. Now restart the SMB service: samba restart Does it work? After rebooting your Windows Client (seems to be a must), download a file from your server (so connection is established) and now you can check if Multichannel + RSS works by opening Windows Powershell as Admin and enter this command: Get-SmbMultichannelConnection -IncludeNotSelected It must return a line similar to this (a returned line = Multichannel works) and if you want to benefit from RSS then "Client RSS Cabable" must be "True": Server Name Selected Client IP Server IP Client Interface Index Server Interface Index Client RSS Capable Client RDMA Capable ----------- -------- --------- --------- ---------------------- ---------------------- ------------------ ------------------- tower True 10.10.10.100 10.10.10.10 11 13 True False In Linux you can verify RSS through this command which returns one open TCP connection per CPU core (in this case we see 4 connections as my client has only 4 CPU cores, altough my server has 6): netstat -tnp | grep smb tcp 0 0 192.168.178.8:445 192.168.178.88:55975 ESTABLISHED 3195/smbd tcp 0 0 192.168.178.8:445 192.168.178.88:55977 ESTABLISHED 3195/smbd tcp 0 0 192.168.178.8:445 192.168.178.88:55976 ESTABLISHED 3195/smbd tcp 0 0 192.168.178.8:445 192.168.178.88:55974 ESTABLISHED 3195/smbd Note: Sadly Samba does not create multiple smbd processes, which means we still need a CPU with high single thread performance to benefit from RSS. This is even mentioned in the presentation: If you are interested in test results, look here. 5.) smb.conf Settings Tuning I did massive testing with a huge amount of smb.conf settings provided by the following websites and really NOTHING resulted in a noticable speed gain: https://wiki.samba.org/index.php/Performance_Tuning https://wiki.samba.org/index.php/Linux_Performance https://wiki.samba.org/index.php/Server-Side_Copy https://www.samba.org/~ab/output/htmldocs/Samba3-HOWTO/speed.html https://www.samba.org/samba/docs/current/man-html/smb.conf.5.html https://lists.samba.org/archive/samba-technical/attachments/20140519/642160aa/attachment.pdf https://www.samba.org/samba/docs/Samba-HOWTO-Collection.pdf https://www.samba.org/samba/docs/current/man-html/ (search for "vfs") https://lists.samba.org/archive/samba/2016-September/202697.html https://codeinsecurity.wordpress.com/2020/05/18/setting-up-smb-multi-channel-between-freenas-or-any-bsd-linux-and-windows-for-20gbps-transfers/ https://www.snia.org/sites/default/files/SDC/2019/presentations/SMB/Metzmacher_Stefan_Samba_Async_VFS_Future.pdf https://www.heise.de/newsticker/meldung/Samba-4-12-beschleunigt-Verschluesselung-und-Datentransfer-4677717.html I would say the recent Samba versions are already optimized by default. 6.) Choose a proper SSD for your cache You could use Unraid without an SSD, but if you want fast SMB transfers an SSD is absolutely required. Else you are limted to slow parity writes and/or through your slow HDD. But many SSDs on the market are not "compatible" for using it as an Unraid SSD Cache. DRAM Many cheap models do not have a DRAM Cache. This small buffer is used to collect very small files or random writes before they are finally written to the SSD and/or is used to have a high speed area for the file mapping-table. In Short, you need DRAM Cache in your SSD. No exception. SLC Cache While DRAM is only absent in cheap SSDs, SLC Cache can miss in different price ranges. Some cheap models use a small SLC cache to "fake" their technical data. Some mid-range models use a big SLC Cache to raise durability and speed if installed in a client pc. And some high-end models do not have an SLC Cache, as their flash cells are fast enough without it. Finally you are not interested in SLC Cache. You are only interested in continuous write speeds (see "Verify Continuous Writing Speed") Determine the Required Writing Speed But before you are able to select the right SSD model you need to determine your minimum required transfer speed. This should be simple. How many ethernet ports do you want to use or do you plan to install a faster network adapter? Lets say you have two 5G ports. With SMB Multichannel its possible to use them in sum and as you plan to install a 10G card in your client you could use 10G in total. Now we can calculate: 10G * 117.5 MByte/s (real throughput per 1G ethernet) = 1175 MByte/s and by that we have two options: buy one M.2 NVMe (assuming your motherboard has such a slot) with a minimum writing speed of 1175 MByte/s buy two or more SATA SSDs and use them in a RAID0, each with a minimum writing speed of 550 MByte/s Verify Continuous Writing Speed of the SSD As an existing "SLC Cache" hides the real transfer speed you need to invest some time to check if your desired SSD model has an SLC cache and how much the SSD throttles after its full. A solution could be to search for "review slc cache" in combination with the model name. Using the image search could be helpful as well (maybe you see a graph with a falling line). If you do not find anything, use Youtube. Many people out there test their new ssd by simply copying a huge amount of files on it. Note: CrystalDiskMark, AS SSD, etc Benchmarks are useless as they only test a really small amount of data (which fits into the fast cache). Durability You could look for the "TBW" value of the SSD, but finally you won't be able to kill the SSD inside the warranty as long your very first filling of your unraid server is done without the SSD Cache. As an example a 1TB Samsung 970 EVO has a TBW of 600 and if your server has a total size of 100TB you would waste 100TBW on your first fill for nothing. If you plan to use Plex, think about using the RAM as your transcoding storage which would save a huge amount of writes to your SSD. Conclusion: Optimize your writings instead of buying an expensive SSD. NAS SSD Do not buy "special" NAS SSDs. They do not offer any benefits compared to the high-end consumer models, but cost more. 7.) More RAM More RAM means more caching and as RAM is even faster than the fastest SSDs, this adds additional boost to your SMB transfers. I recommend installing two identical (or more depening on the amount of slots) RAM modules to benefit from "Dual Channel" speeds. RAM frequency is not as important as RAM size. Read Cache for Downloads If you download a file twice, the second download does not read the file from your disk, instead it uses your RAM only. The same happens if you're loading covers of your MP3s or Movies or if Windows is generating thumbnails of your photo collection. More RAM means more files in your cache. The read cache uses by default 100% of your free RAM. Write Cache for Uploads Linux uses by default 20% of your free RAM to cache writes, before they are written to the disk. You can use the Tips and Tweaks Plugin to change this value or add this to your Go file (with the Config Editor Plugin) sysctl vm.dirty_ratio=20 But before changing this value, you need to be sure to understand the consequences: Never use your NAS without an UPS if you use write caching as this could cause huge data loss! The bigger the write cache, the smaller the read cache (so using 100% of your RAM as write cache is not a good idea!) If you upload files to your server, they are 30 seconds later written to your disk (vm.dirty_expire_centisecs) Without SSD Cache: If your upload size is generally higher than your write cache size, it starts to cleanup the cache and in parallel write the transfer to your HDD(s) which could result in slow SMB transfers. Either you raise your cache size, so its never filled up, or you consider totally disabling the write cache. With SSD Cache: SSDs love parallel transfers (read #6 of this Guide), so a huge writing cache or even full cache is not a problem. But which dirty_ratio value should you set? This is something you need to determine by yourself as its completely individual: At first you need to think about the highest RAM usage that is possible. Like active VMs, Ramdisks, Docker containers, etc. By that you get the smallest amount of free RAM of your server: Total RAM size - Reserved RAM through VMs - Used RAM through Docker Containers - Ramdisks = Free RAM Now the harder part: Determine how much RAM is needed for your read cache. Do not forget that VMs, Docker Containers, Processes etc load files from disks and they are all cached as well. I thought about this and came to this command that counts hot files: find /mnt/cache -type f -amin -86400 ! -size +1G -exec du -bc {} + | grep total$ | cut -f1 | awk '{ total += $1 }; END { print total }' | numfmt --to=iec-i --suffix=B It counts the size of all files on your SSD cache that are accessed in the last 24 hours (86400 seconds) The maximum file size is 1GiB to exclude VM images, docker containers, etc This works only if you hopefully use your cache for your hot shares like appdata, system, etc Of course you could repeat this command on several days to check how it fluctuates. This command must be executed after the mover has finished its work This command isn't perfect as it does not count hot files inside a VM image Now we can calculate: 100 / Total RAM x (Free RAM - Command Result) = vm.dirty_ratio If your calculated "vm.dirty_ratio" is lower than 5% (or even negative), you should lower it to 5 and buy more RAM. between 5% and 20%, set it accordingly, but you should consider buying more RAM. between 20% and 90%, set it accordingly If your calculated "vm.dirty_ratio" is higher than 90%, you are probably not using your SSD cache for hot shares (as you should) or your RAM is huge as hell (congratulation ^^). I suggest not to set a value higher than 90. Of course you need to recalcuate this value if you add more VMs or Docker Containers. #8 Disable haveged Unraid does not trust the randomness of linux and uses haveged instead. By that all encryptions processes on the server use haveged which produces extra load. If you don't need it, disable it through your Go file (CA Config Editor) as follows: # ------------------------------------------------- # disable haveged as we trust /dev/random # https://forums.unraid.net/topic/79616-haveged-daemon/?tab=comments#comment-903452 # ------------------------------------------------- /etc/rc.d/rc.haveged stop
.png.9a4f708867a76b362eeaac6a578d6d21.png)
 1 point
 -
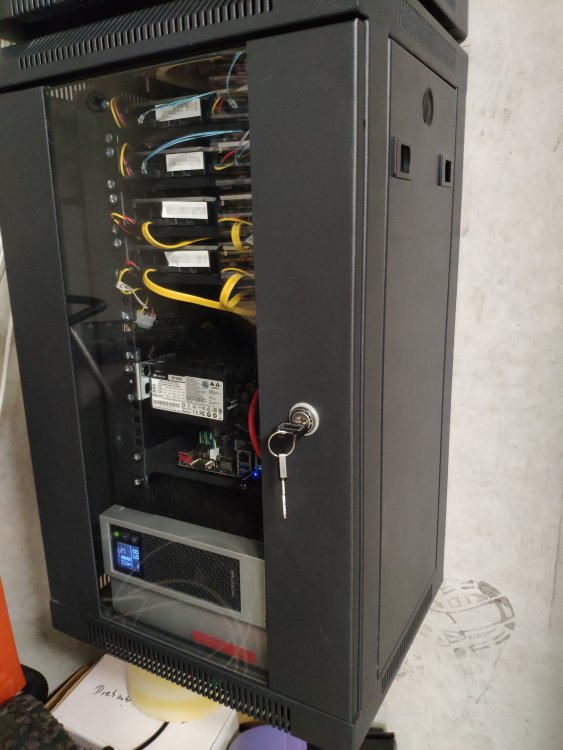
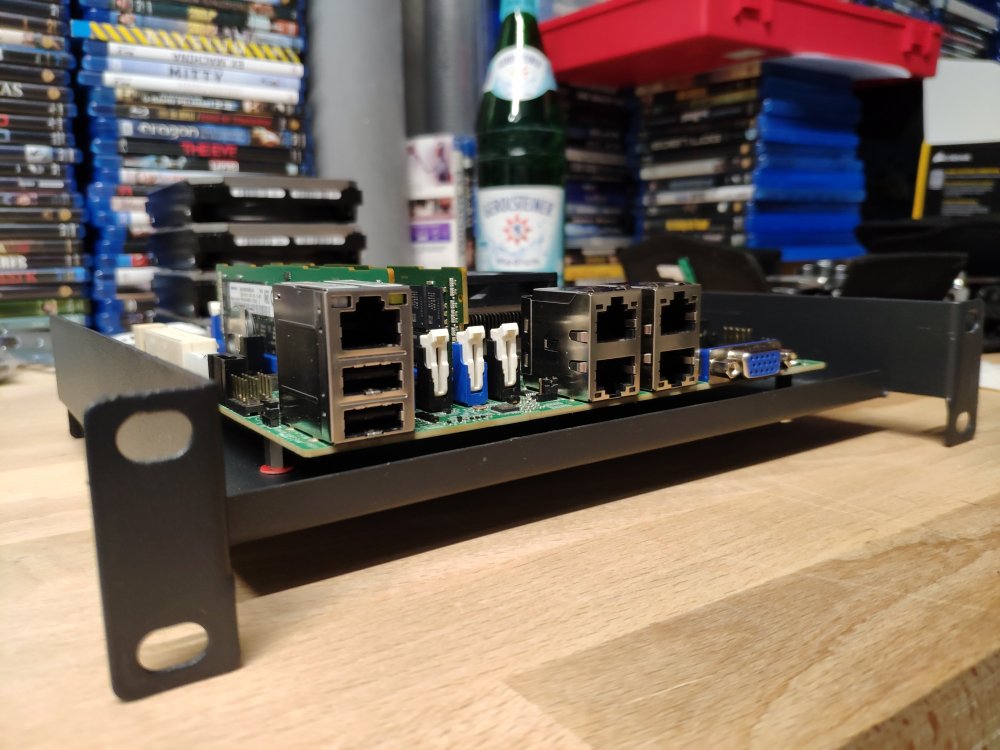
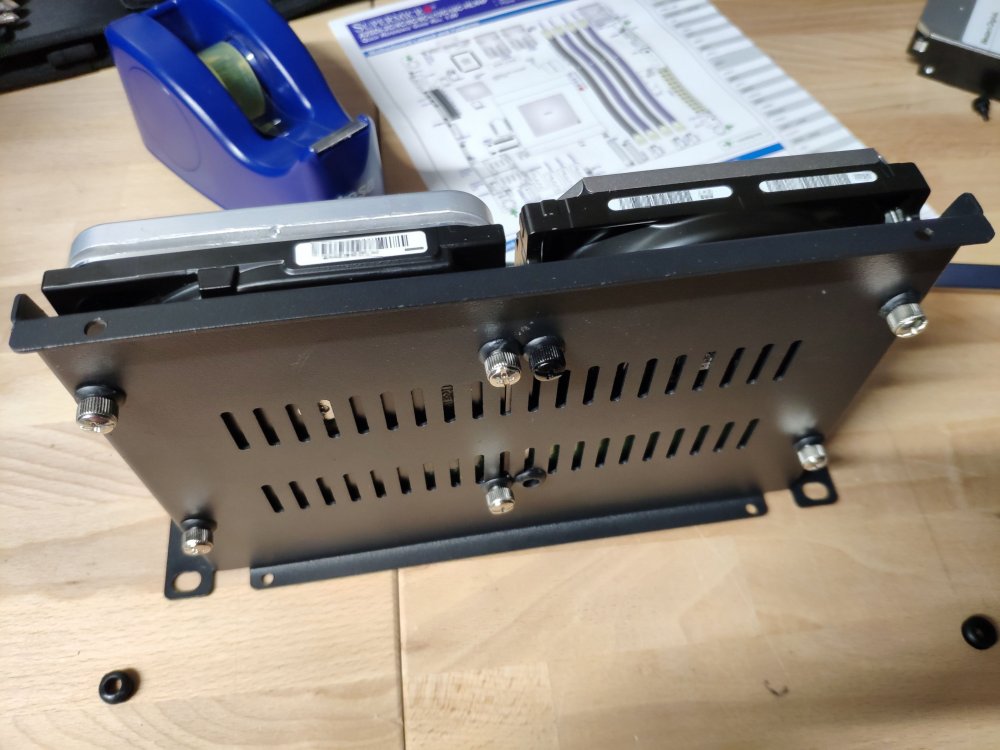
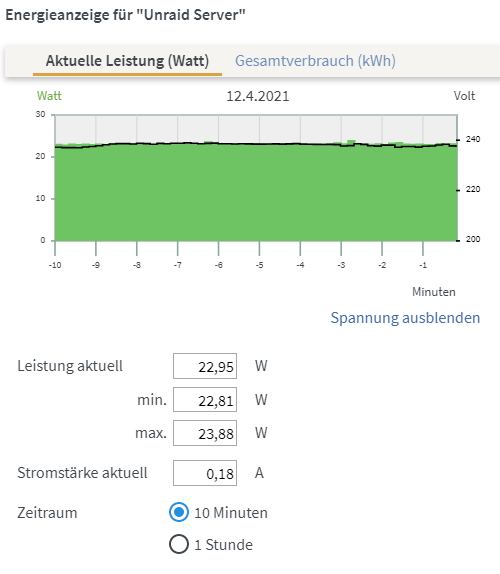
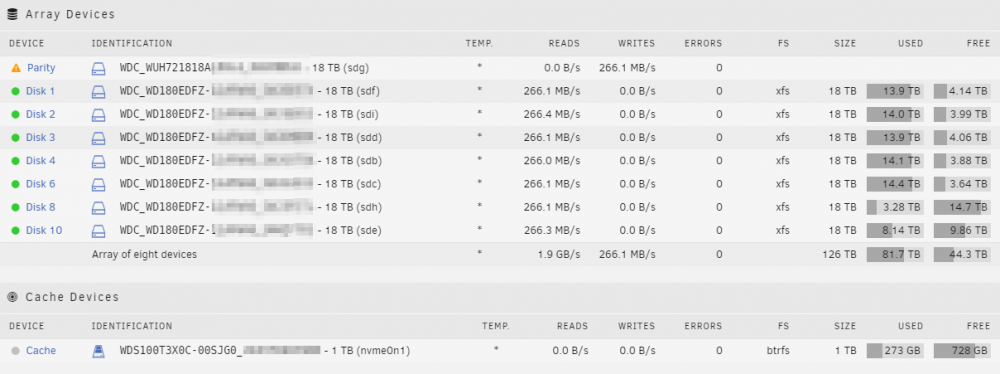
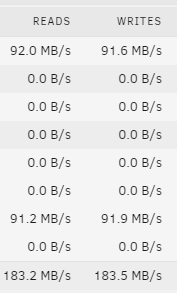
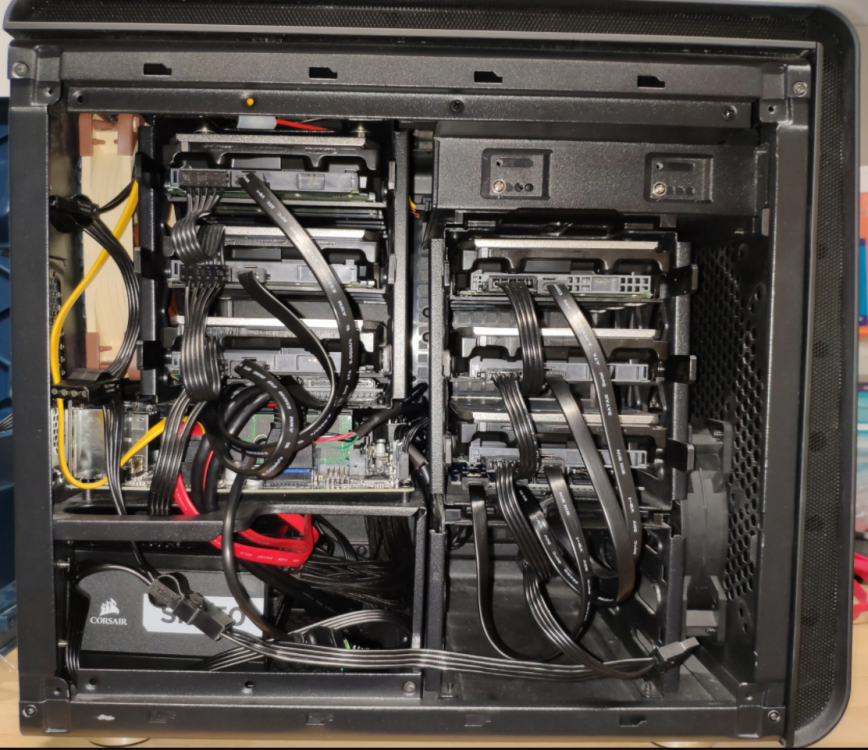
Ich wollte hier mal meinen aktuellen Stand zeigen. Meinen Server habe ich selbst in einem 10 Zoll Rack verbaut: HDDs und Motherboard sind auf simplen Rackböden montiert: Hardware MB: Gigabyte C246N-WU2 CPU: Xeon E-2146G mit Boxed Kühler vom i3-9100 (der vorher verbaut war) RAM: 64GB ECC NT: Corsair SF450 Platinum LAN: 10G QNAP Karte HDD: 126TB bestehend aus 1x 18TB Ultrastar (Parität) und 7x 18TB WD Elements (Ultrastar White Label) Cache: 1TB WD 750N NVMe M.2 SSD USV: AEG Protect NAS quer auf Gummifüßen Als Server-Namen habe ich "Thoth" gewählt, da dies der ägyptische Gott der Weisheit war. Das verleitet auch manchmal dazu ihn "Thot" zu nennen. ^^ Bei 8 stehenden HDDs liegt der Verbrauch im Leerlauf bei 23W: Disk-Übersicht: Beim Hochladen direkt auf die Disks komme ich auf über 90 MB/s, was ich den schnellen HDDs zu verdanken habe: Auf den Cache sind natürlich 1 GB/s kein Problem: Dank 50% RAM-Cache gehen aber auch die ersten 30GB auf die HDDs mit 1 GB/s: Diese Kombination aus Performance und geringem Stromverbrauch bietet nur Unraid 😍 Ich betreibe außerdem noch einen Unraid Backupserver an einem externen Standort. Dieser nutzt ein Asrock J5005 und ist möglichst kompakt / günstig aufgebaut, wobei ich in einem Bitfenix ITX Case einen zusätzlichen HDD Käfig eingepasst habe, um 9 HDDs verbauen zu können:


 1 point
 -
Many people on Reddit ask me how good the 8th/9th/10th Gen Intel iGPU performs and most of them do not believe, when I say "better than a Quadro P2000". Next time I will link to this screenshots Settings - Enabled Hardware Acceleration (requires Plex Pass) - Transcoding to 8GB Ramdisk (4GB was not sufficient for more than 3x 4K streams, didn't tested 6GB) - Enabled direct disk access for Plex Config Results Transcoding 4x 4K Streams without judder: If I transcode 5x 4K it judders from time to time in one stream (randomly): For my next benchmark I will copy some 4K Movies to my SSD cache. Test results follow...


 1 point
 -
OK, at this point, a Diagnostics file will be needed: Tools >>> Diagnostics The file will be in the Downloads directory/folder of your web browser. Attach the entire file to your next post. @JorgeB has indicated that he will give you a hand at this point. Now, he is based in Europe so it may be tomorrow before he has an opportunity to reply. Under no circumstances proceed any further until you hear back from him.1 point
-
Lots changed because of multiple cache pools. I will test having 0% used and no other settings, but it should work. (Might take me a day or two)1 point
-
Ja wie gesagt das liegt an der implementation im BIOS der karte des Herstellers. Für Nvidia Karten gibt es einen workaround damit man die in P8 bringt. Das werden die wohl nicht mehr so schnell machen und die Karten (nicht alle aber viele von denen) unterstützen leider nicht alle features zB für's transcoding zB h265.1 point
-
Das ist kein Bug, sondern liegt daran, dass erst der Treiber der PCIe Karte den Befehl zum Energiesparen erteilt. Das Problem haben also nicht nur GPUs. Jede Karte verhält sich ohne Treiber anders. Dass es aber nicht lohnt die VM zu beenden, ist leider so. Die einzigen Karten, die man vielleicht mal testen sollte sind diese: Radeon R5 430 Radeon R5 435 Radeon R7 430 Radeon R7 435 Radeon R7 450 Radeon RX 460 Das war die letzte Generation von AMD ohne zusätzliche Stromstecker und mit Zerocore Technologie, die AMD leider aufgegeben hat:1 point
-
Hast du eine VM und hast du die Karte auch zur VM durchgereicht gehabt und versucht die VM mal neu zu starten? Das ist korrekt und wenn du meinen Trieber Thread gelesen hast würde ich das nicht empfehlen so zu verwenden, sprich eine Karte für die VM und Docker zu verwenden da du wieder system freezes riskierst. Dir muss bewusst sein das Nvidia Driver Plugin gehört für den Host und ist dafür gedacht das du deine Docker container beschleunigen kannst, wenn du sie aber dann zusätzlich für eine VM verwendest nimst du Unraid die Karte mehr oder weniger weg da du sie dann exklusiv für die VM verwendest und du kannst sie dann nicht mehr für Unraid bzw. Docker container benutzen und damit sieht auch das GPU Statistics Plugin von @b3rs3rk die Karte nicht mehr. Ist das nachdem bereits ein Transcode lief oder ist das gleich nach dem booten? Das ist kein Bug das ist nur eine Einstellungssache und wie der Hersteller der Karte das in das BIOS der Karte implementiert hat, es gibt durchaus Karten die gehen ohne irgendwas nach einer gewissen Zeit in P8 und somit sind die dann sparsamer. Bin von sowas schon lange weg, warum entscheidest du dich gegen Nvidia wenn die Preis Leistung bei denen doch passt (abgesehen von der derzeitigen Lage), momentan sind die noch immer besser als AMD bei den GPU's, wenn AMD wieder vorne ist würd ich auch wieder zu AMD wechseln. 🤑💰 Eigentlich wäre das ganz einfach indem du auf Tools -> System Devices -> deine Karte und alles was dazugehört anklicken -> Bind to VFIO -> Reboot, danach kannst du die Karte ganz normal auf der VM Seite auswählen und brauchst sie nicht per hand einbinden. Ich kann dir schon einen workaround anbieten bei dem du die Karte in P8 bekommst beim starten aber es ist dann schwieriger die Karte in eine VM durchzureichen bzw. hast du das ja schon wahrscheinlich per hand gemacht so wie sich das bei deinem obigen kommentar anhört. EDIT: Die P400 sollte so zwischen 8Watt und 12Watt im Idle auf P8 benötigen wenn ich mich nicht täusche. Wenn du dagegen eine P2000 in P8 nimst braucht die grad ca 5Watt.1 point
-
This is normal after rebooting the server, time will get synchronized after a while (assuming you have NTP configured).1 point
-
@hugenbdd Thanks for the break down. I thought I had it figured out and you more than covered it. So it looks like if you cancel the mover cron you could literally build a script and move individual shares using something as simple as User.Scripts if you need custom shares moved more or less frequently vs using this script to blanket move everything which may or may not work for people based on their needs. Personally Mover.Tuner does exactly what I need and thank you for keeping it going. I know one person asked this very question in another forum topic and now I'm glad I can point them and future people here so they can customize their moves if a need arises.1 point
-
Bei mir ist es: Ausführung alle 30 Minuten.1 point
-
No issue. Yes, nothing need to do.1 point
-
Webcron aktualisiert sich nur, während du im Webclient unterwegs bist. Für Cron braucht es eine externe Lösung, die die cron-URL von Nextcloud regelmäßig öffnet. In Unraid könnte man zb mit dem User Scripts Plugin und dem Befehl den Cron regelmäßig ausführen lassen: curl "http://deinedomain.de/cron.php" Ist doch richtig @Anym001?1 point
-
@saber1 UND DU HAST SONST KEINE PROBLEME ODER So ab und an kann man bei diversen Leuten hier echt nur den Kopfschütteln, das man sich aufregt ist wohl völlig normal wenn man Stunden damit verbringt etwas ans laufen zu bekommen was Wochen / Monate auf dem Weg X funktionierte , und nun mit einer neuen Version Urplötzlich was völlig anders macht und dann kommst du daher und willst mir erklären wie man "BigSure" (Ohh Verda... das böse böse e schon wieder) schreibt .... bist bestimmt Lehrer oder oder Studierst auf Lehramt .... Und schön für dich das du so ein PERFEKT ENGLISCH SPEAKER bist....." My English is not the Yellow from The Egg " und stell dir vor da gibt es hier in Deutschland noch einige mehr weil wir früher in der Schule KEIN ENGLISCH hatten sondern Russisch, was aber auch schon bei mir über 35Jahre her ist .... das ist wohl der Grund warum ich hier im "GERMAN / DEUTSCH" Bereich schreibe !!! Klasse der Link .... der hat was ... ist so als ob man nen Rollstuhlfahrer zum Hürdenlauf anmeldet ! 6.9.2 ist einfach nur BuggY 1.) Macinabox installiert statt dem ausgewählten HighSierra einfach mal BigSur ! 2.) VMs lassen sich auf einmal nicht mehr löschen ! >> Execution error Requested operation is not valid: cannot undefine domain with nvram 3.) Beim installieren von OSx Meckert er auf einmal eine Fehlende "Macinabox_VARS-pure-efi.fd" Datei an.. Nur 3 Dinge die in unter 6.8.x Problemlos funktionierten. will gar nicht wissen was urplötzlich noch nicht alles geht, da dürfte ich noch mehr Spaß haben....1 point
-
very good interview1 point
-
Firstly thankyou for all the support. Looked into Unicable and i think it will be cheaper for me to run 2 more cables myself at this time but will research this more in the future. I have found a TBS card with Quad tuners for a pretty good price its a TBS6985 will this work fine with the TBS modules? Again thanks for everything.1 point
-
Alrighty, but the problem have been solved. Thank you very much for all of your support and help! Very apreciated!.1 point
-
Unraid isn't designed for that.1 point
-
ahh ok so you are with 'Amsterdam @tigervpn.com.ovpn', you need to work out how/if they can assign you a port forward, once you have an assigned port then you need to manually reconfigure rtorrent to use it by entering the port in the rtorrent.rc file.1 point
-
the cert looks to be invalid, re-download the .crt file from pia, also delete the files that start with '._' they might be causing issues.1 point
-
This could be a filesystem issue, diags would show.1 point
-
Syslog starts over after every reboot, enable this then post that log after a crash.1 point
-
thank you that would be great. ill catch up on some sleep till then haha. nextcloudlog .zip1 point
-
This problem occurred again, then I think I worked out what was going on. The device was "disappearing" when I started a VM, but only a certain one. I had had to fiddle with it a day or so ago as it wouldn't start. Something must have got messed up meaning the VM was trying to take control of the nvme drive. I could spot the device in the xml, but am not confident enough to edit it. Just saving the VM settings from the forms view didn't clear the device, but selecting all the possible usb devices and the one pcie device, saving, then clearing them all and saving seems to have sorted it out. Thanks for the support - I know a bit more about checking disks now.1 point
-
Sent you a PM. You don't need to modify anything to get Move Now to move everything now. Simply need to detect if the script was started via cron or not.1 point
-
Ich nehme erst Bestellungen an, wenn sie auf meinem Tisch stehen. Das war mir echt zu viel hin und her.1 point
-
I got this problem a few days back ago too. I justed removed the "app" Macinabox and deleted all userscripts (macinabox) and reinstalled the app within community apps. After this I was able to get which OSX I wanted. Maybe this helps?1 point
-
Das willst Du selbst machen oder machen lassen? Weil "Glasfaser verlegen" kann schnell teuer werden....dazu braucht man ein Slice-Gerät und jemanden, der das auch kann. Wenn Du ein Leerrohr hast, durch das ein LWL-Pachkabel (also fertig, mit angeschlossenem Stecker) passt, dann mach es so. zB sowas: https://www.fs.com/de/c/om4-40-100gb-50-125-multimode-2867 dazu dann die passenden Tranceiver: https://www.fs.com/de/products/65334.html?attribute=106&id=219237 Nimm für den Mikrotik CRS eines in "generisch" oder "Cisco" kodiert...für eine Mellanox SFP+ ebenfalls Cisco oder eben Mellanox codiert. Kann man so machen. Ich denke Dein Unifi-Switch hat nur SFP und kein SFP+...schade.1 point
-
Unraid OS 6.9 adds multiple pool support to your server's repertoire. Today's blog explains why and how to use this new feature! https://unraid.net/blog/unraid-6-9s-multiple-pools-support Along with this blog, be sure to check out @SpaceInvaderOne's video all about Multiple Pools and how to best use multi pools on your server for the best performance.1 point
-
Yes, I’ve reverted to 6.8.3 and have been up and running with no issues for 4 days, 6.9.1 would have crashed by now. Perhaps the UNRAID devs could compare what in the network stack changed and revert that change as it’s a regression. I think I speak for most unraid users that reliability is far more important than feature set. Reliability is the reason I’ve stayed on unraid.1 point
-
@SpaceInvaderOne It would appear that your site is down. I get error 1016 when navigating to it in a browser which is a origin dns error. Will your site be back up or will it change to something else?1 point
-
Please keep us posted. I moved to VLANs instead of static IPs and so far I'm at Uptime 9 days 12 hours 11 minutes @limetech -- is there any way someone can chime on here on this? Not expecting any immediate fixes, but is this somethign related to 6.9.X and something that can be addressed or?... We're all kind of in the dark here, I understand that it's happened to some users and VLANs have fixed it for them in the past, but this is a lot of users now reporting problems ONLY since 6.9.0/6.9.1... Myself included.1 point
-
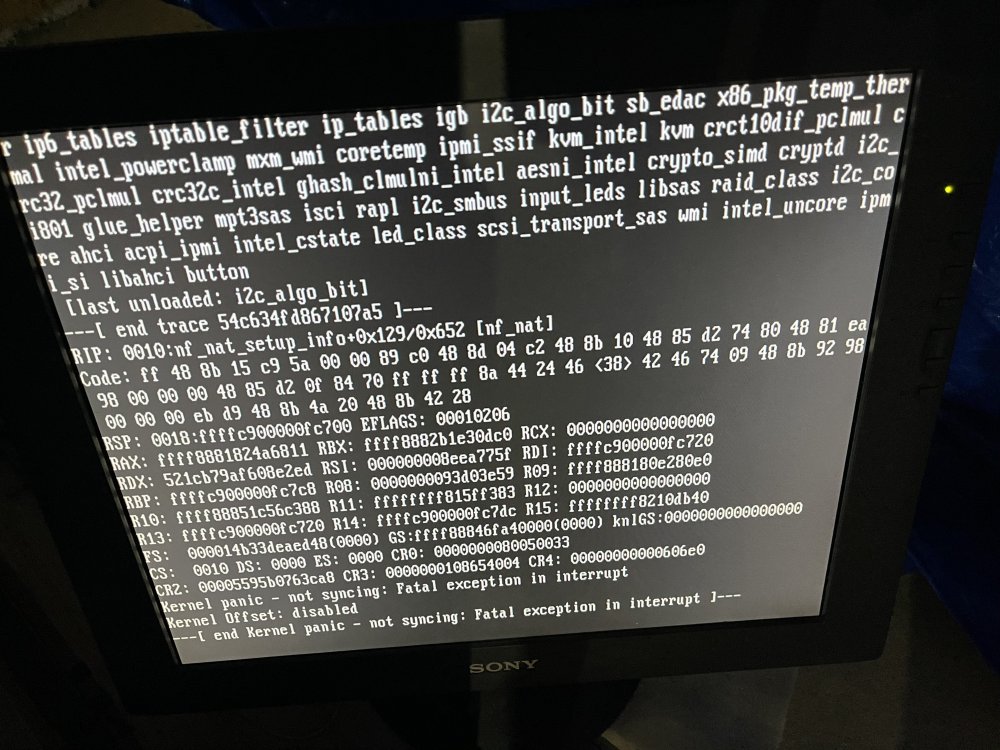
I'm experiencing the exact same issue. On 6.8.3 I had ZERO issues, rock solid, I upgraded for NVIDIA GPU support so that is the only new thing. Yes I have br0 docker IP assignments, its never been a problem, even have VMs and Dockers sharing br0, no issues still. Limetech, this is a pretty serious issue, what do you need from me to investigate further? Are there logs I can upload? Thank you in advance!
 1 point
 -
I had the same problem with Macinabox BigSur after removing the graphic card and trying to get back to VNC. I also had to change the controllers that were on bus='0x00' slot='0x01' to slot='0x02' to fix the problem. Thank you!!!!! This community is AMAZING!!!!
 1 point
 -
Are you sure the iGPU load is visible in those charts ? I would think that it is just the load on the 4 cores.1 point
-
Ok as expected, I was able to transcode even more. Settings - Enabled Hardware Acceleration (requires Plex Pass) - Transcoding to 8GB Ramdisk (4GB was not sufficient for more than 3x 4K streams, didn't tested 6GB) - Direct disk access for Plex Config - Direct disk access to 4K Movies located on NVMe: Results Transcoding 5x 4K Streams without judder: I'm not sure if even 6x 4K would be possible. The only limitation seems to be I/O wait: EDIT: Ok I think its not really an I/O wait, instead the iGPU reached its limit. This output is generated through the Intel GPU Tools: 5x 4K streams = 100% video core load 4x 4K streams = 99% video core load 3x 4K streams = 74% video core load 2x 4K streams = 35% video core load 1x 4K stream = 24% video core load As you can see the Plex CPU dashboard isn't useful for hardware transcoding as it shows only the CPU load and not the video core load. But hey, we were able to transcode 5x 4K streams parallel. Should be enough I think I think it would be possible to get even 6x 4K streams if the iGPU maximum frequency would be 1.150 Mhz as it is with the i3-8300. Or with the 1.200 Mhz of the i5-10600 and many 8th to 10th gen i7 CPUs.


 1 point
 -
For (3) an safer alternative rather than enabling disk share universally is to have custom SMB config file pointing to a top level folder on a disk (e.g. for a share called sharename, have custom SMB config pointing to /mnt/cache/sharename or /mnt/disk1/sharename). Then have the SMB Extras in SMB Settings "include" that config file. That way you just need to restart SMB to change the config file (instead of needing to stop the array to change SMB Extras). Works really well with my cache-only nvme-raid0 share. More detailed guide: Let's say you have a cache-only share called "sharename" that you want a user called "windows" to access via SMB with shfs-bypass. Create a smb-custom.conf with the content below and save it in /boot/config [sharename-custom] path = /mnt/cache/sharename comment = browseable = no Force User = nobody valid users = windows write list = windows vfs objects = Then with the array stopped -> Settings -> SMB -> add this line to Samba extra configuration box: include = /boot/config/smb-custom.conf Apply, done, start array. You can now access the bypassed share at \\tower\sharename-custom or \\server-ip\sharename-custom Some hints It's critical that the name of the bypassed share (e.g. sharename-custom) is DIFFERENT from the normal share name or you will run into weird quirks i.e. Unraid share conflicts with your custom share. To add more shares, just copy-paste the above block in the smb-custom.conf and make appropriate changes (e.g. name, path, user), save and then restart SMB. No need to stop array. Similarly, for edit, just edit smb-custom.conf, save and restart SMB.1 point
-
Hi, I have the same probs with that. Unraid 6.8.3. All Vm´s that switched from or to GPU Passthrough to VNC back have the problems. I find out that after switching the Grafik output the "bus" from 0x00 chnaged to 0x07. With these settings the vms dosen´t work. After change the bus back to 0x00 the vm works fine. If the bus 0x00 is occupied, change the slot to 2 or 3. Sorry for my bad english :-) <model type='qxl' ram='65536' vram='65536' vgamem='16384' heads='1' primary='yes'/> <address type='pci' domain='0x0000' bus='0x00' slot='0x01' function='0x0'/>1 point
-
This was happening to me too and it's infuriating. Because of the way the Unraid works and the way sabnzbd works, it was bringing my computer down to its knees whenever a file decided to repair. And this is with a brand new 9600k, 32GB RAM, 6x2TB WD Blue (1 parity), and 1 evo 500GB for cache. I tried forcing downloads only to cache, the docker image only, etc. The only thing that actually fixed it was to move downloads to their own drive outside the array / cache. I bought a 256GB nvme when I built the computer that was not in the raid / cache yet. Here is what ended up being fairly stable (at least so far): Installed Unassigned Devices Plugin. Formatted NVME as XFS then mounted as unassigned device. Sonarr / Radarr /data -> /mnt/disks/{nvme}/downloads /media -> /mnt/user/media/{tv/movies} (media is a share, setup as 'Cache Yes') SABnzbd /data -> /mnt/disks/{nvme}/downloads. Both completed and in-progress mapped below that. The nvme gets thrashed with the download, verification, repair (if needed), and extraction without taking IO from any of my other docker containers / etc. Just to make sure SABnzbd doesn't ever lock everything, I pegged that VM to 3 of my 6 cores too. Once a download completes sonarr/radarr moves it to the media share, which because it's going from SSD to SSD transfers it over to the cache at a fairly fast speed. Even downloading at the same time as mover is running doesn't seem to kill it anymore. I hope it works well this way.1 point
-
Here's how they're configured in Namecheap1 point
-
OMG I got it to work!!!!!! And it looks like Windows actually detected it as a Bluray writer too (put a blank Bluray in and it asks if I want to use it like a USB )!!!!! I put this in the xml right before the </devices> tag: Note the index = 1 and controller = 1 amendment. <controller type='scsi' index='1' model='virtio-scsi'/> <hostdev mode='subsystem' type='scsi'> <source> <adapter name='scsi_host9'/> <address type='scsi' bus='0' target='0' unit='0'/> </source> <readonly/> <address type='drive' controller='1' bus='0' target='0' unit='0'/> </hostdev> The start the VM (which crashes but it crashes randomly due to lack of memory - oh well, running it in VMWare Workstation) and then install virtio scsi driver (which shows up as passthrough) for the 2nd no-driver scsi item - which windows just install the drivers on the virtio disk, no need to force it. Then voila! When I checked the xml again, unRAID has automatically rearranged the codes and changed it a little: <controller type='scsi' index='1' model='virtio-scsi'> <address type='pci' domain='0x0000' bus='0x00' slot='0x09' function='0x0'/> </controller> ... <hostdev mode='subsystem' type='scsi' managed='no'> <source> <adapter name='scsi_host9'/> <address bus='0' target='0' unit='0'/> </source> <readonly/> <address type='drive' controller='1' bus='0' target='0' unit='0'/> </hostdev> *there should be an emoji for celebration*1 point


.png.9a4f708867a76b362eeaac6a578d6d21.png)


(Small).thumb.png.b884b0484e848c502a315fc27b995f59.png)


