Leaderboard


Popular Content
Showing content with the highest reputation on 06/27/21 in all areas
-
Upgraded this plugin and removed the old iscsi target plugin and everything is still humming along, great job all! Interface updates from the last few versions look great!2 points
-
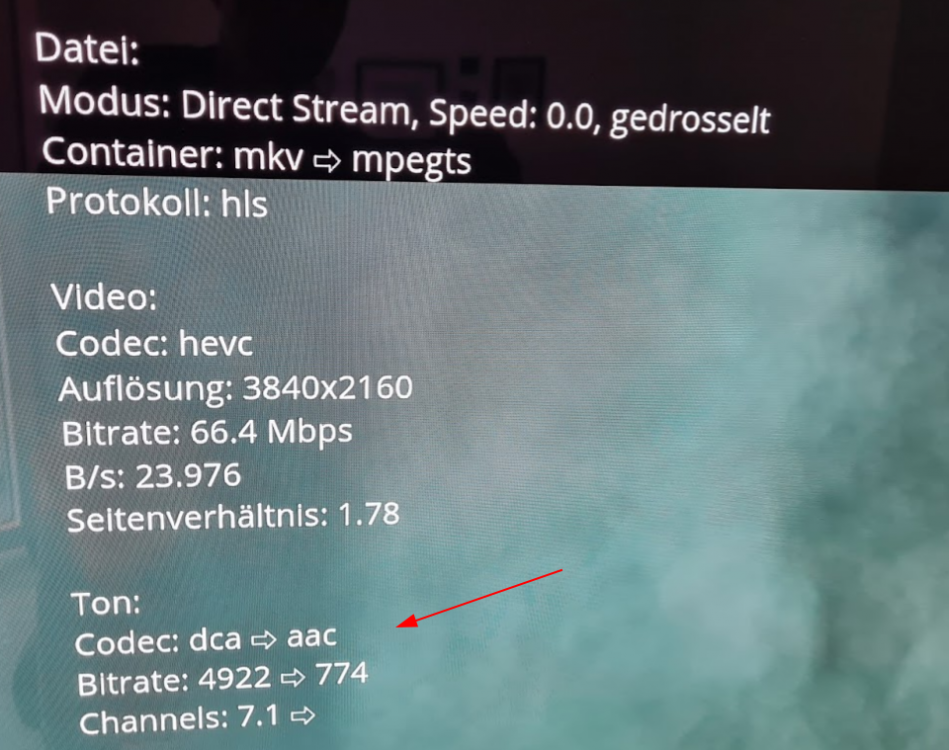
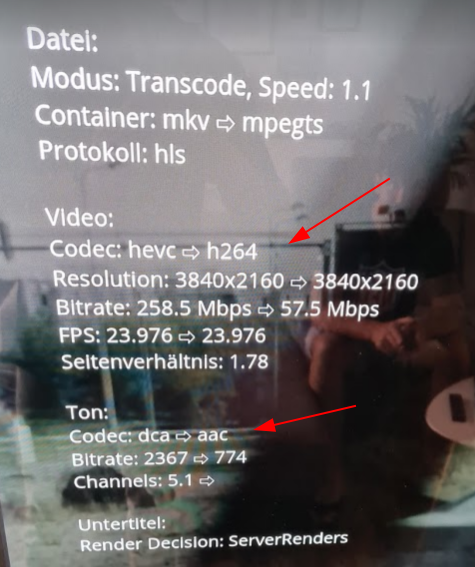
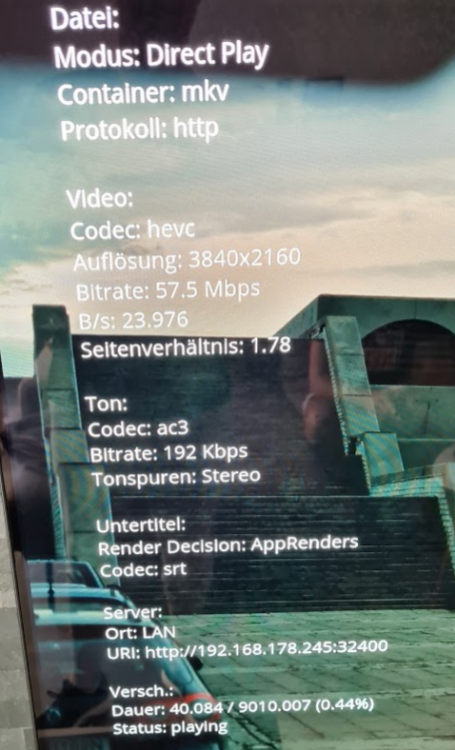
@i-B4se so, gestern mal paar Filme getestet mit der LG App vom Plex Server es liefen immer alle Filme ruckelfrei, ganz ganz hohe Bitrate hatte ich jetzt hier vergessen, 80mb+ aber wie gesagt, denke nicht dass das ein Thema ist. was kam raus, alle Filme mit DTS hat der LG den Ton konvertiert (Bild blieb auf passthrough(, sprich Direct Stream, Start dauert ein paar Sekunden bis Plex soweit ist, dann aber alles gut, 15 Minuten Laufzeit Test gemacht. es gab tatsächlich einen Film wo dieses Szenario nicht funktioniert hatte und auch das Bild konvertiert wurde, Tenet .. warum auch immer ... (wahrscheinlich wegen der DTS-HD MA) Umstellen auf AC3 beim gleichen Film (englische Tonspur) schaltete sofort auf Direct Play wenn Du das nochmal testen möchtest, schau nach den Tonspuren ob das bei AC3 auch passiert um das Thema audio auszuschließen, wie gesagt, leider war da jetzt kein 70+ oder gar 80+ Film vor Ort und ich hab mein Platte vergessen, aber grundsätzlich lief das immer "ruckelfrei" bzw. ohne "Puffern" außer beim Start wegen audio transcode. Ich habe dort keine ramdisk für den transcode pfad hinterlegt, sondern normal im cache (dort eine m2 nvme) als Plex Docker bevorzuge ich den von plexinc und nicht den lsio was jedoch keinen nennenswerten Unterschied machen sollte. Da ich ja öfters dort bin und ich die 70 - 80 er Filme bereits auf meiner portablen nvme habe werde ich das auch noch nachreichen. wenn Du Dir Ärger sparen möchtest, nimm eine Shield ...
 2 points
 -
Info https://github.com/A75G/docker-templates/blob/master/README.md Template Issues (Cant guarantee anything but will try my best) https://github.com/A75G/docker-templates/issues/new/choose If you find an issue in the template or missing notes require you can request pull request in Github and i will review it approve it appropriately. Just heads up i dont make the application i make template which make it eaiser for normal user to use in Unraid. I will try my best to update templates when i can but i would appreciate if you guys/gals would help a bit since it is too much for one person.1 point
-
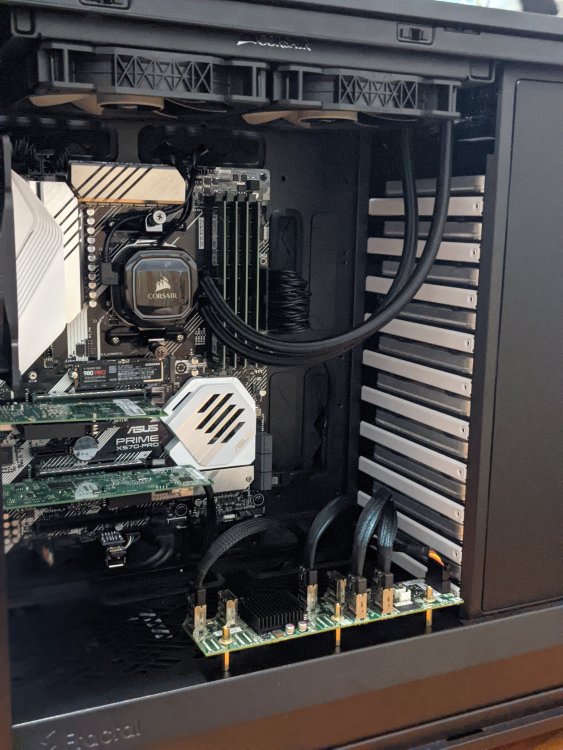
The attachment in this post is a joint effort between @Batter Pudding and myself. @Batter Pudding supplied much of the technical part of the Attached Document and I provide most of the background information. What we are attempting to do is to show that it is easy to actually use Unraid with all of the security features that Microsoft has incorporated into Windows 10. What many of us have been doing (myself included) is to reverse those enhancements to security and use our Unraid network in what is basically a 2010 security environment. @limetechhas announced in the release thread for version 6.9.2 that they are about to increase security on Unraid in future releases. Unfortunately, this list is going to impact a lot of current Unraid users as many have setup their Unraid servers and networking to use these very features. Each user will have two choices. Either embrace security or spend time to undo each new security addition that either LimeTech or MS adds in their updates. If you decide to continue to bypass security, just realize that the number of folks prepared to assist you with any problems doing this will probably decline as more folks adopt increased security as a necessity. In some cases, this is going to present some difficult decisions. For example, I have an old Netgear NTV-550 set top media player (last firmware/software update was in early 2011) that only supports SMBv1 or NFS. Do I open up a security hole to use a well-functioning piece of equipment or do I replace it? (The choice, obviously, is one that only I can make...) Two Important things! Do not post up any problems that you have with networking between Windows 10 and Unraid in this thread! Start a new thread in the General Support forum. Please don’t tell us that there is another way to do something and that we should change our recommendation to employ that method. If you feel you have a better way, you are encouraged to write it up in detail and post it in this thread pointing out the advantages of your way. (One well regarded Windows 10 networking book has over 400 pages in it. Our document is 16 pages long…) EDIT: November 30, 2021. Recently, something has come to my attention about Unraid and SMB. There have been incidences where access to Unraid shares is restricted or blocked completely from users who should have access to it. What has been found in these cases is that a feature, has been enable on the Unraid side, called Access Control Lists (ACL for short). This will show up as an ‘+’ at the end of the Linux permissions. See the screen capture below: Note that the ‘+’ is also on the file as well as the share/directory. ACL changes the way that Linux is going to control access to these resources. After some research, I found out that Windows has used ACL for a long time. The SAMBA group has added ACL into its version of SMB. Unraid does not use ACL in its security scheme. At the present time, I can think of only one way that a ACL could be found on any Unraid server. It was done by a Windows user who was trying to change how SMB worked by applying Windows security features to an Unraid share by changing the default Security settings. (Basically, right-clicking on the Share in Windows Explorer, selecting ‘Properties’, then the ‘Security’ tab and working from there.) The point I am making is that you can’t fix a share access problem by trying to change a Unraid share security using Windows security tools on that share. If you try, you will probably make things worst! (Unless you are a Windows SMB Networking Guru…) It is important to realize that if you are denied permission to an Unraid share resource, the problem can only be fixed on the Unraid side using the Tools in the Unraid GUI (or via the command line for specific problems). If you are having an access problem to a Unraid share and can’t solve it with the tools in the GUI, start a thread in the General Support sub-forum and let the community help you fix it. EDIT: February 25, 2024. It has come to my attention that there is one more setting that was not previously covered. The Network type should be set as 'Private'. For Windows 10 Open up Settings Pick Network & Internet In right panel, click on Properties button In the Network Properties, select the 'Private' radio button. For Windows 11 Open up Settings In left panel, pick Network & Internet In the Right Panel at the top, click on Properties Under Network Profile type, click on the 'Private network' radio button EDIT: March 15, 2024 It has come to my attention that there can be problems in linking the Network Neighborhood folder into Windows File Explorer in Windows 11. While there is a solution to that problem, it has some other side effects and the full scope of those has not been evaluated. In addition, I have become aware of another way to integrate access of servers into Windows File Explorer that works quite well if you have only a few servers. (Things start to look messy if one adds more than two or three servers but that is a matter of each individual’s perception of “messy”.) So if you have having any problems with implementing "Network Neighborhood", try this new approach! This new method is actually quite simple to set up. This method is described in the attached PDF file named: “An Alternative Method to Network Neighborhood.PDF” Unraid & Windows 10 SMB Setup.pdf An Alternative Method to Network Neighborhood.pdf
 1 point
 -
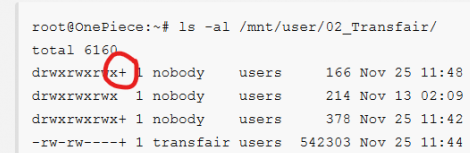
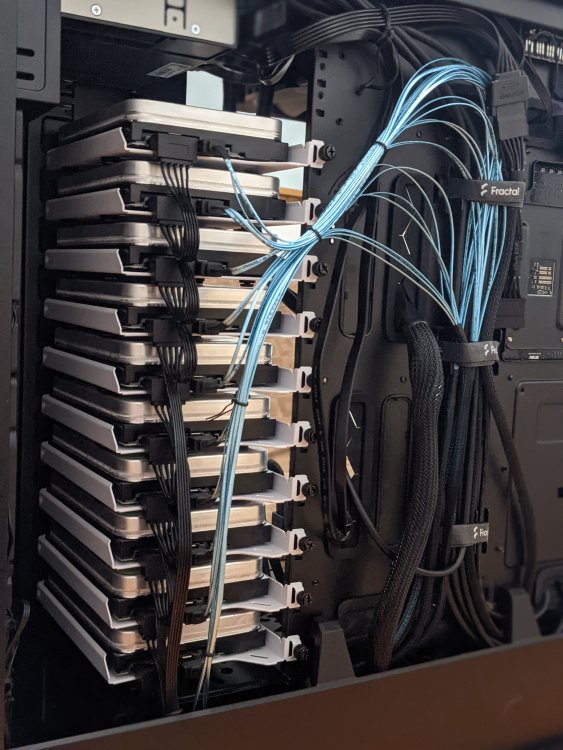
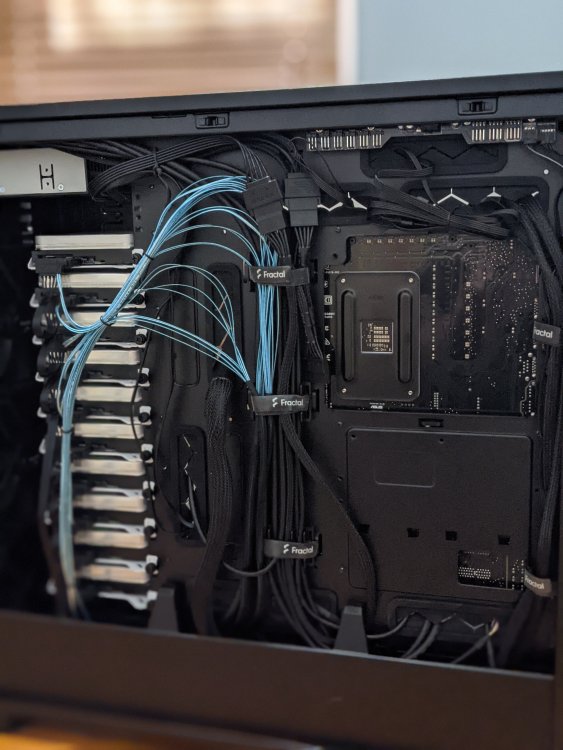
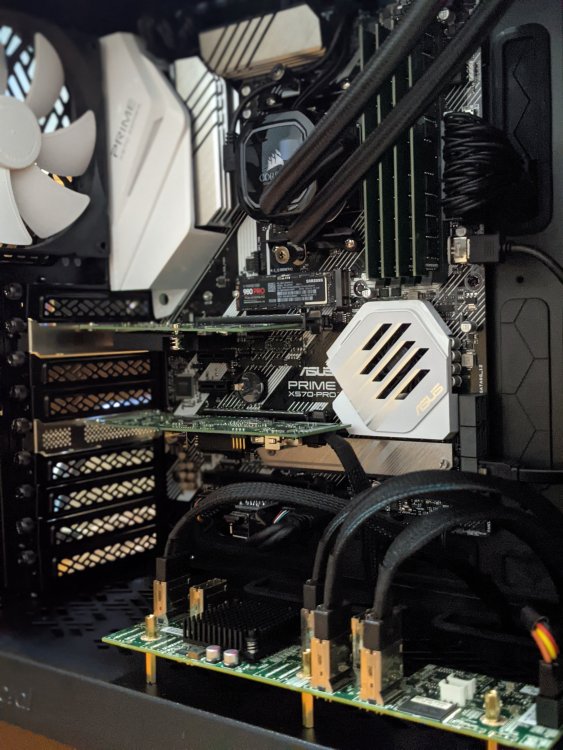
Hey all, Pretty proud of my first Unraid machine. Finally have it to a "finished" state. I wanted to share some good photos but I'm no photographer. I scored all 10 14TB HDD's from shucking Seagate external drives a few months ago, before the price boom, so $225 apiece. Hoping price comes back down because I have space for a few more. I'm still in the learning phase but I have set up OpenVPN, Nextcloud with reverse proxy, Plex, Windows 10 VM, and Ubuntu VM. Running headless for now until I have a need for a GPU assuming they come down to MSRP. I have a 10Gbps card in this and my regular PC, so they're directly connected without a switch. All-in cost right now is north of $5k, but I am also interested in upgrading to a Ryzen 5900/5950x when those are available at MSRP also. Before anyone gets concerned, the drive power lines are not all chained together.


 1 point
 -
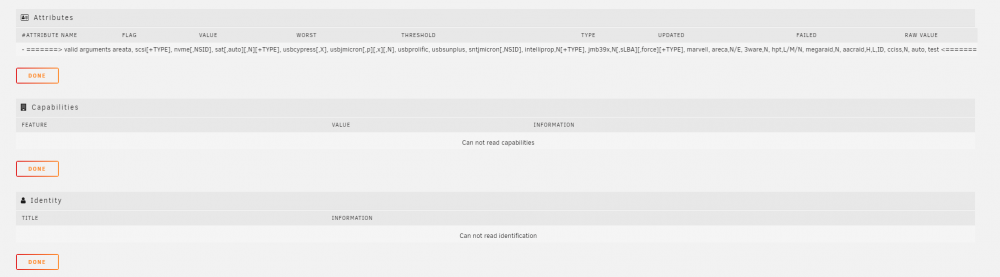
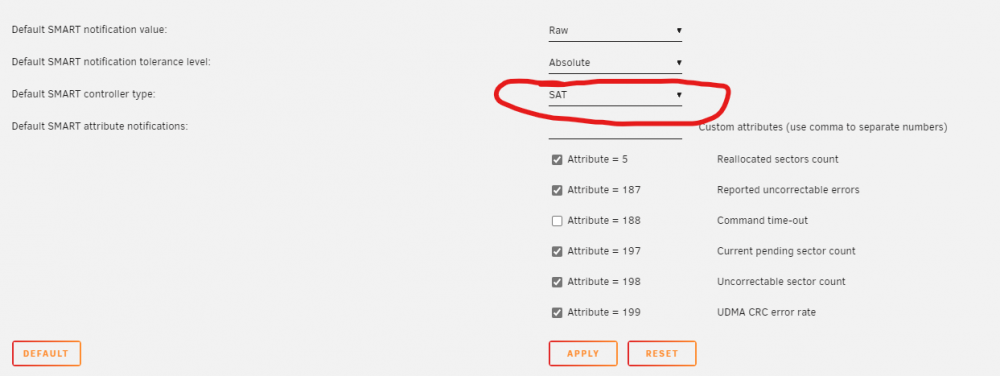
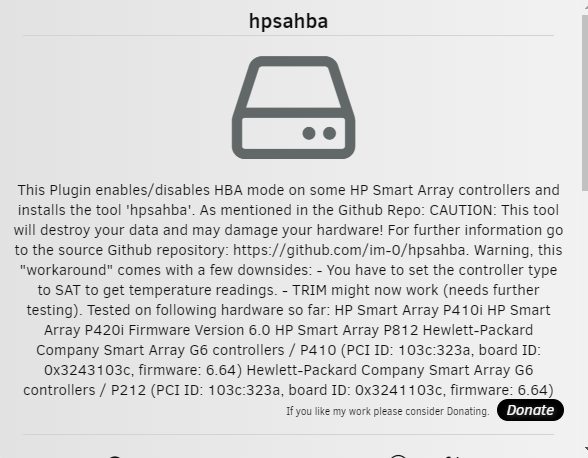
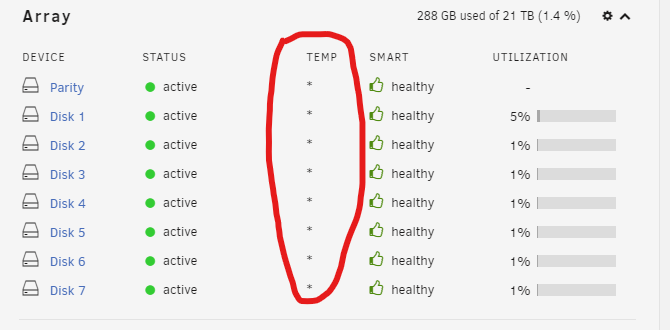
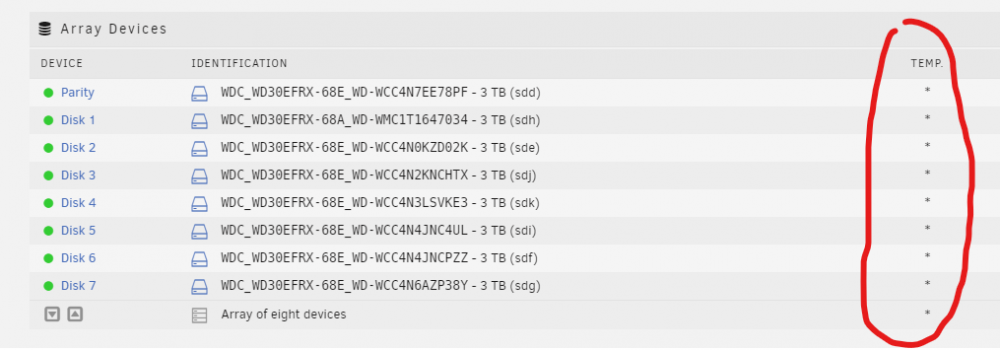
HI! First of all thanks for reading my post! I am a new user to unraid, and bought a HP ProLiant DL380p Gen8 with 12 x 3.5 bays. Currently with 8 x WDC_WD30EFRX-68E Disks. This comes with a HP Smart Array P420i raid card that i changed to HBA Mode. All drives are detected but the problem is that i am not getting any data about temp and smart. I tried changing the Default SMART controller type to HP cciss and have rebooted the server, but does not seem to make any difference. Anyone know how i can fix this ? Hope you have a great day! Best regards Apil Update: I made some progress, and can now see Smart Data under each disk. I did this by intalling the plugin "hpsahba" from the CA apps, and then setting Default SMART controller type to SAT. Though i do not get Tempeture readings still Update again! So i see that the Attribute of 194, Temperature celsius is there, but for some reason it still does not show on the Dashboard/Main page. Wierd.


 1 point
 -
Ich weiß leider nicht genau was du damit meinst - Ich habe an dem Server lediglich 2 USB Geräte hängen. Den einen besagten brauch ich in der VM, den anderen in einem Docker (das funktioniert immer). Das Board hätte somit noch einige Anschlüsse frei, wieviele USB Controller das Board hat, weiß ich leider nicht. Es ist ein BIOSTAR B365MHC Edit: Gerade geschaut, das Board hat leider nur einen Controller. Habe es nun installiert, hab aber leider absolut keine Ahnung wie ich das parametrieren / verwenden soll. Gibt es dafür irgend ein Tutorial? Ich hab leider keins gefunden... Edit2: Das hat geholfen. Ich bekomme zwar eine Fehlermeldung, es funktioniert aber trotzdem sehr gut. Hab es jetzt mehrfach getestet. Vielen Dank für den Tipp!
 1 point
 -
GVT-g unterstüzt nur aktuelle Betriebssysteme, sprich Windows 10. Das ist aber mehr eine Limitation vom Intel Treiber, der GVT-g Adapter wird in Windows 7 auch erkannt nur kannst du keinen Treiber installieren da es schlichtweg keinen gibt (nur mit Umwegen soweit ich gelesen habe wenn es überhaupt zu bewerkstelligen ist, hab mich aber dann nicht weiter beschäftigt damit). HW Transcoding funktioniert dann noch mit GVT-g, wie oben geschrieben maximal 2 VMs und verwendung in Containern möglich (nicht auf einen Container beschränkt).1 point
-
@Zonediver & @mgutt kommt auf die hardware an, wenn es nicht grad RocketLake ist dann würde das mit GVT-g funktionieren, kommt jedoch drauf an für was ihr in der VM machen wollt. Plex reserviert die iGPU nicht wenn es im container läuft, wenn dann ist sie durch Unraid reserviert. Man kann sogar 2 VMs und die iGPU in Emby/Jellyfin/Plex gleichzeitig verwenden mit GVT-g1 point
-
Ich hab mir ein Set aus zwei Luster MoCa 2.5 Adapter geholt. Haben zwei 1Gbit Anschlüsse pro Adapter und liefern eine Bandbreite von 3000Mbit. Die Latenz liegt bei ca. 5ms und und die Teile laufen wirklich stabil. Bei einer Frequenz von 1400Mhz, stören sie kein Kabel Docsis 3.0/3.1 Modem und kein Kabel-TV. https://www.amazon.de/Internet-Coax-adapter-MoCA-2-5-adapters/dp/B08BZRXZCX/ref=sr_1_1?__mk_de_DE=ÅMÅŽÕÑ&dchild=1&keywords=Luster+moca+2.5&qid=1624824851&sr=8-1 Die Geräte kommen aus einem holländischen Shop, aber die haben ein Techniker der auch deutsch spricht.1 point
-
Read only file system on the flash drive. Normally flash errors get corrected during Unraid bootup, but on occasion you have to toss the stick into another box and run the file system checks on it. The preclear folder you posted however shows rather serious corruption problems. You might have to redo the stick altogether.1 point
-
@BinglesWorth/ @ghost82 Correct, the workaround was to not use audio. But there is a better way now that patches out the RMRR issue: I don't currently have any proliants, but this worked well and reliably when last I used it.1 point
-
Meant Intel gpu top but op knew that. Thanks for correcting me1 point
-
I finally got it to boot, drivers installed and I haven't tested anything yet but there are no issues. With Nvidia finally supporting virtualization on the 10 series and newer, we should be fine. Seems like I won't have audio but that's nothing a USB adapter can't fix. Unless I'm mistaking somthing again, seems like my last step is go get an SSD cause my disk usage is a bit to high right now so I need somthing snappier. I'm running sata drives on 6gb sas ports which is slowing them to 3gbs Sata and they are 8 year old drives lol.1 point
-
Really going down the rabbit hole now, trying to eliminate all unnecessary writes possible lol. I have been tweaking things based on the activity logs, slowly knocking out the big hitters. It has made a BIG difference in the logs themselves. I was racking up ~75mb of activity logs a day at first, I had less then 1mb of activity logs overnight now! So far I have mostly just disabled the docker logging of most of the containers using the above commands. Extended the helthchecks of a few containers to 60 mins but only like 2 problem containers so far. The log is still seeing a lot of activity from /btrfs/subvolumes/*id*/tmp from various containers. Obviously it is an internal log of the program thinking it is writing to ram. But by default docker does not map /tmp to ram, instead it maps to the disk. Found another command that should help quite a bit for in this case though, testing it out now on the worst offenders. Added to the extra parms in the docker config as well. --mount type=tmpfs,destination=/tmp,tmpfs-mode=1777,tmpfs-size=256000000 This sets up a 256gb ramdrive (only uses the ram as needed, so oversized it a bit) in the /tmp folder inside the container. Seems to be working on the first container I am testing it on. I just restarted the server so got to wait for the activity logs to start back up and keep testing from there. I can confirm that the helthcheck interval works, only see that activity every 60 mins now, which is ok for me.1 point
-
Can you please attach the iommu groups txt file as you did before? From the diagnostic I cannot find a way to look at devices/groups. Does the audio part 21:00.1 splits and it's alone in a iommu group? Don't bind to vfio the audio part (I can still see it binded in syslinux config), because you have the same error in syslog as before: Jun 27 06:22:55 UnRaid kernel: vfio-pci 0000:21:00.1: DMAR: Device is ineligible for IOMMU domain attach due to platform RMRR requirement. Contact your platform vendor. And obviously, don't pass the audio part to the vm. It's not "an audio problem": the problem is with your mainboard which doesn't allow to passthrough the audio part of the gpu, so the not booting is related to this. Are you running the latest bios?1 point
-
Hallo Allerseits Ich habe es gerade eben noch einmal nachgestellt (neue W10 VM erstellt) und bei diesem neuen Versuch hat Win10 wirklich von selbst kein LAN gefunden. Da muß ich gestern wohl doch noch irgendetwas verändert haben, ohne zu wissen, was ich da mache. Ich bedanke mich für Eure Zeit und Hilfsbereitschaft!1 point
-
Hallo @ich777 Zuerst wollte ich meinen großen Dank für die Arbeit die in dem MFT und der Beantwortung meiner Fragen steckt ausdrücken. Nachdem ich kleinere Klippen umschifft hatte, läuft es nun anscheinend problemlos. Hier eine kleine Bemerkung: Unwissend wie ich war, hatte ich bei der Info zu MFT gedacht, daß ich mir die Original Mellanox Firmware Tools von der Mellanox Webseite herunterladen solle. Doch nachdem ich damit in Unraid direkt nichts anzufangen wusste, habe ich weiter gesucht und da erst bemerkt, daß Du damit das von Dir selbst erstellte Plugin meinst, welches man über die CA bekommen kann. Als ich die hatte und die darin enthaltende Anleitung fand war es dann doch sehr einfach die Firmware zu aktualisieren. Auch dann konnte och erst nachvollziehen, wo die Screenshots mit der Temperaturanzeige her kommen. Danke!1 point
-
Do NOT format disk3 unless you want to lose all its data. The format operation would create an empty file system on disk3 and update parity to reflect this. I assume at this point the system says it is 'emulating' disk3? If that is so then you need to follow the procedure for handling unmountable disks as documented here in the online documentation that can be accessed via the Manual link at the bottom of the Unraid GUI to see if you can successfully repair the file system on the emulated disk before attempting any rebuild. Post back here if that does not work. You can then clear the disabled state on the disabled disks as described here in the online documentation. Not sure if you can rebuild both a parity disk and a data disk at the same time or have to do it in 2 stages - hopefully someone else can chime in with the answer to that.1 point
-
Thank you Jorge. I wasn't aware of that but I will certainly remember that in the future. Luckily I was already able to retrieve all of my data using the 'btrfs restore' command suggested in your FAQ post, so I am very thankful for that. Something funky was happening with the new cache drive anyway so it's probably a good thing to format the drives and start again anyway.1 point
-
Release 2021.06.27 Published. ICON for iSCSI shows in settings rather than tools. @ich777 Targetcli package is now included within the iSCSI-GUI plugin. You no longer need to have both installed.1 point
-
In your syslog you have also a couple of these entries: Jun 26 09:55:59 UnRaid kernel: vfio-pci 0000:21:00.1: DMAR: Device is ineligible for IOMMU domain attach due to platform RMRR requirement. Contact your platform vendor. 21:00.1 is the audio part of the gpu. Here: @1812 solved the same(?) issue by not passing through that audio part. NOTE: you need to use acs override to split your iommu group 78 to have the audio component in its iommu group. And you may need vfio_iommu_type1.allow_unsafe_interrupts=1 added to your syslinux config in unraid. If you want to give it a try, copy and replace: <?xml version='1.0' encoding='UTF-8'?> <domain type='kvm'> <name>Windows 10</name> <uuid>10b4697d-edcf-d7e0-6700-705388f94d3b</uuid> <metadata> <vmtemplate xmlns="unraid" name="Windows 10" icon="windows.png" os="windows10"/> </metadata> <memory unit='KiB'>20971520</memory> <currentMemory unit='KiB'>20971520</currentMemory> <memoryBacking> <nosharepages/> </memoryBacking> <vcpu placement='static'>8</vcpu> <cputune> <vcpupin vcpu='0' cpuset='16'/> <vcpupin vcpu='1' cpuset='36'/> <vcpupin vcpu='2' cpuset='17'/> <vcpupin vcpu='3' cpuset='37'/> <vcpupin vcpu='4' cpuset='18'/> <vcpupin vcpu='5' cpuset='38'/> <vcpupin vcpu='6' cpuset='19'/> <vcpupin vcpu='7' cpuset='39'/> </cputune> <os> <type arch='x86_64' machine='pc-i440fx-5.1'>hvm</type> <loader readonly='yes' type='pflash'>/usr/share/qemu/ovmf-x64/OVMF_CODE-pure-efi.fd</loader> <nvram>/etc/libvirt/qemu/nvram/10b4697d-edcf-d7e0-6700-705388f94d3b_VARS-pure-efi.fd</nvram> </os> <features> <acpi/> <apic/> <hyperv> <relaxed state='on'/> <vapic state='on'/> <spinlocks state='on' retries='8191'/> <vendor_id state='on' value='none'/> </hyperv> </features> <cpu mode='host-passthrough' check='none' migratable='on'> <topology sockets='1' dies='1' cores='4' threads='2'/> <cache mode='passthrough'/> </cpu> <clock offset='localtime'> <timer name='hypervclock' present='yes'/> <timer name='hpet' present='no'/> </clock> <on_poweroff>destroy</on_poweroff> <on_reboot>restart</on_reboot> <on_crash>restart</on_crash> <devices> <emulator>/usr/local/sbin/qemu</emulator> <disk type='file' device='disk'> <driver name='qemu' type='raw' cache='writeback'/> <source file='/mnt/disk1/Windows/Windows 10/Windows 10/vdisk1.img'/> <target dev='hdc' bus='virtio'/> <boot order='1'/> <address type='pci' domain='0x0000' bus='0x00' slot='0x04' function='0x0'/> </disk> <disk type='file' device='cdrom'> <driver name='qemu' type='raw'/> <source file='/mnt/user/isos/Windows10.iso'/> <target dev='hda' bus='ide'/> <readonly/> <boot order='2'/> <address type='drive' controller='0' bus='0' target='0' unit='0'/> </disk> <disk type='file' device='cdrom'> <driver name='qemu' type='raw'/> <source file='/mnt/user/isos/virtio-win-0.1.185.iso'/> <target dev='hdb' bus='ide'/> <readonly/> <address type='drive' controller='0' bus='0' target='0' unit='1'/> </disk> <controller type='usb' index='0' model='ich9-ehci1'> <address type='pci' domain='0x0000' bus='0x00' slot='0x07' function='0x7'/> </controller> <controller type='usb' index='0' model='ich9-uhci1'> <master startport='0'/> <address type='pci' domain='0x0000' bus='0x00' slot='0x07' function='0x0' multifunction='on'/> </controller> <controller type='usb' index='0' model='ich9-uhci2'> <master startport='2'/> <address type='pci' domain='0x0000' bus='0x00' slot='0x07' function='0x1'/> </controller> <controller type='usb' index='0' model='ich9-uhci3'> <master startport='4'/> <address type='pci' domain='0x0000' bus='0x00' slot='0x07' function='0x2'/> </controller> <controller type='pci' index='0' model='pci-root'/> <controller type='ide' index='0'> <address type='pci' domain='0x0000' bus='0x00' slot='0x01' function='0x1'/> </controller> <controller type='virtio-serial' index='0'> <address type='pci' domain='0x0000' bus='0x00' slot='0x03' function='0x0'/> </controller> <interface type='bridge'> <mac address='52:54:00:74:21:ee'/> <source bridge='br0'/> <model type='virtio-net'/> <address type='pci' domain='0x0000' bus='0x00' slot='0x02' function='0x0'/> </interface> <serial type='pty'> <target type='isa-serial' port='0'> <model name='isa-serial'/> </target> </serial> <console type='pty'> <target type='serial' port='0'/> </console> <channel type='unix'> <target type='virtio' name='org.qemu.guest_agent.0'/> <address type='virtio-serial' controller='0' bus='0' port='1'/> </channel> <input type='tablet' bus='usb'> <address type='usb' bus='0' port='2'/> </input> <input type='mouse' bus='ps2'/> <input type='keyboard' bus='ps2'/> <hostdev mode='subsystem' type='pci' managed='yes'> <driver name='vfio'/> <source> <address domain='0x0000' bus='0x21' slot='0x00' function='0x0'/> </source> <address type='pci' domain='0x0000' bus='0x00' slot='0x05' function='0x0' multifunction='on'/> </hostdev> <hostdev mode='subsystem' type='pci' managed='yes'> <driver name='vfio'/> <source> <address domain='0x0000' bus='0x21' slot='0x00' function='0x2'/> </source> <address type='pci' domain='0x0000' bus='0x00' slot='0x05' function='0x2'/> </hostdev> <hostdev mode='subsystem' type='pci' managed='yes'> <driver name='vfio'/> <source> <address domain='0x0000' bus='0x21' slot='0x00' function='0x3'/> </source> <address type='pci' domain='0x0000' bus='0x00' slot='0x05' function='0x3'/> </hostdev> <memballoon model='none'/> </devices> </domain>1 point
-
You can't remove drives from a pool using single profile with the GUI, only manually. You can try this on the removed drive (ckeck that it's still the correct device): btrfs-select-super -s 1 /dev/nvme1n1p1 Then reset the pool config in Unraid: Unassign all cache devices, start array to make Unraid "forget" current cache config, stop array, reassign both cache devices (there can't be an "All existing data on this device will be OVERWRITTEN when array is Started" warning for any cache device), start array and see if it mounts.1 point
-
If there's one best bet is to use the existing docker support thread:
 1 point
 -
Some edits to your xml, put the components of the gpu in a single multifunction device, copy and replace: <?xml version='1.0' encoding='UTF-8'?> <domain type='kvm'> <name>Windows 10</name> <uuid>10b4697d-edcf-d7e0-6700-705388f94d3b</uuid> <metadata> <vmtemplate xmlns="unraid" name="Windows 10" icon="windows.png" os="windows10"/> </metadata> <memory unit='KiB'>20971520</memory> <currentMemory unit='KiB'>20971520</currentMemory> <memoryBacking> <nosharepages/> </memoryBacking> <vcpu placement='static'>8</vcpu> <cputune> <vcpupin vcpu='0' cpuset='16'/> <vcpupin vcpu='1' cpuset='36'/> <vcpupin vcpu='2' cpuset='17'/> <vcpupin vcpu='3' cpuset='37'/> <vcpupin vcpu='4' cpuset='18'/> <vcpupin vcpu='5' cpuset='38'/> <vcpupin vcpu='6' cpuset='19'/> <vcpupin vcpu='7' cpuset='39'/> </cputune> <os> <type arch='x86_64' machine='pc-i440fx-5.1'>hvm</type> <loader readonly='yes' type='pflash'>/usr/share/qemu/ovmf-x64/OVMF_CODE-pure-efi.fd</loader> <nvram>/etc/libvirt/qemu/nvram/10b4697d-edcf-d7e0-6700-705388f94d3b_VARS-pure-efi.fd</nvram> </os> <features> <acpi/> <apic/> <hyperv> <relaxed state='on'/> <vapic state='on'/> <spinlocks state='on' retries='8191'/> <vendor_id state='on' value='none'/> </hyperv> </features> <cpu mode='host-passthrough' check='none' migratable='on'> <topology sockets='1' dies='1' cores='4' threads='2'/> <cache mode='passthrough'/> </cpu> <clock offset='localtime'> <timer name='hypervclock' present='yes'/> <timer name='hpet' present='no'/> </clock> <on_poweroff>destroy</on_poweroff> <on_reboot>restart</on_reboot> <on_crash>restart</on_crash> <devices> <emulator>/usr/local/sbin/qemu</emulator> <disk type='file' device='disk'> <driver name='qemu' type='raw' cache='writeback'/> <source file='/mnt/disk1/Windows/Windows 10/Windows 10/vdisk1.img'/> <target dev='hdc' bus='virtio'/> <boot order='1'/> <address type='pci' domain='0x0000' bus='0x00' slot='0x04' function='0x0'/> </disk> <disk type='file' device='cdrom'> <driver name='qemu' type='raw'/> <source file='/mnt/user/isos/Windows10.iso'/> <target dev='hda' bus='ide'/> <readonly/> <boot order='2'/> <address type='drive' controller='0' bus='0' target='0' unit='0'/> </disk> <disk type='file' device='cdrom'> <driver name='qemu' type='raw'/> <source file='/mnt/user/isos/virtio-win-0.1.185.iso'/> <target dev='hdb' bus='ide'/> <readonly/> <address type='drive' controller='0' bus='0' target='0' unit='1'/> </disk> <controller type='usb' index='0' model='ich9-ehci1'> <address type='pci' domain='0x0000' bus='0x00' slot='0x07' function='0x7'/> </controller> <controller type='usb' index='0' model='ich9-uhci1'> <master startport='0'/> <address type='pci' domain='0x0000' bus='0x00' slot='0x07' function='0x0' multifunction='on'/> </controller> <controller type='usb' index='0' model='ich9-uhci2'> <master startport='2'/> <address type='pci' domain='0x0000' bus='0x00' slot='0x07' function='0x1'/> </controller> <controller type='usb' index='0' model='ich9-uhci3'> <master startport='4'/> <address type='pci' domain='0x0000' bus='0x00' slot='0x07' function='0x2'/> </controller> <controller type='pci' index='0' model='pci-root'/> <controller type='ide' index='0'> <address type='pci' domain='0x0000' bus='0x00' slot='0x01' function='0x1'/> </controller> <controller type='virtio-serial' index='0'> <address type='pci' domain='0x0000' bus='0x00' slot='0x03' function='0x0'/> </controller> <interface type='bridge'> <mac address='52:54:00:74:21:ee'/> <source bridge='br0'/> <model type='virtio-net'/> <address type='pci' domain='0x0000' bus='0x00' slot='0x02' function='0x0'/> </interface> <serial type='pty'> <target type='isa-serial' port='0'> <model name='isa-serial'/> </target> </serial> <console type='pty'> <target type='serial' port='0'/> </console> <channel type='unix'> <target type='virtio' name='org.qemu.guest_agent.0'/> <address type='virtio-serial' controller='0' bus='0' port='1'/> </channel> <input type='tablet' bus='usb'> <address type='usb' bus='0' port='2'/> </input> <input type='mouse' bus='ps2'/> <input type='keyboard' bus='ps2'/> <hostdev mode='subsystem' type='pci' managed='yes'> <driver name='vfio'/> <source> <address domain='0x0000' bus='0x21' slot='0x00' function='0x0'/> </source> <address type='pci' domain='0x0000' bus='0x00' slot='0x05' function='0x0' multifunction='on'/> </hostdev> <hostdev mode='subsystem' type='pci' managed='yes'> <driver name='vfio'/> <source> <address domain='0x0000' bus='0x21' slot='0x00' function='0x1'/> </source> <address type='pci' domain='0x0000' bus='0x00' slot='0x05' function='0x1'/> </hostdev> <hostdev mode='subsystem' type='pci' managed='yes'> <driver name='vfio'/> <source> <address domain='0x0000' bus='0x21' slot='0x00' function='0x2'/> </source> <address type='pci' domain='0x0000' bus='0x00' slot='0x05' function='0x2'/> </hostdev> <hostdev mode='subsystem' type='pci' managed='yes'> <driver name='vfio'/> <source> <address domain='0x0000' bus='0x21' slot='0x00' function='0x3'/> </source> <address type='pci' domain='0x0000' bus='0x00' slot='0x05' function='0x3'/> </hostdev> <memballoon model='none'/> </devices> </domain> Make sure you enabled virtualization in the bios: https://support.hpe.com/hpesc/public/docDisplay?docId=mmr_kc-0121549 Make sure that in unraid system information you have both IOMMU and HVM set to "enabled". Check that all the 4 components of the gpu have a check for vfio (vga, audio and the 2 controllers). If it still doesn't work, try with acs override: Settings -> vm manager -> switch to "advanced view" (top right) -> pcie acs override --> set it to both1 point
-
Your eth0 negotiate in 100Mb/s, so max at 10MB/s was normal. Settings for eth0: Supported ports: [ TP ] Supported link modes: 100baseT/Full 1000baseT/Full 10000baseT/Full 2500baseT/Full 5000baseT/Full Supported pause frame use: Symmetric Receive-only Supports auto-negotiation: Yes Supported FEC modes: Not reported Advertised link modes: 100baseT/Full 1000baseT/Full 10000baseT/Full 2500baseT/Full 5000baseT/Full Advertised pause frame use: Symmetric Advertised auto-negotiation: Yes Advertised FEC modes: Not reported Speed: 100Mb/s Duplex: Full Auto-negotiation: on Port: Twisted Pair Unraid doesn't support WiFi network controller.1 point
-
Those "read SMART" message were not the cause for disk spinup. When Unraid detect disk in sleep then it won't read its SMART data, but once detect it spinup then Unraid will read / poll it. You need try and error to check what will cause array/cache disks spinup, could be first stop most unnecessary service/application, after no more unexpected spinup then start service/application one-by-one until spinup happen again. Some problem found as below (1) Docker store use array, in path /mnt/user", as mention, my docker/VM were host in UD - SSD. Your docker.cfg DOCKER_ENABLED="yes" DOCKER_IMAGE_FILE="/mnt/user/system/docker/docker.img" DOCKER_IMAGE_SIZE="20" DOCKER_APP_CONFIG_PATH="/mnt/user/appdata/" DOCKER_APP_UNRAID_PATH="" DOCKER_CUSTOM_NETWORKS=" " DOCKER_LOG_ROTATION="yes" DOCKER_LOG_SIZE="50m" DOCKER_LOG_FILES="1" DOCKER_AUTHORING_MODE="no" DOCKER_USER_NETWORKS="remove" DOCKER_TIMEOUT="10" (2) Below periodic task may wakeup disk ( not sure ) Jun 24 05:42:24 TheMagicEye flash_backup: adding task: /usr/local/emhttp/plugins/dynamix.my.servers/scripts/UpdateFlashBackup.php update (3) Your cache were full Jun 24 03:08:51 TheMagicEye shfs: share cache full (4) ATA7 & ATA11, periodic error Jun 14 08:24:45 TheMagicEye kernel: ata7.00: status: { DRDY } Jun 14 08:24:45 TheMagicEye kernel: ata7.00: failed command: READ FPDMA QUEUED Jun 14 08:24:45 TheMagicEye kernel: ata7.00: cmd 60/40:30:68:ef:6b/05:00:c6:00:00/40 tag 6 ncq dma 688128 in Jun 14 08:24:45 TheMagicEye kernel: res 40/00:b0:a8:d4:6b/00:00:c6:00:00/40 Emask 0x2 (HSM violation)1 point
-
Ok Just putting this hear as notes to myself and anyone else that finds this. So far the commands I am using to reduce writes are first disabling the low level logging from the docker engine. When possible using : --log-driver none This breaks some containers though and also disables the unraid gui logs so using this for the picky containers or ones I want to be able to see the logs for in unraid: --log-driver syslog --log-opt syslog-address=udp://127.0.0.1:541 I used my unraid server ip so that I could spinup a syslog-ng container and easily capture the logs but that should work as well. I am then using this to mostly disable health checks --health-interval=60m It extends the health checks to 60 mins, I figure they should cause virtually no noticeable writes like that and still function good enough for home use. Slowly working my way through the containers using the watch commands mgutt posted on the last page. Netdata was doing a lot of logging and only way to stop it was with the --log-driver none.1 point
-
Since I can't stop making upgrades, I figured I would keep this thread updated. I decided the best way of beefing up my system was to replace my 3600xt with a 5950x. So I'm running 16 cores now. Part of the reasoning was I added a new windows VM that will be dedicated to running Blue Iris. Once the new PoE/VLAN switch comes, I will be setting up some perimeter cameras on my house which will record to a 4TB WD purple HDD which I plan to add as an unassigned drive, passed into the VM. I also updated my mobo BIOS yesterday around 2:30 PM, and spent the next 7 hours trying to boot back in. The problem just ended up being one of the BIOS settings I was missing. Always save or write down your important BIOS settings, because they don't persist after an update.1 point
-
So it look like Unraid gets grumpy when ram usage inside /tmp reaches half of the system memory. using a dedicated ramdisk seems to be the resolution. Thank you for the suggestion.1 point
-
Some plugin? My Servers or Docker Folder?1 point
-
Thanks for that It's fine to keep it xfs its just a big plex server really thanks for that information rather not format anything haha, I ran the repairs after youtubing some things and did the -v repairs since -n is just a report of what it would do. I completed the repairs and everything is checking out fine now i even did it with the parity drives attached but that took longer for some reason and was slower. After all complete everything showed fine and i took those two parity drives out. I got the cables to replace the splitters I will try and do it tonight or sunday night. I think it might legit be a power issue spinning the drives slowly, will update once cables are switched and see if the parity drives kick faster afterwards. Thanks again for the awesome help i will keep you all posted!1 point
-
iSCSI Target install components have now been added to the iSCSI-GUI plugin. On the next update the ICON will move from the Tools Menu to the settings. You no longer need to have ich777s target plugin installed and he is planning to remove as we have combined into a single plugin. Let us know if there are functions you would like adding.1 point
-
Apologies to @Ystebad and @HATEME for encountering this error in the documentation on my part. The version line of the Madmax-enabled plotman.yaml should be: version: [2] This was incorrectly left at '1' in the Wiki doc example. I have just now corrected it. Please try with that setting. Just be sure to set your Farmer and Pool public keys. Sorry for the trouble and thanks for reporting it!1 point
-
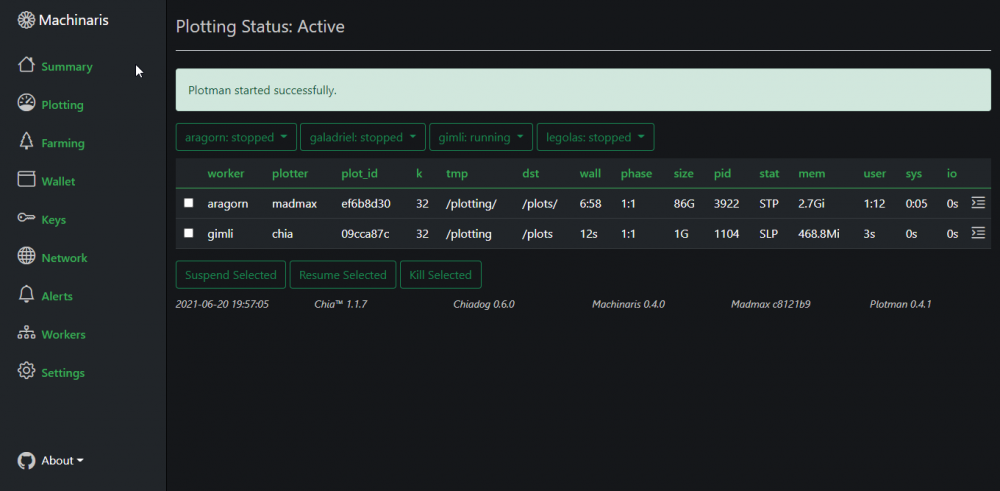
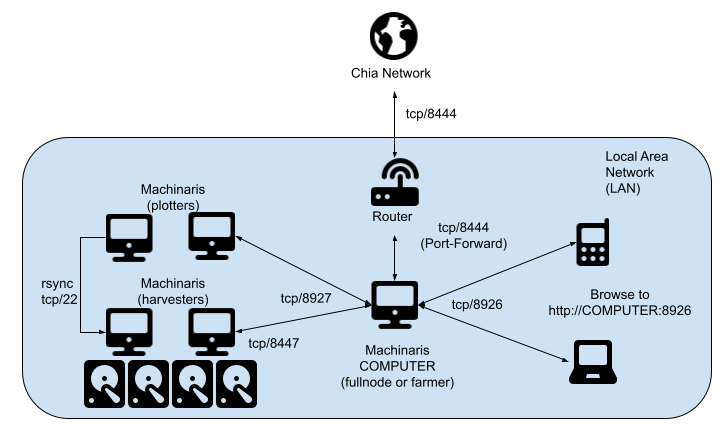
Good day! The next version of Machinaris is now available: v0.4.0. Thanks to all those who tested and provided feedback during the release cycle. All contributions are appreciated! Changes: - Support for the Madmax plotter, in addition to the official Chia plotter. - Manage multiple plotters, harvesters, and farmers across your LAN, all from a single WebUI on one controller system. - A full REST API for developers to extend and integrate with Machinaris. Notes: * Due to configuration file changes in Plotman, you may need to save a new config on your Settings | Plotting page: * --> get a Chia plotter template * --> get a Madmax plotter template
 1 point
 -
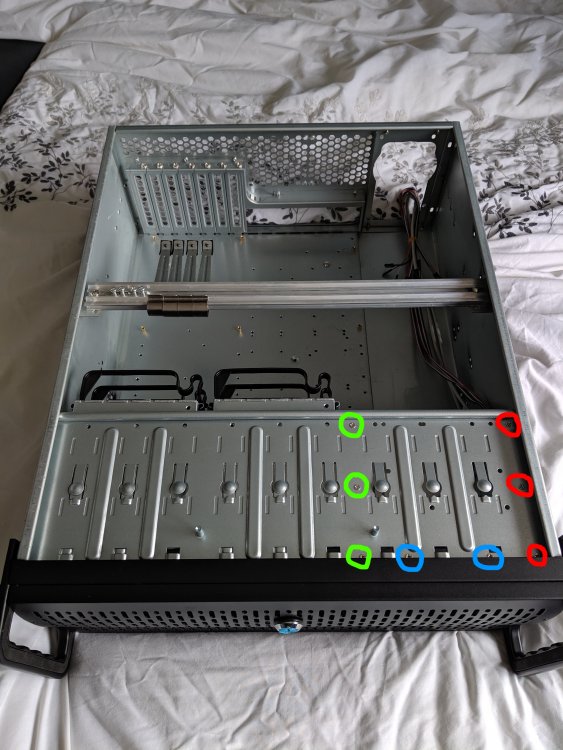
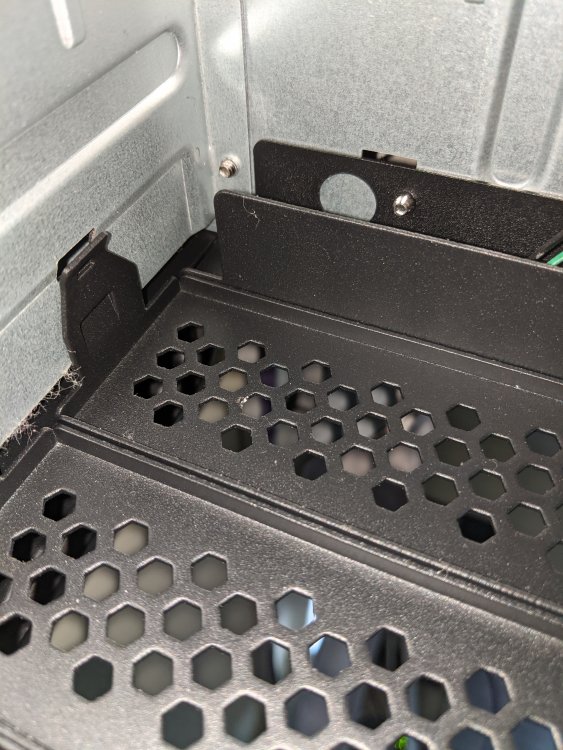
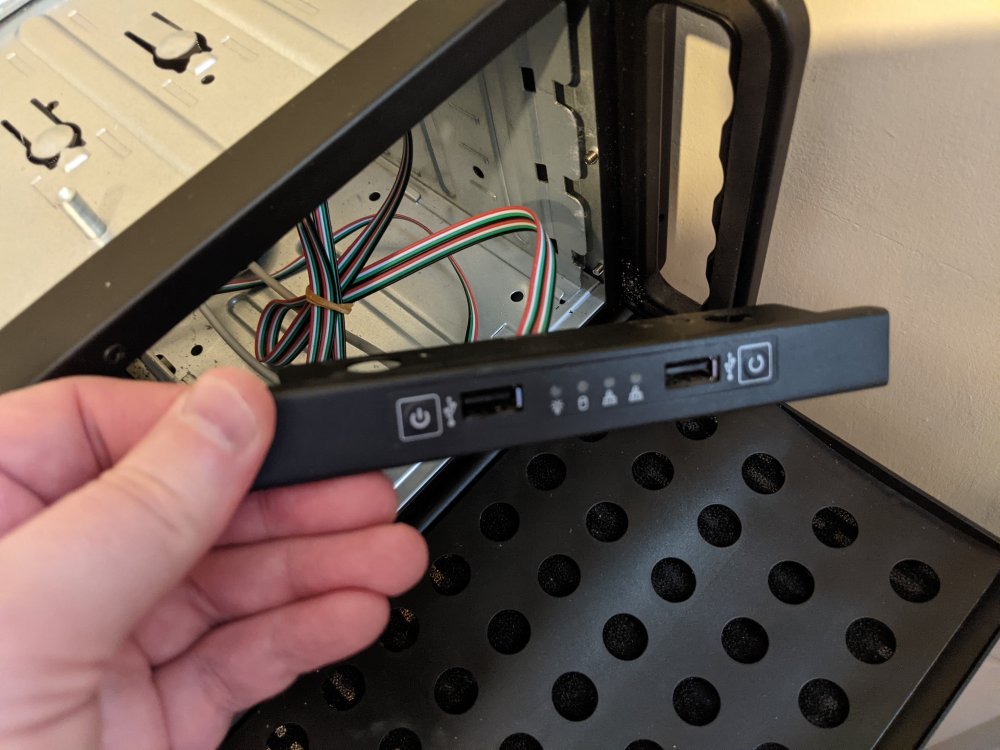
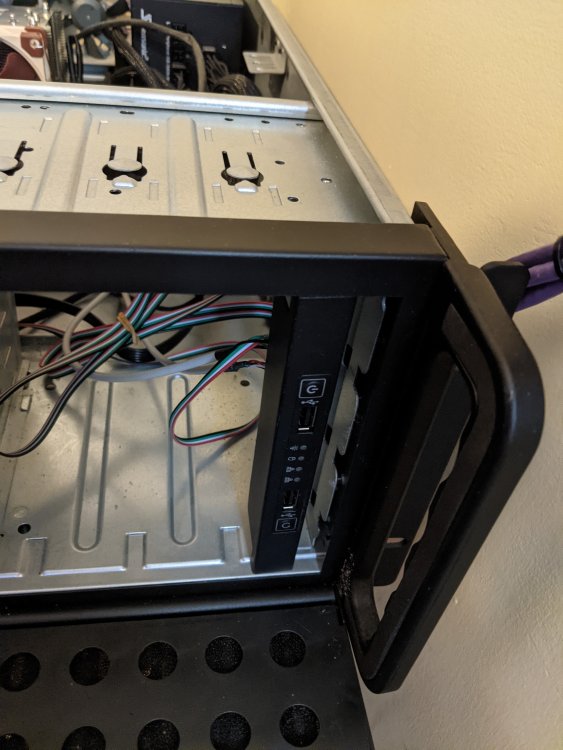
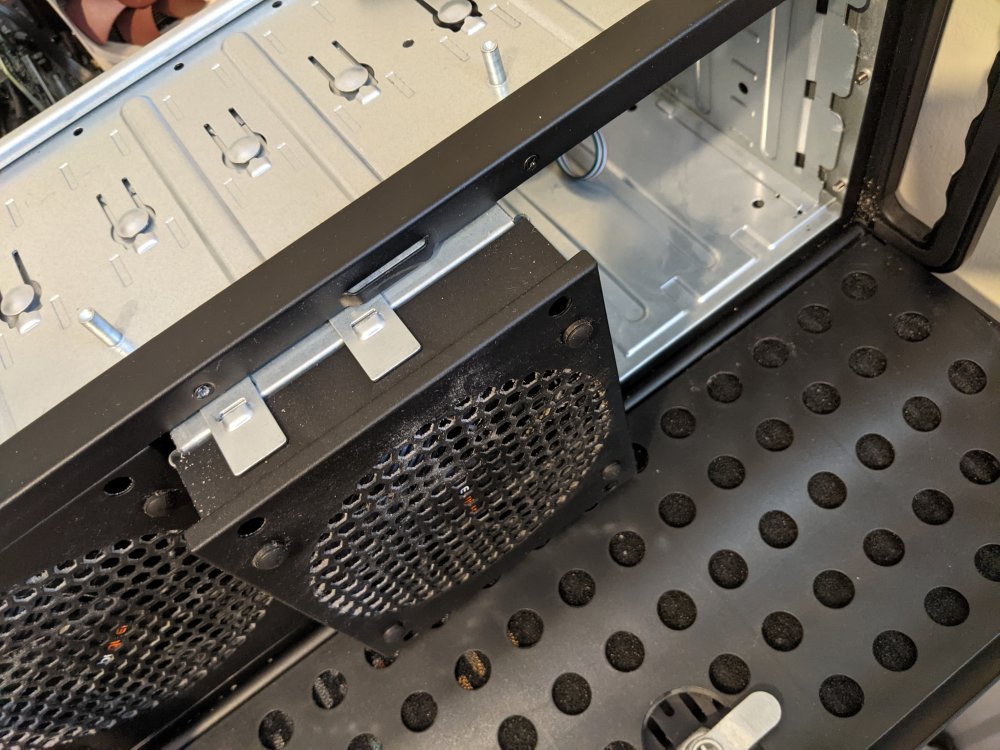
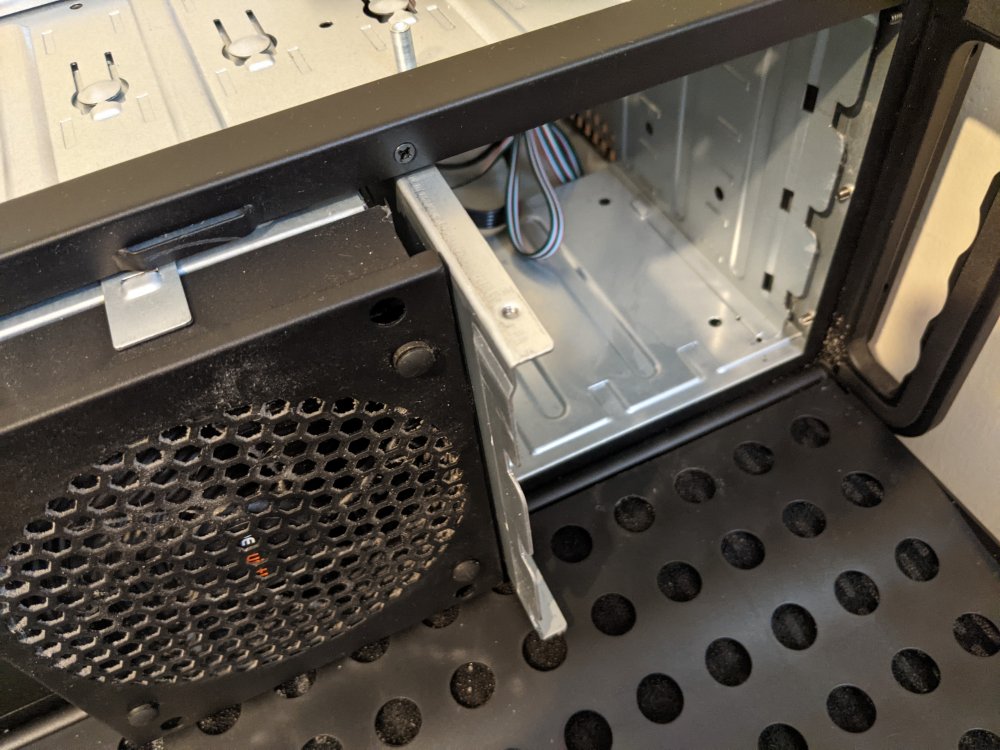
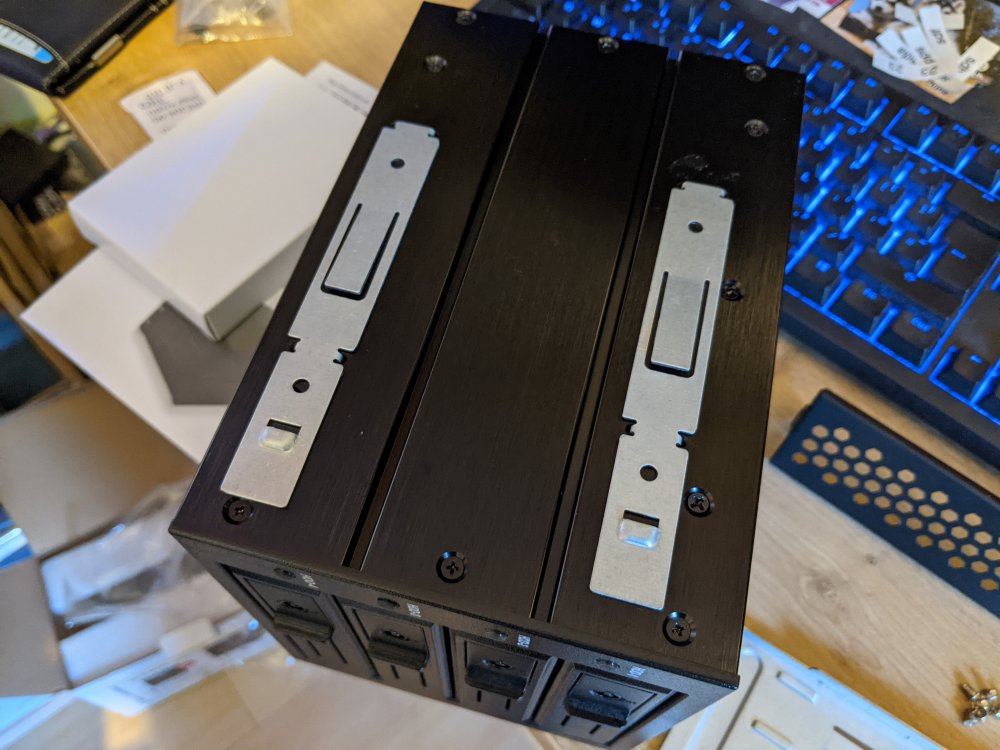
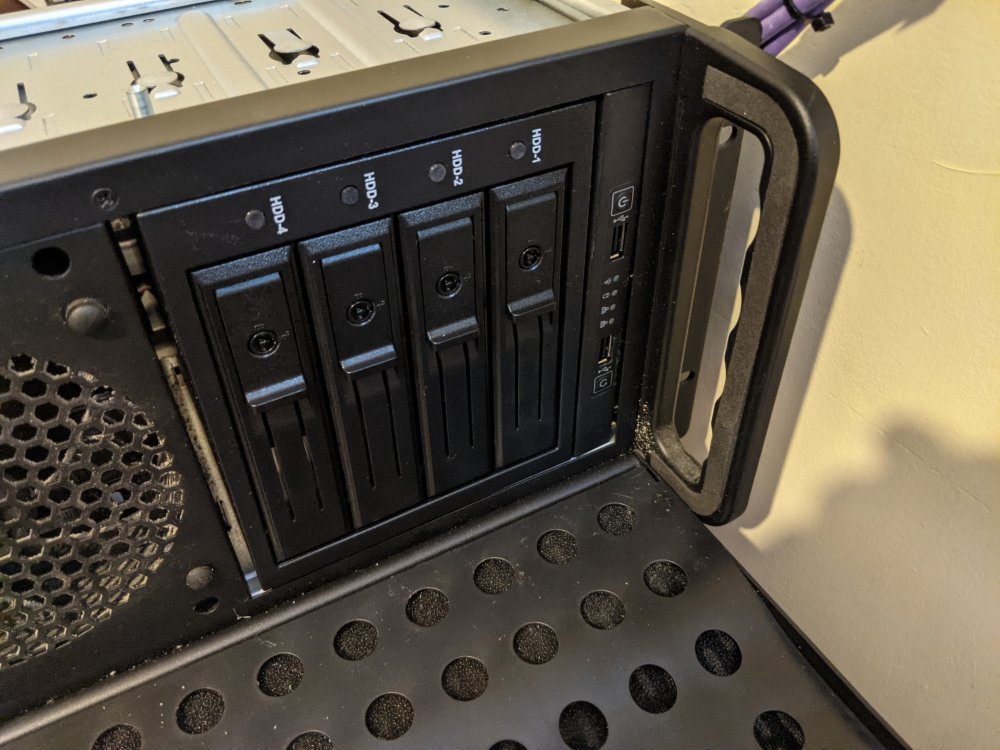
So had a go with this, so for anyone else interested, who finds it in a search, or @Tydell then I hope this helps somewhat. My efforts were foiled by my hotswap cage/backplane being faulty, so never got to actually get the drives installed and use it in 'anger' as it were. The cage/backplane I tried was the Icybox IB-564SSK. So to take apart the horizontal section at the front right of the case, there are several screws that need undoing. The ones I have labelled with green and red hold some metal plates in place, which in effect act as runners for any 5.25" devices you want to install. The screws labelled in blue hold the I/O front panel in place. This photo (sorry for the quality, it was taken one handed and 'blind') shows the screws holding the I/O front panel in place.... This picture shows the front I/O panel and the vertical metal plate, retained by the red screws, can be seen as well. I undid the screws but couldn't get it out of the case, so it's possibly I missed a fixing somewhere or needed to be more medieval with it.... And as soon as you undo the blue screws, the front I/O panel succumbs to gravity.... This next photo shows that the I/O panel will indeed fit vertically - however there appears to be no way of fixing it permanently to the chassis using existing holes. Probably the best solution would be to attach the I/O panel to the edge of the chassis or the side of a drive cage using 3M stick pads or tape etc. And this picture shows the mechanism used to retain the default drive cages and fan assemblies - the metal clips on top spring up and hold the cage in place. This picture shows the vertical metal plate that was held in place by the green screws - I was able to remove it quite easily once the three screws had been undone: And this photo shows how the drive cage would fit inside the case using the retaining clips provided with the chassis. Note that they don't screw in to the exterior of the drive cage - they simply clip in: Finally, here's a photo of the IcyBox cage/backplane with the I/O panel in a vertical setup, mirroring the Rosewill RSV-L4412: So with a little effort, I think it will be quite doable. Depending upon which drive cages are used, there may be some small gaps between each of the drive cages - but they could easily be blanked off. Indeed, if you look closely at a RSV-L4412, there appear to be small gaps with that anyway....

 1 point
 -
And the problems don't end with disk identification. USB connections aren't permanent enough to keep the array in sync.1 point
-
As stated, it's not being removed.1 point
-
Got it to work! Thanks to Ghost82 and glennv. Here are the steps I used, I will try to keep it simple so everyone can try it out. -Install macinabox just as normal (default settings)-- Test to make sure it bootloops for you -Shutdown the macinabox VM -Connect to Unraid terminal -Mount the opencore image file modprobe nbd max_part=8 qemu-nbd --connect=/dev/nbd0 /mnt/user/isos/BigSur-opencore.img mkdir /mnt/user/isos/temp/ mount /dev/nbd0p1 /mnt/user/isos/temp/ -Edit the config.plist nano /mnt/user/isos/temp/EFI/OC/config.plist -Paste the patch after the PENRYN entry - glennv has a post on page 80 that explains it -Save you file -Dismount the image file umount /mnt/user/isos/temp/ rm -r /mnt/user/isos/temp/ qemu-nbd --disconnect /dev/nbd0 rmmod nbd -Rerun the user script - make sure you change the name in the settings of the script to match your VM name (I also set REMOVETOPOLOGY="yes" , not sure if that is needed) -Test it out! Macinabox PENRYN Patch 11_3.txt1 point
-
可以测试一些嘛,host是把这个docker作为一个单独的节点,除了qb,tr,暂时没想到什么了。换另外的qb试试。下载盘一定不要放阵列内,放独立的pool或者Unassigned Devices里面把。1 point
-
I can't get this to work, I copy the file into the folder and then restart the docker from unraid web UI, but it doesnt show up. Any ideas? EDIT: Fixed it. I installed python 3.9 from nerd pack and then just renamed the egg file to "...py3.9.egg" and it works.1 point
-
I know this a repeating topic but I haven't found a concrete answer to permanently resolve this issue. It seems that the majority of my movie trans-codes are failing. I selected remove sub-titles and uncheck audio encoding as I want to maintain the original audio file. For every failure I am seeing similar log files, even though i have remove subtitles checked. Is anyone away of how to fix this issue with a generalized FFMPEG for all video files within a folder or another work around? All logs look like this: [matroska,webm @ 0x55770778b840] Could not find codec parameters for stream 4 (Subtitle: hdmv_pgs_subtitle (pgssub)): unspecified size Consider increasing the value for the 'analyzeduration' and 'probesize' options [matroska,webm @ 0x55770778b840] Could not find codec parameters for stream 6 (Subtitle: hdmv_pgs_subtitle (pgssub)): unspecified size Consider increasing the value for the 'analyzeduration' and 'probesize' options [matroska,webm @ 0x55770778b840] Could not find codec parameters for stream 7 (Subtitle: hdmv_pgs_subtitle (pgssub)): unspecified size Consider increasing the value for the 'analyzeduration' and 'probesize' options [matroska,webm @ 0x55770778b840] Could not find codec parameters for stream 8 (Subtitle: hdmv_pgs_subtitle (pgssub)): unspecified size Consider increasing the value for the 'analyzeduration' and 'probesize' options [matroska,webm @ 0x55770778b840] Could not find codec parameters for stream 9 (Subtitle: hdmv_pgs_subtitle (pgssub)): unspecified size Consider increasing the value for the 'analyzeduration' and 'probesize' options [matroska,webm @ 0x55770778b840] Could not find codec parameters for stream 10 (Subtitle: hdmv_pgs_subtitle (pgssub)): unspecified size Consider increasing the value for the 'analyzeduration' and 'probesize' options [matroska,webm @ 0x55770778b840] Could not find codec parameters for stream 12 (Subtitle: hdmv_pgs_subtitle (pgssub)): unspecified size Consider increasing the value for the 'analyzeduration' and 'probesize' options [matroska,webm @ 0x55770778b840] Could not find codec parameters for stream 13 (Subtitle: hdmv_pgs_subtitle (pgssub)): unspecified size Consider increasing the value for the 'analyzeduration' and 'probesize' options [matroska,webm @ 0x55770778b840] Could not find codec parameters for stream 14 (Subtitle: hdmv_pgs_subtitle (pgssub)): unspecified size Consider increasing the value for the 'analyzeduration' and 'probesize' options [matroska,webm @ 0x55770778b840] Could not find codec parameters for stream 16 (Subtitle: hdmv_pgs_subtitle (pgssub)): unspecified size Consider increasing the value for the 'analyzeduration' and 'probesize' options [matroska,webm @ 0x55770778b840] Could not find codec parameters for stream 17 (Subtitle: hdmv_pgs_subtitle (pgssub)): unspecified size Consider increasing the value for the 'analyzeduration' and 'probesize' options Then the bottom of the log looks like this frame=19283 fps=231 q=-1.0 size= 5145601kB time=00:13:24.34 bitrate=52406.3kbits/s speed=9.64x frame=19345 fps=230 q=-1.0 size= 5161729kB time=00:13:26.94 bitrate=52401.3kbits/s speed=9.61x av_interleaved_write_frame(): No space left on device Error writing trailer of /tmp/unmanic/unmanic_file_conversion-1607700400.3246958/Incredibles 2 2018 Remux-2160p-1607700400.3247025.mp4: No space left on device frame=19436 fps=230 q=-1.0 Lsize= 5183233kB time=00:13:30.72 bitrate=52374.1kbits/s speed=9.61x video:4383218kB audio:800675kB subtitle:0kB other streams:0kB global headers:0kB muxing overhead: unknown Conversion failed!1 point