Leaderboard


Popular Content
Showing content with the highest reputation on 12/10/23 in all areas
-
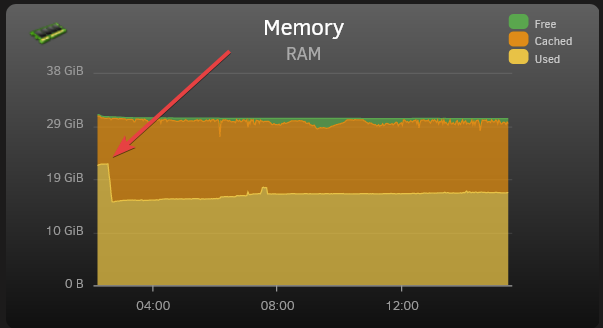
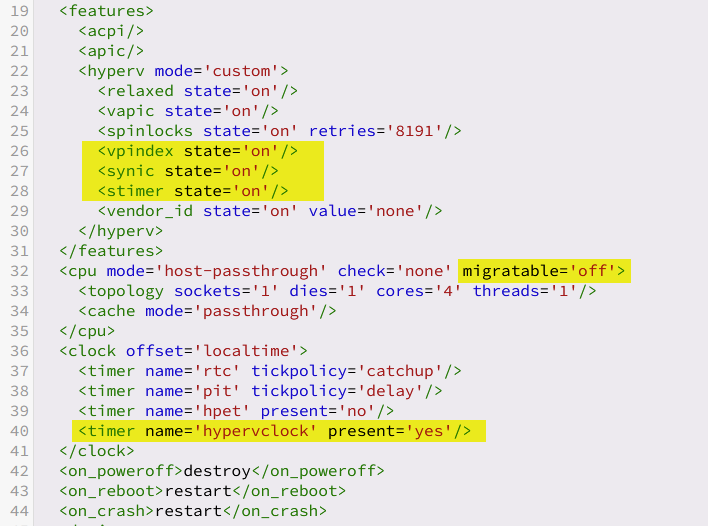
I've switched from Proxmox to unraid not that long ago and I've run into several problems/inconveniences that I managed to overcome and would like to share with everyone as it doesn't seem to be a common knowledge. The issues: 1. Windows VM (Win10 1703 +) high CPU usage when idle. Pretty self explanatory. Default settings the VMs are created with cause CPU to be busy with interrupts contstantly. 2. No KSM enabled by default = much less ram is free/available to other services when running 2+ windows VMs at the same time. This has caused OOM (out of memory) to kick in and kill one of the VMs over time when docker containers start using more RAM. This will probably be useful to people with limited RAM on their servers. I only have 32GB myself and this made a huge difference for me. 3. CPU pinning is the default in unRaid. This is great to isolate certain cores to only be used with a certain VM in some situation, when for example, unraid is also your main PC and you want some cores dedicated to the VM that you use day to day to play games or whatever else you do, but terrible for server workloads, especially if your server doesn't have that many cores and a lot of containers/services/VMs and there is no way to know which core will be loaded at any given time, while others are idling. Solutions: 1. I stumbled upon a thread on the forums that recommended enabling HPET timer which seemed to resolve the issue somewhat. The issue is that HPET is an unreliable clock source and often goes out of sync. The real solution is to enable Hyper-V Enlightenments which was introduced in qemu 3.0. It is already partially enabled in unRaid by default. This is what Proxmox uses by default for Windows VMs Go to settings for your Windows VM, and enable XML view in the upper right corner. We will need to edit 2 blocks: add the following to <hyperv mode='custom'> block <vpindex state='on'/> <synic state='on'/> <stimer state='on'/> Change migratable='on' to migratable='off' in the following line <cpu mode='host-passthrough' check='none' migratable='off'> add the following to <clock offset='localtime'> block <timer name='hypervclock' present='yes'/> In the end, it should look like this The bonus is that this reduces idle CPU usage even further compared to HPET, without all of the HPET drawbacks. Please note this ONLY applies to Windows VMs. Linux and *BSD already use a different paravirtualized clock source. 2, (do NOT do this if you are gaming on the VM or otherwise need a more predictable performance not affected by all the other containers/VMs running on the same machine - you are better off adding more ram to the host) unRaid does come with a kernel that has KSM (kernel samepage merging) enabled (thank you, unraid dev team). What it does is it looks for identical pages in memory for multiple VMs and replaces them with write-protected single page, thus saving (a lot) of RAM. The more similar VMs you have, the more ram you will save with almost no performance penalty. To enable KSM at runtime append the following line to /boot/config/go echo 1 > /sys/kernel/mm/ksm/run And remove the following block from all of the VMs configs that are subject to KSM: <memoryBacking> <nosharepages/> </memoryBacking> Let it run for an hour or 2, and then you can check if it's actually working (besides seeing more free ram) by cat /sys/kernel/mm/ksm/pages_shared The number should be greater than 0 if it's working. If it isn't working then either your VMs aren't similar enough, or your server hasn't reached the threshold of % used memory. The result (This is with Windows 11 and Windows Server 2022 VMs, 8GB ram each) 3. (do NOT do this if you are gaming on the VM or otherwise need a more predictable performance not affected by all the other containers/VMs running on the same machine) We want to disable CPU pinning completely and let the kernel deal with scheduling and distributing load between all the cores on the CPU. Why is CPU pinning not always good? Let's assume you did your best to distribute and pin cores to different VM. For simplicity let's assume we have a 2 core CPU and 4 VMs. We pin core #1 to VM1 and VM3, and core #2 to VM2 and VM4. Now it so happened that VM1 and VM3 started doing something CPU intensive at the same time and they have to share that core #1 between the two of them all while core #2 is doing completely nothing. By letting kernel schedule the load without pinning it will distribute the load between both cores. Let's go back into the VM settings and Delete the following block <cputune> . . . </cputune> Make sure that the line <vcpu placement='static'>MAX_CPU_NUMBER</vcpu> and <topology sockets='1' dies='1' cores='MAX_CPU_NUMBER' threads='1'/> still has the maximum number of cores your VM is allowed to use (obviously MAX_CPU_NUMBER is a number of cores you want to limit this particular VM to, so replace it with a number) NOTE: if you switch back from XML view to the basic view and change some setting (could be completely unreleated) and save, unraid may overwrite some of these settings. Particularly I noticed that it likes to overwrite max cores assigned to VM to just a single core. You will just need to change back to XML view and change "vcpu placement" and "topology" again Bonus: - Make sure you are only using VirtIO devices for storage and network - Make sure CPU is in passthrough mode - Disable drive encryption (BitLocker) which is enabled by default with latest Win10 an 11 ISOs. - For "network model" pick "virtio" for better throughput ("virtio-net" is the default) - If you have Realtek 8125[A || B] network adapter and having issues with throughput, have a look at @hkall comment below. OR There is now a native r8125 driver available in under Apps within unraid.
 1 point
 -
Writing to the array using an NVMe SSD as a cache drive is nice and serves well on LANs with 10Gbit/s and more. But once Mover has done his job, read performance drops down to ridiculous drive speeds. What I like to see is another Pool, designated as a read cache for all shares (or configurable, but it does not really matter). * if a file is requested, it is checked first, if it is on cache already * if yes check if it still recent (size / time of last write and so on) * if recent (last cache write is younger than file creation time) reading continues from the cache drive (exit here) * if not, delete the file from the cache SSD (no exit, continue next step as if the file would not have been on cache at all) * if no, the free space of the cache is checked to see if the requested file would fit * if no, but the cache COULD hold the file, the oldest file from the cache is deleted, check is redone (loop until enough space is freed up) * read the file from the array, write it to the LAN, but also write it to the cache drive and write the current time to the cache too * if a file is closed: * if it came from the cache: * update "time of last write" on the cache (this is to let it "bubble" up to prevent it from early deletion if space is needed. Often used files will this way stay on cache for a longer period whereas files that were only ask for once will be prefered to be cleaned up) Fairly straightforward and simple approach. The last part could be optimized by reading ahead and writing asynchoronnally, but with the current speeds for LAN and SSDs, it does not matter, the SSD is in any cases faster than the LAN. This would not speed up the first access to the file, but the second and more would greatly be improved. And if the designated Read Cache SSD is large (like 2Tb or more), a lot of files will fit until the first delete will be necessary. This feature could be added to the high level of the vfs file system overlay from unraid, (the cache disk itself is disposable, even if the content gets lost due to errors, it does not matter, it is just a copy and also needs no backup. So UNRAID should not look for shares or allow to create folders on that designated cache ssd) Update: yeah, I know, it will make file reading a bit slower (because of the additional write to the read cache), but this is almost not measurable. Reading from real disks is about 290MB/s with best conditions, writing to SATA SSDs should be almost twice as fast and writing to NVMe SSDs will be five or even more times faster. So this really does not count in. Update2: I would like to add 2 config settings for fine tuning: a) minimum file size: files smaller than this are never put on cache (default 0) b) maximum file size: files larger than this are never put on cache (default: not set or 100M or so) Update3: additionally there could be an cron driven "garbage collection" to free files from cache that have not been accessed for a certain period of time (should be a piece of cake since the read/close updates the file time, it is always recent and a simple find /mnt/readcache -atime -XXX -exec ... is enough for cleaning up)1 point
-
I originally was looking for a low power, lower cost Xeon build but was, after a lot of research, a PIA finding all I wanted in my build with that, so I decided to bite the bullet and spend a couple hundred more and just go for a build that will hopefully last me another 10 years as my previous system did. So here it is: (FPB) = from previous build unRAID v6.12.4 (upgraded from 6.10.3) Case: Fractal Design Define R5 (FPB) PSU: SeaSonic SSR-450RM (FPB), may upgrade at some point MB: SuperMicro X13SAE-F CPU: i5-13500 RAM: 32GB Micron DDR5 ECC DRIVES: (FPB) WD Gold- Parity 1x 2TB, Cache 1x 1TB • DATA- Seagate Barracuda 7200 rpm 2x 1TB + 4x 2TB • 1TB Unassigned SATA CONTROLLER: Adaptec 1430SA (FPB) CPU Cooler: Noctua NH-D9L Cooler Power Consumption: All 9 Drives spun down = 36w (same as previous build) All 9 Drives spun up but idle = 63w (9w lower than previous) I Haven't checked it under typical full load yet. Update: Running ChannelsDVR in a Docker and Recording 4 HD TV Show Streams to unRAID and Streaming 1 HD Show to an Apple TV from unRAID and also Transcoding 1 HD stream to an iPAD power consumption is 99w. Without the Transcode stream consumption bounces between 63w and 72w I suspect the bouncing maybe do to saving the recording streams to the Cache HDD. IGPU & CPU Fan: To get the igpu to work for transcoding I had to change the Primary Video in BIOS to IGFX I also had to install IPMI Tools to control the CPU Fan so SuperMicro's Fan Sensors wouldn't complain about the fan speed being too low. I set the Min fan speed to 31.2% in the IPMI Tools plugin so it would run at 560 RPM and SM's IPMI Fan control at Standard (before setting it in IPMI Tools), the IPMI Tools plugin seems to change it back to Full Speed so that's where I left it. I did set the Max speed in the IPMI Tools plugin to 100% If the Fan is set to Full Speed in SM's IPMI without the IPMI Tools plugin the power consumption at idle with drives spun down jumps to 56w. The setting I have doesn't seem to affect power consumption. Previous Build for ref. MEDIA: V 6.10.3 plus • Fractal Design Define R5 • SeaSonic SSR-450RM • SanDisk Ultra FIT 16GB • SuperMicro X9SCM-F-O • i3 3240 • 4GB Kingston Value RAM • DRIVES- WD Gold- Parity 1x 2TB, Cache 1x 1TB • DATA- Seagate Barracuda 7200 rpm 2x 1TB + 4x 2TB • 1TB Unassigned • Adaptec 1430SA SATA Controller • Stock Cooler I hope this info is helpful to someone in the future since it seems hard to find in one place.1 point
-
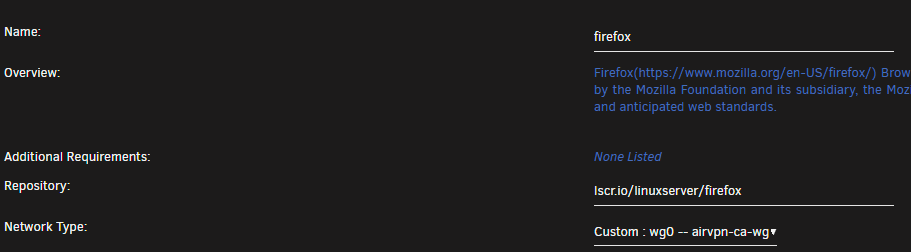
When editing the container config, set Network Type to `wg0`. Also make sure that the `wg0` connection is active under your VPN setup.
 1 point
 -
Personally, I thank you for that. I will be using your documentation to migrate my current LSIO Unifi container to their new dual-container solution. It will only be a backup to Unifi-Controller-Reborn for me, but at least you made some sense of it when all that existed before was a bit convoluted and seemed to be missing some important information. Anyone choosing to stick with the LSIO solution should be very grateful for you efforts.1 point
-
Sorry, again. Was just asking if r8153_ecm was included and if it was not included I just wrote a suggestion. Everythin is fine now!1 point
-
Yes, cdc_mbim, just shortened it in writing here... Removing it now. From version 6.12.4 to 6.12.6. I realise that was not the clearest way of writing that. The first diagnostics file was from after installing the driver to show that things were installed correctly, the second file is after the upgrade to 6.12.6. The modprobe thing, is what I mentioned earlier of seeing the message "modprobe FATAL: module r8152 is in use" during bootup of the unraid server. Followed shortly by the 2 minute stop at the udev portion of boot (forget the exact words). Figured it was worth mentioning. I did not type in a command that you guys did tell me to, just to be clear. Im no linux guru, but this isn't my first time with a CLI. Ran the command blacklisting r8153_ecm. Rebooted, things were fine, and then ran the upgrade tool for Unraid 6.12.6. And it seems the r8153_ecm blacklist did it! Everything booted as it should, and I can remotely access the server! Thanks you so much for the help! Sorry if I wasn't super clear. Anyhow, I included the diagnostics of the confirmed working configuration in case you guys wanted to pick it apart a bit more. tower-diagnostics-20231210-1948.zip1 point
-
I have been running Unraid for 12 years and a Unifi network for six years. I have used the LSIO versions of the Unifi Network Controller containers since I started with Unifi. When it was announced the LSIO container would be split into two containers, I thought I'd give the single container solution from @PeteAsking a try. It installed without a hitch and I am now running it with version 8.0.7 of the controller. PeteAsking has been very active in this particular forum and knows his stuff when it comes to the Unifi infrastructure; however, I do understand the angst of a single maintainer vs. the resources of LSIO behind their solution. Personally, I plan to stick with the "controller-reborn" version. As a backup, I will likely transition my currently inactive LSIO controller container to their new dual-container version but I personally prefer what PeteAsking has done.1 point
-
It will move both. It will work through the shares, checking which pool (if any) is associated for caching purpose for each User Dhare and if needed move the files to/from the main array according to the mover direction set.1 point
-
@DaHol funktioniert denn eine shutdown? Also fährt dein Server runter? Falls ja, sind wir vom gleichen Problem betroffen. Ein Reboot funktioniert seit geraumer Zeit einfach nicht mehr. Ein Shutdown und Boot jedoch schon. Habe dafür keine Lösung finden können. Daher nutze ich seit geraumer Zeit ein einfaches Shutdown und starte denn Server danach per Hand.1 point
-
Also, if you’re still having problems post your docker run commands for Radarr and your download client.1 point
-
This video will likely answer most of your questions. If you still have any unresolved issues you can post them. https://youtu.be/j6lT7zDkT4M?si=lLxfzrTVF0lwDi7_1 point
-
And why dont we dig deeper there? There are further details. I checked the eval'd code. The affected page is DashStats and line 53 is the docker status exec. I asked him to execute the rc.docker status command and this command takes ~20 secs to complete, so here we have our issue at least for him. The question is: Is this the same cause for all others? And if yes, what is taking so long time inside the rc.d script for some users. For others having the issue, I would ask them to execute the command "/etc/rc.d/rc.docker status" in a terminal and observe, how many seconds it need to generate output. That are my findings. Correct me if anything looks wrong.1 point
-
I use ASRock boards since 2010 for all my PCs and other creations. My unraid bord (B365M) is running since 14.12.2020 every day ~16 hours without any problems. My oldest (still working) ASRock board is a B75 Pro3-M from Nov. 2013 with an i7-3770. This machine runs every day for 8-9 hours without any problems too. So i think, they are reliable 🤣 I also use MSI boards but not that long... so i cant say how good they are...1 point
-
sieht man leider nichts da "frisch" nach Neustart was ich sehe, bonding aktiv (nutzt du 2 NIC's ?) bridging aktiv ... auch wenn wahrscheinlich kein Fritz User ... trotzdem einlesen und ggf. umstellen. dann stell mal noch das timeout in den disk settings höher, sollte bei SSD zwar nicht sein ... aber wer weiß ... wenn das Verhalten so bleibt, syslog mirror to flash aktivieren .. da sieht man (abseits vom Monitor) noch die meisten Fehler ...1 point
-
yep, i saw that, but in the end as you see in the logs ... you actually do sorry to say ... but i agree, i wouldnt have expected it either ...1 point
-
may ask in the official filebot forum sample https://www.filebot.net/forums/viewtopic.php?t=11518 or also the maintainer is pretty active in discord too ... i can say the custom AMC function is working here (actually i never tested TVDB format as no need to here) with some functions added
 1 point
 -
get a dummy plugin ... Quadro cards are usually server cards and dont rely on a monitor, RTX are main stream cards and like to rely on a monitor ... a simpl edummy plug will solve it (as you noticed yourself already) as mentioned several times here before1 point
-
diagnostics mal posten, ansonsten warum rebootet unraid nicht sauber ... offene Connection/s (webui, terminal, ...) disks/cache in use ist gerne noch ein Grund ... irgendwelche plugins, tools, scripts, ... wo ggf. hängen ...1 point
-
Oh Super Danke. Nuja aktuell läuft unser gesamtes Hausnetzwerk auf 1.0Gb der Mini-PC kann 2.5Gb Nur RFouter und switches sind alle nur mit 1.0Gb. Was du meinst wegen MOdis, sind mit bridge und MacVLAN zu arbeiten für eigene IP im Docker wegen Ports und so.1 point
-
Vielen lieben Dank dir und deine Super Anleitung hat alles funktioniert 🙏😊1 point
-
I had the issue before I upgraded to 6.12.6, so rolling back to 6.12.4 wasn't really an option (short of a new USB, which I really didn't feel like doing) However I gave the VFIO config recreation a go as I am only passing through the 3080 and wow, that worked! I now have the iGPU going again, thanks mrhanderson for finding that thread! I still have the issue with the System Temps not showing, but they are not as important as the AIO is auto controlled based on coolant temp, so I will probably live with out that1 point
-
You can't, it's a diagnostic message built directly into NUT. It only means that it's checking for duplicate instances of NUT before starting up but couldn't find any (which is a good thing)... so it's safe to ignore this message. 🙂1 point
-
Ok I see what I was doing wrong. Problem solved. Thank you both.1 point
-
well, you see the error usually its - you have issues downloading from github - you have some other DNS in your net running which collides - ... also could be (uncommon) - even broken USB, no spave left on Flash USB - ... are you using any DNS solutions at home, are you may blocked due DNS setup ...1 point
-
I haven't personally had to this upgrade but this is the advice that was posted on reddit: UnRaid —UPDATE—DO THIS ALWAYS!!! make a full backup of the boot usb prior to performing the update by going to MAIN > Flash > Flash backup take a screenshot of the main page where it shows what drive is in what slot in the array and pools optionally do a appdata backup and backing up of your virtual machines using the appdata backup plugin and the vmbackup plugin install fix common problems plugin as well as fully update all plugins that are installed go to tools > upgrade assistant and run tests (stable branch) and address anything shown in red shut off all docker containers and then go to settings > docker and turn enable docker to no to effectively turning off docker shut off all virtual machines and then go to settings > vm manager and turn enable vms to no to effectively turning off vm service go to settings > disk settings and turn enable auto start to no to stop the array from auto turning on at start of unraid optional but suggest unless you know you need ipv6: go to settings > network settings and change network protocol to ipv4 only as 6.12 has been having problems with ipv6 for quite a few people stop the array on the main page near the bottom and confirm it says array stopped in the bottom taskbar perform the upgrade at tools > update os and reboot when it says to reboot, if you have any driver plugins wait like 5 minutes before rebooting after the upgrade finishes once it reboots, access unraid ui again optional but suggested: go to settings > global share settings and set permit exclusive shares to yes start the array on the main page near the bottom go to shares page and look over each shares settings to make sure they are set how you want them to be go to settings > docker and click advanced view, and change Docker custom network type to ipvlan from macvlan and apply the setting change or confirm it's already set to ipvlan in settings > docker turn enable docker to yes to effectively start docker service, then confirm on the docker page that dockers are booting up or wait until they all boot your choice go to settings > vm manager and turn enable vms to yes to effectively start the vm service, then confirm on the vms page that a vm can start (if you have vms that is) go to settings > disk settings and turn enable auto start back to yes so the array autostarts on boot (only if you wish this to be the case) enjoy the new version1 point
-
Do you have fastboot enabled in the bios, change to disabled.1 point
-
Sorry haven‘t got time yet to reply. I see it, anyways, glad that it‘s solved!1 point
-
You can use a modern i3/i5/i7 (12th, 13th Gen) and use HW-transcoding from Plex (Plex Pass required). There is no need for an extra Graphic - the iGPU can handle that. My old i7-iGPU can transcode ~8 4K-to-1080p streams without problems (transcode to RAM)... Delivering 4K-streams without transcoding needs no CPU-Power at all. And yes, ECC RAM is not necessary1 point
-
I have one and it works fine with the disks I have there, but they are older models, since it's an older expander it can have issues with newer disks, look for a firmware update, IIRC needs to be >2.08 to support SATA2, which yours should already be, if that doesn't help I would also recommend getting a newer expander.1 point
-
All the config data is being placed into appdata. I was able to re-map it. Maybe this helps someone else also. I have not gone beyond just getting this installed and the volumes remapped. I created a new share called "minecraft-crafty" In the extra parameters: -v "/mnt/user/minecraft-crafty/backups:/config/crafty/backups" -v "/mnt/user/minecraft-crafty/logs:/config/crafty/logs" -v "/mnt/user/minecraft-crafty/servers:/config/crafty/servers" -v "/mnt/user/minecraft-crafty/config:/config/crafty/app/config" -v "/mnt/user/minecraft-crafty/import:/config/crafty/import"1 point
-
Hallo, ich nutze seit 3 Jahren eine DS220+ und fotografiere auch gerne und viel. Meine RAW Dateien lege ich immer erst auf dem Laptop mit Kopie auf USB Festplatte ab, nach ein paar Monaten wandern die RAW Files dann auf die Syno. Das funktioniert auch mit 1Gbit Netzwerk Anbindung dank der "Smart-Vorschau" von Lightroom sehr gut (Lightroom legt "kleine" 2560×1770 Pixel große DNG-Dateien lokal an). Also damit meine ich, dass dank der Smart Vorschau problemlos Bilder welche im Original aus dem NAS liegen bearbeitet und exportiert werden können. Soweit dazu. Ansonsten läuft die Synology auch mit ein paar Docker Containern, für eine VM ist die DS220+ m.M.n. aber etwas schwach. Ich liebe die Synology Photos App zum ablegen der entwickelten Bilder und von da werden die auch direkt geteilt (geht natürlich auch per Nextcloud o.ä.). Ich werde nun trotzdem nach 3 Jahren zu Unraid wechseln, weil mir der Speicherplatz langsam knapp wird stand ich vor der Frage Unraid selber bauen? oder Upgrade auf Synology 4-Bay mit Erweiterungsmöglichkeit. Synology +alles funktioniert out of the box - teurer (wenn man 4 und mehr bays haben möchte) - weniger leistungsreserve Unraid +super flexibel was Speichererweiterung angeht +kann günstiger sein als vergleichbare neue Synology - ne Menge stuff zu lernen und selbst einzurichten im Vergleich zu Synology. Das ist mein persönliches Empfinden. Da ich der Typ DIY bin und mich gerne in Themen einarbeite um zu lernen, Stand für mich der Wechsel zu Unraid ausser Frage. Gruß, Chris1 point
-
Seems like there might be an issue with iGPU and 13th gen CPUs in 6.12.6 See if the fix posted here works for you too https://forums.unraid.net/bug-reports/stable-releases/612x-call-traces-on-modprobe-i915-with-intel-13th-gen-gigabyte-z690-ud-ddr4-board-with-vt-d-enabled-r2756/?do=findComment&comment=267381 point
-
Along with a flash drive backup, I usually: Grab a diagnostic (full of useful info if things go sideways) A printout of the Main tab (array and drive assignments) Set array, docker and VM to not start automatically (I'll start them up manually at first, once I see things are working properly) Manually stop the array before updating (avoids any unclean shutdown) When all works perfectly, none of this is needed. But better to have it and not need it than...1 point
-
Welcome! I'd advise against any of that. Underclocking or undervolting experiments should be reserved for "play" systems. You'd need to look into stability and simplicity in a first NAS build. Especially with a goal to achieve good power efficiency at idle. That means an Intel-based with QuickSync system. Also, you don't "have" to build a home NAS around ECC RAM or a "server" motherboard . Consumer boards are fully designed and capable of running 24/7 without any stability problems. Stay away from discrete video cards and SATA expansion cards unless or until it becomes absolutely necessary. Get a motherboard with enough of onboard SATA ports and a compatible computer case to reserve enough of room for future expansion. If you have no need for VMs then even a cheap dual-core Intel pentium like G7400 would be more than enough.1 point
-
Man nice Motherboard Choice for a AMD proc. Just kind of sucks they didnt give you more SATA ports. I would have expected better from a ASRock Server Rack board. You should be ok to add that kind of adapter card. I think others have used the same one. One question I have if this is going to be for a Media Server. Are you adding a Nvida GPU card for transcoding? I know recently they just got plex to with with ATI cards in Linux. But I'm sure its no where nearly as good as Intel QuickSync. Me personally I've been building on much older hardware spec's and using Intel CPU's with GPU. But AMD can be really good too. It just depends on what your building. From the sounds of things it sounded like you are looking to run low power as well. I think you might want to rethink the setup if your not planning to use a GPU card. For me I would look at a older Intel 10 to 13th gen with similar core count like a i5 something. I wouldn't really look into 14th gen because then you get into those new weird cores. I'm not sure anyone has like developed the OS to take any benefit from those yet. The preformace cores and stuff sounds good in theory. But everyone mostly just builds apps and dockers to the OS layer and depend on the OS to handle the new hardware changes. You might try your idea on a build. And then later on see how much better the ATI Graphics gets better for Transcoding. I would expect to wait almost 1 year before it gets better. But again if adding a GPU then it doesn't matter.1 point
-
This just happened to me in Version 6.12.4 . I found a workaround that doesn't require a reboot which is nice . But you have to stop your docker daemon (disable docker in the settings). Solution: Disable docker . run the command "fusermount -u /mnt/user" . You will now be able to stop the array . Enable docker . Start the array and everything will be back to normal.1 point
-
So it looks like this still hasn't been sorted? I'm having this issue occur more and more.1 point
-
I was having a lot of problems with performance in my environment until very recently. I couldn't quite put a finger on when I started noticing things getting really bad but it was definitely getting worse over the past year. Then, a couple of days ago, I stumbled upon some things that helped me to resolve my slowness problem on Mac. Essentially, for the past several years the performance of SMB has gotten worse and with most of us trying to tinker with settings to improve performance, which many of us did, it would seem that around last year, limetech actually decided to work on improved settings for SMB... which after looking at this post here, caused me to figure out that all of my settings and changes combined with their settings and changes was actually the culprit. And, interestingly enough, that was around the time that I started to notice performance getting really bad for me. The fix for me was to remove all of my SMB extra settings completely, copy the fruit conf file that is in the post, add my appropriate changes that I wanted to be default, removed the ones that they explicitly state shouldn't be working, and restarted samba. When I tell you performance was night and day, it would be an understatement. To confirm that was the issue, I undid everything and put it back to what it was before and sure enough, performance tanked. To put into perspective, what would take only a few seconds to copy on my 10gb network was taking hours. Now, things are back to taking seconds. My advice would be that if you have made your own settings changes to unRAID over the years in order to improve performance, especially in the smb extras files, if you are running 6.11 or newer, you may want to re-evaluate your settings against the default, as you may be inadvertently negating options designed to improve performance from some of the changes put in. That is what was happening to myself.1 point
-
I am moving my home assistant installation to my unraid server running on a vm. I used the snap shot function to move the installation. After I found this thread Installed the usb manager to pass through my conbee II stick to the home assistant. The stick shows up in the deconz app config but in deconz it is not connected and I also can´t connect it. Any idea what I am missing? Edit: I solved the problem on my own. Of course all the information was allready there. Maybe a little bit scattered for a rookie like me but I got it together. What I got worong was the fact that you need both the plugin "USB Manager" as well as the modification to the xml file. So for other rookies here is the way I did it. Also I would kindly ask the professionals in this forum to check this solution for mistakes. Get the plugin "USB Manager" and configure the conbee by clicking on the link in the first part of the line (marked in red). Configure it like in the next screen shot with the radio buttons toggled and assigned to the right vm. Then you need to get the id of your device by opening the console in unraid and type cd /dev/serial/by-id/, then enter. Next type ls. The part behind the "DE" except for the "@" is your id. You will need this in the next step. Edit your vm and toggle the xml view with the switch in the top right. Then search for the part where it says " </interface> " and after that put: <serial type='dev'> <source path='/dev/serial/by-id/usb-dresden_elektronik_ingenieurtechnik_GmbH_ConBee_II_DE2XXXXXX-XXXX'/> <target type='usb-serial' port='1'> <model name='usb-serial'/> </target> <alias name='serial1'/> <address type='usb' bus='0' port='4'/> </serial> with your device id behind the "_Conbee_II_DE". Apply the changes and start the vm. Now you can enter the home assistant webserver and configure the deconz plugin by selecting your conbee stick and restart the plugin.


 1 point
 -
When it happened to me, windows was installing software from the samba share. The contents of the folder it was installing from was static, nothing to go stale. I've always assumed unRAID was designed to be a NAS as a core competency and it's failing at doing that task and has me questioning my choices. It's rock solid for the most part, but I can't stand random, unknown, and unpredictable crashes with no explanation or potential fix in the pipeline. I'm willing to do whatever it takes to make this problem go away, but so far all I get is "?????????" from the community, unraid, and as the directory structure itself says when listing /mnt/user.1 point
-
start from scratch uninstall the plugin, remove the existing files from your USB drive reboot, install again and WAIT until the done message comes up, reboot and you should be good to go.
 1 point
 -
Yeah, Apps - Settings - Enable install 2nd Instance Apps - Installed Apps, Sabnzbd - Actions - Install 2nd Instance1 point
-
Lauscht der Proxy auf Port 80? Dann hast du logischerweise keinen Zugriff mehr auf Unraid, weil dieser Port ja von Unraid für die GUI verwendet wird. Du könntest nun versuchen dich per ssh mit dem Server zu verbinden, sofern du diesen Dienst noch aktiv gelassen hast. Dazu einfach die Kommandozeile deines PCs öffnen und das ausführen: ssh [email protected] Nach Eingabe des Passwortes bist du auf dem Terminal. Jetzt die Frage wie der Proxy installiert wurde. War das ein Docker Container? Wenn ja, dann beende einfach mal den Docker Service: /etc/rc.d/rc.docker stop Dann sollte der Port wieder für die GUI zur Verfügung stehen. Screenshot: Alternativ könnte man den Port von Unraid ändern. Dazu das ausführen: nano /boot/config/ident.cfg Und dann "PORT" von "80" auf "5000" umstellen. Screenshot: Danach control+X, Y und Enter und den Server neu starten. Die GUI ist dann erreichbar über http://192.168.x.x:5000/

 1 point
 -
I've tried doing a bit of research on this already, and I think I understand what I need to do, but I'm also a bit paranoid of doing something wrong and losing all my data. I currently have a system with a single parity drive (10tb), 4 data drives (2x10tv, 6tb and 3tb). and a Cache drive. Just this morning I woke up to my find my array was down, and it appears that my 3tb drive has failed. Although I have an extra 12tb and a 14tb drive that I've yet to install, I can't install those yet as I was originally planning on tossing the 14tb in as a new parity drive, and I obviously can't do that right now. So, I have enough space on my system where without the 3tb drive being replaced, I would still have room to spare. I've physically removed the drive and disconnected it from the system, and upon booting up, the UnRaid system still believes it's there of course. I can force to start the array, and it just tells me it's emulated, but again it notifies me that the disk is missing. It appears that I need to go through and run the tool New Config, and tell it to preserve my Parity, and Cache drive, while not preserving my Data drives (I hope this is correct?). At this point I have not come across any videos or images of what the next step looks like.. at least not on this version of UnRaid (v6.8.3). From what I can tell, the next step is going to allow me to pick which drives I wish to preserve (or do I need to tell the system to preserve all Parity, Data, and Cache drives?). I can then choose my 2x10tb and the 6tb and just forget about the 3tb. From there it'll rebuild the array without the 3tb, and it'll be back to business as usual. If there's any other important information that might be needed, let me know, but I'm more so posting this as a sanity check before I dive in and potentially destroy my array/data. Thanks!1 point