Leaderboard


Popular Content
Showing content with the highest reputation on 02/25/19 in all areas
-
To upgrade: If you are running any 6.4 or later release, click 'Check for Updates' on the Tools/Update OS page. If you are running a pre-6.4 release, click 'Check for Updates' on the Plugins page. If the above doesn't work, navigate to Plugins/Install Plugin, select/copy/paste this plugin URL and click Install: https://s3.amazonaws.com/dnld.lime-technology.com/stable/unRAIDServer.plg Refer also to @ljm42 excellent 6.4 Update Notes which are helpful especially if you are upgrading from a pre-6.4 release. BIOS: Especially if using Virtual Machines, we highly recommend keeping your motherboard bios up-to-date. Bugs: If you discover a bug or other issue new to this release, please open a Stable Releases Bug Report. This is a security release that updates docker from version 18.06.1 to 18.06.3. Version 6.6.7 2019-02-22 Base distro: docker: version 18.06.3 (CVE-2019-5736)1 point
-
For those who keep local syslogs and want them to be included in the 'regular' log rotation scheme, you can create a settings file, e.g. rsyslog_local with content similar to the below. Copy this file to the folder /etc/logrotate.d /mnt/user/syslog/*.log { su nobody users missingok create 0666 nobody users size 1M rotate 2 sharedscripts postrotate /bin/kill -HUP `cat /var/run/rsyslogd.pid 2>/dev/null` 2>/dev/null || true endscript } /mnt/user/syslog/*.log refers to the location where the log files are stored.1 point
-
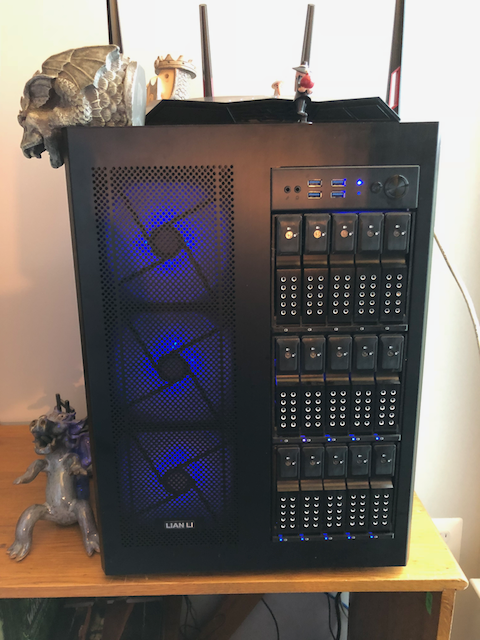
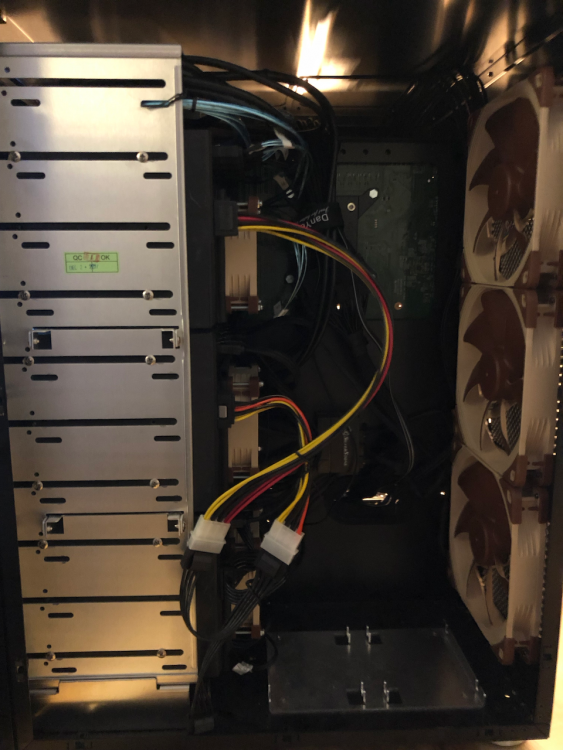
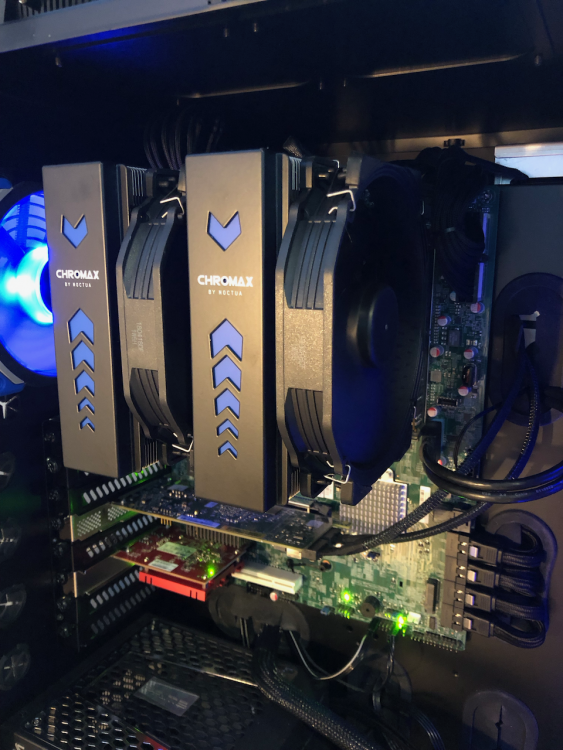
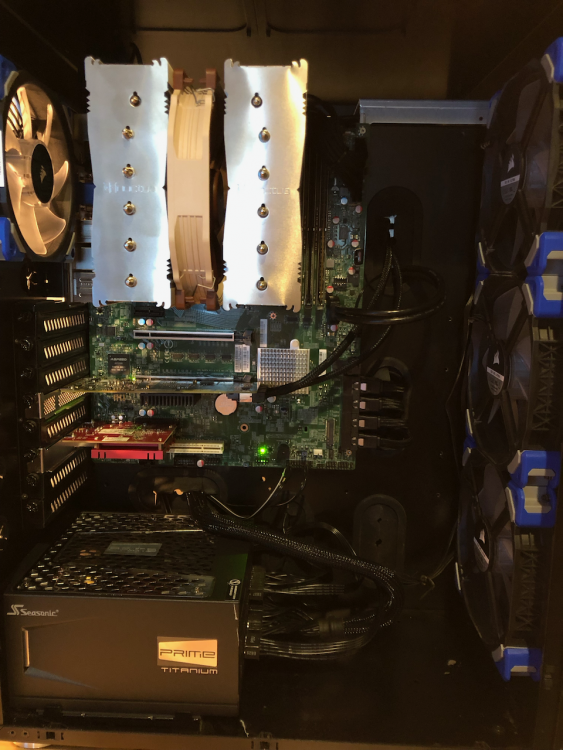
I've been using unraid for almost 10 years with only one small upgrade over 7 years ago. The server has been bullet proof and the MB/CPU have survived transplants 3 times as I grew. This summer I started ground-up rebuild to move from a 24 bay rack to a system that could reside in my office. This is a work in progress, I upgraded the Case/Drives/Fans over the summer and am now assembling the parts to replace the MB/CPU/RAM. I'm not going to make this a build-log, just going to edit it as I settle on parts and get things running. The basic idea came from snuffy1pro's "Shogun" build OS at time of building: 6.6.0 CPU: E-2176G Cooler: Noctua NH-DS15S Heatsink Covers: Noctua NA-HC3 chromax.Black.swap heatsink Covers Replacement Cooler Fans: Noctua NF-A15 HS-PWM chromax.Black.swap Premium-Grade Quiet 140mm Fan Motherboard: X11SCA-F-O Thermal: Graphite Pad RAM: 2xSupermicro 16GB 288-Pin DDR4 2666 (ECC) Case: LIAN LI PC-D600WB Drive Cage(s): 3xiStarUSA BPN-DE350SS-BLACK 3x5.25" to 5x3.5" SAS/SATA 6.0 Gb/s Trayless Hot-Swap Cage Note: I replaced the fans on the cages with Noctua NF-A8 PWM Premium 80mm and ran them to the motherboard along with the 3 Noctua fans on the back of the drive side of the case, all 6 fans are controlled by the auto-fan plugin and watching HD temps rather than system temps. Power Supply: Seasonic 650W 80 Plus Titanium ATX12V Power Supply with Active PFC F3 (SSR-650TD) SATA Expansion Card(s): LSI SAS 9207-8i Cables: Cable Matters Internal Mini SAS to SATA Cable (SFF-8087 to SATA Forward Breakout) (2x3.3' 2x1.6') Addon Network Card: ASUS XG-C100C 10G Network Adapter PCI-E x4 Card Fans: 2xCorsair ML140 Pro LED, Blue (1xML120); 3xNoctua NF-A14 PWM chromax.Black.swap Parity Drive: 12TB Seagate Ironwolf Data Drives: 5x10TB Seagate Ironwolf, 3x8TB Seagate Ironwolf Cache Drive: Samsung 860 EVO 2TB VM Drive: Samsung 970 EVO 250GB Total Drive Capacity: 74TB (67% used) Primary Use: Media storage and streaming (Kodi local, Plex remote) Likes: Love the look, very quiet even under load. Dislikes: Seagate drives in these trayless bays can "tick" a bit, sort of annoying in an otherwise silent system. Add Ons Used: Radarr, Sonarr, NZBGet, Organizr, DuckDNS and tons of plugins...I'm a nerd what I can I say. Future Plans: None at the moment Boot (peak): TBD Idle (avg): 70w Active (avg): ~90w Light use (avg): ~80w Disk Rebuild: 105w The highest usage I've seen was the 105w during data rebuild, even booting my windows and linux VMs doesn't push it about the mid 80s. More information to follow when I can order the CPU and swap the core of the system. Current view from the front (Will replace later with full pictures of finished project) System Side: System Side with Chromax fans and Heatsink covers: Drive side:
 1 point
 -
After what appeared to be a successful installation, I rebooted when prompted. Instead of the Unraid gui opening, I received an error that the site was unreachable. I logged into the IPMI interface on the server, and it showed Unraid was at the Tower Login, but no gui. I don't have a diagnostics log to share. I am willing to attempt the same process with my backup USB stick to see what happens, but if it fails, I would need help to get a log file out of it. The good news, is I was able to rectify the situation by reflashing my USB drive with 6.6.7 and recopying the config back onto it. Specs: - original version of Unraid on the server was 6.6.6 - data disks are encrypted - Unraid Pro license - 1 Parity disk - 4 data disks - 2 cache disks (not encrypted) I upgraded my backup USB stick successfully, then re-inserted my primary USB stick with I flashed (above). Upon boot, I had a Tower login, but no Unraid GUI. A similar result to my upgrading experience. It's possible the upgrade was successful, but the failure of the GUI to start is the same between both situations. tower-diagnostics-20190224-1436.zip1 point
-
CPU if stream limit is reached.1 point
-
hmm ok new one on me, fyi i did a quick torrent download of the same torrent as you, ubuntu 18.10 desktop and hit 3MB/s no probs, which is not too bad for my connection, thats without the above tweak *shrug*, glad you got something that works for you, i will add this to the faq.1 point
-
This is on my todo list. Its a good idea. Sent from my ONE E1003 using Tapatalk1 point
-
Enable Hardware Decoding in Plex #!/bin/bash con="plex" echo "" echo "<font color='red'><b>Applying hardware decode patch...</b></font>" echo "<hr>" docker exec -i $con mv "/usr/lib/plexmediaserver/Plex Transcoder" "/usr/lib/plexmediaserver/Plex Transcoder2" docker exec -i $con /bin/sh -c 'printf "#!/bin/sh\nexec /usr/lib/plexmediaserver/Plex\ Transcoder2 -hwaccel nvdec "\""\$@"\""" > "/usr/lib/plexmediaserver/Plex Transcoder";' docker exec -i $con chmod +x "/usr/lib/plexmediaserver/Plex Transcoder" docker exec -i $con chmod +x "/usr/lib/plexmediaserver/Plex Transcoder2" docker restart $con echo "" echo "<font color='red'><b>Done!</b></font>" Description: Translation of manual steps required to patch Plex docker to enable hardware decoding if you're running an Nvidia version of Unraid. Quick Start: Set up and run as a script every time Plex updates. If your container is not called "plex", change the "con" variable (see notes) Disclaimer: If it can be improved (or if it's dangerously wrong), please let me know. Notes: Should be run when Plex is installed/updated From the command line, run "docker ps" to see what your plex container is called. Set that as the "con" variable in your script (mine is "plex") This script is only required until Plex officially supports hardware decoding It preforms the same as recommended in the NVidia plugin support thread here (where it was originally published), namely... Renames the file "Plex Transcoder" to "Plex Transcoder2" Creates a new "Plex Transcoder" file with the suggested contents Changes permissions on both "Plex Transcoder" and "Plex Transcoder2" files (not sure it's required on Transcoder2 - seemed to work for me without) Restarts the Plex container (not sure if required, but doing it anyhow) Probably best nothing is playing whilst the script is run You'll need to have Plex running for the script to work. Would require different code if stopped (would probably be safer to stop the container first, make the changes then start again, but here we are) Run "nvidia-smi dmon -s u" from the terminal (not within Plex container) to check whether the decoding is working. Set a video to play in a transcoded state, and the 3rd and 4th columns from the end should be non-zero This includes the "exec" addition to the Plex Transcoder file contents Good luck!1 point
-
Just there (in first Line starting with docker exec) : "#!/bin/sh\nexec /usr/lib/plexmediaserver/1 point
-
@Pducharme What would the whole script look like? I don't really know where to add that extra line to fix the parsing of decoding. I appreciate the help! #!/bin/sh con="plex" echo "" echo "<font color='red'><b>Applying hardware decode patch...</b></font>" echo "<hr>" docker exec -i $con mv "/usr/lib/plexmediaserver/Plex Transcoder" "/usr/lib/plexmediaserver/Plex Transcoder2"docker exec -i $con /bin/sh -c 'printf"#!/bin/sh\n/usr/lib/plexmediaserver/Plex\ Transcoder2 -hwaccel nvdec "\""\$@"\""" > "/usr/lib/plexmediaserver/Plex Transcoder";' docker exec -i $con chmod +x "/usr/lib/plexmediaserver/Plex Transcoder" docker exec -i $con chmod +x "/usr/lib/plexmediaserver/Plex\ Transcoder2 -hwaccel nvdec "$@"" docker restart $con echo "" echo "<font color='red'><b>Done!</b></font>"1 point
-
Hey all, got my P2000 in over the weekend and I just wanted to say thanks for this awesome plugin! Working VERY well and I'm impressed with how much of a difference it's made not killing my CPUs with transcodes.1 point
-
The 1050 ti is more than capable of doing pretty much anything (encoding and decoding) why swap it out?1 point
-
Yeah, the documentation is confusing for that. 8GB is definitely the max. New system is running great and very happy so far.1 point
-
what guide did you follow in setting up the windows vm? at this point, I'd make a new windows 10 vm and see if the issues are still persistent to better isolate where the source problem is, as up to this point, there have been wild guesses and standard optimization solutions presented. also, take your main image off the cache and put it on another fast drive via unassigned devices.1 point
-
https://forums.unraid.net/topic/57181-real-docker-faq/#comment-5643261 point
-
@snailbrain One difference I see so far, is that you use the caching of the shares. All my shares are sitting on the array with caching disabled. Nothing is using my cache drive except for the docker appdata and a couple VMs which I don't use when I play games and the dockers are all lightweigt and not doin much stuff in the background (Unifi, Nextcloud, MariaDB, Duplicati, Netdata). In your example writing to a share is writing to the cache first where at the same time the VM OS disk sits on, right? You copying from and writing to the same device at the same time. If you have a spare SSD as a unassigned device, try to place your VM vdisk on there. I guess i will see the same issues duplicating a large file on the OS device while gaming. Or another option is to try copy to a shared folder where caching is disabled.1 point
-
Updated the user script on the previous page to add "exec" to the file that's created. Thanks for looking into this. On my 1050ti I've been getting high CPU usage on occasion too.1 point
-
For me the IOThread i set in the XML is used when i copy files from the VM to the array or the cache. Maybe there is some sort of caching involved for you in the backround causing your games to lag. Are your disks for the VM set to "writeback"? Maybe try none instead. <driver name='qemu' type='raw' cache='none'/>1 point
-
Yeah I’m patiently waiting. The return period on my 1050 ti is up today so it’s going back. Just getting prepped at this point.1 point
-
Here's my effort...
 1 point
 -
Hi Docker forum Just thought I'd share with you all, some material design icons that I made today for the containers I use in my system: https://imgur.com/a/ehRQ3 I couldn't stand the default smokeping icon looking so bad... So while I only wanted to change that single icon, it looked so nice that I had to rip out all of the other icons to make them look uniform Feel free to use any of these - I could probably add to this album if anyone really wants some more done in a similar style (The Plex icon reminds me a lot of the LSIO's Plex Request logo but it was the best I could do!) They're all 512x512 .png files & look wicked on the unRAID docker page1 point
-
Nice, thanks for these.1 point
-
The update is now available1 point
-
https://www.privateinternetaccess.com/helpdesk/kb/articles/how-many-devices-can-i-use-simultaneously-while-connected-to-the-vpn-service1 point
-
That's awesome! Unleash your hardware!1 point
-
Thank you. 6.6.7 has been released. Upgraded with no issues. Much appreciated.1 point
-
Hello, I'm looking at getting a smart UPS for my box and I'm wondering what brands are good and bad and what features I REALLY need to have vs those that don't matter. Right now I'm behind a low end dumb UPS solely for leveling purposes.1 point
-
That's a great idea. That way it's either half stretched or half squished, so it will look more normal. I went ahead and created a 1080p version, and even stretched to 4K it looks okay, so for this one I'll just stick with 1080p. Since we seemed to be missing some AMD love in here:

 1 point
 -
Check out this awesome introduction video produced by @SpaceInvaderOne:1 point
-
The "correct" setting for this should be: allocation roundup size = 4096 because all our file systems used a 4K block size. When set to 4096 do you see a big disparity between win7/win10? I'm not so much interested in how long it takes to populate the Properties for a directory, instead I want to know what impact this setting might have on transfer rates. Also, the way storage space is calculated is just how we do it on the Shares page (and how 'du' command does it) - by using 'stat' to fetch the size of each and every file in the directory. This is going to produce a great deal of network traffic and can be affected by whether the inode for those files exists already in RAM on the server or not.1 point
-
This value is being reported by Samba wrong and because of it, if you check the properties of directory it can get wildly invalid, eg, 40MB of small files shows up as 1.5GB on disk. The problem stems from this Samba parameter: allocation roundup size (S) This parameter allows an administrator to tune the allocation size reported to Windows clients. The default size of 1Mb generally results in improved Windows client performance. However, rounding the allocation size may cause difficulties for some applications, e.g. MS Visual Studio. If the MS Visual Studio compiler starts to crash with an internal error, set this parameter to zero for this share. The integer parameter specifies the roundup size in bytes. Default: allocation roundup size = 1048576 Example: allocation roundup size = 0 # (to disable roundups) Often there are doc errors in Samba so if we set this thing to 4K it may or may not result less "improved Windows client performance." Some of you please add this line to your smb-extra.conf file (Settins/SMB Settings/SMB Extras): allocation roundup size = 4096 or even allocation roundup size = 0 and let me know if you notice any performance differences.1 point
-
Generally speaking, there isn't a ton of easy-to-digest information on the web about the KVM hypervisor, VFIO, and IOMMU, so I thought I'd write up a brief post on these technologies to educate those that are interested. The goal of this post is to write as little as possible while conveying as much as possible, so yes, I'm going to skip over a lot of the boring details and jump into the most important facts. What is a Hypervisor? KVM is a component in the Linux kernel that allows it to act as a hypervisor. Simply put, hypervisors are responsible for monitoring and managing the resources allocated to virtual machines. Virtual machines are emulated computers that run on top of a physical computer. Ever wanted to run three operating systems on one computer all at the same time? Hypervisors make this possible. Examples of other hypervisors include Xen, VMWare (ESX/ESXi), VirtualBox, and Microsoft Hyper-V. So what's unique about KVM? Unlike other hypervisors, KVM is the only one that is built directly into and supported by the Linux kernel itself. All other type-1 hypervisors out there will load before Linux does, and then Linux runs in an underprivileged state to that hypervisor. By leveraging a hypervisor that is part of the Linux kernel itself, it means better support, less complexity, and more room for optimization improvements. What is QEMU? KVM is just the component in the kernel that manages / monitors resources allocated to virtual machines. The other half of that puzzle is in the emulation of hardware components such as a motherboard, CPU, and various controllers that make up a virtual machine. That's where QEMU comes in (short for quick emulator). KVM can't work without QEMU, so you'll often times see KVM referred to as QEMU/KVM or KVM/QEMU. While QEMU is required to make use of KVM, other hypervisors also use QEMU including Xen and VirtualBox. What's HVM? When virtual machine technology was first starting to grow in adoption, it wasn't directly supported by the chipset manufacturers directly. As such, there was a significant amount of overhead associated with virtual machines due to software emulation. Later, Intel and AMD built support for virtualization directly into their hardware (Intel VT-x and AMD-v), reducing overhead for emulation, monitoring, and security. These technologies allow for the creation of hardware assisted virtual machines (referred to as HVMs). While Xen offers a way to eliminate the overhead associated with traditional emulation without the need for VT-x, this paravirtualization method only works with Linux-based guests, and for that, Docker Containers are a better solution anyway. As such, HVMs are best suited for virtual machines where more than just basic Linux applications are needed. What is VFIO? Simply put, virtual function IO allows us to assign a physical device, such as a graphics card, directly to a virtual machine that in turn will provide driver support for the device directly. But that's not all. We can also prevent the device from accessing spaces in memory that are outside of that VM. This means that if something goes wrong with the device or it's driver, the impact of such an event is limited to the virtual machine and not the host. This shields unRAID OS from being exposed to unnecessary risk due to faulty hardware or misbehaving device drivers. VFIO usage requires IOMMU capable hardware (your CPU must have Intel VT-d or AMD-Vi support). Questions? Like I said at the beginning, I wanted to keep this post as short and direct as I could to get the most important points across without making folks go crosseyed while reading. If you have any questions, please reply here with them!1 point
-
That works as long as you only write to shares -- not to the disks themselves. It also is not a percentage -- it's an absolute value; so unless all drives are the same size, the percentage of unused space will be different on each different drive size => potentially a lot different if there's a significant variance in sizes.1 point