Leaderboard


Popular Content
Showing content with the highest reputation on 01/21/21 in all areas
-
As @alturismo said that's not possible you can only view the GPU's that are not in use by a VM, since it's not exclusively available on the host and the GPU Statistics Plugin simply can't "see" it. You can't install a second instance of the Plugin, the developer would need to make something like a drop down to see and switch between multiple cards, but I think that involves a lot of work for the dev since the Plugin has to change significantly in terms of the code and also think that wouldn't make much sense because the normal use case is that you use one Card or the iGPU for transocding and the other card(s) for VM(s).2 points
-
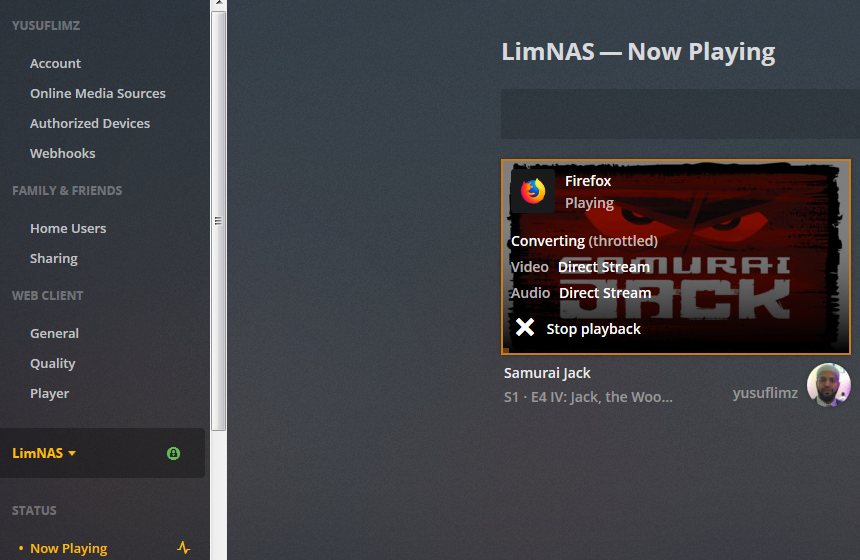
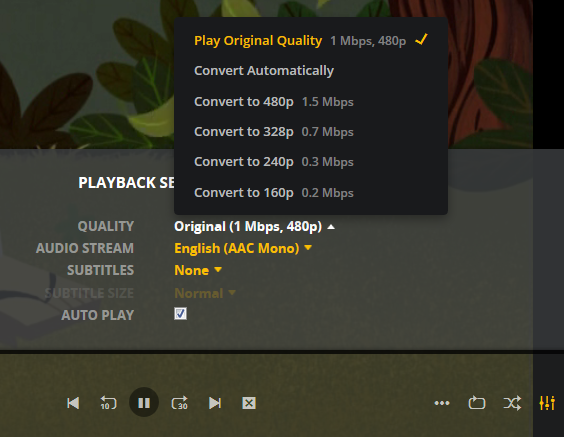
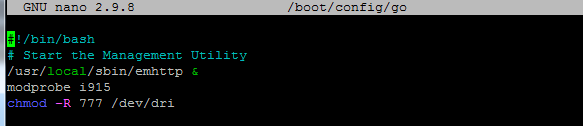
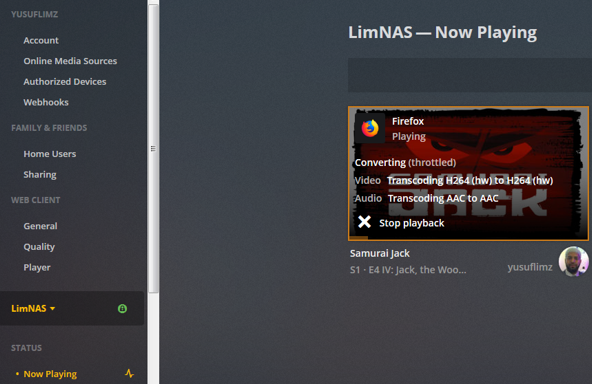
***Update*** : Apologies, it seems like there was an update to the Unraid forums which removed the carriage returns in my code blocks. This was causing people to get errors when typing commands verbatim. I've fixed the code blocks below and all should be Plexing perfectly now Y =========== Granted this has been covered in a few other posts but I just wanted to have it with a little bit of layout and structure. Special thanks to [mention=9167]Hoopster[/mention] whose post(s) I took this from. What is Plex Hardware Acceleration? When streaming media from Plex, a few things are happening. Plex will check against the device trying to play the media: Media is stored in a compatible file container Media is encoded in a compatible bitrate Media is encoded with compatible codecs Media is a compatible resolution Bandwith is sufficient If all of the above is met, Plex will Direct Play or send the media directly to the client without being changed. This is great in most cases as there will be very little if any overhead on your CPU. This should be okay in most cases, but you may be accessing Plex remotely or on a device that is having difficulty with the source media. You could either manually convert each file or get Plex to transcode the file on the fly into another format to be played. A simple example: Your source file is stored in 1080p. You're away from home and you have a crappy internet connection. Playing the file in 1080p is taking up too much bandwith so to get a better experience you can watch your media in glorious 240p without stuttering / buffering on your little mobile device by getting Plex to transcode the file first. This is because a 240p file will require considerably less bandwith compared to a 1080p file. The issue is that depending on which format your transcoding from and to, this can absolutely pin all your CPU cores at 100% which means you're gonna have a bad time. Fortunately Intel CPUs have a little thing called Quick Sync which is their native hardware encoding and decoding core. This can dramatically reduce the CPU overhead required for transcoding and Plex can leverage this using their Hardware Acceleration feature. How Do I Know If I'm Transcoding? You're able to see how media is being served by playing a first something on a device. Log into Plex and go to Settings > Status > Now Playing As you can see this file is being direct played, so there's no transcoding happening. If you see (throttled) it's a good sign. It just means is that your Plex Media Server is able to perform the transcode faster than is necessary. To initiate some transcoding, go to where your media is playing. Click on Settings > Quality > Show All > Choose a Quality that isn't the Default one If you head back to the Now Playing section in Plex you will see that the stream is now being Transcoded. I have Quick Sync enabled hence the "(hw)" which stands for, you guessed it, Hardware. "(hw)" will not be shown if Quick Sync isn't being used in transcoding. PreRequisites 1. A Plex Pass - If you require Plex Hardware Acceleration Test to see if your system is capable before buying a Plex Pass. 2. Intel CPU that has Quick Sync Capability - Search for your CPU using Intel ARK 3. Compatible Motherboard You will need to enable iGPU on your motherboard BIOS In some cases this may require you to have the HDMI output plugged in and connected to a monitor in order for it to be active. If you find that this is the case on your setup you can buy a dummy HDMI doo-dad that tricks your unRAID box into thinking that something is plugged in. Some machines like the HP MicroServer Gen8 have iLO / IPMI which allows the server to be monitored / managed remotely. Unfortunately this means that the server has 2 GPUs and ALL GPU output from the server passed through the ancient Matrox GPU. So as far as any OS is concerned even though the Intel CPU supports Quick Sync, the Matrox one doesn't. =/ you'd have better luck using the new unRAID Nvidia Plugin. Check Your Setup If your config meets all of the above requirements, give these commands a shot, you should know straight away if you can use Hardware Acceleration. Login to your unRAID box using the GUI and open a terminal window. Or SSH into your box if that's your thing. Type: cd /dev/dri ls If you see an output like the one above your unRAID box has its Quick Sync enabled. The two items were interested in specifically are card0 and renderD128. If you can't see it not to worry type this: modprobe i915 There should be no return or errors in the output. Now again run: cd /dev/dri ls You should see the expected items ie. card0 and renderD128 Give your Container Access Lastly we need to give our container access to the Quick Sync device. I am going to passively aggressively mention that they are indeed called containers and not dockers. Dockers are manufacturers of boots and pants company and have nothing to do with virtualization or software development, yet. Okay rant over. We need to do this because the Docker host and its underlying containers don't have access to anything on unRAID unless you give it to them. This is done via Paths, Ports, Variables, Labels or in this case Devices. We want to provide our Plex container with access to one of the devices on our unRAID box. We need to change the relevant permissions on our Quick Sync Device which we do by typing into the terminal window: chmod -R 777 /dev/dri Once that's done Head over to the Docker Tab, click on the your Plex container. Scroll to the bottom click on Add another Path, Port, Variable Select Device from the drop down Enter the following: Name: /dev/dri Value: /dev/dri Click Save followed by Apply. Log Back into Plex and navigate to Settings > Transcoder. Click on the button to SHOW ADVANCED Enable "Use hardware acceleration where available". You can now do the same test we did above by playing a stream, changing it's Quality to something that isn't its original format and Checking the Now Playing section to see if Hardware Acceleration is enabled. If you see "(hw)" congrats! You're using Quick Sync and Hardware acceleration [emoji4] Persist your config On Reboot unRAID will not run those commands again unless we put it in our go file. So when ready type into terminal: nano /boot/config/go Add the following lines to the bottom of the go file modprobe i915 chmod -R 777 /dev/dri Press Ctrl X, followed by Y to save your go file. And you should be golden!


 1 point
 -
This thread will serve as the support thread for the GPU statistics plugin (gpustat). UPDATE: 2022-11-29 Fix issue with parent PID causing plugin to fail Prerequisite: 6.7.1+ Unraid-Nvidia plugin with NVIDIA kernel drivers installed. 6.9.0 Beta35 and up no longer require a kernel build, but now require the Nvidia plugin by @ich777. Intel support requires the plugin install for Intel GPU TOP from @ich777. Both plugins can be found in Community Apps. Plugin is now live on CA but if you want to manually install see the below -- To review the source before installing (**You should always do this**): https://github.com/b3rs3rk/gpustat-unraid Manual Plugin Installation URL: https://raw.githubusercontent.com/b3rs3rk/gpustat-unraid/master/gpustat.plg Enjoy! ====================================================================== Information to Include when asking for Support: 1a) the result of 'nvidia-smi -q -x -i 0' from the UnRAID console (via SSH or the webterminal is fine) for NVIDIA support AND/OR 1b) the result of 'timeout -k .500 .400 intel_gpu_top -J -s 250' for Intel support AND/OR 1c) the result of 'radeontop -d - -l 1' 2) the result of 'cd /usr/local/emhttp/plugins/gpustat/ && php ./gpustatus.php' 3) a screenshot of the dashboard plugin (if issue is only seen during transcoding, then a snippet during transcode is best) 4) the contents of '/boot/config/plugins/gpustat/gpustat.cfg'1 point
-
之前折腾diy的freenas,因掉盘问题弃坑(可能是硬件问题),某日在B乎看到还有付费的nas系统,想着能收费,必是有所特长。 试用了两个礼拜,果断pro版。 有几个功能十分满足我的需求: 1、硬盘混搭,我有挺多各种大小的磁盘,正好可以串起来。 2、就算阵列崩溃(比如坏了3块),正常硬盘的数据会保留。而不是像riad会全崩。 3、虚拟机、docker 4、硬盘加密 5、硬盘休眠,在riad中,无法对单盘进行休眠。 同时有一些不足的地方: 1、阵列写入速度,比较慢,只能追加缓存池来弥补 2、大陆网络问题,经常要下插件比较麻烦 3、缓存策略,不支持类似 傲腾内存 的那种 4、如果能够建立两个array,一个数据,一个缓存,会比较刺激。目前的缓存池只是软raid或single,磁盘混搭不方便。 体会: 对于新人上手还是难度比较大的,但熟了后,发现unraid才是all in one的最佳server os选择,棒极了。1 point
-
Connect to you database using this and run the variable command there. http://influxui.s3-website-us-east-1.amazonaws.com/ It works locally. Or exec into the container and run it that way. That will atleast confirm that there is data in the dB. Have you tried to remove and re add the datasource in grafana.1 point
-
IMHO, this is a wonderful suggestion. I would say `Parity Update` is the best option - short and intuitively understandable. Also, I would like to propose that Parity Check and Parity Update would be split into separate buttons in the UI. Furthermore, it would be nice if: Parity Update button would be disabled by default. As much as I understand, it is recommended to always run a Parity Check not and Update, at least according to wiki. Notice, how much easier it is to say Check and Update, instead of Check and Check without writing... yada...yada...yada... 😉 When and only when parity errors have been found, the Update button is enabled. And the most useful feature would be, if unRAID would keep the log of error block, where errors have just been found during the Parity Check. Then, running the Update, it could use that log to read and update only the blocks, that had errors. Imagine 200TB+ array with 1 parity error... 😉 IMHO, the result - way more intuitive and considerably faster way to deal with parity checks and errors. 👍 A column, where it clearly states the action taken - Parity Check or Parity Update. That'd be perfect.1 point
-
You are trying to run the commands before starting the emhttp daemon. Also /mnt/disk8 will not be available until after the array has successfully been started. Maybe you would better off running commands that need the array started via the User Scripts plug-in?1 point
-
Based on the link you provided you should have setup 3 volume mounts for your container - /path/to/local/config.json:/app/config.json # For easy editing of the config - /path/to/local/plugins:/app/plugins # Only needed if using plugins - /path/to/local/libraries:/app/libraries # Only needed if using external libraries In the case of unraid the "/path/to/local" would likely be a folder in your appdata folder like "/mnt/user/appdata/amoungus". Within the amoungus folder you would have a subfolder "plugins" and a subfolder "libraries". The config.json is a bit of a special case. That file should be put directly into the amoungus folder since the above recommended mapping maps the file in directly. You will want to make sure the permissions for everything in the amoungus folder are correct for the container, I typically just set them to 777.1 point
-
...nein, sind zwei klassische SATA SSD.1 point
-
Nein. UUID und UUID_SUB haben zwei unterschiedliche ID's EDIT: Doch. SDJ und SDF haben beide die gleiche UUID.1 point
-
Das und du solltest natürlich mal über Backups nachdenken. Ich nutze zB dieses Script (mit dem User Scripts Plugin) um /mnt/user/appdata auf /mnt/user/backups zu sichern: https://forums.unraid.net/topic/97958-rsync-incremental-backup/ Das lasse ich 1x täglich ausführen.1 point
-
It is a bad ideea. I recommend installing something like Ngnix proxy manager and adding at least some basic auth in front of it over SSL. The reason why it can be a bad ideea is that you might never be sure that the whole UI is propperly protected. By adding a proxy in front or even better a vpn like wireguard, the attacker will have to bypass this authentication before getting to the unraid server. Nginx basic auth and witeguard auth are way more battle tested (not to mention a lot smaller as attack surface) than the whole unraid UI.1 point
-
I am back. No further call traces, errors, or lockups. I have had the power supply idle control setting set to auto and the global c-states set to auto. This has not caused any further issues. I will install some plugins and see if that causes any issues. At this point I think the issue is related to my 10Gig NIC somehow. However I will install some plugins and report back in another two weeks.1 point
-
I probably understood why, this morning I set a new icon (Macmini) manually in the smb.service file, everything worked until now, I don't know how, but the Xserve icon returned.1 point
-
1 point
-
This was it, I didn't realize that a BIOS setting even had that effect. Its working now, thank you for your patience and help troubleshooting.1 point
-
This sounds wrong. It should be the full path to the vdisk file on the NVME drive and I would expect it to be something along the lines of /mnt/disks/nvme_mount_point/vdisk_file_name. You may have ended up specifying a location in RAM1 point
-
Dir scheint das Prinzip von unRaid noch nicht ganz klar zu sein. Schau Dir diesen Beitrag einmal an. Eventuell wird es dann klarer: https://www.kodinerds.net/index.php/Thread/60933-How-To-unRAID-und-die-Verwendung-von-Cache-Drives/ Die HDD's (inkl. Parity) laufen nur, wenn drauf geschrieben wird. Nach welcher Zeitspanne sie in den Spindown gehen sollen, kannst Du einstellen.1 point
-
I followed this guide which is very complete. You can find the configuration file for Authelia as well as for the NginxProxyManager at the top and the page. https://github.com/ibracorp/authelia Just tell me if you need more info, I'll gladly share.1 point
-
if the GPU is in use for a VM you cant "use" it in unraid OS or fetch data for gpustats, so i guess that wont happen.1 point
-
Firstly, great plugin and presentation of information! The drop down box to select GPU in a multi GPU setup is a great function. Is it at all possible to have both (or more) GPU's visible on the dashboard? I use 1 GPU for transcoding and 1 for VM. While the 1 for the VM isn't visible when in use by the VM, it would be good to still be able to monitor it when it's not (even if it's not doing anything). Alternatively, how could I go about installing a second instance of gpustats?1 point
-
Just an update. I'm sitting on over 4 days uptime, keeping my fingers crossed but I feel good about this. Thanks Hoopster for pointing out MacVlan. I thought it wasn't in effect since I wasn't using a custom ip or br0 on any docker, but just having the br0 option checked in docker was enough to add it.1 point
-
If I had to take a wild guess, it would be that there is a typo at or near where you edited the ModIDs... maybe a space where there shouldn't be... Are you using the automod manager in ark? or adding the files manually? I have a new XML and container image that triggers the ARK automodmanager to download and update them, I will try to post it when I get home.1 point
-
Im not sure how advanced that feature is, like if it follows the html tag for favicon, or just assumes it lives on /favicon.ico, i have those errors too sometimes, and i havent seen anything bad from it.1 point
-
Seems like the latest(v4.3.3) update is broken, it doesn't load the old torrents. Does anyone have the Repository tag for v4.3.2, there are so many to choose from. EDIT: I just tried this linuxserver/qbittorrent:14.3.2.99202101080148-7233-0cbd15890ubuntu18.04.1-ls110 And it worked, but if it's not the correct one i'm happy to be corrected.1 point
-
Have you updated the plugin amd have you one of the Plugins (Nvidia-Driver or Intel GPU TOP) installed? I now have a few reports that it is working and I also don't have a problem since the last update.1 point
-
Looks like this isn't being maintained anymore I am working on setting up my own docker to upload an updated version of the pihole-dot-doh Edit - I have submitted to Squid to get added onto CA Edit 2 - Pihole DoT-DoH now on CA, and with latest FTL version 5.5.1 etc This can be installed over testdasi's pihole without any issues.1 point
-
ALT+1 means F1 ...... etc1 point
-
thank you so much. by the way just wanted to say its a awesome plugin. thanks for all your hard work1 point
-
Thats good then. Sounds like you're all set. So I could try and describe how to do the process but its easier to just reference another post I am assuming that you have the nvme mounted by unassigned devices. Basically just copy the VM image file from the cache to the nvme using your choice of methods; although I recommend using the --sparse=always option as it keeps the image size smaller. Then edit the VM to point to the new disk location (XML editor may be easier) If you have any questions, feel free to come back here1 point
-
Das liegt daran das im Dockerfile kein 'EXPOSE 8081' drin ist (Port 8081 hab ich hier nur angenommen weil ich es oben gelesen hab). Das hängt aber eher mit der Unraid WebUI zusammen aber kann Unraid im prinzip auch nichts für, am besten wäre der Maintainer erweitert das Dockerfile mit EXPOSE [DERENTSPRECHENDEPORT] damit es in der WebUI angezeigt wird und die Schaltfläche wieder da ist. Hier ein Beispiel, ich verwende Homeassistant in br0 und Gitea in br0. Bei Homeassistant ist auch kein Expose im Dockerfile somit wird mir auch die option für das WebUI auch nicht angezeigt und auch keine IP Adresse (kann aber trotzdem mit der vergebenen IP und PORT connecten), bei Gitea sind im Dockerfile verschiedene Expose einträger drin für SSH WebUI usw. das wirkt sich dann auch auf der Übersichtsseite von Unraid aus und der Button für WebUI ist auch vorhanden: Jedoch birgt das auch Tücken mitsich. Wenn im Container selbst bzw. in der config für den Container der Port geändert wird stimmt der WebGUI port nicht mehr und muss dann im Template auch mittels 'Advanced View' und 'WebUI' geändert werden. Hier ist auch gleich wieder ein Beispiel für so eine Tücke. Bei Gitea hab ich den Port für SSH in der config von Gitea von 22 einen anderen umgestellt und dieser wird natürlich hier jetzt falsch angezeigt da dieser im Dockerfile mit EXPOSE 22 festgelegt wurde aber das tud dem nichts zur sache da er sich im Netzwerk 'Custom: br0' befindet ist er quasi ein "echtes/eigenständiges" Netzwerkgerät mit allen Ports im LAN offen.
 1 point
 -
Amazing job on this! I saw the post on reddit this morning about the Intel GPU, so I commented out the modprobe in my go file, installed the Intel GPU Top plugin, rebooted and installed GPU statistics, setup the plugin and everything worked great! It's really nice to be able to see some visualizations and stats of life in the Intel GPU if it's doing some transcoding or something else. Quick question I was wondering, is if it is possibly to poll more than a single graphics card? I have an i9700k as the main CPU and use the Intel GPU for the dockers that benefit from it, but I also have a GTX 1080 installed for the gaming VM, and was wondering if its possible to have the Nvidia card polled by Unraid. My gut thought was that since the VM has control of this card than it might not be possible for unraid to see it unless I do the bios patch to the vm, but I was curious if there was a way to select a second card to poll within the plugin itself?1 point
-
We are actively working towards this!1 point
-
FYI I've upated the details about the RX550 compatibility as a bug report to Dortania. As for passing it through to the Mac VM. There is nothing special required. Just track it down in your PCIe IOMMU group. IOMMU group 33: [1002:67ff] 10:00.0 VGA compatible controller: Advanced Micro Devices, Inc. [AMD/ATI] Baffin [Radeon RX 550 640SP / RX 560/560X] (rev ff) [1002:aae0] 10:00.1 Audio device: Advanced Micro Devices, Inc. [AMD/ATI] Baffin HDMI/DP Audio [Radeon RX 550 640SP / RX 560/560X] In my case device 10:00.0 for video and 10:00.1 for audio. Then map that bus 0x10 function 0x0 and 0x1 to a spare bus in the VM. For me, I used bus 0x04 (the next unused bus) and function 0x0 and 0x1. Don't forget to use the multifunction command option to bring both the audio and video together. <hostdev mode='subsystem' type='pci' managed='yes'> <driver name='vfio'/> <source> <address domain='0x0000' bus='0x10' slot='0x00' function='0x0'/> </source> <address type='pci' domain='0x0000' bus='0x04' slot='0x00' function='0x0' multifunction='on'/> </hostdev> <hostdev mode='subsystem' type='pci' managed='yes'> <driver name='vfio'/> <source> <address domain='0x0000' bus='0x10' slot='0x00' function='0x1'/> </source> <address type='pci' domain='0x0000' bus='0x04' slot='0x00' function='0x1'/> </hostdev> Spaceinvader One made a video that talks about this in more details. Do make sure your have a recent Lilu and WhateverGreen kexts installed in clover/opencore. I find that sometimes the card does not initialise until the OS fires up the GUI so don't stress if you don't get the display turning on immediately, just be patient. See how you go.1 point
-
1 point
-
Hola amigos, Hay algunas traducciones de la webgui que se agregaron en el último minuto. Si pudieras echar un vistazo a lo que tengo, sería muy apreciado. Se bueno por favor. Mi español no es muy bueno 🙂 ; users.txt ;------------------------------------------------------------------------------------------------------------------------------------------------------------------------ Click to select PNG file=Haga clic para seleccionar el archivo PNG ;helptext.txt ;------------------------------------------------------------------------------------------------------------------------------------------------------------------------ :display_custom_banner_help: Image will be scaled to 1920x90 pixels. The maximum image file upload size is 512 kB (524,288 bytes). :end en español= :display_custom_banner_help: La imagen se escalará a 1920x90 píxeles. El tamaño máximo de carga del archivo de imagen es 512 kB (524,288 bytes). :end ;------------------------------------------------------------------------------------------------------------------------------------------------------------------------ :display_temperature_unit_help: Selects the temperature unit for the disk temperature thresholds. Changing the unit will adjust the existing value in the disk temperature thresholds as appropriate. Make sure any newly entered values represent the selected temperature unit. :end en español= :display_temperature_unit_help: Seleccione la unidad de temperatura para los umbrales de temperatura del disco. Cambiar la unidad ajustará el valor existente en los umbrales de temperatura del disco según corresponda. Asegúrese de que los valores recién ingresados representen la unidad de temperatura seleccionada. :end ;------------------------------------------------------------------------------------------------------------------------------------------------------------------------ :eth_network_rules_help: The interface assignment rules can be changed here and might be necessary to set the preferred interface for managing Unraid - *use with care, usually there is no need to change*. **eth0** is the main interface used to manage the Unraid system. The other interfaces are optional and may be used as desired. Every interface must be uniquely identified by its MAC (hardware) address. The interface assignment is stored on the flash device under */config/network-rules.cfg*. This file can be viewed with any editor, but it is recommended to make changes via the webGUI only.<br> Deleting the file *network-rules.cfg* from the flash device will restore automatic interface assignment after a system reboot. :end en español= :eth_network_rules_help: Las reglas de asignación de interfaz se pueden cambiar aquí y pueden ser necesarias para establecer la interfaz preferida para administrar Unraid - * use con cuidado, generalmente no hay necesidad de cambiar *. ** eth0 ** es la interfaz principal utilizada para administrar el sistema Unraid. Las otras interfaces son opcionales y se pueden usar como se desee. Cada interfaz debe identificarse de manera única por su dirección MAC (hardware). La asignación de la interfaz se almacena en el dispositivo flash en * / config / network-rules.cfg *. Este archivo se puede ver con cualquier editor, pero se recomienda hacer cambios solo a través de webGUI. Al eliminar el archivo * network-rules.cfg * del dispositivo flash, se restaurará la asignación automática de la interfaz después de reiniciar el sistema. :end ;------------------------------------------------------------------------------------------------------------------------------------------------------------------------ :eth_routing_table_help: Enter a valid IPv4 route in the format *nnn.nnn.nnn.nnn/xx*, e.g. *192.168.1.0/24*<br> or enter a valid IPv6 route in the format *nnnn:nnnn:nnnn::nnnn/xxx*, e.g. *fe80::3ad8:2fff:fe25:9709/64* Select the gateway from the dropdown list or enter a valid IPv4/IPv6 address as gateway value. The metric value is optional, it defaults to 1. Use it to select the prefered gateway when more than one entry of the same route exist. :end en español= :eth_routing_table_help: Ingrese una ruta IPv4 válida en el formato * nnn.nnn.nnn.nnn / xx *, p. * 192.168.1.0 / 24 * <br> o ingrese una ruta IPv6 válida en el formato * nnnn: nnnn: nnnn :: nnnn / xxx *, p. * fe80 :: 3ad8: 2fff: fe25: 9709/64 * Seleccione la puerta de enlace de la lista desplegable o ingrese una dirección IPv4 / IPv6 válida como valor de la puerta de enlace. El valor de la métrica es opcional, su valor predeterminado es 1. Úselo para seleccionar la puerta de enlace preferida cuando exista más de una entrada de la misma ruta. :end ;------------------------------------------------------------------------------------------------------------------------------------------------------------------------ :sysdevs_iommu_groups_help: This displays a list of IOMMU groups available on your system along with the output of the `lspci` command for each IOMMU group. The numeric identifiers are used to configure PCI pass-through. Devices you select will be bound to the vfio-pci driver at boot, which makes them available for assignment to a virtual machine, and also prevents the Linux kernel from automatically binding them to any present host driver. **Note that selecting a device will bind not only the specified device(s), but *all* other devices in the same IOMMU group as well.** <i class="fa fa-circle orb green-orb middle"></i> This symbol indicates the device is currently bound to the vfio-pci driver. <i class="fa fa-retweet grey-orb middle"></i> This symbol indicates the device supports FLR (Function Level Reset). <input type="checkbox" value="" disabled> If a checkbox is greyed out it means the device is in use by Unraid and can not be passed through. :end en español= :sysdevs_iommu_groups_help: Esto muestra una lista de grupos de IOMMU disponibles en su sistema junto con la salida del comando `lspci` para cada grupo de IOMMU. Los identificadores numéricos se utilizan para configurar el paso de PCI. Los dispositivos que seleccione estarán vinculados al controlador vfio-pci en el arranque, lo que los hará disponibles para su asignación a una máquina virtual y también evitará que el kernel de Linux los asocie automáticamente a cualquier controlador de host presente. ** Nota: al seleccionar un dispositivo, se vincularán no solo los dispositivos especificados, sino también * todos los demás dispositivos en el mismo grupo de IOMMU. ** <i class="fa fa-circle orb green-orb middle"></i> Este símbolo indica que el dispositivo está vinculado actualmente al controlador vfio-pci. <i class="fa fa-retweet grey-orb middle"></i> Este símbolo indica que el dispositivo admite FLR (restablecimiento del nivel de función). <input type="checkbox" value="" disabled> Si una casilla de verificación está atenuada, significa que el dispositivo está en uso por Unraid y no se puede pasar. :end ;------------------------------------------------------------------------------------------------------------------------------------------------------------------------ :sysdevs_thread_pairings_help: This displays a list of CPU thread pairings. :end en español= :sysdevs_thread_pairings_help: Esto muestra una lista de pares de hilos de CPU. :end ;------------------------------------------------------------------------------------------------------------------------------------------------------------------------ This displays the output of the `lsusb` command. The numeric identifiers are used to configure PCI pass-through. en español= :sysdevs_usb_devices_help: Esto muestra la salida del comando `lsusb`. Los identificadores numéricos se utilizan para configurar el pass-through de PCI. :end ;------------------------------------------------------------------------------------------------------------------------------------------------------------------------ :sysdevs_scsi_devices_help: This displays the output of the `lsscsi` command. The numeric identifiers are used to configure PCI pass-through. Note that linux groups ATA, SATA and SAS devices with true SCSI devices. :end en español= Esto muestra la salida del comando `lsscsi`. Los identificadores numéricos se utilizan para configurar el paso de PCI. Nota: linux agrupa dispositivos ATA, SATA y SAS con dispositivos SCSI verdaderos. Gracias, Spencer1 point
-
So after my Unmanic vs Tdarr testing, I've decided to use Tdarr for now. I like the simplicity of Unmanic, but Tdarr supports NVENC, so my encodes there are much faster. Initially I was using Unmanic because the resulting files were significantly smaller than Tdarr's output, but that was until I realized Unmanic was clobbering my audio. Once I disabled the audio transcoding in Unmanic the file sizes between the two were about the same. Besides the faster GPU encoding, I like the control Tdarr gives me through the use of plugins. It was more difficult to get set up and figure out the workflow and what plugins I wanted to use, but now that I've gone through that it seems to be working pretty well.1 point