Leaderboard


Popular Content
Showing content with the highest reputation on 01/12/22 in all areas
-
Nothing, the touch command will create an empty file. Unraid checks on startup if a file is present or not. The content is irrelevant.3 points
-
Easiest way to tell if stuff has been uploaded into the cloud would be to check your mount_rclone folder (as this is basically a mapped folder to GDrive directly) To answer your first question, yes, you can copy stuff manually to your mergefs folder. I've noticed for my though when I do it copies at like 10MB/sec but if I copy to my "local" folder directly (by manually creating the music folder for example) it copies at gigabit speeds to then be uploaded.2 points
-
...sorry, war ein paar Tage zu sehr busy....ist das Thema noch akut?2 points
-
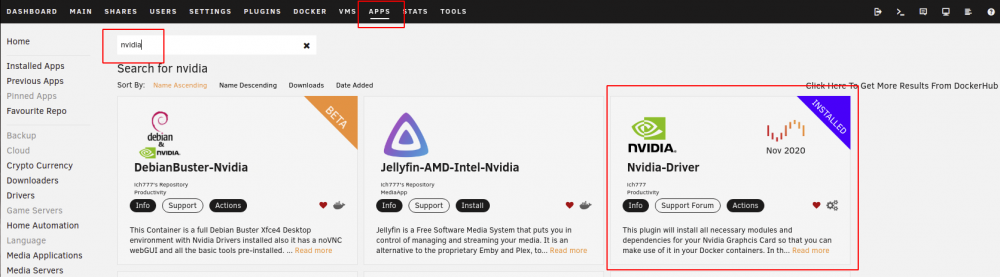
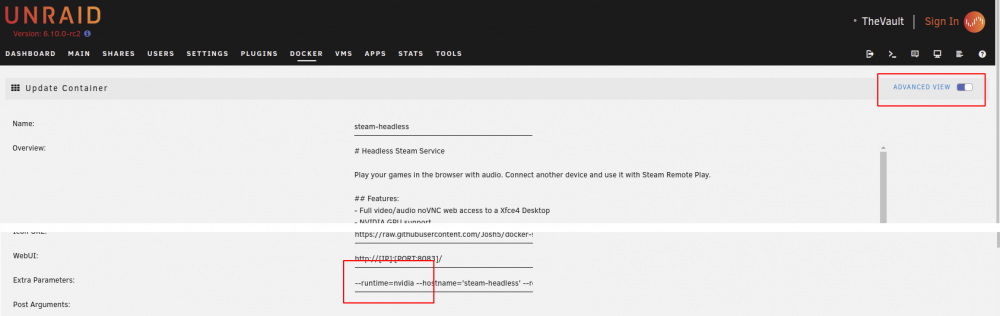
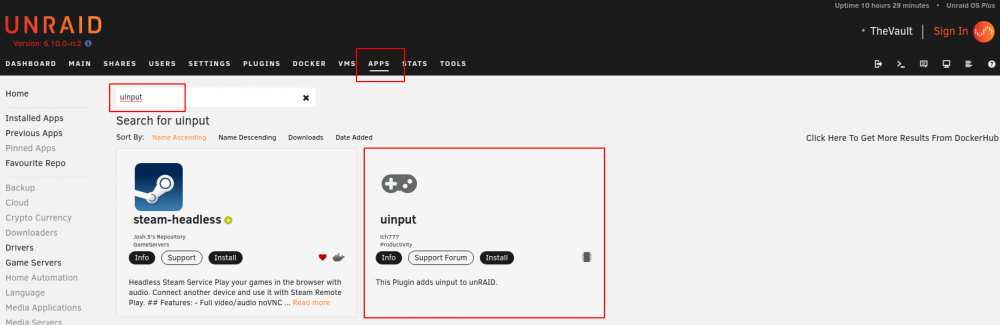
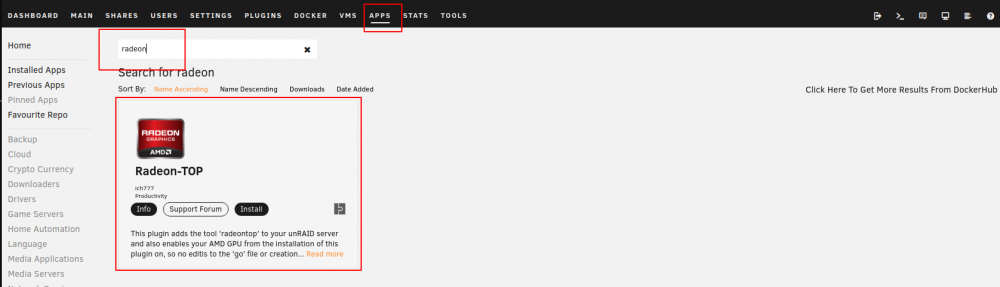
Application Name: Steam (Headless) Application Site: https://store.steampowered.com/ Docker Hub: https://hub.docker.com/r/josh5/steam-headless/ Github: https://github.com/Josh5/docker-steam-headless/ Discord: https://unmanic.app/discord (Not just for Unmanic...) Description: Play your games in the browser with audio. Connect another device and use it with Steam Remote Play. Features: NVIDIA GPU support AMD GPU support Full video/audio noVNC web access to a Desktop Root access Support for Flatpaks and Appimages Compatible with EmuDeck installer (not supplied) Notes: ADDITIONAL SOFTWARE: If you wish to install additional applications, you can generate a script inside the "~/init.d" directory ending with ".sh". This will be executed on the container startup. STORAGE PATHS: Everything that you wish to save in this container should be stored in the home directory or a docker container mount that you have specified. All files that are store outside your home directory are not persistent and will be wiped if there is an update of the container or you change something in the template. GAMES LIBRARY: It is recommended that you mount your games library to `/games` and configure Steam to add that path. AUTO START APPLICATIONS: In this container, Steam is configured to automatically start. If you wish to add additional services to automatically start, add them under Applications > Settings > Session and Startup in the WebUI. NETWORK MODE: If you want to use the container as a Steam Remote Play (previously "In Home Streaming") host device you should set the Network Type: to "host". This is a requirement for controller hardware to work and to prevent traffic being routed through the internet since Steam thinks you are on a different network. Setup Guide: CONTAINER TEMPLATE: Navigate to "APPS" tab. Search for "steam-headless" Select either Install or Actions > Install from the search result. Configure the template as required. GPU CONFIGURATION (NVIDIA): This container can use your GPU. In order for it to do this you need to have the NVIDIA plugin installed. Install the Nvidia-Driver Plugin by @ich777. This will maintain an up-to-date NVIDIA driver installation on your Unraid server. Toggle the steam-headless Docker Container template editor to "Advanced View". In the "Extra Parameters" field, ensure that you have the "--runtime=nvidia" parameter added. (Optional - This step is only necessary if you only multiple NVIDIA GPUs. If you have a single GPU, then leaving this as "all" is fine.) Expand the Show more settings... section near the bottom of the template. In the Nvidia GPU UUID: (NVIDIA_VISIBLE_DEVICES) variable, copy your GPU UUID (can be found in the Unraid Nvidia Plugin. See that forum thread for details). GPU CONFIGURATION (AMD): Install the Radeon-Top Plugin by @ich777. Profit ADDING CONTROLLER SUPPORT: Unraid's Linux kernel by default does not have the modules required to support controller input. Steam requires these modules to be able to create the virtual "Steam Input Gamepad Emulation" device that it can then map buttons to. @ich777 Has kindly offered to build and maintain the required modules for the Unraid kernel as he already has a CI/CD pipeline in place and a small number of other kernel modules that he is maintaining for other projects. So a big thanks to him for that! Install the uinput plugin from the Apps tab. The container will not be able to receive kernel events from the host unless the Network Type: is set to "host". Ensure that you container is configured this way. WARNING: Be aware that this container requires at least 8083, 32123, and 2222 available for the WebUI, Web Audio, and SSH to work. It will also require any ports that Steam requires for Steam Remote Play No server restart is required, however. Ensure that the steam-headless Docker container is recreated after installing the uinput plugin for it to be able to detect the newly added module.


 1 point
 -
Ich korrigiere: unmöglich. Man müsste schon einen Benchmark bei CPU und GPU machen und dann währenddessen den Strom der Platten trennen und nachdem diese zum Stillstand gekommen sind und die Elektronik vollständig entladen wurde, den Strom wieder einschalten. Viele vergessen auch, dass die Netzteile alle kurzfristig 35 bis 50% Überlastung aushalten und dann auch nicht explodieren oder so, sondern einfach ausgehen. Es wird viel zu viel Aufriss deswegen gemacht. Einfach mal die Tests lesen, die zb TweakPC macht. Die überlasten die ja immer durchgehend um das Maximum zu ermitteln und den Überlastschutz zu testen. Das soll jetzt natürlich nicht heißen, dass man dauerhaft über der Spitzenleistung liegen soll, aber dieses "ich brauche möglichst viel Puffer" ist einfach nur Geldverschwendung, mal abgesehen von der miesen Effizienz dieser übergroßen Netzteile.1 point
-
Hallo @chrizzo Ich habe jetzt nur grob überflogen, was hier von Dir angedeutet wurde. Mir erscheint das Netzteil mit 1100W überdimensioniert gewählt, aber wenn Dir die Verluste egal sind oder Du noch weiter aufrüsten willst kannst Du es nehmen. Ich würde mal pauschal grob so rechnen: Da Du bei der CPU ins hohe Regal greifen willst: 125W (+ ein bisschen Tolleranz) Mainboard +Ram: 50W Graka 1060 OC: 150W (+OC Tolleranz) Graka 1070 OC finde ich nicht; Scheibfehler? Vielleicht ist eine 2070 gemeint?: 215W (+OC Tolleranz) Ein paar Lüfter: 30W 7 HDD: 105W ein paar SSD: 40W Das kommt irgendwo bei der Summe von 715 Watt (+die erwähnte Tolleranz) an, wenn ich nichts vergessen habe. ==== Noch ein bisschen Reserve eingeplant: Vielleicht ein aktuelles Corsair RM850x Netzteil ausprobieren? Wie @mgutt schon angedeutet hat: Beim booten ziehen die Festplatten einen hohen Anlaufstrom, aber die Grafikkarten ziehen dafür nicht so viel. Es ist unwahrscheinlich, daß alle Komponenten gleichzeitig alle ihre maximale Last aufbringen.1 point
-
I ultimately deleted the plugin and then re-added it and configured from scratch and that fixed the problem.1 point
-
I have scoured these forums for an understanding on what the errors are. I have found a post from someone with the exact same error as me and the resolution was not to worry about it. MCE Error Post1 point
-
From my understanding it works. As hinted by @rachid596, it seems that HDR tone mapping might be an issue, but maybe not on Unraid side, most probably from Plex.1 point
-
Not the diagnostics file. Unraid generates a zip, please attach it directly. It will be easier to look at for the people that are used to that.1 point
-
Already compiled and updated. 🙂1 point
-
CoreFreq 1.89.1 released1 point
-
Agreed @jonathanM, there is a lot of value in being able to install your firewall OS from scratch. Just being able to run through the installation process is valuable, in the event you need to switch hardware, and as you say, being able to make light modification to the config files can be invaluable. Also, the security paranoid will appreciate that they can download the installation files, verify they haven't been tampered by comparing hashes and install themselves. Appreciate the remarks and thanks for the engagement.1 point
-
Bin gerade auch dabei, mir einen Server zusammenzubauen und hätte Interess an dem Gigabyte C246M-WU4, wenn du es verschicken würdest. Gruß, Sven1 point
-
But often different. Attach diagnostics to your NEXT post in this thread.1 point
-
Well, I've figured out the issue, and it was network related. Somehow, on a recent reboot of my unraid server, it set my default gateway to my DMZ interface's Default gateway. Of course, my DMZ has much tighter rules, and didn't allow outbound traffic to the internet on ports 1194/1195/1300, so the tunnel would never come up. Changed the default route to the correct network segment, and boom, tunnel came up. @Binhex, thanks for pointing me at it being a networking issue.1 point
-
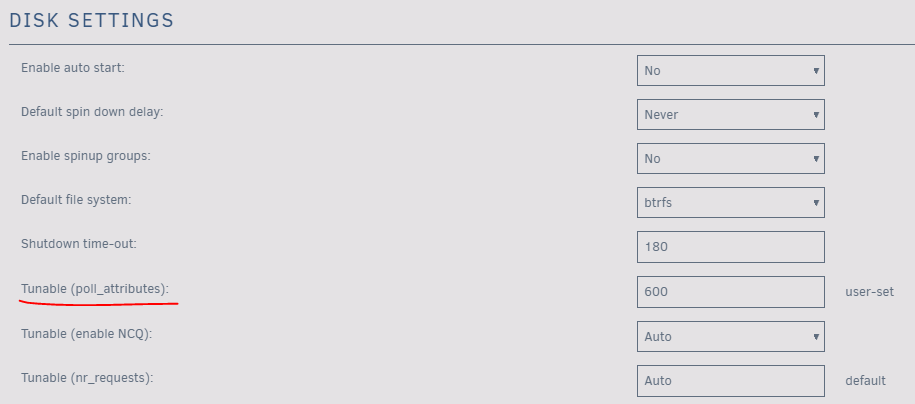
It is because item 5 and 196 not zero value, this not a good sign, if disk have warranty then I will got RMA. FYR, my disks almost all problem free even they age 5yrs+, only 2 got problem, but I also have hard time for many disks got trouble in past. SMART Attributes Data Structure revision number: 16 Vendor Specific SMART Attributes with Thresholds: ID# ATTRIBUTE_NAME FLAGS VALUE WORST THRESH FAIL RAW_VALUE 1 Raw_Read_Error_Rate PO-R-- 100 100 050 - 0 2 Throughput_Performance P-S--- 100 100 050 - 0 3 Spin_Up_Time POS--K 100 100 001 - 7721 4 Start_Stop_Count -O--CK 100 100 000 - 799 5 Reallocated_Sector_Ct PO--CK 100 100 050 - 8 7 Seek_Error_Rate PO-R-- 100 100 050 - 0 8 Seek_Time_Performance P-S--- 100 100 050 - 0 9 Power_On_Hours -O--CK 084 084 000 - 6427 10 Spin_Retry_Count PO--CK 100 100 030 - 0 12 Power_Cycle_Count -O--CK 100 100 000 - 6 23 Helium_Condition_Lower PO---K 100 100 075 - 0 24 Helium_Condition_Upper PO---K 100 100 075 - 0 191 G-Sense_Error_Rate -O--CK 100 100 000 - 0 192 Power-Off_Retract_Count -O--CK 100 100 000 - 0 193 Load_Cycle_Count -O--CK 100 100 000 - 908 194 Temperature_Celsius -O---K 100 100 000 - 42 (Min/Max 25/54) 196 Reallocated_Event_Count -O--CK 100 100 000 - 1 197 Current_Pending_Sector -O--CK 100 100 000 - 0 198 Offline_Uncorrectable ----CK 100 100 000 - 0 199 UDMA_CRC_Error_Count -O--CK 200 200 000 - 0 220 Disk_Shift -O---- 100 100 000 - 100925444 222 Loaded_Hours -O--CK 097 097 000 - 1407 223 Load_Retry_Count -O--CK 100 100 000 - 0 224 Load_Friction -O---K 100 100 000 - 0 226 Load-in_Time -OS--K 100 100 000 - 584 240 Head_Flying_Hours P----- 100 100 001 - 0 Try check below setting, I set 600 means polling every 10min. Pls note all extended test was "abort by host", never complete. SMART Extended Self-test Log Version: 1 (1 sectors) Num Test_Description Status Remaining LifeTime(hours) LBA_of_first_error # 1 Extended offline Aborted by host 90% 6231 - # 2 Extended offline Aborted by host 90% 6203 - # 3 Extended offline Aborted by host 90% 6089 - # 4 Extended offline Aborted by host 90% 6083 - # 5 Short offline Completed without error 00% 6081 - A normal test result like as below
 1 point
 -
Intel Workstation / Consumer CPUs können max X8 X4 X4 aufteilen. Dein Board hat zwei PCIe Slots, die mit jeweils X8 von der CPU versorgt werden. Du müsstest im BIOS nun nach der Einstellung X8X8 suchen und die dann auf X8X4X4 umstellen. Dann wäre der zweite Port X4X4 Bifurcation oder der zweite wird deaktiviert und der erste ist X8X4X4. Kommt auf das BIOS / Board an. Bei Bedarf Supermicro fragen. Der dritte X4 Slot wird bei dir übrigens über den Chipsatz bedient. Der unterstützt grundsätzlich kein Bifurcation.1 point
-
Das Neueste vom Neuesten ist nie gut bei Linux. Siehe auch: https://forums.unraid.net/topic/113367-intel-12th-generation-alder-lake-hybrid-cpu/ Und AMD hat eben auch so eine Nachteile. Das Beste vom Besten ist für unRAID der Xeon W-1290P.1 point
-
It's not the bootloader that sets the number of cores, but libvirt (xml or unraid gui). The bootloader simply detects the number of cores you are setting and it will fail if it detects an odd number of cores for the mac os vm (like 3, 5, etc.).1 point
-
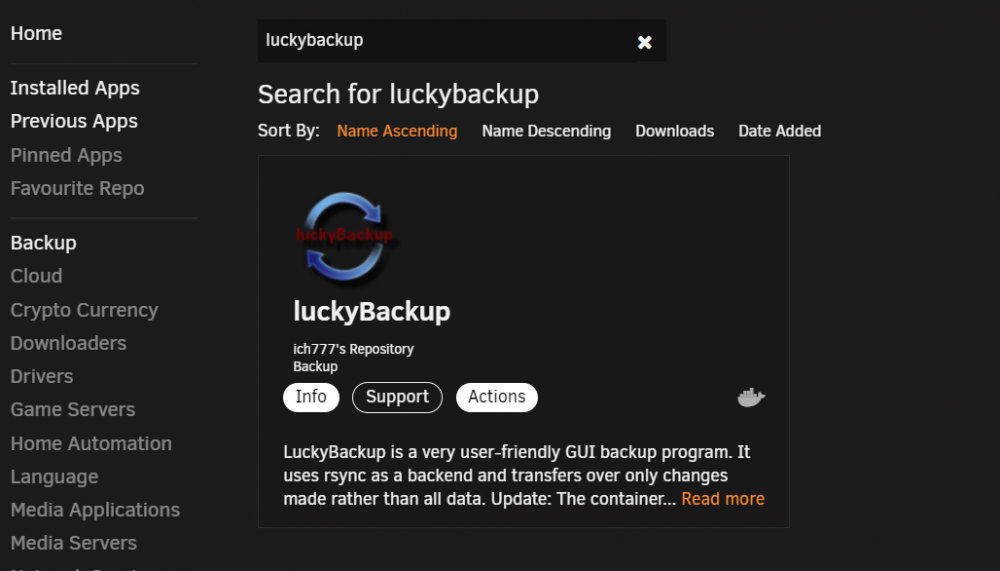
hier eine schöne Vorlage von @mgutt stellt sich jetzt die Frage wie du die "externe" Quelle erreichen kannst/willst ... oder mit GUI, Docker luckybackup von @ich777
 1 point
 -
Danke für die Nachfrage. Ist echt super klasse wie gut der support hier funktioniert.1 point
-
und ob AMD die bessere Wahl ist sei mal dahin gestellt ... sowie VM mit passthrough (GPU) ins Spiel kommt sind AMD Systeme in der Regel nicht unbedingt die beste Wahl ... (leider), hier treten häufiger Probleme auf. also, usecase bedenken, nachlesen was dafür passt1 point
-
This driver does not compile currently because of this (last line from the changelog), have to contact Nvidia about that: Updated nvidia.ko to load even if no supported NVIDIA GPUs are present when an NVIDIA NVSwitch device is detected in the system. Previously, nvidia.ko would fail to load into the kernel if no supported GPUs were present. Also keep in mind this is a beta driver. You have to give me a few days to solve this.1 point
-
Schon erledigt.1 point
-
Are all the Torrent apps screwing up one by one?? Didn't deluge have major issues not to long ago? It happens with apps that are having major development. Bound to get bugs now and then. That's why I appreciate auto-update on other people's servers.😁😁1 point
-
Dont forget to install the previous version of qbit or you'll have issues setting proper download locations.1 point
-
Just got to say, i found scrypted thanks to you, its a godsend for getting my unifi cameras into homekit secure video.1 point
-
🤣 No need to get defensive. Wait, yes there is. I called you out, and wanted you to explain what differentiated you from generic chinese hardware. Thanks for clearing that up from your perspective. Now all we need is a rep from netgate to drop by the thread and explain how valuable their support options are to the companies that use them. 😎 My takeaway from all this is protectli made a compelling case for your product in the market for advanced home user all the way to small and medium business with tech savvy staff.1 point
-
Ok, so I loaded the i915 kernel driver using the method from @Hoopster above, and interestingly the 'HPD interrupt storm detected' line in my previous post is absent from the system log. I googled that error and it led to a bunch of bug reports from 2018 for the Linux kernel wherein the X server would freeze after loading the i915 module (sounds familiar). Some examples: https://issues.hyperbola.info/index.php?do=details&task_id=741 https://bugs.freedesktop.org/show_bug.cgi?id=106675 I think it's a good sign that this error has not appeared in my logs thus far. I hope that I get at least 16 days of stable uptime too!1 point
-
(update) Asrock provided an engineering BIOS that separated the devices from 5 to 21 IOMMU groups. I've had great customer service from them in the past. They delivered again.1 point
-
1 point
-
It'll be in the next release.1 point
-
Mods, after reading my reply as follows, It's reading like a sales pitch. That's not my intnet - i'm trying to highlight why many people may be more interested in purchasing from Protectli than generic hardware from China. If I need to tone down the links and the sales pitch I'm happy to do so - please let me know. First, we will try not to take too much offense at the implied lack of creativity in just reselling "generic Chinese hardware". (J/k, it's a reasonable comment and we're happy to address it). Second, there is certainly nothing wrong with much of the generic Chines hardware out there. Plenty of people have had plenty of success doing so. That said, the Chinese market is full of knockoffs and copycats. TBH, our original FW1 was just an off the shelf box that we sourced from China. However, recent hardware (such as our FW4B, VP2410) is our own bespoke design. There's a lot of suspiciously similar looking hardware out there, but what I would offer as our commitment to our hardware is that we not only create the hardware design, but we also port and support coreboot (https://coreboot.org) firmware for our hardware. If unfamiliar, coreboot is an open source firmware that is MUCH more lightweight than a traditional BIOS, is custom built for the specific hardware, and is actually open source which is becoming more and more important at the firmware layer as we continue to learn about microcode and hardware vulnerabilities in closed ecosystems. Finally, we do pride ourselves on customer satisfaction, as reviews on Amazon and elsewhere will attest to. We go way outside of the box to help customers not only get their hardware in order, but also resolve issues with OS's that they're trying to install. We provide a KB with loads of testing that we do with different OS's (and even specific VPN configurations like OpenVPN, and wireguard) to ensure that they work on our hardware and we'll even go as far as to help customers troubleshoot software issues if they appear to be reasonably adjacent to a potential hardware problem or conflict. Hopefully that helps? Feel free to reach out incase of other questions.1 point
-
Loud and clear. Looks like i'll just be passing on block devices in that case and stay away from fileIO images. I don't feel very confident about software-raiding multiple iscsi devices on windows so i'll just stick with individual drives. Anyways, when speed is really of the essence i'll stick to local nvme storage on the gaming machine. The iSCSI extra storage is so i can keep more of my steam library permanently installed. And iscsi is certainly a lifesaver here because both Origin and nvidia gamestream don't play nice with games running from regular network shares. With iscsi, not a problem. Now it's time to go break my btrfs pool and pass on some block storage Cheers!1 point
-
More than that actually. This series of tests (and yes we're finding some corner cases regarding it) actually began due to changes on Windows 11 which prevented me from mounting any SMB share hosted on Win11 to any of my servers.1 point
-
A new test to prepare for changes coming in unRAID 6.10. There is some discussion of it in the past 10 or 12 posts if you scroll up/back.1 point
-
I ended downloading this instead of using my router's built-in VPN, since my PC is definitely stronger than my router.1 point
-
OTOH, revert the changes you made that were in some thread that put the logs to RAM Jan 7 14:30:01 KingServer docker: RAM-Disk synced and if that solves it ask about it in the relevant thread.1 point
-
I ran into the same problem when setting up the My Servers plugin and I was pulling my hair out trying to figure out how to change my router settings. Turns out using cloudflair's 1.1.1.1 dns was my issue, not the router. I changed over to googles, waited for a bit and was able to generate the SSL certificate.1 point
-
...dann wäre das sogar eine erste Empfehlung....nimm 6.9.21 point
-
OK This is MY ISSUE!! ive got 2x (8TB) drives I wanna use for NAS, Plex, VMs, Dockers, etc and a spare 2TB drive I want dedicated to my NVR for my Unifi Protect network. Id rather use cheap smaller drives for Security Cameras without killing my expensive 8TB drives lifespan. And I live in an apartment so I'm not looking to have 2 PCs lying around here when I could theoretically just have this 1 box do it all. Maybe in the future, Id even consider having SSDs to host my VMs + Dockers so that my 8TB drives arent constantly running 24/7 But its almost 2022 and this thread started in mid 2019, how come it isn't a thing yet?? This is just starting to feel like a dealbreaker.1 point
-
I didnt find a solution to this problem with the SMB share, but I have found a work around for now. on my Mac I had to go into Settings --> Security & Privacy --> Full Disk Access and approve Terminal.app. That is in prep for the next part. Mount your Unraid SMB share ("SMB-TM-UNRAID" in this example) to the Mac client. open terminal and run: sudo hdiutil create -size 300g -type SPARSEBUNDLE -nospotlight -volname "SMBTimeMachine" -fs "Case-sensitive Journaled HFS+" -verbose /Volumes/SMB-TM-UNRAID/$HOST_TimeMachine.sparsebundle Navigate to the directory /Volumes/SMB-TM-UNRAID/ in finder and click the .sparcebundle file to mount it as a disk. This will mount a new disk called SMBTimeMachine to your Mac. open terminal and run: sudo tmutil setdestination -a "/Volumes/SMBTimeMachine/" open Time Machine utility and configure. Youll need to configure Mac to remount these shares at boot. Settings --> Users & Groups --> Your User --> Login Items. Drag the mounted drives SMB-TM-UNRAID and SMBTimeMachine into the login items window.1 point
-
Cool app!! FEATURE REQUESTS: User ability to change font color. User ability to change order of Disk Tray Layouts (when there's more than one, of course) on configuration page Thanks for your time and consideration.1 point
-
There is actually a bug in displaying the correct bonding mode. It is using 802.3ad but it is wrongly displayed. I made a correction for this in the upcoming Unraid version. Thx1 point
-
integrated cloud backup. either onedrive, google etc or your own hosted service or a with a partner.1 point
-
Hi, I would like to request TeslaMate. https://hub.docker.com/r/teslamate/teslamate1 point
-
Finally managed to get it to work by (mostly) following this guide. First, unrelated to the guide, we reverted from UEFI to Legacy boot. Went to the Unraid GUI Main tab, clicked on "Flash" in the list of drives, scrolled to the bottom, and unchecked the UEFI checkbox thing. We also connected to the flash drive share from another computer and copied all the contents as a backup, and after that renamed the "EFI-" folder to just "EFI" (simply removing the hyphen). Then we shut down Unraid, went to BIOS, and using the manual found every setting related to UEFI and set it to the Legacy option. Then we boot Unraid and checked to make sure it had boot in Legacy mode (by going to the Main page, clicking "Flash", and scrolling to the bottom). Now we made a new virtual machine and went through the configuration, which I'll copy with slight modification from the guide linked earlier. Machine: latest Q35 option BIOS: OVMF Same ISO and VirtIO ISO we've clicked maybe forty times today Used 100G as disk size. VNC graphics with no sound card. Unlike the tutorial we were following (but as a way of avoiding using RDP since we don't have Windows 10 Pro) we enabled every single USB device we planned on using in the final setup. Unchecked "Start VM after creation" and created it. Then edited the VM and went to XML. Under the <apic/> tag added <ioapic driver='kvm'/> Left hyperv just like it was except we changed the vender_id value to `1234567890ab` as in the tutorial. Also added a <kvm> tag under it such that all the changes together looked like <ioapic driver='kvm'/> <hyperv> <relaxed state='on'/> <vapic state='on'/> <spinlocks state='on' retries='8191'/> <vendor_id state='on' value='1234567890ab'/> </hyperv> <kvm> <hidden state='on'/> </kvm> Then at the bottom of the XML before the closing </domain> tag but after the </devices> tag we added this XML: <qemu:commandline> <qemu:arg value='-cpu'/> <qemu:arg value='host,kvm=off,hv_vendor_id=null'/> <qemu:arg value='-machine'/> <qemu:arg value='q35,kernel_irqchip=on'/> </qemu:commandline> There was alternative XML here but it seemed to be for ryzen and we have an Intel CPU and GTX 1060 GPU. Clicked update, started the VM, and quickly opened VNC and pressed a key. I assume you're familiar with SpaceInvader One's tutorial on configuring a Windows 10 VM if you're reading this, and if not you should follow his video first. Then we selected a Windows 10 version (Home in our case) and went through the self explanatory setup. The one thing different than usual was after selecting the drive we clicked browse again and went to NetKVM>win10>amd64 to get the network ethernet adapter. Normally this was done within Windows in the Device Manager, but we wanted to follow the source tutorial closely. Went through the rest of setup. On the Windows 10 Desktop, we opened Device Manager and fixed the two devices without drivers. Unlike SpaceInvader One, we did NOT fix the display driver. At this point we skipped all the parts of the tutorial regarding RDP because this is Windows 10 Home. We did install Teamviewer as an alterative, but it proved unnecessary later since we had enabled the usb keyboard and mouse. We shut down the VM, went into edit mode, and added the GPU and associated vbios, along with the audio controller. Clicked apply, and then edited the VM again in XML mode. We made all the same changes as before (interestingly the kvm part was still there), and additionally removed all the <graphics> and <video> tags related to VNC. We also followed SpaceInvader One's advanced GPU passthrough tutorial and adjusted the bus and slot of the audio controller to match the graphics card. We saved the XML and started the VM, and magically everything was working. At this point the tutorial we were following said to install the gpu driver 399.24, but we didn't do that. Or well, we started to, but magically about 2 minutes into the download everything just suddenly worked. The screen resolution fixed and all the other monitors started up. It worked! I still have absolutely no idea why since we didn't change any drivers, but it just worked. I'd suggest waiting like 1 to 10 minutes, who knows. We messed something up in the XML later and repeated this entire process, and sure enough the same thing happened again. After two minutes the display worked. Note that we never installed any drivers from Nvidia; it just worked. Went from code 43 to no error at all. If you repeat this, make sure that you never ever boot your VM without the XML edits made. Every time you change something in the regular form view, you need to click "Update" and then go back into the edit page of the VM in XML mode and confirm that the changes are still there. In my experience everything around the kvm section works fine, but the gpu and soundcard and the qemu part at the end get reset.1 point
-
@Maggi0r can you please elaborate on how you fixed this error? I'm stuck with the same problem... what folder did you remove, what else did you do? Thanks!1 point
-
My take on this. Wifi support in Linux is limited, the main reason is drivers are not free. It will be hit and miss with your hardware. Unraid is based on slackware, which has virtually no wifi implementation. The network stack of Unraid is heavily modified to support a lot more networking than slackware offers. Wifi support requires additional development, which isn't a light job (not to mention hardware purchases to do so). Wifi is a support nightmare. Speaking from own experience I can tell that most connection problems are caused by wifi. It is questionable whether the additional support burden is worth it. The easy solution I have done, is the installation of an AP set as client. APs come in all sorts of shapes and sizes. It is a matter of finding the right one for the job. An advantage with a separate AP is its placement. Instead of a server somewhere tucked away in a corner, the AP can be placed anywhere in the room for best reception.1 point