Leaderboard


Popular Content
Showing content with the highest reputation on 05/23/22 in all areas
-
VM's are functionally the same as standalone computers from the user standpoint. What you are asking is a function of joining the machine to a windows server domain controller, so that is how you would need to do it with VM's as well.2 points
-
You'd want @ich777 not me for helping with the nVidia driver plugin.2 points
-
I can reproduce the issue that udev creates interfaces with duplicated MAC addresses, it is under investigation whether this is particular to the udev version used, or kernel version or network driver.2 points
-
The context is fixed. Feel free to fork https://github.com/Squidly271/docker.folder2 points
-
OK. Not that I use this plugin, but I have forked it so that the logs and the context menus appear. I have temporarily removed the dashboard part of things until I get more time to look at it's display aberrations. Going forward, so long as explicit directions are made as to how to replicate issues on 6.10 I will attempt to fix, but no guarantees will be made, and my goal here is not to continue development on this plugin, but to simply keep it in the same rough state as it was left in when the author stopped development. You will need to uninstall the version from Guild Darts and then reinstall the forked version. I would suggest making a backup of the folder.json file within /config/plugins/docker.folder on the flash drive. If you don't do this, then you will need to recreate your folders.2 points
-
It would be nice to have virt-sparsify to reduce VM disks size when they have zeros/unused space. https://libguestfs.org/virt-sparsify.1.html1 point
-
Refer to Summary of New Features for an overview of changes since version 6.9. To upgrade: First create a backup of your USB flash boot device: Main/Flash/Flash Backup If you are running any 6.4 or later release, click 'Check for Updates' on the Tools/Update OS page. If you are running a pre-6.4 release, click 'Check for Updates' on the Plugins page. If the above doesn't work, navigate to Plugins/Install Plugin, select/copy/paste this plugin URL and click Install: https://unraid-dl.sfo2.cdn.digitaloceanspaces.com/stable/unRAIDServer.plg Bugs: If you discover a bug or other issue in this release, please open a Stable Releases Bug Report. Credits Special thanks to all our beta testers and especially: @bonienl for his continued refinement and updating of the Dynamix webGUI. @Squid for continued refinement of Community Apps and associated feed. @dlandon for continued refinement of Unassigned Devices plugin and patience as we change things under the hood. @ich777 for assistance and passing on knowledge of Linux kernel config changes to support third party drivers and other kernel-related functionality via plugins. @SimonF for refinements to System Devices page and other webGUI improvements. @thohell for an extra set of eyes looking at md/unraid driver and for work-in-progress of adding changes to support multiple Unraid arrays. @JorgeB for rigorous testing of storage subsystem1 point
-
Hello... My daughter (12) plays on a really underpowered laptop of mine which happens to have a Vega 8 chip on board. She plays Genshin and always complains about the motion (lack of fps) she gets when playing on low at 720. I decided to try negate that by creating a little 500GB SSD VM for her with a GPU passthrough. I was hoping to use left over items to potentially upgrade her experience and I am here to explain what I had to do as I pieced this solution together using multiple sources. Due to some anti cheat that the game runs a lot of people have been asking the same questions. The game essentially will not run on a VM with Hyper Visor optimisations enabled. I am using a passed through NVIDIA 1650 StormX OC and utilising the game stream feature with a dummy HDMI (there is no dedicated monitor with my server) and Moonlight (absolutely underrated app). I am going to assume you have your VM up set up and pinned etc but if not here is a very detailed guide on this. Remote Gaming on Unraid - Veriwind Once you have your VM setup you will need to open up the XML view by clicking the tab in the top right corner. Locate the CPU element and add in the line <feature policy='disable' name='hypervisor'/> What most people don't see is that there is already a feature element within so you need to add another with the line above like mine. <cpu mode='host-passthrough' check='none' migratable='on'> <topology sockets='1' dies='1' cores='2' threads='2'/> <cache mode='passthrough'/> <feature policy='require' name='topoext'/> <feature policy='disable' name='hypervisor'/> </cpu> This should now allow you to run the game. I am aware that this information is within this forum but its not clear on how to implement this work around. I have run some tests and its working over really better than expected, no more complaints of headaches now!1 point
-
But keep in mind slackware, and by extension Unraid, doesn't do automatic package version management, so it's up to you to keep on top of versioning and conflicts. You can easily cripple your server if you aren't careful. If you have issues with your server and want help troubleshooting, you will need to remove or rename all the modifications you have done before we can help.1 point
-
FYI Unraid 6.10.2 will have a fix for this.1 point
-
Changed Status to Solved1 point
-
Yes that works. root@computenode:~# cat /boot/config/smart-one.cfg [ST3000DM001-9YN1_S1F05AM9_2001b4d209d87941a] smType="-d megaraid" smPort1="16" smDevice="sg6" smGlue="," root@computenode:~# cat /boot/config/smart-one.cfg [ST3000DM001-9YN1_S1F05AM9_2001b4d209d87941a] smType="-d areca" smPort1="15" smDevice="sg6" smGlue="/" smPort2="2" root@computenode:~#1 point
-
Hallo, vielen Dank für deine Hilfe. Ich habe heute mal eine mal eine Peer to Peer Verbindung via DAC-Kabel getestet und alles hat wunderbar funktioniert. iperf3 hat volle 40Gbe übertragen. Anschließend habe ich den defekt der Glasfaserleitung ausgeschlossen indem ich ein anderes kabel genutzt habe. schlussendlich bin ich zum schluss gekommen das es nur noch am Switch liegen kann. Dort wird irgendwo in der Config der Fehler liegen. Nur so zur Info der Switch ist L3. Viele Grüße1 point
-
Hallo, @i-B4se dank dem Workaround konnte ich jetzt auch von 6.9.2 auf 6.10.1 hochziehen 🙂 und mein deConz funktioniert weiter in HA Danke für den Tip1 point
-
Dashboard re-added. Aberrations minimized You may still see some minor ones when expanding, but it's more than usable.1 point
-
You are correct. I had it plugged into an Emporia power monitor which was flaking out. Thanks for the pointer JorgeB. edit... Turns out it was the power supply after all. Replaced with Corsair RM750x. So far so good. Steve1 point
-
I also was getting that error that was nearly crashing my server. The issue is the database command yarn database:setup, what I had to do to fix this was clear my postgresDB and run the command yarn database:migrate instead. Seems the issue is the default data that gets inserted using the setup version of the command. In reality I wouldn't think this error should cause CPU overload, maybe the authors of the project could lower the amount of logs written?1 point
-
No, as long as the board doesn't have some compatibility issue with them.1 point
-
...did you see the response in the other thread, here ? ->1 point
-
@ddrulez Sounds like you're having this problem1 point
-
Try the update1 point
-
Hi @Ricardo Maranhao I managed to cobble together a quick tutorial. Let me know if that's clear, helpful, or if you have any further questions that I could address in the article. https://mediaserver8.blogspot.com/2022/05/mapping-additional-and-network-drives.html1 point
-
Hi all, any chance of a mobile friendly ui being implemented? Current experience on mobile is terrible.1 point
-
I will do thank you1 point
-
Thank you very much for your answer... I just wanted to write that I had checksums from the files, so I checked all the files again, when the rebuilt finished, and all files where fine!!! This second parity truly saved my butt!1 point
-
Please post this in the Prometheus Support Thread here, I've only written the Guide on how to install it in conjunction with my plugins and I'm not the maintainer from the Prometheus container.1 point
-
Problem is that you're using a very old firmware for the LSI HBA, those ancient firmware versions used the long name for SATA devices, this has been fixed a long time ago, and now it was also fixed in the driver for people still using an old firmware, you just need to do a new config and re-assign all the devices, then check "parity is already valid" before starting the array. I would also recommend updating the LSI firmware to latest, note that if you update the firmware first you'll see the same issue with -rc4 you're seeing now with v6.10.11 point
-
With the patch applied since 6.10.0rc8 everything should work fine.1 point
-
Arrived today, testing tonight1 point
-
Only eth0 can manage Unraid, so if you try another network port, you need set it be eth0. If you disable the problematic port and try next once, that's fine too.1 point
-
Yes I added you to a group here in the forum, need to investigate why you weren't in it1 point
-
Good point! Oh man, didn't realize I could do that, much easier! Appreciate you taking the time to explain.1 point
-
Guck mal hier: Hat wohl was mit dem MyServers Plugin, einem Redirect nach HTTPS zu tun. SSL yes ist wohl das Geheimnis.1 point
-
1 point
-
Thanks, I went with the add more btrfs devices I converted disk 4 since it had only backups on it. Problem solved1 point
-
Hey JorgeB, thank you, looks like it has worked a treat. You are a legend.1 point
-
Ich habe Punkt 8 (fehlende Indizes) auf Seite 1 ergänzt und den folgenden Hinweis bei Punkt 5 und 6:1 point
-
Hi ElectricBrainUK. It worked. Did exactly what you said and now works fine. Many thanks my friend Cheers1 point
-
Where is the Changelog, Thread, Blog for 6.10.1?1 point
-
Hi there, Quite some time ago we tried getting my MyGyca T230A running with @ich777, but we failed, at least getting dvb-c running. Now I have a different setup and I don't have DVB-C anymore, but I do have DVB-T routed to my unraid server. So I thought to give this tuner a try again so I can sell my DVB-C capable tuner. I managed to get it working perfectly with DVB-T using the TBS-OpenSource package after I added the firmwares I tried back then: https://github.com/osmc/dvb-firmware-osmc/raw/master/dvb-demod-si2168-d60-01.fw https://github.com/osmc/dvb-firmware-osmc/raw/master/dvb-tuner-si2141-a10-01.fw We also have DVB-T2 test running here, which also worked. Wether or not DVB-C is working, I have no idea and I cannot test anymore. Still, I think it is worth adding the above firmwares to the TBS-OpenSourse package. I know it is weird that it works with that driver and not libreelec, but if it works, who cares BTW, it's a cool tuner, I also have an old af9015 based tuner, both of these T230 tuners can do about 10dB better signal strength. Thanks for the continous developement of the plugin as well as the help back then!1 point
-
That did the trick. There was quite a bit more in the .conf file after re-installing it. The config page for the docker also didn't show the PUID GUID either. A few changes. I've had the same install probably not long after you initially released the docker.1 point
-
Besten Dank, das hat funktioniert. ❤️ Doch, so ist es. Hier nochmal meine "rangehensweise" 1. HA-VM stoppen 2. Den Haken für den Stick im VM GUI entfernen: 3. ID von deinem Conbee mittels Unraid-Console: ls /dev/serial/by-id/ So sieht es bei MIR aus 4. Bearbeitest du deine VM mittels "XML-Ansicht" 5. Dann fügst du folgende Zeilen ein. Einfach unter </memballoon> Also zeimlich weit unten <serial type='dev'> <source path='/dev/serial/by-id/<HierDeineCONBEEID>'/> <target type='usb-serial' port='1'> <model name='usb-serial'/> </target> <alias name='serial1'/> <address type='usb' bus='0' port='4'/> </serial> Dann deine Conbee ID einfügen die du per Console ausgelesen hast OHNE DIE < > und OHNE @ So sieht das ganze bei MIR aus <serial type='dev'> <source path='/dev/serial/by-id/usb-dresden_elektronik_ingenieurtechnik_GmbH_ConBee_II_DE2417249-if00'/> <target type='usb-serial' port='1'> <model name='usb-serial'/> </target> <alias name='serial1'/> <address type='usb' bus='0' port='4'/> </serial> 6. Die VM starten. Du musst nur bezüglich deinen Addons in HA schauen. Ich nutze Deconz und da musste ich einfach einen neuen Port auswählen und alles läuft wieder.


 1 point
 -
1 point
-
1 point
-
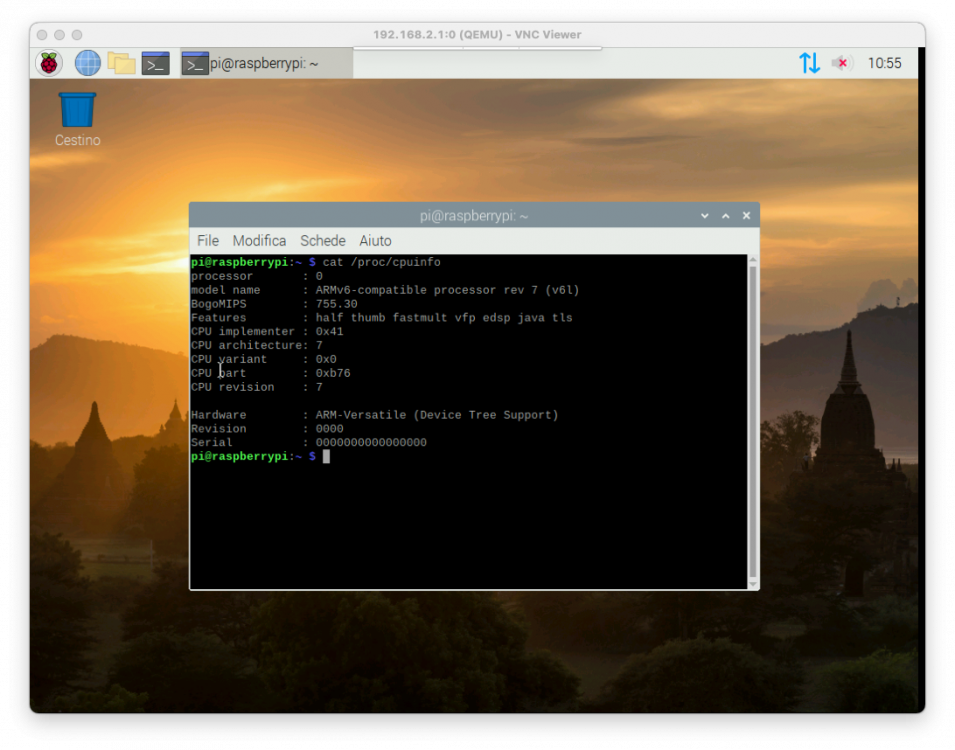
Work in progress...: This is a basic template I'm using to boot the image: <domain type='qemu'> <name>rpi</name> <uuid>removed</uuid> <memory unit='KiB'>262144</memory> <currentMemory unit='KiB'>262144</currentMemory> <vcpu placement='static'>1</vcpu> <os> <type arch='armv7l' machine='versatilepb'>hvm</type> <kernel>/media/6TB/rasp/kernel-qemu-4.19.50-buster</kernel> <cmdline>root=/dev/sda2 rootfstype=ext4 rw</cmdline> <dtb>/media/6TB/rasp/versatile-pb-buster.dtb</dtb> <boot dev='hd'/> </os> <cpu mode='custom' match='exact' check='none'> <model fallback='forbid'>arm1176</model> </cpu> <clock offset='utc'/> <on_poweroff>destroy</on_poweroff> <on_reboot>restart</on_reboot> <on_crash>destroy</on_crash> <devices> <emulator>/usr/bin/qemu-system-arm</emulator> <disk type='file' device='disk'> <driver name='qemu' type='raw'/> <source file='/media/6TB/rasp/2020-02-13-raspbian-buster.img'/> <backingStore/> <target dev='sda' bus='scsi'/> <address type='drive' controller='0' bus='0' target='0' unit='0'/> </disk> <controller type='pci' index='0' model='pci-root'/> <controller type='scsi' index='0' model='lsilogic'> <address type='pci' domain='0x0000' bus='0x00' slot='0x01' function='0x0'/> </controller> <interface type='bridge'> <mac address='52:54:00:ed:eb:c7'/> <source bridge='virbr0'/> <model type='virtio'/> <address type='pci' domain='0x0000' bus='0x00' slot='0x06' function='0x0'/> </interface> <graphics type='vnc' port='-1' autoport='yes' websocket='-1' listen='0.0.0.0' keymap='en-us'> <listen type='address' address='0.0.0.0'/> </graphics> <audio id='1' type='none'/> <video> <model type='cirrus' vram='16384' heads='1' primary='yes'/> <address type='pci' domain='0x0000' bus='0x00' slot='0x02' function='0x0'/> </video> </devices> </domain> kernel/dtb are downloaded from here: https://github.com/dhruvvyas90/qemu-rpi-kernel Raspbian buster downloaded from here: https://downloads.raspberrypi.org/raspbian/images/raspbian-2020-02-14/ For now it's giving a kernel panic on shutdown..need to investigate: seemed to be solved with qemu 6.1-RC, but it seems it's not the case.. I'm only able to use arm1176 with qemu-system-arm (32 bit), maybe related to the custom kernel.
 1 point
 -
Hi, I started yesterday to play with this, not so easy if one has to start from scratch. As far as I know we need AAVMF bios, basically it's OVMF for arm/aarch64; sources are in the same edk2 OVMF package, but we need cross compilation with a toolchain to compile the fd files on a x86_64 machine. I was able to compile from sources with these commands: git clone https://github.com/tianocore/edk2.git cd edk2 git clean -ffdx git reset --hard git submodule deinit --force --all git checkout edk2-stable202108 git submodule update --init --force export GCC5_AARCH64_PREFIX=/home/xxx/Scrivania/toolchain/gcc-arm-10.3-2021.07-x86_64-aarch64-none-elf/bin/aarch64-none-elf- source edksetup.sh nice make -C "$EDK_TOOLS_PATH" -j $(getconf _NPROCESSORS_ONLN) build -a AARCH64 -b RELEASE -p ArmVirtPkg/ArmVirtQemu.dsc -t GCC5 Note also that GCC 11 will not work, GCC 10 is ok, with GCC 11 brotli gives some errors! Toolchain is available here: https://developer.arm.com/tools-and-software/open-source-software/developer-tools/gnu-toolchain/gnu-a/downloads About the xml template: there are some examples in internet, they don't differ too much from a q35 template, I noticed that you need to pass the kernel too, that if I understood well must be modified to be run on qemu. I'm at half way and will play with this in the following days, glad that you opened this post!1 point
-
Libvirt refused to unmount because something was keeping it open. Probably a docker container that you're using to help manage VMs (or possibly a faulty Netdata that needs to be updated -> it is updated every day)1 point
-
As a test, try it again with the docker service disabled.1 point
-
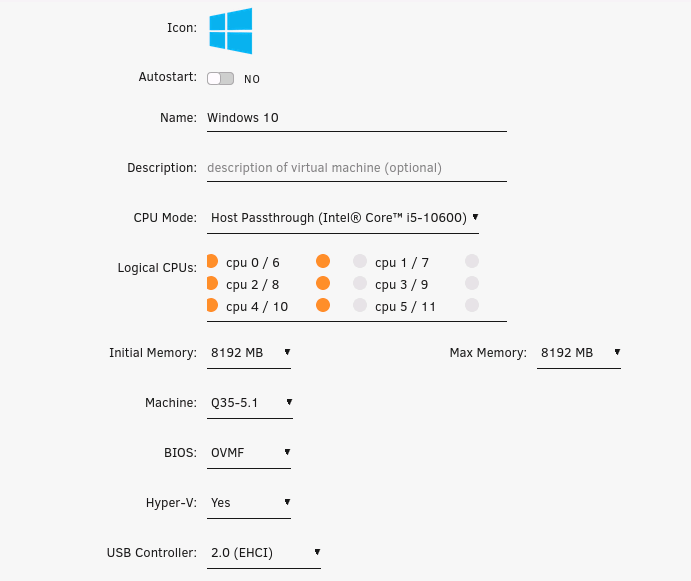
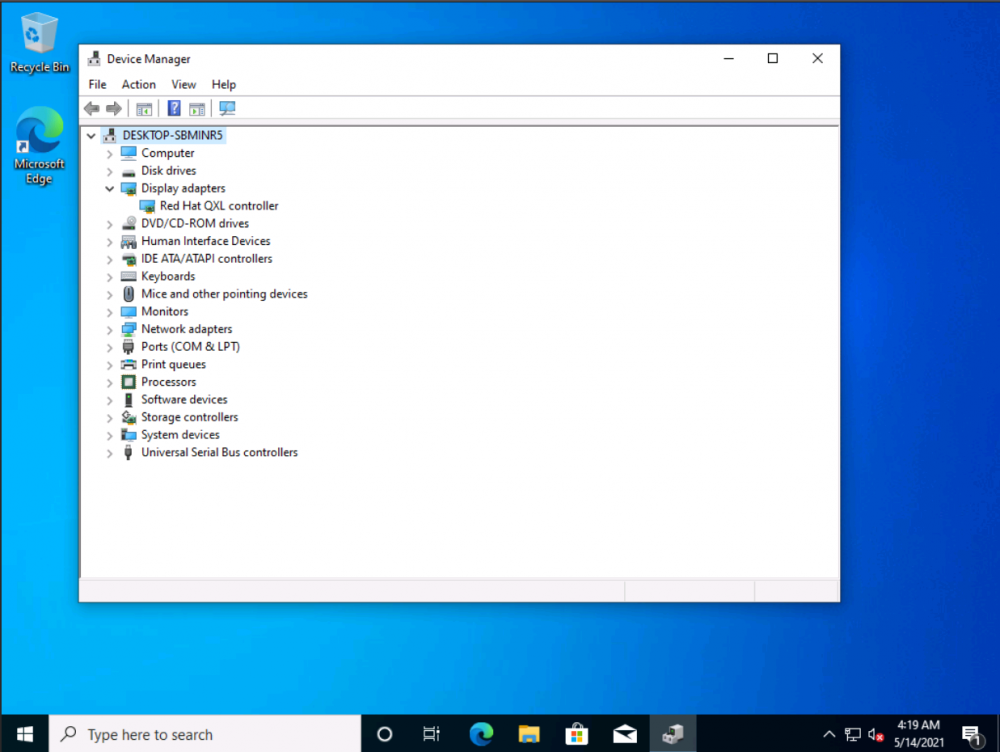
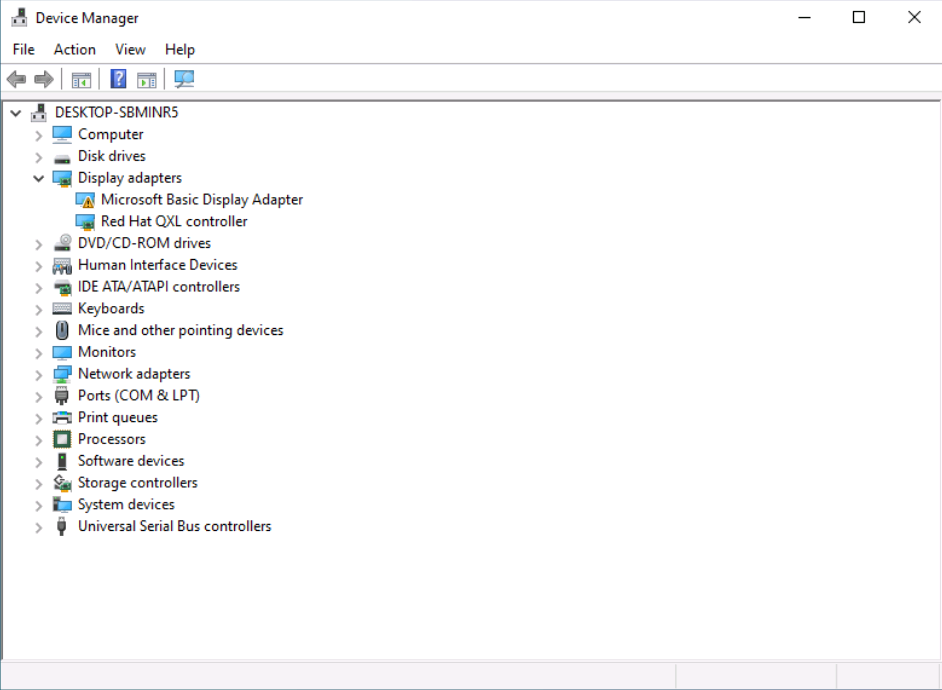
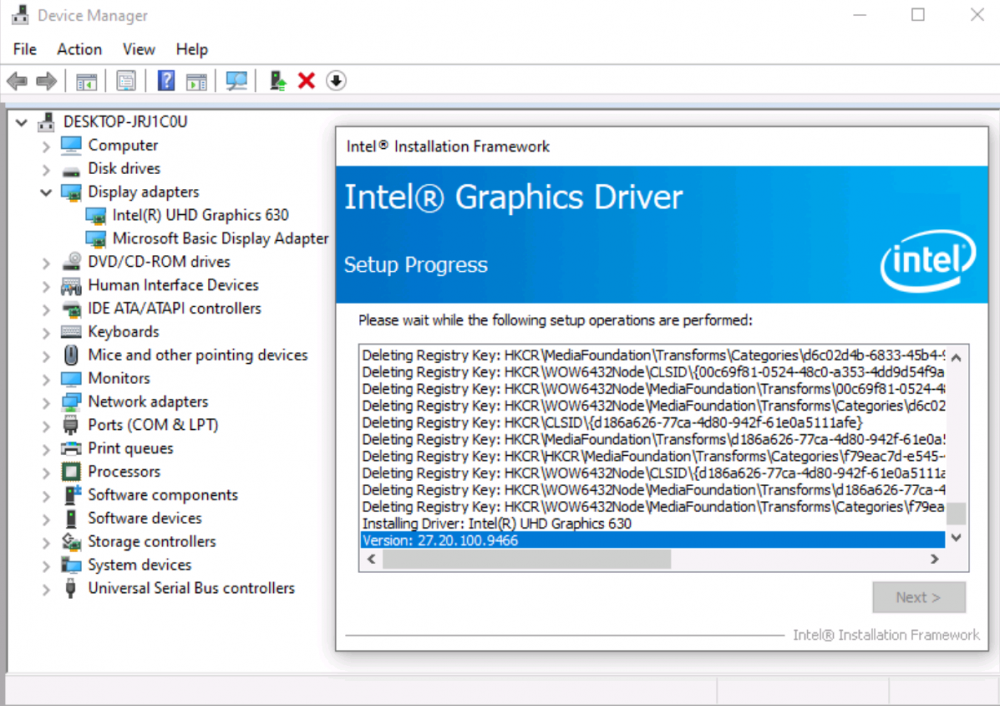
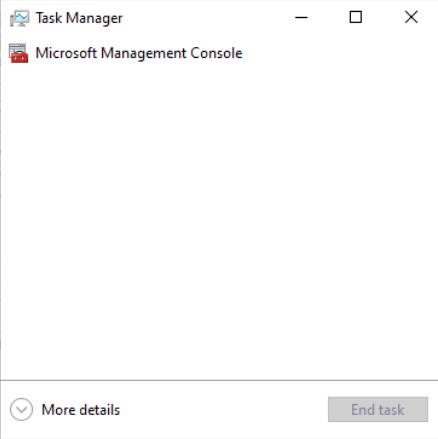
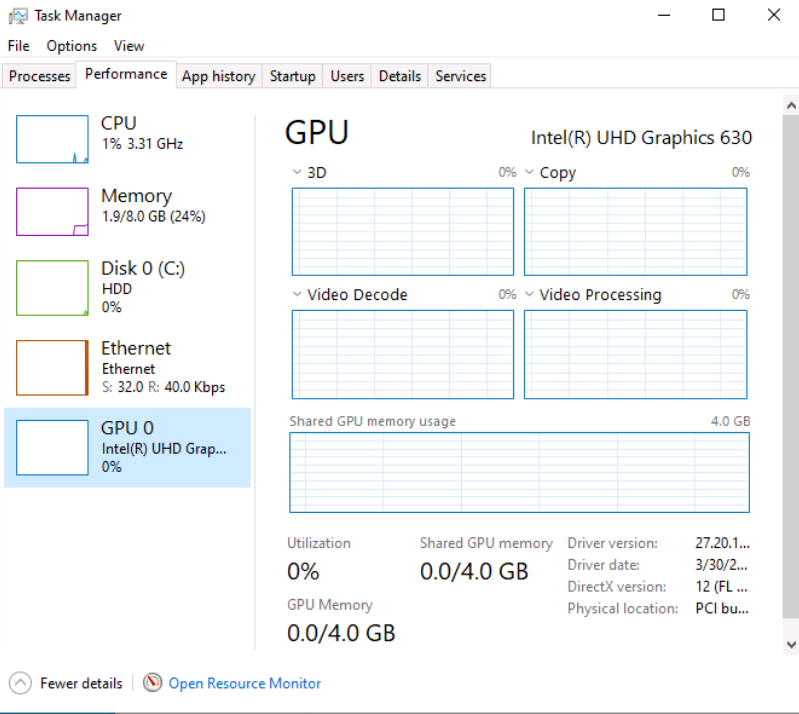
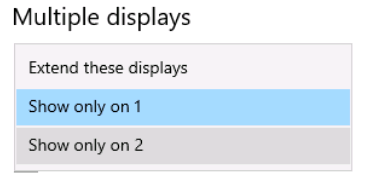
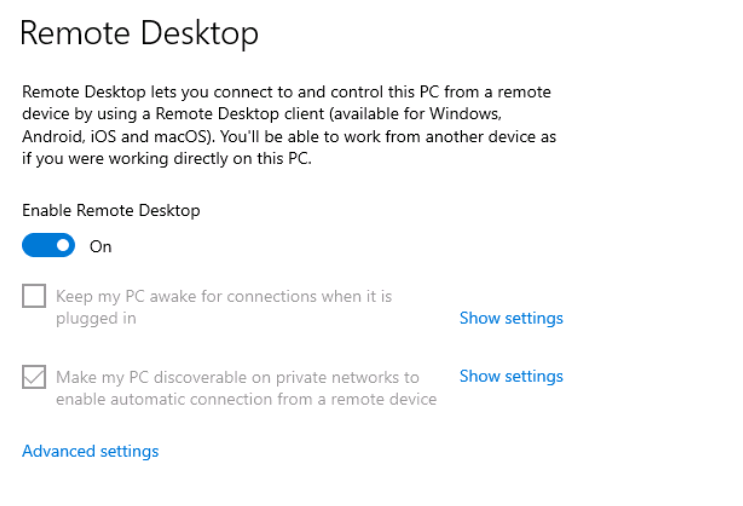
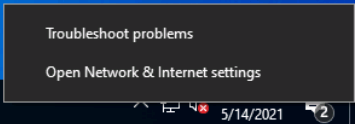
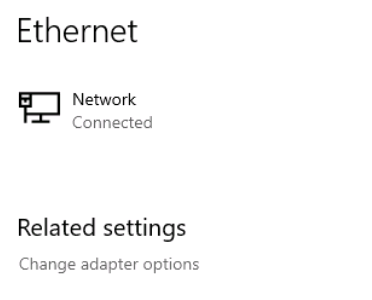
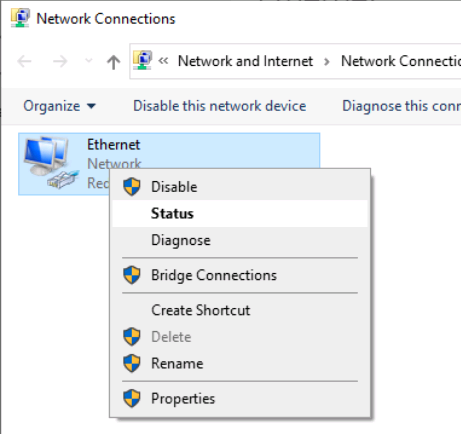
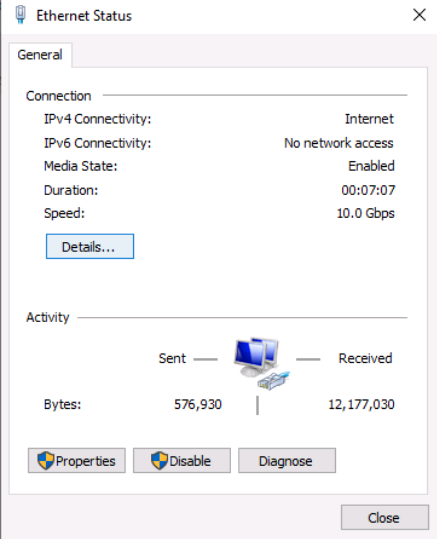
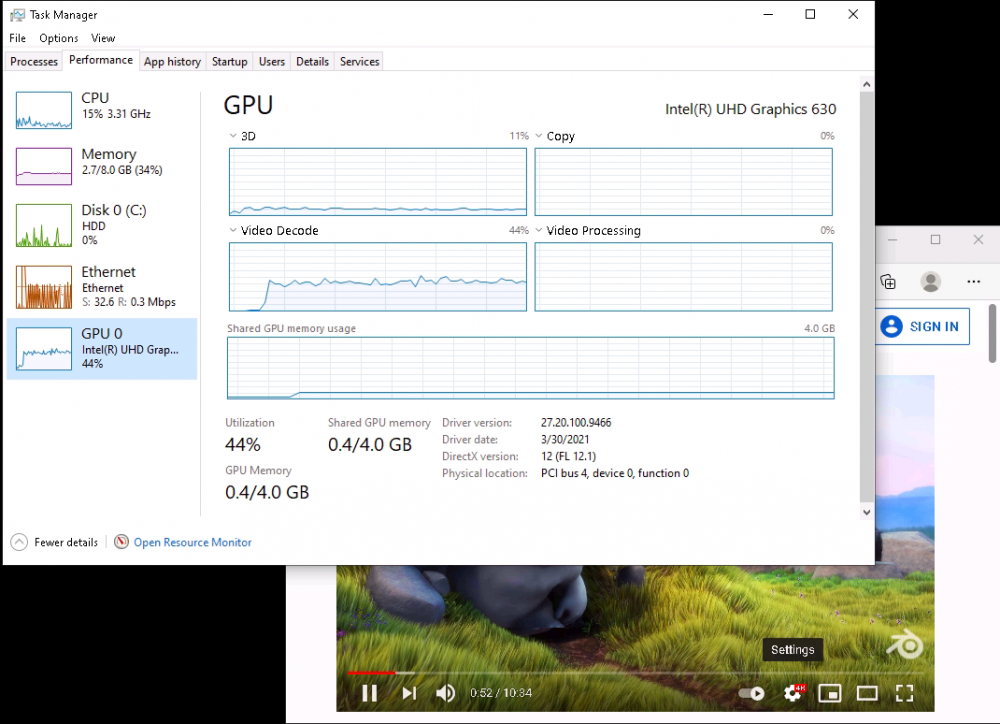
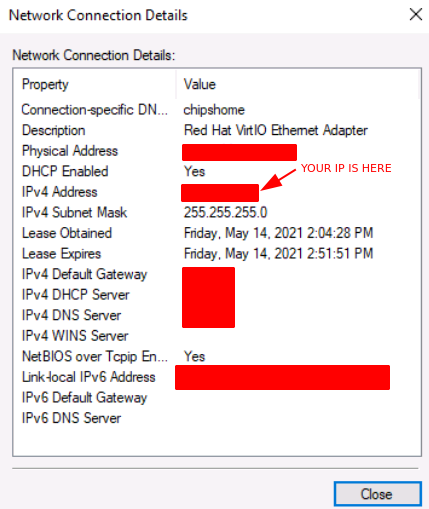
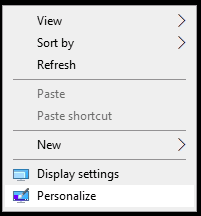
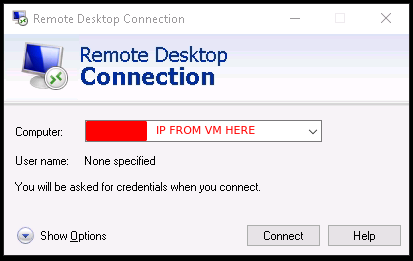
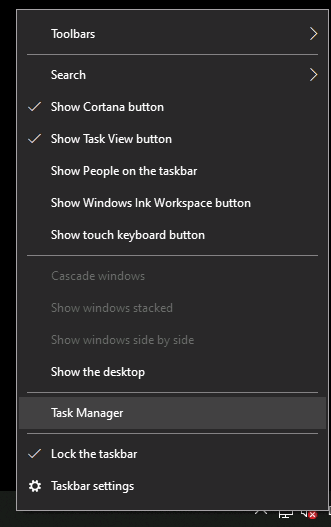
Tutorial (Windows 10 VM) First of all we will create a new VM with the latest Q35 "Machine" type (you can also use an existing VM but make sure that it actually set to to the latest Q35 "Machine"). But don't assign a vGPU just yet, first we will install Windows and after everything is installed we will actually assign a vGPU. Both SeaBIOS and OVMF will work fine with vGPU's. Please note this is just one way to set up your vGPU, you don't have to enable RDP like in this tutorial, and you can also set up Parsec or any other kind of remote connection software that you want to. This tutorial is written for less experienced users and should be seen as a step-by-stepwalk through. These are the basic settings for this tutorial (you can assign as much RAM and as many CPU cores as you want) : Install Windows as usual and make sure that you create a password for your User (this is really important for the RDP connection in this tutorial, otherwise you can't connect to the VM via RDP) : After installing Windows go to your Device Manger (right click the "Start" button -> Device Manger) install all missing drivers for Ethernet, and the the other devices from the VirtIO Drivers ISO and it should look like this: Shutdown the VM and go to the Intel-GVT-g plugin page and select the "Mode" that you want to use and the VM you want to assign a vGPU to click "Assign VM" (please make sure that the VM isn't running when you do this!) : Start the VM and go again to the Device Manager and see if the vGPU is displayed in the VM: Download the Intel Driver for your iGPU in your VM from here: Click and install it. After the installation is complete you should see that your vGPU is recognized correctly in the Device Manager. Once done, reboot once more: Enable the RDP service from Windows itself by going to the Settings and searching for "Remote Desktop", switch "Enable Remote Desktop" from "Off" to "On" and confirm that you want enable it and close the Settings Window again: Now we are going to check the VM's IP address. Right click on the Network icon in the lower right corner and select "Open Network & Internet settings": In the following window, click on "Change adapter options": In the following window, right click on your Ethernet connection and select "Status": In the following window click on "Details...": And finally in the following window you will see your IP here: Write that IP down so that we can actually can connect to it later from our local computer, smartphone,... Now we disable the output to the QXL Display Adapter and display everything on the vGPU Adapter, right click somewhere on the Desktop and select "Display settings": Scroll down a little down to the "Multiple displays" section and select "Show only on 2" (PLEASE NOTE, that you don't get any VNC output after doing this!) and press on time on the "TAB" Key once and then on "Return" once: After that, close the VNC Remote window and on your local computer search for "Remote Desktop Connection" in the Start menu and open it up: In the next window enter the IP from Step 14 here and click on "Connect": In the next window enter the credentials for the VM/User that you created when setting up the VM and click "OK": You should be greeted with the Desktop from your VM. Now right click somewhere on the Task Bar and select "Task Manager": In the next window click on "More details": Got to the "Performance" tab and you should see your vGPU at the bottom: To test if everything is working correctly simply open up a browser and play a video on YouTube and check your vGPU's utilization in Task Manager: Have fun with your HW accelerated VM! Now you can install your favorite kind of Remote Connection software (Parsec, TeamViewer,...) and make use of the vGPU. If something isn't working, you have always the ability to connect via RDP (please not if you use Parsec for streaming, unlike RDP, that you actually have to pass through a Audio Device to the VM otherwise you will get no sound output, the onboard audio or a cheap USB audio adapter will do the job just fine).


 1 point
 -
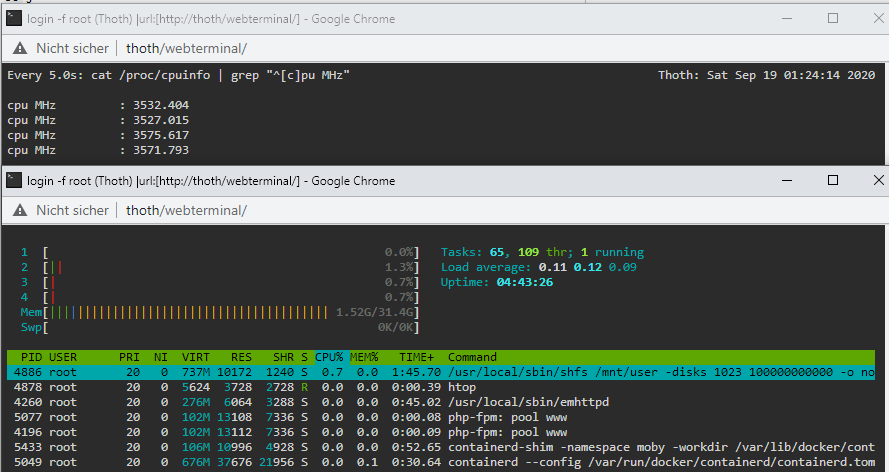
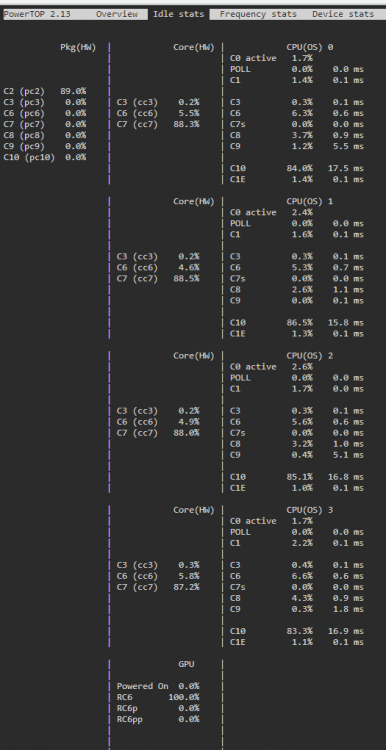
I asked this question by myself and found out that this message is created through the underlying Slackware: https://www.linuxquestions.org/questions/slackware-14/locking-all-cpu's-to-their-maximum-frequency-4175607506/ So I checked my file as follows: cat /etc/rc.d/rc.cpufreq #!/bin/sh # # rc.cpufreq: Settings for CPU frequency and voltage scaling in the kernel. # For more information, see the kernel documentation in # /usr/src/linux/Documentation/cpu-freq/ # Default CPU scaling governor to try. Some possible choices are: # performance: The CPUfreq governor "performance" sets the CPU statically # to the highest frequency within the borders of scaling_min_freq # and scaling_max_freq. # powersave: The CPUfreq governor "powersave" sets the CPU statically to the # lowest frequency within the borders of scaling_min_freq and # scaling_max_freq. # userspace: The CPUfreq governor "userspace" allows the user, or any # userspace program running with UID "root", to set the CPU to a # specific frequency by making a sysfs file "scaling_setspeed" # available in the CPU-device directory. # ondemand: The CPUfreq governor "ondemand" sets the CPU depending on the # current usage. # conservative: The CPUfreq governor "conservative", much like the "ondemand" # governor, sets the CPU depending on the current usage. It # differs in behaviour in that it gracefully increases and # decreases the CPU speed rather than jumping to max speed the # moment there is any load on the CPU. # schedutil: The CPUfreq governor "schedutil" aims at better integration with # the Linux kernel scheduler. Load estimation is achieved through # the scheduler's Per-Entity Load Tracking (PELT) mechanism, which # also provides information about the recent load. SCALING_GOVERNOR=ondemand # For CPUs using intel_pstate, always use the performance governor. This also # provides power savings on Intel processors while avoiding the ramp-up lag # present when using the powersave governor (which is the default if ondemand # is requested on these machines): if [ "$(cat /sys/devices/system/cpu/cpu0/cpufreq/scaling_driver 2> /dev/null)" = "intel_pstate" ]; then SCALING_GOVERNOR="performance" fi # If rc.cpufreq is given an option, use it for the CPU scaling governor instead: if [ ! -z "$1" -a "$1" != "start" ]; then SCALING_GOVERNOR=$1 fi # To force a particular option without having to edit this file, uncomment the # line in /etc/default/cpufreq and edit it to select the desired option: if [ -r /etc/default/cpufreq ]; then . /etc/default/cpufreq fi # If you need to load a specific CPUFreq driver, load it here. Most likely you don't. #/sbin/modprobe acpi-cpufreq # Attempt to apply the CPU scaling governor setting. This may or may not # actually override the default value depending on if the choice is supported # by the architecture, processor, or underlying CPUFreq driver. For example, # processors that use the Intel P-state driver will only be able to set # performance or powersave here. echo $SCALING_GOVERNOR | tee /sys/devices/system/cpu/cpu*/cpufreq/scaling_governor 1> /dev/null 2> /dev/null # Report what CPU scaling governor is in use after applying the setting: if [ -r /sys/devices/system/cpu/cpu0/cpufreq/scaling_governor ]; then echo "Enabled CPU frequency scaling governor: $(cat /sys/devices/system/cpu/cpu0/cpufreq/scaling_governor)" fi As you can see the default is "ondemand", but then follows this condition which sets "performance" as default: # For CPUs using intel_pstate, always use the performance governor. This also # provides power savings on Intel processors while avoiding the ramp-up lag # present when using the powersave governor By that explanation its not recommened to set something else then "performance" for an Intel cpu. I had problems with "powersave" in the past, but this was with an Intel Atom CPU (now I'm having an i3): https://forums.plex.tv/t/cpu-scaling-governor-powersave-causes-massive-buffering/604018 I never experienced similar problems with "ondemand", so I wanted this gorvernor for the i3, too. Nevertheless I checked the active governor as follows: cat /sys/devices/system/cpu/cpu0/cpufreq/scaling_governor performance Ok, performance has been set as expected. Lets try to overwrite it: /etc/rc.d/rc.cpufreq ondemand Enabled CPU frequency scaling governor: performance Hmm.. does not work. Seems to be this condition: # ... For example, # processors that use the Intel P-state driver will only be able to set # performance or powersave here. Lets try it out: cat /sys/devices/system/cpu/cpu*/cpufreq/scaling_governor performance performance performance performance This means our cpu cores support only "performance"?! EDIT: Yes, recent Intel CPUs do only support performance or powersave (with massive lags): https://wiki.archlinux.org/index.php/CPU_frequency_scaling#Scaling_governors And the most important part: The performance governor should give better power saving functionality than the old ondemand governor. For me it does not really look like a proper p-state handling as my cpus maximum is 3.6Ghz and with really low load it never reduces the frequency: So lets try to find out what goes wrong here. At first the pstate values: ls /sys/devices/system/cpu/intel_pstate/* /sys/devices/system/cpu/intel_pstate/hwp_dynamic_boost /sys/devices/system/cpu/intel_pstate/num_pstates /sys/devices/system/cpu/intel_pstate/max_perf_pct /sys/devices/system/cpu/intel_pstate/status /sys/devices/system/cpu/intel_pstate/min_perf_pct /sys/devices/system/cpu/intel_pstate/turbo_pct /sys/devices/system/cpu/intel_pstate/no_turbo root@Thoth:~# cat /sys/devices/system/cpu/intel_pstate/hwp_dynamic_boost 0 root@Thoth:~# cat /sys/devices/system/cpu/intel_pstate/max_perf_pct 100 root@Thoth:~# cat /sys/devices/system/cpu/intel_pstate/min_perf_pct 22 root@Thoth:~# cat /sys/devices/system/cpu/intel_pstate/no_turbo 1 root@Thoth:~# cat /sys/devices/system/cpu/intel_pstate/num_pstates 29 root@Thoth:~# cat /sys/devices/system/cpu/intel_pstate/status active root@Thoth:~# cat /sys/devices/system/cpu/intel_pstate/turbo_pct 0 Explanations can be found here: https://www.kernel.org/doc/html/v4.12/admin-guide/pm/intel_pstate.html#user-space-interface-in-sysfs For example num_pstates returns the amount of p-states supported by the cpu. As we can see we have 29 for my cpu. And we know that the status is "active" and this means changing the p-states should work, but we do not know how: https://www.kernel.org/doc/html/v4.12/admin-guide/pm/intel_pstate.html#active-mode do we have Active with HWP or not? I found this sentence: https://01.org/linuxgraphics/gfx-docs/drm/admin-guide/pm/intel_pstate.html#user-space-interface-in-sysfs Our value is zero. What could that mean? Another hint that we are using Active with HWP is this explanation: https://www.kernel.org/doc/html/v4.12/admin-guide/pm/intel_pstate.html#energy-vs-performance-hints Lets check if they are present: Both are present so we can be sure. We use Active Mode with HWP: https://www.kernel.org/doc/html/v4.12/admin-guide/pm/intel_pstate.html#active-mode-with-hwp I disabled all my writings to the unraid server and stopped all disks. In this state the server consumes 24W. Performance still does not downclock: watch -n1 "cat /proc/cpuinfo | grep \"^[c]pu MHz\"" cpu MHz : 3600.114 cpu MHz : 3600.910 cpu MHz : 3601.040 cpu MHz : 3600.269 Does HWP + Performance mean it never changes the p-state? Which algorithm is used and where can I find it or influence it? I tried it with powersave /etc/rc.d/rc.cpufreq powersave Enabled CPU frequency scaling governor: powersave I don't know why, but all disks started with several seconds delay and very small writes (1,4 kB/s) were done. I waited one minute and spun them down again. The power consumption stayed at 24W. The frequency is only a little bit lower watch -n10 "cat /proc/cpuinfo | grep \"^[c]pu MHz\"" cpu MHz : 3263.100 cpu MHz : 3021.631 cpu MHz : 3252.913 cpu MHz : 2819.033 I checked the available HWP profiles and which one is used: cat /sys/devices/system/cpu/cpu0/cpufreq/energy_performance_preference balance_performance cat /sys/devices/system/cpu/cpu0/cpufreq/energy_performance_available_preferences default performance balance_performance balance_power power I did not found any documentation about these variables. Only this answer to the same question: https://superuser.com/a/1449813/129262 So lets try them out: echo "power" > /sys/devices/system/cpu/cpu0/cpufreq/energy_performance_preference echo "power" > /sys/devices/system/cpu/cpu1/cpufreq/energy_performance_preference echo "power" > /sys/devices/system/cpu/cpu2/cpufreq/energy_performance_preference echo "power" > /sys/devices/system/cpu/cpu3/cpufreq/energy_performance_preference cat /sys/devices/system/cpu/cpu*/cpufreq/energy_performance_preference power power power power I tested "power" and "balance_power". No difference in power consumption. If I set "/etc/rc.d/rc.cpufreq" to "performance" the "/sys/devices/system/cpu/cpu0/cpufreq/energy_performance_preference" becomes "performance". If I set it to "powersave" the preference becomes "balance_performance". Conclusion: Although "performance" is set, there is no room to save more energy in an idle state. "powersave" seems only influence the time in which the core stays in a slower state which could cause latency issues, but the lowest p-state is the same for all profiles. This is completely different to my Atom CPU, which directly showed a lower energy consumption after changing the profile to "ondemand". So it depends on the used CPU. But finally "ondemand" is set if its present so no further optimization seems to be needed. The next we could check are the c-states. For this I used "powertop" from the nerd pack. It seems we have the best results as c-state C10 is used most of the time:
 1 point