Leaderboard


Popular Content
Showing content with the highest reputation on 12/09/23 in all areas
-
Resolved over an embarrassing concern... typo in the variable -- unreal @ me !2 points
-
Just recapping what happened in the end. The last week it got so bad I couldn't boot anything at all, no Live-USBs or anything. So after months of trying to find the problem I finally couldn't narrow it down any more than to the MB or the CPU. Since I had so many errors that pointed to the CPU I decided to open a warranty ticket with Intel. They accepted after I presented my evidence of my problems and replaced my CPU with a new one. Very nice experience dealing with the support, and I'm glad I bought the boxed and not the trayed version of the CPU since the trayed had shorter warranty. At least for 11th gen, I think the warranty aren't differentiated in the newer generations. Now it runs good again. 👍2 points
-
This plugin allows you to track how long your drives are (or are not) in standby. This is great for those that are trying to make their rig as low power as you can as it will allow you to see what drives are highly active. The plugin gives you an overview of activity per device, but also gives you a breakdown of the status changes. It scans your drives every 15 minutes, this should not cause them to spin up, and logs the data. Upcoming releases will tie the data to drive serial numbers and show a bit more information as to disk names, currently it is based on the dev name (/dev/sdX). You can check out the repo HERE if you come across a bug or issue feel free to open a issue on Github as well. If you're having an issue related to drives spinning up and believe it is related to the plug-in, please file a ticket on the github repo using this link as it has a command you can run and get a better look into what the issue might be.1 point
-
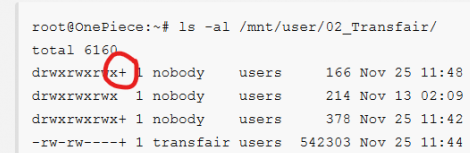
The attachment in this post is a joint effort between @Batter Pudding and myself. @Batter Pudding supplied much of the technical part of the Attached Document and I provide most of the background information. What we are attempting to do is to show that it is easy to actually use Unraid with all of the security features that Microsoft has incorporated into Windows 10. What many of us have been doing (myself included) is to reverse those enhancements to security and use our Unraid network in what is basically a 2010 security environment. @limetechhas announced in the release thread for version 6.9.2 that they are about to increase security on Unraid in future releases. Unfortunately, this list is going to impact a lot of current Unraid users as many have setup their Unraid servers and networking to use these very features. Each user will have two choices. Either embrace security or spend time to undo each new security addition that either LimeTech or MS adds in their updates. If you decide to continue to bypass security, just realize that the number of folks prepared to assist you with any problems doing this will probably decline as more folks adopt increased security as a necessity. In some cases, this is going to present some difficult decisions. For example, I have an old Netgear NTV-550 set top media player (last firmware/software update was in early 2011) that only supports SMBv1 or NFS. Do I open up a security hole to use a well-functioning piece of equipment or do I replace it? (The choice, obviously, is one that only I can make...) Two Important things! Do not post up any problems that you have with networking between Windows 10 and Unraid in this thread! Start a new thread in the General Support forum. Please don’t tell us that there is another way to do something and that we should change our recommendation to employ that method. If you feel you have a better way, you are encouraged to write it up in detail and post it in this thread pointing out the advantages of your way. (One well regarded Windows 10 networking book has over 400 pages in it. Our document is 16 pages long…) EDIT: November 30, 2021. Recently, something has come to my attention about Unraid and SMB. There have been incidences where access to Unraid shares is restricted or blocked completely from users who should have access to it. What has been found in these cases is that a feature, has been enable on the Unraid side, called Access Control Lists (ACL for short). This will show up as an ‘+’ at the end of the Linux permissions. See the screen capture below: Note that the ‘+’ is also on the file as well as the share/directory. ACL changes the way that Linux is going to control access to these resources. After some research, I found out that Windows has used ACL for a long time. The SAMBA group has added ACL into its version of SMB. Unraid does not use ACL in its security scheme. At the present time, I can think of only one way that a ACL could be found on any Unraid server. It was done by a Windows user who was trying to change how SMB worked by applying Windows security features to an Unraid share by changing the default Security settings. (Basically, right-clicking on the Share in Windows Explorer, selecting ‘Properties’, then the ‘Security’ tab and working from there.) The point I am making is that you can’t fix a share access problem by trying to change a Unraid share security using Windows security tools on that share. If you try, you will probably make things worst! (Unless you are a Windows SMB Networking Guru…) It is important to realize that if you are denied permission to an Unraid share resource, the problem can only be fixed on the Unraid side using the Tools in the Unraid GUI (or via the command line for specific problems). If you are having an access problem to a Unraid share and can’t solve it with the tools in the GUI, start a thread in the General Support sub-forum and let the community help you fix it. EDIT: February 25, 2024. It has come to my attention that there is one more setting that was not previously covered. The Network type should be set as 'Private'. For Windows 10 Open up Settings Pick Network & Internet In right panel, click on Properties button In the Network Properties, select the 'Private' radio button. For Windows 11 Open up Settings In left panel, pick Network & Internet In the Right Panel at the top, click on Properties Under Network Profile type, click on the 'Private network' radio button EDIT: March 15, 2024 It has come to my attention that there can be problems in linking the Network Neighborhood folder into Windows File Explorer in Windows 11. While there is a solution to that problem, it has some other side effects and the full scope of those has not been evaluated. In addition, I have become aware of another way to integrate access of servers into Windows File Explorer that works quite well if you have only a few servers. (Things start to look messy if one adds more than two or three servers but that is a matter of each individual’s perception of “messy”.) So if you have having any problems with implementing "Network Neighborhood", try this new approach! This new method is actually quite simple to set up. This method is described in the attached PDF file named: “An Alternative Method to Network Neighborhood.PDF” Unraid & Windows 10 SMB Setup.pdf An Alternative Method to Network Neighborhood.pdf
 1 point
 -
写了一个支持11代12代intel GPU开启SR-IOV的插件, GitHub地址:https://github.com/zhtengw/unraid-i915-sriov 在unraid插件安装页面,输入此链接https://raw.githubusercontent.com/zhtengw/unraid-i915-sriov/master/i915-sriov.plg安装插件,然后重启即可使用。 插件支持unRAID版本:6.11.0~6.11.5, 6.12.0-rc1, 6.12.0-rc21 point
-
I noticed that it works to have three columns in chrome but not in firefox -> for usage in firefox with 3 columns you could change the scrollbar to the Android Scrollbar then the window is wide enough for 3 columns on fhd - to change that you need to go to about:config and change the value of key widget.non-native-theme.scrollbar.style to 31 point
-
Viel Spaß \m/1 point
-
Also ich kann auch auf keinen Port pingen und das ist imho normal. ich hatte öfter mal Probleme mit meinen Diensten und Ports und nach einigen Hinweisen von @Alturismo (glaube ich) habe ich irgendwann mein Netzwerk von 192.168.178 auf 10.10.10 umgestellt und jeder Docker bekommt von mir direkt im Unraid Einrichtungsdialog eine eigene Adresse zugewiesen. Bringt vor allem den Vorteil mit daß man alle Ports die der Dienst gerne haben möchte, einfach so lassen kann weil die IP Adresse ja eh eine eigene ist. Das kann ich jedem nur empfehlen. Irgendwann geht das ganze in Fleisch und Blut über und man weiß, nginx ist 2, Jellyfin 5, nextcloud 4 etc.pp. Die unteren Adressen der Fritzbox, von 2 bis 9 werden imho nicht von der Fritzbox automatisch vergeben und so hat man, bis man das neue Gerät (z.B. PC-10-10-10-2) auf feste IP umgestellt hat, keine Probleme. https://unraid.net/blog/6-12-41 point
-
Hi, I have two small problems. Even if I change the place of the output, it still generates the images in the default output file. (when I return from the docker setting my custom path is there) Do you have an idea? I use Fooocus GUI The other problem is that the images are generated by the "nobody" user, which means that I constantly have to give myself write permission to delete the images. And really good work, the docker works very well! it's great!1 point
-
Servus, gute Zeit und man liest sich😝🤘1 point
-
Ah, yeah that did it. I set 'Minimum free space' to 1GB. I had tried to do this in the past, but I didn't understand you can't just put 0B in there. When I did that, it just went back to whatever the calculated value was. Thank you for looking at this! I'm now getting syslog files created.
 1 point
 -
Hi, im Paperless Log steht ein Eintrag drin der wohl auch dein Problem sein wird. "ValueError: An IPv4 address cannot be in brackets" Schau mal in den Docker Einstellungen von Paperless-ngx nach. Dort darf die Adresse nicht in Klammern stehen. So muss das aussehen
 1 point
 -
See if the flash drive boots on another PC, that would confirm if it or the server is the problem.1 point
-
Yes, and you'll find it on the Settings tab towards the bottom called "TurboWrite".1 point
-
may try with the official container in terms you have a 3rd party like binhex, linuxserver, ... running.1 point
-
Make sure this been taken care of: https://forums.unraid.net/topic/46802-faq-for-unraid-v6/?do=findComment&comment=8191731 point
-
Musste nun doch auf ein 19V 90W Netzteil wechseln. Da ich statt zwei nun doch vier HDD's betreibe. Mit dem 12V 72W Netzteil klappte dies nicht. Steht aber ja auch so im Handbuch... 😉1 point
-
It seems that in your case another driver is used, can you please try to do the following with the plugin installed: echo "blacklist cdc_ether" > /boot/config/modprobe.d/cdc_ether.conf It seems like that your NIC is using another driver. However as @JorgeB said it might be possible that you even don't need the R8152 anymore. Can you please also test what removing the R8152 does after a reboot and if everything is working as expected (of course you have to remove the file /boot/config/modprobe.d/cdc_ether.conf first <- otherwise you won't have network!)?1 point
-
Try v6.12.6 again but without the plugin, rtl8152 since v6.12.5 now works with or without the plugin, not sure about that one.1 point
-
Thank you, that is exactly the solution, and I confirmed it's working as intended! Thank you for your support and frequent responses in here. You are really a wonderful member of the unraid community.1 point
-
ja, mein Neffe will mich auch damit ärgern, aber das sind doch Peanuts. Im richtigen Leben ist im Notfall Dein 2.5G Segment ebenso überlastet, wie das 1G Teil und beide Anschlüsse schnarchen. Dafür hol ich mir keine neue FB. (zumal 2.5G hier "unüblich" ist, alle Rechner haben mindestens 10G) Hier gibts nächstes Jahr LWL, da sollte der Upload dann deutlich steigen und der Download stabil bleiben (versprechen sie, wir werden sehen...)1 point
-
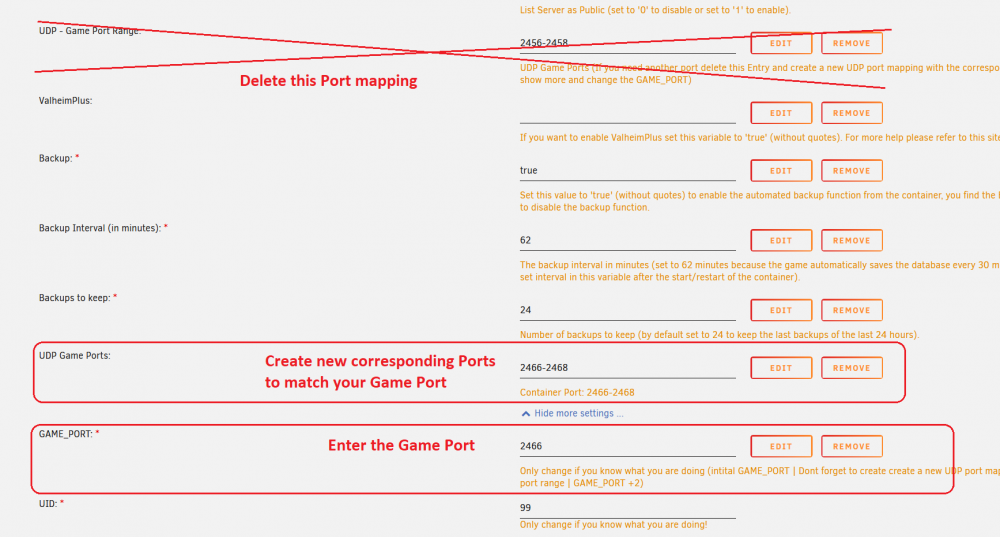
Sure, simply create a port mapping to somewhere on the Array (or a share that is located to move the files from the Cache to the Array): (make sure that you stop the container, move the old folder "Backup" that already exists in your Valheim directory to somewhere else and it will work as intended) SteamCMD is a shared directory which my game server containers use that only exists one time on your server to download the game files, ServerFiles are the location where the necessary dedicated server files are download to.
 1 point
 -
may a general question about the GUI and updating ... once i start a job and keep the UI open, i can simply minimize the window and return it, the status, speed, rest time ... keeps updating as expected. once i disconnect and reconnect (same mashine, different mashine, ...) i see its "stalled" in the bottom line sample here the bottom Line wont update at all anymore, it will be gone "sometime" once the job is done .... also bringing it up wont show any progress anymore etc ... sample here this is all just "cosmetic" and would be nice if the progress would be somehow updated when reconnecting, ... i know the job is still working and in the end it will be done, just as note ... already moved 9 TB in "slices" and always wited until the job was done. tested on 2 different Servers, 2 different Clients (webui access) with 2 different (more or less) browsers (chrome, edge) Servers where both 6.12.6, Clients where Laptops (Dell, HP)

 1 point
 -
@Omid Thank you so much!1 point
-
@golfsands7 Here are the IOMMU groups on my Asus Pro WS W680-ACE IPMI (ATX, not mATX), in two different formats: IOMMU Group 0 00:02.0 VGA compatible controller [0300]: Intel Corporation Raptor Lake-S GT1 [UHD Graphics 770] [8086:a780] (rev 04) IOMMU Group 1 00:00.0 Host bridge [0600]: Intel Corporation Device [8086:a703] (rev 01) IOMMU Group 2 00:01.0 PCI bridge [0604]: Intel Corporation Device [8086:a70d] (rev 01) IOMMU Group 3 00:06.0 PCI bridge [0604]: Intel Corporation Raptor Lake PCIe 4.0 Graphics Port [8086:a74d] (rev 01) IOMMU Group 4 00:0a.0 Signal processing controller [1180]: Intel Corporation Raptor Lake Crashlog and Telemetry [8086:a77d] (rev 01) IOMMU Group 5 00:0e.0 RAID bus controller [0104]: Intel Corporation Volume Management Device NVMe RAID Controller Intel Corporation [8086:a77f] IOMMU Group 6 00:14.0 USB controller [0c03]: Intel Corporation Alder Lake-S PCH USB 3.2 Gen 2x2 XHCI Controller [8086:7ae0] (rev 11) IOMMU Group 6 00:14.2 RAM memory [0500]: Intel Corporation Alder Lake-S PCH Shared SRAM [8086:7aa7] (rev 11) IOMMU Group 7 00:15.0 Serial bus controller [0c80]: Intel Corporation Alder Lake-S PCH Serial IO I2C Controller #0 [8086:7acc] (rev 11) IOMMU Group 7 00:15.1 Serial bus controller [0c80]: Intel Corporation Alder Lake-S PCH Serial IO I2C Controller #1 [8086:7acd] (rev 11) IOMMU Group 7 00:15.2 Serial bus controller [0c80]: Intel Corporation Alder Lake-S PCH Serial IO I2C Controller #2 [8086:7ace] (rev 11) IOMMU Group 8 00:16.0 Communication controller [0780]: Intel Corporation Alder Lake-S PCH HECI Controller #1 [8086:7ae8] (rev 11) IOMMU Group 8 00:16.3 Serial controller [0700]: Intel Corporation Device [8086:7aeb] (rev 11) IOMMU Group 9 00:17.0 SATA controller [0106]: Intel Corporation Alder Lake-S PCH SATA Controller [AHCI Mode] [8086:7ae2] (rev 11) IOMMU Group 10 00:1a.0 PCI bridge [0604]: Intel Corporation Alder Lake-S PCH PCI Express Root Port #25 [8086:7ac8] (rev 11) IOMMU Group 11 00:1b.0 PCI bridge [0604]: Intel Corporation Device [8086:7ac0] (rev 11) IOMMU Group 12 00:1b.4 PCI bridge [0604]: Intel Corporation Device [8086:7ac4] (rev 11) IOMMU Group 13 00:1c.0 PCI bridge [0604]: Intel Corporation Alder Lake-S PCH PCI Express Root Port #1 [8086:7ab8] (rev 11) IOMMU Group 14 00:1c.1 PCI bridge [0604]: Intel Corporation Alder Lake-S PCH PCI Express Root Port #2 [8086:7ab9] (rev 11) IOMMU Group 15 00:1d.0 PCI bridge [0604]: Intel Corporation Alder Lake-S PCH PCI Express Root Port #9 [8086:7ab0] (rev 11) IOMMU Group 16 00:1f.0 ISA bridge [0601]: Intel Corporation Device [8086:7a88] (rev 11) IOMMU Group 16 00:1f.3 Audio device [0403]: Intel Corporation Alder Lake-S HD Audio Controller [8086:7ad0] (rev 11) IOMMU Group 16 00:1f.4 SMBus [0c05]: Intel Corporation Alder Lake-S PCH SMBus Controller [8086:7aa3] (rev 11) IOMMU Group 16 00:1f.5 Serial bus controller [0c80]: Intel Corporation Alder Lake-S PCH SPI Controller [8086:7aa4] (rev 11) IOMMU Group 17 01:00.0 SATA controller [0106]: Marvell Technology Group Ltd. 88SE9215 PCIe 2.0 x1 4-port SATA 6 Gb/s Controller [1b4b:9215] (rev 11) IOMMU Group 18 02:00.0 Non-Volatile memory controller [0108]: Sandisk Corp Western Digital WD Black SN850X NVMe SSD [15b7:5030] (rev 01) IOMMU Group 19 03:00.0 Non-Volatile memory controller [0108]: Sandisk Corp Western Digital WD Black SN850X NVMe SSD [15b7:5030] (rev 01) IOMMU Group 20 05:00.0 Non-Volatile memory controller [0108]: Sandisk Corp Western Digital WD Black SN850X NVMe SSD [15b7:5030] (rev 01) IOMMU Group 21 06:00.0 Ethernet controller [0200]: Intel Corporation Ethernet Controller I226-LM [8086:125b] (rev 06) IOMMU Group 22 07:00.0 Ethernet controller [0200]: Intel Corporation Ethernet Controller I226-LM [8086:125b] (rev 06) IOMMU Group 23 08:00.0 PCI bridge [0604]: ASPEED Technology, Inc. AST1150 PCI-to-PCI Bridge [1a03:1150] (rev 06) IOMMU Group 23 09:00.0 VGA compatible controller [0300]: ASPEED Technology, Inc. ASPEED Graphics Family [1a03:2000] (rev 52) IOMMU Group 23 09:01.0 IPMI Interface [0c07]: ASPEED Technology, Inc. Device [1a03:2402] (rev 01) Alternative format: Group 0: [8086:a780] [R] 00:02.0 VGA compatible controller Raptor Lake-S GT1 [UHD Graphics 770] Group 1: [8086:a703] 00:00.0 Host bridge Device a703 Group 2: [8086:a70d] [R] 00:01.0 PCI bridge Device a70d Group 3: [8086:a74d] [R] 00:06.0 PCI bridge Raptor Lake PCIe 4.0 Graphics Port Group 4: [8086:a77d] 00:0a.0 Signal processing controller Raptor Lake Crashlog and Telemetry Group 5: [8086:a77f] 00:0e.0 RAID bus controller Volume Management Device NVMe RAID Controller Intel Corporation Group 6: [8086:7ae0] 00:14.0 USB controller Alder Lake-S PCH USB 3.2 Gen 2x2 XHCI Controller USB: [05ac:0250] Bus 001 Device 004 Apple, Inc. Aluminium Keyboard (ISO) USB: [05ac:1006] Bus 001 Device 002 Apple, Inc. Hub in Aluminum Keyboard USB: [046b:ff10] Bus 001 Device 009 American Megatrends, Inc. Virtual Keyboard and Mouse USB: [046b:ffb0] Bus 001 Device 008 American Megatrends, Inc. Virtual Ethernet. USB: [046b:ff01] Bus 001 Device 007 American Megatrends, Inc. Virtual Hub USB: [1b1c:1c1e] Bus 001 Device 006 Corsair HX1000i Power Supply USB: [05e3:0608] Bus 001 Device 005 Genesys Logic, Inc. Hub USB: [0781:5567] Bus 001 Device 003 SanDisk Corp. Cruzer Blade USB: [1d6b:0002] Bus 001 Device 001 Linux Foundation 2.0 root hub USB: [1d6b:0003] Bus 002 Device 001 Linux Foundation 3.0 root hub [8086:7aa7] 00:14.2 RAM memory Alder Lake-S PCH Shared SRAM Group 7: [8086:7acc] 00:15.0 Serial bus controller Alder Lake-S PCH Serial IO I2C Controller #0 [8086:7acd] 00:15.1 Serial bus controller Alder Lake-S PCH Serial IO I2C Controller #1 [8086:7ace] 00:15.2 Serial bus controller Alder Lake-S PCH Serial IO I2C Controller #2 Group 8: [8086:7ae8] 00:16.0 Communication controller Alder Lake-S PCH HECI Controller #1 [8086:7aeb] 00:16.3 Serial controller Device 7aeb Group 9: [8086:7ae2] 00:17.0 SATA controller Alder Lake-S PCH SATA Controller [AHCI Mode] Group 10: [8086:7ac8] [R] 00:1a.0 PCI bridge Alder Lake-S PCH PCI Express Root Port #25 Group 11: [8086:7ac0] 00:1b.0 PCI bridge Device 7ac0 Group 12: [8086:7ac4] [R] 00:1b.4 PCI bridge Device 7ac4 Group 13: [8086:7ab8] [R] 00:1c.0 PCI bridge Alder Lake-S PCH PCI Express Root Port #1 Group 14: [8086:7ab9] [R] 00:1c.1 PCI bridge Alder Lake-S PCH PCI Express Root Port #2 Group 15: [8086:7ab0] [R] 00:1d.0 PCI bridge Alder Lake-S PCH PCI Express Root Port #9 Group 16: [8086:7a88] 00:1f.0 ISA bridge Device 7a88 [8086:7ad0] 00:1f.3 Audio device Alder Lake-S HD Audio Controller [8086:7aa3] 00:1f.4 SMBus Alder Lake-S PCH SMBus Controller [8086:7aa4] 00:1f.5 Serial bus controller Alder Lake-S PCH SPI Controller Group 17: [1b4b:9215] [R] 01:00.0 SATA controller 88SE9215 PCIe 2.0 x1 4-port SATA 6 Gb/s Controller Group 18: [15b7:5030] [R] 02:00.0 Non-Volatile memory controller Western Digital WD Black SN850X NVMe SSD Group 19: [15b7:5030] [R] 03:00.0 Non-Volatile memory controller Western Digital WD Black SN850X NVMe SSD Group 20: [15b7:5030] [R] 05:00.0 Non-Volatile memory controller Western Digital WD Black SN850X NVMe SSD Group 21: [8086:125b] [R] 06:00.0 Ethernet controller Ethernet Controller I226-LM Group 22: [8086:125b] [R] 07:00.0 Ethernet controller Ethernet Controller I226-LM Group 23: [1a03:1150] [R] 08:00.0 PCI bridge AST1150 PCI-to-PCI Bridge [1a03:2000] [R] 09:00.0 VGA compatible controller ASPEED Graphics Family [1a03:2402] [R] 09:01.0 IPMI Interface Device 24021 point
-
Nope Die meisten Handys haben (wie auch Laptops) aus Platzgründen nur eine 2x2 Antennenkonfiguration. Für die 4800 Mbit bräuchte man aber 8 Antennen/streams. Und das tolle Marketing "+1200 mbit" funktioniert auch etwas anders. Das wäre dann nämlich eine separate Übertragung (insofern immerhin Korrekt 4800 Mbit + 1200 Mbit und nicht wie man es leider sehr häufig sieht ultra super duper 6000 Mbit). Die streams zu kombinieren kann dann nämlich tatsächlich erst wifi7. Und wie du selbst schon richtig erkannt hast, sind es ja auch nur theoretisch 4800 Mbit. Kurz und knapp: beim WLAN wirst du keinen nennenswerten Unterschied merken, denn auf brutto 2500 Mbit kommst du so oder so nicht1 point
-
That's it, THAT'S IT. Removing the leading zero brings all back to normal. Just by some old habit, I've been using a leading 0 as a lot of broken UIs require you to enter 3 digits, so I don't even think about anymore. You have some serious troubleshooting moves going on there!1 point
-
I may have found what was causing these issues (i've had issues in the past before re-setting the server with drives being 'disabled' and 'contents emulated'). I made a little diagram of what the power structure was like before and what I changed it to now. I have removed the SATA extension cable (I believe I originally put it there for future expansion) but I have no idea what I was thinking before. Hopefully, now the power structure is much better and I don't have any issues in the future, I am currently running a parity sync and seems to be going well. Thank you @JorgeBfor your help with this, I will mark it as the solution once the parity sync is complete.
 1 point
 -
Seems to still be going strong. Thank you for your help.1 point
-
After BIOS update and changing to IPVLAN, all is resolved. Thanks!1 point
-
Hi thanks all this was the problem! I changed the power cables and the speeds are now as they should be, 200mb/s a second I want to thank @JorgeB and @itimpi for your help and patience with me. you guys are doing gods work!1 point
-
Here ya go! blackpearl-diagnostics-20231208-1042.zip1 point
-
Hi, i was able to take an old backup of my config and copy the new unraid key file, everything is working now thank you vm :)- Have a nice day !1 point
-
Ja. Dieser NIC auf Linux ist ein zustand… Das ist fällt leider auf Realtek zurück, hauptsache massig chips verkaufen aber keinen Treiber support für Linux liefern und sich auf die Community verlassen. Sorry, is leider so und ich bin das Thema mit den Realtek chips leid. Dann musst du wohl zurück auf die alte version von Unraid und musst warten bis die Community im Kernel den Treiber fixt. Traurig aber wahr. Naja ned Amis ist es ziemlich egal ob die 1W oder 100W mehr brauchen übertrieben gesagt. Leider nicht weil dies ein Kernel thema ist und ein generelles Linux Thema. Du solltest das im Kernel GitHub melden. Es kotzt mich schon so an das immer Limetech angekreidet wird und niemand versteht das die auch unter der Haube nur den Linux Kernel verwenden der bei jeder Distribution der gleiche ist. Wah und schon wieder Themenverfelung, die Treiber kommen von Kernel und wenn du die gleich version vom Kernel auf Ubuntu verwendest hast du genau das gleiche Fehlerbild. Sorry ich bin hier raus mich kotzt das so an das immer Unraid schuld ist obweohl es eigentlich ein Kernel thema ist. Ich beteilig mich nicht mehr an so threads. Sorry das ich hier drin überhaupt gepostet hab.1 point
-
Glad to hear that it is working, also see the first recommended post in this thread on top.1 point
-
Release 2023.12.06 Add secondary Temp check if HDD is primary and disk have spundown. Add JSON to config page. Also shows F in fans page.1 point
-
@SimonFonly thing I can think of would be to add the json files to the config editor dropdown so people less technically inclined can still see/adjust those files if necessary.1 point
-
Any ASRock users able to test? the dev release to confirm working ok still?1 point
-
This feature doesn't seem ready for prime time. Wish they just implemented an automated backup to our own cloud or network share instead.1 point
-
Ich erwähne wegen SATA Portkarten mal die FAQ: https://forums.unraid.net/topic/132205-faq-grundlagen-zusatzkarte-für-sata-ports-v12-stand-08052023/ PCIe 3.0 x1 reicht für gleichzeitig 4x ca. 250MByte/s aus. Im Peak schaffen sehr grosse heutige SATA Festplatten zwar minimal mehr, aber meiner persönlichen Meinung nach ist PCIe 3.0 x1 ausreichend für 4 SATA Ports für heutige Festplatten. Bei performanten SSD wäre es hingegen zu wenig für 4 Stück gleichzeitig. Solltest Du oben genannten Kontroller verwenden, dann im Array bevorzugt nur 4 Ports verwenden. Die anderen entweder leer lassen oder für Pools/UD verwenden, die nicht gleichzeitig zum Array laufen. Nur so: Wenn man es nicht eilig hat ist eine ASM1166 6Port PCIe 3.0 x1 Karte auch günstiger zu haben: https://de.aliexpress.com/item/1005003960990557.html Preis 36,09€; Kostenfreie Lieferung; 12-Tage Lieferung auf Bestellungen über 10,00€1 point
-
In case anyone has issues, here is how I got this container working with the latest version of the Joplin app: After installing the app, you need to chown -R 1000:1000 /mnt/user/appdata/joplinapp Then, open a console into the docker (it should put you in /app. If not, "cd /app" Get the latest appimage. For 2.11.11, that would be (replace with whatever the latest is from https://github.com/laurent22/joplin/releases) wget https://github.com/laurent22/joplin/releases/download/v2.11.11/Joplin-2.11.11.AppImage Execute rm -rf /app/squashfs-root Execute chmod +x ./JoplinXXXXXXXXXXXXXXX.AppImage where JoplinXXXXXXXXXXXXXXX.AppImage is the name of the file you downloaded in step 3 (e.g., Joplin-2.11.11.AppImage for the latest version at the time of this posting) Execute /app/JoplinXXXXXXXXXXXXXXX.AppImage --appimage-extract Execute chown -R app:app /app/squashfs-root That's it. Now, restart the container and you should be running the latest version. Hope this helps someone!1 point
-
I'm having a really weird issue where I get this error: [core] Warning: Login failed: 'username' (Remote IP: 'router ip') GET /remote.php/webdav/ from 'router ip' at 2023-05-07T19:33:35+00:00 Also this one: [no app in context] Warning: Invalid cliBasedCronUser data provided to provideInitialState by settings GET /settings/admin from 'router ip' by 'username' at 2023-05-07T19:53:33+00:00 and last one: #PHP# Error: Trying to access array offset on value of type bool at /var/www/html/apps/settings/lib/Settings/Admin/Server.php#76 GET /settings/admin from 'router ip' by 'username' at 2023-05-07T19:55:19+00:00 Any ideas how to fix this?!1 point
-
Die wird auch in den CA Apps nicht mehr angeboten aus Kompatibilitätsgründen mit neueren Unraid Versionen1 point
-
And there is also this guide from Bonienl which has been around for a while. I followed it to set up a Docker VLAN in version 6.7 or 6.8 of unRAID. This one is a bit more comprehensive but may be too complex depending on what you are trying to accomplish. Just another point of reference in addition to @wgstarks guide.1 point
-
With a lot of help from an unraid user on reddit I was able to figure this out and am posting here for anyone else tryin to do this. Prerequisites- Router and network switches must support VLANs. You will need to research the configuration of these for your particular brand. Docker service and VM Manager must both be disabled in settings (set enabled to "No"). In Settings>Network Settings set Enable VLANs to "Yes" for your desired ethernet port (eth1 in the pic) and click "Apply". This will add several new settings. Enter your desired VLAN number, set Network protocol (optional) and set address assignment(s) (optional). Click "Apply" once again. In Settings>Docker enable Advanced View. Check the box next to the new network you have just added (eth1 in the pic) and enter the proper subnet and CIDR. Gateway will be the address of your router. Once you have finished, set Docker Enable to "Yes" and click "Apply" Finally, in the configuration settings for your docker container set Network Type to your newly added custom network (Custom:eth1 in the pic) and click "Apply". Note: I am not an expert on networking by a long shot. It took me quite a lot of digging through various forums to piece this together. Some of it may be wrong. If anyone sees any errors please let me know and I'll make the appropriate edits.


 1 point
 -
Optional extra parameters to be added to the extra parameters section of the container's options page: --servePath Used to specify the server path, the default value is window.location.hostname+":6806". For example, when you need to access through a domain name, please set the value to yourdomain.com. Leave the port blank to indicate that the protocol default port is used, and the NGINX reverse proxy needs to be requested to port 6806. --resident After specifying with --resident=true, the kernel will be resident in memory, the default is true. After set to false, the list of active sessions will be checked every 30 seconds, and the kernel process will be exited if there are no active sessions. --readonly After specifying with --readonly=true, the kernel will run in read-only mode and all write operations will be prohibited. --accessAuthCode Used to specify the browser access authentication password, which will overwrite the authCode in conf.json after setting. --ssl After using --ssl=true, https and wss protocols will be used for serving.1 point
-
I noticed recurring questions about Dell R710 servers and unraid over the past few months and I currently have two in operation, one with Perc 6i controller and one with an H700. I just wanted to post the steps I go through in order to turn them into unraid servers for those who were asking, seeing as though I have had a lot of help from the community. Dell R710's running either PERC H700 or 6i controllers should be able to be setup as an unraid server. The first thing you need to do is configure the virtual drives. You want to assign each drive seperately to its own raid-0 virtual drive. 1. Boot the server and enter into the raid configuration utility (usually CTRL+R when prompted). 2. Press F2 on the controller and click create new VD. 3. Select your first drive with an x 4. Give it a name (see note below) 5. Select advanced options and set element size to 64KB, read policy to "adaptive read" and write policy to "write through". Press OK 6 Repeat for each drive. NOTE: Your drives start at 0. If you have an R710 with 6 3.5" drives then your drives will number 0-5. If you have an R710 with 8 2.5" drives (like me) then your drives will be numbered 0-7. I highly suggest giving the VD for drive 0 the name "B", VD for drive 1 the name "C", VD for drive 2 the name "C" etc. The reason for this is quite simple. When unraid lauches the drives are named a, b, c etc. The first one "a" is always the USB stick you have the unraid flashed to. Your SSD's and HDD's are then b, c, d, e etc. The raid controller does not pass the actual drive numbers through to unraid, so if you don't name the drives and assign them in unraid in the same order, it makes fault finding a pigs ear when you have to replace a drive. For instance, my setup has drives 0 and 1 as SSDs. I use these for my cache. Drives 2-7 are hdd's. When configuring unraid from the UI, you would designate them to their slots in the same order. I label them as such: Unraid VD Physical Drive Slot Information (sda) N/A USB Flash (sdb) (b) Drive 0 Cache (sdc) (c) Drive 1 Cache (sdd) (d) Drive 2 HDD (sde) (e) Drive 3 HDD (sdf) (f) Drive 4 HDD (sdg) (g) Drive 5 HDD (sdh) (h) Drive 6 HDD (sdi) (i) Drive 7 HDD If you follow this very simple labelling scheme then if drive sdg on unraid experiences issues, then you know that it is VD G in the raid controller that you are dealing with and that corresponds to drive 5. 7. IMPORTANT: MAKE SURE THAT AFTER YOU HAVE CREATED YOUR VD'S YOU GO OVER EACH OF THEM AND PRESS F2 THEN "START INIT" TO INITIALISE THEM. YOU MUST LET THEM ALL GO THROUGH THE INITIALISATION PROCESS. 8. BOOT INTO UNRAID. You may have to go into the bios and enable USB booting. You can do this by turning UEFI boot off in the bios and that will then let you set the boot order. Make sure the unraid USB is in the machine when you boot up or you wont see it in the bios to select it. Once booted into unraid, it's the usual config you would do with any other unraid server.1 point
-
Ok, with the Array Stopped, go to Tools / New Config. Then select Preserve current assignements: All Yes, I want to do this Apply Back to main, change the drive assignements as you want them to be. Start the Array.1 point
-
Let me try to understand what steps you took. So you have several drives in your Array, you selected "no disk" on one slot, and added this disk to the Parity slot ? Then you have the invalid configuration error. I think Unraid tries to prevent a bad manipulation that would erase data in some situations. You should try to: Select "no disk" on the drive you want to remove Start the Array so that Unraid forgets that this drive (S/N) is part of the Array Stop the Array Select this drive on the Parity slot Start the Array. Note that all data on this drive will be wiped. If this does not work, you could try the New Config approach.1 point
-
Yes, but you do this with the Variable in the 'Show More Settings' section of the Template. Keep in mind that for every container the Game Port itself has to be set in the GAME_PORT variable like mentioned above. This is the way you would do it (this is tested and working btw):
 1 point