Leaderboard


Popular Content
Showing content with the highest reputation on 03/02/24 in all areas
-
I think the terminology should be changed from Subscription pricing to Update pricing as it better reflects what is being proposed and has less negative connotations for most people4 points
-
Don`t come and say I did not warn ya!2 points
-
Before anyone says anything, my answer is "I know". Try again in about 5 minutes2 points
-
@alturismo Ich muss mich für meinen frustrierten Post weiter oben entschuldigen. Ich war einfach nur so genervt von mir selber, so schnell mich in UNRAID gestürtzt zu haben aus einem Bauchgefühl heraus, dass die Community hilfsbereit und die Software ausgereift ist. Die Community ist toll (auch du hast freundlich geantwortet, dass kennt man so im Netz eigentlich gar nicht, wenn man als Newbie gerade den absoluten Frust schiebt und den ungefiltert herauslässt) und die Software IST ausgereift. Nachdem du auch zum x. Mal geschrieben hast "es.liegt.an.der.hardware" und ich Memtest, Temps usw. alles durch hatte habe ich *nochmal* alles aufgemacht und überprüft. (Danke) Ich weiß nicht ob es das war, aber in der SAS-Backplane von dem Gehäuse mit den 3 Molexanschlüssen war der letzte irgendwie etwas lose, obwohl ich den Server nicht bewegt habe, obwohl ich nach dem finalen Einbau noch einmal alle Stecker geprüft habe. Zumindest der Paritycheck von 1 Tag und 4 Stunden lief fehlerfrei durch, ich werde mich gleich weiter an die Betankung machen.2 points
-
(chuckling at the irony of some of these people who illegally download movies they didn't pay for, complaining that software they already own that isn't changing, but new purchases will incur potential recurring fees to support further development of the platform they love, use, and, again, already own and will continue to receive the benefits of using at no additional cost.) Seriously folks, it's a standard, common sense practice for mature software to have recurring fees to sustain continued development. If it didn't, once you hit a market saturation point for your product, you essentially can only cover maintenance but no other development (or get in the business of harvesting your existing user base's personal information to sell to third parties.) Some of you complaining would be shocked to learn that there are many of us that pay hundreds every year for updates to other software companies we use and need. From audio and video editing, to network licensing. I do. I just did 2 weeks ago! But I evaluate if the new features in that next version are worth it, or skip a generation. Now, with all that said, I will honestly admit that the little cheapskate in me doesn't like any increase on anything ever! Even if I can rationally justify it. And that's because nobody really wants to gleefully pay more for anything. I hear you. I feel you. I started out like some folks cobbling together hardware and sketchy drives to make my first server. Many of you are probably still in this stage. But 8 years later, and after numerous sever interactions, I run 4 licenses now on solid hardware with solid drives [knock on wood.] If their newly announced model was implemented when I first looked around 8 years ago, it would have given me the same pause to consider it versus alternatives. I would have still tried all the other free operating systems like I did. But I think in the end, I would have still picked Unraid for its ease of use, ability to run on a wide range of hardware, and community support. I think that it's ridiculously generous that Unraid has stated that they will grandfather previously sold licenses to have continued updates. Some of my licenses are 7 or 8 years old, and I'm still getting new features, new patches, and more. There is no other software that I own that has done that beyond a few years. This is why I have recommended this os, and will continue to do so. I'll just tell people to suck it up and buy the lifetime upfront, as it'll pay for itself over time, and give the dev's the ability to do more sooner. --- as a postscript, don't reply to me with nonsensical arguments or how it "costs a month's worth of food" replies. I'll just ignore them. This software is a luxury, not a necessity. If you are having to make the decision between eating versus storing more data than the average pc can do, then the solution is simple; go use a completely free os and stop making irrelevant arguments.2 points
-
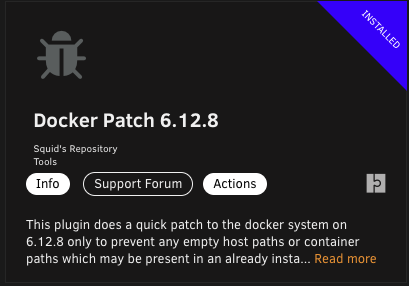
This plugin does a quick patch to the docker system on 6.12.8 only to prevent any empty host paths or container paths which may be present in an already installed template (or on a new installation) from triggering an error (and creating an orphan image) when updating the application. This is NOT fixing any bug in Unraid at all. Previously, the docker run command (eg: on 6.12.6) would not return an error if there was no container path specified. The docker system in 6.12.8+ does return an error (which is the proper operation). This quick patch simply has the docker system not add in to the docker run command any paths which has either the container or host side of it blank. If you did update an application and then had it orphan due to an empty path, then simply installing this plugin and then going to Apps, Previous Apps and reinstalling will get you back and running without changing the template to how it should be set up
 1 point
 -
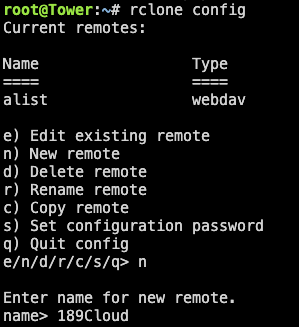
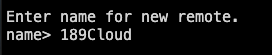
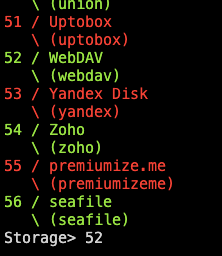
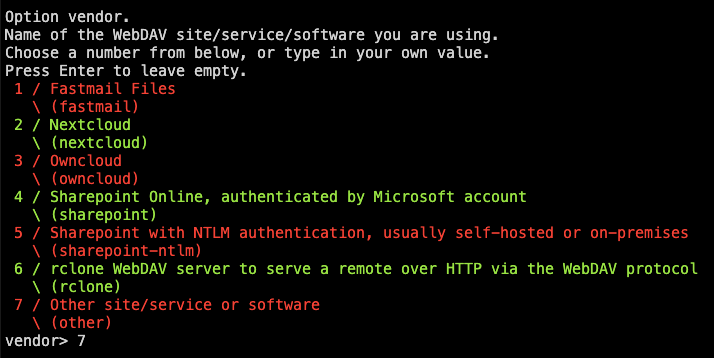
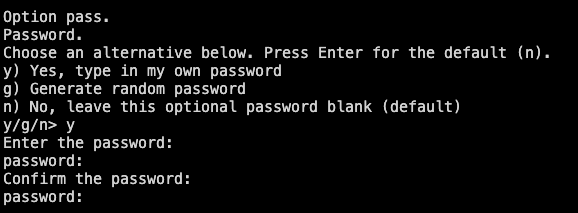
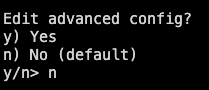
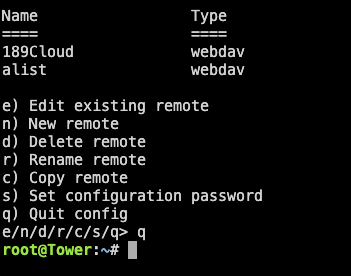
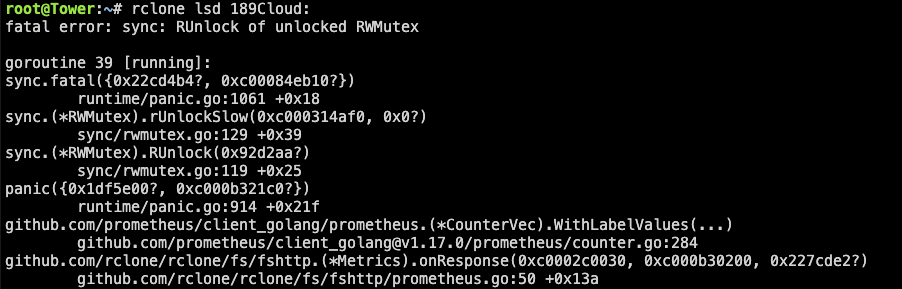
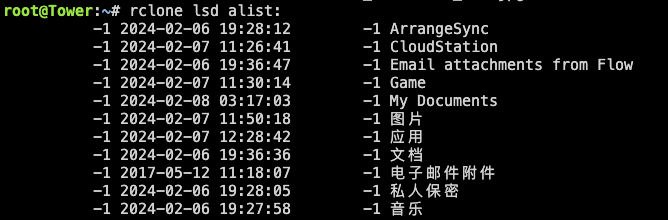
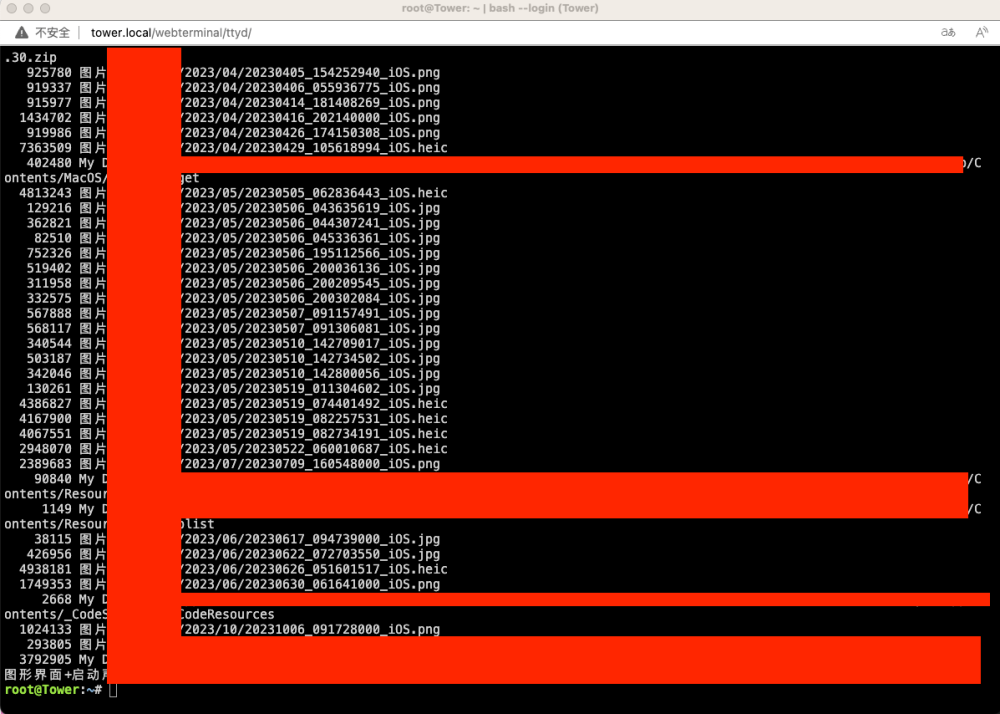
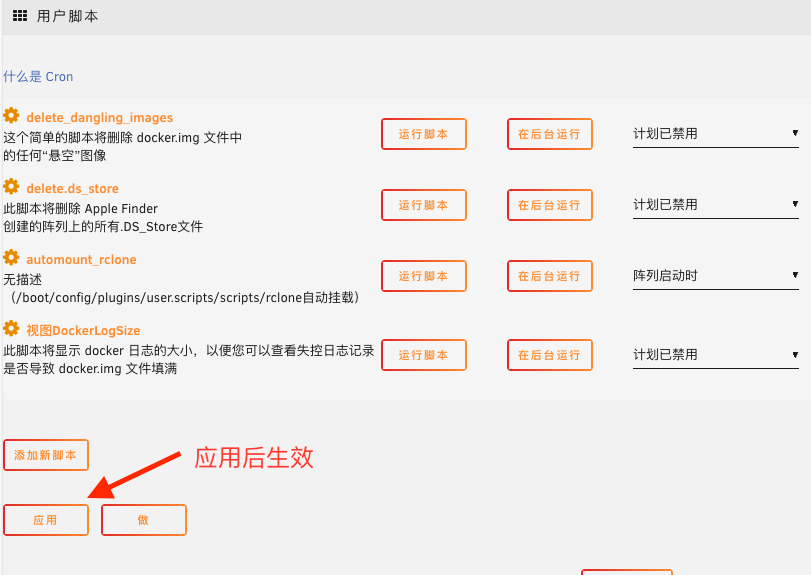
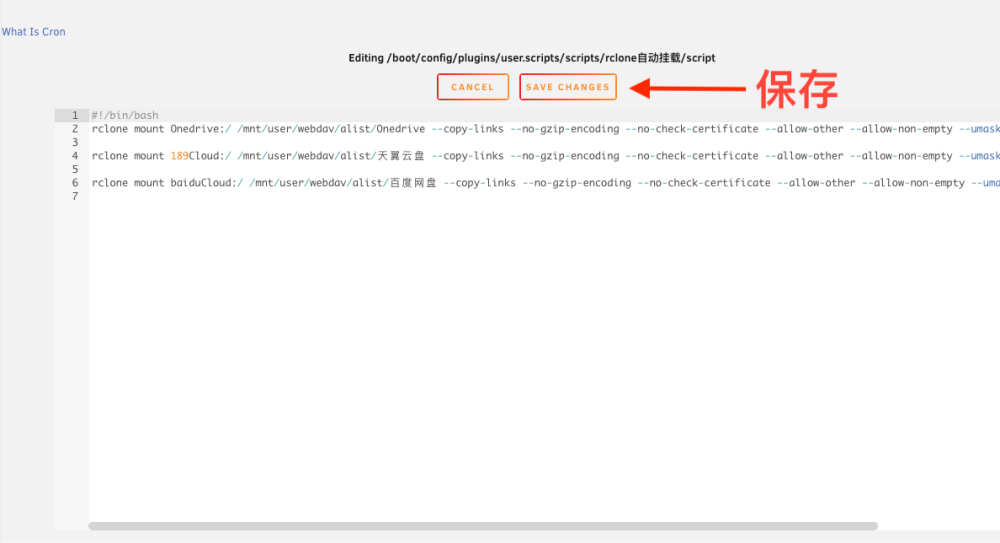
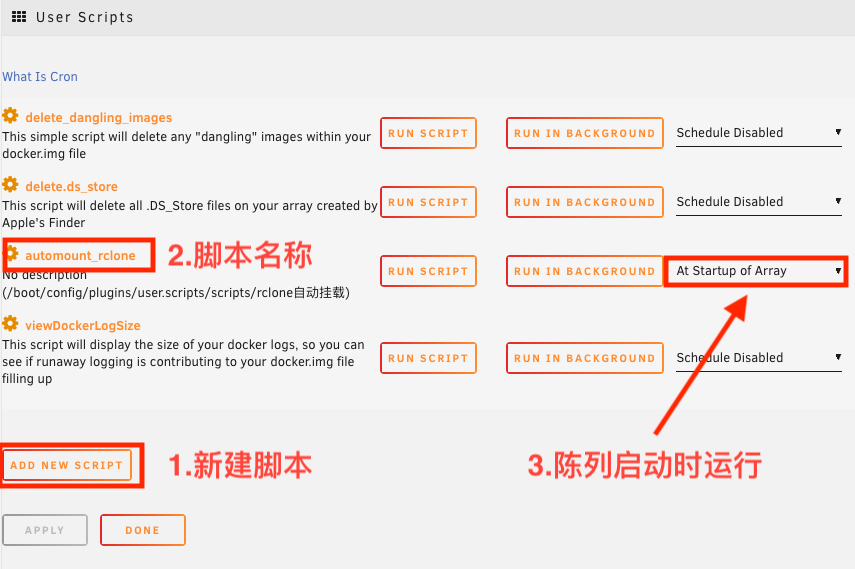
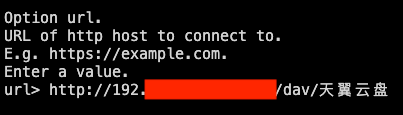
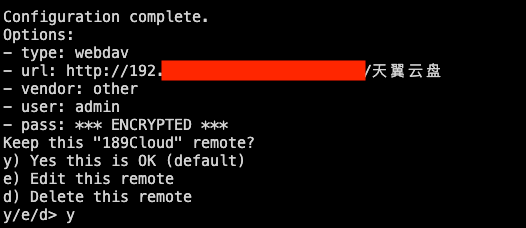
rclone挂载网盘到本地(Alist篇) alist 最近折腾unraid存储服务器,对于云盘有很多的APP特别麻烦,所以想把所有不同的网盘都放在一起进行管理,先是用了CloudDrive2感觉很不错,图形界面设置很简单,小白都会。我也喜欢,但免费版只能挂两个云盘,一个本地。着实有点失望,开终身会员499.论价格只是unraid一半,但对免费用户来说 ,有点小贵。直到听说alist的大名,rclone是全系列的产品。苹果,Windows,linux等系统全支持。以前还没有用过,这次就来试试。如遇到问题可以去官方网站研究。 本次我们跳过所有官方方法安装,在unraid安装插件来实现本地挂载云盘。 安装 1.打开unRaid,到应用 2.搜索“rclone” 3.最新版会有两个rclone,一个docker版,一个插件版。 4.我们下载插件版。 5.如果无法安装。先下载一个docker版的v2rayA。架梯子安装。我用正版unRaid没有任何系统设置,把梯子架好后,添加节点。选择美丽的节点。运行梯子。就能正常下载rclone,不像网上说的那样要在系统go文件,或是在etc网络文件中添加设置才能用 。 5.安装完成后,选择插件,看看rclone有没有在插件中。如果有。 6.点右上角的“终端”打开 7.下面我们将开始配置rclone。 配置rclone rclone config # 进入rclone设置 1. No remotes found, make a new one? n) New remote # 创建新配置 s) Set configuration password # 为配置设置密码 q) Quit config # 退出配置 n/s/q> n enter。 #这里选择n 2. Enter name for new remote. name> 189Cloud enter。 # 设置名字(网络教程都是用remote为配置名)。 3. Option Storage. Type of storage to configure. Choose a number from below, or type in your own value. 前面省略50种连接……. 51 / Uptobox \ (uptobox) 52 / WebDAV \ (webdav) 53 / Yandex Disk \ (yandex) 54 / Zoho \ (zoho) 55 / premiumize.me \ (premiumizeme) 56 / seafile \ (seafile) Storage>52 enter。 #输入你做连接的服务器序号,这儿我们用webdav做连接,所以选择52 4. Option url. URL of http host to connect to. E.g. https://example.com. Enter a value. url> http://192.168.xxx.xxx:5244/dav/天翼云盘 enter # 设置远程地址url: http://your_alist_ip:port/dav/网盘名 #这里在alist的地址和端口后加/dav,是alist官方端口挂载要求的 5. # 这里选7就可以了,1-6都不是我们使用的 Name of the WebDAV site/service/software you are using Choose a number from below, or type in your own value Option vendor. Name of the WebDAV site/service/software you are using. Choose a number from below, or type in your own value. Press Enter to leave empty. 1 / Fastmail Files \ (fastmail) 2 / Nextcloud \ (nextcloud) 3 / Owncloud \ (owncloud) 4 / Sharepoint Online, authenticated by Microsoft account \ (sharepoint) 5 / Sharepoint with NTLM authentication, usually self-hosted or on-premises \ (sharepoint-ntlm) 6 / rclone WebDAV server to serve a remote over HTTP via the WebDAV protocol \ (rclone) 7 / Other site/service or software \ (other) vendor>7 enter。 #因为我们选择的是webdav方法挂载云盘。这里选择其它方式连接到服务器就可以了 6. Option user. User name. In case NTLM authentication is used, the username should be in the format 'Domain\User'. Enter a value. Press Enter to leave empty. user> admin #这里是你alist的用户名 7. Option pass. Password. Choose an alternative below. Press Enter for the default (n). y) Yes, type in my own password #是的,输入我自己的密码 g) Generate random password #生成随机密码 n) No, leave this optional password blank (default) # 否,将此可选密码留空(默认) y/g/n>y enter #这里输入y Enter the password: password: #这输入你的密码,密码是看不到的 Confirm the password: password: #再次输入你的密码 enter 8. Option bearer_token. Bearer token instead of user/pass (e.g. a Macaroon). Enter a value. Press Enter to leave empty. bearer_token> enter # 这里是填写密钥的,如果没有可以留空 #直接回车 9. Edit advanced config? y) Yes n) No (default) y/n>n enter #默认配置就可以了 #高级配置或默认配置。 10. Configuration complete. Options: - type: webdav - url: http://192.168.xxx.xxx:5244/dav/天翼云盘 - vendor: other - user: admin - pass: *** ENCRYPTED *** Keep this "189Cloud" remote? y) Yes this is OK (default) #是的,我确认默认配置 e) Edit this remote #编辑配置 d) Delete this remote #删除配置 y/e/d> y enter 确认配置无误后,确认。 11. Current remotes: Name Type ==== ==== 189Cloud webdav alist webdav e) Edit existing remote n) New remote d) Delete remote r) Rename remote c) Copy remote s) Set configuration password q) Quit config e/n/d/r/c/s/q> q # 最后按q退出设置 挂载到本地 1: 查看是否连接成功,使用以下命令可以确认是否已经挂载上了alist和天翼云盘 rclone lsd Onedrive: rclone lsd 189Cloud: # 查看alist的文件目录 #查看天翼云盘的文件目录 2: rclone ls Onedrive: rclone ls 189Cloud: # 查看Onedrive的文件 #查看天翼云盘的文件 如果发生下面的结构,应该检查,你输入的运行脚本是不是正确,查找错误,更正后,就可以看到你的网盘结构了。 # 一、 前台模式挂载到本地 (建议用户使用后台挂载) #1.将Onedrive挂载到本地目录/webdav rclone mount Onedrive:/ /mnt/user/webdav/alist/Onedrive --copy-links --no-gzip-encoding --no-check-certificate --allow- other --allow-non-empty --umask 000 --use-mmap 挂载完成后,发现控制台就卡住了,在官方文档看了半天,发现这是前台命令,会一直运行,ctrl+c之后就会退出本地挂载。 #2. 将天翼挂载到本地目录/webdav (建议用户使用后台挂载) rclone mount 189Cloud:/ /mnt/user/webdav/alist/189Cloud --copy-links --no-gzip-encoding --no-check-certificate --allow-other --allow-non-empty --umask 000 --use-mmap 二、 后台模式挂载到本地 # 1.将Onedrive挂载到本地目录/webdav # --daemon 强制后台模式 rclone mount Onedrive:/ /mnt/user/webdav/alist/Onedrive --copy-links --no-gzip-encoding --no-check-certificate --allow-other --allow-non-empty --umask 000 --use-mmap --daemon 官方文档只是提了以下这个命令,并没有太详细的信息。 # 2.将189Cloud挂载到本地目录/webdav # --daemon 强制后台模式 rclone mount 189Cloud:/ /mnt/user/webdav/alist/天翼云盘 --copy-links --no-gzip-encoding --no-check-certificate --allow-other --allow-non-empty --umask 000 --use-mmap --daemon # 3.将189Cloud挂载到本地目录/webdav # --daemon 强制后台模式 rclone mount baiduCloud:/ /mnt/user/webdav/alist/百度网盘 --copy-links --no-gzip-encoding --no-check-certificate --allow-other --allow-non-empty --umask 000 --use-mmap --daemon 其它的云盘挂都是一样的配置。只是把下面改在成你所用的云盘就行。 Onedrive:/ /mnt/user/webdav/alist/Onedrive 189Cloud:/ /mnt/user/webdav/alist/天翼云盘 baiduCloud:/ /mnt/user/webdav/alist/百度网盘 115:/ /mnt/user/webdav/alist/115 结构简析: Onedrive:/ /mnt/user/webdav/alist/Onedrive Onedrive:/ rclone配置名称(自己创建)。为网盘的名字不特指微软网盘test为要挂载的网盘文件夹路径,不填留为挂载整个网盘 /mnt/user/rclone/onedrive 本地用于挂载的目录 关于其他参数含义,可自行查阅最下方命令说明 如需要给emby之类使用,挂载文件夹不显示文件,请修改--umask 000 在emby终端输入 umask / # umask 0022 / # 将示例中--umask 000修改为--umask 0022emby即可正常访问文件 解除本地挂载 # 解除本地挂载,后面跟的是挂载的本地目录 # 当自动取消挂载失败时,也可以这样手动取消挂载 fusermount -qzu /webdav 开机自动挂载 上面的手动挂载方式,在机器重启后,就失效了,每次都要手动在设置一遍,很麻烦。我们可以使用service文件来进行自动挂载。 一、使用User Scripts插件新建开机任务 在 Unraid 应用中心安装 User Script 插件。安装后打开插件,添加新脚本,此处命名为 automount_rclone 1. 添加新脚本 2. 脚本名称命名为:automount_rclone 3. 保存 4. 编辑脚本 5. 把要挂载的网盘的后台运行脚本全都添加到编辑栏中 6. 如果有两条或更多回车后再添加一条。 7. 保存脚本。 8. 计划任务以“陈列启动时运行” 9. Apply(应用) 10.Done(完成) 设置好之后,就可以开机启动阵列自动挂载了。 二、 修改Service文件新建开机任务,输入示例命令 (本人未测试,但作为保留) 设置service文件 #创建service文件 vim /usr/lib/systemd/system/rclone.service 文件内容: [Unit] Description=rclone [Service] User=root ExecStart=/usr/bin/rclone mount alist: /webdav --copy-links --no-gzip-encoding --no-check-certificate --allow-other --allow-non-empty --umask 000 --use-mmap [Install] WantedBy=multi-user.target 设置开机自启 # reload守护进程 systemctl daemon-reload # 设置service文件自启 systemctl enable rclone.service # 启动service文件 systemctl start rclone.service 总结 相对来说alist配置配置还是比较简单,很快就能通过文档设置好。相对比较麻烦的是rclone,会出现报错情况,只能一点一点排查,如果按照文档走,大概率可以规避掉一些问题。


 1 point
 -
I recently defragmented my XFS array drives and I thought I'd document the process. Note: defragmenting takes a long time, so if you decide to do this you should either be working directly on the console (i.e. with a keyboard and monitor attached directly to the system) or via SSH and screen (from the NerdPack plugin). If someone has success using Shell in a Box let me know, otherwise I recommend you avoid it. First, I disabled my monthly parity check and Dynamix File Integrity cron jobs, just to ensure they wouldn't slow things down. I left Cache Dirs running. Then I ran xfs_db on each drive to see whether they were fragmented. Here are the commands I typed for disk3, along with some comments and the results: # The -r means read-only, so for this step no changes are made # do not use /dev/sdXX # for 6.12 and newer use /dev/mdXp1 # for 6.11 and older use /dev/mdX root@Tower:~# xfs_db -r /dev/md3 # "frag" shows overall fragmentation xfs_db> frag actual 2031, ideal 1419, fragmentation factor 30.13% # "frag -d" shows directory fragmentation xfs_db> frag -d actual 29, ideal 29, fragmentation factor 0.00% # "frag -f" shows file fragmentation xfs_db> frag -f actual 1317, ideal 705, fragmentation factor 46.47% xfs_db> quit I'm not sure what the cutoff should be, but I decided 46% file fragmentation was past it. So I ran this to defrag it: xfs_fsr -v /dev/md3 This is a 4TB drive with 3TB of data (mostly movies). It ran for nearly 48 hours! When I checked the results afterwards, fragmentation was improved although not as much as I expected: root@Tower:~# xfs_db -r /dev/md3 xfs_db> frag actual 1608, ideal 1419, fragmentation factor 11.75% xfs_db> frag -d actual 29, ideal 29, fragmentation factor 0.00% xfs_db> frag -f actual 894, ideal 705, fragmentation factor 21.14% xfs_db> quit I ran it a second time, but the results were almost identical. Afterwards: I ran a parity check and there were no errors, confirming that parity is not affected by this process. I used the "check" feature of the Dynamix File Integrity plugin and confirmed that the files were all fine. Crashplan did not detect any changes in the files either. So the process worked, although it didn't reduce fragmentation as much as I expected it to. Open questions: How often does the fragmentation level need to be checked? What fragmentation % warrants a defrag? At what point does fragmentation actually become an issue? I'm guessing somewhere around 80-90%? Anyway, hopefully this will help someone.1 point
-
Hallihallo Allerseits. Ich habe des öfteren das Mainboard Gigabyte B760M DS3H DDR4 als ein sparsames Mainboard benannt. Daraufhin haben mich ebenfalls des öfteren Fragen dazu erreicht. Da ich das Mainboard sowieso nur für Testzwecke (eigentlich für Windows zum Festplatten und SSD testen & prüfen) gekauft habe, habe ich aktuell Zeit es auch für Unraidtests zu nutzen. Ggf. werde ich diesen Beitrag von Zeit zu Zeit mit weiteren Infos erweitern. Aktuell geht es erst einmal um den Stromverbrauch/C-States des Boards und einiger NVME SSD. Ergänzend zu meiner Testorgie mit verschiedenen Steckkarten und Bestückungen unter https://forums.unraid.net/topic/152936-hilfe-bei-entscheidungsfindung-erster-build/?do=findComment&comment=1367540 will ich es auch mal nutzen um auf dem (fast) nackten Mainboard verschiedene angefragte oder von mir gelegendlich erwähnte Komponenten zu prüfen (die ich auch aktuell noch so in meinem Fundus habe & aktuell nicht direkt anderweitig brauche). Erst einmal die Ausgangssituation: Hardware und Beschaltung: - Gigabyte B760M DS3H DDR4 (BIOS/UEFI: 2023-11-09 F16b) (BIOS auf Default und dann die unten im Bild 1 erkennbaren Abweichungen eingestellt). !! (Beachte ich habe aus Stromspargründen im BIOS die CPU und PCH Geschwindigkeit auf PCIE 3.0 reduziert! Somit laufen auch die später eingesteckten Komponenten (auch die NVME SSDs) mit PCIE 3.0) !! - Intel I3-12100 boxed (incl. Intel boxed CPU Kühler) - 2x 16GB DDR4-3200 Mushkin Essentials (MES4U320NF16) - kein SATA - interne Netzwerkkarte (Realtek RTL8125BG) 1GBLan Link aktiv - PCIe 4.0 x16: leer - M.2 NVME Slot neben CPU: leer - 1. PCIe 3.0 x1: leer - 2. PCIe 3.0 x1: leer - M.2 NVME Slot (Chipsatz) am Ende des Mainboard: leer - QNAP Netzteil (12V 5A max. 67W) des QNAP TR-004 (vernmutlich nicht so effizient wie die oft empfohlenen Leicke) hatte ich noch rumfliegen. Ein Leicke 156W 12V ist unterwegs. - Inter-Tech Mini-ITX PSU 160W, Wandlerplatine (88882188) 12V Input - USB Bootstick: Transcend Jetflash 600 32GB - USB 2.0 Kabelpeitsche: USB_SanDisk_3.2 Gen1 32GB als einzige Disk im Array (weil sich unraid sowieso ja nur mit Array vollständig nutzen läßt). Array mit Autostart, damit es imme rgleich ist und ich nach einem Reboot für die Tests nicht erst ins WebGUI zum Starten gehen muß. Unraid hat alle Systemshares automatisch auf die USB Stick gelegt (weil ich ja keinen Pool/Cache-SSD eingebunden habe) und damit den USB Stick schon mit 28GB von den vorhandenen nominal 32GB belegt. Software: unraid 6.12.4 stable (weil ich keine Lust habe mich nur für diese Tests mit manuellen ASPM Einstellungen rumzuschlagen. Ich weiss da immer noch nicht so ganz, was ich da wirklich tue und will nicht durch Hardwareveränderungen wieder die passenden 'setpci' parameter rausfummeln.) Community App nerdtools + powertop-2.15-x86_64-1.txz Dynamix Cache Dirs Dynamix File Manager Dynamix System Temperature Unassigned Devices Unassigned Devices Plus Unassigned Devices Preclear im Go File: powertop --auto-tune alle tunables stehen auf "Good" WebGUI und Terminal geschlossen, idle, der Bildschirmschoner hat den angeschlossenen HDMI Ausgang schwarz geschaltet (das spart hier noch mal rund 1W, deshalb warte ich mindestens diesen 'Bildschirmschoner' ab). Messungen wieder mit AVM DECT200 Funksteckdose. Messung 1: nur die nackte (oben genannte Konfiguration) - knapp unter 10W (Siehe Bild 2) Messung 2: M.2 NVMe/PCIe SSD AData Legend 960 4TB PCIe 4.0 x4 (mit dem Max Kühlkörper) im M.2 Slot (Chipsatz) am unteren Ende des Mainboard eingebaut. Wird in den Unassigned Devices gelistet. Ich werde sie nicht weiter einbinden/Formatieren, da es mir hier nur um die Auswirkungen auf den Energieverbrauch idle bzw. die C-States geht. - wieder knapp unter 10W (Siehe Bild 4). Sie wird in Powertop tunables übrigens gelistet und auch da steht sie auf "Good" Messung 3: Die Selbe M.2 NVMe/PCIe SSD AData Legend 960 4TB PCIE 4.0 x4 (mit dem Max Kühlkörper) im M.2 Slot der CPU, da sich das Verhalten der CPU ändern kann, wenn etwas direkt angeschlossen ist und das vielleicht tiefere C-States verhindern könnte oder ob etwas am Chipsatz hängt. Sie wird wieder als Unassigned Devices gelistet. Auch hier nicht weiter eingebunden/formatiert. - Hier werden wieder rund 10W dargestellt (Siehe Bild 6). Diese NVMe SSD wirkt sich also in beiden M.2 Slots identisch aus. Weiterhin in Powertop tunables "Good" Messung 4: M.2 NVMe/PCIe SSD Patriot Viper VP4300 Lite 4TB PCIe 4.0 x4 (VP4300L4TBM28H) im M.2 Slot (Chipsatz) am unteren Ende des Mainboard eingebaut. Auch die wird in den Unassigned Devices gelistet. - wieder knapp unter 10W (Siehe Bild 8). Sie wird in Powertop tunables übrigens als "MAXIO Technology (Hangzhou)" gelistet und auch da steht sie auf "Good" Messung 5: die Selbe M.2 NVMe/PCIe SSD Patriot Viper VP4300 Lite 4TB PCIe 4.0 x4 (VP4300L4TBM28H) im M.2 Slot der CPU. Auch die wird in den Unassigned Devices gelistet. - wieder knapp unter 10W (Siehe Bild 10). weiterhin in Powertop tunables als "MAXIO Technology (Hangzhou)" auf "Good" Messung 6: M.2 NVMe/PCIe SSD Samsung SSD 960 PRO 512GB,PCIe 3.0 x4 (MZ-V6P512BW) (Beifang aus einem gebraucht gekauften PC) im M.2 Slot des Chipsatzes. Auch die wird in den Unassigned Devices gelistet. - wieder knapp unter 10W (Siehe Bild 10). weiterhin in Powertop tunables als "Samsung Electronics Co Ltd NVMe SSD Controller SM961/PM961/SM963" auf "Good" Messung 7: M.2 NVMe/PCIe SSD Samsung SSD 960 PRO 512GB,PCIe 3.0 x4 (MZ-V6P512BW) (Beifang aus einem gebraucht gekauften PC) im M.2 Slot der CPU. Auch die wird in den Unassigned Devices gelistet. - Hier werden nun 10,08W gemeldet. Ob das nun Messtoleranz ist oder wirklich ein paar Millliwatt mehr kann ich nicht entscheiden. (ich spare mir die beiden Screenshots... sieht fast so aus, wie in Messung 6 und auch hier wird C10 überwiegend erreicht). Messung 8: M.2 NVMe/PCIe SSD Lexar NM790 4TB PCIe 4.0 x4 (LNM790X004T-RNNNG) im M.2 Slot des Chipsatzes. Auch die wird in den Unassigned Devices gelistet. - wieder bleibt es knapp unter 10W (Siehe Bild 14). In Powertop wird sie mit "Shenzhen Longsys Electronics Co., Ltd" gelistet und ist auch als "good" angegeben Da sich bei vorangegangenen Beispielen kein wirklicher Unterschied zwischen den M.2 Slots ergab (Chipsatz und CPU) erspare ich allen hier die Messung im CPU M.2 Slot. (Ja, ich bin gerade wieder faul). Fazit bis hier hin: Entweder ich mache etwas falsch (dann bitte Info) oder alle hier getestete SSD beeinflußen, unter den gegebenen Bedingungen, die C-States bei mir in dem System nicht und wirken sich auf den Verbrauch des Systemes idle nur im (von mir) nicht meßbaren Bereich aus. Bild 1: BIOS Default mit folgenden Abweichungen: Bild 2: Messung 1 (nackte Ausstattung) - AVM DECT200 Anzeige in Fritzbox Bild 3: Messung 1 - Powertop Anzeige der C-States nach rund 10 Minuten Bild 4: Messung 2 (mit Legend 960 im Chip-M.2) - AVM DECT200 Anzeige in Fritzbox Bild 5: Messung 2 - Powertop Anzeige der C-States nach rund 5 Minuten (die niedrigeren C10-Prozentzahlen liegen vermutlich an dem kürzeren Messzeitpunkt seit Boot). Bild 6: Messung 3 (mit Legend 960 im CPU-M.2) - AVM DECT200 Anzeige in Fritzbox Bild 7: Messung 3 - Powertop Anzeige der C-States nach rund 5 Minuten (die niedrigeren C10-Prozentzahlen liegen vermutlich an dem kürzeren Messzeitpunkt seit Boot). Bild 8: Messung 4 (mit Viper VP4300 Lite im CHIP-M.2) - AVM DECT200 Anzeige in Fritzbox Bild 9: Messung 4 - Powertop Anzeige der C-States nach rund 5 Minuten Bild 10: Messung 5 (mit Viper VP4300 Lite im CPU-M.2) - AVM DECT200 Anzeige in Fritzbox Bild 11: Messung 5 - Powertop Anzeige der C-States nach rund 5 Minuten Bild 12: Messung 6 (mit Samsung SSD 960 PRO im CHIP-M.2) - AVM DECT200 Anzeige in Fritzbox Bild 13: Messung 6 - Powertop Anzeige der C-States nach rund 5 Minuten Bild 14: Messung 8 (mit Lexar NM790 im CHIP-M.2) - AVM DECT200 Anzeige in Fritzbox Bild 15: Messung 8 - Powertop Anzeige der C-States nach rund 5 Minuten


 1 point
 -
This release has two very important fixes around security and data integrity, along with other improvements and bug fixes. All users are encouraged to read the release notes and upgrade. Upgrade steps for this release As always, prior to upgrading, create a backup of your USB flash device: "Main/Flash/Flash Device Settings" - click "Flash Backup". Update all of your plugins. This is critical for the Connect, NVIDIA and Realtek plugins in particular. If the system is currently running 6.12.0 - 6.12.6, we're going to suggest that you stop the array at this point. If it gets stuck on "Retry unmounting shares", open a web terminal and type: umount /var/lib/docker The array should now stop successfully (this release takes another stab at preventing issues related to Docker not stopping properly) If you have the latest Connect plugin installed, or Unraid 6.12.7-rc2: Open the dropdown in the top-right of the Unraid webgui and click Check for Update. More details in this blog post If you don't have the Connect plugin installed Go to Tools -> Update OS and switch to the "Stable" branch if needed. If the update doesn't show, click "Check for Updates" Wait for the update to download and install If you have any plugins that install 3rd party drivers (NVIDIA, Realtek, etc), wait for the notification that the new version of the driver has been downloaded. Reboot This thread is perfect for quick questions or comments, but if you suspect there will be back and forth for your specific issue, please start a new topic. Be sure to include your diagnostics.zip.1 point
-
Update should be available for this in ~5 minutes.1 point
-
Try it in safe mode and without the dockerd command you're running in /config/go on the flash drive1 point
-
I switched from emilated to host passthrough and now it all works as intended. Thank you very much for the help!1 point
-
1 point
-
Genau so ist es. Der Anlaufstrom hat bei 3x zeitgleich startende 3,5" HDDs schon Peak bei mir 75Watt, gemessen Fritz Dect 200. Bei 4x HDDs war das wohl overkill beim 65 Watt Netzteil. Wenn der Rechner anläuft und die 4 Platte nachtäglich angeschlossen wird, oder ein normaler Reboot, kein Problem. Nur der Kaltstart. Das Mainboard hat einen 12V und einen 5V Anschluss. Mit dem Umgebauten Kabel ging es. Danach einfach mit Y-Kabel weiter machen. Ich Poste mal meine Config: chenyang CY M.2 NVME NGFF M-Key SSD Stecker auf Buchse Verlängerungskabel 40cm mit SFF-8654 Steckeradapter für Mainboard SSD ASM 1166 M2 NVME SATA Adapter Firmware hab ich mir die neuste besorgt1 point
-
Found the new version of the plugin has USB power management override Will see if that may have been the reason for the disconnection and if this setting helps.
 1 point
 -
Thanks for the explanation and help rutherford. All populating now by the looks of it. Cheers again.1 point
-
Du hast recht. Ist in der Tat so. Versteh ich nicht. Ich werde jetzt mal ein paar Tage messen ob das auch wirklich was bringt und nicht nur ein Anzeigeproblem (was ich nicht glaube) ist. Du bekommst jetzt von mir erstmal ein Bienchen verliehen. (Gabs bei mir in der ersten Klasse bei: Hat gut seine Hausaufgaben gemacht). Gruss, Joerg
 1 point
 -
The idea behind Docker is that the software has everything it needs to run all inside its own walled garden. You specify a few little holes it has to see through in the docker config page on the unraid template. Port 55000 is open to it. You have your unraid path /mnt/user/Music mapped over to /music and a few other paths mapped. Roon, inside its little garden, thinks it has a /music folder, and has read write access to that folder. In fact, that /music folder is mapped to an external to the garden folder at /mmt/user/Music So scroll down a bit to the part where the folder /music resides and see if all your music files are in there. When we put a slash as the first thing, it means root directory. When we don’t specify a slash first, is a relative directory. let’s say my Documents folder is in my username folder. I’d type that like Documents/ if my documents was on my “C:” directly, I’d type /Documents I'm assuming you’re a windows user and have some experience with Windows Explorer.1 point
-
Das passt mit meiner Messung überein. Irgendwo knapp unter 2W (idle ohne Beschaltung).1 point
-
Wenns nur um paar Docker und einfache VMs geht reicht ein Asrock N100Dm (4 Kerne) mit 16GB RAM vollkommen aus. Leistung vergleichbar mit einem i5-7500, hat aber da neuer in der iGPU die aktuellen Codecs die für Plex relevant sind. Ist passiv gekühlt ohne Lüfter. Ist uATX Formfaktor. Um 6 Platten ansteuern zu können braucht man noch einen ASM1166 PCie SATA Controller zusätzlich (es muss!!! der ASM1166 sein, andere machen allgemein Probleme). Bei bis zu 6 Platten reicht eine 160W PicoPSU mit hoher Wahrscheinlichkeit aus, das macht das System nahezu lautlos (Festplattenzugiffe mal aussen vor, die hört man). Stromverbrauch mit 6HDDs im Spindown und paar Dockern laufend vermutlich: 6-8W Board + 2W SATA Controller, +6W Festplatten = 16W, eher weniger. Mit laufenden HDDs statt im Spindown erhöht sich das natürlich. Preis: - 125 Euro Board mit CPU - 40 Euro 16GB RAM - 25 Euro PicoPSU - 46 Euro Leicke 156W Netzteil für die PicoPSU - 40 Euro??? ASM1166 (hier bin ich jetzt nicht sicher, am besten @DataCollector fragen, der ist unser SAT Controller Guru) = 276 Euro Datenträger sind natürlich nicht kalkuliert. Dann kannst Du eine 1-2TB NVME als Cache einsetzen und bis zu 6 HDDs (2 auf dem Board und 4 via SATA PCIe ASM1166 Controller. Gruss, Joerg1 point
-
Post docker run1 point
-
With that many reallocated sectors I am surprised the disk is still functioning 😇1 point
-
You can run a scrub, ideally only after fixing the issue, assuming it's really RAM. Can be, and when multiple apps are having that issue it's almost always a hardware problem, most often bad RAM. Could have just coincided with the upgrade.1 point
-
Du hast Bedingungen für den E-Mail-Versand festgelegt, wo du u.a. nur bei Fehlern benachrichtigt werden möchtest....1 point
-
Ich bin gerade dabei diese und andere SSDs auf dem Gigabyte B760M von mir mal durchzujagen: Vielleicht kannst Du damit ja was anfangen.1 point
-
Based on the SMART report the disk needs to be replaced.1 point
-
1 point
-
Thanks for the quick reply, I'd assume once the parity disk is in and finish it's check job, the Array shares should turn to green, right?1 point
-
1 point
-
you may should take a look t the handbrake log what it says, if its really a hardware issue for handbrake or some missing setting for your encode i can confirm, plugin works nice here (incl. handbrake), thanks @giganode as soon other hardware encoders work it should also work for handbrake, sample, set a fixed fps for your output or or or ...
 1 point
 -
Thanks!!! That seemed to fixed everything.1 point
-
Once you have your largest disk completely copied elsewhere, change the desired format in that disk's properties page, when you start the array it will show unmountable and ask you to format it. As long as that particular drive is the only one showing unmountable, go ahead and format. Then copy the entire content of your next largest disk to the newly formatted disk, verify the copy was completed accurately with file comparisons or whatever, change the source disk format, lather, rinse, repeat.1 point
-
I watched this and it was very informative. I really liked the new licensing model, since it will allow the company to thrive w/o having to always seek new users. Van Dyke (who make my favourite ssh client) uses a 'updates' cost model so they can continue to develop. Great and informative show.1 point
-
In case anybody has problems finding the right tools. Theres an open source alternative "openSeaChest" on gihub which seems to work too. It has releases for different types of platforms: https://github.com/Seagate/openSeaChest1 point
-
This was happening to me. In my case, it was the DDNS container. Stopping it solved my issue. Now I just need to figure out why it is filling the folder. The process I used to determine which container was using all the space, Log into the terminal Determine if /run is full by running df Figure out which directory is using the space by running du /run In my case it was /run/docker/containerd/daemon/io.containerd.runtime.v2.task/moby/d0d2f1fc260167b0504709e92ee78b602a3acc9837735feff0d751c5cf55283d Take a look in the directory to see what is taking up the space so you can fix it later. In my case it was thousands of .pid files Note the hash, that is the container id Run docker container ls The first 12 characters from the hash should line up with one of the running containers listed Kill the offending container Fixed, buy yourself a beer1 point
-
In unraid itself
 1 point
 -
现在很多程序是可以实现unraid 本地文件夹或网盘文件夹 通过webdav(http)形式访问,比如alist,但是alist无法实现把webdav目录直接挂载到unraid共享目录里。挂载到本地用途就很多,比如可以直接备份(copy)任意文件或文件夹到网盘或和网盘做同步等。 之前如果实现这功能,需要docker装rclone,配置起来挺麻烦的。下面推荐个插件:davfs2 filesystem,可以很方便的挂载webdav目录到本地。 1、装完插件后基本用法: mount -t davfs http(s)://address:/path /mount/point 比如我的挂载路径如下: mount -t davfs http://192.168.1.31:5244/dav/webdav_backup /mnt/user/webdav/aliyun_backup http://192.168.1.31:5244/dav/webdav_backup 是我的webdav服务路径,这里用的alist挂的我某一个阿里云网盘。其他webdav服务器路径请根据实际情况填写。 /mnt/user/****,这是挂载到本地的路径。 2、如果你在shell中直接执行上面的mount命令,会提示输入webdav服务器登录用户名、密码,每次都要手动输入不现实,davfs提供了个存储webdav服务器登录用户名密码的文件,路径如下: /etc/davfs2/secrets 填写格式: http://webdav服务器地址:端口/路径 用户名 密码 比如我的: http://192.168.1.31:5244/dav/webdav_backup admin 123456 3、存放用户名密码的文件secrets,是存在内存中的,重启就没有了,所以最终形式就是开机执行一行代码,就可以一直挂载网盘目录了 #!/bin/bash echo "http://192.168.1.31:5244/dav/webdav_backup admin 123456" | sudo tee -a /etc/davfs2/secrets \ && sudo mount -t davfs http://192.168.1.31:5244/dav/webdav_backup /mnt/user/webdav/aliyun_backup 请自行替换自己的目录。 最后感谢插件作者。1 point
-
I can verify that you can use a physical monitor but you can not use the onboard hdmi/dp ports. With Intel GVT-g it was possible to use an usb to hdmi adapter. This also works with the new iGPUs, just passtrough the usb device and give it a go.. With my adapter I had to install a driver first, this may not be the case for every adapter.
 1 point
 -
Already updated, ffmpeg is now part of the container. Please updated the container itself.1 point
-
It's any publicly published version of Unraid OS, including "major" version updates, eg, from v6 to v7. We're also not going to play any games like coming up with "NewUnraid OS" where all of a sudden your key won't work or we start charging an extra fee to keep using.1 point
-
It's amazing the amount of people that can't read.1 point
-
Hello, I followed the installation steps, but after successfully linking the new device by clicking the link, nothing happens after the "Welcome Alain." prompt. When I restart the container, it seems as if the device is no longer linked and I am prompted to link the device again: Checking for latest Dropbox version... Latest : 192.4.4605 Installed: 192.4.4605 Dropbox is up-to-date Using Europe/Paris timezone (09:43:33 local time) Starting dropboxd (192.4.4605)... dropbox: load fq extension '/opt/dropbox/bin/dropbox-lnx.x86_64-192.4.4605/cryptography.hazmat.bindings._openssl.abi3.so' dropbox: load fq extension '/opt/dropbox/bin/dropbox-lnx.x86_64-192.4.4605/cryptography.hazmat.bindings._padding.abi3.so' dropbox: load fq extension '/opt/dropbox/bin/dropbox-lnx.x86_64-192.4.4605/apex._apex.abi3.so' dropbox: load fq extension '/opt/dropbox/bin/dropbox-lnx.x86_64-192.4.4605/psutil._psutil_linux.cpython-38-x86_64-linux-gnu.so' dropbox: load fq extension '/opt/dropbox/bin/dropbox-lnx.x86_64-192.4.4605/psutil._psutil_posix.cpython-38-x86_64-linux-gnu.so' dropbox: load fq extension '/opt/dropbox/bin/dropbox-lnx.x86_64-192.4.4605/tornado.speedups.cpython-38-x86_64-linux-gnu.so' dropbox: load fq extension '/opt/dropbox/bin/dropbox-lnx.x86_64-192.4.4605/wrapt._wrappers.cpython-38-x86_64-linux-gnu.so' This computer isn't linked to any Dropbox account... Please visit https://www.dropbox.com/cli_link_nonce?nonce=XXXXXXXXXXXXXXXXXXXXXXXXXX to link this device. When I click the link and add the device, I get this: Please visit https://www.dropbox.com/cli_link_nonce?nonce=XXXXXXXXXXXXXXXXXXXXXXXXX to link this device. This computer is now linked to Dropbox. Welcome Alain And then it just sits there. My settings for the container are as follows:
 1 point
 -
I slapped together this HP Z440, it looks fine when you put it on the main screen (though up close you can see some minor imperfections/misalignments).

 1 point
 -
I had this issue recently, where I was unable to unmount /mnt/cache even though all docker and VM services were stopped (as confirmed by `ps aux`). It turned out that the docker image was still mounted and this did the trick: umount /var/lib/docker Once I did that, it was able to unmount the cache immediately.1 point
-
This is a must: Please make a copy of you backup and firmware folder in the old docker container. Please go to the gear system > setting > backup and download current backup of your system. This is the new required to use the next gen package maintainers version per the announcement. If you rather stick to one docker please use PeteAsking version found here: Thank you PereAsking! Now then, Here is Some documentation on what users can do to stay in a package maintainers and receive continued updates and support. Unifi Docker Application Setup: Following the LinuxServer.IO group and to keep with package maintainer: Following there GitHub for setup… See: https://github.com/linuxserver/docker-unifi-network-application Lets start by Setting Up Your External Database Unraid Community App page: Mongo DB Maintainer Notes This is meant for mongodb 3.6 through 4.4 that are supported… but docker template works for Official mongo db image: https://hub.docker.com/layers/library/mongo/7.0-rc/images/sha256-5227c4e82658359049d86d9b87039b989e2b4e42908d93fcb6f042b8846a4cdb?context=explore Docker Hub Repository: mongo:7.0-rc The new Unifi Docker Application requires mongodb version 6 or higher…. YOU MUST SET A MONGO TAG! Don’t use latest! Mongdb doesn’t support in place upgrades between dockers and this will break you setup! We will also be making a init-mongo.js file for this docker to make our database, user, and access. THANK YOU wgstarks for you assistance on this: So a template change edit would look something like this: Install Official Mongo DB and at the template make the necessary changes: *Advance toggle at the top to view and make changes We will be adding a path, changing the network type and setting a mongo DB tag Change the following: *Unraid by default will go to folders you will need to go to where your init-mongo.js file you make is and type in the path to do a docker 1 for 1 file replacement and run. The init-mongo.js via GitHub Docker Maintainer should look something like this example init-mongo.js per github db.getSiblingDB("unifidb").createUser({user: "unifi", pwd: "Change_ME_password", roles: [{role: "dbOwner", db: "unifidb"}]}); db.getSiblingDB("unifidb_stat").createUser({user: "unifi", pwd: " Change_ME_password ", roles: [{role: "dbOwner", db: "unifidb_stat"}]}); With these edits you now have a working mongo 7 DB with a known database, user an password. Using the Host network now means that the ip address of you unraid or hostname of you unraid will now reach the MongDB. Example of a docker run: docker run -d --name='MongoDB' --net='host' -e TZ="America/Chicago" -e HOST_OS="Unraid" -e HOST_HOSTNAME="BMM-Unraid" -e HOST_CONTAINERNAME="MongoDB" -e 'TCP_PORT_27017'='27017' -l net.unraid.docker.managed=dockerman -l net.unraid.docker.icon='https://raw.githubusercontent.com/jason-bean/docker-templates/master/jasonbean-repo/mongo.sh-600x600.png' -v '/mnt/user/appdata/unifi-controler/mongodb/db-data/':'/data/db':'rw' -v '/mnt/user/appdata/unifi-controler/mongodb/init-mongo.js':'/docker-entrypoint-initdb.d/init-mongo.js':'ro' 'mongo:7.0-rc' I Have made folders and changed where docker will save the docker appdata and file paths... We are now ready to install the NEW Unifi Docker. Now lets make some small changes. I run an advance static network as such I like to have hostnames and mac address via custom Br0 to maintain ip firewall and known traffic. This will still work in bridge mode: example of my working docker run: docker run -d --name='unifi-network-application' --net='br0' --ip='192.168.1.4' -e TZ="America/Chicago" -e HOST_OS="Unraid" -e HOST_HOSTNAME="BMM-Unraid" -e HOST_CONTAINERNAME="unifi-network-application" -e 'TCP_PORT_8443'='8443' -e 'UDP_PORT_3478'='3478' -e 'UDP_PORT_10001'='10001' -e 'TCP_PORT_8080'='8080' -e 'UDP_PORT_1900'='1900' -e 'TCP_PORT_8843'='8843' -e 'TCP_PORT_8880'='8880' -e 'TCP_PORT_6789'='6789' -e 'UDP_PORT_5514'='5514' -e 'MONGO_USER'='unifi' -e 'MONGO_PASS'='change+me_password!' -e 'MONGO_HOST'='Unradihosname/IP addrerss' -e 'MONGO_PORT'='27017' -e 'MONGO_DBNAME'='unifidb' -e 'MEM_LIMIT'='4096' -e 'MEM_STARTUP'='1024' -e 'PUID'='99' -e 'PGID'='100' -e 'UMASK'='022' -l net.unraid.docker.managed=dockerman -l net.unraid.docker.webui='https://[IP]:[PORT:8443]' -l net.unraid.docker.icon='https://raw.githubusercontent.com/linuxserver/docker-templates/master/linuxserver.io/img/unifi-network-application-icon.png' -v '/mnt/user/appdata/unifi-controler/unifi_config/':'/config':'rw' --mac-address 02:42:C0:A8:01:5B --hostname UNIFI-DOCKER 'lscr.io/linuxserver/unifi-network-application' lets make some tempalte edits: add https://[IP]:[PORT:8443] so we can use the webui to open the container add the username you used in the init-mongo.js atm the above database name is unifidb, user unifi, password Change_Me_password and the host is the ip/hostname of unraid... fill in the necessary option in their correct places in the template. as they are optional, remove the bottom 2 options about the auth method and tls option. I have also increased the mem limit to 4 GB of ram this will now connect to the mongo db 7 on the unraid IP. and give you a https web connect to the controller. at setup click restore at bottom left and restore from the file you backed up at the very beginning. You will need to stop the unifi docker after the restore to move the backup folder and firmware folder to keep old backups and old device firmware. I Hope this helps other and users alike in moving and maintain their current configurations. I recommend moving sooner than later to keep back and restore files on the current unifi application version. as of writing that is: v7.5.187


 1 point
 -
Built-in backup MFA for WebUI Selective updates for containers Podman support1 point
-
As mentioned above, running Unraid as a VM is not a common occurrence, and isn't even officially supported. Some of us do it, though. Reasons vary. For me, it is the combination of a few reasons. (a) ESXi has been rock solid for me, for years now. It just works - and, in my scenario, it's always on, essentially feeling as part of the hardware. I've also not felt a need to update it (running an ancient 6.x version), so it's really always up - as long as the UPS can carry it. In contrast, I've been updating Unraid occasionally (that's a good thing!), taking it down from time to time for maintenance, and so forth. During those times, my other VMs were up and chewing. (b) Historically, for me, Unraid has mainly served as a (great) NAS, with its unique approach to building the storage array, protecting it etc. Its additional services (a few docker containers) have been an upside, running under Unraid as a convenience. Over the years Unraid as developed immensely and moved from being a storage solution into a one-stop-shop for your home server needs; I've not boarded that train - at least not completely. The shorter version is - I've started with VMWare as a hypervisor, it's been rock solid, my other VMs are not affected by Unraid's dynamic nature (updates etc.), never saw a good reason to flip that structure.1 point
-
Ok, you asked for it ^^ https://forums.unraid.net/topic/98033-xfs-extended-defragmentation/1 point
-
Yeah I'm not really sure why it took so long, or why it wasn't able to get to zero fragments when the drive has 1 TB of free space, you'd think there would be enough contiguous free space to finish the job. I'm not really worried about it though, 21% file fragmentation doesn't seem too bad. The good news is that there was no effort on my part, no downtime, and I didn't have to worry about data loss. Copy off/copy back would have added to all three. I'm not sure about that, I mean, how did the fragmentation get there in the first place? It isn't like I am editing the movies once they are on the array. When I copy from my desktop they go to the cache first and then mover takes them over to the array. Not really sure why they are getting fragmented since mover runs during the night when nothing else is writing to the array. That is definitely a discussion worth having! The good news is that with XFS we can easily measure fragmentation, the tough part is figuring out the threshold for when to take action.1 point