Leaderboard


Popular Content
Showing content with the highest reputation on 03/03/24 in all areas
-
Es funktioniert und es muss genau so ablaufen. Wenn ein Container gestartet ist und sich im Hintergrund Mount Points verändern dann bekommt das der Container nicht mit. Oftmals reicht ein Neustart des Containers in einem solchen Fall. Die Slave Option (z.B. r/w/s) hilft dabei auch nur in bestimmten Fällen - eben nicht immer. Es hängt davon ab, auf welcher Ebene oder Seite sich die Änderung ergibt. Offizielle Doku hierzu: https://docs.docker.com/storage/bind-mounts/#configure-bind-propagation2 points
-
Doch läuft mit so einem Konstrukt. Ich habe allerding nur eine Share eingebunden, den überwachten Ordner der nzbd, und bin über das gleiche Problem wie bei dir gestolpert. SABnzbd darf erst starten, wenn der Mount eingehangen ist. Das lässt sich sehr einfach über ein Device-Script zum Laufwerk mit docker start SABnzbd lösen. Also Autostart raus und über den Mount-Point regeln. Das Default-Script was du einfügen kannst, ist gut dafür vorbereitet.2 points
-
dein "Kostrukt" mit smb ist wahrscheinlich nicht die beste Lösung für das Szenario genau, diese bitte auf read/write/SLAVE setzen ... dafür ist diese Option dann ist die Chance größer dass das funktioniert, ohne SLAVE wird bei einem "Verlust" der path nicht mehr mounted 1/ ist weg 2/ schreibt gerne mal ins docker image anstelle effektiv dorthin ... genau und ja, für den "Moment" hätte das gereicht2 points
-
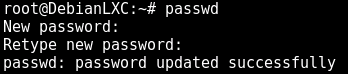
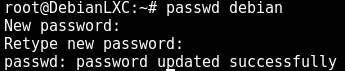
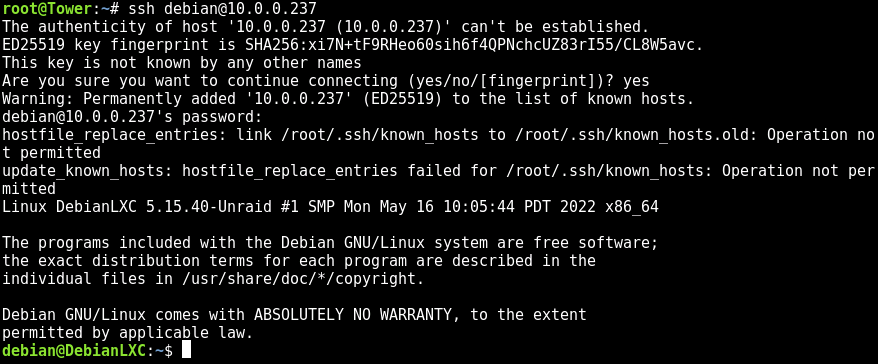
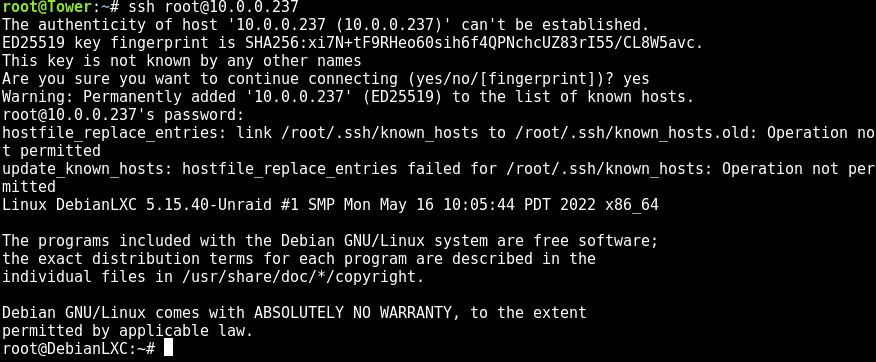
Install SSH Server in Debian based containers: Method 1 (recommended) : Attach to the container with "lxc-attach DebianLXC /bin/bash" (replace DebianLXC with your container name) : I would first recommend that you add a password for the user root, to do so enter "passwd" and enter your preferred root password two times (there is nothing displayed while typing) : Now Create a user with the command "useradd -m debian -s /bin/bash" (in this case the newly created username is "debian") : In the next step we will create a password for the user "debian" with the command "passwd debian" (replace "debian" with your preferred username) type in the password two times like above for the root user: Now install the openssh-server with "apt-get -y install openssh-server": After it successfully installed you can close the terminal window from the LXC container, connect via SSH to the container via Putty or your preferred SSH client through the IP from your container and the username "debian" and the password set for the user "debian" (in this example we will connect through a Linux shell with the command "ssh [email protected]" you see the IP address in the LXC tab in Unraid) : Now you are connected through SSH with the user "debian" to your LXC container. Method 2 (not recommended - root connection) : Attach to the container with "lxc-attach DebianLXC /bin/bash" (replace DebianLXC with your container name): I would first recommend that you add a password for the user root, to do so enter "passwd" and enter your preferred root password two times (there is nothing displayed while typing) : Now install the openssh-server with "apt-get -y install openssh-server": Now issue the command: "sed -i "/#PermitRootLogin prohibit-password/c\PermitRootLogin yes" /etc/ssh/sshd_config" (this will basically change your SSH configuration file so that you can login with the root account through SSH) : Restart the sshd service with the command "systemctl restart sshd" to apply the new settings: After that you can close the terminal window from the LXC container, connect via SSH to the container via Putty or your preferred SSH client through the IP from your container and the username "root" and the password set for the "root" user (in this example we will connect through a Linux shell with the command "ssh [email protected]" you see the IP address in the LXC tab in Unraid) : Now you see that you are connected through SSH with the user "root" to your LXC container.


 2 points
 -
This plugin does a quick patch to the docker system on 6.12.8 only to prevent any empty host paths or container paths which may be present in an already installed template (or on a new installation) from triggering an error (and creating an orphan image) when updating the application. This is NOT fixing any bug in Unraid at all. Previously, the docker run command (eg: on 6.12.6) would not return an error if there was no container path specified. The docker system in 6.12.8+ does return an error (which is the proper operation). This quick patch simply has the docker system not add in to the docker run command any paths which has either the container or host side of it blank. If you did update an application and then had it orphan due to an empty path, then simply installing this plugin and then going to Apps, Previous Apps and reinstalling will get you back and running without changing the template to how it should be set up
 1 point
 -
Hallihallo Allerseits. Ich habe des öfteren das Mainboard Gigabyte B760M DS3H DDR4 als ein sparsames Mainboard benannt. Daraufhin haben mich ebenfalls des öfteren Fragen dazu erreicht. Da ich das Mainboard sowieso nur für Testzwecke (eigentlich für Windows zum Festplatten und SSD testen & prüfen) gekauft habe, habe ich aktuell Zeit es auch für Unraidtests zu nutzen. Ggf. werde ich diesen Beitrag von Zeit zu Zeit mit weiteren Infos erweitern. Aktuell geht es erst einmal um den Stromverbrauch/C-States des Boards und einiger NVME SSD. Ergänzend zu meiner Testorgie mit verschiedenen Steckkarten und Bestückungen unter https://forums.unraid.net/topic/152936-hilfe-bei-entscheidungsfindung-erster-build/?do=findComment&comment=1367540 will ich es auch mal nutzen um auf dem (fast) nackten Mainboard verschiedene angefragte oder von mir gelegendlich erwähnte Komponenten zu prüfen (die ich auch aktuell noch so in meinem Fundus habe & aktuell nicht direkt anderweitig brauche). Erst einmal die Ausgangssituation: Hardware und Beschaltung: - Gigabyte B760M DS3H DDR4 (BIOS/UEFI: 2023-11-09 F16b) (BIOS auf Default und dann die unten im Bild 1 erkennbaren Abweichungen eingestellt). !! (Beachte ich habe aus Stromspargründen im BIOS die CPU und PCH Geschwindigkeit auf PCIE 3.0 reduziert! Somit laufen auch die später eingesteckten Komponenten (auch die NVME SSDs) mit PCIE 3.0) !! - Intel I3-12100 boxed (incl. Intel boxed CPU Kühler) - 2x 16GB DDR4-3200 Mushkin Essentials (MES4U320NF16) - kein SATA - interne Netzwerkkarte (Realtek RTL8125BG) 1GBLan Link aktiv - PCIe 4.0 x16: leer - M.2 NVME Slot neben CPU: leer - 1. PCIe 3.0 x1: leer - 2. PCIe 3.0 x1: leer - M.2 NVME Slot (Chipsatz) am Ende des Mainboard: leer - QNAP Netzteil (12V 5A max. 67W) des QNAP TR-004 (vernmutlich nicht so effizient wie die oft empfohlenen Leicke) hatte ich noch rumfliegen. Ein Leicke 156W 12V ist unterwegs. - Inter-Tech Mini-ITX PSU 160W, Wandlerplatine (88882188) 12V Input - USB Bootstick: Transcend Jetflash 600 32GB - USB 2.0 Kabelpeitsche: USB_SanDisk_3.2 Gen1 32GB als einzige Disk im Array (weil sich unraid sowieso ja nur mit Array vollständig nutzen läßt). Array mit Autostart, damit es imme rgleich ist und ich nach einem Reboot für die Tests nicht erst ins WebGUI zum Starten gehen muß. Unraid hat alle Systemshares automatisch auf die USB Stick gelegt (weil ich ja keinen Pool/Cache-SSD eingebunden habe) und damit den USB Stick schon mit 28GB von den vorhandenen nominal 32GB belegt. Software: unraid 6.12.4 stable (weil ich keine Lust habe mich nur für diese Tests mit manuellen ASPM Einstellungen rumzuschlagen. Ich weiss da immer noch nicht so ganz, was ich da wirklich tue und will nicht durch Hardwareveränderungen wieder die passenden 'setpci' parameter rausfummeln.) Community App nerdtools + powertop-2.15-x86_64-1.txz Dynamix Cache Dirs Dynamix File Manager Dynamix System Temperature Unassigned Devices Unassigned Devices Plus Unassigned Devices Preclear im Go File: powertop --auto-tune alle tunables stehen auf "Good" WebGUI und Terminal geschlossen, idle, der Bildschirmschoner hat den angeschlossenen HDMI Ausgang schwarz geschaltet (das spart hier noch mal rund 1W, deshalb warte ich mindestens diesen 'Bildschirmschoner' ab). Messungen wieder mit AVM DECT200 Funksteckdose. Messung 1: nur die nackte (oben genannte Konfiguration) - knapp unter 10W (Siehe Bild 2) Messung 2: M.2 NVMe/PCIe SSD AData Legend 960 4TB PCIe 4.0 x4 (mit dem Max Kühlkörper) im M.2 Slot (Chipsatz) am unteren Ende des Mainboard eingebaut. Wird in den Unassigned Devices gelistet. Ich werde sie nicht weiter einbinden/Formatieren, da es mir hier nur um die Auswirkungen auf den Energieverbrauch idle bzw. die C-States geht. - wieder knapp unter 10W (Siehe Bild 4). Sie wird in Powertop tunables übrigens gelistet und auch da steht sie auf "Good" Messung 3: Die Selbe M.2 NVMe/PCIe SSD AData Legend 960 4TB PCIE 4.0 x4 (mit dem Max Kühlkörper) im M.2 Slot der CPU, da sich das Verhalten der CPU ändern kann, wenn etwas direkt angeschlossen ist und das vielleicht tiefere C-States verhindern könnte oder ob etwas am Chipsatz hängt. Sie wird wieder als Unassigned Devices gelistet. Auch hier nicht weiter eingebunden/formatiert. - Hier werden wieder rund 10W dargestellt (Siehe Bild 6). Diese NVMe SSD wirkt sich also in beiden M.2 Slots identisch aus. Weiterhin in Powertop tunables "Good" Messung 4: M.2 NVMe/PCIe SSD Patriot Viper VP4300 Lite 4TB PCIe 4.0 x4 (VP4300L4TBM28H) im M.2 Slot (Chipsatz) am unteren Ende des Mainboard eingebaut. Auch die wird in den Unassigned Devices gelistet. - wieder knapp unter 10W (Siehe Bild 8). Sie wird in Powertop tunables übrigens als "MAXIO Technology (Hangzhou)" gelistet und auch da steht sie auf "Good" Messung 5: die Selbe M.2 NVMe/PCIe SSD Patriot Viper VP4300 Lite 4TB PCIe 4.0 x4 (VP4300L4TBM28H) im M.2 Slot der CPU. Auch die wird in den Unassigned Devices gelistet. - wieder knapp unter 10W (Siehe Bild 10). weiterhin in Powertop tunables als "MAXIO Technology (Hangzhou)" auf "Good" Messung 6: M.2 NVMe/PCIe SSD Samsung SSD 960 PRO 512GB,PCIe 3.0 x4 (MZ-V6P512BW) (Beifang aus einem gebraucht gekauften PC) im M.2 Slot des Chipsatzes. Auch die wird in den Unassigned Devices gelistet. - wieder knapp unter 10W (Siehe Bild 10). weiterhin in Powertop tunables als "Samsung Electronics Co Ltd NVMe SSD Controller SM961/PM961/SM963" auf "Good" Messung 7: M.2 NVMe/PCIe SSD Samsung SSD 960 PRO 512GB,PCIe 3.0 x4 (MZ-V6P512BW) (Beifang aus einem gebraucht gekauften PC) im M.2 Slot der CPU. Auch die wird in den Unassigned Devices gelistet. - Hier werden nun 10,08W gemeldet. Ob das nun Messtoleranz ist oder wirklich ein paar Millliwatt mehr kann ich nicht entscheiden. (ich spare mir die beiden Screenshots... sieht fast so aus, wie in Messung 6 und auch hier wird C10 überwiegend erreicht). Messung 8: M.2 NVMe/PCIe SSD Lexar NM790 4TB PCIe 4.0 x4 (LNM790X004T-RNNNG) im M.2 Slot des Chipsatzes. Auch die wird in den Unassigned Devices gelistet. - wieder bleibt es knapp unter 10W (Siehe Bild 14). In Powertop wird sie mit "Shenzhen Longsys Electronics Co., Ltd" gelistet und ist auch als "good" angegeben Da sich bei vorangegangenen Beispielen kein wirklicher Unterschied zwischen den M.2 Slots ergab (Chipsatz und CPU) erspare ich allen hier die Messung im CPU M.2 Slot. (Ja, ich bin gerade wieder faul). Fazit bis hier hin: Entweder ich mache etwas falsch (dann bitte Info) oder alle hier getestete SSD beeinflußen, unter den gegebenen Bedingungen, die C-States bei mir in dem System nicht und wirken sich auf den Verbrauch des Systemes idle nur im (von mir) nicht meßbaren Bereich aus. Bild 1: BIOS Default mit folgenden Abweichungen: Bild 2: Messung 1 (nackte Ausstattung) - AVM DECT200 Anzeige in Fritzbox Bild 3: Messung 1 - Powertop Anzeige der C-States nach rund 10 Minuten Bild 4: Messung 2 (mit Legend 960 im Chip-M.2) - AVM DECT200 Anzeige in Fritzbox Bild 5: Messung 2 - Powertop Anzeige der C-States nach rund 5 Minuten (die niedrigeren C10-Prozentzahlen liegen vermutlich an dem kürzeren Messzeitpunkt seit Boot). Bild 6: Messung 3 (mit Legend 960 im CPU-M.2) - AVM DECT200 Anzeige in Fritzbox Bild 7: Messung 3 - Powertop Anzeige der C-States nach rund 5 Minuten (die niedrigeren C10-Prozentzahlen liegen vermutlich an dem kürzeren Messzeitpunkt seit Boot). Bild 8: Messung 4 (mit Viper VP4300 Lite im CHIP-M.2) - AVM DECT200 Anzeige in Fritzbox Bild 9: Messung 4 - Powertop Anzeige der C-States nach rund 5 Minuten Bild 10: Messung 5 (mit Viper VP4300 Lite im CPU-M.2) - AVM DECT200 Anzeige in Fritzbox Bild 11: Messung 5 - Powertop Anzeige der C-States nach rund 5 Minuten Bild 12: Messung 6 (mit Samsung SSD 960 PRO im CHIP-M.2) - AVM DECT200 Anzeige in Fritzbox Bild 13: Messung 6 - Powertop Anzeige der C-States nach rund 5 Minuten Bild 14: Messung 8 (mit Lexar NM790 im CHIP-M.2) - AVM DECT200 Anzeige in Fritzbox Bild 15: Messung 8 - Powertop Anzeige der C-States nach rund 5 Minuten


 1 point
 -
Hello, Just switched to a Dream Machine SE and I am getting errors about a duplicate IP. It's two mac addresses both owned by the unRAID server. The stuff I've found online mostly points to disabling "Host Access to Custom Networks" for docker which was already disabled: With ifconfig I see bond0 and eth0 assigned to the mac address of the servers network card: bond0: flags=5187<UP,BROADCAST,RUNNING,MASTER,MULTICAST> mtu 1500 inet 192.168.0.200 netmask 255.255.255.0 broadcast 0.0.0.0 ether e4:1d:2d:24:39:c0 txqueuelen 1000 (Ethernet) RX packets 1248780799 bytes 1808446219605 (1.6 TiB) RX errors 0 dropped 22179 overruns 454 frame 0 TX packets 205059076 bytes 143180099899 (133.3 GiB) TX errors 0 dropped 0 overruns 0 carrier 0 collisions 0 eth0: flags=6211<UP,BROADCAST,RUNNING,SLAVE,MULTICAST> mtu 1500 ether e4:1d:2d:24:39:c0 txqueuelen 1000 (Ethernet) RX packets 1248780799 bytes 1808446219605 (1.6 TiB) RX errors 0 dropped 454 overruns 454 frame 0 TX packets 205059076 bytes 143180099899 (133.3 GiB) TX errors 0 dropped 0 overruns 0 carrier 0 collisions 0 However, for the mystery mac address I see vhost0. vhost0: flags=4163<UP,BROADCAST,RUNNING,MULTICAST> mtu 1500 ether 02:fb:51:73:ed:04 txqueuelen 500 (Ethernet) RX packets 8869581 bytes 29481304941 (27.4 GiB) RX errors 0 dropped 0 overruns 0 frame 0 TX packets 3974 bytes 166908 (162.9 KiB) TX errors 0 dropped 0 overruns 0 carrier 0 collisions 0 I do have a Windows 11 and Howe Assistant VM running but both have their own IPs. What is weird is that this duplicate IP w/ the same mac does not appear for long. It goes away for a while and then comes back seemingly randomly.


 1 point
 -
Right now there is no clean way to monitor the security on Unraid OS, I think is something critical since many people is publishing dockers to internet. It's not compatible with auditd or wazuh or elastic agents or similar solutions. Right now even easy projects like crowdsec are compatible with auditd so people can easily implement some monitoring or going more advance with wazuh or other tools make use of the sigma rules, wazuh, security onion, Qradar Community edition, etc. So the request at least is to have auditd official support which is the standard way to monitor linux OS, wazuh support would be awesome as well. https://slackbuilds.org/repository/15.0/system/audit/1 point
-
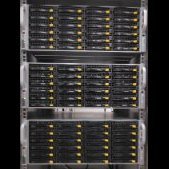
Build’s Name: My Customised SFF Home Server Build Full Spec: PartPicker Link Usage Profile: Unraid Server for Containers, VM's and Storage Server Time to upgrade my home server again, decided to down size from my current Fractal Design XL to something smaller and more power efficient. Decided to go with the Fractal Node 304 case, I’m moving from 12x 8tb disks with dual parity to 6x 20tb disks with single parity so will fit. Using a smaller case will mean taking up a lot less space in my small home office! Here's a finished picture, with a rather long build thread below: ________________________________________________________________________ So then, started of by ordering the case. I managed to swap the white HDD caddys for black ones with a colleague, looks much better. Then swapped out the Fractal fans for black Noctua A9 and A14 Chromax fans. These look slightly better and much quieter. Reused one of the LSI 9207-8i HBA from the old server. The brackets are powder coated black and have a Fractal R3 40mm fan on the heat sink. The fans are mounted using black nylon nuts and bolts, reusing the same holes as the heat sink to keep things neat and tidy. Updated the firmware while I was at it. Installed a Corsair RM650 (2021) PSU and realised the motherboard ATX cables were pretty long. Time consuming, but re-pinned and braided the connectors to make the optimal length. The USB cables from the front IO to the motherboard were also pretty long, so found some shorter ones on Ali Express. Soldered these onto the original PCB and braided the cable. Also shortened and braided a few other cables, like the on/off, restart buttons and hdd activity cables. I also removed the front panel audio cables as not needed for a server. Not a massive problem, but noticed that the power cable orientation meant the cable at the PSU end pointed up and needed to loop round, which looked messy. So found a left angle IEC (that’s a thing) cable, braided and re-terminated at the case end. Now it points down and runs along the bottom of the case, much tidier. Next up was the mother boards silver IO shield, didn’t look brilliant on the black case. I couldn’t find a black one, thought about 3d printing one, but ended up just powder coating the original. Came out really well and looks much better. Installed everything on the motherboard and made a custom length, braided cable for the CPU fan. Did the same for the two front fans and exhaust fan. The case takes 6x 3.5 HDD’s, these would be filled with my 20tb disks, so needed somewhere to install the 2x 2.5 HDD’s I use for cache drives. Easy option would be to mount on the outside of the HDD caddys, but where’s the fun in that! I decided to make my own bracket to mount them both on the side of the case. Fabricated these out of aluminium sheet and powder coated black. Drilled two holes in the bottom of the case, then used some black, low profile bolts to secure the bracket. These are hidden by the plastic feet mounting covers that run round the bottom edge of the case, so can’t be seen. Inside view of the bottom of the case, where the brackets secured. I used black nylock nuts and black washers to keep looking original. Drilled two more holes a the top of the case and secured the bracket using rivnuts and some more low profile bolts, with black washers. These were needed to make sure the case top fitted without snagging. Made some custom length SATA power cables for the HDD’s to keep things tidy. Then connected the HBA’s SATA data cables. I forgot to take a picture with the cables tied together, but looks tidy. Swapped the remaining PCI cable to a black one and all done! All sealed up, shame no one will ever see the hard work that went into the build! A fun project though, so worth it for me! ________________________________________________________________________ Well done for making it to the end of this post! I'm please with how the builds turned out. My old server use to average 190W power draw, this uses 110W. To be honest, I was hoping for a little lower, need to do some troubleshooting when I have some time. I think the HBA is stopping the system from getting to lower C states, so may swap out for a ASM1064 based card in the future and check things out with powertop.1 point
-
Hi, My ubiquity unifi router is complaining that it sees two MAC addresses referencing the same IP address. The mac addresses belong to my UnRAID server's eth0 and vhost0. Note that I am using macvlan rather than ipvlan for my docker containers so that I can better see/manage them within the unifi interface. Is there any way to have different IP addresses for eth0 and vhost0 ? At the moment, I am getting a daily "nag" email from unifi that would be good to quiet. Thanks. root@Server:~# ifconfig ... eth0: flags=4163<UP,BROADCAST,RUNNING,MULTICAST> mtu 1500 inet 10.10.10.10 netmask 255.255.255.0 broadcast 10.10.10.255 ether 70:85:c2:49:49:72 txqueuelen 1000 (Ethernet) RX packets 1312049842 bytes 1715808516599 (1.5 TiB) RX errors 0 dropped 43501 overruns 4 frame 0 TX packets 592446388 bytes 64135910321 (59.7 GiB) TX errors 0 dropped 0 overruns 0 carrier 0 collisions 0 device memory 0xdf200000-df21ffff ... vhost0: flags=4163<UP,BROADCAST,RUNNING,MULTICAST> mtu 1500 inet 10.10.10.10 netmask 255.255.255.0 broadcast 0.0.0.0 ether 02:2f:25:90:90:5d txqueuelen 500 (Ethernet) RX packets 42872774 bytes 19317802710 (17.9 GiB) RX errors 0 dropped 15410 overruns 0 frame 0 TX packets 42247302 bytes 33452512600 (31.1 GiB) TX errors 0 dropped 0 overruns 0 carrier 0 collisions 01 point
-
Wanted to thank you PeteAsking for your continued support and maintaining of the docker. Also wanted to throw this out to the community for those who would want to maintain their own instead of waiting for a tag release. use a LXC container:1 point
-
unraid 7 mby. per new key announcement. You can plug in a usb and have the usb be disk 1. to satisfy a 1 disk array. be sure to set the correct path location under the share gui if you do this.1 point
-
Der Containername muss natürlich stimmen. Wenn du ihn nicht geändert hast, dann funktioniert es bestimmt. Nimm doch das Script zum Testen ohne einzukürzen. Sind eh nur Notifications, die kann man auch auskommentieren. Hier ein Schnipsel aus dem Script ab dem "case $ACTION in" . Alle Notifications im Script habe ich auskommentiert. case $ACTION in 'ADD' ) /usr/local/emhttp/webGui/scripts/notify -e "Unraid Server Notice" -s "Unassigned Devices" -d "Device mounted" -i "normal" if [ "$OWNER" = "udev" ]; then # do your hotplug stuff here sleep 1 else # do your user initiated stuff here docker start SABnzbd sleep 1 fi ;; Nach dem 1. Save ist es bei mir auch rausgeflogen. Erst nach dem 2. Save waren die Daten da. Ich habe den Eintrag im ungemounteten Zustand erstellt. Nach dem Save erscheint oben bei Device Script der Eintrag mit deinem Mount.1 point
-
Are you sure it didn't get moved into another share? Why do you have so many (45) shares? Have you been creating folders at the top level of disks? Top level folders on pools and array are automatically user shares. Why do you have 325G docker.img? Default 20G is often more than enough, maybe a little more if you have a lot of containers. The usual cause of filling docker.img is an application writing to a path that isn't mapped. Making it larger is not the fix for this. Usage shouldn't be growing. Why are your docker and VM related files on the array? Ideally, these would all be on fast pool such as cache, so Dockers/VMs will perform better, and so array disks can spin down since these files are always open.1 point
-
um es abzukürzen wie @DataCollector anmerkte, so groß wie möglich deine Entscheidung, alles ist möglich deine Entscheidung, alles ist möglich deine Entscheidung, alles ist möglich aber um es kurz zu machen ... mit USB Platten wirst du sicherlich früher oder später in Issues laufen, daher wird das auch nicht ernsthaft supportet, sprich, Ausfälle, Geschwindigkeiten, merkwürdiges Verhalten nach Neustarts, ... du weißt jetzt warum und brauchst auch nicht ernsthaft nach Lösungen fragen ... USB Platten sind für ein NAS und mehr (Docker, VM, LXC, ...) nicht geeignet.1 point
-
Die maximal mögliche, damit man keine USB Datenspeicher mehr braucht (außer dem USB Bootstick). Welcher Datenträger als Pool, Array, Parity und mit welchen Shares verwendet wird hängt von Deiner manuellen Konfiguration ab und ist weitgehend einstellbar.1 point
-
Mar 3 15:26:03 Tower kernel: BTRFS error (device nvme0n1p1): block=957896572928 write time tree block corruption detected Mar 3 15:26:03 Tower kernel: BTRFS: error (device nvme0n1p1) in btrfs_commit_transaction:2494: errno=-5 IO failure (Error while writing out transaction) Mar 3 15:26:03 Tower kernel: BTRFS info (device nvme0n1p1: state E): forced readonly Btrfs is detecting corruption and going read-only to prevent further problems, start by running memtest since this can be the result of bad RAM.1 point
-
Yes, then transfer the key.1 point
-
I think the latest update killed everything. I am having the same issue currently. I updated last night and went to watch a show to only see nothing there. Plex is gone.1 point
-
So the other day the Plex docker got updated and it deleted itself. I reinstalled it and now I can see all my media but nothing is playing, it says unavailable. Any idea?? I also installed the docker patch plugin1 point
-
1 point
-
I think you might have missed the part where I wrote that I moved to Unraid because I have no time budget to browse through forums and try out suggested solutions. I moved in anticipation that a for-pay system would put stability first and new experimental features second. I am not running a complex and complicated system, just basic storage and a few docker containers. No VMs, no transcoding, no fancy stuff. The system was running stable after I set it up, and it ran that way for a while. If a configuration is running stable and a system update breaks it, forcing me to go on a bugfixing hunt (which is almost always time-consuming), that basically ruins the deal for me. At the absolute minimum, I would expect a clear warning prior to the upgrade that new functions are introduced and that they break stuff / require maintenance work. Ideally, I would expect a separate, optional security-update-only path and maybe an update profile that you can select which will delay all updates until they have been found to be stable on all tested systems. That would allow me to avoid a situation where I have to invest time I do not have to fix something that was broken by a change in code I did not introduce. For me, the most important thing in servers is stability and reliability. New features are nice, but only if they do not impact those two things negatively. The new pricing model just adds more issues to that. From the scarce details we were provided, there is another big problem I see: the non-existent synchronization in terms of versioning and licensing. If I understood it right, a user that pays for a license of let's say version 7.xx gets updates during the first year. The problem I see is if there are bugs in one of the versions he updates to towards the end of the year that will only be fixed after the year has expired. I mean, generally speaking, the idea that "you don't have to pay the subscription, you can just run your current version forever" is already unviable when one cares about security. But the idea that you could end up with a broken system that you need to pay to fix is making things worse. It would be much better to have a model where you get support until EOL for the version you buy, so basically paying for a license when version 7 is out gives me all updates until version 8 comes out. That would give the user at least the choice to stay with a stable and final release or to upgrade for a new version and new features based on a subscription model. I might have missed that this is actually what they plan but from what I have read, they do not.1 point
-
Thanks JorgeB that did the trick, I must have changed to ZFS whilst it was autoformatting. I'll move the stuff off if I need it and reformat if I really want to do ZFS Happy Sunday, thanks again1 point
-
Thanks a lot, that did the trick.1 point
-
And did you yet try TightVNC? How do you try to connect? Did you forward a port or how do you connect exactly? EDIT: I just now tried Remote Ripple on my iPhone and I can connect just fine, however the picture looks weird and I can of course stay connected. EDIT2: I just also now tried TightVNC on my Windows machine and it is working there too, you have to change the encoding to RAW. In my opinion it would be better to ask the developers from Remote Ripple if TurboVNC is supported and/or if you have to pass over special startup parameters for TurboVNC? I also tried Remmina and it is working there fine too.1 point
-
Vielen Dank, xfs_repair hat funktioniert, auch wenn ich kurz etwas Angst hatte, weil es auch nicht auf Anhieb funktionieren wollte. Ein Backup wäre vielleicht die schönere Lösung gewesen, aber das war leider keine Option – da nicht vorhanden. Die Daten im Pool waren mir bisher einfach nicht wichtig genug für eine Sicherung. Allerdings würde es doch sehr lange dauern, diese Daten wiederherzustellen. Ich habe daraus gelernt und werde in Zukunft wohl den Pool sichern. War klar, dass das kommt. Haha. Ich habe vor Monaten kurz nach Release der Version mehrfach versucht zu aktualisieren und habe es dann nach mehreren Problemen erstmal ruhen gelassen. Habe mich heute mal hingesetzt und alles aktualisiert und angepasst.1 point
-
Thought I'd have a go at making the Silverstone CS351 case.


 1 point
 -
You can go directly to the correct support thread for any of your plugins by clicking its Support thread link in the Plugins page of your Unraid webUI.1 point
-
Whether we use the term subscription, maintenance fee, support fee, held hostage or whatever you choose to call it, it is an ongoing cost to keep the os secure and up to date.... if I need to keep paying for something that is basically a subscription in my eyes. (I want a different scream this time 😜) I'd be fine with it be a subscription to get feature updates, or even a more modular approach where you can add 'extras' (not sure what exactly, or how much extra), but this doesn't just block you from getting features, it stops you from getting updates for security of the OS and we all know how fun it was for some nas owners who got hit by ransomware attacks...1 point
-
System is stable. It was 100% a bad processor. Thanks everyone for all your help!1 point
-
Well I just got the 3rd Crucial P3Plus drive and so when adding it i took your advice and so far the results have been fairly good. Current setup is the CWWK 4x2.5GB Mini PC with a Intel N305 Processor 32GB of RAM. Storage configuration: Array 3TB with no parity ------------------------- Disk 1 =WD SN560E 2TB (shucked) Disk 2 = WD SN770 1TB ZFS Pool Raidz1 3x 4TB P3Plus Using Zpool IOstat i have observed the speed of the drives reach around 2.4-2.5GB/s which is really good when you consider all of the drives are limited to PCIe3x1. Considering the fastest network connection is 2.5gbps that is plenty of throughput. The only real issue is that when the array is under load and transferring about as fast as it can the CPU usage jumps and can even max the cpu out. It will probably never be to much of a issue though unless doing local only tasks. Hopefully I can add another P3Plus drive before to long and test this again. Though i don't expect to get much if anymore throughput since I think I am starting to hit being cpu bound.1 point
-
Can confirm, this one worked without any changes made in the BIOS. It wasn't recognized in the BIOS but Unraid could see it so that's all that matters. Thanks for your help @JorgeB Hopefully this helps someone else new to NAS with old hardware!1 point
-
Start with one of these: https://www.amazon.com/Sperry-Instruments-GFI6302-Receptacle-Professional/dp/B000RUL2UU/ref=sr_1_1?crid=1R2WDNC6LZXHG&dib=eyJ2IjoiMSJ9.svpbjDlqX4uo_ueqG5xxKUTmIivWoVqUmUz9_pAW1TXZChZfd8NgM0zQzL7YLaV6FNpgbt1ojDTkYxh8XnsDHBkj_1u4SkulycyYmIEj4EdzVxTaWw19QiB8M2NqJLmAzEfdxV3VmfRW35fn2Fj60loytzL31XU2vFkdH1nPXFga2xQdpXqK_iBfzTZarivH_4cZwwAw7QQGHaK9vXs_cSQ122IaTa6LDP9I4SrzR5PNhVXsFjiiIKyLjWn8zADVgYsdaQv_luwmkAPaPTLUgHlmYi5-J65pXHI4x3Ic1ts.vSpBV2tXiCXhKr0wVmVwerPP4SbdPPH7x3-ahxciG5w&dib_tag=se&keywords=outlet+tester+plug+in&qid=1709389369&sprefix=outlet+tester%2Caps%2C112&sr=8-1-spons&sp_csd=d2lkZ2V0TmFtZT1zcF9hdGY&psc=1 (Not an endorsement of this specific device, but an example of a tool available to help you figure out what it going on...)1 point
-
change the value, reboot ... they are created at boot. you can may take a look at this after you changed the value in the GUI root@AlsServerII:~# cat /boot/config/plugins/i915-sriov/i915-sriov.cfg vfnumber=1 root@AlsServerII:~# here they are stored, in my case "1" vf is created at boot. you can also try to nano, edit and boot (bypass the webui)1 point
-
Nicely done! I upgraded from the Fractal 304 to the 804 about 3 years ago. I love that it fits in my desk after I removed the drawer hardware!
 1 point
 -
Please post your Diagnostics.1 point
-
I've described most of these settings/features extensively here: However, it would be great if these were added to the image by default: 1. Add <timer name='hypervclock' present='yes'/> along with the reset of prerequisites to Windows 10/11 VMs by default. This will dramatically reduce idle CPU usage of these VMs 2. Add "ksmtuned" daemon to the image for controlling KSM (kernel samepage merging) to reduce RAM usage for those with multiple similar VMs and enable it by default. It only gets triggered at 80% RAM utilization by default. It's really just a shell script. 3. Add ability to limit maximum number of cores for a VM without actually pinning the cores to physical cores to let the host kernel distribute the load.1 point
-
The triangle (if you hover over it) means that some (or all) of the files are unprotected by a parity system. Since the ZFS and NVMEs are presumably protected, that means that the ISOs share is sitting on the array which doesn't look like you've added a parity drive to.1 point
-
Yes. At the bottom of the immich template, click on "+Add another Path, Port, Variable, Label or Device". Follow the instructions for filling these out from the second post from the NVidia Driver support thread.1 point
-
3.7.24 Update: Caveat Emptor: Multiple users have run into GUID conflicts with these devices. I will attempt again to contact Eluteng and ask about this to see if this was a recent manufacturing change or a one-off "bag batch". Another option/alternative to USBs that we've been internally testing and vetting are mSATA adapters/drives: This USB mSATA adapter (~$10) appears to provide unique GUIDs for Unraid: https://www.amazon.com/gp/product/B07VP2WH73/ This 32GB mSATA drive works with the above adapter (~$15): https://www.amazon.com/gp/product/B07543SDVX/ To avoid having the adapter hang off the back of the machine, these can allow you to mount it inside your case (depending on your system): https://www.amazon.com/gp/product/B000IV6S9S/ https://www.amazon.com/gp/product/B07BRVBQVW/ Important notes/caveats: The mSATA drive does not come pre-partitioned, so you have to create one yourself. Windows sees it as a hard disk, not a removable drive, so the USB Creator might not write to it and you may need to use the manual method. The USB Creator worked fine from a Mac for me. While we're not officially officially recommending these just yet, multiple members of the Unraid team are running OS instances off of this exact set up. We hope to have a full blog/video on this alternative soon. You can use them for Unraid VMs too, just be sure to configure "USB 3.0 (qemu XHCI)" in the VM template (even if the host only has USB 2 hardware!). As always, if you are running the same make/model of drive for both the host and the guest you will need the "USB Manager" plugin to pass the drive to the VM. Major props to @AgentXXL over in our Discord server for doing much of the early testing on this.


 1 point
 -
The installation of the GPU SR-IOV plugin fixes the following errors on my ASROCK N100DC-ITX motherboard + UnRaid 6.12.8: [ 231.726795] i915 0000:00:02.0: [drm] *ERROR* Unexpected DP dual mode adaptor ID 7f [ 278.497321] i915 0000:00:02.0: [drm] *ERROR* Unexpected DP dual mode adaptor ID 7f But I have this line at boot (dmesg): i915 0000:00:02.0: Direct firmware load for i915/adlp_dmc.bin failed with error -2 The required binary is not available under /lib/firmware/i915 only adlp_dmc_ver2_16.bin. Is it a real issue? Another problem with the i915 driver, it causes UnRaid to not wake up from sleep ! My server is stuck and cannot be accessed. This is an issue for me, the problem may be found on different forums with this i915 driver but I haven't found a workaround.1 point
-
Best to use the DOS or UEFI tools to do any crossflashing and/or other more advanced options, e.g., for some reason erasing the BIOS doesn't work with the Linux version, but if you just need to update firmware it can be easily done with Unraid. Download the MSDOS firmware package form Broadcom's support site (https://www.broadcom.com/support/download-search), for example for the 9300-8i it currently is this one: 9300_8i_Package_P16_IR_IT_FW_BIOS_for_MSDOS_Windows Note: Downloads for SAS2 HBAs like for example the 9211-8i are usually under "Legacy Products" and then "Legacy Host Bus Adapters". Now download the Linux Installer, also from the firmware section, again for the 9300-8i it currently is: Installer_P16_for_Linux From the DOS package we only need the firmware: 9300_8i_Package_P16_IR_IT_FW_BIOS_for_MSDOS_Windows\Firmware\SAS9300_8i_IT\SAS9300_8i_IT.bin Optional: if the HBA has a BIOS installed and we want to updated it also copy the BIOS file: 9300_8i_Package_P16_IR_IT_FW_BIOS_for_MSDOS_Windows\sasbios_rel\mptsas3.rom From the installer package we only need sas3flash (sas2flash for SAS2 models): Installer_P16_for_Linux\sas3flash_linux_x64_rel\sas3flash Copy both files to your Unraid server, you can copy them to flash first but still need to copy them elsewhere since the executable can't be run from the flash drive, we also don't want them in the array since it should be stopped before flashing. For this example I first copied both files to folder called "lsi" in the flash drive then copied them to a temp folder I created called /lsi (this folder will be stored in RAM and gone after a reboot), use the console and type: mkdir /lsi cp /boot/lsi/* /lsi After copying the files navigate to that directory, in this case: cd /lsi We now need to make sas3flash executable with: chmod +x sas3flash Before flashing we can confirm the adapter (or adapters) are being detected and check what is the firmware currently installed: ./sas3flash -listall Avago Technologies SAS3 Flash Utility Version 17.00.00.00 (2018.04.02) Copyright 2008-2018 Avago Technologies. All rights reserved. Adapter Selected is a Avago SAS: SAS3008(C0) Num Ctlr FW Ver NVDATA x86-BIOS PCI Addr ---------------------------------------------------------------------------- 0 SAS3008(C0) 16.00.01.00 0e.01.00.07 08.37.00.00 00:01:00:00 1 SAS3008(C0) 16.00.01.00 0e.01.00.07 08.37.00.00 00:02:00:00 Make sure the array (and any UD devices using the HBA) is stopped and unmounted and now we can proceed with the upgrade, just use the standard sas3flash command, but remember that Linux is case sensitive, e.g.: ./sas3flash -o -f SAS9300_8i_IT.bin Optional: if you also want to flash the BIOS use ./sas3flash -o -f SAS9300_8i_IT.bin -b mptsas3.rom After it's done confirm the new firmware (and bios if also flashed) is installed: ./sas3flash -listall Avago Technologies SAS3 Flash Utility Version 17.00.00.00 (2018.04.02) Copyright 2008-2018 Avago Technologies. All rights reserved. Adapter Selected is a Avago SAS: SAS3008(C0) Num Ctlr FW Ver NVDATA x86-BIOS PCI Addr ---------------------------------------------------------------------------- 0 SAS3008(C0) 16.00.10.00 0e.01.00.07 08.37.00.00 00:01:00:00 1 SAS3008(C0) 16.00.01.00 0e.01.00.07 08.37.00.00 00:02:00:00 If there are multiple adapters like in this case only the first one will be flashed, to flash the other one use -c to specify the adapter#, e.g.: ./sas3flash -c 1 -o -f SAS9300_8i_IT.bin ./sas3flash -listall Avago Technologies SAS3 Flash Utility Version 17.00.00.00 (2018.04.02) Copyright 2008-2018 Avago Technologies. All rights reserved. Adapter Selected is a Avago SAS: SAS3008(C0) Num Ctlr FW Ver NVDATA x86-BIOS PCI Addr ---------------------------------------------------------------------------- 0 SAS3008(C0) 16.00.10.00 0e.01.00.07 08.37.00.00 00:01:00:00 1 SAS3008(C0) 16.00.10.00 0e.01.00.07 08.37.00.00 00:02:00:00 Finished Processing Commands Successfully. Exiting SAS3Flash. Now both are updated. P.S. to see more detailed info from an adapter we can use: ./sas3flash -list Avago Technologies SAS3 Flash Utility Version 17.00.00.00 (2018.04.02) Copyright 2008-2018 Avago Technologies. All rights reserved. Adapter Selected is a Avago SAS: SAS3008(C0) Controller Number : 1 Controller : SAS3008(C0) PCI Address : 00:02:00:00 SAS Address : 500605b-0-0b1c-2d00 NVDATA Version (Default) : 0e.01.00.07 NVDATA Version (Persistent) : 0e.01.00.07 Firmware Product ID : 0x2221 (IT) Firmware Version : 16.00.10.00 NVDATA Vendor : LSI NVDATA Product ID : SAS9300-8i BIOS Version : 08.37.00.00 UEFI BSD Version : 06.00.00.00 FCODE Version : N/A Board Name : SAS9300-8i Board Assembly : H3-25573-00H Board Tracer Number : SP60700521 Finished Processing Commands Successfully. If there's more than one we can again use -c, e.g.: ./sas3flash -c 1 -list1 point
-
No, supposed to be in 6.13/7.1 point
-
Okay, the problem is fixed. I had the following in the description of Unraid: "I'm the server". I removed the special character. Problem gone. This also explains the error: DOMException: String contains an invalid character1 point
-
I managed to enable the Linux Audit Framework for unRAID but unfortunately it requires rebuilding the kernel. It's a simple flag in the .config file when building and I don't think there is really any downside or performance hit to having it available since the package would still need to be installed to use it. I think it would be beneficial to enable this for unRAID as it open the door for a more community development. I'm working on one right now that would benefit greatly from being able to track file system changes.1 point
-
🤣 That’s nice indeed! With a lot of works, I was able to drop the power consumption to 70W. It’s really tricky but interesting ! However, I forgot that I had to finish this post so thank for the reminder ;)1 point
-
Let's see if you can mount it, from unraid terminal: modprobe nbd max_part=8 qemu-nbd --connect=/dev/nbd0 /path/to/the/image/test.qcow2 Create a mount point: mkdir /path/to/the/mount/point/ List the partitions of nbd0: fdisk /dev/nbd0 -l Mount the partition (in this example is p1): mount /dev/nbd0p1 /path/to/the/mount/point/ cd to the mount point and do what you need to do. Once finished: umount /path/to/the/mount/point/ qemu-nbd --disconnect /dev/nbd0 rmmod nbd1 point
-
1 point
-
https://us18.campaign-archive.com/home/?u=4ce73a4dbebfb261481909068&id=7d5746a7851 point
-
My Win10 laptop started doing this a lot more recently. I am assuming some Windows update has prompted the change. I can resolve it by telling windows to log into the share with username of "\" and leave the password box blank. I hope that works for you.1 point


.thumb.jpg.d41b3d13eafb9b2529a93d338507d030.jpg)