Leaderboard


Popular Content
Showing content with the highest reputation on 04/23/21 in all areas
-
Unraid OS 6.9 adds multiple pool support to your server's repertoire. Today's blog explains why and how to use this new feature! https://unraid.net/blog/unraid-6-9s-multiple-pools-support Along with this blog, be sure to check out @SpaceInvaderOne's video all about Multiple Pools and how to best use multi pools on your server for the best performance.2 points
-
...um da nochmal eines drauf zu packen....die UDM Pro kann nicht wirklich 10G, denn sie hat nur einen 10G LAN und einen 10G WAN Port. Der 10G LAN Port ist für die Anbindung an einen zweiten Switch, als uplink zwischen den beiden gedacht. Laut Datenblatt schafft sie wohl etwa 8G, max....mit einem 10G WAN (also inkl. ein paar Firewall regeln, IDS/IPS - schafft sie 3.5G) und so steht es auch im I-Net: http://www.smartredirect.de/redir/clickGate.php?u=Ha2Rd3xX&m=1&p=9yUI69TI8b&t=kLf5673Z&st=&s=&url=https%3A%2F%2Funifi-network.ui.com%2Fdreammachine&r=https%3A%2F%2Fwww.hardwareluxx.de%2Fcommunity%2Fthreads%2Fheimnetzwerk-defh.1295369%2F ...ein teures Stück, aber die 10G musst Du auch einordnen. Ich denke mit 2x 10G Adaptern und Direktverbindung PC - unraid fährst Du erstmal besser, weil Dir sonst Hardware / ein 10G Switch fehlt. Hast Du da schon was im Auge? ...und, wie oben angesprochen, musst Du Deine hausverkabelung in RJ45 nehmen oder kannst Du ein "Kabel werfen"? Bei unraid darauf achten, dass da nicht für alle Fabrikate Treiber drin sind...2 points
-
@Dr.NAS Schön zu hören und vielen Dank für die Spende. Ich arbeite schon länger an der nächsten Version. Manche wünschen sich auch auf externe rsync Server über SSH sichern zu können. Man glaubt gar nicht wie viel Stunden bei sowas drauf gehen.2 points
-
Introduction unbalanced is a plugin to transfer files/folders between disks in your array. Support Fund If you wish to do so, learn how to support the developer. Description unbalanced helps you manage space in your Unraid array, via two operating modes: Scatter Transfer data out of a disk, into one or more disks Gather Consolidate data from a user share into a single disk It's versatile and can serve multiple purposes, based on your needs. Some of the use cases are: Empty a disk, in order to change filesystems (read kizer's example) Move all seasons of a tv show into a single disk Move a specific folder from a disk to another disk Split your movies/tv shows/games folder from a disk to other disks You'll likely come up with other scenarios as you play around with it. Installation - Apps Tab (Community Application) Go to the Apps tab Click on the Plugins button (the last one) Look for unbalanced Click Install Running the plugin After installing the plugin, you can access the web UI, via the following methods: - Method 1 Go to Settings > Utilities Click on unbalanced Click on Open Web UI - Method 2<br/> Go to Plugins > Installed Plugins Click on unbalanced Click on Open Web UI - Method 3<br/> Navigate with your browser to http://Tower:7090/ (replace Tower with the address/name of your unRAID server)<br/> Check the github page for additional documentation Changelog The full changelog can be found here1 point
-
Great Odin's Raven! Today's blog is a guide on how to set up a dedicated Valheim server on Unraid by @spxlabs! Want to set up a co-op with fellow Unraiders? Need help troubleshooting? Let us know below in the comments. SKOL! 🛡️ https://unraid.net/blog/unraid-valheim-dedicated-server1 point
-
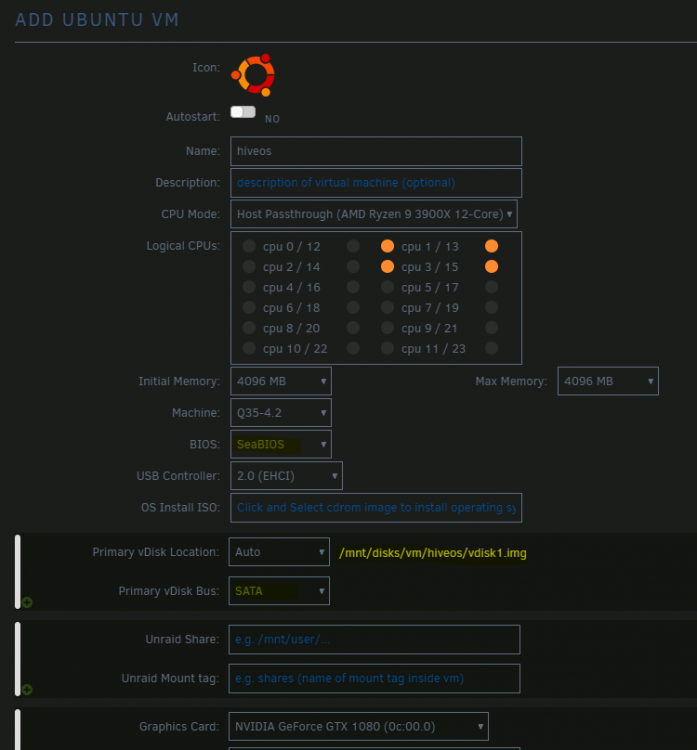
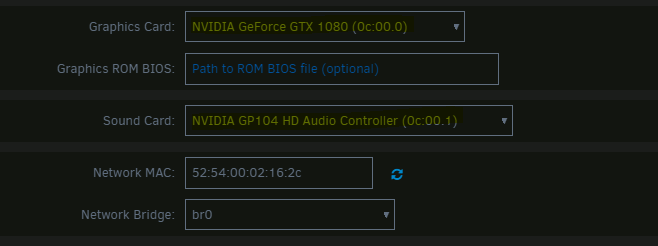
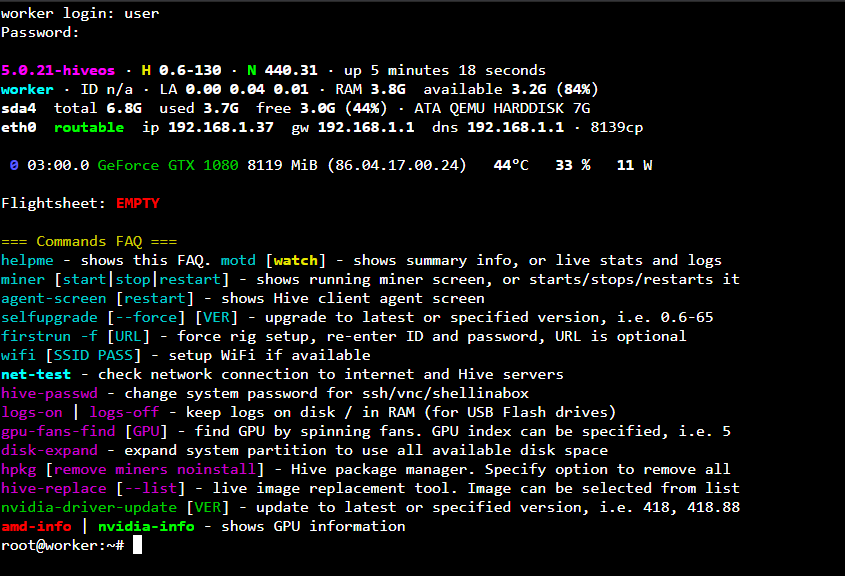
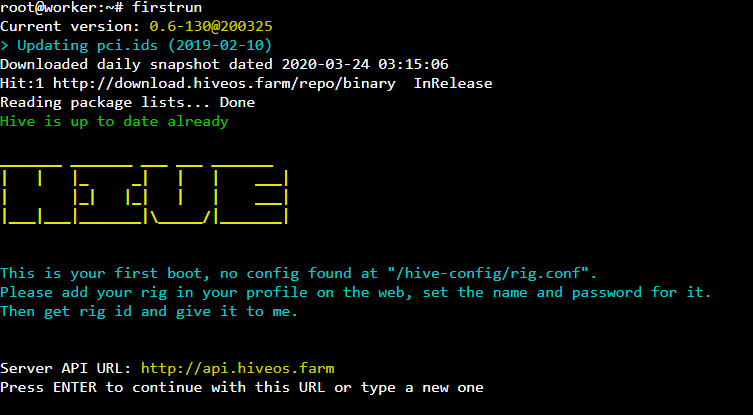
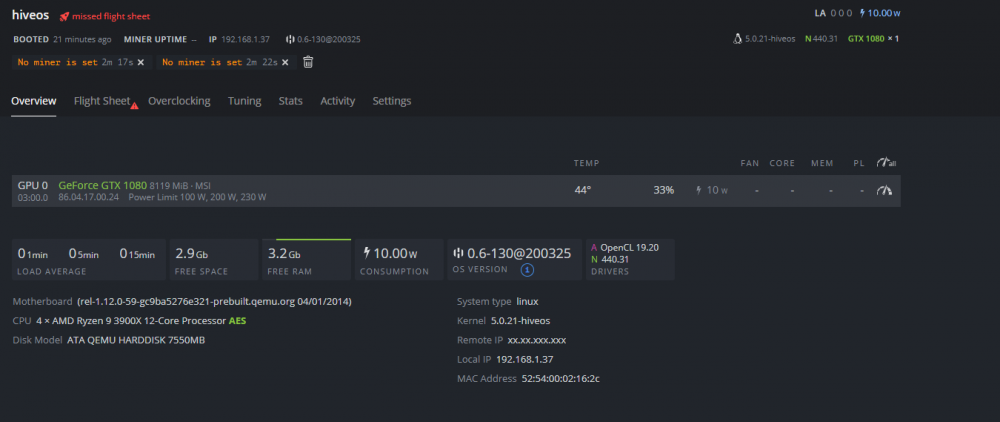
Hi guys, I've recently setup a Hive OS VM and ecountered a couple of issues during this. So I've decided to prepare a quick start guide. This guide won't explain you what Hive OS is and used for, neither it will show how to setup your Hive OS account and crypto wallets. There is a lot of guides on this on the web. [Prerequisite] The only prerequisite is you have to setup your Hive OS account and properly configure at least one farm and worker. You can go through the guide here or just google any appropriate guide you like. [Instructions] Download the latest Hive OS GPU image here . You should then unpack it and put into your isos share temporarily. For me it was a 7Gb file named [email protected] . Normally this image file is supposed to be written to the usb stick, but we instead just use it as our VM disk. You need to copy the image to your VM share. cd /mnt/disks/vm/ mkdir hiveos cp /mnt/user/isos/[email protected] hiveos/vdisk1.img Now let's create a VM itself which will use our Hive OS disk image. Use Ubuntu template because Hive OS is ubuntu based distro. There are however a couple of issues we must to address. First I suggest to leave OVMF bios as default. If the VM won't boot then try the same steps with SeaBIOS. I wasn't able to boot some cards with default OVMF bios. Second it seems that Hive OS doesn't contain the Virtio drivers normally found in Ubuntu and most Linux distros. I could overcome this with setting Primary vdisk bus to SATA . As for CPU and memory don't assign much resources to it. You have to pass your dedicated GPU as well because Hive OS isn't much useful without it. Switch to XML view to change the network adapter, because as I told before there are no Virtio drivers preinstalled in Hive OS. I chose rtl8139 and it worked fine for me. You must remember that whenever you edit anything using the form view the XML part would reset and you'll have to add that part once again. Now we are ready to start our VM. Once VM is started properly you need to figure out it's assigned IP. I use my router admin page for that. Then we need connect to our VM and finish the worker configuration. Since we passed through GPU and didn't configure the VNC we'll use Hive OS integrated shellinabox. Open https://YOUR_IP:4200/ in a browser. Default login is user password 1 . If everything is ok you'll see a welcoming screen like this. Your GPU must be present and identified correctly. It's now time to finish our Hive OS worker setup. Type firstrun and follow the instructions to enter your worker RIG_ID and RIG_PASSWORD . You'd better reboot your VM after configuration finished. After completion you might check your Hive dashboard to see that the worker is online and assign a flight sheet to it. [FAQ] todo

 1 point
 -
This isn't specifically a UnRAID problem but I'm putting it here for visibility and awareness, as UnRAID v6.9.2 is affected by this bug. I already commented about the problem over here: UNRAID 6.9.2 - DOCKER CONTAINER NOT REACHABLE OVER THE INTERNET WITH IPV6 There is a problem in the networking engine of Docker when using IPv6 with a container that has only a IPv4 assigned in a bridged network. Prior to Docker version 20.10.2 IPv6 traffic was forwarded to the container regardless. This behavior changed with version 20.10.2. This is the pull request that changed this behavior: Fix IPv6 Port Forwarding for the Bridge Driver A fix for this regression was issued 4 days later: Fix regression in docker-proxy but this wasn't implemented into Docker until version 20.10.6. For me this is just a minor issue as I have a full dual-stack connection and switched to only IPv4 for now, but for people using a connection via DS-Lite, this could mean that their docker-containers that are operating in bridged mode aren't accessible from outside of their home network anymore (like PLEX or Nextcloud).1 point
-
If I set these values and hit Apply the values are set back to the default values: Warning disk temperature threshold Critical disk temperature threshold The disks in question are M.2 NVMe devices running in single disk XFS pools. I tried to set these values to 60/65 celsius. After hitting Apply these values go back to 45/55 celsius.1 point
-
Ich musste dir noch schnell antworten, weil du dir so viel Mühe gemacht hast. Ersteimal tausend Dank für die ganzen Informationen und ich werde sie mir zu Herzen nehmen. Werde mir nächste Woche einen kleinen Plan machen und die ganzen Sachen und Vorschläge von dir Checken. Ich muss mal langsam auf die Couch, weil ich seit 8 Uhr morgens vorm Rechner sitze und mir die Augen zufallen. Vielen, vielen Dank für deine Mühe und ich melde mich, sobald ich einen Plan habe. Wünsche dir noch einen schönen Abend. Gruß Dirk1 point
-
...und in das Rack soll dann auch der unraid-Server, oder? Ja, dann wirst Du also einen Switch in der Mitte, zwischen Rack und PC brauchen. Ich denke es ist Verlegekabel in CAT5e mit "ordendlichen" Dosen und einem Patchpanel, oder hast Du da Patchkabel gelegt? ...Du hast Dir die UDM-Pro schon mal angeschaut, oder.? 8x1G sind nicht 1x8G...ich meinte den Switch da drin, der hat 8 einzelne 1G Ports. Da ist nix in dem Setup mit 2.5G zu machen. Du könntest einen SFP+ Tranceiver, der 10GBE-T (RJ45) draus macht in den 10G LAN-Port der UDM-Pro stecken. Diese Tranceiver konnen auf 1G, 2,5G, 5G und 10G synchronisieren, mit der entsprechenden Gegenstelle. Aber Du hast in der UDM-Pro keinen weiteren Port, der diese Geschwindkeit erreicht und den Du zur Weiterleitung an den PC nutzen könntest, sobald Du umgezogen bist und das Rack im Keller steht. Das wäre, meiner Mienung nach, Deine einzige Lösung, um mehr als 1G hinzubekommen, sobald Du das Rack im Keller hast. Du brauchst dann aber noch einen zweiten Switch mit der entsprechenden Anbindung am Ort des PC. Ja, Du liegst falsch, siehe meine Anmerkung oben. Wenn das ordentlich verlegtes cat5e Kabel ist, dann gehen da auf kurze Strecken, unter 30m auch 10G drüber. Habe ich hier selbst so laufen...nutze das als Link zwischen zwei Switches im UG und OG, ca. 18m Länge, Verlegekabel STP/CAT5e und Dosen...Schirm sauber mit aufgelegt. Selbst wenn nicht, sollten 5G drin sein, 2.5G gehen immer...Versuch macht kluch. Du brauchst dann, nach dem Umzug einen 2ten von den CRS305 Switches und 2x diese: https://geizhals.de/mikrotik-routerboard-10g-lan-transceiver-s-rj10-a1827894.html Wenn Du Geld sparen willst, gehen auch zwei dieser Switche: https://geizhals.de/mikrotik-cloud-smart-switch-css610-desktop-gigabit-smart-switch-css610-8g-2s-in-a2379806.html Den CSS610 habe ich bei mir auch im OG, daran meinen Desktop PC mit einer Mellanox 10G und DAC-Kabel. Im Rack steht ein grösserer Switch und die Verbindung zwischen Beiden läuft eben über cat5e .. 10G sind stabil. Der Königsweg wäre eben im Rack den CRS305 und am Ort des PC den CSS610....spart etwa 50EUR. Dann kannst Du im Rack den UDMPro, den unRaid-Server (beide jeweils über SFP+ DAC-Kabel) und den Uplink zum Switch am PC "bauen"....durchgängig mit 2.5, 5 oder 10G, je nachdem was das cat5e stabil hergibt. Du kannst also Schrittweise anfangen (mein Vorschlag mit dem einen CRS305 und 10G Karten mit DAC). Nach dem Umzug dann den CSS610 und zwei Tranceiver...und noch ein DAC Kabel (ca. 10-15EUR) für die UDMPro, die dann mit 10G an den CRS305 angebunden wird). Wenn Deine SSD eben erstmal nur 400MB/s schafft, ist das ja schon was...das 10G Netzwerk kann das nächste Upgrade zu einer NVMe ja dann verkraften. Es gingen natürlich auch noch andere Switche, aber das wird tatsächlich teurer. Nochwas: In dem Setup, komm bitte nicht auf die Idee 2 dieser 10GBE-T/RJ45 nebeneinander in den Switch zu stecken. Die werden heiss, weil die Chipsätze eben (noch) viel Strom verbrauchen....die Switche haben keine Lüfter zur Kühlung (auch nicht nötig, wenn man sich an diese Angaben hält). Daher auch meine Empfehlung die andenen 10G Anbindungen an die Switche und UDM-Pro mit SFP+ DAC-Kabeln zu machen. Die sind günstig und brauchen nur 25% der Leistung (also auch weniger Wärmeentwicklung). Mein Tipp: denk das mal durch und mache eine Zeichnung, welche Verbindungen Du "ziehen/schalten" willst, in welcher Geschwindigkeit und welcher Technologie (SFP+, RJ45, welche Tranceiver-Typoen/Modell, usw.). Ein Bild sagt mehr als 1000 Worte, heisst es ja Edit: ...und da Du ja so mit den Port-Geschwindigkeiten auf Kriegsfuss stehts, der zweite Tipp: Wenn Du die Zeichnung hast, denke Dir den Weg der Daten zwischen den beiden betroffenen Enggerätenn (zB unraid und PC) entlang der Verbindungen zwischen diesen Punkten (auch über Switche hinweg). Jede Vetrbindung hat an jedem Ende einen Port mit einer Geschwindigkeit X, zB 1G, 10G ... aber eben auch auf dem Weg durch die Switche und deren Ports. Das Ganze funktioniert wie ein System aus unterschiedlich dicken Wasserrohren. Es geht zwischen den Endpunkten nur soviel Wasser durch, wie an der Stelle mit der geringsten Port-Geschwindigkeit durchgeht. Dieese Stelle ist das Nadelöhr der Verbindung zwischen A und B. Hoffe es wird klarer....1 point
-
Have you tried clicking on a drive on the Main tab and setting the value you want from there?1 point
-
What do you mean exactly? 😅 You made this beautiful guid/tutorial... 😍 I'm only here to give support for the container itself.1 point
-
NO! If you issue a format that will erase the contents of the disk and update parity to reflect this. You should run the xfs_repair command without -n and with -L to repair the file system.1 point
-
https://forums.unraid.net/topic/48707-additional-scripts-for-userscripts-plugin/#comment-4816881 point
-
VMs reservieren sich exklusiv den RAM, den du zuweist. Also denkbar schlechte Voraussetzungen um den RAM als Upload-Cache zu verwenden.1 point
-
Will look at those, thank you. Jonathanm's suggestion if using "insert" key is great for precision file transferring too.1 point
-
Yes. The owner should be 'nobody' and the group S/B 'users'. The 'New Permissions' Tool/script will fix all of these!1 point
-
Try hitting the insert key and see if it turns the highlighted item yellow, if so, that's a selection, and you can select multiple items to operate on.1 point
-
...also hast Du die UDM-Pro schon mit einem weiteren Switch über SFP+ verbunden? Was ist das für ein Switch? ...und bist Du sicher, das der 2te SFP+, den Du nun für den PC verwenden willst als LAN-Port fungieren kann? Der ist in den Specs als dedizierter WAN-Port ausgezeichnet...siehe auch hier: Wenn es eine NVMe mit PCIe Interface und nicht SATA ist, sollte das gut gehen.1 point
-
Maybe this is wrong here. But I have to say thank you for this great Plugin, because this helped me alot to get my drives sorted for me. 🙂 Thanks!1 point
-
The fix took a few days but included clearing CMOS, removing ram, listening for the chimes... I had to pull the 24pin and 2x 8 pin for it to finally post. Now I am happy as can be. Thank you all for suggestions and help!1 point
-
Oder mehr RAM verbauen:1 point
-
Was a typo, meant http rather than https.1 point
-
Ok, I would not say that my tests were definitive, but I am confident enough to say that this was user error (my fault). The ultimate issue sprang from how I made my key. I tried to concatenate a few binary files to make a file key and, for whatever reason, the key that actually registered was only the first of the concatenated files (I made sure to test with a combined keyfile size of less than 8 MB). While I don't have a complete, in-depth understanding of what happened, I think I have enough information for me to keep going with my build.1 point
-
Ja wobei die IOPS jetzt trotzdem nicht so schlecht sind. Ich sage nicht dass mit DRAM nicht besser ist. Aber im Gegensatz zu SATA-SSDs ist DRAM bei NVME-SSD mMn nicht ganz so wichtig. Wenn der Rest passt (TLC statt QLC, ausreichend SLC-Cache...) ist das eher das Sahnehäubchen obendrauf.1 point
-
Yes, disk looks fine, swap cables/slot with another disk to rule that out and if the emulated disk is mounting and contents look correct you can rebuild on top.1 point
-
Die SN550 bzw. genauer gesagt das baugleiche Modell von Sandisk gibt es gerade wieder im Angebot: https://www.mydealz.de/deals/sandisk-ultra-nvme-ssd-wd-sn550-1tb-m2-2280-pcie-30-x4-3d-nand-tlc-r2400mbs-w1950mbs-slc-cache-600tbw-5j-garantie-1788869#comments1 point
-
It should be enough to add '>> /var/log/valheim.log', no guarantee that this works... What you can actually do is to set the Variable Debug Log output to 'true' and then add '>> /var/log/valheim.log' (this is very verbose!). But keep in mind that you save it to /var/log directory inside the container, wouldn't it be better to save the log to the server directory? Isn't the Docker log enough? Something seems wrong with the save game. From what I've see the container has also problems to connect to the internet, are you sure that the container has exclusive access to the internet without any blocking software like PiHole or Steam Cache in front of it? Please go to the support thread from the container and read the second recommended post in the game server thread.1 point
-
I always treat the fact that a SMART report that says passed is not definitive (whereas a failure probably is). I would not be happy with such a large number of reallocated sectors as they definitely indicate that there have been a lot of read failures in the past. Technically if that number stays stable you may be OK but definitely a disk to consider retiring.1 point
-
Well when I got home tonight I tried again and it worked. Not sure what was up, but apologize for throwing a flag for nothing. Keep up the great work!1 point
-
Ich bin eine Wurst ihr habt recht. War wohl von meinen internen kopieren der SSDs geblendet und habe nicht nachgedacht. Sorry für meine Dummheit. Dann werde ich einmal nach 10 G Netzwerkkarten suchen. Habt Ihr vielleicht Vorschläge? Brauche ja zwei 😉1 point
-
@binhex Thanks for being on top of it. I appreciate you!1 point
-
Not your fault. It's confusing because Unraid has evolved and changed immensely over the years, and some legacy settings haven't been renamed because of inertia and nobody came up with a universally accepted way of upending tradition and starting over with new terminology.1 point
-
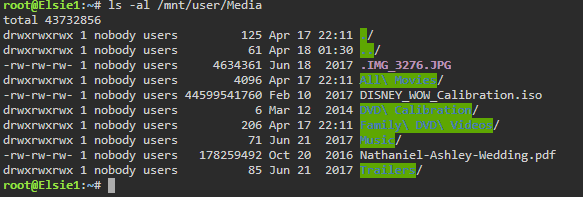
I just had an epiphany. What I saw initially as a pure SMB access issue, I now see could well be a file/directory permission issue. Were you using mc to copy from a HD mounted with the Unassigned Devices plugin directly to a disk? (The other way would have been to copy from the Unassigned Device mounted HD to a User Share.) (Today it is recommended that users use Shares rather individual disk access. In fact, disk sharing is turned off by default. Thus, you only have access to User Shares via SMB!) Check to see that your owner/group and file/directory permissions look like this: I am assuming that you are well enough versed in Linux operations to do this since you were using ver4.3 of Unraid. (If you need help, just ask.) Oh, there is now a built-in terminal in Unraid, just look for the >_ on the right side of the Toolbar. IF they are not as indicated, there is a script that will fix the problem called New Permissions under Tools. Run it only against the User Shares that you are having a problems with. It can take a long time to run as it will work on every file and directory in the share. I also seem to recall that it runs 'silently' so wait for it to finish. I seem to recall that the command line prompt will return when it is done.
 1 point
 -
I just wanted to stop in and say thanks for making this plugin. My transcoding GPU has been acting up for while, but I wasn't sure what the problem was. This plugin helped me see that the temp was high and the fan wasn't working. Turns out I had a stray wire blocking the fan's operation. So thanks again, I appreciate it.1 point
-
Good news, no more AMD reset bug with RX 6xxx XT series GPUs in macOS 11.4 beta 1 on UnRAID.1 point
-
This is part of the board, it's the IPMI function, it allows accessing the server over LAN without a keyboard/monitor, and not the reason the board is not posting, try clearing CMOS, reinserting the CPU/RAM, etc, if it still doesn't post you need to do an RMA.1 point
-
Then it's something in your network not resolving the domain.1 point
-
When you enable HTTPS in Unraid, then you can no longer use HTTP. Well, you can, but it automatically redirects you to the HTTPS port. So if that is what you are seeing then it is working as designed. A valid cert must be for a Fully Qualified Domain Name, a certificate will not be issued for an IP address. So https://<IP> will not work without ignoring certificate errors from your browser. In terms of next steps, what are you trying to achieve? It sounds like you had a working SSL setup but then disabled it so I'm not sure what your goal is.1 point
-
New Config without the disk and rebuild parity. https://wiki.unraid.net/Manual/Storage_Management#Removing_data_disk.28s.291 point
-
The problem is that even an disk with no files but has been formatted to create an empty file system (what a user normally means by an ‘empty’ disk) is included in the parity calculations and cannot be removed without invalidating its role in the parity calculations. This would mean that there is no longer enough redundancy information to allow disk10 to be rebuilt. this is one reason why it is frequently recommended to not add a disk to the array before you require (or will soon require) the space. Once added the drive is no longer available to be used as a replacement for another drive that then fails.1 point
-
i have this problem too! changing the temperature setting on one disk and then change smart setting on an another disk resets the first disk to the default settings... removing the smart-one.cfg does NOT fix this! the smart attribute Notification settings are elso broken... (my telegramBOT can confirm this.) noting visible in the logbooks... edit: manual edit the smart-one.cfg did work!! but i cant edit something in the GUI or the smart-one.cfg file will be over written...1 point
-
Thanks @bytchslappa for the heads up. Everyone using a User Script for Nvidia GPU Power State just edit the script to: #!/bin/bash nvidia-persistenced fuser -v /dev/nvidia* and leave the schedulle At first Array start only unchanged.1 point
-
The description on how to run it is not accurate anymore but it's pretty easy: 1 . Open a terminal and create the folder and sub-folder mkdir mnt/user/appdata/tor-relay mkdir mnt/user/appdata/tor-relay/config 2. Create the config file by opening it with nano nano mnt/user/appdata/tor-relay/config/torrc 3. Copy-paste the configuration information from here https://github.com/DarkIsDude/tor-server#tor-configuration and change whatever you want there. 4. Save the file and start the docker1 point
-
Thanks for the help in this post, works fantastically. TL;DR of original, here's a step by step guide for creating a mount on VM creation (as of unraid 6.8.3). In the "Unraid Share" section, select the unraid folder that you want to make mountable. This can be an individual share or a parent directory of the share for multiple. e.g `/mnt/user` In the "Unraid Mount tag" section, enter a tag name, this can be anything and will be passed to the VM. e.g `myMountTag` Complete VM setup, power on and install your VM OS or normal. The following steps require root/sudo user. Make a backup copy of fstab in case you mess up your configuration `sudo cp /etc/fstab /etc/fstab.orig` Create a target mount directory where you want to mount your share e.g. `sudo mkdir /path/to/myMountedDir` Edit `/etc/fstab` config by adding the following line to the end of the file, (change tag & path to your needs) `myMountTag /path/to/myMountedDir 9p trans=virtio,version=9p2000.L,_netdev,rw 0 0` Save fstab file and run `sudo mount -a` to check your mount works (there should be no output for on success) You should now have a mounted share in your VM Futher detail For anyone new to unraid, looking for an explanation as to what the fstab values are, here is an explanation <device>: myMountTag <mount point>: /path/to/myMountedDir <file system type>: 9P (The protocol that QEMU uses for a VirtFS) <options>: trans=virtio,version=9p2000.L (our transport for this share will be over virtio, and we specify the 9P version (2000.L) because the default for QEMU is 2000.U. "L" has better support for ACLs, file locking and more efficient directory listing, deletion edge cases etc) _netdev (tells the system that this mount relies on the network, and to delay the mount until a network is enabled) rw (mount as read/write) <dump>: 0 (disables backup via the dump command) <pass num>: 0 (disable any error checking) Cheers!1 point
-
Is the process still so complex in Oct 2019, for the linux untrained? I want to share my /mnt/user to my NethServer . Can I have a step by step "stupid-proof" guide?1 point
-
Try this From a windows command prompt (run as administrator) mklink /d "c:\WhateverFolderYouWantItCalled" "\\unRaidServer\unRaidShareName" Your share will wind up being mounted within that folder on an existing windows drive Should be close enough to what you need.1 point
-
Record Disk Assignments Records your current disk assignments to a file on the flash drive called DISK_ASSIGNMENTS.txt (config folder). Not necessary if you run CA's appdata backup as that's done automatically #!/usr/bin/php <?PHP $availableDisks = parse_ini_file("/var/local/emhttp/disks.ini",true); $txt .= "Disk Assignments as of ".date(DATE_RSS)."\r\n"; foreach ($availableDisks as $Disk) { $txt .= "Disk: ".$Disk['name']." Device: ".$Disk['id']." Status: ".$Disk['status']."\r\n"; } file_put_contents("/boot/config/DISK_ASSIGNMENTS.txt",$txt); echo "Disk assignments have been saved to the flashdrive (config/DISK_ASSIGNMENTS.txt)\n"; ?> record_disk_assignments.zip1 point