Leaderboard


Popular Content
Showing content with the highest reputation on 01/15/22 in all areas
-
I am in the process of remaking Macinabox & adding some new features and hope to have it finished by next weekend. I am sorry for the lack of updates recently on this container. Thankyou @ghost82 for all you have done in answering questions here and on github and sorry i havent reached out to you before.4 points
-
all the users, including me, like you! thank you to you!3 points
-
Waking up after the omnicron wave, @SpencerJ let me know of this prophecy 🙂 "00110110 00101110 00110001 00110000 00101110 00110000 00101101 01110010 01100011 00110011 01100100"3 points
-
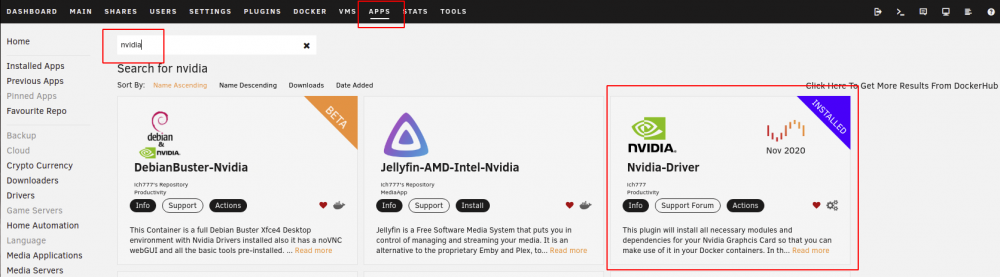
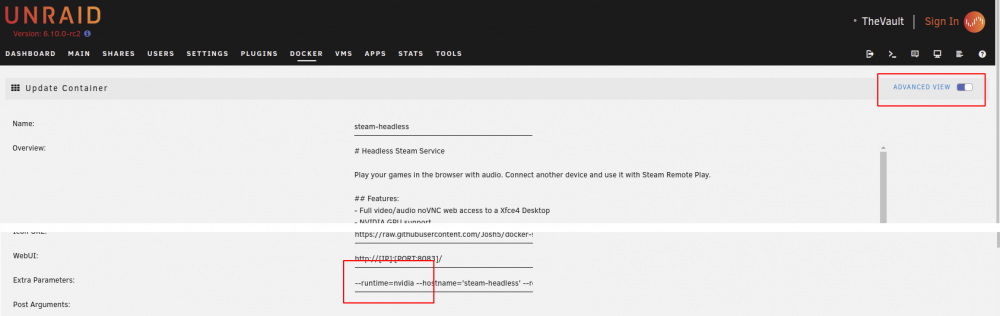
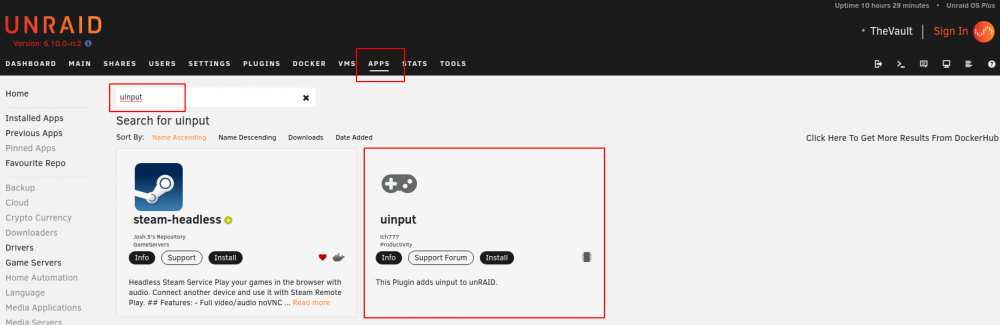
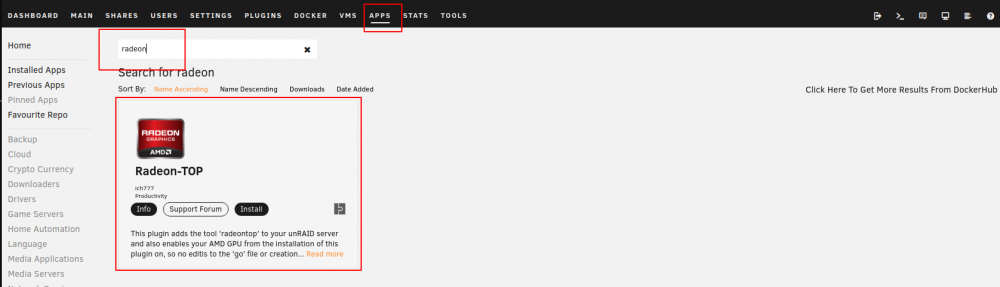
Application Name: Steam (Headless) Application Site: https://store.steampowered.com/ Docker Hub: https://hub.docker.com/r/josh5/steam-headless/ Github: https://github.com/Josh5/docker-steam-headless/ Discord: https://unmanic.app/discord (Not just for Unmanic...) Description: Play your games in the browser with audio. Connect another device and use it with Steam Remote Play. Features: NVIDIA GPU support AMD GPU support Full video/audio noVNC web access to a Desktop Root access Support for Flatpaks and Appimages Compatible with EmuDeck installer (not supplied) Notes: ADDITIONAL SOFTWARE: If you wish to install additional applications, you can generate a script inside the "~/init.d" directory ending with ".sh". This will be executed on the container startup. STORAGE PATHS: Everything that you wish to save in this container should be stored in the home directory or a docker container mount that you have specified. All files that are store outside your home directory are not persistent and will be wiped if there is an update of the container or you change something in the template. GAMES LIBRARY: It is recommended that you mount your games library to `/games` and configure Steam to add that path. AUTO START APPLICATIONS: In this container, Steam is configured to automatically start. If you wish to add additional services to automatically start, add them under Applications > Settings > Session and Startup in the WebUI. NETWORK MODE: If you want to use the container as a Steam Remote Play (previously "In Home Streaming") host device you should set the Network Type: to "host". This is a requirement for controller hardware to work and to prevent traffic being routed through the internet since Steam thinks you are on a different network. Setup Guide: CONTAINER TEMPLATE: Navigate to "APPS" tab. Search for "steam-headless" Select either Install or Actions > Install from the search result. Configure the template as required. GPU CONFIGURATION (NVIDIA): This container can use your GPU. In order for it to do this you need to have the NVIDIA plugin installed. Install the Nvidia-Driver Plugin by @ich777. This will maintain an up-to-date NVIDIA driver installation on your Unraid server. Toggle the steam-headless Docker Container template editor to "Advanced View". In the "Extra Parameters" field, ensure that you have the "--runtime=nvidia" parameter added. (Optional - This step is only necessary if you only multiple NVIDIA GPUs. If you have a single GPU, then leaving this as "all" is fine.) Expand the Show more settings... section near the bottom of the template. In the Nvidia GPU UUID: (NVIDIA_VISIBLE_DEVICES) variable, copy your GPU UUID (can be found in the Unraid Nvidia Plugin. See that forum thread for details). GPU CONFIGURATION (AMD): Install the Radeon-Top Plugin by @ich777. Profit ADDING CONTROLLER SUPPORT: Unraid's Linux kernel by default does not have the modules required to support controller input. Steam requires these modules to be able to create the virtual "Steam Input Gamepad Emulation" device that it can then map buttons to. @ich777 Has kindly offered to build and maintain the required modules for the Unraid kernel as he already has a CI/CD pipeline in place and a small number of other kernel modules that he is maintaining for other projects. So a big thanks to him for that! Install the uinput plugin from the Apps tab. The container will not be able to receive kernel events from the host unless the Network Type: is set to "host". Ensure that you container is configured this way. WARNING: Be aware that this container requires at least 8083, 32123, and 2222 available for the WebUI, Web Audio, and SSH to work. It will also require any ports that Steam requires for Steam Remote Play No server restart is required, however. Ensure that the steam-headless Docker container is recreated after installing the uinput plugin for it to be able to detect the newly added module.


 2 points
 -
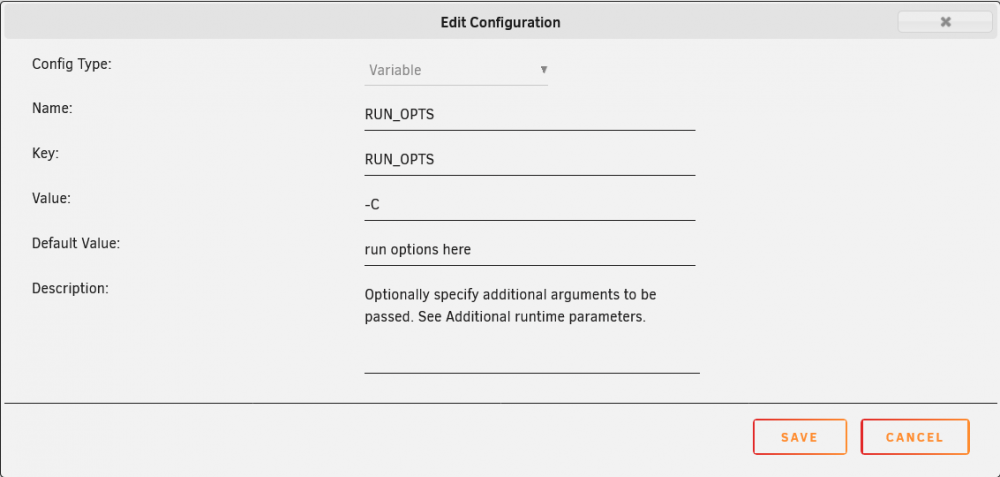
Ja, das ist das Log, was @VK28.01 am Anfang zitiert hat. Da läuft ganz schnell immer wieder der gleiche Text durch. Offensichtlich so schnell, dass es mir fast die Unraid WebUI einfriert und ich Schwierigkeiten habe, den Docker zu stoppen, weil ich kaum noch in das Kontextmenü komme. Das reagiert aber zum Glück doch noch nach einer Weile. Ich hab's... Das Template hat die Variable RUN_OPTS und die hat wiederum den Standard-Wert "run options here", wie man hier noch sehen kann: Der Text war durch das Template so voreingetragen, nehme ich an, was einen korrekten Start verhindert hat. 😄 Deswegen hatte es dann auch geklappt, als ich da etwas funktionierendes eingetragen habe. Ich habe den EIntrag aus meiner Config ganz gestrichen und jetzt läuft's.
 2 points
 -
3d indeed2 points
-
The macOS interroperability setting is now in UD settings. This is a separate setting from the array share setting. This only pertains to UD devices and is set independent of the array setting. It defaults to off. Once you update UD, you'll be able to work with your exFAT disk. You don't need to make any changes.2 points
-
It was 666 replies, sorry had to bump it up by one to avoid chaos. Go on.2 points
-
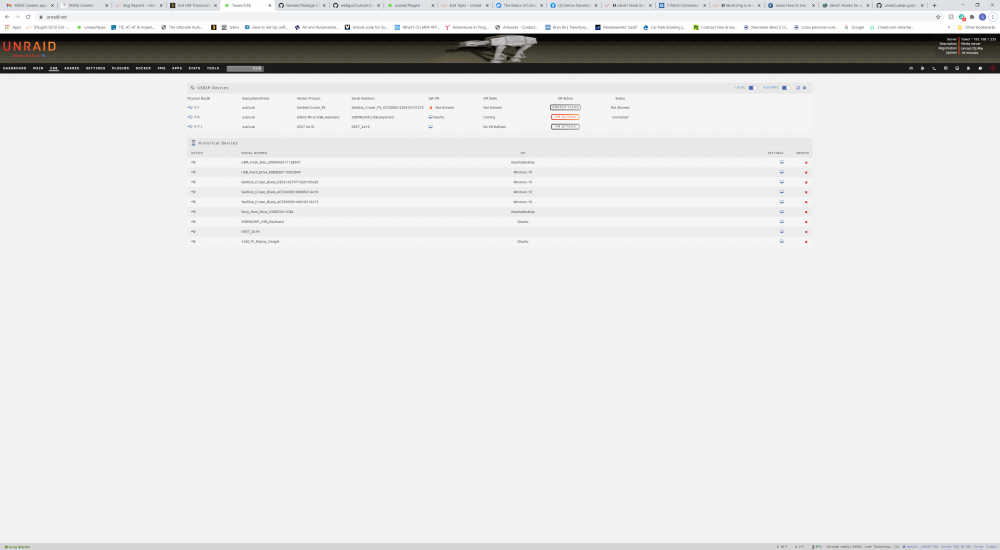
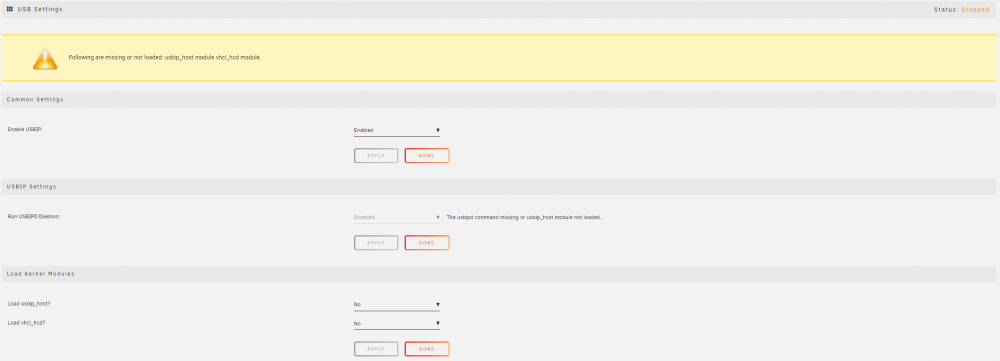
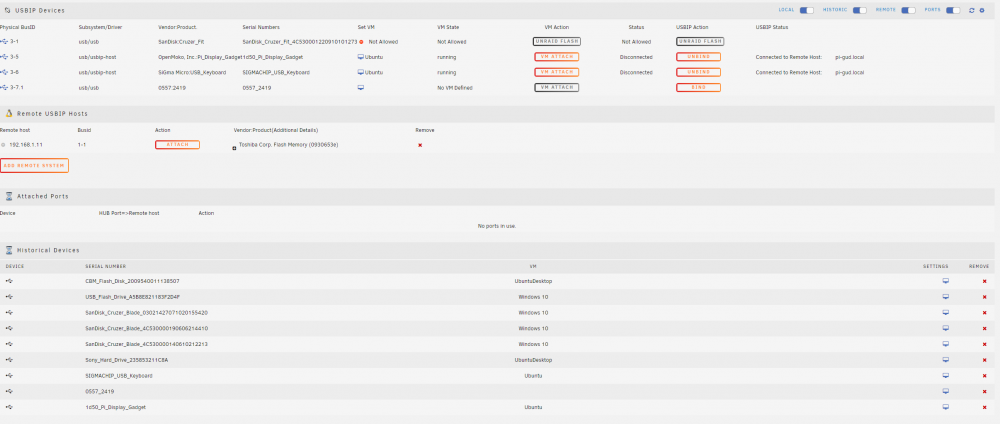
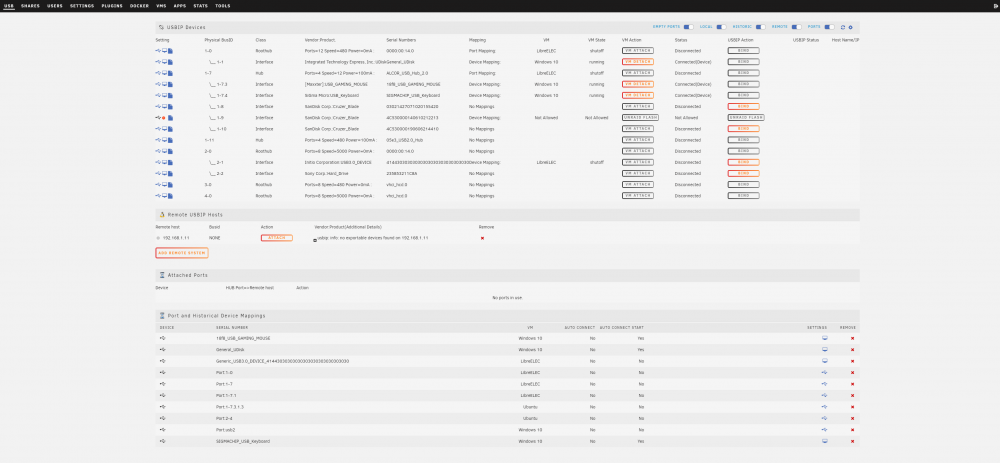
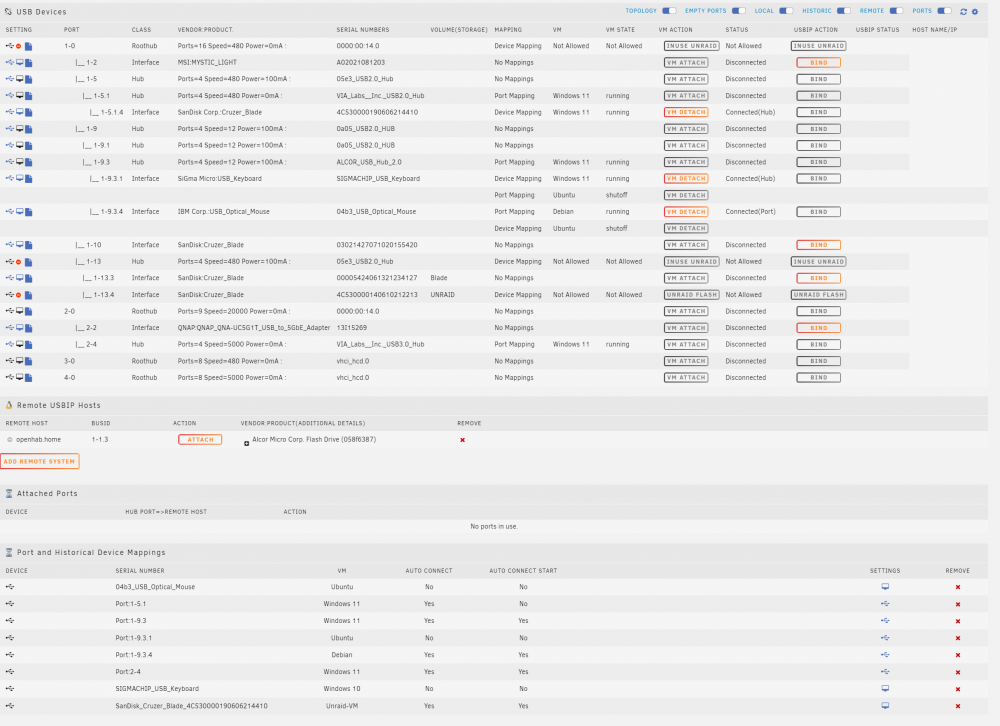
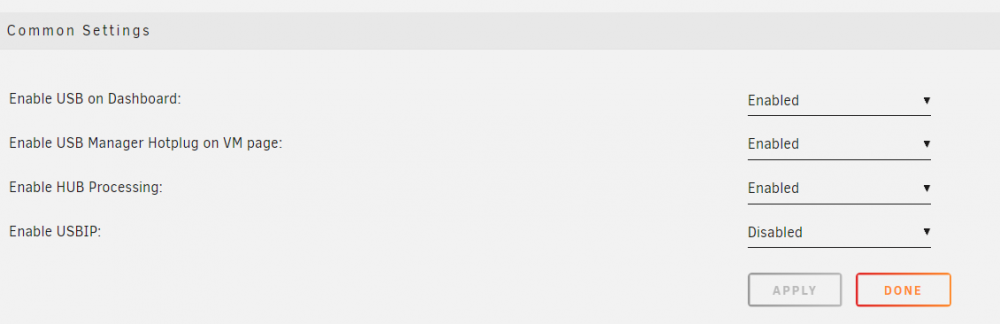
USB_Manager is in CA as of 6th June 2021, Please continue to use USBIP-GUI but will be replaced by USB_Manager. The plugin supports attaching multiple USB devices of the same Vendor/Model to a VM. Also it will auto hotplug devices are plugged in if defined and the VM is started. Dashboard View add in 16.02.2021. To see USBIP Functions you need to enable in Settings. This function is only valid from 6.9.0-rc2 onwards. Once enabled additional panels are available. (USBIP status and connection host/ip from vers >14.02.21 USB_Manager Change Log 2021.12.12a Revert 2012.12.12 2021.12.12 - Add Hub processing.You can define a port mapping for a hub. If connected or vm starts all devices on that hub will be connected to the VM. Will not process next level down hubs. - Chg Disable device mapping for Root Hubs and Hubs. Disable port mapping for Root Hub. - Chg Detach button show next to connected port or device on the main line. - Fix Buttons if Hotplug mapping used. - Note reboot or disconnect/reconned of Hub may be required. 2021.09.18 - Code review and update. 2021.09.01 - Fix start of usbipd and load of modules on array start. 2021.08.01 - Code clean up - Change to udev rules for 6.10+ support. - Enable zebra strips on tables. 2021.07.27 - Fix Change Unraid Flash to Unraid inuse on the hub lines on dashboard page. - Chg Use Port as standard rather than Physical BUSI/Port. 2021.07.23 - Fix Disable roothub and hubs used for Unraid Flash device. 2021.07.10 - Add volume to device list in USBHotplug page. 2021.07.09a - Add display of Hotplug Devices on main USB page and allow detach. 2021.07.09 - Fix Virsh error if both port and device mapping exist for a device a connection time. - Add USB Manager Hotplug page on VM page, to enable change options in settings. Base code from DLandons Hot plug plugin. Addition support to show on USB page if mapping doesn't exist in next release. 2021.06.02a - Fix table formating if both port and device mappings for new volume column - Add Log virsh calls. 2021.06.26 - Enhancement Show Volume for USB Storage Devices. 2021.06.20 - Enhancement enable port processing for mappinng ports to VM at start. - Update text on edit settings page to describe entry being changed. 2021.06.19 - Install QEMU hooks file code, thanks to ljm42 for code. 2021.06.08 - Fix USBIP command check. 2021.06.06 - Initial beta release. If you are using USBIP-GUI continue to do so at this time. This plugin will suppercede USBIP-GUI in the future and will migrate configurations. USBIP-GUI and USB_Manager cannot co-exist. If you want to replace USBIP-GUI then uninstall first, Config files we remane on the flash drive you can copy them to usb_manager directory. USBIP and USBIP-HOST module are not loaded by default. If you want to use them enable USBIP in the Settings and click the install button to install the additional plug. Add the following lines, see support page for complete code as cannot be insert here to /etc/libvirt/hooks/qemu after the PHP line, These will be automatically added in the a future release. if ($argv[2] == 'prepare' || $argv[2] == 'stopped'){ shell_exec("/usr/local/emhttp/plugins/usb_manager/scripts/rc.usb_manager vm_action '{$argv[1]}' {$argv[2]} {$argv[3]} {$argv[4]} ................ Includes all changes from USBIP-GUI + Topology Slider addition. USBIP-GUI Change Log 2021.05.15 - Chg Fix Remove USB device from VM for devices not in a shutdown state, was previously only for running. 30.04.2021 - Add Remove USB Device from VM when disconnected. 2021.04.22 - Add Roothub and Hubs to view. - Add Switch to show empty ports. - No process added at this time for additional devices. 10.03.2021 - Add VM disconnect option to be used in pre sleep commands to remove USB mappings from VM before sleep. 09.03.2021 - Chg Fix issue introduce as part of port mapping for checking status. 24.02.2021 - Add Support for port-based mappings Auto connecting to a VM when device is connected to a USB port. Only devices being plugged in are supported for Ports at this time. Support for port level will be added in the furture for VM Starts. Precedence is for device level mappings over port. If a device is set to autoconnect no then the auto connect at the port level will be evaluated. 17.02.2021 - Add Dashboard update and refresh. 16.02.2021 - Add USB Dashboard entry. Enable within settings. 14.02.2021 - Add Display host name or IP address for remote USBIP Clients. 13.02.2021 - Add Show remote connection status. Host/IP to follow WIP. 12.02.2021 - Chg Fix for Bind/Unbind Button. 10a.02.2021 - Add Disconnect update function implemented. - Add Auto Connect on VM Start. - Chg Auto Connect on device added checks VM Status - Add Update Status when VM Stops. Note you need to manually add code to /etc/libvirt/hooks/qemu for VM start/stop process to function. See support page. Development yet to be completed. Update of qemu hook file. Add checks before historical info can be removed. Rename Plugin to USB Manager Change to include USBIP package install in the settings page. 08.02.2021 - Add: Autoconnect function. If VM defined and Autoconnect is set to Yes then when usb device is connected device will be connected to VM. If VM is not started Error is show. - Chg: Main USB list is no longer depetant on USBIP. Version change to support 6.8. Error will be seen during install as it trys to install USBIP package which doesnt exist pre kernel 5.10.1, but is ignored. Development yet to be completed. Autoconnect function, check VM status before connecting. Autodisconnect function. Will provide log entry but no action taken at present. Add checks before historical info can be removed. Rename Plugin to USB Manager VM Start/Stop process. Change to include USBIP package install in the settings page. 07.02.2021 - Add: VM Mapping functions - Add: Display USBIP function messages if not used. Enable/Disable for USBIP added to settings. Defaults to disable, change to enable if you are upgrading. - Add: Historical Devices added, list includes current devices also which can be removed whilst inuse. - Add: Failure Message for virsh errors. Note, Existing Libvirt plugin cannot be used to connect devices. Development yet to be completed. Autoconnect function. udev Rules exist and process works, but there are timing issues to be resolved. Add checks before historical info can be removed. Rename Plugin to USB Manager VM Start/Stop process. Changes to USB device list not to be depentant on usbip. Once change version pre-6.9.0-rc2 will be available. 31.01.2021 - Add: Revised Load process and addition of loading usbip package from ich777. USBIP package includes all commands and modules required for USBIP 28.01.2021 - Initial beta release.


 1 point
 -
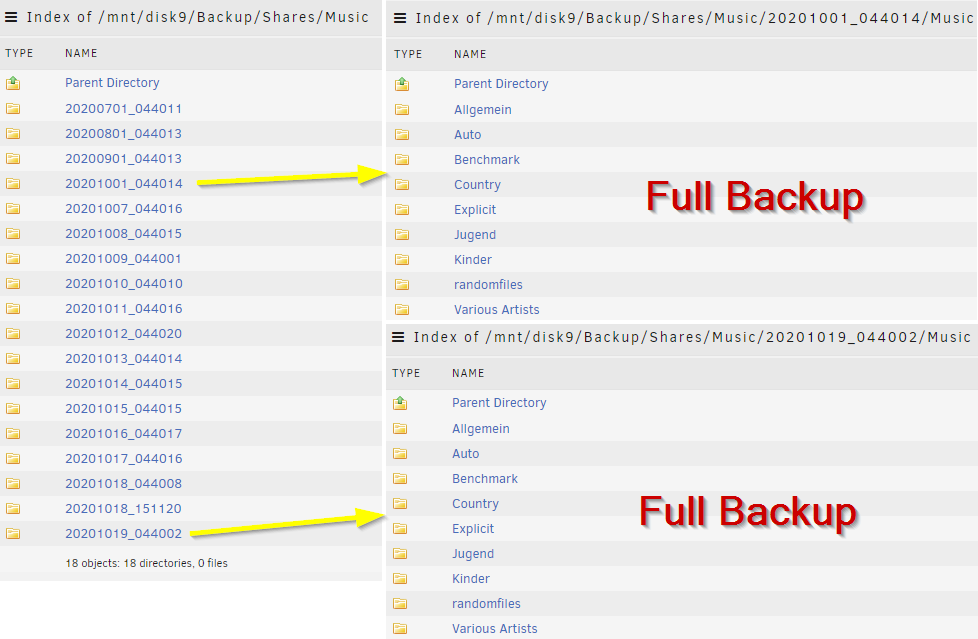
The following script creates incremental backups by using rsync. Check the settings to define your own paths. Donate? 🤗 https://codeberg.org/mgutt/rsync-incremental-backup > incbackup.sh Explanations All created backups are full backups with hardlinks to already existing files (~ incremental backup) All backups use the most recent backup to create hardlinks or new files. Deleted files are not copied (1:1 backup) There are no dependencies between the most recent backup and the previous backups. You can delete as many backups as you like. All backups that are left, are still full backups. This could be confusing as most incremental backup softwares need the previous backups for restoring the data. But this is not valid for rsync and hardlinks. Read here if you need more informations about links, inodes and files. After a backup has been created the script purges the backup dir and keeps only the backups of the last 14 days, 12 month and 3 years, which can be defined through the settings logs can be found inside of each backup folder Sends notifications after job execution Unraid exclusive: Stops docker containers if the source path is the appdata path, to create consistent backups Unraid exclusive: Creates a snapshot of the docker container source path, before creating a backup of it. This allows an extremely short downtime of the containers (usually only seconds). How to execute this script? Use the User Scripts Plugin (Unraid Apps) to execute it by schedule Use the Unassigned Devices Plugin (Unraid Apps) to execute it after mounting a USB drive Call the script manually (Example: /usr/local/bin/incbackup /mnt/cache/appdata /mnt/disk6/Backups/Shares/appdata) How does a backup look like? This is how the backup dir looks like after several month (it kept the backups of 2020-07-01, 2020-08-01 ... and all backups of the last 14 days): And as it's an incremental backup, the storage usage is low: (as you can see I bought new music before "2020-08-01" and before "2020-10-01"): du -d1 -h /mnt/user/Backup/Shares/Music | sort -k2 168G /mnt/user/Backup/Shares/Music/20200701_044011 4.2G /mnt/user/Backup/Shares/Music/20200801_044013 3.8M /mnt/user/Backup/Shares/Music/20200901_044013 497M /mnt/user/Backup/Shares/Music/20201001_044014 4.5M /mnt/user/Backup/Shares/Music/20201007_044016 4.5M /mnt/user/Backup/Shares/Music/20201008_044015 4.5M /mnt/user/Backup/Shares/Music/20201009_044001 4.5M /mnt/user/Backup/Shares/Music/20201010_044010 4.5M /mnt/user/Backup/Shares/Music/20201011_044016 4.5M /mnt/user/Backup/Shares/Music/20201012_044020 4.5M /mnt/user/Backup/Shares/Music/20201013_044014 4.5M /mnt/user/Backup/Shares/Music/20201014_044015 4.5M /mnt/user/Backup/Shares/Music/20201015_044015 4.5M /mnt/user/Backup/Shares/Music/20201016_044017 4.5M /mnt/user/Backup/Shares/Music/20201017_044016 4.5M /mnt/user/Backup/Shares/Music/20201018_044008 4.5M /mnt/user/Backup/Shares/Music/20201018_151120 4.5M /mnt/user/Backup/Shares/Music/20201019_044002 172G /mnt/user/Backup/Shares/Music Warnings Its not the best idea to backup huge files like disk images that changes often as the whole file will be copied. A file change while copying it through rsync will cause a corrupted file as rsync does not lock files. If you like to backup for example a VM image file, stop it first (to avoid further writes), before executing this script! Never change a file, which is inside a backup directory. This changes all files in all backups (this is how hardlinks work)! Do not use NTFS or other partition formats, which do not support Hardlinks and/or Linux permissions. Format external USB drives with BTRFS and install WinBTRFS, if you want to access your backups through Windows. Do NOT use the docker safe perms tool if you backup the appdata share to the array. By that all file permissions are changed and can not be used by your docker containers anymore. Docker safe perms skips only the /mnt/*/appdata share and not for example /mnt/disk5/Backups/appdata!
 1 point
 -
EDIT: As of 2023-02-26 few years active use this solution is confidently stable. Not a single stale and no problems encountered. The Issue and cause When SMB share is mounted to Linux you sometimes might encounter mount hanging and you get error stale file handle. Something in terms of: cannot access '/mnt/sharename': Stale file handle This is caused by file being stored into cache and then moved into another disk by the Mover. The file inode changes and client gets confused because of it. I suspect it could also happen when file moves from another disk inside array, but have not confirmed that and it would be fairly rare issue. Solutions gathered (only one required) Disabling the cache or mover are ways to solve this. However not very practical for many people as it takes away a feature. Disabling hardlinks also fix this problem from occuring. However it also disables hardlinks from whole system. Generally this isn't huge problem. Only certain apps require it and still kind of work with it disabled. Change SMB version to 1.0 at client side. This has some problems as well, such as exposing server to security problems coming with the 1.0 version. It also has some performance problems and lack of features compared to v3. Now for PROPER fix. Key is to add noserverino to mount flags. This forces client to generate its own inode codes rather than using server one. So far I have not noticed any problems by doing this. I can not replicate the issue with this method and I have hardlinks enabled (not required) and SMB v1 disabled (not required). How to replicate the issue Create a file to share that has cache enabled (not prefered). Browse into that directory inside the mount using /mnt/user path Enable the mover Witness the stale file handle error Ramblings Also I found many different variations for the full mount flags and here is what I use: //192.168.1.20/sharename /mnt/sharename cifs rw,_netdev,noserverino,uid=MYLOCALUSERNAME,gid=users,credentials=/etc/samba/credentials/MYLOCALUSERNAME,file_mode=0666,dir_mode=0777 0 0 Let's go thru the mount flags. I'm using these knowing that posix extensions are DISABLED. With them enabled, you might want to use different flags, especially about permissions. Feel free to change them as you like, the noserverino is the ONLY required one. rw - This is just in case and it enabled read/write access to mount. Might be default anyway. _netdev - Makes the system consider this as network device and it actually waits for networking to be enabled before mounting. noserverino - Client generated inodes (required for the fix) uid/gid - These are optional. It makes the mount appear as like its owned by certain uid. Inside the server nothing changes. I'm using these because files are owned by the nobody/users and I can't open files. There is also noperm flag etc. you could use. I just find uid and gid most practical. credentials - This is a file containing username and password for the share. This is just so that people can't see my password by reading /etc/fstab. For more reference how to set this up https://wiki.archlinux.org/index.php/samba#Storing_share_passwords file_mode/dir_mode - These are optional. These make files appear in share as 0666 and 0777 permissions, it does not actually change permissions at server side. Without these the file permissions are not "in sync" and appear wrong in the client side. Such as 0755 directory permissions while it is 0777 in server. Posix/Linux/Unix extensions (not related to stale file handle) Problem I have not been able to solve is how to enable Posix/Linux/Unix extensions. When I try to enable the extensions it errors out saying that server does not support them. Inside samba config in unraid there is unix extensions = No. However turning this Yes in many ways did not enable them. Why this matters? Well those extensions enable certain nice features that makes the share appear as proper linux drive. To confirm that unix extensions are not enabled: mount | grep "//" in the flags you see nounix flag. To enable unix extensions manually add unix to flags. However during mount you get an error and reading dmesg shows you that it reports server not supporting unix extensions. NFS For NFS I still have no real solution other than disabling hardlinks.1 point
-
Since the 5.x kernel based releases many users have been reporting system hangs every few days once the i915 module is loaded. With reports from a few users detailed in the thread below we have worked out that the issue is caused by the i915 module and is a persistent issue with both the 6.9.x release and 6.10 release candidates. The system does not need to be actively transcoding for the hang to occur. 6.8.3 does not have this issue and is not hardware related. Unloading the i915 module stops the hangs. Hangs are still present in 6.10.0RC2. I can provide a list of similar reports if required.1 point
-
Whenever I can, I extol the virtues of unRAID for those looking for a NAS solution. Synology, QNAP, etc. tend to be under-powered (especially on the low end) for the price and you can almost always build a more powerful unRAID server for the same price. Their hardware also tends to be very proprietary. The advantage to Synology, etc. is that you don't have to know a lot about how things work and they have a locked down interface where you just click icons to do what you want to do without the need to really understand everything that is going on. On the higher end in the Synology world, of course, there are more options and they do offer some things not yet available in unRAID. I finally had to give up with my latest attempt and tell the guy to just buy a Synology NAS because he could not comprehend how things work in the NAS world. The flexibility of unRAID was overwhelming to him. Even though I showed him a server parts list that was much more powerful than a 4-bay Synology NAS, in the end, that's what he needed. Unfortunately, he would have needed a lot of hand holding with unRAID. I am glad unRAID exists because I like to tinker and upgrade hardware but there are many who just want something that sits on their desk and they rarely have to think about it (what's the fun in that?). Maybe someday Limetech will offer a locked down/beginner version of unRAID that is similar to the Synology experience but that would not be of much interest to me. I am not dissing Synology, QNAP and the like. They sell a lot of NAS units for a reason but I am glad there is the unRAID alternative.1 point
-
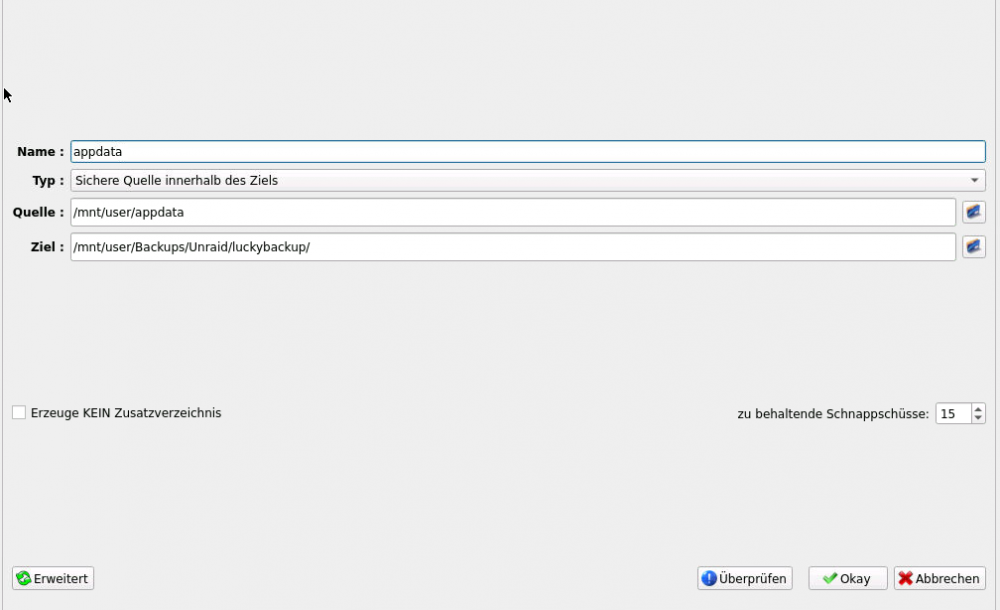
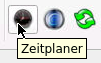
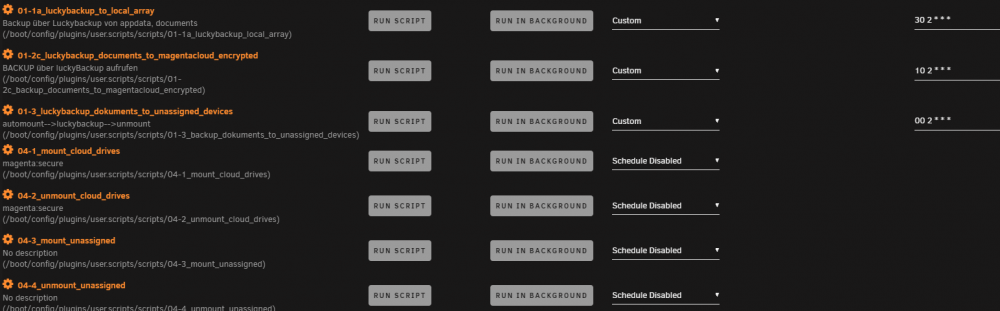
Hallo Zusammen, nachdem ich einige Backup-Möglichkeiten ausprobiert habe und dank des tollen Supports hier, möchte ich gerne meine Backup-Routine hier an alle Einsteiger und Interessierte gerne zurück geben. Was war mein Ziel? Ich habe alle wichtigen Dokumente eingescannt und vernichtet, somit alles einzig nur noch digital. Diese wollte ich unbedingt nicht nur mit Snapshots auf einer Parity gesichert wissen, sondern zusätzlich verschlüsselt in einer cloud und auf wechselnden USB-Platten, die ich hin und wieder tausche und so automatisiert zusätzlich ein echtes "cold-backup" erzeuge. Dazu sollen natürlich auch die Appdata, VMs, boot-stick gesichert werden (können), wie ich es will. Bei Appdata sollen beispielsweise einzelne Dateiendungen ausgeschlossen werden um Platz zu sparen (Gameserver). Also eine one for all - Lösung. Meine Lösung besteht aus dem Docker "Luckybackup", das verschiedene Profile, Snapshots und sämtliche Zusatzfunktionen beherrscht, und aus drei Userscripts aufgerufen wird, die vorher entsprechend die Remotes oder UADs mounten und anschließend unmounten. Zu lokalen Backups muss ich denke nicht viel sagen, einfach Quellordner und Zielordner auswählen, Anzahl Snapshots, unter Erweitert mögliche exklusive Ausschlüsse und Einbezüge benennen und fertig. Anschließend oben mit dem Zeitplaner einen Zeitplan erstellen, "Konsolen-Modus" aktivieren, "in Cron-Datei eintragen", und "cron anzeigen" auswählen: Ergebnis: Das nun abschreiben, bzw. gegen mein Script überprüfen und anschließend den Zeitplan löschen und "in Cron-Datei eintragen" auswählen. sonst wird später doppelt ein backup gefahren. Lokal gibts da keine Probleme, aber bei uad und remote später ohne mounten sonst schon.. In den Userscripts nun ein neues Script anlegen und folgenden Inhalt übernehmen: #!/bin/bash #als root user ausführen #docker exec -i luckyBackup /usr/bin/luckybackup -c --no-questions --skip-critical /root/.luckyBackup/profiles/default.profile #als luckybackup user ausführen docker exec -i --user luckybackup luckyBackup /usr/bin/luckybackup -c --no-questions --skip-critical /luckybackup/.luckyBackup/profiles/default.profile sleep 20s Ich habe hier mal beide Befehle drin, einen für LuckyBackup eingestellt als User und einmal der Befehl als Root (wer boot/ zusätzlich sichern will z.B.). Nun zuerst in Luckybackup das Erste Backup erstellen, danach einmal das Userscript im Hintergrund ausführen und die Logs checken, der Zweite Log sollte dann so aussehen: Das Backup ist Inkrementell als Snapshot, im 2. Durchlauf wurden nur noch 4 Files geschrieben und 2 gelöscht. Auf Eurer Userscript-Seite könnt ihr nur den gewünschten Zeitplan hinterlegen, bei mir ist es z.B. jeden Tag um 2:30 Uhr: Damit ist das täglich lokale Backup aktiv. Natürlich würde lokal auch der Zeitplan in Luckybackup funktionieren, allerdings nur der lokale ohne mounten. Ich habe daher alle in den Userscrips, damit ich die Übersicht über alle Backups habe: Wie ihr seht habe ich insgesamt 7 Skripte angelegt, auf die restlichen gehe ich in den nächsten 2 Posts ein. Erst da wird es eigentlich interessant.


 1 point
 -
No, not with this container. There are other containers out there that can do things like that.1 point
-
It's not an issue where everything lives. It all boils down to the mappings that you choose for the various containers. See https://forums.unraid.net/topic/57181-docker-faq/?tab=comments#comment-5660861 point
-
@guy.davis the chia plots show command led me to what I needed: I had a key mismatch.1 point
-
It could be the card. Another possibility is unreliable power, particularly if you are using splitters as that can cause intermittent connection issues due to vibrations.1 point
-
These are warnings from WINE because there is no dbus in the container installed to keep the size as small as possible and also it isn't needed anyways (this container is running using WINE and it isn't small in any way).1 point
-
Ah, thank you for that advice! It is working now! I'm new to unraid and thought there is a sort of reverse unraid logic1 point
-
Is this your first time opening the schedules page? i.e. nothing saved yet? There is a bug with some of the javascript I can't track down that may do this sometimes. I would say, make a small change somewhere, apply, and reload the page. Then see what happen.1 point
-
Drives always get slower as the heads move towards the inner tracks. I believe that this is due to the tracks being shorter and thus having less sectors per disk rotation.1 point
-
As you are on rc2. either add to syslinux or add to i915.conf in modprobed. options i915 force_probe=4680 or blacklist i915 and load intel gpu top as per this post.1 point
-
I think I'm good now. Via SSH I backed up and removed /boot/config/shadow and /boot/config/smbpasswd, then rebooted. After that it prompted me to configure a new root password and then let me log into the web GUI. I obviously had to reset my user passwords for my various shares as well, but so far my login issue seems to be resolved. Regards1 point
-
Really nice. Thank you for your great work about this !1 point
-
Super ! Thanks a lot that cleans it up ! Should have found that myself.1 point
-
Après essais, retour sur le sujet des grappes si il y a deux disques : C'est vrai pour le format XFS, mais pas pour le BTRFS. Voilà pourquoi je ne comprenais plus pourquoi je n'avais pas de RAID1. Mon dernier essai avec 2 disques était en BTRFS. Je viens de tester avec les deux formats.1 point
-
Thank you for the report will look into this ASAP.1 point
-
Das würd ich so echt nicht behaupten... Die meisten meiner Container funktionieren Grundlegend anders, fängt bei den updates schon an. Deine beschriebenen Probleme hatte ich früher auch teilweisr. Bist du dir da 100%ig sicher? Kommt auch auf die Größe der einzelnen Pakete, ob sie Passwortgeschützt usw. sind.1 point
-
I would give the xml edit a try, works in my case, the device doesn't change the address on reboot/shutdown.1 point
-
Thanks rich and econaut, thats solved it transcoding is seamless now and cpu usage has dropped right down so it appears to be working. Thanks very much for the help.1 point
-
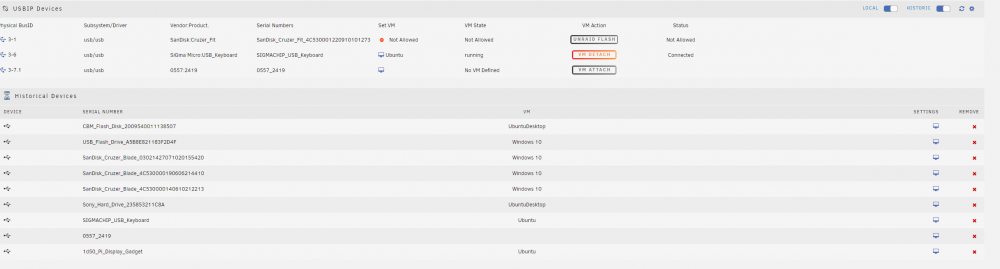
If it has the name of the device it is a device mapping as per the edit settings you have attached. If you have the device defined in the XML the plugin will not be able to map hence the maybe virsh error. but if you hover over it will show the error. Delete the device mapping in the historical settings by the red X for the device. A Device mappings are setup via the terminal icon and port mapping by the usb icon. Goto settings and enable HUB processing. if you haven't already. With hub process you should only need a single port 1-11 defined, So also delete the 1-11.4 port mapping also. Make sure to enable the Auto connect options on the port 1-11 mapping. See if this works.
 1 point
 -
In der neusten Version funktioniert es bei mir nur mit diesen Einstellungen:
1 point
-
Hey, so I got the LMS working like a charm again. It was the router in the end (Unraid had upnp off, unsure about what impact that had). I hard-reset the router and when adding the machines back to the network, I was asked whether the Unraid machine should have permissions to open ports on its own. That set - all good! :yay:1 point
-
Welche Version vom TVHeadend verwendest du denn? Die latest vom Linuxserver.io geht bei mir auch nicht. Deshalb nutze ich das letzte 4.2 release. linuxserver/tvheadend:release-4.21 point
-
Ich hatte/habe das Problem tatsächlich auch. Der Docker scheint sich immer wieder neu zu starten, das Log füllt sich und füllt sich, aber man sieht eigentlich nichts. Geholfen hatte dieser Tipp hier: Also der letzte Absatz, genauer gesagt: Bei mir war das Problem aber nach dem nächsten Neustart wieder da.1 point
-
did you try q35+ovmf instead of i440fx?1 point
-
Wow. I feel dumb. It was the firewall. I temporarily cleared iptables and it connects. I thought I already tried that but I guess there was something else wrong when I tried. Ugh. Hopefully this can be a cautionary tale for anyone who falls down the same rabbit hole1 point
-
So I went and installed this and really didn't like it's functionality that much and I also don't really mess with changing my pre-rolls all that often. I removed the docker and the appdata folder. However, for some reason now none of my pre-rolls will play on Plex. I looked at the settings in Plex itself and everything seems to be as it should and was but, for some reason, none of the pre-rolls are playing anymore. Anyone have any advice? So my paths for my prerolls were almost identical to what this Docker changes the paths too. I had to go back in and double check and change the paths. Got my prerolls back!1 point
-
Exactly like the description of the ports tells you to.1 point
-
Well, I have good news to report. After purchasing some ram (Corsair Dominator Platinum 16GB (2x8GB) DDR4 Gen6 3200MHz) off the motherboard's QVL list, the parity check completed successfully! No crashing. No reboots. Just started Dockers and... I'll report back, but it seems that: SOLUTION: Install RAM which is listed on the motherboard's QVL1 point
-
this docker image was created several years ago, at the time macvlan and custom bridge were not visible through the unraid web ui and thus the only option was bridge or host, so is it by design, well kinda :-), the scripts are designed around the concept that the unraid docker network is separate to the lan network, thus macvlan and custom bridge do not work UNLESS you assign a different network range to your lan (you can do this for custom bridge). in what way does using the default bridge 'make it a bit hard' to use privoxy?, as long as your unraid server is using a static ip (it should be) then all you do is hit privoxy via <unraid ip address>:<port assigned for privoxy> e.g. 192.168.1.100:8118 this is how i use privoxy when required in a browser.1 point
-
Either you can disable bluetooth in bios. or unload the modules. see this thread entry.1 point
-
2TB SATA SSD für 129 €: https://www.mydealz.de/deals/ab-111-20-uhr-sandisk-ultra-3d-2tb-sata-ssd-3d-nand-tlc-512mb-dram-129eur-sandisk-extreme-portable-ssd-v2-1tb-r1050w1000-fur-101eur-19279791 point
-
hi guys, this looks like a qbittorrent bug, please feel free to monitor or add anything useful to this support thread:- https://github.com/qbittorrent/qBittorrent/issues/15969 this may also be related:- https://github.com/qbittorrent/qBittorrent/issues/15965 and/or this:- https://github.com/alexbelgium/hassio-addons/issues/155 if you wish to roll back to get you going then follow these instructions, see Q5:- https://github.com/binhex/documentation/blob/master/docker/faq/unraid.md1 point
-
I have the same issue... The solution is replace 755 from folder to 777 mkdir -p /mnt/user/appdata/cloudflared/ && chmod -R 777 /mnt/user/appdata/cloudflared/ After that you can keep sending the other commands, it will work1 point
-
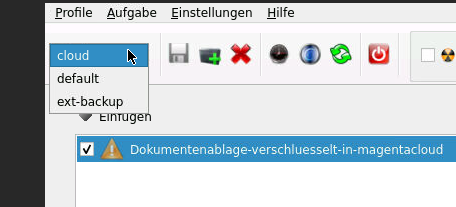
Backup in Clouds oder verschlüsselt in Clouds An sich ist es ziemlich identisch zum Backup auf UADs, nur muss die Cloud gemounted werden und ein Verzeichnis angelegt werden. Hier bediene ich mich an rclone, aus den community apps. Man kann sich gut an das Tutorial von Spaceinvader One zum Einrichten der Clouds halten: How to use rclone in unRAID Copy sync and encrypt files to the cloud So können sämtliche Clouds gemountet werden, bei Spaceinvader wird es dauerhaft gemacht, ich gehe jetzt nur mal auf eine Cloud ein, die ebenfalls nur nachts gemountet wird, ein verschlüsseltes Backup macht und wieder unmountet. danach sollten euch alle Anpassungen möglich sein. In Luckybackup wieder ein neues Profil anlegen, bei mir "cloud" mount-user-skript #!/bin/bash mkdir -p /mnt/remotes/encrypt_backup #Connect to remote secure via rclone and mount it locally to mnt/remotes/encrypt_backup rclone mount --allow-non-empty --max-read-ahead 1024k --allow-other secure: /mnt/remotes/encrypt_backup & sleep 10s Im Hintergrund ausführen Nun Vorgehen analog zu 1. und 2. Post unmount-user-skript #!/bin/bash sleep 20s sync -f /mnt/remotes/encrypt_backup umount /mnt/remotes/encrypt_backup && rmdir /mnt/remotes/encrypt_backup ich habe meine magentacloud, da 25GB, als "secure" in rclone angelegt, die ich so nun lokal mounten kann. Nun noch das komplette Backup-Skript anlegen #!/bin/bash mkdir -p /mnt/remotes/encrypt_backup #Connect to remote secure via rclone and mount it locally to mnt/remotes/encrypt_backup rclone mount --allow-non-empty --max-read-ahead 1024k --allow-other secure: /mnt/remotes/encrypt_backup & sleep 10s #als root user ausführen #docker exec -i luckyBackup /usr/bin/luckybackup -c --no-questions --skip-critical /root/.luckyBackup/profiles/cloud.profile #als luckybackup user ausführen docker exec -i --user luckybackup luckyBackup /usr/bin/luckybackup -c --no-questions --skip-critical /luckybackup/.luckyBackup/profiles/cloud.profile sleep 20s sync -f /mnt/remotes/encrypt_backup umount /mnt/remotes/encrypt_backup && rmdir /mnt/remotes/encrypt_backup Wie oben im Hintergrund laufen lassen, checken, Zeitplan des User-Skripts anlegen und fertig. An dieser Stelle macht bitte ein Backup des Flash-Stick Sinn, da eure rclone.conf wichtig ist, damit ihr später wieder an eure verschlüsselten Daten kommt. Auch die User-Skripts werden so ins Backup vom Stick geschrieben. Ich habe zusätzlich in meiner Keepass Datenbank mir die Secrets aus der Unraid Oberfläche "Einstellungen-->Rclone" gesichert, was faktisch der Inhalt der rclone.conf ist und ich sie so nicht verlieren kann. Ich hoffe das hilft ein paar von euch, die noch eine gute Backuplösung im Step-by-Step Verfahren gesucht haben!! MfG digikus
 1 point
 -
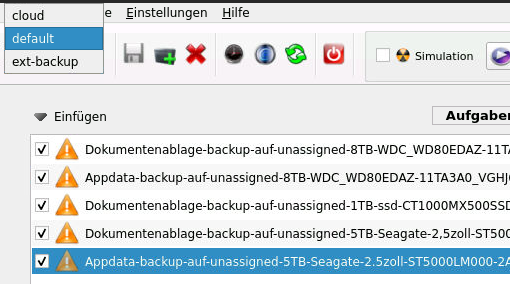
Backups auf UADs Ich mache meine Backups immer nachts um 2:00 Uhr, damit ich sie am Tage jederzeit wechseln kann ohne vorher ins System zu gehen zum unmounten etc. Heißt was aus dem Keller holen oder Wäsche machen = Festplatte wechseln am Server. zum Einrichten in Luckybackup müssen die Unassigned Devices jedoch erst einmal gemountet werden. hierfür meine mount / unmount Skripts: Mount UAD - skript \#!/bin/bash \# 1TB Crucial SSD MX500 /usr/local/sbin/rc.unassigned mount /dev/disk/by-id/ata-CT1000MX500SSD1_xxxxxxxxxxxx \# 8TB Western Digital WD White /usr/local/sbin/rc.unassigned mount /dev/disk/by-id/ata-WDC*WD80EDAZ-xxxxxxxxxxxx \# 5TB Seagate 2,5" Portable /usr/local/sbin/rc.unassigned mount /dev/disk/by-id/ata-ST5000LM000-xxxxxxxxxxxx sleep 10s Die genaue Bezeichnung lässt sich ja auf der Main Page kopieren und hier einsetzen, anschließend im Hintergrund ausführen Natürlich lässt sich auch auf der Main Page per Mausklick mounten, aber wir brauchen das sowieso für das backup-skript gleich und so können wir das gleich Stück für Stück ausprobieren. Anschließend ist die / sind die Platte/n für Luckybackup sichtbar und ihr könnt ein neues Profil anlegen, bei mir ext_backup: . Hier habe ich bereits einige Backups für verschiedene Platten mit auch unterschiedlichen Inhalten angelegt. Anschließend analog zum 1.Post verfahren: - Backups anlegen - Zeitplan erstellen, in Cron-Datei eintragen - Inhalt Kopieren / mit dem Skript hier abgleichen - Zeitplan löschen, in Cron-Datei eintragen - Backup erstmalig ausführen in Luckybackup Nach dem erfolgreichen Backup, Luckybackup wieder schließen und das User-Skript zum unmounten erstellen und im Hintergrund ausführen: #!/bin/bash sync -f /mnt/disks/CT1000MX500SSD1_2xxxxxxxxxx sync -f /mnt/disks/WDC_WD80EDAZ-xxxxxxx_xxxxxxx sync -f /mnt/disks/ST5000LM000-xxxxxx_xxxxxxxxxx sleep 10s /usr/local/sbin/rc.unassigned umount /dev/disk/by-id/ata-CT1000MX500SSD1_xxxxxxxxxxxx /usr/local/sbin/rc.unassigned umount /dev/disk/by-id/ata-WDC_WD80EDAZ-xxxxx_xxxxxxx /usr/local/sbin/rc.unassigned umount /dev/disk/by-id/ata-ST5000LM000-xxxxxx_xxxxxxxx Jetzt legen wir das komplette Backup User-skript an: #!/bin/bash # 1TB Crucial SSD MX500 /usr/local/sbin/rc.unassigned mount /dev/disk/by-id/ata-CT1000MX500SSD1_20xxxxx # 8TB Western Digital WD White /usr/local/sbin/rc.unassigned mount /dev/disk/by-id/ata-WDC_WD80EDAZ-11xxxxxx # 5TB Seagate 2,5" Portable /usr/local/sbin/rc.unassigned mount /dev/disk/by-id/ata-ST5000LM000-2Axxxxxxxxxxx sleep 10s #luckybackup als root user ausführen #docker exec -i luckyBackup /usr/bin/luckybackup -c --no-questions --skip-critical /root/.luckyBackup/profiles/ext-backup.profile #luckybackup als luckybackup user ausführen docker exec -i --user luckybackup luckyBackup /usr/bin/luckybackup -c --no-questions --skip-critical /luckybackup/.luckyBackup/profiles/ext-backup.profile sync -f /mnt/disks/CT1000MX500SSD1_20xxxxxxxxxxxxxxx sync -f /mnt/disks/WDC_WD80EDAZ-1xxxxx-xxxxxx sync -f /mnt/disks/ST5000LM000-xxxxx_Wxxxxxxxx sleep 30s /usr/local/sbin/rc.unassigned umount /dev/disk/by-id/ata-CT1000MX500SSD1_2xxxxxxxxxxxxx /usr/local/sbin/rc.unassigned umount /dev/disk/by-id/ata-WDC_WD80EDAZ-1xxxxx_Vxxxxxxx /usr/local/sbin/rc.unassigned umount /dev/disk/by-id/ata-ST5000LM000-2xxxxxxxxx_xxxxxx Bei jedem Ausführen versucht nun Luckybackup alle UADs zu mounten, das backup zu machen und zu unmounten. Sollte eine UAD nicht zur Verfügung stehen, so wird das Backup dieser einen Platte mit einem Fehler übersprungen. Einmal im Hintergrund ausführen und nach den Logs schauen. Wichtig ist dass ihr während die Platten gemounted sind, nichts separat dort kopiert oder in Unterordner geht, dann wird die Platte u.u. nicht mehr automatisch geunmounted. Nun noch Zeitplan beim User-Skript hinterlegen und das war es schon. Funktioniert bei mir sehr zuverlässig, mit Abstand das schnellste Backup, dass ich probiert habe und dazu ist es sehr Platzsparend und einfach zu bedienen.
 1 point
 -
1 point
-
I'm having a similar issue here...have a drive that is now marked as disabled. I don't think the drive is bad - the issue started after I shut down and was installing another SATA drive. I have unplugged the new drive - shutdown/restarted - just to get back to the previous state. How can I re-enble this drive. This link does not work: https://wiki.unraid.net/UnRAID_6/Storage_Management#Rebuilding_a_drive_onto_itself nor does this link: https://wiki.unraid.net/UnRAID_6/Storage_Management#Replacing_disks Thanks for any help!....1 point