Leaderboard


Popular Content
Showing content with the highest reputation on 01/06/22 in all areas
-
A tip for those who are impatient... To get the latest version of a language pack, simply remove the existing language pack and install it again. This will automatically install the latest available version.2 points
-
Vielen dank für die Antworten. Ich weiß nicht was ich vorher anders gemacht habe oder ein Schreibfehler dabei war. Jedenfalls funktioniert es so wie @ich777 und @alturismo geschrieben haben. Danke!2 points
-
Great to put a face with a name/voice @SpaceInvaderOne 🙂2 points
-
Heimdall stop working with Nginx Reverse Proxy. In LAN is everything okay. Looks like CSS ist broken. *edit* i open the console from the docker go the path /var/www/localhost/heimdall/ open with vi editor the file ".env" and change the host from http://localhost to http://SUBDOMAIN.DOMAIN - reboot the docker. *edit edit* i write it a little bit more understandable2 points
-
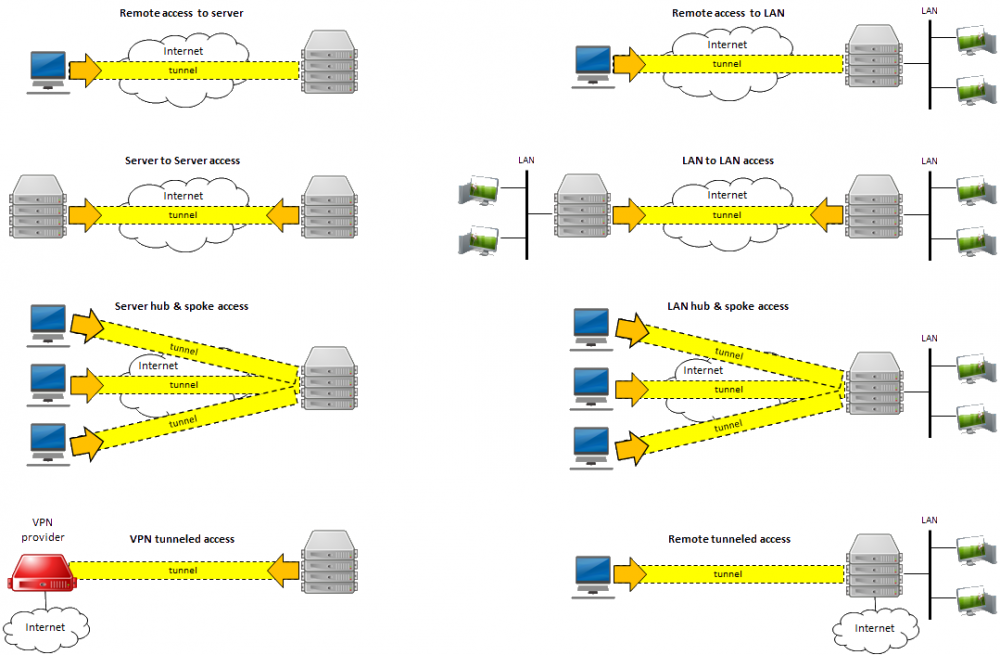
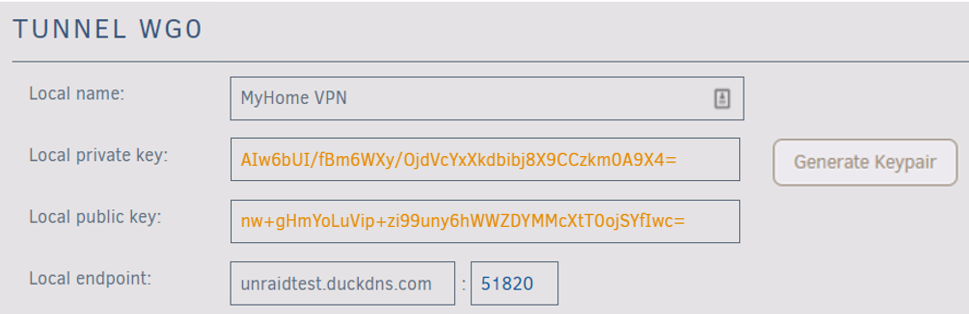
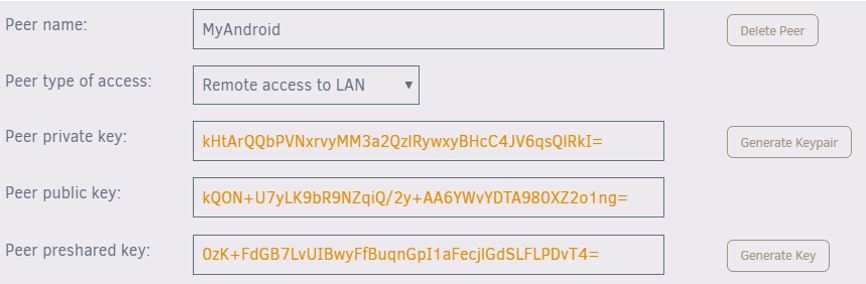
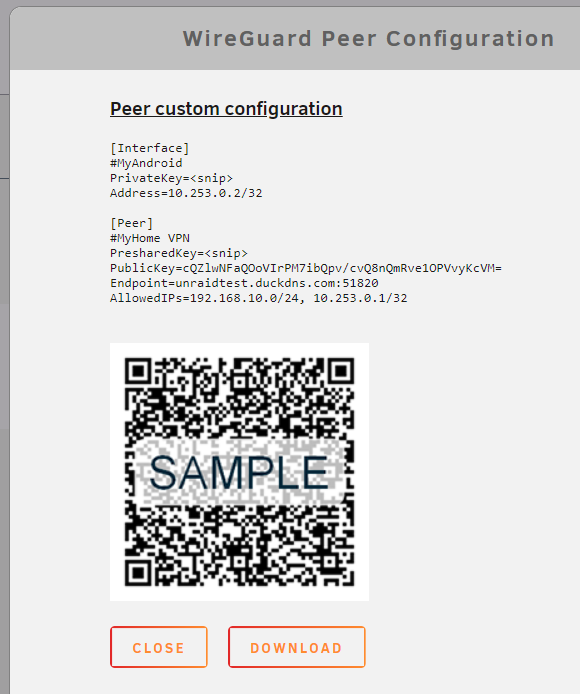
Note: this community guide is offered in the hope that it is helpful, but comes with no warranty/guarantee/etc. Follow at your own risk. What can you do with WireGuard? Let's walk through each of the connection types: Remote access to server: Use your phone or computer to remotely access your Unraid server, including: Unraid administration via the webgui Access dockers, VMs, and network shares as though you were physically connected to the network Remote access to LAN: Builds on "Remote access to server", allowing you to access your entire LAN as well. Server to server access: Allows two Unraid servers to connect to each other. LAN to LAN access: Builds on "Server to server access", allowing two entire networks to communicate. (see this guide) Server hub & spoke access: Builds on "Remote access to server", except that all of the VPN clients can connect to each other as well. Note that all traffic passes through the server. LAN hub & spoke access: Builds on "Server hub & spoke access", allowing you to access your entire LAN as well. VPN tunneled access: Route traffic for specific Dockers and VMs through a commercial WireGuard VPN provider (see this guide) Remote tunneled access: Securely access the Internet from untrusted networks by routing all of your traffic through the VPN and out Unraid's Internet connection In this guide we will walk through how to setup WireGuard so that your trusted devices can VPN into your home network to access Unraid and the other systems on your network. Prerequisites You must be running Unraid 6.8-6.9 with the Dynamix WireGuard plugin from Community Apps or Unraid 6.10+ (which has the plugin built in). Understand that giving someone VPN access to your LAN is just like giving them physical access to your LAN, except they have it 24x7 when you aren't around to supervise. Only give access to people and devices that you trust, and make certain that the configuration details (particularly the private keys) are not passed around insecurely. Regardless of the "connection type" you choose, assume that anyone who gets access to this configuration information will be able to get full access to your network. This guide works great for simple networks. But if you have Dockers with custom IPs or VMs with strict networking requirements, please see the "Complex Networks" section below. Unraid will automatically configure your WireGuard clients to connect to Unraid using your current public IP address, which will work until that IP address changes. To future-proof the setup, you can use Dynamic DNS instead. There are many ways to do this, probably the easiest is described in this 2 minute video from SpaceInvaderOne If your router has UPnP enabled, Unraid will be able to automatically forward the port for you. If not, you will need to know how to configure your router to forward a port. You will need to install WireGuard on a client system. It is available for many operating systems: https://www.wireguard.com/install/ Android or iOS make good first systems, because you can get all the details via QR code. Setting up the Unraid side of the VPN tunnel If UPnP is enabled on your router and you want to use it in Unraid, go to Settings -> Management Access and confirm "Use UPnP" is set to Yes On Unraid 6.8, go to Settings -> VPN Manager Give the VPN Tunnel a name, such as "MyHome VPN" Press "Generate Keypair". This will generate a set of public and private keys for Unraid. Take care not to inadvertently share the private key with anyone (such as in a screenshot like this) By default the local endpoint will be configured with your current public IP address. If you chose to setup DDNS earlier, change the IP address to the DDNS address. Unraid will recommend a port to use. You typically won't need to change this unless you already have WireGuard running elsewhere on your network. Hit Apply If Unraid detects that your router supports UPnP, it will automatically setup port forwarding for you: If you see a note that says "configure your router for port forwarding..." you will need to login to your router and setup the port forward as directed by the note: Some tips for setting up the port forward in your router: Both the external (source) and internal (target/local) ports should be the set to the value Unraid provides. If your router interface asks you to put in a range, use the same port for both the starting and ending values. Be sure to specify that it is a UDP port and not a TCP port. For the internal (target/local) address, use the IP address of your Unraid system shown in the note. Google can help you find instructions for your specific router, i.e. "how to port forward Asus RT-AC68U" Note that after hitting Apply, the public and private keys are removed from view. If you ever need to access them, click the "key" icon on the right hand side. Similarly, you can access other advanced setting by pressing the "down chevron" on the right hand side. They are beyond the scope of this guide, but you can turn on help to see what they do. In the upper right corner of the page, change the Inactive slider to Active to start WireGuard. You can optionally set the tunnel to Autostart when Unraid boots. Defining a Peer (client) Click "Add Peer" Give it a name, such as "MyAndroid" For the initial connection type, choose "Remote access to LAN". This will give your device access to Unraid and other items on your network (there are some caveats to this covered below) Click "Generate Keypair" to generate public and private keys for the client. The private key will be given to the client / peer, but take care not to share it with anyone else (such as in a screenshot like this) For an additional layer of security, click "Generate Key" to generate a preshared key. Again, this should only be shared with this client / peer. Click Apply. Note: Technically, the peer should generate these keys and not give the private key to Unraid. You are welcome to do that, but it is less convenient as the config files Unraid generates will not be complete and you will have to finish configuring the client manually. Configuring a Peer (client) Click the "eye" icon to view the peer configuration. If the button is not clickable, you need to apply or reset your unsaved changes first. If you are setting up a mobile device, choose the "Create from QR code" option in the mobile app and take a picture of the QR code. Give it a name and make the connection. The VPN tunnel starts almost instantaneously, once it is up you can open a browser and connect to Unraid or another system on your network. Be careful not to share screenshots of the QR code with anyone, or they will be able to use it to access your VPN. If you are setting up another type of device, download the file and transfer it to the remote computer via trusted email or dropbox, etc. Then unzip it and load the configuration into the client. Protect this file, anyone who has access to it will be able to access your VPN. Complex Networks The instructions above should work out of the box for simple networks. With "Use NAT" defaulted to Yes, all network traffic on Unraid uses Unraid's IP, and that works fine if you have a simple setup. However, if you have Dockers with custom IPs or VMs with strict networking requirements, you'll need to make a few changes: In the WireGuard tunnel config, set "Use NAT" to No In your router, add a static route that lets your network access the WireGuard "Local tunnel network pool" through the IP address of your Unraid system. For instance, for the default pool of 10.253.0.0/24 you should add this static route: Destination Network: 10.253.0.0/24 (aka 10.253.0.0 with subnet 255.255.255.0) Gateway / Next Hop: <IP address of your Unraid system> Distance: 1 (your router may not have this option) If you use pfSense, you may also need to check the box for "Static route filtering - bypass firewall rules for traffic on the same interface". See this. If you have Dockers with custom IPs then on the Docker settings page, set "Host access to custom networks" to "Enabled". see this: https://forums.unraid.net/topic/84229-dynamix-wireguard-vpn/page/8/?tab=comments#comment-808801 There are some configurations you'll want to avoid, here is how a few key settings interact: With "Use NAT" = Yes and "Host access to custom networks" = disabled (static route optional) server and dockers on bridge/host - accessible! VMs and other systems on LAN - accessible! dockers with custom IP - NOT accessible (this is the "simple network" setup assumed by the guide above) With "Use NAT" = Yes and "Host access to custom networks" = enabled (static route optional) server and dockers on bridge/host - accessible! VMs and other systems on LAN - NOT accessible dockers with custom IP - NOT accessible (avoid this config) With "Use NAT" = No and no static route server and dockers on bridge/host - accessible! VMs and other systems on LAN - NOT accessible dockers with custom IP - NOT accessible (avoid this, if "Use NAT" = No, you really need to add a static route in your router) With "Use NAT" = No and "Host access to custom networks" = disabled and static route server and dockers on bridge/host - accessible! VMs and other systems on LAN - accessible! dockers with custom IP - NOT accessible (You've come this far, just set "Host access to custom networks" to enabled you're set) With "Use NAT" = No and "Host access to custom networks" = enabled and static route server and dockers on bridge/host - accessible! VMs and other systems on LAN - accessible! dockers with custom IP - accessible! (woohoo! the recommended setup for complex networks) About DNS Everything discussed so far should work if you access the devices by IP address or with a Fully Qualified Domain Name such as yourpersonalhash.unraid.net. Short names such as "tower" probably won't work, nor any DNS entries managed by the router. To get those to work over the tunnel, return to the VPN Manager page in Unraid, switch from Basic to Advanced mode, and add the IP address of your desired DNS server into the "Peer DNS Server" field (don't forget to put the updated config file on the client after saving it!) You may want to use the IP address of the router on the LAN you are connecting to, or you could use a globally available IP like 8.8.8.8 ** "WireGuard" and the "WireGuard" logo are registered trademarks of Jason A. Donenfeld.


 1 point
 -
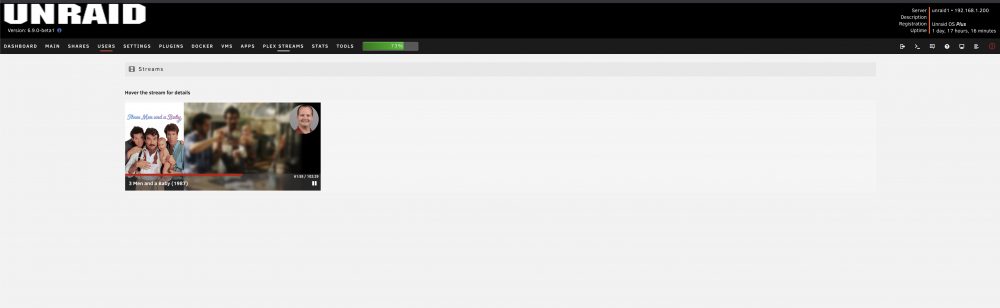
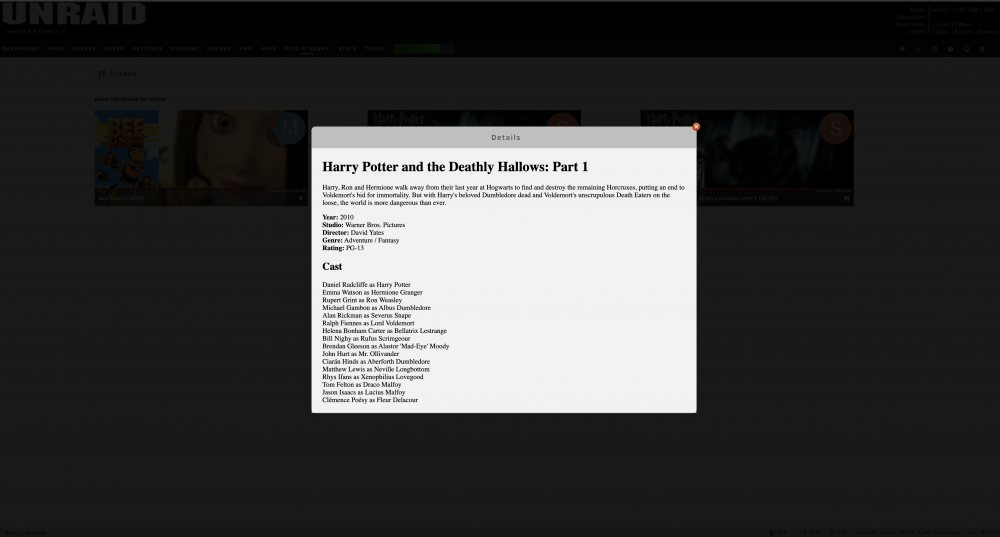
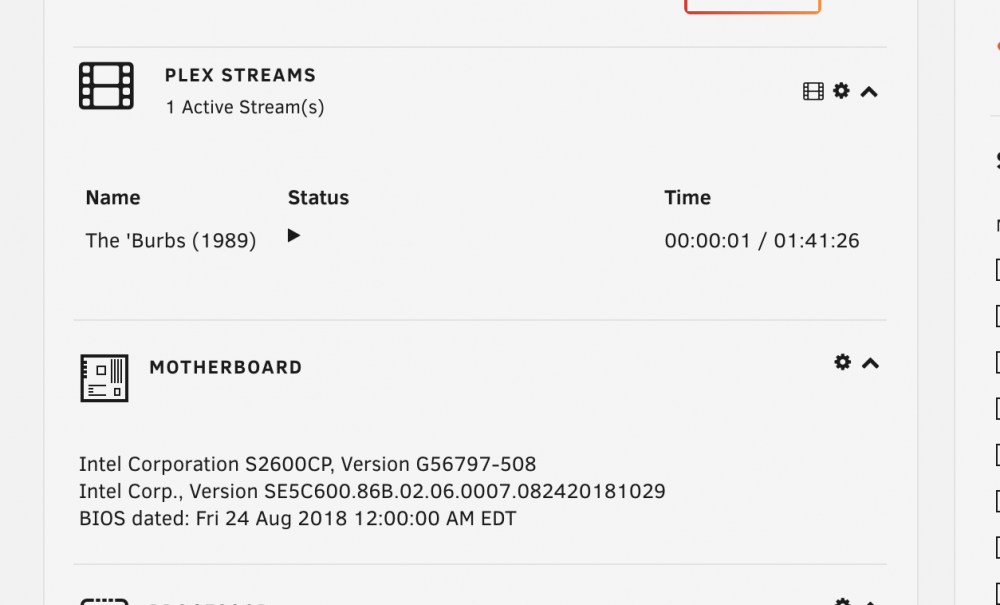
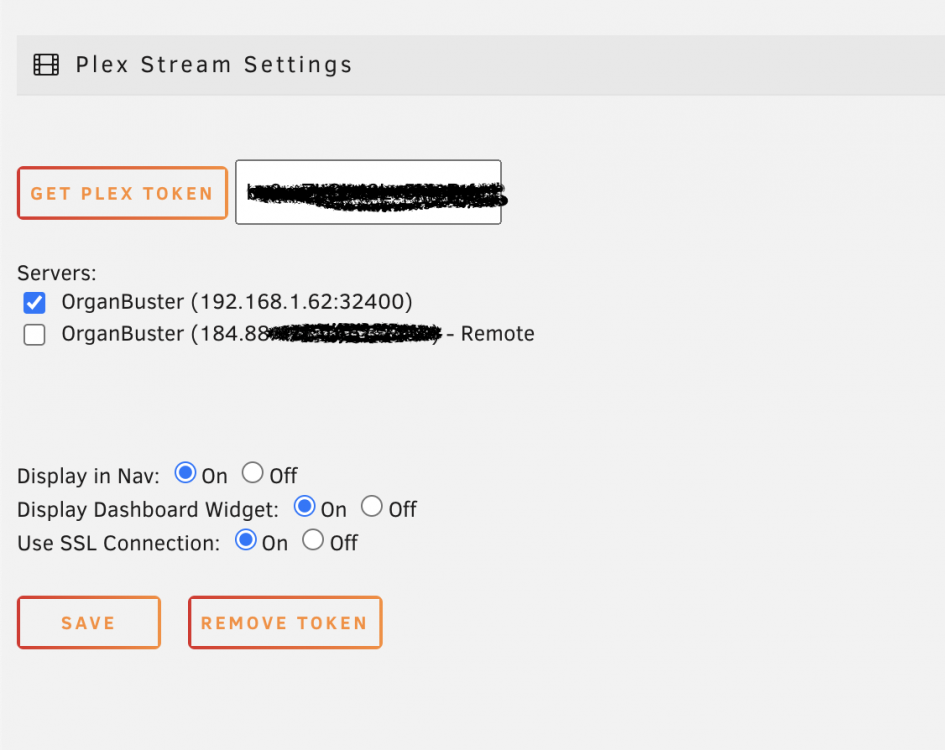
Introduction Install from Community Application Support Fund If you wish to do so, you can learn more here. Setup Once installed if you go to Settings->Plex Streams you need to provide the full url to your plex server as well as your plex username/password Changelog 2023.06.29 - Correcting display issue of end time for a stream 2023.06.28a - Correcting reversed logic 2023.06.28 - Making end time respect time display settings - Fix for deprecated warning 2023.05.23 - Adding a fix to surpress issues during plugin install 2023.05.18 - Add more fixes for PHP notices - Fix for display of Live TV streams 2023.04.18a - Even more minor fixes 2023.04.18 - More minor bug fixes 2023.04.07 - Minor bug fix to get rid of php warnings 2023.04.06a - Add estimated end time to dashboard widget for unraid 6.12rc2+ 2023.03.31a - Bug fix for desktop widget when displaying stream count per server 2023.03.31 - Defect fix for legacy versions 2023.03.29a - Minor adjustment 2023.03.29 - Fix a bunch of issues for UnRaid versions less than 6.12rc2 2023.03.28b - Fixing bug with unRaid less than 6.12 2023.03.28a - Correcting a typo for legacy support 2023.03.28 - Added Support for displaying which server the video/audio is streaming from - More fixes for PHP warnings 2023.03.26 - Various fixes for PHP warnings 2023.03.22 - Minor adjustments for PHP warnings/deprecations 2023.03.21 - Add compatability for Unraid 6.12 - Fix bug with livestreams - Update nav/dashboard module to use conditions for whether to display instead of renaming files 2022.08.29 - Fix for audio file having HTML in title attribute 2021.08.09 - Fixes for sorting of dashboard widget - Fix for collapsing/expanding of dashboard widget 2021.03.17 - Fix collapse bug for dashboard widget 2021.02.11a - Added ability to setup custom servers, that may not be getting returned from plex 2021.02.09 - Correcting some display issues where audio streams from plexamp were not showing - Adding details about transcoding sessions 2020.07.23 - Correcting legacy display issue for dashboard widget 2020.07.20 - Correct display issue on settings page 2020.07.09 - Correcting display issue for the dashboard widget 2020.06.30b - Correct display issue for details page when there is no Director. - Fix display issue for Legacy support 2020.06.26b - Both the dashboard and the streams page now fully update with new/removed streams without having to reload 2020.06.22 - Updated streams page to update streams via ajax, still need to have it add streams as they come online 2020.06.20a - Fix javascript issues, and dashboard widget issue 2020.06.20 - Fix JavaScript Issue when retrieving plex token 2020.06.19 - Added the ability to view multiple servers at a time 2020.06.12 - Make server list load via ajax so that it doesnt slow down the initial rendering the pages 2020.06.10a - Updated way to use SSL when connecting to plex server. This should fix outstanding problems. - Correcting display issue with live streams from Tuner Devices 2020.06.09 - Correct issue when plex server has disabled remote connections 2020.06.07 - Maintain settings for dashboard widget and nav item when restarting 2020.06.03 - Fix display issue where more than 3 streams was not wrapping 2020.05.28 - Correcting details sent to Plex.tv during OAuth Process 2020.05.27a - Fix issue for movie details where not being pulled 2020.05.27 - Integrate with Plex OAuth - Allow for remote plex server connection - Correct issue for remote plex server wasnt displaying artwork 2020.05.20b - Ability to turn dashboard widget on/off - Ability to turn top level nav on/off 2020.05.20 - Add audio streams to both streams page and dashboard widget - Remove debug output from saving settings - Correct details screen for TV Shows 2020.05.19 - Correct display issue on dashboard widget for long titles 2020.05.18a - Added basic dashboard widget functionality 2020.05.18 - Correct issue for direct play status wasnt showing for audtio/video 2020.05.16 - Added the ability to click on the Stream title to get content details - Fixed bug that was displaying progress time incorrectly 2020.05.15a - Fixing bug for stream type wasn't being displayed 2020.05.15 - More tweaks to UI 2020.05.14e - Remove unused function 2020.05.14d - Some CSS tweaks and add icon for when tasks menu is on the left 2020.05.14c - Initial Beta Release

 1 point
 -
Ich weiß nicht ob ich Dich richtig verstanden habe, aber die nginx Container mit webgui stellt man in Hosts als ohne s ein und erzwingt im hinteren Tab http. Dann geht's. Screenshots kann ich morgen zeigen.1 point
-
Du hast mich grad mit cracyfloyd verwechselt und ich hatte/habe unabhängig von ihm das identische Problem aber ich bin da grad noch im Testaufbau. Das mit dem Stromausfall wird noch lustiger werden die nächsten Jahre und meine QNAP z.B. die brauch locker 5min bis Sie runtergefahren ist daher fahre ich die 1-2min direkt nach dem Stromausfall runter. Passiert natürlich extrem selten aber man versucht ja dem schlimmsten Fall vorzubeugen. Mein Unraid Server hat einen 40min Puffer da sehe ich das entspannter PS: Ich hab mittlerweile in der Wohnung die ganze zentrale Infrastruktur an der UPS hängen...Erfahrungswerte...im Homeautomation Bereich1 point
-
thank you all for the answers1 point
-
Follow the diagnostics link1 point
-
That was it, thanks! DuckDNS was the offending container.1 point
-
Thank you for your contributions. If you want we can add your name to the list of contributors of the Dutch language on the Credits page of Unraid. Let us know if you want this and what name should be added.1 point
-
I will probably test some plugins from the English repo, see if they are any useful for me and then translate them. One of the future days1 point
-
Because Fix Common Problems is so verbose and with a lot of substitutions taking place in the text messages, it was going to be a real pain to reconfigure everything support multi-language (and with the necessary testing of every single warning / error / other all over again) that it wasn't worth the free time investment on my part unless a massive overhaul of the test routines ever takes place.1 point
-
Thanks, server reboot solved it. I just installed the dutch language pack again and I see the changes that I did, all working now.1 point
-
I fixed a lot of missing translations in already existing files listed here. See pull request Personally my main language is Dutch, the translations should be correct. I'm only using Unraid for a couple days now, I saw the dutch language pack and updated it. The following files are added: /Unassigned Devices/editsettings.tx The following files still need to be translated: (I will do this later, still unknown when exactly) /Dynamix Active Streams/activestreams.txt /Dynamix Auto Fan/fansettings.txt /Dynamix Cache Dirs/folderchacingsettings.txt /Dynamix Date Time/datetime.txt /Dynamix Day Night/daynightssettings.txt /Dynamix File Integrity/fileintegrity.txt /Dynamix File Integrity/integrity.txt /Dynamix Local Master/smb.txt /Dynamix S3 Sleep/sleepsettings.txt /Dynamix SSD Trim/scheduler.txt /Dynamix System Info/systemprofiler.txt /Dynamix System Stats/statsettings.txt /Dynamix System Stats/stats.txt /Dynamix System Temp/tempsettings.txt /Enhanced Log/enhancedsyslogsettings.txt /Enhanced Log/enhancedsyslog.txt /File Activity/fileactivity.txt /Hotplug USB/libvirthotplugusb.txt /Open Files/openfiles.txt /Parity Check Tuning/paritychecktuning.txt /Tips and Tweaks/tipsandtweaks.txt Is there any way to test the plugins with new translations that I just did? Do I need to build those language packs or how does that work?1 point
-
@SpencerJ might have missed it.1 point
-
@Hirates Du brauchst natürlich keine DynDNS Umleitung sondern nur eine DNS Umleitung Deiner Domain. Da Du eine feste IP Adresse hast genügt es in den DNS Einstellungen Deines Providers einfach als Umleitungsziel Deine feste IP Adresse anzugeben. Hast Du keine Domain geht das auch über z.B. DuckDNS. Da ich keine Domain alá martinsnextcloud.duckdns.org mehr wollte habe ich mir meine eigene Domain bei Strato geleistet. Damit geht zwar Cloudflare nicht, ist mir vorerst aber mal wurscht. Übrigens wäre mir die feste IP die 12 Euro im Monat Wert. Bekomme ich von Vodafone aber bisher nicht, immerhin hats für ipv4 gereicht.1 point
-
Die gibt's auch erst mit Unraid 6.101 point
-
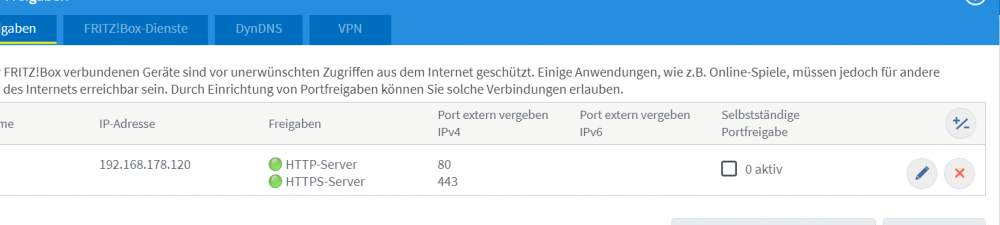
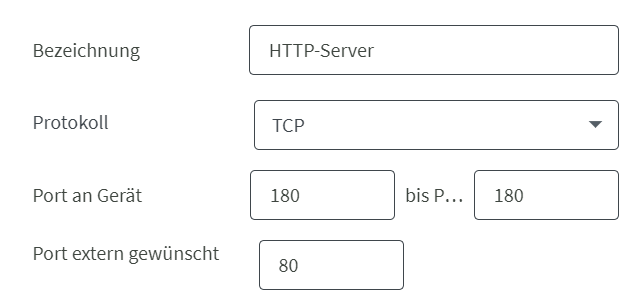
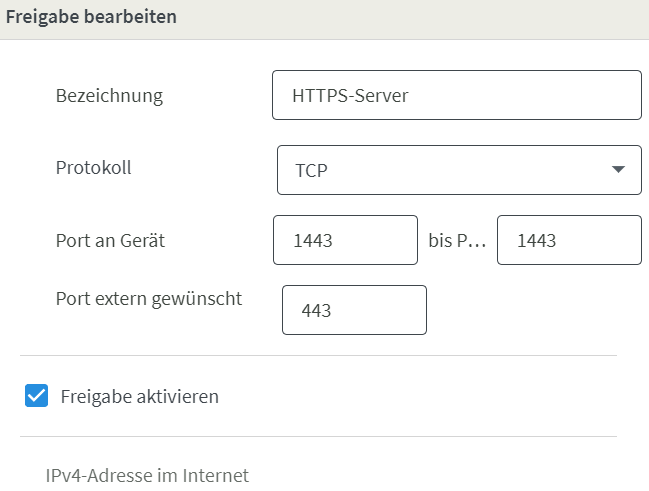
Dein nginx Container sollte ja mit einer lokalen, wahrscheinlich von Deiner Fritzbox (oder wasauchimmer) vergebenen IP auf einem defnierten Port angesprochen werden. Du müsstest in der "Fritzbox" die Ports 80 und 443 auf die ip und Port vom Docker Container mappen. Bei mir sind das 192.168.178.xxx port 180 und port 1443 die von außen direkt über den nginx Container mit meiner Kabel ipadresse auf port 80 und 443 adressiert werden können. Mittels einer Dyndns Umleitung meines Domain Providers auf meine Fritzbox kann ich mittels z.B. nextcloud.meinedomain.de direkt auf z.B. Nextcloud oder auch Jellyfin zugreifen. Dazu muss der einzurichtende Host in nginx genau so heißen wie die subDomain heißt und auf die IPadresse und Port des Dienstes zeigen.
 1 point
 -
Fixed the issue; ended up being an ID10T error. The Dell drive caddies have a SAS and SATA hole layout, and I figured 'hey, I should use the SATA holes!'.... nope; the drives were not connected to the backplane as I didn't screw the drives into the correct holes in the caddy. Now using the SAS holes, and lo and behold everything works!1 point
-
I just embarrassed myself. I needed to "Add Pool". Head down in shame.1 point
-
It's in the template. You can't map something to a container folder of /1 point
-
This was the reason: https://github.com/GilbN/theme.park/releases/tag/1.6.9 You can fix it with using the latest version of the script: https://github.com/GilbN/theme.park/blob/master/css/addons/unraid/login-page/custom_login.sh1 point
-
Look at your various templates. One of them has a webUI entry of http://[IP]:[PORT:] The [PORT:] part is invalid and should have a number in there1 point
-
I sense frustration based solely on the terseness and lack of info, but you likely won't get any help with this approach. Without more information, it's impossible to determine whether $100 is easy money, or completely worthless because the problem is unsolvable and whoever tries to help will be out hours of time with no payment. The fact that you posted the way you did implies heavily that it's a fools errand to attempt to help. There are combinations of hardware that just don't work with GPU passthrough, but without a more thorough description of the hardware involved and what has been tried already, there is just no way to know.1 point
-
Actually those 1 yrs+ posts are outdated. We have supported HDR10 TM on QSV in the later versions of 10.7. And with the release of 10.8 (alpha5), both VPP and OpenCL tone-mapping impl got much improved in terms of speed and stability. Current status of HDR tone-mapping support are as follows: https://jellyfin.org/docs/general/administration/hardware-acceleration.html#configuring-opencl--cuda--intel-vpp-tone-mapping
 1 point
 -
Hum, it's complicated, so I did not vote. I generally use Chrome, but I access Unraid through Firefox so that I keep my general web-browsing and Unraid management separate.1 point
-
I totally forgot I did this!! Thanks!1 point
-
Ja, genau.... Habs gerade auch mal "verifiziert"....einfach bei bestehender WG-Verbindung den Flugmodus an....der Schlüssel flackert kurz, bleibt aber in der Anzeige dann *an* 😝. Im Protokoll sieht man dann, dass er weiss, dass der Peer nicht mehr da ist...nach 20 handshakle Versuchen alle 5sec bricht er dann ab, aber auch hier bleibt der Schlüssel an. Macht man den Flugmodus wieder an, geht es sofort weiter sobald die SIM wieder eingebucht ist... Also unschön, aber für diesen Usecase doch OK. Es sei denn alle Dienst beim Kumpel haben die gleichen IPs, certs und PWDs wie Deine daheim 😁1 point
-
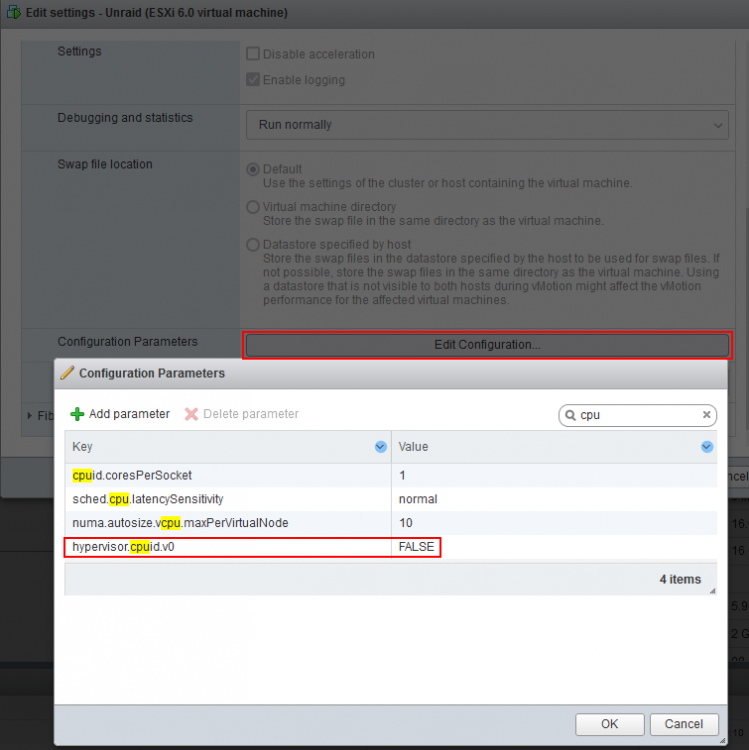
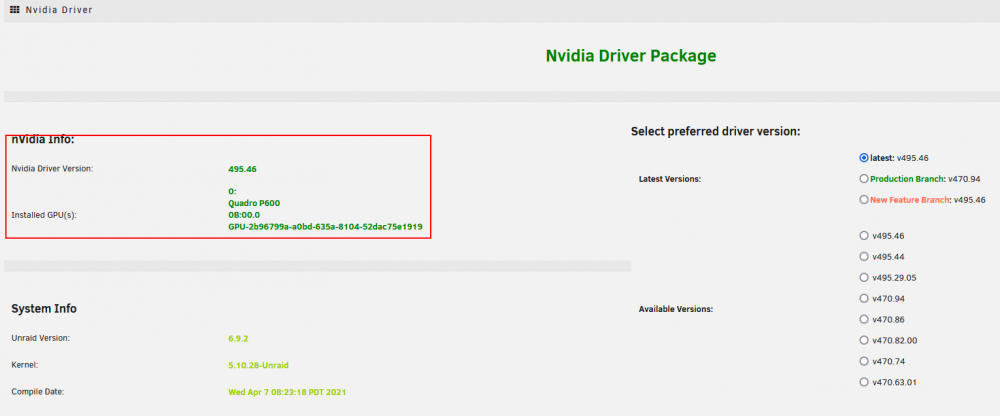
Fixed, I added in Edit settings > VM Options > Advanced > Configuration Parameter > Edit Configuration > Add parameter KEY: hypervisor.cpuid.v0 Value: FALSE > OK > Then Reboot Now it shows up You are essentially hiding the fact the Host is a VM from the NVIDIA driver package, as they want to buy a expensive GPU for virtualization. A$$Hol3s. Hope this helps someone. Regards Pedro
 1 point
 -
Hoping to bounce this back into the hearts and minds of the mod team, now that the holidays are done. Thank you!1 point
-
Firefox - for all things mobile and desktop/laptop Sent from my SM-G998U using Tapatalk1 point
-
A multifunction device is a device incorporating different functions, same bus, same slot, different functions. GPU, ethernet cards, usb controllers, can be multifunction. If a device has different portions of the same device in the same bus/slot and different functions it's a multifunction device. It is good practice to have the topology of the vm reflecting that of the hardware on the host you want to passthrough. But no idea why it isn't working.1 point
-
@Jojo1965 meine Lösung ist eine ganz Andere. Da ich bei Keyfeatures nicht so einen hohen Aufwand betreiben will, hab ich mein Unraid abgeschaltet und mein Synology NAS reaktiviert. Da funktioniert SMB wenigstens ohne Einschränkungen.1 point
-
Bei der Suche nach gebrauchten Fertig PCs, die man auch als Server/NAS einsetzen könnte, stolpere ich immer wieder über den Fujitsu Esprimo P558 / P758 / P958. Das Gehäuse hat gerade mal ein Volumen von 20 Litern. Der P558 verbraucht 10W, hat 3x SATA und 1x M.2 und es gibt ihn ab 100 € mit einem Pentium Gold G5400: Der P758 / P958 verbraucht 15W, hat 5x SATA und es gibt ihn ab 200 € mit einem i3-8100: Das Gehäuse bietet Platz für 4x 3.5 Zoll (2x intern, 1x extern und 1x adaptiert im 5.25 Zoll Schacht): Eine 5. HDD kann man sicher simpel unten auf den Käfig legen und irgendwie befestigen. Das kleinste Netzteil hat 210W. Das sollte problemlos reichen. Häufig hat man Glück und es ist eine SSD dabei. Dann hat man auch gleich was für den unRAID Cache. Platz für eine SATA, 10G oder M.2 Adapterkarte sind ebenfalls vorhanden. Ich denke günstiger kommt man nicht an einen flexiblen und sparsamen unRAID Server.


 1 point
 -
simpler for me to include it, which im happy to do as its a small package, look for it in the next image release.1 point
-
When you add the JSON-API datasource, the URL needs to end with /api/getServers For example http://192.168.1.99:3005/api/getServers1 point
-
Mach einen neuen Port im Template der ca. so aussieht: Danach kannst du dich mit so ziemlich jedem beliebigen VNC Client, wie in diesem Beispiel, auf Port 5990 verbinden. Vergiss aber bitte nicht das der Host Port immer ein anderer sein muss und der Continer Port muss immer 5900 sein, nur so als Zusatzinfo ich verwende in diesem Beispiel 5990 und das hat genau den Grund weil auch unRAID für die VNC Verbindung zu den VMs Ports 5900 und so weiter verwendet und einen Konflikt zu vermeinden.
 1 point
 -
ok, wie du siehst sind deine beiden NUR im bridge mode und haben NUR die web Weiterleitung drin, sprich, VNC nativ kein Zugang aktuell. da VNC standardmäßig auf 5900 läuft ergänze jetzt einfach eine port regel, Beispiel 5900 <> 5911 im Krusader, damit wäre dann Krusader per 192.168.188.53:5911 nativ per VNC zu erreichen, port 5910 bleibt dann für im Browser zu öffnen. das war es dann auch schon gleiches für andere VNC Container, hier auch mal schauen da manche NICHT nativ 5900 nutzen sondern evtl. andere Ports, steht jedoch in der Regel in den settings.1 point
-
Glückwunsch, davon stimmt gar nichts 😅 Eine Parity ist keinen Platte wo Dateien drauf liegen, sondern sie enthält nur die "Quersumme" aller Daten aller Platten. Eventuell hilft dir diese Erklärung um ein RAID bzw die Parity besser zu verstehen: https://forums.unraid.net/topic/99393-häufig-gestellte-fragen/?tab=comments#comment-1021986 Deswegen kannst du zB 5 Platten mit jeweils 10TB im Array haben und brauchst trotzdem nur eine 10TB große Parity, um irgendeinen Festplattenausfall abzusichern. Nein. Wenn Platten einem Pool zugewiesen werden, dann bilden diese ein RAID, was ausschließlich von Unraid genutzt werden kann (zB für den Cache oder als Speichort für Docker Container). Auf diesem RAID könnte man dann aber zB virtuelle Festplatten als vdisk-Dateien ablegen, die dann von VMs verwendet werden. Wenn man dagegen eine Platte 1:1 durchschleifen möchte, muss man diese aus Sicht von Unraid ignorieren, also als Unassigned Device stehen lassen. Dann weist man sie der VM zu und nur die VM kann diese dann nutzen. Beide Methoden haben Vor- und Nachteile. Wenn du zB mit vdisk-Dateien arbeitest, hat das den Vorteil, dass du mehrere virtuelle Festplatten auf einer Platte ablegen kannst. Du kannst also problemlos 10 VMs starten, deren virtuelle Platten (vdisk-Dateien) in Wirklichkeit alle auf der selben Platte liegen. Das hat auch den Vorteil, dass du kompakte virtuelle Festplatten über Unraid sichern kannst. Hast du dagegen eine 1TB Platte 1:1 an die VM durchgeschliffen, dann hast du die komplett für die eine VM "verschwendet" und Backups gehen nur platzsparend, wenn du innerhalb der VM eine Backup-Software verwendest. Der Nachteil von mehren vdisks ist, dass du dir die Performance der Platte mit anderen Prozessen teilst, die ebenfalls auf die Platte zugreifen. Der klassische Aufbau bei Unraid ist eigentlich so: - viele große HDDs im Array als Speicherplatz für eher selten genutzte Dateien - mehrere SSDs im Pool als Speicherplatz für schnelle Uploads (Cache), häufig genutzte Dateien, Docker Container und virtuelle Festplatten (vdisks) Es sind aber zig andere Konstellationen denkbar. zB könnte man nur einen USB Stick ins Array packen und alle seine HDDs in einem Pool verwenden. Oder man hat nur SSDs, packt die alle ins Array und verzichtet auf Pools. Oder man hat neben dem Array mehrere Pools. Oder zusätzlich noch Datenträger, die man 1:1 an VMs durchschleift... Was man macht, hängt schlicht vom persönlichen Bedarf ab. Für den ersten Einstieg empfehle ich dir aber den klassischen Aufbau. Dh du machst eine New Config und weist die 6TB Platten wieder den Slots zu, wo sie vorher auch drin waren (daher der Screenshot). Dann nimmst du die zwei M.2 SSDs und erstellst daraus einen Pool. Fertig. Die SATA SSDs kannst du weglassen. Mehr Performance bringen dir die eh nicht in der VM, da sie auf 550 MB/s limitiert sind und nicht mal ansatzweise so viele parallele Zugriffe wie M.2 SSDs verarbeiten können. Das einzige was man evtl überlegen könnte, wäre ein zweiter Pool mit den SATA SSDs und darauf dann die Docker Container ablegen, damit diese Zugriffe von der M.2 weg kommen, aber ob das lohnt... hängt auch davon ab wie viele Container man schlussendlich im Einsatz hat und wie viel die eigentlich schreiben.1 point
-
I too for a long time was very frustrated with very slow SMB connections between macOS and Unraid. I had several (somewhat unsuccessful attempts) at reading Samba documentation and adding various parameter combinations. Then I stumbled across a solution that provides excellent (much faster!) result. See here… My Unraid "Samba extra configuration" optimised (and working well) accessing Unraid shares from macOS Monterey 12.0.11 point
-
Das machst du per Kommandozeile im ioBroker Container. Mehr Infos hier: https://smarthome.buanet.de/2020/10/iobroker-docker-container-updates-upgrades/1 point
-
Below I include my Unraid (Version: 6.10.0-rc1) "Samba extra configuration". This configuration is working well for me accessing Unraid shares from macOS Monterey 12.0.1 I expect these configuration parameters will work okay for Unraid 6.9.2. The "veto" commands speed-up performance to macOS by disabling Finder features (labels/tags, folder/directory views, custom icons etc.) so you might like to include or exclude these lines per your requirements. Note, there are problems with samba version 4.15.0 in Unraid 6.10.0-rc2 causing unexpected dropped SMB connections… (behavior like this should be anticipated in pre-release) but fixes expected in future releases. This configuration is based on a Samba configuration recommended for macOS users from 45Drives here: KB450114 – MacOS Samba Optimization. #unassigned_devices_start #Unassigned devices share includes include = /tmp/unassigned.devices/smb-settings.conf #unassigned_devices_end [global] vfs objects = catia fruit streams_xattr fruit:nfs_aces = no fruit:zero_file_id = yes fruit:metadata = stream fruit:encoding = native spotlight backend = tracker [data01] path = /mnt/user/data01 veto files = /._*/.DS_Store/ delete veto files = yes spotlight = yes My Unraid share is "data01". Give attention to modifying the configuration for your particular shares (and other requirements). I hope providing this might help others to troubleshoot and optimize SMB for macOS.1 point
-
Create a Unraid container of PlexTraktSync: Go to the Docker section, under "Docker Containers" and click "Add Container". Click the advanced view to see all of the available parameters. Leave the template blank/unselected. Under Name: enter a name for the docker (e.g., PlexTraktSync). Under Repository: enter ghcr.io/taxel/plextraktsync:latest (or whatever tag you want). Under Extra Parameters: enter -it for interactive mode. Click "Apply". The container should start automatically. If not, start it. Enter the console for the container. Enter python3 -m plextraktsync to start the credential process described above.1 point
-
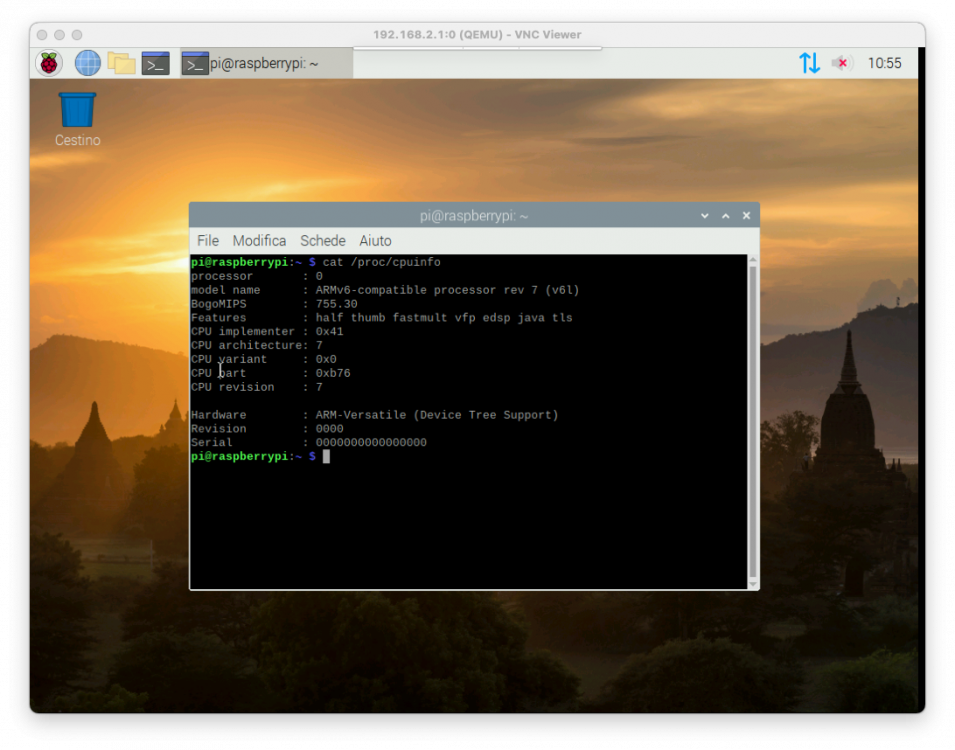
Work in progress...: This is a basic template I'm using to boot the image: <domain type='qemu'> <name>rpi</name> <uuid>removed</uuid> <memory unit='KiB'>262144</memory> <currentMemory unit='KiB'>262144</currentMemory> <vcpu placement='static'>1</vcpu> <os> <type arch='armv7l' machine='versatilepb'>hvm</type> <kernel>/media/6TB/rasp/kernel-qemu-4.19.50-buster</kernel> <cmdline>root=/dev/sda2 rootfstype=ext4 rw</cmdline> <dtb>/media/6TB/rasp/versatile-pb-buster.dtb</dtb> <boot dev='hd'/> </os> <cpu mode='custom' match='exact' check='none'> <model fallback='forbid'>arm1176</model> </cpu> <clock offset='utc'/> <on_poweroff>destroy</on_poweroff> <on_reboot>restart</on_reboot> <on_crash>destroy</on_crash> <devices> <emulator>/usr/bin/qemu-system-arm</emulator> <disk type='file' device='disk'> <driver name='qemu' type='raw'/> <source file='/media/6TB/rasp/2020-02-13-raspbian-buster.img'/> <backingStore/> <target dev='sda' bus='scsi'/> <address type='drive' controller='0' bus='0' target='0' unit='0'/> </disk> <controller type='pci' index='0' model='pci-root'/> <controller type='scsi' index='0' model='lsilogic'> <address type='pci' domain='0x0000' bus='0x00' slot='0x01' function='0x0'/> </controller> <interface type='bridge'> <mac address='52:54:00:ed:eb:c7'/> <source bridge='virbr0'/> <model type='virtio'/> <address type='pci' domain='0x0000' bus='0x00' slot='0x06' function='0x0'/> </interface> <graphics type='vnc' port='-1' autoport='yes' websocket='-1' listen='0.0.0.0' keymap='en-us'> <listen type='address' address='0.0.0.0'/> </graphics> <audio id='1' type='none'/> <video> <model type='cirrus' vram='16384' heads='1' primary='yes'/> <address type='pci' domain='0x0000' bus='0x00' slot='0x02' function='0x0'/> </video> </devices> </domain> kernel/dtb are downloaded from here: https://github.com/dhruvvyas90/qemu-rpi-kernel Raspbian buster downloaded from here: https://downloads.raspberrypi.org/raspbian/images/raspbian-2020-02-14/ For now it's giving a kernel panic on shutdown..need to investigate: seemed to be solved with qemu 6.1-RC, but it seems it's not the case.. I'm only able to use arm1176 with qemu-system-arm (32 bit), maybe related to the custom kernel.
 1 point
 -
I'll be looking into this as it's not the expected behavior.1 point