Leaderboard


Popular Content
Showing content with the highest reputation on 01/03/23 in all areas
-
ok, good catch, then I'm quite sure the -set option wont work. I'm on mobile now if a possible solution wont be posted I'll write it tomorrow.2 points
-
Da war aber die Lösung AMD in die Tonne zu schmeißen und eine NVIDIA zu kaufen. Jedenfalls auch eine Art LÖSUNG2 points
-
Update Wie oben geschrieben habe ich mir gestern nach einem echten "Schnauze jetzt dick voll"-Moment meinen Kurzen geschnappt und bin zum örtlichen Dealer. Habe eine ASUS GeForce RTX™ 3060 Dual OC 12GB V2 LHR gekauft. Ich habe nicht vor irgendwas mit Cryptocurrencies zu machen, also ist mir LHR egal. Habe jetzt die ursprüngliche Win 11 VM - die zu Beginn meines Posts die Probleme bereitete - umgebogen auf die neue nVidia-Karte. Nach einem bisschen Konfigurations-Heck-Meck im BIOS habe ich die VM jetzt am Laufen. Problemlos. Gut, Bootup ist ziemlich langsam, habe aber auch noch n bisschen was zu erledigen bzgl. Parity Check und bei einer Platte machen sich nach den ganzen Crashes jetzt Read Error breit. Fakt ist aber, dass der 3D Mark Time Spy Test komplett durch läuft. Kein Absturz, nix. War ja vorher nicht möglich. Sogar mit Auto Tuning der GPU läuft die VM stabil. Die Framerate liegt gefühlt leicht niedriger als bei der RX 6700 XT, ist aber auch vielleicht verständlich, denn die spielt eher in der Liga einer 3070. Wollte aber mein Budget jetzt nicht noch weiter überziehen. Jetzt läuft noch mal prime95 für den finalen Stabilitätstest. Wenn das jetzt durchläuft, dann kann ich das Kapitel zu machen. Die RX 6700 geht dann zurück zum Händler. Schade drum - und doof ob der ganzen Mühe der letzten Woche(n). Leider bestätigt das mein altes Vorurteil, weswegen ich seit über 15 Jahren eigentlich keine AMD-GPU mehr hatte. Aber aufgrund des positiven Preis-Leistungs-Verhältnisses wollte ich AMD noch mal eine Chance geben.2 points
-
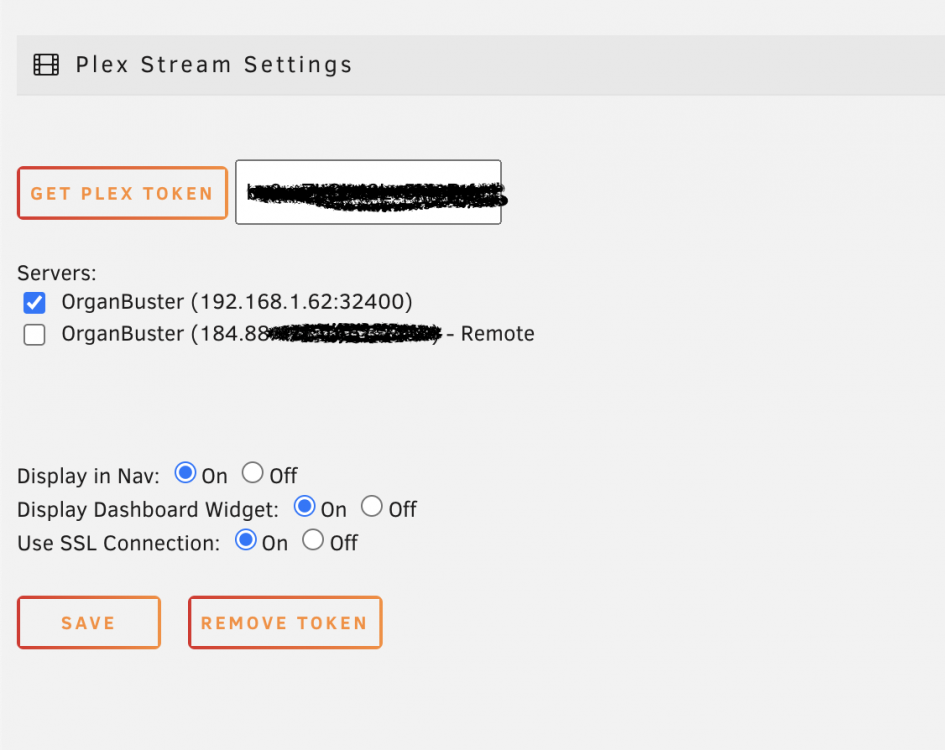
Introduction Install from Community Application Support Fund If you wish to do so, you can learn more here. Setup Once installed if you go to Settings->Plex Streams you need to provide the full url to your plex server as well as your plex username/password Changelog 2023.06.29 - Correcting display issue of end time for a stream 2023.06.28a - Correcting reversed logic 2023.06.28 - Making end time respect time display settings - Fix for deprecated warning 2023.05.23 - Adding a fix to surpress issues during plugin install 2023.05.18 - Add more fixes for PHP notices - Fix for display of Live TV streams 2023.04.18a - Even more minor fixes 2023.04.18 - More minor bug fixes 2023.04.07 - Minor bug fix to get rid of php warnings 2023.04.06a - Add estimated end time to dashboard widget for unraid 6.12rc2+ 2023.03.31a - Bug fix for desktop widget when displaying stream count per server 2023.03.31 - Defect fix for legacy versions 2023.03.29a - Minor adjustment 2023.03.29 - Fix a bunch of issues for UnRaid versions less than 6.12rc2 2023.03.28b - Fixing bug with unRaid less than 6.12 2023.03.28a - Correcting a typo for legacy support 2023.03.28 - Added Support for displaying which server the video/audio is streaming from - More fixes for PHP warnings 2023.03.26 - Various fixes for PHP warnings 2023.03.22 - Minor adjustments for PHP warnings/deprecations 2023.03.21 - Add compatability for Unraid 6.12 - Fix bug with livestreams - Update nav/dashboard module to use conditions for whether to display instead of renaming files 2022.08.29 - Fix for audio file having HTML in title attribute 2021.08.09 - Fixes for sorting of dashboard widget - Fix for collapsing/expanding of dashboard widget 2021.03.17 - Fix collapse bug for dashboard widget 2021.02.11a - Added ability to setup custom servers, that may not be getting returned from plex 2021.02.09 - Correcting some display issues where audio streams from plexamp were not showing - Adding details about transcoding sessions 2020.07.23 - Correcting legacy display issue for dashboard widget 2020.07.20 - Correct display issue on settings page 2020.07.09 - Correcting display issue for the dashboard widget 2020.06.30b - Correct display issue for details page when there is no Director. - Fix display issue for Legacy support 2020.06.26b - Both the dashboard and the streams page now fully update with new/removed streams without having to reload 2020.06.22 - Updated streams page to update streams via ajax, still need to have it add streams as they come online 2020.06.20a - Fix javascript issues, and dashboard widget issue 2020.06.20 - Fix JavaScript Issue when retrieving plex token 2020.06.19 - Added the ability to view multiple servers at a time 2020.06.12 - Make server list load via ajax so that it doesnt slow down the initial rendering the pages 2020.06.10a - Updated way to use SSL when connecting to plex server. This should fix outstanding problems. - Correcting display issue with live streams from Tuner Devices 2020.06.09 - Correct issue when plex server has disabled remote connections 2020.06.07 - Maintain settings for dashboard widget and nav item when restarting 2020.06.03 - Fix display issue where more than 3 streams was not wrapping 2020.05.28 - Correcting details sent to Plex.tv during OAuth Process 2020.05.27a - Fix issue for movie details where not being pulled 2020.05.27 - Integrate with Plex OAuth - Allow for remote plex server connection - Correct issue for remote plex server wasnt displaying artwork 2020.05.20b - Ability to turn dashboard widget on/off - Ability to turn top level nav on/off 2020.05.20 - Add audio streams to both streams page and dashboard widget - Remove debug output from saving settings - Correct details screen for TV Shows 2020.05.19 - Correct display issue on dashboard widget for long titles 2020.05.18a - Added basic dashboard widget functionality 2020.05.18 - Correct issue for direct play status wasnt showing for audtio/video 2020.05.16 - Added the ability to click on the Stream title to get content details - Fixed bug that was displaying progress time incorrectly 2020.05.15a - Fixing bug for stream type wasn't being displayed 2020.05.15 - More tweaks to UI 2020.05.14e - Remove unused function 2020.05.14d - Some CSS tweaks and add icon for when tasks menu is on the left 2020.05.14c - Initial Beta Release


 1 point
 -
I know many people scoff at sleeping a VM, but I really want to put my Windows 10 VM's to sleep because they are constantly doing things in the background and utilizing a lot of CPU. It costs me about 50 watts to not sleep the VM and to me that is just a waste. The trouble has been how to wake them up easily without using another device. All you have to do to make the mouse and keyboard wake Windows from sleep is use evdev to pass them through instead of the Windows template. The easiest way to learn how to do this is to watch and mostly follow Spaceinvader's new tutorial on evdev: I'm sure he will fix it, but please note that Spaceinvader doesn't quite have the syntax correct in the qemu.conf. The correct syntax is in my post just below his in the linked thread. Once you get it right, your mouse and keyboard will be able to wake your Windows VM from sleep 🤩 Also, don't forget to turn "Link State Power Management" back on in the Advanced settings of the Windows 10 Power Options, otherwise your computer may just hard shutdown instead of sleep. I am finally happy! Best regards, craigr1 point
-
With the rise of global electricity prices, (especially in Europe), running an energy-efficient Unraid server is more relevant than ever. In this blog, we go over some best practices, tips + tricks, and build basics for users to run their servers in the most energy-efficient way possible! https://unraid.net/blog/energy-efficient-server How many watts does your Unraid server run at idle? Do you have any other energy efficiency tips?
 1 point
 -
When dealing with multi-function devices (e.g. GPU with GPU + HDMI audio), Unraid GUI will assign a new bus for each additional device by default. This can cause compatibility / performance issues in some cases, most notably but not exclusive to MacOS VM. The workaround is adding multifunction='on' and change the bus + function values in the xml. If any edit is done via the GUI, it will revert the bus + function back to the default method, requiring additional edits. New users are also unlikely to be able to make these manual xml edits. It would be a good idea to enhance the VM GUI to detect and make the appropriate edits in the xml automatically for these devices. E.g. group devices by bus + function and create the bus + function in the xml accordingly (adding multifunction='on' for the first device of a multi-function group). At least, I would imagine it would not too complicated to apply it as a priority to GPU and HDMI audio devices since they have their own dedicated GUI boxes so matching them is rather simple.1 point
-
I tried looking for existing posts about this but couldn't find any, so hopefully this isn't a duplicate It would be really helpful to be able to set the `multifunction='on'` for certain passthrough devices, such as a NIC for pfSense. Use Case: In order to get my pfSense VM to recognize the NIC ports as 4 separate interfaces (rather seeing than the whole card as only one interface), I have to manually edit the xml to set the 4 "devices" that make up the NIC so that the first has multifunction='on' and the others have the correct matching bus and function address values. However, the problem really is that if I forget and make any edit via the VM template in the webUI, then it will "undo" this multifunction option. Since this "multifunction" thing is actually (usually) a capability of the device, it should be possible for Unraid to detect when it should provide this option by looking for the fact that the addresses of the devices are all in the form 04:00.0 04:00.1 04:00.2 04:00.3 etc... As an alternative or additional method of detection, you may also notice that they should all have the same device ids, For example mine shows 8086:1521 on all 4 of these because they are the 4 interfaces of same physically PCIe card: IOMMU group 20: [8086:1521] 04:00.0 Ethernet controller: Intel Corporation I350 Gigabit Network Connection (rev 01) IOMMU group 21: [8086:1521] 04:00.1 Ethernet controller: Intel Corporation I350 Gigabit Network Connection (rev 01) IOMMU group 22: [8086:1521] 04:00.2 Ethernet controller: Intel Corporation I350 Gigabit Network Connection (rev 01) IOMMU group 23: [8086:1521] 04:00.3 Ethernet controller: Intel Corporation I350 Gigabit Network Connection (rev 01) Of course, I understand that just because this looks simple in theory, that doesn't mean it will be easy to implement in practice. I don't fully know how the UI--XML generation works, but I have been involved in software development long enough to know that there may be other obstacles or limitations of the system that I am completely unaware of. So, I completely understand if this request/idea gets rejected. Lastly, I would like to provide an example of the "desired" XML with multifunction enabled vs. the default XML generated by the VM Template Here is the XML with multifunction enabled: ... <hostdev mode='subsystem' type='pci' managed='yes'> <driver name='vfio'/> <source> <address domain='0x0000' bus='0x04' slot='0x00' function='0x0'/> </source> <alias name='hostdev0'/> <address type='pci' domain='0x0000' bus='0x01' slot='0x00' function='0x0' multifunction='on'/> </hostdev> <hostdev mode='subsystem' type='pci' managed='yes'> <driver name='vfio'/> <source> <address domain='0x0000' bus='0x04' slot='0x00' function='0x1'/> </source> <alias name='hostdev1'/> <address type='pci' domain='0x0000' bus='0x01' slot='0x00' function='0x1'/> </hostdev> <hostdev mode='subsystem' type='pci' managed='yes'> <driver name='vfio'/> <source> <address domain='0x0000' bus='0x04' slot='0x00' function='0x2'/> </source> <alias name='hostdev2'/> <address type='pci' domain='0x0000' bus='0x01' slot='0x00' function='0x2'/> </hostdev> <hostdev mode='subsystem' type='pci' managed='yes'> <driver name='vfio'/> <source> <address domain='0x0000' bus='0x04' slot='0x00' function='0x3'/> </source> <alias name='hostdev3'/> <address type='pci' domain='0x0000' bus='0x01' slot='0x00' function='0x3'/> </hostdev> ... Here is the XML generated by the webUI: ... <hostdev mode='subsystem' type='pci' managed='yes'> <driver name='vfio'/> <source> <address domain='0x0000' bus='0x04' slot='0x00' function='0x0'/> </source> <alias name='hostdev0'/> <address type='pci' domain='0x0000' bus='0x01' slot='0x00' function='0x0'/> </hostdev> <hostdev mode='subsystem' type='pci' managed='yes'> <driver name='vfio'/> <source> <address domain='0x0000' bus='0x04' slot='0x00' function='0x1'/> </source> <alias name='hostdev1'/> <address type='pci' domain='0x0000' bus='0x02' slot='0x00' function='0x0'/> </hostdev> <hostdev mode='subsystem' type='pci' managed='yes'> <driver name='vfio'/> <source> <address domain='0x0000' bus='0x04' slot='0x00' function='0x2'/> </source> <alias name='hostdev2'/> <address type='pci' domain='0x0000' bus='0x04' slot='0x00' function='0x0'/> </hostdev> <hostdev mode='subsystem' type='pci' managed='yes'> <driver name='vfio'/> <source> <address domain='0x0000' bus='0x04' slot='0x00' function='0x3'/> </source> <alias name='hostdev3'/> <address type='pci' domain='0x0000' bus='0x05' slot='0x00' function='0x0'/> </hostdev> ...1 point
-
I think 6.11.5 looking at the template. so will be qemu 7.11 point
-
Ja, die stimmt. Was nach der Zeitanpassung noch gefehlt hat, war ein Neustart. Ohne den Neustart wurde zwar der Daily Schedule bereits korrekt ausgeführt, jedoch wurde in der Mover Logdatei mit der alten "nicht korrekten" Uhrzeit geloggt. Nun funktioniert auch der Daily Schedule ohne Probleme mit der korrekten Uhrzeit. Vielen herzlichen Dank euch allen für eure tolle Hilfe und dir @i-B4se für den Tipp der zur Lösung geführt hat.
 1 point
 -
Same here. Bought a license, server is laying around waiting for official ZFS support1 point
-
It doesn't touch anything.1 point
-
There is this old kernel bug which Limetech has been involved with. Looks like a firmeware issue with the nvme controller. https://bugzilla.kernel.org/show_bug.cgi?id=202055#c43 Try this workaround to see if that fixes. Also unlikely to get iGPU to work in windows, I have 126000K UHD770 works ok in linux but not currently in Windows. <domain type='kvm' xmlns:qemu='http://libvirt.org/schemas/domain/qemu/1.0'> > ... > <hostdev mode='subsystem' type='pci' managed='yes'> > <source> > <address domain='0x0000' bus='0x01' slot='0x00' function='0x0'/> > </source> > <alias name='ua-sm2262'/> > <address type='pci' domain='0x0000' bus='0x02' slot='0x00' > function='0x0'/> > </hostdev> > ... > <qemu:commandline> > <qemu:arg value='-set'/> > <qemu:arg value='device.ua-sm2262.x-msix-relocation=bar2'/> > </qemu:commandline> > > > (NB: "ua-" is a required prefix when specifying an alias) > > A new virtual BAR appears in the guest hosting the MSI-X table and QEMU > starts normally so long as the guest doesn't exceed 15 vCPUs. > > The vCPU/pCPU count limitations are obviously not ideal, but hopefully this > provides some degree of workaround for typical configurations.1 point
-
Maybe @binhex can confirm this but I believe to do that you’ll need to add the network that wireguard is using to LAN network in the docker configuration. Comma separated.1 point
-
There is, but I've moved your thread earlier to the correct subforum.1 point
-
@ich777 Hi - thank you much for the information. All good knowing it is the the ZFS plug-in issuing the command. I am new to ZFS & raidz and with 120TB of data I have been learning and watching the zpool history to make sure my migration from Windows RAID5 to UnRaid is working well. When seeing that command I wanted to make sure I did not have plugs doing unwanted things. This is just a learning experience for me and appreciate the explanation. Also, love your docker container work. Ill be sending a donation soon. Awesome job!1 point
-
Hallo, mich interessiert noch sehr der Stromverbrauch. Hast du eine Möglichkeit den zu messen?1 point
-
Hat Super geklappt, thx @fk_muck1 Steht sogar in der Beschreibung, habe es irgendwie nicht gerafft Nun Scannt er wie man ihn dafür geschaffen hat 😄1 point
-
syslog snippet indicated 2 were corrected. yes1 point
-
Post new diagnostics after. Disable Docker and VM Manager in Settings till things are working well again. cache_nvme is showing (XFS) corruption, check filesystem docker and libvirt img both showing corruption. Since system share is on cache_nvme fix that filesystem then you will probably have to recreate them. Corruption on cache_ssd, (btrfs) may be more complicated to fix.1 point
-
I am also trying to get my idle consumption as low as I can and maybe someone has some helpful info to share. My system: i5 8500 Asus Prime H370-A 2x 8 GB RAM 1x HBA LSI 9200-16e 1x 500GB Cache NVME 11x HDD PSU: Corsair HX750i CPU Cooler: Artic Freezer 11 LP 3x 120mm fan Noctua Low Noise Adapter 1x 80mm fan with Noctua Low Noise Adapter powertop shows, that the maximum c-state reached is c3 in Pkg(HW) ...if powertop is correct I am idleing at around 45W with drives spun down1 point
-
if you only use it locally, then you can stay away from them. The need for them arises, if you want to use some dockers from the internet that all use the same ports like 80 or 443. Normal IPV4 gives you only a single global reachable address, so you can only reach ONE docker per port. Thats what this nginx/Swag jumps in, it serves the global port and looks either for requested subfolders or for registered dnsname. It then delegates the data internally to the (hopefully) correct docker which runs on a different port. As a side effect it also fetches a Letsencrypt SSL certificate and encrypts the traffic with it. No need for every docker behind him to deal with certificates, encryption and renewal. But internally, you can configure the dockers to use different ports (like 4443 or 8080) and access them directly with your browser. (anyway, some lazy people like me also use swag internally because I have limited storage and cant remember all the ports where I moved the dockers to, so, I let swag handle this for me 😁)1 point
-
Don't mess with ports that was already there, they are there for a reason. You only need to change the host ports in the container template IF you have conflicting ports. If you don't then you don't need to touch them. So put it back to where it was and only change the host port if you need to. And yes, the incoming port you have from AirVpn does NOT go in the template but in the deluge settings in the webui. Edit: If the port in the template you're referring to is this variable, then you have an old template like me and you can just delete it OR put the port that you're connecting to. But it won't make a difference anyway since this port get read from the ovpn file.
 1 point
 -
Nice idea, but the average user don't read the logs. Most don't even read the post right above their own when they post in the forums, let alone the last pages, and read their own log before posting it. And if they do by any chance read the log most don't know what to do with it, even if the log clearly states the issue. But yeah, it's a nice idea either way. Some few people might take the hint and take the pressure off @KluthRand @wgstarkswhich seems to be helping out most users. But this version of the plugin is new so there is bound to be some issues, it will settle down once most of the users has migrated to this version.1 point
-
Big thanks to @trurl and @JorgeB for support today. Getting the dockers off disk1 and on to the cache drive is like night and day! I don't know how that get set that way in the first place but it definitely is the wrong approach for a smooth running server. CPU use was running at 100% constantly on at least 6 of 11 cores before ... now 9 / 11 are at 0% Docker containers rebuild in a second and start now just as fast. Everything is back to being zippy.1 point
-
When you set up unRAID your hard drives become one massive pool of disk space. You then split up this pool by going into the OS and creating directories or I prefer to create a user share. A user share is a directory but it can be exposed as a shared directory and you can limit access to that directory. In Windows you would create a folder and then share it and give access to the users of that server. In unRAID you create the user share which becomes a folder but is also shared. You then create users in unRAID and give them access to this share. Once the share is there you can easily use Windows to manage the share by creating more folders and adding files. A docker or VM is similar to a program you install in Windows but it has one huge difference. The docker/VM is an isolated container so whatever is running inside only has access to what you give to it. When you set up the docker you tell it what directory it has access to. In the following diagram I have my unRAID server with two user shares that are also folders on the array. I have a user called "Tim" using a Windows computer who can access both the Shared and Media shares on the unRAID server (SMB shares). I also have a media computer/device with Kodi or VLC which has access to only the Media share. Lastly, I have a Roku device which has the Plex app and can see the Plex docker (via the port that Plex uses) on the unRAID server.
 1 point
 -
It seems that way yes, S7150 range, which is basically the Firepro series, with varying sizes of core count. I have the S7150, and it appears from the docs I've seen that they all point to the GIM driver which I guess is what would need to be understood by unraid in order for it to partition the GPU up for virtualization. I can see the repo has been forked many times, I've looked through a few and it looks like people have customised it for use in various forms. Perhaps that's the right path here, but it certainly is niche. When I'm back from my holidays I'll look into this all further, I'm a developer and wouldn't mind a new project for the new year!1 point
-
My best to you... Maybe post *one* of your best at new years? MtGrey.1 point
-
"This year we put a 12 on the box"1 point
-
Thanx a bunch for this...I've struggled with my Docker/Plex setup on my Unraid instance on a Asustor Lockerstor 4 Gen 2 AS6704T with a Celeron N5105. Your suggestion did it! And to make it permanent and survive reboots you could: echo "options i915 enable_fbc=1 enable_guc=3" > /boot/config/modprobe.d/i915.conf1 point
-
I'm using a Fritz!DECT 200. Winner in multiple tests because of its accuracy 😉 Maybe not a good board regarding efficiency. ASRock often disallows very low C-States. Bad and kills your C-States Bad for low loads. Use the Corsair RM550x (2021). Should save additional 3W. I tested this with several Intel CPUs, too, and it saved only 1W while my server crashed two times while unzipping a huge file. That's because I don't undervolt anymore. PS: A T-CPU does not save energy. Instead it costs you more energy as processes like a parity check takes much longer. If you need a small TDP because your want to use a small or passive cooler: Set the TDP as you need it through the BIOS. No need to buy an expensive T-CPU. One module needs <1W. There is no real difference between 2x 4 or 3x 32GB. Bad. ^^ Check this thread: https://www.hardwareluxx.de/community/threads/die-sparsamsten-systeme-30w-idle.1007101/ And: You didn't write anything about C-States, ASPM, AHCI Link Power Management, CPU Governor, etc. There are many settings available to save energy:1 point
-
Unsolved mystery but in the end good news I can just say that this bios setting disappearing for you while bios update has happened others including me before as well. I'd give the ftpm section some attention as well. For me, it was causing some serious time of investigation1 point
-
How's uptime looking now on your end? My system unexpectedly, inexplicably, and without any changes made on my part decided it was finished with the daily crashing nonsense. So, when last I posted, I thought things were stable after removing the GPU, but it went from multiple daily crashes to once per day. I believe it was Jorge who suggested changing power supply idle control settings and seeing if that helped. I didn't get a chance to do that right away because I was working 12+ hour days. Well after that, and again with no changes made to anything, it stopped crashing. I've been up 4 days and 3 hours now without a sign of trouble. When it was doing the daily crash, it seemed like both times it happened right around 2pm, so I'm wondering if there was some scheduled task that was causing it, but it wouldn't have been anything that I scheduled. In my experience, I can't think of a single computer that I've built that didn't have bizarre stability issues at the very beginning that didn't resolve themselves without any intervention on my part. I've always theorized that it's just cables/connections settling in or something like that. Maybe heat cycling the plastic insulation from normal use removes any tension they were under? I don't know, but it sounds smart1 point
-
By chance any update for a 6.0 agent?1 point
-
Welche Hardware ist für Unraid optimal? Die offiziellen Mindestanforderungen von Unraid: Ein 64-Bit-fähiger Prozessor mit 1GHz oder besser Mindestens 2GB RAM Linux-Hardwaretreiber für Speicher-, Ethernet, und USB-Controller Zwei Festplatten - um den Schutz deiner Dateien mit einer Paritätsfestplatte zu gewährleisten Rein von den Funktionen empfehlen wir: eine CPU mit iGPU eine CPU mit guter Single Thread Leistung (Liste von Passmark), wobei ich 1400 Punkte als Minimum empfehle ein Mainboard mit zwei M.2 Slots für einen ausfallsicheren SSD Cache (RAID1) möglichst viele SATA Buchsen um langfristig auf Erweiterungskarten verzichten zu können keine RAID Karten/Controller (werden nicht unterstützt) Die höchste Effizienz, Komfort und Funktionsumfang bietet ein Intel System mit iGPU bis zur 10ten Generation: Xeon Workstation CPUs der Serien E-21xxG (8th), E-22xxG (9th) und W-12xxn(10th) sind in der Regel mit einer iGPU ausgestattet bis zur 10ten Generation funktioniert das Intel GVT-g Plugin, das die Nutzung der iGPU in mehreren VMs erlaubt, also i-Core 11xxx oder Xeon W-13xx - oder neuer - können das nicht! ab der 10ten Generation ist der Stromverbrauch bei Intel leicht gestiegen, ab der 11ten ist er deutlich höher, die 8te und 9te Generation ist die sparsamste. ab der 11ten Generation unterstützt Intel keinen Legacy Mode mehr, was das Durchschleifen von Hardware an VMs erschweren kann (alte Karten kennen kein UEFI und manche bekommen ihre VMs nur zum Laufen, wenn der Unraid Server im Legacy Modus gebootet wurde) ab der 11ten Generation gibt es eine komplett neue iGPU Generation, deren Linux-Treiber noch nicht ausgereift sind (Plex SDR Tonemapping geht nicht) Intel Systeme verbrauchen im Leerlauf teilweise deutlich weniger Strom als AMD Systeme. ab der 13ten Generation könnte Intel wieder effizienter geworden sein. Besonders sparsam sollen die Kontron Boards für the 12te Intel Generation sein (wo auch die 13te drauf laufen sollte, bitte selbst prüfen!) Warum ich von AMD abrate: ein AMD System besitzt nur bei den teuren und seltenen Ryzen 4xxxG oder 5xxxG eine iGPU eine AMD iGPU besitzt deutlich weniger Video-Transcoding Leistung als eine Intel iGPU alte AMD Ryzen 1xxx laufen nicht stabil in Linux AMD Setups reagieren sehr empfindlich auf "zu schnellen" RAM. Verzichtet also auf RAM jenseits von 3200 Mhz (bei DDR4) so etwas wie Intel GVT-g gibt es bei AMD nicht es gibt kein sparsames AMD Mainboard mit 8x SATA und 2x M.2 die iGPU kann nicht an eine VM durchgeschliffen werden Finger weg von Threadripper: Hier gibt es Latenzprobleme in VMs manche Boards haben beim Einsatz von PCIe 4.0 Hardware oder der Aktivierung der sparsamen C-States einen Bug und werfen den unRAID USB Stick aus Wann würde ich ein AMD System in Betracht ziehen: es ist bereits vorhanden der Stromverbrauch spielt keine Rolle man braucht die hohe Kernzahl und Leistung eines zb 5900X für möglichst wenig Geld und möchte evtl auch ECC RAM einsetzen Welche Optionen habe ich, wenn ich ECC RAM haben möchte: die meisten AMD Systeme unterstützen ECC RAM (technische Mainboard Daten lesen!) bei Intel unterstützen alle Xeon CPUs ECC RAM und bis zur 9ten Generation auch die Pentium Gold und i3 CPUs Achtung: Consumer/Workstation Systeme unterstützen in der Regel nur ECC und kein Reg ECC RAM! Für die Suche passender Hardware empfehle ich Geizhals, da es dort sehr gute Filter gibt. So kann man zb leicht alle DDR4 Non-Reg ECC Module finden Besonders sparsame Netzteile bei niedriger Last (<25W): - PicoPSU - Corsair RM550x (2021), verbraucht 1W mehr als die PicoPSU - Be Quiet Pure Power FM 11 550W, verbraucht 1,6W mehr als die PicoPSU - alle anderen Netzteile verbrauchen 3 bis 4W mehr als eine PicoPSU - informiert euch bei TweakPC über die neuesten Netzteile, denn wegen dem neuen ATX12VO Standard, kommen immer mehr sparsame Netzteile Hier ein paar Bauvorschläge : https://geizhals.de/?cat=WL-3054899 (ITX, Mini-Case, Non-ECC) https://geizhals.de/?cat=WL-2107598 (Intel, mATX, ECC, 10te Generation) https://geizhals.de/?cat=WL-2161844 (Intel, mATX, Non-ECC, 8te und 9te Generation) https://geizhals.de/?cat=WL-2107596 (Intel, mATX, ECC, 8te und 9te Generation) https://geizhals.de/?cat=WL-1881432 (Intel, ITX, ECC, 1x M.2, 8x SATA, 8te und 9te Generation) https://geizhals.de/?cat=WL-1881408 (Intel, ITX, 1x M.2, 8te und 9te Generation) https://geizhals.de/?cat=WL-2166906 (AMD, mATX, ECC, 2x M.2, 8x SATA, IPMI, 10G, 4xxxG/5xxxG) Alle XEON Prozessoren der 8ten und 9ten Generation bei eBay sind vielleicht auch interessant.1 point
-
Vielen Dank für eure Anregungen. Habe es nun wie folgt eingestellt:
 1 point
 -
Bei mir siehts so aus: Was ich noch einfügen möchte, ist ein automatisches Backup vom USB Stick / Flash. Da weiß ich aber noch nicht wie. Falls noch jemand Tipps hat, ich bin für alles offen 🙂
 1 point
 -

From the album: Community Created Banners
1 point -

From the album: Community Created Banners
1 point -
.png.e344ced1b067ea9a59fe7d496cb061fdcopy.thumb.png.db56f41eb625ff87d89d1148d44cdd25.png.964cf8ad469ae0f34dd474ca1f611121.png)
From the album: Community Created Banners
1 point -

From the album: Community Created Banners
1 point -
Strictly speaking step 5 is normally not necessary as KVM can handle .vmdk files directly. To do so you need to enter the path to the .vmdk file directly into the template as the unRAID GUI does not offer such files automatically.1 point
-
Not sure if you ever got this done, but if anyone else finds this topic, here's how i did it: 1) Stop the VM in ESXI 2) Export the VM as an OVF template 3) Make a folder on your unraid box called /mnt/user/domains/<NameOfVM> 4) Copy the VMDK file from the export folder to the folder you created in step 3 5) Run the following command: "qemu-img convert -p -f vmdk -O raw <vmdkfile> <vmdkfilename>.img". This will convert the file to the KVM/OVirt format. 6) Create a new VM, change the bios to "SeaBIOS", and choose the .img file created in step #5 for the first hard drive. At this point, if it's a linux machine, you can boot it and it pretty much Just Works (tm). If it's a windows box, you've got a couple more steps. 7) Boot the windows box, let it freak out that there is a bunch of new hardware and attempt to install drivers for it. Let it do it's thing - it'll probably reboot a couple times. 8 ) go to add/remove programs and uninstall vmware tools 9) As part of the creation process, you'll end up with a D (or first available) letter drive with the OVirt client VM files (basically vmware client for OVirt). Open that up, go to the client install folder and install it. Reboot. 10) after the reboot, go to device manager and install drivers for anything that wasn't detected properly. All the drivers you need should also be on that D drive disk. 11) Reboot one last time and you should be good to go! That's pretty much it. The only other snag i noticed is that a couple VMs that i converted that had static IPs flipped back over to DHCP (my assumption is because of the change in virtual network hardware), so make sure to check that. Let me know if you (or anyone else) runs into any issues!1 point


.png.e344ced1b067ea9a59fe7d496cb061fdcopy.thumb.png.db56f41eb625ff87d89d1148d44cdd25.png.964cf8ad469ae0f34dd474ca1f611121.png)


