Leaderboard


Popular Content
Showing content with the highest reputation on 12/11/23 in all areas
-
2 points
-
Moinsen, ich habe gegoogelt und gesucht (auch hier im Forum) - ich habe bestimmt auch die falschen Suchbegriffe genutzt - und nix gefunden, nichts, was mit meiner Situation genügend vergleichbar wäre. Aber auf die naheliegende Idee, die Release-Notes zu prüfen (wie ich ja selbst immer anrate), bin ich wirklich nicht gekommen. Es scheint genau das Problem zu sein, denn es läuft, auch mit Reboot. Hammer! VIELEN DANK! LG F PS Sollte es doch nicht gehen, werde ich weiter "jammern"2 points
-
Oh sorry, as we like to say in Germany: I can't see the wood for the trees... Didn't follow the pinned message. After an install & reboot everything is great again. Thanks for the quick help -> reading always helps, should just do it2 points
-
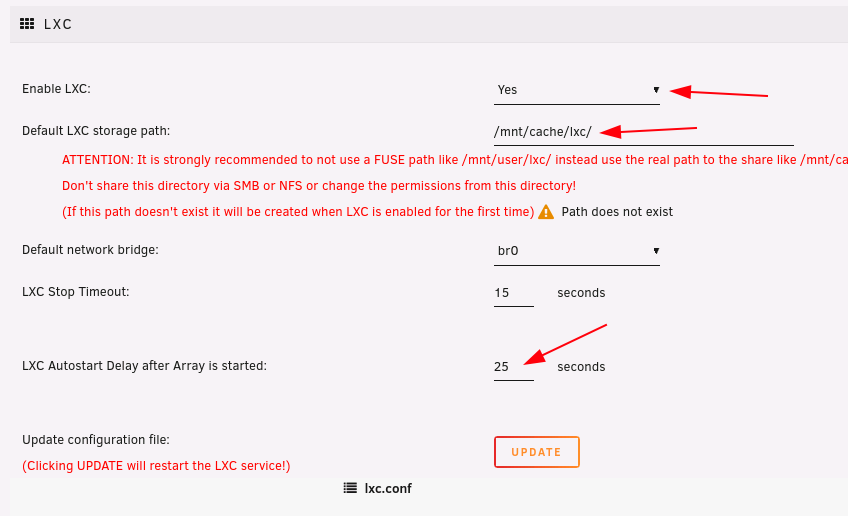
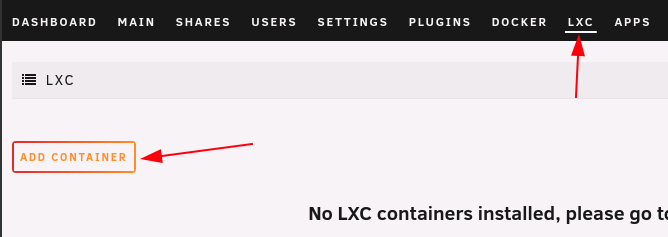
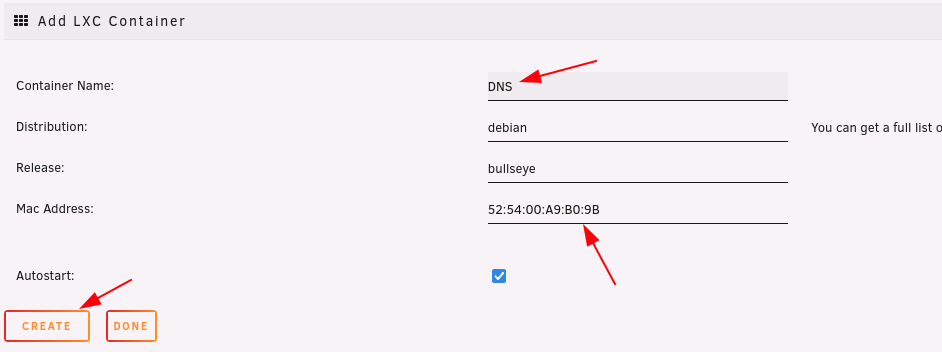
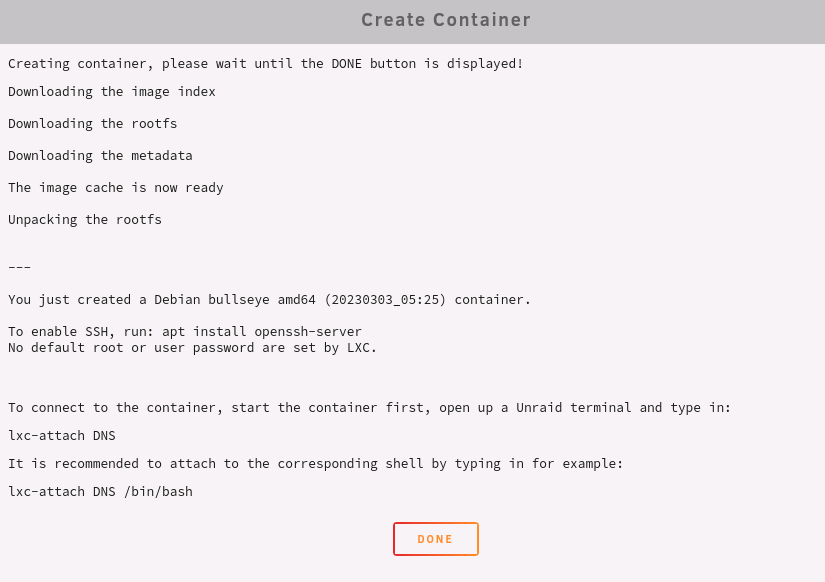
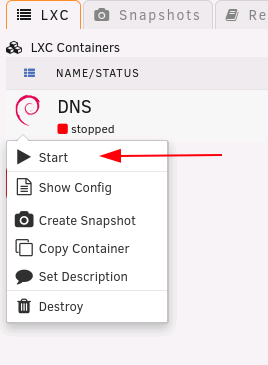
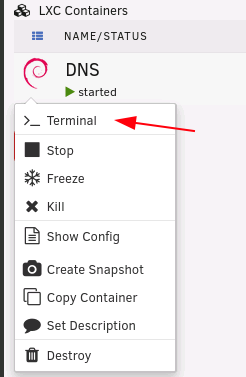
BITTE DIESE ANLEITUNG NICHT MEHR BENUTZEN DA SIE VERALTET IST UND NICHT MEHR AKTUELL! Unbound/AdGuard/LANCache Monolithic in LXC Container Ziel dieser Anleitung soll es sein einen LXC Container aufzusetzen der für die ganzen DNS Anfragen in eurem Netzwerk und auch als LANCache für Blizzard, Steam, EPIC, Windows Updates,... usw. zuständig ist (LANCache ist auch optional). Dies ist speziell für Fritzbox Nutzer interessant die IPVLAN mit Docker Container im br0 Netwerk nicht vernünftig nutzen können um sich so Container im br0 Netzwerk zu ersparen. LANCache ist wie schon oben erwähnt komplett optional und kann als Schritt ausgelassen werden. Eines gleich vorweg, dieses Tutorial sollte auch mit anderen Disributionen funktionieren und auch PiHole statt AdGuard-Home möglich sein jedoch kann ich dazu keine Hilfe leisten da in diesem Tutorial Debian Bullseye verwendet wird und ich nur AdGuard-Home nutze (PiHole Blocklisten werden auch in AdGuard-Home unterstützt). Dieses Tutorial ist für erfahrenere Nutzer gedacht jedoch versuche ich hier alles wirklich komplett Schritt für Schritt zu erklären und obwohl hier oft das Terminal verwendet wird für das initiale Setup/Konfiguration sollten auch neue Unraid Nutzer oder Nutzer die mit dem Terminal nicht vertraut sind damit umgehen können. Ich würde speziell neuen Nutzern empfehlen sich das Tutorial einmal komplett durchzulesen und dann erst zu starten. Bitte auch ganz zum Schluss hier den Appendix lesen, dieser wird erweitert und beantwortet womöglich einige Fragen. Noch ein Hinweis am Rande, das Tutorial ist so geschrieben das ihr nie mehr als ein Terminal Fenster gleichzeitig offen habt, falls doch habt ihr irgendwo einen Schritt überlesen. LXC von der CA App installieren: In Unraid zu den Settings gehen und auf LXC klicken, in dem nächsten Fenster Enable LXC auf "Yes" stellen, den gewünschten Pfad für LXC angeben, das Autostart Delay auf mindestens 20 Sekunden stellen 10 Sekunden reichen vollkommen aus und anschließen auf "Update" klicken: ACHTUNG: Bitte beim Pfad den "richtigen" Pfad angeben (zB: "/mnt/cache/lxc/" oder "/mnt/disk1/lxc/") und nicht den FUSE Pfad ("/mnt/user/lxc/") um möglichen Problemen wie zB Performanceinbrüchen vorzubeugen. Ich würde euch stark empfehlen den LXC Pfad nicht auf das Array zu legen sondern entweder fix auf den Cache oder eine Disk die mittel UnassignedDevices gemounted ist <- der LXC Pfad und dessen Inhalt ist nicht leicht ohne Probleme wo anders hin zu verschieben (bitte beachtet auch das beim Pfad hinten am Ende ein "/" sein muss). WARNUNG: Niemals ein Fix Permissions auf dem LXC Pfad ausführen, das wird/würde alle Container zerstören. Zu LXC wechseln und auf Add Container klicken: Im nächsten Fenster den Container Namen eingeben, evtl. die MAC Adresse notieren bzw. in eurem Router eine Statische IP für diese MAC Adresse vergeben und auf "Create" klicken (hier, im Appendix, ist noch eine kleine Anleitung wie ihr eine Statische IP im Container vergebt): Wenn der Container fertig erstellt wurde solltet ihr diese Ausgabe bekommen, mit "Done" bestätigen und erneut auf LXC klicken: Danach auf das Symbol von unserm neu erstellten LXC Container klicken und "Start" wählen: Nochmals auf den Container klicken und "Terminal" klicken, bitte alle folgenden Befehle in diesem Fenster ausführen: Im nächsten Fenster dann diesen Befehl per Copy/Paste einfügen und Enter drücken (hier installieren wir mal die Basics): apt-get update && apt-get -y install nano curl wget cron Danach installieren wir Docker mit diesem Befehl per Copy/Paste und Enter drücken: curl -fsSL https://get.docker.com -o /tmp/get-docker.sh && \ chmod +x /tmp/get-docker.sh && \ /tmp/get-docker.sh && \ rm /tmp/get-docker.sh Als nächstes müssen wir den DNS Listener der standardmäßig an ist ausschalten und den Dienst neu starten, Copy/Paste und Enter drücken: sed -i "s/#DNSStubListener=yes/DNSStubListener=no/g" /etc/systemd/resolved.conf && \ systemctl restart systemd-resolved Jetzt beginnen wir mit der Installation unserer DNS Container, wir starten hier mit AdGuard-Home mit diesem Befehl, Copy/Paste und Enter drücken: (die Pfade und Ports wurden alle schon dementsprechend angepasst und müssen nicht mehr geändert werden) ACHTUNG: Bitte passt den Wert TZ nach dem "=" aus diesem Befehl an (hier eine Übersicht aller TZ) docker run -d --name='AdGuard-Home' \ --net='bridge' \ -e TZ="Europe/Vienna" \ -v '/docker/adguard_home/workingdir':'/opt/adguardhome/work':'rw' \ -v '/docker/adguard_home/config':'/opt/adguardhome/conf':'rw' \ -p 53:53 -p 53:53/udp -p 3000:3000 \ --restart=unless-stopped \ --no-healthcheck \ 'adguard/adguardhome' Als nächstes installieren wir nun Unbound mit diesem Befehl, Copy/Paste und Enter drücken: ACHTUNG: Bitte passt den Wert TZ nach dem "=" aus diesem Befehl an (hier eine Übersicht aller TZ) docker run -d --name='Unbound' \ --net='container:AdGuard-Home' \ -e TZ="Europe/Vienna" \ -v '/docker/unbound/':'/opt/unbound/etc/unbound':'rw' \ --no-healthcheck \ --restart=unless-stopped \ 'mvance/unbound' Danach diesen Befehl ausführen um Unbound zu Stoppen, die initiale Konfiguration zu löschen und unsere Konfiguration einzufügen, Copy/Paste und Enter drücken: (nicht erschrecken wenn ihr dann etwas seht das Nano anzeigt, das ist ein einfach Texteditor den wir hier benutzen um die Konfiguration einzufügen, dazu mehr im nächsten Schritt) docker container stop Unbound && \ rm /docker/unbound/unbound.conf && \ nano /docker/unbound/unbound.conf Das Terminal sollte jetzt Nano anzeigen und der Cursor sollte in der ersten Zeile stehen, in Nano könnt ihr mit den Pfeiltasten navigieren falls ihr was ändern wollt. Ladet euch diese Datei herunter: unbound.conf, öffnet sie und Copy/Pasted den Inhalt der Datei in das geöffnete Terminal in Nano dort hinein, wenn ihr das gemacht, und noch evtl. Anpassungen vorgenommen habt drückt auf der Tastatur "STRG + S" (das speichert unsere Konfiguration für Unbound) und danach "STRG + X" (damit verlasst ihr den Editor). ACHTUNG: Bitte passt die IP bei der Zeile "access-control: 10.0.0.185/8 allow snoop" mit der Container IP Adresse an die ihr verwendet bzw. verwenden wollt. Hinweis: Wie schon oben geschrieben, navigieren könnt ihr mit den Pfeiltasten und teilweise auch mit der Maus, würde euch aber die Pfeiltasten empfehlen. Jetzt holen wir uns noch die neueste root.hints für Unbound und starten anschließend den Unbound Container wieder mit diesem Befehl, Copy/Paste und Enter drücken: wget -q -O /docker/unbound/root.hints "https://www.internic.net/domain/named.root" && \ docker container start Unbound Das wäre es mal mit dem Initialen Setup von Unbound als nicht Forwardenen DNS Server und AdGuard-Home, wenn ihr LANCache nicht installieren wollt dann zu diesem Post springen, falls Ihr LANCache installieren wollt einfach weiter scrollen.
 1 point
 -
Since adding a bunch of Traefik labels to every container is a pain I created a simple script with xdotool to automate the process The script is available HERE You need to install xdotool to run it. There is currently a bug so for now mouse clicks must be used. Therefore you need to find the right coordinates yourself like explained in the script header. Not sure if it works on Windows natively yet, but I guess you can just use WSL to run it. Have fun with all the time you saved adding labels manually. xdotool-demo.mp41 point
-
This feature was introduced because folders being only client side, it wouldn't affect the real order of the containers, this is not a problem normally, but it is a problem when you enable autostart, to fix the problem reorder one container/folder and refresh the page, the color of the icon won't change if you don't refresh.1 point
-
I let @CiscoCoreX do several „echo 1 > /boot/test.xml“ which delayed up to 6 seconds. (Btw, could you test „echo 1 > /mnt/user/someshare/test.txt“ with started array and real share name?) downgrading fixes all delays. The issue seems to be Linux related. At least nothing to do with webgui. anyway, Iam out now. The slowlog brought a new finding which was my only idea 😂 Maybe LimeTech can share some thoughts on this.1 point
-
naja, bist ja auch bereits ne Weile dabei ... mal zum Spaß, Jelly stoppen, ../appdata/jellyfin backup erstellen (cp -r /mnt/user/appdata/jellyfin /mnt/user/appdata/jellyfin_backup) screenshot der vorhandenen settings machen ... docker Jelly fin aus der anderen repo installieren und schauen das der config und die library pfade passen, ebenco falls igpu oder dgpu (nvidia...) Variablen auch da sind, docker starten ... schauen was passiert ... best case, alles erledigt, worst case, entfernen, backup wieder umbenennen (nachdem man den anderen gelöscht hat), "alten" Docker wieder installieren ...1 point
-
Yes. Can be confusing, too: If you would delete the 254G backup and repeat the command, the 154G backup becomes "bigger". And of course: If you delete the 6.0T backup, the 154G backup will "become" 6.x T.1 point
-
Thanks @Kilrah and @JorgeB for your assistance. I have been able to recreate my original VM's with no issues using the steps I mentioned above in the comment I marked as the solution. I appreciate the help.1 point
-
Seite 1 ... mit Bildern ... und wie @jj1987 erwähnte, nur mit Plex Pass macht es Sinn ...1 point
-
Yes, this line means a new boot.1 point
-
... i know ... i just mirrored my complete array as i switched from parity setup to simple mirror to my 2nd Unraid. so i just simply used open files lookup on the drive ... lsof -a /mnt/source/ lsof -a /mnt/target/ but i totally aggree and thats why i also opened the "request" to "fix" this behaviour ...1 point
-
Try this address: http://192.168.68.5 If that does not work, do this: Type diagnostics after logging-in on the console. Look to see which folder/directory the Diagnostics file will be written to on the Unraid boot drive. Use poweroff to shut your server down and upload that Diagnostics file in a new post in this thread.1 point
-
Uninstall and reinstall, doing nothing more, did the trick. :)))) It really works a lot faster. I don't know what happened1 point
-
Hast du denn einen Plex Pass? Ohne geht nämlich kein HW Transcoding. Und die Hinweise wie eine Nvidia graka eingebunden werden muss, hast du in dem Docker Template auch nachgelesen und entsprechend umgesetzt?1 point
-
Welchen Netzwerktyp verwendest du für Docker? IPVLAN oder MACVLAN? Bei ersterem kommt die Fritzbox nämlich durchaus durcheinander bei den dockern. Bei letzterem muss man sich die Releasenotes zu 6.12.x durchlesen und befolgen (wobei das andere Probleme produzieren würde, der Hinweis dient nur der Vollständigkeit)1 point
-
Got everything back in working order. Thanks, you're a rock star!1 point
-
Nein. Bei drei Festplatten werden die Daten verteilt und mit Hilfe der Parity gesichert. Da hast eine Information auf beide Festplatten, nennen wir sie A + B. Daraus wird eine Information für die Parity erzeugt. Nennen wir sie Information C. Die Formel ist A + B = C. Fällt nun eine Datenplatte aus, haben wir in der Gleichung eine unbekannte. Das kann man schnell lösen. Nehmen wir an, die Daten aus Platte A sind defekt. Dann ist A = C - B. So würde eine Datenplatte also rekonstruiert werden können. Fällt die Parity aus, passiert erst mal nichts, es sind ja alle Klardaten weiter vorhanden. Ungefähr klar wie unraid funktioniert? Nein, raucht die Parity ab bei der Wiederherstellung lächelst du kurz, ziehst deine Backupfestplatte aus der Schublade und machst völlig tiefen entspannt weiter.1 point
-
Parity sync completed without any errors, thanks again for your help @JorgeB1 point
-
Enable the syslog server and post that after a crash.1 point
-
Ich hatte ja auch was von Verfügbarkeit geschrieben. Unraid, oder auch anderen Raidsysteme, bieten nur eine Datenverfügbarkeit. Diese steigt mit den Redundanzen der Festplatten, das ist richtig. Bei drei Festplatten ist die Wahrscheinlichkeit, dass zwei Aufgrund eines technischen Defekts, welches nur die Festplatten und nicht das gesamte System betrifft, ZEITGLEICH ausfallen so gering, dass ich es als quasi unmöglich deklarieren würde. Wenn eine Festplatte ausfällt, bringt der Versender deines Vertrauens dir innerhalb 24 Stunden eine Ersatzplatte. Die tauscht du mit deiner defekten und freust dich alles richtig gemacht zu haben. In der Zwischenzeit kannst du weiter auf deine Daten zugreifen, das Array ist auch mit einer Platte erreichbar. Vielleicht deutlich langsamer, aber erreichbar. Zeit ein gutes Buch zu lesen, bis der Postbote zweimal klingelt. Das alles hat jedoch nichts und gar nichts mit Datensicherheit zu tun. Unraid schützt dich nicht vor physikalischen Gefahren, wie Brand, Blitzschlag, Hochwasser. Auch nicht vor Layer8 Fehlern. Wenn du heute Daten löscht und morgen merkst das es die falschen waren, holt dir keine Parityplatte der Welt die Daten wieder zurück. All diese Fälle, kann man nur über ein Backup abdecken. Wie mpc561 schon sagt, wichtige Daten existieren immer an drei Orten. Einmal dem Ort wo sie als Wirksystem vorgehalten werden, auf einem vom System getrennten Speichermedium und auf einem weiteren Medium, welches an einem anderen Ort als das Wirksystem steht. Z.B. Cloud, oder aber auch ein anderes Haus. Das nennt man auch feuerfestes Backup. Und hier kannst du dann auch verschiedene Stände sichern, so das wenn du merkst das jemand den falschen Ordner gelöscht hat, du diesen aus wieder zurückholen kannst. Ich empfehle drei Festplatten. Maximale Größe was der Geldbeutel hergibt. Platte 1 und 2 im Unraid. Parity und Daten. Platte drei per SATA-USB als Backupplatte nutzen. Diese nach dem Backup immer abziehen und sicher lagen.1 point
-
gar keiner, müsste so laufen außer die IP wäre vergeben ... du vergibst ja die IP im Docker selbst fix.1 point
-
Servus @fcscholz du bist ja auf der Aktuellen Version 6.12.6, hast eine Fritzbox und macvlan. Hast du die Hinweise in den ReleaseNotes zu macvlan gelesen und konfiguriert? https://docs.unraid.net/unraid-os/release-notes/6.12.4/#fix-for-macvlan-call-traces Noch was, du musst lokale IP Adressen nicht verschleiern 😉 Die .100 ist aber nicht in deinem DHCP-Bereich der Fritzbox?1 point
-
I just use DNS entries but I guess rewrite does the same yes...1 point
-
Quite likely then. Have you tried power-cycling the server to see if that brings it online?1 point
-
It's worth a try.1 point
-
It looks like both of you are using the old plugin, since the plugin date from my fork is: 2023.11.22 and not 2023.04.06 Please look at the first recommended post in this thread on top, uninstall the old plugin and install my fork since @zhtengw seems like to be not active anymore and that's why I forked the plugin (I explained this in the recommended post).1 point
-
You can give it a 2nd chance, any more errors I would replace it.1 point
-
Ich habe nen altes Thermaltake Core V1 und da kann habe ich zwei Halterungen für Disks, die nebeneinander angeordnet werden. Bei der Montage und dem Problem mit dem Kabel hätte ich gern mal mein langes Gesicht gesehen. ^^1 point
-
A typical "UNRAID not understood" and "Chicken & Egg" Problem. A VM on UNRAID will not start without the array beeing started and samba is up and running (the shares are available). So there is NO WAY to delay SAMBA until your Domain Controller is up. You either live with the (I bet) excessive delays or you correct your error and move off your PDC to a real computer (or VM elsewhere).1 point
-
Oh man, had a lot of things to do so I wasn't able to visit the forum in the last month, sry. Probably you don't need it anymore but I used the asus ryujin 2 (Display is unfortunately useless in my chassis). I chose this AIO, because it's compact with a big radiator and it cooles the VRM with an additional fan on the head of the cooler. Also I found decent tests and reviews, which was actually not that easy for other AIOs in terms of thermal performance. BTW: the IPMI is designed to be placed in the first slot. My guess is it is going to work in any PCIe, but considering the cable management I don't know if it would fit any layout. It is pretty slim tho.1 point
-
5 days and there have been no more crashes. Looks like the Macvlan to ipvlan was the fix. Cheers.1 point
-
You don't need the common script in your situation. As for a delay to mount remote shares, go to Settings->Unassigned Devices and set the 'Remote Share Mount Wait Time' to the time you want to wait to give the VM time to start. It defaults to 5 seconds and that's probably not enough time for your situation.1 point
-
It is magic. 🎅🎄🎄🎄1 point
-
@JorgeB Testing with 6.12.6 (kernel 6.1.64) right now, uptime 30+ minutes and so far without crash. So it looks like this revert helped.1 point
-
That seems to have worked! Thank you so much! I'm backing up my appdata directory1 point
-
I've pushed an update to the plugin so that it blacklist all cdc drivers.1 point
-
I just upgraded one server from 6.11.5 to 6.12.6, after following the steps listed by @ConnerVT. Everything went fine, although I had a small scare with my NUT plugin. It was removed automatically because it wasn't compatible with the new OS version. Fortunately there is a new compatible version, although it's a slightly different name: Network UPS Tools (NUT) for UNRAID. I was worried that I'd have to input all the NUT parameters again, because it had been a bit of a struggle the first time, but the new plug-in seems to have picked up everything fine and I have the reassuring UPS details in my GUI footer as before. I don't know if there's a way to turn off docker containers or VMs starting automatically at a global level, so I turned off each one manually. For this server it was simple, but when I get round to my other server, I will definitely record which ones are set to start automatically because I'm not sure I would remember which ones I had set to start automatically.1 point
-
Keep in mind that having this can cause issues with a future Unraid update, so any devices issues after updating try to remember disabling the script first and retesting.1 point
-
After some more digging, I found this pull request in the VIM GitHub repository. https://github.com/vim/vim/pull/12996 I also found a newer version of VIM (9.0.2127) on https://packages.slackware.com/. This version of VIM needs libsodium version 1.0.19 (which is also to be found on https://packages.slackware.com/. But after manually installing these two packages. I got the following errors: vim: /lib64/libc.so.6: version `GLIBC_2.38' not found (required by vim) vim: /lib64/libm.so.6: version `GLIBC_2.38' not found (required by vim) This suggests to also upgrade glibc to version 2.38. But, I'm not sure how this will affect the working of UnRaid itself.1 point
-
The reason for the spin up is that the image file is check for size, it uses the same process and the main VM screen even thou you don't see the info in the Dashboard. Will look to see if I can put a fix in. Other solutions are To move to a drive that doesn't spin down. Remove ISOs from the VM template if not required.1 point
-
FWIW, I found this method in Reddit that seemed to work for me until they fix the log bug. But note if you have qbittorrent internet facing, it's a risk. Adding this line under [Preferences], in the config file, works, for setting the default password manually to: adminadmin WebUI\Password_PBKDF2="@ByteArray(ARQ77eY1NUZaQsuDHbIMCA==:0WMRkYTUWVT9wVvdDtHAjU9b3b7uB8NR1Gur2hmQCvCDpm39Q+PsJRJPaCU51dEiz+dTzh8qbPsL8WkFljQYFQ==)"1 point
-
This just happened to me in Version 6.12.4 . I found a workaround that doesn't require a reboot which is nice . But you have to stop your docker daemon (disable docker in the settings). Solution: Disable docker . run the command "fusermount -u /mnt/user" . You will now be able to stop the array . Enable docker . Start the array and everything will be back to normal.1 point
-
I am experiencing this issue too. Every 3-4 days, I can no longer start any docker containers. I get the following "no space on device" kind of error for each container. docker: Error response from daemon: failed to create shim task: OCI runtime create failed: runc create failed: unable to start container process: unable to apply cgroup configuration: mkdir /sys/fs/cgroup/docker/92f1ef37cbe933b33651c450bfb566b2243b365d4bae76b791f7c5f990f5ec67: no space left on device: unknown. Unlike the posters above me, I am not running the nvidia container and my /run directory is not being filled. I tried the suggestions posted there anyways with no success. I can't find any directory or drive that is being filled. df -h yields nothing concerning. A reboot fixes this, but this is extremely annoying.

 1 point
 -
I think the problem is that its not correctly handled on unraids side, so that would be probably a very easy fix if "already unmounted" = dont try to unmount...1 point
-
Es geht auch einfach... Nach der Installation: 1. virtio-win-gt.msi installieren > VM Neustarten 2. Gerätemanager öffnen 3. "Red Hat VirtIO Ethernet Adapter" Rechtsklick > Gerät deinstallieren 4. "Nach geänderter Hardware suchen" klicken 5. "Ethernet-Controller" Rechtsklick > Treiber aktualisieren 6. virtio ISO auswählen und Weiter Und funktioniert Im prinzip einfach nur nach der Installation von virtio den Treiber im Gerätemanager löschen und über die virtio ISO installieren. Funktioniert auf allen Settings Getestet auf: 7x Win10_22H2_x64_German 3x Win10_21H2_x64_German Gerät: Q35-7.1


 1 point
 -
Unraid does not care where drives are physically connected. It simply recognises drives using their serial numbers.1 point
-
A easier method of discovering the right card to passthrough is running: #!/bin/bash for ETH in $(find /sys/devices/ -type d -iname "eth[0-9]"); do port=$(basename $ETH); export $(cat $ETH/device/uevent); link_status=$(cat $ETH/operstate); desc=$(lspci -d $PCI_ID| cut -d ':' -f3) pci_bus=$(echo $PCI_SLOT_NAME|sed -e 's#0000:##') echo -e "Found NIC: $port\n Name: $desc\n PCI id: $PCI_ID\n PCI bus: $pci_bus\n Status: $link_status\n" done1 point