Leaderboard


Popular Content
Showing content with the highest reputation on 03/25/24 in all areas
-
I think the value proposition of Unraid is not being communicated to users and is getting lost. Unraid is primarily about the array - i.e. shfs using software real time parity, mix/match disk sizes, and NOT striping data. TrueNas or any of the custom NAS OS's don't do this. THIS is what keeps your data safe and allows you to grow. You can use mergerfs to combine disks. But the only alternative for parity is snapraid and its not real time. Everything else - vm's, dockers, community apps. all of that came much later, all of it its just a wrapper around open source projects you can use on any other distro or custom OS, with maybe a little bit more work. No one else has the data safefy. Not if you want to avoid striping and keep data in native format.3 points
-
Aber das wird einen großen Teil deinens Stromverbauchs ausmachen, überleg dir lieber das auf Docker um zu ziehen.2 points
-
Hallo zusammen, Nachdem ich als Unraid & Docker-Anfänger erst selbst vor dem Thema stand wie man in Unraid PiHole / Adguard & Unbound installieren könnte, hier die Schritte, die bei mir gut funktioniert haben. Vielleicht hilft es dem ein oder anderen bei dem eigenen Setup - Ideen zur Verbesserung, Tipps, Korrekturen usw. sind natürlich immer gerne gesehen Grundsätzlich gibt es verschiedene Kombinationsmöglichkeiten, weshalb ich die Beschreibung auf verschiedene Teile aufbreche damit es übersichtlicher wird. So kann man nach eigener Präferenz dann PiHole oder Adguard mit Unbound kombineren. Übersicht: Hintergrundsdetails & Vorbereitung & Test- und Erweiterungsmöglichkeiten Setup von PiHole Setup von Adguard Optionen zur Bekanntmachung des PiHole / Adguard Home im LAN Setup von Unbound PiHole & Unbound Adguard & Unbound Filterlisten hinzufügen Warnmeldungen im Unbound Log Stand 2024-02-23 läuft es auf: Unraid 6.12.8 / PiHole 2024.02.0 / Adguard 0.107.44 / Unbound 1.19.0 Hintergrundsdetails zum Verständnis Was machen eigentlich PiHole & Unbound genau? >Klick< Was ist DOT / DOH / DNSSEC und was bringt es? DNSSEC: Gewährt Authentizität & Integrität der DNS Abfragen >Klick< DOT / DOH: Gewährt Vertraulichkeit durch Verschlüsselung der DNS Abfragen >Klick< Rekursiver DNS: Gewährt Privatsphäre (Data Privacy) durch die rekursive Durchführung der DNS Abfragen >Klick< Ich habe mich entschieden PiHole bzw. Adguard und Unbound getrennt laufen zu lassen, da man damit zum einen schneller die jeweils neuste Version erhält und zum anderen, damit man einen Einblick (und damit Kontrolle) über das Setup behält Die Docker-Container laufen mit eigenen IPs auf dem br0 Netzwerk. So kann man bspw. den PiHole einfach gegen Adguard tauschen und braucht die Unbound Installation an sich nicht ändern. Oder man nutzt nur Unbound ohne PiHole oder oder oder.. Durch die Nutzung von eigenen IPs pro Docker per br0 hat man keine Probleme mit doppelt belegten Ports in diesem Fall dem Standard-Port 53 für DNS als auch dem Webinterface auf Port 80 von PiHole / Adguard In den Screenshots ist mein lokales Netzwerk, also die 192.168.0.x, abgebildet. PiHole läuft bei mir also auf der 192.168.0.5, Unbound auf der 192.168.0.6, Adguard Home auf der 192.168.0.4 Die IPs müssen entsprechend eurem lokalen Netzwerk angepasst werden Bei einer Fritzbox ist das Standardnetz idR. die 192.168.178.x IPv6 habe ich im lokalen Netz in meinem Router komplett deaktiviert, da die "reverse" Namensauflösung von lokalen Adressen zu Gerätenamen im PiHole (unter "Conditional forwarding") mit ipv6 bei mir nicht funktioniert hat. Die reine Funktion als DNS sollte jedoch auch mit IPv6 funktionieren und kann, wenn benötigt, an verschiedenen Stellen in der Konfiguration aktiviert werden PiHole kann DNSSEC, was wir jedoch nicht benötigen, da die eigentliche DNS Abfragen von Unbound (er sollte automatisch DNSSEC machen) durchgeführt werden. Ebenso braucht man bei Adguard Home DOT & DOH meines Wissens nach nicht aktivieren, da es nur für die Strecke bis zum Unbound aktiv wäre Unbound an sich ist ohne weitere Änderungen so konfiguriert, dass es die DNS Abfragen per DOT an einen Cloudflare DNS Server weiterleitet. In dieser Anleitung geht es jedoch explizit um die Konfiguration als rekursiven DNS Resolver, wodurch eine kleine Änderung an der Konfiguration notwendig wird Als rekursiver DNS Resolver macht Unbound zwar DNSSEC aber DOT/DOH ist aktuell nicht gleichzeitig möglich PiHole & Adguard können Ads auf Youtube aktuell (leider) nicht blockieren, da die Ads von den selben Servern stammen, wie das eigentliche Video. Hierzu empfielt es sich zumindest am Mac/Pc zusätzlich bspw. UBlock als Addon im Browser zu installieren Mit "dig" kann man auf der Unraid-Kommandozeile direkt testen, ob PiHole / Adguard / Unbound funktionieren, bevor die Systeme miteinander verbunden werden und ohne die Änderung an das komplette lokale Netzwerk zu verteilen. Alternativ kann man es auch von einem anderen Computer in eurem LAN testen: Auf Win10/11 über ein "nslookup www.heise.de <IP_von_PiHole/Adguard/Unbound>" auf der Kommandozeile Auf MacOS über ein "dig www.heise.de <IP_von_PiHole/Adguard/Unbound>" auf der Kommandozeile Vorbereitung Als Vorbereitung für die Nutzung der DNS Tests per "dig", ist in den Unraid Einstellungen unter "Settings" -> "Docker" -> "Host access to custom networks" auf "enabled" zu setzten. Das sollte dann so aussehen (mit euren eventuell dort zusätzlich durchgeführen Änderungen & LAN Einstellung für Docker) Nach den Tests kann es wieder deaktiviert werden, wenn ihr es nicht für andere Sachen (Stichwort Erweiterung Wireguard) benötigt. Die Verbindung zu und zwischen PiHole / Adguard & Unbound funktioniert auch ohne dem Host (in dem Fall also Unraid an sich) Zugriff auf das br0 Netzwerk zu geben. Testmöglichkeiten Nach den erfolgreichen Tests mit "dig" und der Verknüpfung von PiHole / Adguard mit Unbound stellt sich die Frage, ob es denn nun funktioniert. Da ja (hoffentlich) alles "einfach" funktioniert, hier ein paar Links, welche bei diesen Tests helfen: https://d3ward.github.io/toolz/adblock oder https://fuzzthepiguy.tech/adtest/ Testet die Ad-Lists in PiHole / Adguard durch verschiedene bekannte Ad-Seiten. Je nachdem wie umfangreich eure Listen sind, sollte alles geblockt werden. Für einen ersten Eindruck ok aber wichtiger ist, wie gut Werbung auf den von euch besuchten Webseiten - also in eurem Alltagsgebrauch - geblockt wird https://www.ipchicken.com Zeigt die eigene IP an, welche wir bei den nächsten Tests nutzen können https://internet.nl/connection Grundlegende Details zu ipv4 / ipv6 & DNS. Hier taucht die eigene IP als DNS Server auf, da wir Unbound als DNS selbst betreiben. DNSSEC sollte positiv sein https://www.perfect-privacy.com/en/tests/dns-leaktest Zeigt den genutzten DNS Server an. Dies sollte wiederum die eigene IP sein, da wir Unbound als DNS selbst betreiben https://0skar.cz/dns/en/ Testet explizit DNSSEC und sollte mit Unbound alles positiv sein https://www.grc.com/dns/Benchmark.htm Interessantes Tools für DNS Benchmarks. Da wir mit Unbind einen eigenen rekursiven Resolver haben, sollten wir beim ersten Durchlauf langsamer sein, als so mancher Public Resolver wie 1.1.1.1 oder 8.8.8.8. Der zweite Durchlauf ist möglicherweise schneller, da die Test-Daten bereits im Cache beim PiHole / Adguard / Unbound liegen. Durch die rekursive Abfragen und die DNSSEC Validierung sowie das Adblocking, wird das eigene Setup jedoch immer etwas länger (im Millisekunden Bereich) für eine DNS Anfrage brauchen, als eine Anfrage direkt an einen Public Resolver. Im Alltag sollte dies jedoch nicht bemerkbar und mit Blick auf die Vorteile akzeptabel sein Erweiterungsmöglichkeiten Eine Erweiterung des PiHole/Adguard & Unbound durch Unraids Wireguard-VPN bspw. um das Handy unterwegs per VPN anzubinden und über den durch den eigenen, optimierten Internetzugang zu schicken, bietet sich an. Ich habe hierzu die folgende Anleitung genutzt >Klick< Meiner Erfahrung nach ist hierbei zu beachten: Der IP Bereich eures lokalen LAN sollte nicht den typischen LAN Vorgaben entsprechen und bspw. auf 192.168.0.x umgestellt werden. Damit beugt ihr vor, dass wenn ihr euch mit eurem Handy gerade bspw. im WLAN eurer Freundin/Oma/Kumpel.. befindet und diese die selbe IP Range im (W)LAN haben wie ihr daheim, es zu Routing Problemen mit eurem VPN kommt. Das heisst einmal den DHCP & LAN Settings in eurem Router anpassen In der Konfiguration von Wireguard ist die IP von PiHole/Adguard als DNS einzutragen Der "Host access to custom networks" in den Docker Settings von Unraid muss auf "enabled" stehen, damit Wireguard mit diesen sprechen kann Für den Zugriff eurer Geräte aus dem VPN auf lokale Geräte (PiHole/Adguard Oberfläche..) ist im Router noch eine manuelle Route notwendig, damit der von Wireguard genutzte IP Bereich (10.x.x.x) mit eurem lokalen LAN (192.x.x.x) sprechen kann. Das sollte dann so aussehen:


 1 point
 -
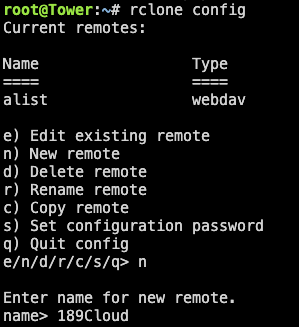
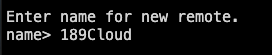
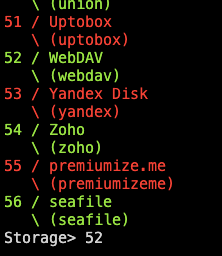
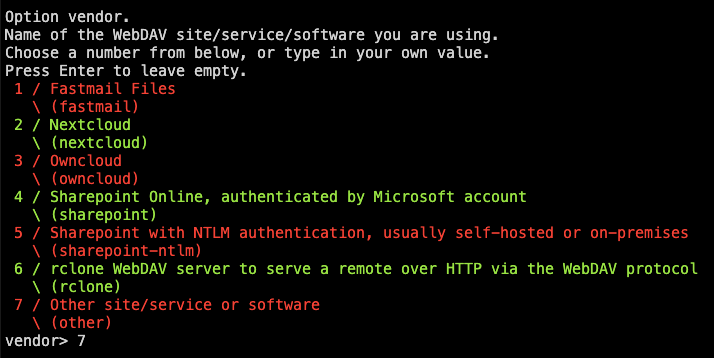
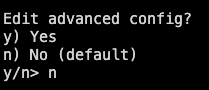
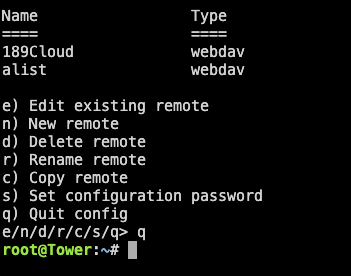
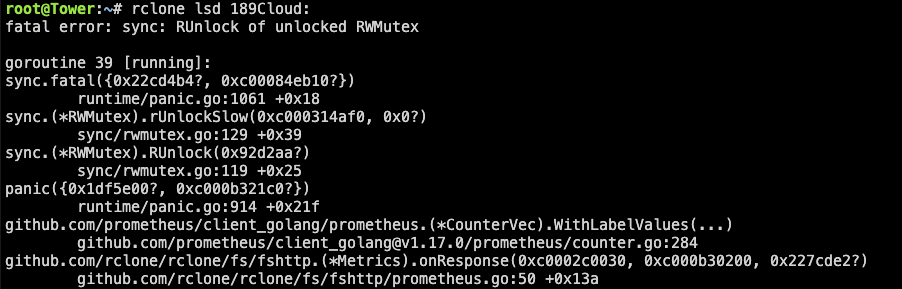
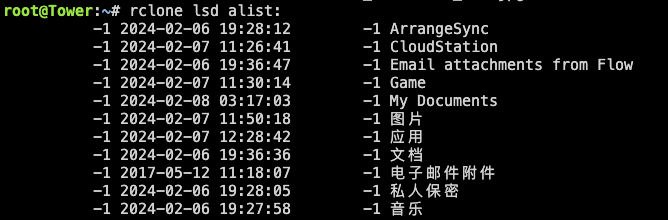
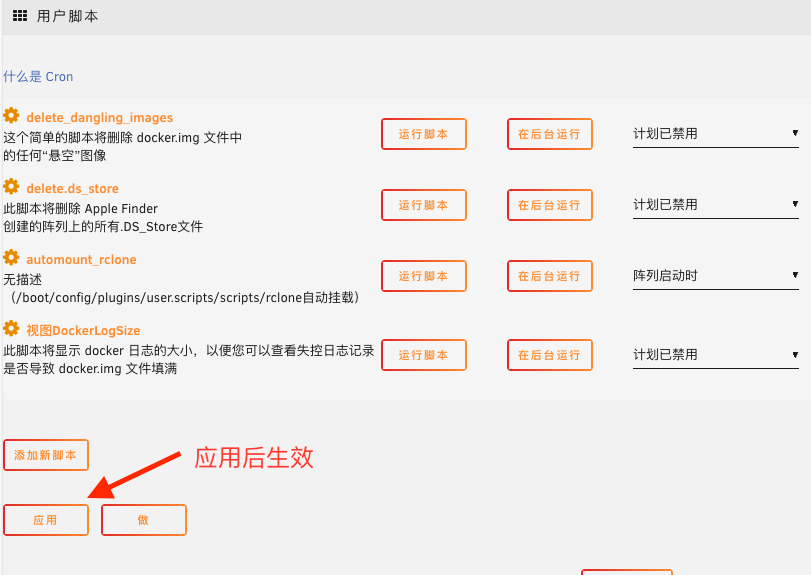
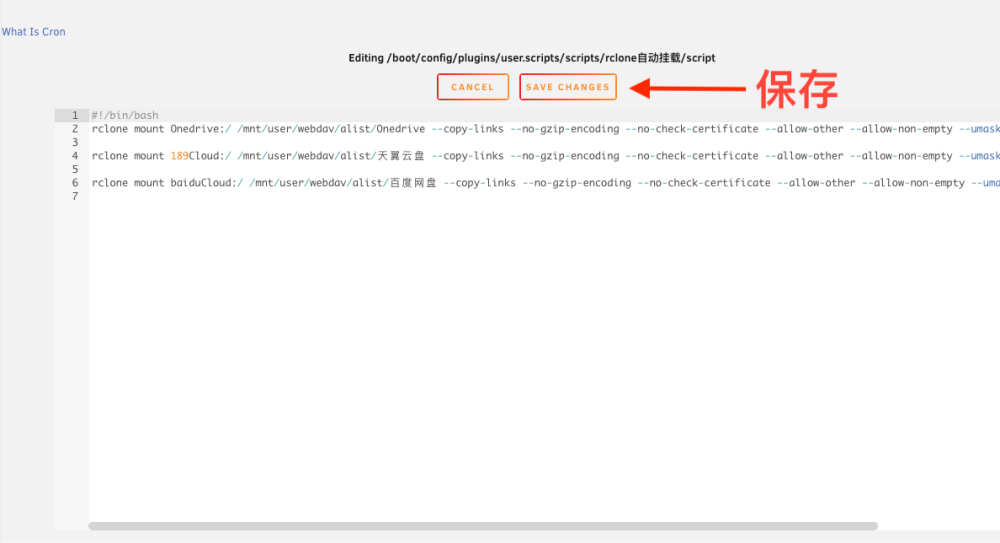
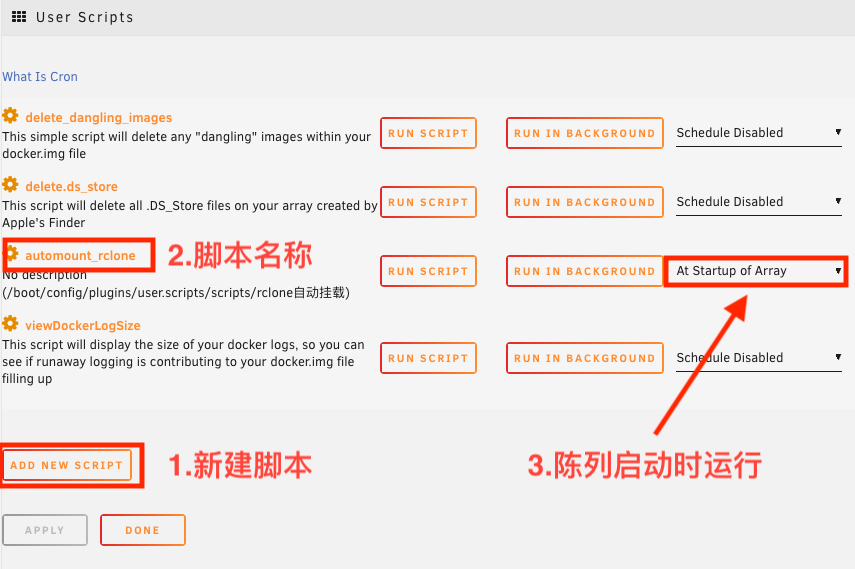
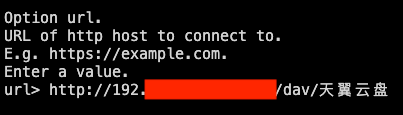
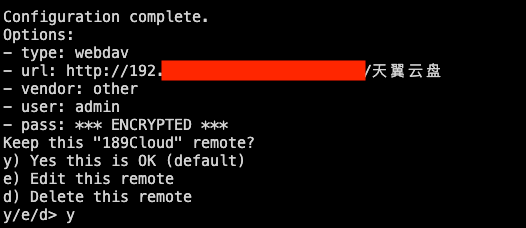
rclone挂载网盘到本地(Alist篇) alist 最近折腾unraid存储服务器,对于云盘有很多的APP特别麻烦,所以想把所有不同的网盘都放在一起进行管理,先是用了CloudDrive2感觉很不错,图形界面设置很简单,小白都会。我也喜欢,但免费版只能挂两个云盘,一个本地。着实有点失望,开终身会员499.论价格只是unraid一半,但对免费用户来说 ,有点小贵。直到听说alist的大名,rclone是全系列的产品。苹果,Windows,linux等系统全支持。以前还没有用过,这次就来试试。如遇到问题可以去官方网站研究。 本次我们跳过所有官方方法安装,在unraid安装插件来实现本地挂载云盘。 安装 1.打开unRaid,到应用 2.搜索“rclone” 3.最新版会有两个rclone,一个docker版,一个插件版。 4.我们下载插件版。 5.如果无法安装。先下载一个docker版的v2rayA。架梯子安装。我用正版unRaid没有任何系统设置,把梯子架好后,添加节点。选择美丽的节点。运行梯子。就能正常下载rclone,不像网上说的那样要在系统go文件,或是在etc网络文件中添加设置才能用 。 5.安装完成后,选择插件,看看rclone有没有在插件中。如果有。 6.点右上角的“终端”打开 7.下面我们将开始配置rclone。 配置rclone rclone config # 进入rclone设置 1. No remotes found, make a new one? n) New remote # 创建新配置 s) Set configuration password # 为配置设置密码 q) Quit config # 退出配置 n/s/q> n enter。 #这里选择n 2. Enter name for new remote. name> 189Cloud enter。 # 设置名字(网络教程都是用remote为配置名)。 3. Option Storage. Type of storage to configure. Choose a number from below, or type in your own value. 前面省略50种连接……. 51 / Uptobox \ (uptobox) 52 / WebDAV \ (webdav) 53 / Yandex Disk \ (yandex) 54 / Zoho \ (zoho) 55 / premiumize.me \ (premiumizeme) 56 / seafile \ (seafile) Storage>52 enter。 #输入你做连接的服务器序号,这儿我们用webdav做连接,所以选择52 4. Option url. URL of http host to connect to. E.g. https://example.com. Enter a value. url> http://192.168.xxx.xxx:5244/dav/天翼云盘 enter # 设置远程地址url: http://your_alist_ip:port/dav/网盘名 #这里在alist的地址和端口后加/dav,是alist官方端口挂载要求的 5. # 这里选7就可以了,1-6都不是我们使用的 Name of the WebDAV site/service/software you are using Choose a number from below, or type in your own value Option vendor. Name of the WebDAV site/service/software you are using. Choose a number from below, or type in your own value. Press Enter to leave empty. 1 / Fastmail Files \ (fastmail) 2 / Nextcloud \ (nextcloud) 3 / Owncloud \ (owncloud) 4 / Sharepoint Online, authenticated by Microsoft account \ (sharepoint) 5 / Sharepoint with NTLM authentication, usually self-hosted or on-premises \ (sharepoint-ntlm) 6 / rclone WebDAV server to serve a remote over HTTP via the WebDAV protocol \ (rclone) 7 / Other site/service or software \ (other) vendor>7 enter。 #因为我们选择的是webdav方法挂载云盘。这里选择其它方式连接到服务器就可以了 6. Option user. User name. In case NTLM authentication is used, the username should be in the format 'Domain\User'. Enter a value. Press Enter to leave empty. user> admin #这里是你alist的用户名 7. Option pass. Password. Choose an alternative below. Press Enter for the default (n). y) Yes, type in my own password #是的,输入我自己的密码 g) Generate random password #生成随机密码 n) No, leave this optional password blank (default) # 否,将此可选密码留空(默认) y/g/n>y enter #这里输入y Enter the password: password: #这输入你的密码,密码是看不到的 Confirm the password: password: #再次输入你的密码 enter 8. Option bearer_token. Bearer token instead of user/pass (e.g. a Macaroon). Enter a value. Press Enter to leave empty. bearer_token> enter # 这里是填写密钥的,如果没有可以留空 #直接回车 9. Edit advanced config? y) Yes n) No (default) y/n>n enter #默认配置就可以了 #高级配置或默认配置。 10. Configuration complete. Options: - type: webdav - url: http://192.168.xxx.xxx:5244/dav/天翼云盘 - vendor: other - user: admin - pass: *** ENCRYPTED *** Keep this "189Cloud" remote? y) Yes this is OK (default) #是的,我确认默认配置 e) Edit this remote #编辑配置 d) Delete this remote #删除配置 y/e/d> y enter 确认配置无误后,确认。 11. Current remotes: Name Type ==== ==== 189Cloud webdav alist webdav e) Edit existing remote n) New remote d) Delete remote r) Rename remote c) Copy remote s) Set configuration password q) Quit config e/n/d/r/c/s/q> q # 最后按q退出设置 挂载到本地 1: 查看是否连接成功,使用以下命令可以确认是否已经挂载上了alist和天翼云盘 rclone lsd Onedrive: rclone lsd 189Cloud: # 查看alist的文件目录 #查看天翼云盘的文件目录 2: rclone ls Onedrive: rclone ls 189Cloud: # 查看Onedrive的文件 #查看天翼云盘的文件 如果发生下面的结构,应该检查,你输入的运行脚本是不是正确,查找错误,更正后,就可以看到你的网盘结构了。 # 一、 前台模式挂载到本地 (建议用户使用后台挂载) #1.将Onedrive挂载到本地目录/webdav rclone mount Onedrive:/ /mnt/user/webdav/alist/Onedrive --copy-links --no-gzip-encoding --no-check-certificate --allow- other --allow-non-empty --umask 000 --use-mmap 挂载完成后,发现控制台就卡住了,在官方文档看了半天,发现这是前台命令,会一直运行,ctrl+c之后就会退出本地挂载。 #2. 将天翼挂载到本地目录/webdav (建议用户使用后台挂载) rclone mount 189Cloud:/ /mnt/user/webdav/alist/189Cloud --copy-links --no-gzip-encoding --no-check-certificate --allow-other --allow-non-empty --umask 000 --use-mmap 二、 后台模式挂载到本地 # 1.将Onedrive挂载到本地目录/webdav # --daemon 强制后台模式 rclone mount Onedrive:/ /mnt/user/webdav/alist/Onedrive --copy-links --no-gzip-encoding --no-check-certificate --allow-other --allow-non-empty --umask 000 --use-mmap --daemon 官方文档只是提了以下这个命令,并没有太详细的信息。 # 2.将189Cloud挂载到本地目录/webdav # --daemon 强制后台模式 rclone mount 189Cloud:/ /mnt/user/webdav/alist/天翼云盘 --copy-links --no-gzip-encoding --no-check-certificate --allow-other --allow-non-empty --umask 000 --use-mmap --daemon # 3.将189Cloud挂载到本地目录/webdav # --daemon 强制后台模式 rclone mount baiduCloud:/ /mnt/user/webdav/alist/百度网盘 --copy-links --no-gzip-encoding --no-check-certificate --allow-other --allow-non-empty --umask 000 --use-mmap --daemon 其它的云盘挂都是一样的配置。只是把下面改在成你所用的云盘就行。 Onedrive:/ /mnt/user/webdav/alist/Onedrive 189Cloud:/ /mnt/user/webdav/alist/天翼云盘 baiduCloud:/ /mnt/user/webdav/alist/百度网盘 115:/ /mnt/user/webdav/alist/115 结构简析: Onedrive:/ /mnt/user/webdav/alist/Onedrive Onedrive:/ rclone配置名称(自己创建)。为网盘的名字不特指微软网盘test为要挂载的网盘文件夹路径,不填留为挂载整个网盘 /mnt/user/rclone/onedrive 本地用于挂载的目录 关于其他参数含义,可自行查阅最下方命令说明 如需要给emby之类使用,挂载文件夹不显示文件,请修改--umask 000 在emby终端输入 umask / # umask 0022 / # 将示例中--umask 000修改为--umask 0022emby即可正常访问文件 解除本地挂载 # 解除本地挂载,后面跟的是挂载的本地目录 # 当自动取消挂载失败时,也可以这样手动取消挂载 fusermount -qzu /webdav 开机自动挂载 上面的手动挂载方式,在机器重启后,就失效了,每次都要手动在设置一遍,很麻烦。我们可以使用service文件来进行自动挂载。 一、使用User Scripts插件新建开机任务 在 Unraid 应用中心安装 User Script 插件。安装后打开插件,添加新脚本,此处命名为 automount_rclone 1. 添加新脚本 2. 脚本名称命名为:automount_rclone 3. 保存 4. 编辑脚本 5. 把要挂载的网盘的后台运行脚本全都添加到编辑栏中 6. 如果有两条或更多回车后再添加一条。 7. 保存脚本。 8. 计划任务以“陈列启动时运行” 9. Apply(应用) 10.Done(完成) 设置好之后,就可以开机启动阵列自动挂载了。 二、 修改Service文件新建开机任务,输入示例命令 (本人未测试,但作为保留) 设置service文件 #创建service文件 vim /usr/lib/systemd/system/rclone.service 文件内容: [Unit] Description=rclone [Service] User=root ExecStart=/usr/bin/rclone mount alist: /webdav --copy-links --no-gzip-encoding --no-check-certificate --allow-other --allow-non-empty --umask 000 --use-mmap [Install] WantedBy=multi-user.target 设置开机自启 # reload守护进程 systemctl daemon-reload # 设置service文件自启 systemctl enable rclone.service # 启动service文件 systemctl start rclone.service 总结 相对来说alist配置配置还是比较简单,很快就能通过文档设置好。相对比较麻烦的是rclone,会出现报错情况,只能一点一点排查,如果按照文档走,大概率可以规避掉一些问题。


 1 point
 -
That sounds like USB issues - cables and connectors. You will see "Reboot" if the device is removed without being unmounted properly, or if the USB drive drops ofline.1 point
-
+-+-+-+-+-+-+-+-+-+-+-+-+-+-+-+-+-+-+-+-+-+-+-+-+-+-+-+-+-+-+-+-+-+-+-+-+-+-+-+-+-+-+-+-+-+-+- |.|.|.|.|.|.|o|o|o|o|o|o|O|O|O|O|O|O|0|0|0|0|0|0|0|0|0|0|O|O|O|O|O|O|o|o|o|o|o|o||.|.|.|.|.|.| +-+-+-+-+-+-+-+-+-+-+-+-+-+-+-+-+-+-+-+-+-+-+-+-+-+-+-+-+-+-+-+-+-+-+-+-+-+-+-+-+-+-+-+-+-+-+- ██████╗░███████╗██████╗░░█████╗░██████╗░███╗░░██╗ ██╔══██╗██╔════╝██╔══██╗██╔══██╗██╔══██╗████╗░██║ ██████╔╝█████╗░░██████╦╝██║░░██║██████╔╝██╔██╗██║ ██╔══██╗██╔══╝░░██╔══██╗██║░░██║██╔══██╗██║╚████║ ██║░░██║███████╗██████╦╝╚█████╔╝██║░░██║██║░╚███║ ╚═╝░░╚═╝╚══════╝╚═════╝░░╚════╝░╚═╝░░╚═╝╚═╝░░╚══╝ ░█████╗░██████╗░███████╗░██╗░░░░░░░██╗ ██╔══██╗██╔══██╗██╔════╝░██║░░██╗░░██║ ██║░░╚═╝██████╔╝█████╗░░░╚██╗████╗██╔╝ ██║░░██╗██╔══██╗██╔══╝░░░░████╔═████║░ ╚█████╔╝██║░░██║███████╗░░╚██╔╝░╚██╔╝░ ░╚════╝░╚═╝░░╚═╝╚══════╝░░░╚═╝░░░╚═╝░░ +-+-+-+-+-+-+-+-+-+-+-+-+-+-+-+-+-+-+-+-+-+-+-+-+-+-+-+-+-+-+-+-+-+-+-+-+-+-+-+-+-+-+-+-+-+-+- |.|.|.|.|.|.|o|o|o|o|o|o|O|O|O|O|O|O|0|0|0|0|0|0|0|0|0|0|O|O|O|O|O|O|o|o|o|o|o|o||.|.|.|.|.|.| +-+-+-+-+-+-+-+-+-+-+-+-+-+-+-+-+-+-+-+-+-+-+-+-+-+-+-+-+-+-+-+-+-+-+-+-+-+-+-+-+-+-+-+-+-+-+- 🅟🅡🅞🅤🅓🅛🅨 🅟🅡🅔🅢🅔🅝🅣🅢 Docker tag: 8.1.113-unraid NEW: Current recommended Home User tag: 11notes/unifi:8.1.113-unraid NEW: Current Company/Corporate recommended tag: 11notes/unifi:8.1.113-unraid Current Critical Infrastructure (no downtime) tag: 11notes/unifi:7.5.187-unraid1 point
-
Based on the errors, and since memtest is only definitive if it finds an error, I would run the server with just one stick of RAM, if the same try the other one, that will basically rule out a RAM issue, and board/CPU would be the next suspects.1 point
-
Übrigens scheint der Spin Down jetzt zu funktionieren und damit lande ich dann bei rund 60W. Das ist ja schon wesentlich besser als vorher1 point
-
Any chance of a new poll or ability to change our vote as my choice has changed over the past 27 months since the Poll started?1 point
-
@DataCollector offiziell ja. Inoffiziell hab ich 32 GB am laufen. Alturismo glaube ich auch.1 point
-
First of all: THANK YOU so much for actively maintaining this plugin. I have a small feature request: The plugin right now seems to dislike hyphenated UPS names, like ups-main and ups-22. The GUI does not let you enter those names, even in manual config mode hyphenated UPS names do not work correctly. It would be great to support hyphenated UPS names.1 point
-
From what I see it writes a little more to the larger device(s), so as to try to keep about the same used space in terms of percentage, meaning with different sized devices, it's not a true raid0, but unlike the GUI, zfs calls it stripe, not raid0 anyway.1 point
-
You can't use the same IP address for your Unraid and for your Windows computer.1 point
-
Das klingt für mich am ehesten nach RAM Problemen. Welchen RAM verwendest du genau? Eventuell passt das Seating nicht? Also einfach mal versuchen den Stick rauszunehmen und wieder einzusetzen, bzw mal einen anderen Stick nehmen falls vorhanden.1 point
-
You have the cache dirs plugin installed. Be sure you set it to include only the shares you want it to operate on. If you don't set up include shares, it will cache all shares including UD and cause issues like this.1 point
-
You don't need to set this flag unless the log message is bothering you. That status itself is not a problem anymore because the OFF-state related bug (which some APC models experienced) has been fixed so that previously affected UPS do not falsely shutdown (when actually doing calibration) anymore. If the log message bothers you, then you can put this flag in the ups.conf so that it reports CAL instead of OL DISCHRG. But honestly if everything works I would not bother because it's just a log message and doesn't cause any problem on its own.1 point
-
Habe das N100DC bei mir jetzt seit ein paar Tagen laufen und soweit sehr zufrieden. Komme mit folgenden Komponenten auf Durchschnittlich ca. 6.5W im Idle (mit C8 Package States): 1x 16GB Corsair DDR4 2133MHz CL15 DIMM 1x 1TB Smasung 970 Evo (NVMe) 1x 2TB Crucial P3 Plus 2TB (NVMe über PCIe Adapter) 1x Be Quiet! Silent Wing 3 - 140mm PWM SONOFF Zigbee ZBDongle 3 Netzteil: LEICKE 60W 12V Case: Goodisory MX01 Dafür im BIOS HD Audio, WAN, SATA, Serial, Parallel deaktiviert, C-States aktiviert und per Tips&Tweaks den Governor auf "Power Save" gestellt. Ganz wichtig war außerdem den r8168 community driver (mit options r8168 aspm=1) zu verwenden weil ich ansonsten nicht unter C3 gekommen bin. Aber hat sonst noch jemand das Problem, dass die Lüfter nicht auftauchen (also weder im Dashboard, noch in Dynamix oder mit sensors)? Nach dem ersten booten bin ich mir relativ sicher die Lüfter noch gesehen zu haben aber seit dem kein Anzeichen mehr. Im BIOS kann ich alles ganz normal Steuern und der Lüfter funktioniert auch und mit sensors-detect wird mit angezeigt, dass er nct6775 gefunden hat. Auch der folgende Workaround hat keine Abhilfe geschaffen:1 point
-
Stromverbrauch senken: XMP Profile deaktivieren Netzteil prüfen ob das wirklich so dick (850W) sein muß. Eine Asus GF2070 (RTX) wird mit 215W angegeben. Die Intel i9 14900K geht bis ca. 253W max hoch. 4 Festplatten und 3 SSD + paar Lüfter = ca. 90W Ein 650 oder 750W Netzteil sollte auch beim Spitzenverbrauch aller Komponenten ausreichen. Leider konnte ich für das Seasonic Vertex PX-850 leider keine Verbrauchs-/Effizienzkurven finden (weder im Manual noch Datasheet). Somit kann ich nichts zu dessen Effizienzaussagen (vor allem, da es bei Dir mit der Daierlaufenden VM1 mit der 2070 wohl nie in den Niedriglastbereich (10-20W) herab geht. Im Main Tab kannst Du auf den Flash Stick schauen. Dort manövrierst Du in das Unterverzeichnis config. Darin ist die Go Datei. Dies läßt sich dann anklicken und danach die Zeile einfach reintippen/einkopieren. (Ich habe den Dynamix File Manager installiert) Screenshot siehe unten. Wenn eine Vm eben läuft braucht sie Ressourcen (wobei die GF2070 dann auch noch EInfluß nimmt). Somit kann die CPU kaum schlafen und deswegen gehen die C-States in die Knie. Mach die unnötigen VM aus. War da nicht etwas, daß eien dGPU ggf. nicht in Stromsparmodus geht, wenn diese von keinem OS gesteuert wird? Ich verwende keine dGPU, aber vielleicht suchst Du mal in die Richtung im Forum. Hier verweise ich mal auf: https://forums.unraid.net/topic/157823-faq-spin-down-oder-warum-bleiben-die-festplatten-nicht-im-schlafen/ Jedes verwendet PCIe Device kann sich hier negativ auswirken (und auch jede Firmware) Deswegen werden Mainboards auch in der Regel mit möglichst wenig Komponenten gemessen, weil man sonst gar keine Vergleichsgröße hätte. Im Betrieb mit Steckkarten und zusätzlich laufender Software, die auch noch Ressourcen bedarf (selbst wenn eine VM idle ist, muß dafür das BIOS/UEFI/Grundfunktionen permanent simuliert werden), kann die CPU nicht signifikant tief schlafen. Ich würde zuerst prüfen ob die VM wirklich laufen müssen & ob die 2070 nicht gegen etwas effizienteres getauscht werden könnte (oder ganz rausfliegen kann).
 1 point
 -
War das schon jemals so? Wenn Intel NICs erstmal unterstützt werden sind die in der "Regel" wesentlich stabiler von den Treibern her, als die verdammten Realteks. Sieht man ja hier an dem Board gut welchen Ärger die machen. Erst alles gut, dann plötzlich kein ASPM mehr...1 point
-
I just dealt with a similar issues since I just started using this Docker and switched from TP-Link Omada to Ubiquiti UniFi to use the U7-Pro So in my case yes the reason why it wasnt adopting was not because of this docker but a number of other things. Need to be on controller 8.0.26 which is not default for the Docker from App If your like me and are using a non-Ubiquiti gateway you need to be on U7-Pro Firmware 7.0.35 or newer, it was a known issue. Following this reddit post use SSH to tell the U7-Pro where the inform server is https://www.reddit.com/r/Ubiquiti/comments/19fgmzl/u7_pro_stuck_in_adopting_on_unifi_network/ Last thing also mentioned in the reddit post that I needed to look into further was was setting Inform Host Override. Once I had that set to the IP of my unraid box everything adopted. Previously the Omada Docker was in Host host mode so the equivalent wasnt needed.1 point
-
Yep en effet j'ai du supprimer tous les cookies et vider le cache pour que ça fonctionne .. Merci à toi !1 point
-
Have you set up core isolation in Settings-> CPU pinning? If so then those wouldn't be used for anything else than VMs.1 point
-
That will be because you had the Parity Check Tuning plugin installed at the time the most recent check was run. The earlier checks which do not show the type of check would have been run before installing the plugin so there is no indication of what type of check they were.1 point
-
Das ist vollkommen richtig Ich mache das so, dass ich auf beide Pfade (Local und Remote) im Docker zugriff habe. So bin ich flexibler und habe die Selbe Struktur wie im Unraid Host selbst Letztendlich kann das ja jeder machen wie er will, nur sollte Quelle und Ziel nicht das selbe sein beim sichern Hatte Revan335 aber bereits gelesen

 1 point
 -
[ups] driver = nutdrv_qx port = auto vendorid = 0001 productid = 0000 protocol = hunnox langid_fix = 0x0409 novendor noscanlangid default.battery.voltage.high = 27.50 default.battery.voltage.low = 21.40 default.battery.voltage.nominal = 24.00 default.input.voltage.nominal = 230 runtimecal = 900,100,1800,50 removed: default.battery.voltage.high = 27.50 default.battery.voltage.low = 21.40 default.battery.voltage.nominal = 24.00 Then Nut would not start. changed the attribute to runtime.low and then it loaded. see how that fares i guess.
 1 point
 -
Wenn Du eine alte Lizenz gekauft hast, dann bleibt diese gültig:
 1 point
 -
I believe Limetech has stated you can use it whenever you wish. No time limit on activation.1 point
-
Container updated .... 21.03.2024 01:16:19 cloudflared version 2024.3.0 (built 2024-03-20-1010 UTC) installed for amd64 21.03.2024 01:16:19 Unbound Version 1.19.3 installed for amd64 21.03.2024 01:16:20 Built from pihole/pihole with tag latest and while we are at it , container also unbound ready for your use it listening on "127.0.0.1#5335" thanks1 point
-
Solved. All this time I assumed that the OOM error was not actually unRAID running out of memory, because I miscalculated the amount of RAM that should be allocated to each VM to prevent an OOM condition. I reset the memory allocation for each VM (correctly this time) and the system no longer crashes.1 point
-
If you want plex to be backed up separately / differently then skip it in appdata backup and use a different method just for that.1 point
-
Soweit ich weiß, gibt es keine zeitliche Begrenzung1 point
-
Sorry. Owncast. I figured out what happened I think. I use different than default port in the docker configuration. If I try to change that to the same port in the server config from the web ui it causes problems and won't let you access the stream or the admin panel anymore. I just reinstalled, changed it in the initial config, and left it alone in the server config.1 point
-
Fixed it, it's always the simplest things. I had a trailing / at the end of the home server URL in the compose file. Removed that and it starts fine.1 point
-
So the HBA in IT Mode does work in pcie 4x slot with the adapter. Thanks' for the assistance.1 point
-
Yes, multi-device testing will be available in a future update. RAID support is already added, other types will be as well such as ZFS pools.1 point
-
Oh I didn't realize that. OK good to know thanks! The only thing with that is that I just tried deleting a file over the network and it didn't go into the .RecycleBin This is using using Windows Explorer over the network to delete a file on the Unraid server share. Isn't that using SMB? Maybe I'm wrong.1 point
-
Hey @dlandon Hey just wondering exactly how this is supposed to work and what it keeps in the Recycle Bin. The reason I'm asking is because I noticed it wasn't recycling a bunch of stuff so I did some tests. Here are the things that I tested. These WERE capture by RecycleBin Swift Android App (phone): Uses SMB to backup Android apps. Looks like RecycleBin kept a bunch of test files it made. Macrium (laptop): Set to backup my PC image over the network and delete images older than 7 days. Looks like RecycleBin kept the ones deleted by Macrium. Were NOT capture by RecycleBin Explorer (laptop): Files I delete via Explorer on my laptop do NOT get kept by RecycleBin. Krusader (server): Files I delete via Krusader on the server itself do NOT get kept. User script (server): I have a script running to delete a bunch of files nightly. They have NOT been kept. So I'm just trying to understand what gets put into .Recycle.Bin and what doesn't. I was under the impression ANY file deleted on those shares were capture and saved until the configured amount of time. Thanks for any insight!1 point
-
Im missing something here, i installed and enabled the plugin but no shares are detected or have a recycle bin. I deleted files many different ways via smb but that appears to do nothing. Im stuck1 point
-
Wilkommen im Kurs: DataCollector nimmt sich wieder zu ernst und meint etwas helfen zu können. 😅 Und mal wieder ein Thema, das in der letzten Zeit ab und zu auftauchte. Bevor nun jede gute Seele das immer wieder von vorne schreibt, dachte ich mir, daß ich das mal zusammenkritzele. Stand: 12.03.2024 und betrifft die vermutlich alle unraidversionen. Aber in Wirklichkeit kenne ich nur unraid ab 6.9.x bis aktuell 6.12.x und da trifft es zu. Da man die unraid GUI Oberfläche auch durch andere Sprachpakete anpassen und man auch die Farben manuell verändern kann, beziehe ich mich hier auf die default englischsprachige GUI Oberfläche (egal ob gebootete GUI direkt am PC oder WebGUI). Definition: Dies hier hängt zusammen mit klassischen Festplatten mit in sich drehenden Plattern und beweglichen Köpfen, da dies dort am wichtigsten ist und die größte Stromersparnis im idle Zustand bewirken kann. SSDs lassen sich auch damit steuern, aber es hängt stark von der Firmware der SSD ab, ob diese das auch wirklich mitmachen oder einfach ignorieren. Übliche SSDs sind aber von Natur aus (fast) alle auf Stromsparen in idle getrimmt, weshalb sich das dort kaum auf den Strombedarf auswirkt (und eben deshalb vielleicht ignoriert wird?). Ausnahme sind überwiegend Enterprise-SSDs. Die haben gelegentlich nicht die selben Stromsparmechanismen und halten des öfteren einen PC sowieso unnötig 'wacher' als erforderlich. Zuerst: Man kann in unraid einstellen, wann (sich langweilende) Festplatten die Platter stoppen. Dies nennt sich 'spin down' und ist wohl die sparsamste Betriebsart einer Festplatte, wenn man mal von 'PC Abschalten' absieht. 🔌 Natürlich dauern dann erneute Zugriffe auf die Festplatte einige Sekunden, weil eben die Platter wieder die richtige Rotationsgeschwindigkeit erreichen müssen, damit die Festplattenköpfe ihre korrekte Flughöhe einnehmen und dann loslegen können. Pauschal wird pro Festplatte von rund 30 Sekunden Aufwachzeit geschrieben, wobei das in Wirklichkeit von Modell zu Modell leicht abweichen kann. Zu finden ist diese Einstelloption einmal zentral für alle Datenträger unter: Settings / Disk Settings / "Default spin down delay" Man kann aber auch für einzelne Datenträger dies individuell anders einstellen indem man beispielsweise unter: Main / Disk<Nr> / "Spin down delay" für diese gezielte Festplatte <Nr> extra konfiguriert. Wenn man es will kann man Datenträger auch manuell sofort anstoßen sich schlafen zu legen oder aufzuwachen indem man auf den kleinen Kreis links des Datenträgers klickt. Ist der Kreis grau schläft die Festplatte. Ist der Kreis grün dreht die Festplatte. So, num zum eigentlichen Thema: Warum schläft meine Festplatte nicht? SAS: Ein Punkt ist mir recht früh aufgefallen: Sollte man SAS Festplatten verwenden gibt es so einige Kontroller-Festplattenkombinationen, die das einfach ignorieren. Es gibt ein extra Plugin (SAS Spindown), welches dann doch einige SAS Festplatten dazu überreden kann, aber auch das wirkt nicht bei allen SAS Geräten. SATA: Hier kenne ich keine Einschränkungen, weshalb ich sage, daß sich direkt angeschlossene SATA Festplatten eigentlich immer in den "spin down" bringen lassen. Warum klappt das also nicht? In allen Beiträgen, die ich bisher las, lag es daran, daß auf den Festplatten noch Reste von oft angesprochenen Shares (Verzeichnissen) vorhanden sind und Zugriffe darauf eben die Festplatte entweder sofort wieder aufweckten oder gar dem Befehl zum "Spin down" so schnell wiedrsprachen, daß die Festplatte einfach weiter läuft. Nun ist man aber vielleicht der festen Überzeugung, daß man doch alles getan habe um die Shares auf einem Pool/Cache/SSD auszulagern und dennoch die Festplatten weiter drehen. Tja, es hat sich eigentlich immer gezeigt, daß da etwas übersehen wurde. Sofern ein Array mit Parity betroffen ist, kann das Verhalten der Paritydisk(s) Aufschluß über die Art der Zugriffe bieten. Wenn die Parity schläft, aber eine oder mehrere Datenfestplatten nicht einschlafen sind es lesende Zugriffe. Wenn die Parity auch aufwacht/wach bleibt sind es schreibende Zugriffe. Zu beachten: unraid hat 4 wichtige shares, ich nenne sie systemshares: appdata - hier finden sich Teile von Docker domains - hier befinden sich Virtuelle Disks von VM isos - hier werden ISO Dateien abgelegt (selten im Zugriff) system - hier finden sich auch Teile von Docker und libvirt Hier greift unraid drauf zu, wenn die Docker und VM Dienste benutzt werden. Um zu prüfen ob die wirklich alle richtig lokalisiert sind sollte man in der GUI unter shares / 'compute all' anklicken. Nach kurzer Recherche sieht man dann auf welchen Datenträgern sich diese Shares verteilen. (Links ist der Datenträger unter dem jeweiligen Share zu sehen und rechts, wieviel Platz das Share dort belegt.) Wenn die Festplatten schlafen sollen, ist es sehr zu empfehlen alle diese 4 Systemshares auf einen Pool/Cache/SSD zu verlagern. Selbst ein absolut leeres Share auf einer Festplatte kann dafür sorgen, dass das "Fuse" Dateisystem dennoch ab und zu dort nachsieht, ob da nicht doch zwischenzeitlich was drin ist und deshalb springt die Festplatte immer wieder an. Nachdem man dafür gesorgt hat, die Systemshares von den Disks weg auf den Pool/Cache/SSD zu verlagern, sollten die Festplatten sich dann auch wirklich schlafen legen können, selbst wenn Docker und VM laufen. Nebenbemerkung: Natürlich ist es dann ungeschickt, wenn man dennoch in einer VM oder Docker einen direkten Pfad angibt der dann beispielsweise downloads doch auf die Festplatte schreibt. Denn dann halten nicht die systemshares die Festplatte drehend, sondern das was man da manuell eingestellt hat und gerade durch die VM/Docker angesprochen wird. Falls man sich nicht mehr dran erinnert, was da schreiben könnte kann man beispielsweise mit dem Plugin "File Activity" sich eine Liste der Zugriffe auflisten lassen. Anhand der dort gelisteten und betroffenen Dateien sind dann Rückschlüsse möglich. USB: Warnung: Igitt! USB Festplatten/SSD sind im unraid Array nicht wirklich empfohlen und immer wieder ein Quell der Probleme (vielleicht nicht zu Anfang aber dann doch des öfteren später). Es gibt Berichte, bei denen USB Datenträger seit Jahren problemlos im Array funktionieren, aber seid gewarnt: wenn etwas schief geht, habt Ihr es gewusst und Euch gezielt dafür entschieden. In diversen Fällen ist dann Hilfe kaum möglich. Zum Thema: bei USB Festplatten hängt es stark von der Firmware in der USB-SATA Wandlerplatine ab, ob sie die daran verbaute Festplatte von einem PC dahingehend steuern läßt oder nicht. Bei vielen moderneren externen Gehäusen klappt es, auch externe Markenfestplatten machen das meist mit, aber wenn nicht: Pech gehabt. Mißverständnis S.M.A.R.T.: Gerne ist ungefär sowas zu lesen: "Meine Festplatte wird durch Abfrage der SMART-Attribute aufgeweckt, das habe ich im Syslog auch gesehen". Seid versichert, das ist nicht so. Es ist genau anders herum. Wenn eine Festplatte aufwacht, versucht unraid zu aller erst diese SMART-Attribute abzufragen. Und genau deshalb sieht es im Syslog so aus, als wenn diese SMART Operation für den "Spin up" verantwortlich sei. Irgendetwas anderes hat die Festplatte aufgeweckt und dann hat unraid sofort gelesen. Wenn man nicht weiß was es war: auch hier könnte das Plugin "File Activity" helfen die Dateien herauszufinden und daraus zurück zu schließen, wer oder was der Verursacher ist. So, mehr fällt mir jetzt nicht ein. Have a nice day with unraid!1 point
-
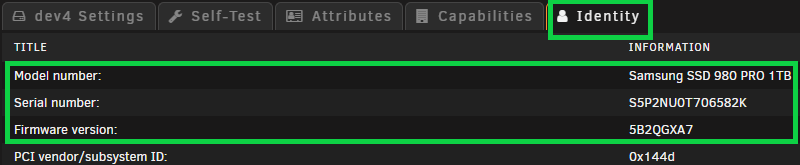
Upgraded some NVMe/SSD firmware today, the process is fairly simple. Running the Utility does not required you to shutdown/stop the array. Upgrades can/were done 'on-the-fly'. -Note your NVMe/SSD model and firmware version you have. -Go to the downloads page, firmware section and locate your drive model and firmware. -Copy link address. -Download firmware files to share/location of choice. wget https://semiconductor.samsung.com/resources/software-resources/Samsung_SSD_980_PRO_5B2QGXA7.iso -P /mnt/user/downloads/temp/ -Firmware files are a .iso and need to be extracted. -I just used 7z, if you don't have it, you can install it from the NerdTools plugin. --Once you have 7z installed. -Change directory to downloaded firmware file location and extract files. cd /mnt/user/downloads/temp/ 7z x Samsung_SSD_980_PRO_5B2QGXA7.iso -aoa && 7z x initrd -aoa && 7z x initrd~ -aoa -Once files are extracted, change directory to firmware file, change permissions and Run. cd /mnt/user/downloads/temp/root/fumagician/ && chmod +x fumagician && ./fumagician -Follow the prompts until completion. -Repeat the steps for each NVMe/SSD model you have downloading the respective firmware for each model. 🖖

 1 point
 -
Personally I would like to see the linux community get its shit together and create a set of driver standards and a centralised database for all flavours. That way a manufacturer can submit the appropriate information about a products drivers to said central database and then that driver would be converted autonomously and released all at the same time. Its one of the reasons windows and macos is so dominant and are able to treat customers the way they do, because installing software and drivers in all flavours of linux is a pain in the arse, and I say that as someone who doesn't use windows except for the VMs I need to run drivers I cant get on freakin linux. LOL1 point
-
Spin up / down is less of an issue than temperature shock. If the temperature difference between spun up and spun down is small, spin them down as soon as you can, assuming they won't get spun back up minutes later. If, on the other hand, you see a huge temperature swing every time the drives spin up, I'd be less likely to spin them down. Better to keep the drives warmer than ideal but at a steady temperature than to cool them way down only to heat them way up comparatively.1 point
-
Still waiting for wireless!1 point
-
I just moved back my Dockers but they won't show up again in the docker tab. I just checked locations in the docker settings but it seems to look right the paths are : Docker vDisk location: /mnt/nvme_cache/system/docker/docker.img Default appdata storage location: /mnt/user/appdata/ The appdata and docker.img exist in these paths too. Mover did move them from the array back to the cache I don't get why they are missing now. EDIT : Deleted docker.img recreated it, reinstalled apps from appstore via reinstall. Now everything is working again i think. Thanks1 point
-
You can always simply download the .zip file and everything in the root of the zip (ie: all the bz* files) save them onto the flash drive and reboot. Don't extract the files within /config in the zip1 point
-
i see what you're trying to do here and wonder if you're taking on more complexity than is necessary? the frustration i have with the docker ui in unraid is that there is a lot of manual clicking and form filling to add containers. this is especially annoying when you see projects with demo docker-compose.yaml files just sitting there ready to use. perhaps a good solution would be to create a docker compose yaml parser, which imports the docker compose yaml into an unraid docker configuration, which you can then start in the ui as if you did all the manual clicking and form filling legitimately? bonus points for changing the existing basic/advanced view toggle in the container configuration UI to include 'edit as docker compose yaml'! do you see the problem the same way i do?1 point
-
@primeval_god suggestion for "GUI". I just prepped a dockerdev container for my unraid compose management as a supplement for your plugin. Why not include just a vscode server container for editing the files. I have a working compose file that setups a vscode server container based on linuxservers/code-server with docker, docker compose with same version as you provide in the plugin and some suggar. Features: vscode extension: docker support for managing/debug docker via vscode docker explorer. support for compose up down commands. synatx highlighting and help for compose and docker files vscode extension: dotenv for all the people using .env files bash completion in the vscode terminal for docker and docker-compose I'm happy if you would integrate that with your plugin, I assume you would have less effort to bring this up and running and support with more features than self dev a gui. Maybe it needs a bit of cleanup und convert to a template but should be almost 1:1 mapping. Explanation: The docker file builds the sugar into the code-server image, they have a "mod" for integrating docker into their images, but hard to maintain with custom version etc. The settings.json of the workspace is currently manually created after container is running... but could be easy integrated into the docker image as base. And maybe I missed some docker command settings for all possible cases. and currently also hardcoded for using .env file in these commands (couldn't get it to pick it up automatically). Also the image needs some cleanups like removing apt cache etc. to make it smaller. dockerfile for codeserver with sugar: docker-compose: vscode workspace settings file:1 point
-
If you haven't transferred the license to a new stick in the past year, it's just a matter of copying everything over to the new drive and running the make bootable script, then booting up unraid and going through the license transfer wizard. However... I highly recommend NOT moving to a mini drive, they don't have very good lifespans compared to full size drives, the concentrated heat seems to kill them. You would be much better off getting an adapter to move the stick inside the case. Something like this, I typically bend the L shaped bit back straight and stack it to an unused slot.
 1 point
 -
Set up your new USB stick just like you did your existing stick to begin with, but don't bother doing any customizations. Purchase the key on the new stick using the registration tool, make a backup on the flash page, shut down, copy the config folder from your current running key to the new key, delete the trial key from the config folder and extract the new registered key from the backup you made before you shut down and copy it to the new stick. Boot back up and and you should be golden. If you are fuzzy on anything I said, please ask for clarification.1 point
-
JonP, this is rather worrisome. Those SCSI ID's can change, just as much as the sd symbols and the ata numbers. It's true that some systems seem to be more 'stable', especially small systems with no added disk controllers, but otherwise, I can't see how hard coding the SCSI ID in will work across boots. It will at times, but not reliably. A user could reboot and it would stop working, then reboot again, and it would start working, if that session happened to match the same lsscsi list. If you have multiple diagnostics zips available, test this yourself, compare the lsscsi.txt files. I personally haven't had this issue, but yes, some may. This is why we haven't put it formally into the webGui yet. Eric and I are working on a VM device manager for the webGui. The goal here is to manage device assignments differently, where a user could specify a device for use with a VM, then we would do the legwork at runtime to determine the appropriate changes to XML for VMs. E.g., if the SCSI address changed, the /dev/disk/by-id path won't, and we can use something like udevadm to trace back to the actually SCSI ID. There is another method for passing through a block device as well which we are experimenting with, and doesn't use SCSI IDs. The difference in methods could impact performance though. It should be noted that whenever I provide these guides, they are a temporary way to establish a level of functionality that isn't supported officially in the webGui yet. I want to hear from folks experiences in using these methods so we can adjust our formal support implementation path. Baked in support would be awesome. Currently, when I reboot unRAID for whatever reason(new build here so im doing quite a lot right now), I have to go in a change the address, as the device address seems to change every reboot. Always changes between the same 2 numbers, oddly enough. Even changes when I don't touch my drives during the reboot/power off. Also, as far as performance or issues, I am not positive this is unRAID/KVM/passthrough related yet, but my SABnzbD downloads are mostly failing. WinRAR unpack issues, "unexpected end of archive". Have even downloaded some NZB's which I had recently grabbed before making the unRAIR leap. Going to install on my desktop and test it out to see what might be up. When I first booted the VM up with the disk passed through, I formatted, copied some files to/from to test, and windows gave me a filesystem corruption error(didnt jot it down). Ran it through a chkdsk and have not had that error since, though still have the odd unpack issues. Ok, if you'd like to be a guinea pig, here's another method for passing through a block device that does not utilize the virtio-scsi controller. Changing your existing VM to this may possibly not work (you may have to reinstall windows or try a few things to get it to boot again). 1 - Remove all the custom xml stuff I had you add originally. 2 - Add a new <disk> section that looks like this: To find what to put in the highlighted portion, you will need to login to your server from command line. Then type the following command: ls /dev/disk/by-id Find the one that represents your storage device (but without the -part1 at the end) and paste that in the section above that says YOUR DISK ID HERE. This should work regardless of what SCSI IDs change to after reboots.1 point


.thumb.jpg.bec61e4e919a9235cc4475f8cb53d5e3.jpg)