Leaderboard


Popular Content
Showing content with the highest reputation on 08/25/21 in all areas
-
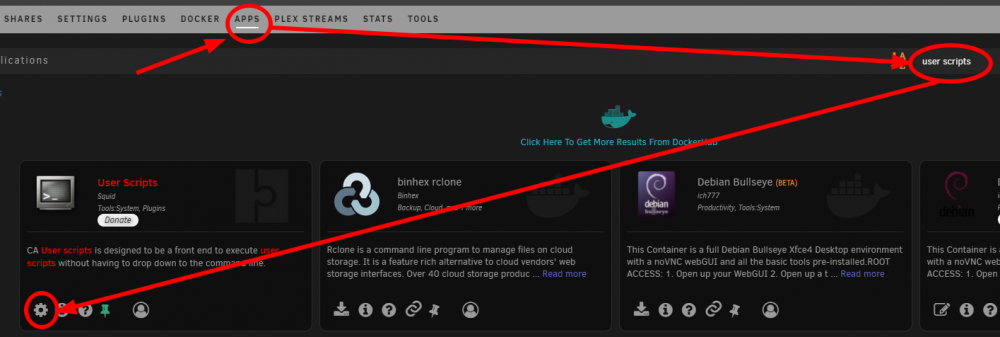
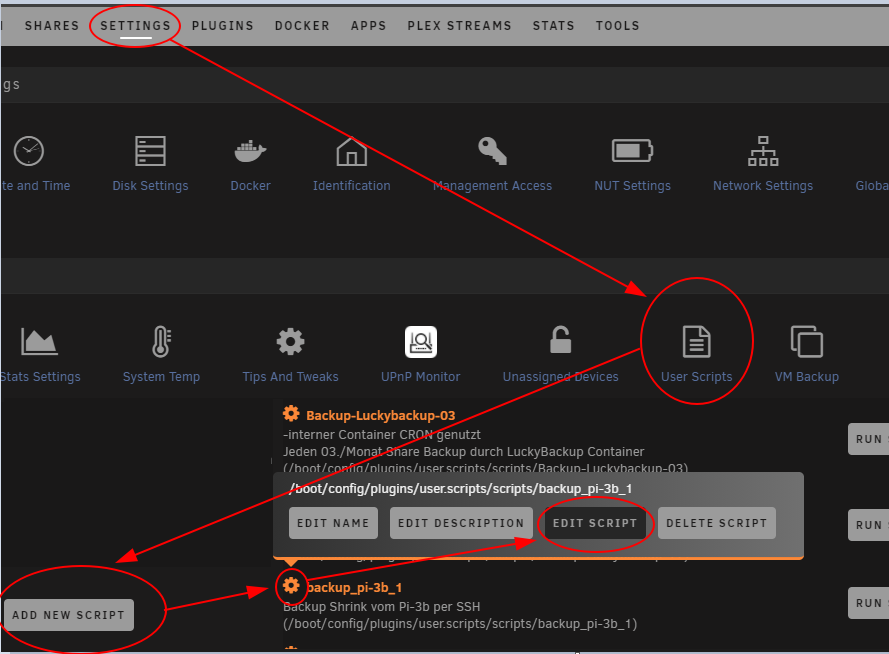
Hier ein kurzer Guide zu einem User Script um von einem Pi eine Sicherungsimage zu erstellen und zu verkleinern. Da ich selbst recht neu mit Unraid unterwegs bin und total unerfahren im Bereich Linux, Termina, Befehle, etc... bitte ich Fehler zu entschuldigen und gerne zu Verbessern und/oder brauchbares zu ergänzen. Als Basis habe ich das Script von Lukas Knöller - hobbyblogging.de genommen und um ein paar Variablen und PiShrink ergänzt. Das Script verbindet sich per SSH auf den Pi, erstellt ein Image davon und legt es im Backup Share ab. Danach werden überfällige Backups gelöscht und das erstellte Backup verkleinert. -Backup Share als Ziel einrichten. Falls mehrere Pi's gesichert werden sollen, empfehle ich für jeden Pi einen eigenen Unterordner im Share zu erstellen. -Unterordner im Share erstellen: Im Unraid Terminal folgenden Befehl ausführen mkdir -p /mnt/user/DEIN-BACKUP-SHARE/PI-UNTERORDNER -sshpass downloaden, /extra/ Ordner auf dem Stick erstellen, sshpass in den Ordner /extra/ verschieben und sshpass installieren: Im Unraid Terminal folgenden Code ausführen. wget https://packages.slackonly.com/pub/packages/14.2-x86_64/network/sshpass/sshpass-1.06-x86_64-1_slonly.txz && mkdir /boot/extra && mv sshpass-1.06-x86_64-1_slonly.txz /boot/extra/ && installpkg /boot/extra/sshpass-1.06-x86_64-1_slonly.txz Alternative, falls die Quelle nicht erreichbar ist: Dadruch dass wir das sshpass im /extra/ Ordner des Unraid Sticks liegen haben, wird sshpass mit jedem Unraid Start installiert. Wer das "Fix Common Problems" Plugin nutzt, wird nun eine Meldung bekommen, diese kann man mit dem Button rechts ignorieren: -PiShrink download, verschieben nach /mnt/user/appdata/, ausführbar machen: Im Unraid Terminal folgenden Code ausführen. wget -O /mnt/user/appdata/pishrink.sh https://raw.githubusercontent.com/Drewsif/PiShrink/master/pishrink.sh && chmod +x /mnt/user/appdata/pishrink.sh -User Script Plugin installieren: -User Script Plugin aufrufen und neue User Script erstellen: -Script ins leere Feld kopieren und Variablen anpassen: #!/bin/bash #Variablen PI_IP="XXX.XXX.XXX.XXX" SSH_USER="PI-USER" SSH_PW="DEIN-SUPER-PASSWORT-VOM-PI-USER" BACKUP_PFAD="/mnt/user/DEIN-BACKUP-SHARE/PI-UNTERORDNER" #ohne / am Ende BACKUP_ANZAHL="5" BACKUP_NAME="pi_image" SHRINK_SCRIPT_PFAD="/mnt/user/appdata/pishrink.sh" DATUM="$(date +%Y%m%d)" #Backup erstellen sshpass -p ${SSH_PW} ssh ${SSH_USER}@${PI_IP} sudo "dd if=/dev/mmcblk0" | dd of=${BACKUP_PFAD}/${BACKUP_NAME}-${DATUM}.img bs=1MB #Alte Sicherung löschen pushd ${BACKUP_PFAD}; ls -tr ${BACKUP_PFAD}/${BACKUP_NAME}* | head -n -${BACKUP_ANZAHL} | xargs rm; popd sync -f ${BACKUP_PFAD} #shrink ${SHRINK_SCRIPT_PFAD} ${BACKUP_PFAD}/${BACKUP_NAME}-${DATUM}.img Im falle von Raspberry Pi OS sollte der User "Pi" sein. Das Passwort habt ihr bei der Installation von Raspberry Pi OS selbst festgelegt. Am Ende der Variablen BACKUP_PFAD darf kein "/" gesetzte sein, da dieses schon im Code enthalten ist. Solltet Ihr "root" nutzen, oder das Script aufgrund von sporadischen erneutem Abfragen des Passwortes abbrechen, haben @dan4UR und @Anym001 vielleicht die Lösung für euch: root User Erneute Passwortabfrage bei sudo -Script mit dem "SAVE CHANGES" Button abspeichern. -Cron anpassen: in meinem Beispiel läuft das Script zur 15. Minute in der 23. Stunde am 11. und 26. Tages jeden Monat, an egal welchem Wochentag. Oder kurz: jeden 11. und 26. um 23:15Uhr. Hilfe zu Cron: https://crontab.guru/ -Einstellungen unten mit dem Button "APPLY" sichern. Wie Anfangs schon erwähnt, bin ich nicht sehr Erfahren und bitte um Rücksicht bei Fehlern. Danke auch an @ich777, @alturismo und @Anym001 für Idee, Ratschläge, Testen und Wissen. Ansonsten, Happy Backup! *CHANGELOG* 25.08.2021 20:20 - Variable DATE hinzugefügt 30.11.2021 09:35 - Troubleshooting Ergänzung für root und sudo 26.12.2021 14:22 - Alternative Quelle für sshpass. Danke @mgutt

 5 points
 -
The thing is that we are not making any changes just shipping ZFS 2.1 by default. We have shipped 2.0 by default until now because of this deadlock problem, and 2.1 if you enabled "unstable builds" (see the first post). ZFS 2.0 only supports kernels 3.10 - 5.10, but unRAID 6.10 will ship with (at least) kernel 5.13.8 therefore we have to upgrade to ZFS 2.1 So if you are running ZFS 2.1 now on 6.9.2 or 6.10.0-rc1 there wont be any changes: You can check what version is running i two ways: root@Tower:~# dmesg | grep -i zfs [ 69.055201] ZFS: Loaded module v2.1.0-1, ZFS pool version 5000, ZFS filesystem version 5 [ 70.692637] WARNING: ignoring tunable zfs_arc_max (using 2067378176 instead) root@Tower:~# cat /sys/module/zfs/version 2.1.0-13 points
-
Thanks, looks like it might be OK then - will just have to try it. That thread if I recall, was multiple people with issues, not just me. And mine 'went away' for lack of a better explanation, but one person's didn't, so it was quite inconclusive really. They recently posted back on ZFS that it's still an issue for them too. Anyway, thanks for info - I'll hold my breath until I upgrade!2 points
-
Never had any issues with zfs on unraid since day one (while before that , btrfs was all pain and misery) and been running also 2.1 since a while now. All rock solid with multiple different pools (all ssd or nvme) running all my vm's and docker. But run docker in folders on zfs . Never had it in an img on zfs. I do have libvirt image on zfs but that holds nothing compared to a docker img. I guess you have just been unlucky as i remember your thread with all the issues you had before. Even recently moved all my docker folders back and forth between pools while swapping and rearranging ssd's , while beeing amazed with zfs's possibilities in this (combination of snapshots send / receive and data eviction from disks/vdevs when adding/removing disks/vdevs). All smooth sailing and not a single issue. I became such a zfs fanboy. Looooove it2 points
-
I made a correction in the German translation, because it included some invalid lines, which are now removed. To translators: do not add extra lines (such as ========).2 points
-
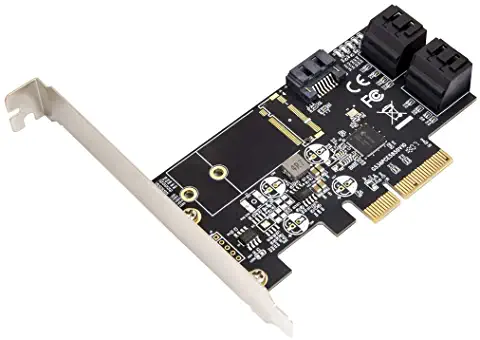
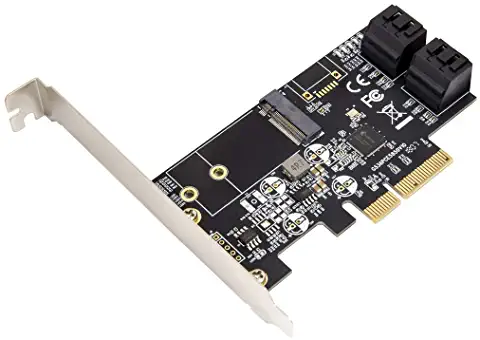
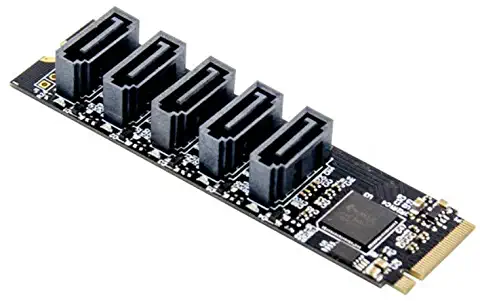
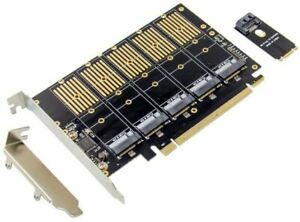
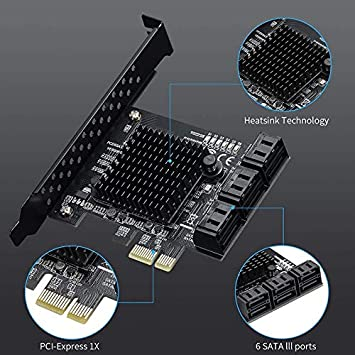
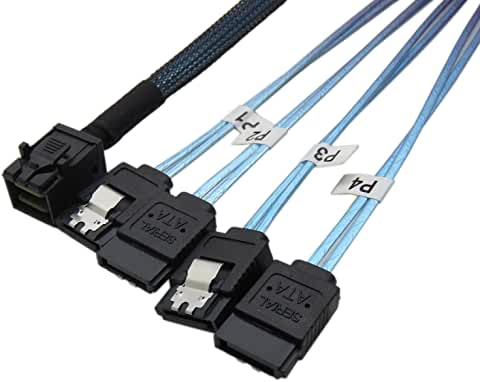
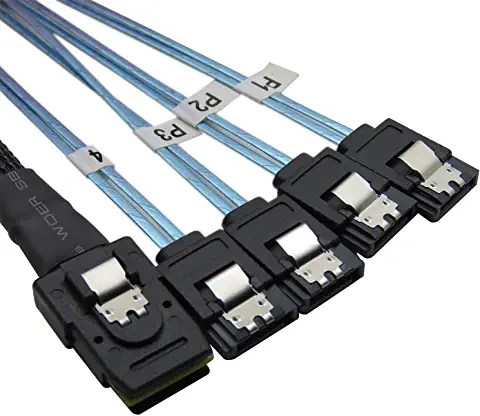
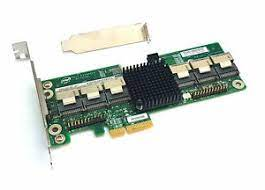
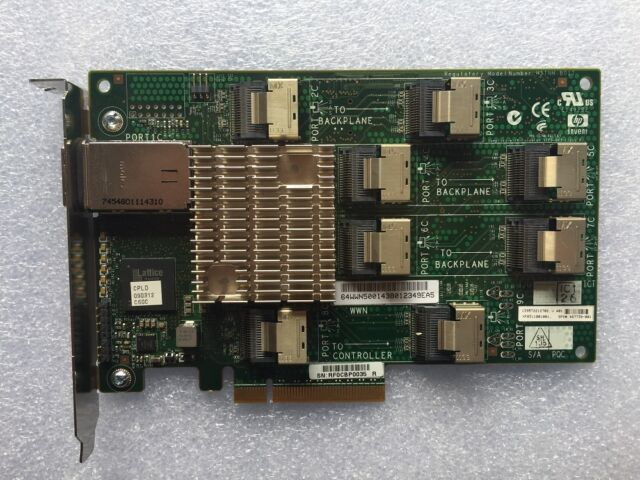
This thread is meant to replace the now outdated old one about recommended controllers, these are some controllers known to be generally reliable with Unraid: Note: RAID controllers are not recommended for Unraid, this includes all LSI MegaRAID models, doesn't mean they cannot be used but there could be various issues because of that, like no SMART info and/or temps being displayed, disks not being recognized by Unraid if the controller is replaced with a different model, and in some cases the partitions can become invalid, requiring rebuilding all the disks. 2 ports: Asmedia ASM1061/62 (PCIe 2.0 x1) or JMicron JMB582 (PCIe 3.0 x1) 4 ports: Asmedia ASM1064 (PCIe 3.0 x1) or ASM1164 (PCIe 3.0 x4 physical, x2 electrical, though I've also seen some models using just x1) 5 ports: JMicron JMB585 (PCIe 3.0 x4 - x2 electrically) These JMB controllers are available in various different SATA/M.2 configurations, just some examples: 6 ports: Asmedia ASM1166 (PCIe 3.0 x4 physical, x2 electrical) * * There have been some reports that some of these need a firmware update for stability and/or PCIe ASPM support, see here for instructions. These exist with both x4 (x2 electrical) and x1 PCIe interface, for some use cases the PCIe x1 may be a good option, i.e., if you don't have larger slots available, though bandwidth will be limited: 8 ports: any LSI with a SAS2008/2308/3008/3408/3808 chipset in IT mode, e.g., 9201-8i, 9211-8i, 9207-8i, 9300-8i, 9400-8i, 9500-8i, etc and clones, like the Dell H200/H310 and IBM M1015, these latter ones need to be crossflashed (most of these require a x8 or x16 slot, older models like the 9201-8i and 9211-8i are PCIe 2.0, newer models like the 9207-8i, 9300-8i and newer are PCIe 3.0) For these and when not using a backplane you need SAS to SATA breakout cables, SFF-8087 to SATA for SAS2 models: SFF-8643 to SATA for SAS3 models: Keep in mind that they need to be forward breakout cables (reverse breakout look the same but won't work, as the name implies they work for the reverse, SATA goes on the board/HBA and the miniSAS on a backplane), sometimes they are also called Mini SAS (SFF-8xxx Host) to 4X SATA (Target), this is the same as forward breakout. If more ports are needed you can use multiple controllers, controllers with more ports (there are 16 and 24 port LSI HBAs, like the 9201-16i, 9305-16i, 9305-24i, etc) or use one LSI HBA connected to a SAS expander, like the Intel RES2SV240 or HP SAS expander. P.S. Avoid SATA port multipliers with Unraid, also avoid any Marvell controller. For some performance numbers on most of these see below:

 1 point
 -
@Valerio found this out first, but never received an answer. Today I found it out, too. But this is present since 2019 (or even longer). I would say it's a bug, as: it prevents HDD/SSD spindown/sleep (depending on the location of docker.img) it wears out the SSD in the long run (if docker.img is located here) - see this bug, too. it prevents reaching CPU's deep sleep states What happens: /var/lib/docker/containers/*/hostconfig.json is updated every 5 seconds with the same content /var/lib/docker/containers/*/config.v2.json is updated every 5 seconds with the same content except of some timestamps (which shouldn't be part of a config file I think) Which docker containers: verified are Plex (Original) and PiHole, but maybe this is a general behaviour As an example the source of hostconfig.json which was updated yesterday 17280x times with the same content: find /var/lib/docker/containers/40b4197fdea122178139e9571ae5f4040a2ef69449acf14e616010c7e293bb44 -ls -name hostconfig.json -exec cat {} \; 2678289 4 -rw-r--r-- 1 root root 1725 Oct 8 13:46 /var/lib/docker/containers/40b4197fdea122178139e9571ae5f4040a2ef69449acf14e616010c7e293bb44/hostconfig.json { "Binds":[ "/mnt/user/tv:/tv:ro", "/mnt/cache/appdata/Plex-Media-Server:/config:rw", "/mnt/cache/appdata/Plex-Transcode:/transcode:rw", "/mnt/user/movie:/movie:ro" ], "ContainerIDFile":"", "LogConfig":{ "Type":"json-file", "Config":{ "max-file":"1", "max-size":"50m" } }, "NetworkMode":"host", "PortBindings":{ }, "RestartPolicy":{ "Name":"no", "MaximumRetryCount":0 }, "AutoRemove":false, "VolumeDriver":"", "VolumesFrom":null, "CapAdd":null, "CapDrop":null, "Capabilities":null, "Dns":[ ], "DnsOptions":[ ], "DnsSearch":[ ], "ExtraHosts":null, "GroupAdd":null, "IpcMode":"private", "Cgroup":"", "Links":null, "OomScoreAdj":0, "PidMode":"", "Privileged":false, "PublishAllPorts":false, "ReadonlyRootfs":false, "SecurityOpt":null, "UTSMode":"", "UsernsMode":"", "ShmSize":67108864, "Runtime":"runc", "ConsoleSize":[ 0, 0 ], "Isolation":"", "CpuShares":0, "Memory":0, "NanoCpus":0, "CgroupParent":"", "BlkioWeight":0, "BlkioWeightDevice":[ ], "BlkioDeviceReadBps":null, "BlkioDeviceWriteBps":null, "BlkioDeviceReadIOps":null, "BlkioDeviceWriteIOps":null, "CpuPeriod":0, "CpuQuota":0, "CpuRealtimePeriod":0, "CpuRealtimeRuntime":0, "CpusetCpus":"", "CpusetMems":"", "Devices":[ { "PathOnHost":"/dev/dri", "PathInContainer":"/dev/dri", "CgroupPermissions":"rwm" } ], "DeviceCgroupRules":null, "DeviceRequests":null, "KernelMemory":0, "KernelMemoryTCP":0, "MemoryReservation":0, "MemorySwap":0, "MemorySwappiness":null, "OomKillDisable":false, "PidsLimit":null, "Ulimits":null, "CpuCount":0, "CpuPercent":0, "IOMaximumIOps":0, "IOMaximumBandwidth":0, "MaskedPaths":[ "/proc/asound", "/proc/acpi", "/proc/kcore", "/proc/keys", "/proc/latency_stats", "/proc/timer_list", "/proc/timer_stats", "/proc/sched_debug", "/proc/scsi", "/sys/firmware" ], "ReadonlyPaths":[ "/proc/bus", "/proc/fs", "/proc/irq", "/proc/sys", "/proc/sysrq-trigger" ] }1 point
-
yes, thats correct. there's also a docker for my provider. i'll give it a try with later! or is there anything else i could do? edit: 17 mb/s with the nordvpn docker.1 point
-
I don't see it on Brave browser.1 point
-
Da gibt einige Tutorials. Ich glaube 😅 ich habe das damals nach dieser Anleitung gemacht. https://www.tecmint.com/ssh-passwordless-login-using-ssh-keygen-in-5-easy-steps/ Ansonsten einfach mal nach "SSH-Key-Authentifizierung" gucken. Mittlerweile arbeite ich so nicht mehr. Der Backupserver hat Leserechte auf einige Ordner und "zieht" dann die Daten. Stimmt, aber durch den Key wird es auch ein wenig einfacher1 point
-
*CHANGELOG* 25.08.2021 20:20 - Variable DATE hinzugefügt Musste schon die erste Sache anpassen. Wenn das Script über einen Tageswechsel läuft, würde das Shrinken nicht stattfinden.1 point
-
An eine Möglichkeit das Passwort nicht im Klartext ins Script zu packen, hatte ich auch schon gedacht. Aber zum jetzigen Zeitpunkt sprachen zwei Gründe für mich dagegen: 1. Passwort als Klartext war sehr Einsteigerfreundlich und für diese Nachvollziehbar. Jemand der Fit in der Materie ist, wird das Script mit Leichtigkeit anpassen. 2. Es überstieg bisher einfach meine Fähigkeiten1 point
-
Worked on Safari desktop too (at least for my limited testing).1 point
-
This may have worked for me on Safari mobile. I cleared history/cookies and I’ve logged out/in 3 times now without issue.1 point
-
Hi, thx your excellent work! I'm using the verson 10.7.6. But I've met some problems recently that I can't get the images of episodes. Metadata seems ok and the original jellyfin also works properly. Log is attached below, can you help me fix the problems? Thx a lot! new 2.txt1 point
-
Ah ok. Ja den Test könnte man trotzdem machen.1 point
-
Sorry @PeteAsking I do not know the answer to that other than to say that zram support is not part of this plugin.1 point
-
Hey thanks for this, I just got this setup as I've been pretty unhappy with Photoprism's mobile app not getting updated/working with some new backend changes and only being accessible from a constantly broken Testflight link. Also I don't feel warm and fuzzy it will keep getting updated when it specifically states it's just a hobby. Some notes: Steps 1,4,9 you call the network 'private' but later use it as 'privnet'. Personally I just called it 'photonix'. For the postgres container I suggest changing the data storage path because it's just something like /mnt/disk1/appdata/postgres/ by default and could conflict with other containers if you use more than one DB. I set it to /mnt/disk1/appdata/photonix_postgres11/ Not an issue with any of this process per se, but I tried adding an additional mount point (photos_photonix_import) and letting Photonix have a separate import folder as it asked me during the initial setup page, but it seems to just ignore that folder entirely and not import from it. Thanks again! So far this seems a bit early in the life of the app, but I like how responsive the devs are, it's got a mobile app, and some neat features. A lot of promise here.1 point
-
Router hosted VPN to IPMI.1 point
-
sure, either binhex/privoxy, i also provide a ovpn docker with privoxy and socks proxy, ...
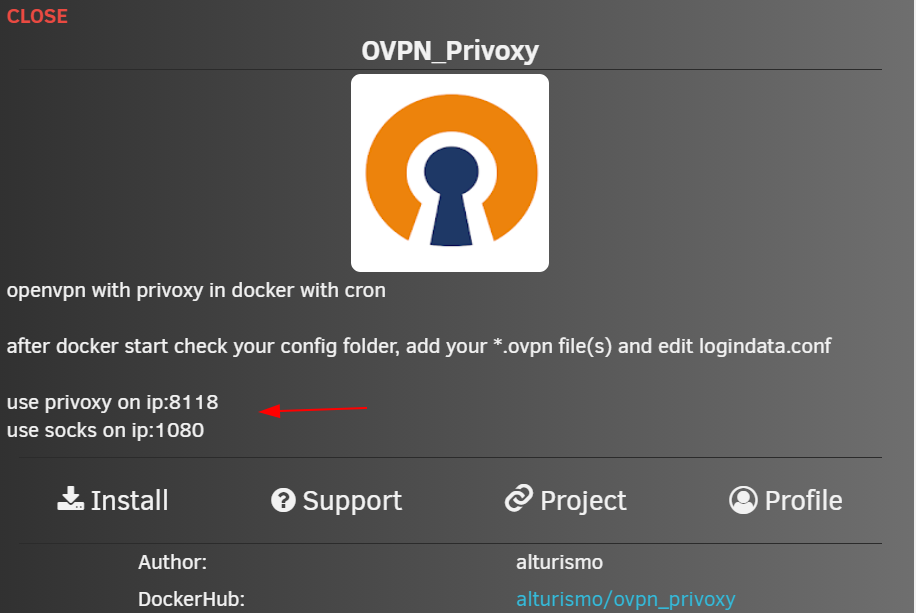 1 point
 -
I am in the same boat as you are. Limetech is looking into this together with the vendor, and hopefully there will be a solution soon(tm). No ETA given though.1 point
-
Usually you have to do something like: docker exec -i DOCKERNAME YOURCOMMAND1 point
-
Ich würde vorschlagen, dass Du Deine Verbesserungsvorschläge im Forum Feature Request einstellst. Dort erhalten sie mehr Aufmerksamkeit. Desweiteren würde ich empfehlen ein wenig mehr Zeit mit Unraid aufzuwenden. Einige Deiner Vorschläge sind schlichtweg nicht möglich (Deaktivieren von Plugins ohne Deinstallieren - das sind "Programme" und zugehörige Dateien oder Bibliotheken) bzw. durch eine andere Arbeitsweise möglich (Super-Config von VMs - clone eine VM und passe deren Einstellungen einmalig an, switche dann auf Knopfdruck durch vorkonfigurierte Varianten der VM - das fände ich sogar besser).1 point
-
It is really ugly and pretty much a nag screen. Why does it have to be on the banner?1 point
-
Die /dev/sdx Bezeichner können sich beim nächsten Boot verändern. Die /dev/disk/by-id Bezeichner ändern sich nicht. Beim nächsten Boot könntest Du bei erster Variante aus Versehen eine falsche Festplatte durchschleifen. Das musst Du dann jedesmal vor dem Start der VM prüfen. Bei der zweiten Variante kannst Du Dich darauf verlassen, dass sich nichts geändert hat.1 point
-
Nein, UD macht nix. Die Setting "Passed through" setzt Du - oder auch nicht. Es hilft Dir Devices, die Du durchgeschliffen hast, zu schützen. Wenn man so will ist es eine Vorsichtsmaßnahme die Du für Dich selbst setzen kannst. UD macht nichts anderes als den "Mount" Knopf zu deaktivieren. Und das für Devices die Du als "Passed through" in den UD Device Settings markiert hast. Ich weiß nicht, wie ich das anders erklären soll. Nehmen wir mal an Du schleifst eine normale Festplatte an eine VM durch. Dann bleibt die Festplatte in UD trotz laufender VM sichtbar. Neben der Festplatte leuchtet in UD unverändert der orange "Mount" Knopf, auf den Du aus Versehen drücken könntest. Also markierst Du diese Festplatte in den UD Settings als "Passed through". Ab dem Zeitpunkt ist der "Mount" Knopf nicht mehr klickbar. Das ist alles was UD in diesem Umfeld macht.1 point
-
Schön das es dazu einen Fred gibt ... Ich hatte mir die gleichen Fragen nämlich auch gestellt. Auch bezüglich der Sicherheit wenn die Konfigurationen meines Server hier auf den Limetech Servern liegen... Passt nicht zu dem was ich aktuell abarbeite... So wenig wie möglich an Daten ins Netz zu stellen und langsam einige Clouds und Services nicht mehr zu nutzen, die ich selber "hosten" kann. Ich sichere den Unraid stick über das CA Backup / Restore Appdata Plugin. Dann per rsync rüber auf die Synology. Klappt super.1 point
-
@JorgeB It took me a few days to get everything situated but it all worked out following the information you provided. Thanks for your help.1 point
-
thanks @Tristankin I think I may need to downgrade, my power is fine and I am not overclocking it at all.1 point
-
ALT+0 means F10, no idea of F11 F12 and MC seems no F11 F12 etc1 point
-
You can't do it from the GUI. As I said, get a linux compatible editor and edit it in place.1 point
-
@ghost82 - I realised one more thing . Some of the instability in the system (sleep/wake) was because I deleted a number of unused controllers which caused the PCIe Device Paths to change. My config.plist Device properties were referencing the older Device Paths and causing a lock-up / devices not detected after sleep. After cleaning up - it sleep/wake issues have disappeared. I am still testing for Unraid hanging on shutting down the VM. It seems to be the reset bug on AMD.I did try the vendor_reset plugin on 6.10-RC1 and ti didn't seem to help. I will try a few other stuff and update you.1 point
-
Wakeon WAN ( WOW ) was base on WOL, if WOL doesn't work then you can't WOW. So make sure you success on WOL first. For WOW, this is harder part, most router won't support this. I use handset APP "Fing" to perform WOL and WOW.1 point
-
Since I'm Canadian, I'll go with this 😀1 point
-
Can I just say that I don't have this issue and I do store docker.img on a ZFS drive. I have no idea why - I did have the issue for a while, but one of the updates fixed it. I don't even run an unraid cache drive or array (I'm entirely ZFS) so couldn't anyway. So it may not apply to everyone.1 point
-
Thought I'd give an update. My system has an 11th Gen i9-11900K. In Unraid 6.9.2 (based on Linux kernel 5.10.28), I created this file on the flash: config/modprobe.d/i915.conf containing this text to activate the experimental i915 drivers for this GPU: options i915 force_probe=4c8a and Plex was able to do hardware transcoding. In some of the earlier private betas of 6.10, this worked as well. Starting with 6.10.0-rc1 (kernel 5.13.8) Plex was unable to do hardware transcoding on this system (it works on 9th and 10th gen Intel CPUs, just not 11th gen.) Internally today we are up to kernel 5.13.12 and Plex still will not do hardware transcoding on this system. In the 'Plex Media Server.log' it reports: TPU: hardware transcoding: enabled, but no hardware decode accelerator found On the plus side, you no longer need to create an i915.conf file with those custom options, the GPU activates right out of the box. And an interesting data point, this Jellyfin docker does hardware transcoding beautifully on the 6.10 rc's: https://forums.unraid.net/topic/102787-support-ich777-jellyfin-amdintelnvidia/ Now I'm not suggesting that die hard Plex fans need to switch to Jellyfin, I don't intend to. Just saying that the Linux drivers for the latest Intel CPU/GPUs are still in flux and for whatever reason, Jellyfin works with them and Plex does not. I do not know if a future Linux kernel will solve the problem, or if it will take an update from Plex. But I do not have high hopes for the current version of Plex doing hardware transcoding in rc2 on the latest Intel CPUs. Update - For completeness I will add that I am using the LSIO Plex Container: https://forums.unraid.net/topic/40463-support-linuxserverio-plex-media-server/ and Plex itself is currently (as of 8/25/21) version 1.24.1.4931. I have a Plex Pass.1 point
-
Awesome. Thanks for the detailed report and logs. @SuberSeb, @harriedr I believe @rbourassa44 just identified your problem. I'll add a fix for this in the next release.1 point
-
Only call traces I see are about the Realtek NIC: Aug 24 10:52:40 Unraid kernel: NETDEV WATCHDOG: eth0 (r8169): transmit queue 0 timed out It does appear to recover after a few seconds, but if issues persist try another NIC if available, Intel preferred.1 point
-
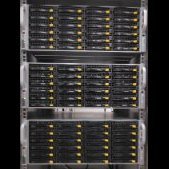
I 3D printed a custom shroud to hold 3 120mm fans to keep my drives happy in the Florida heat
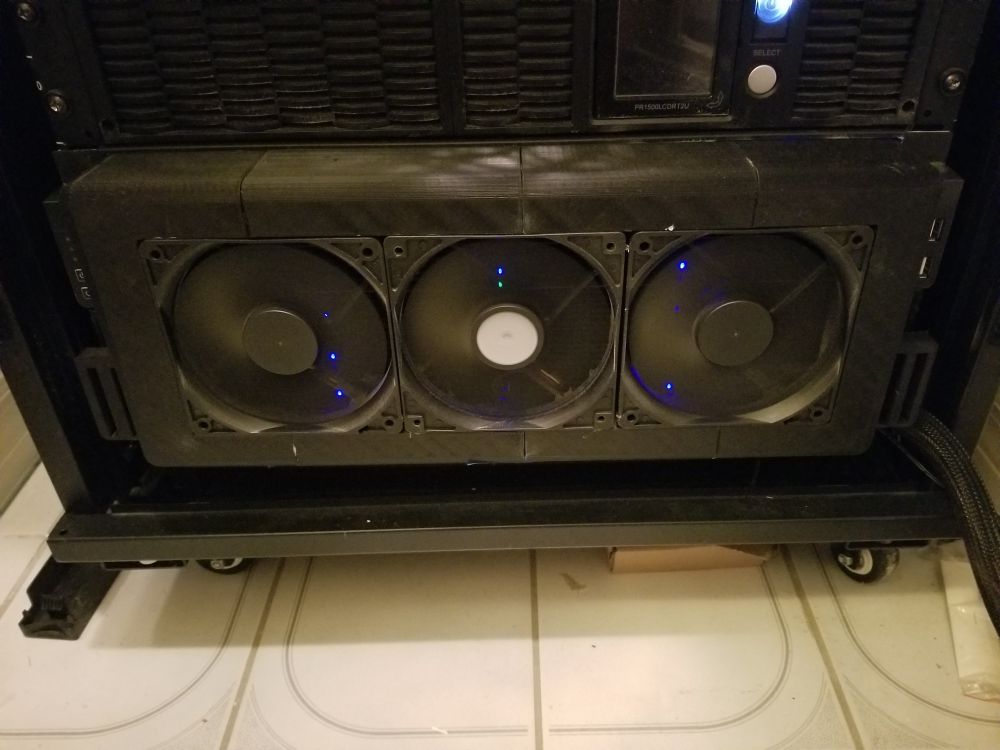 1 point
 -
Alternatively, I'd be happy to take over managing the template: there are several things I'd suggest changing. What's the friendly protocol for this sort of thing? (Also: I push :stable releases to :alpha and :beta tags to make sure people don't get left behind)1 point
-
In verbindung mit einer RX550 bist du vom AMD Reset Bug betroffen und die VMs starten nicht nach dem Herunterfahren/Force Shutdown usw. (abweichung je nach Karte). Ich würd dir hier empfehlen auf unRAID 6.10.0-rc1 zu wechselen und dann in die CA App zu gehen und nach AMD Vendor Reset zu suchen, zu installieren und dann nochmal deinen Server neu zu starten, danach sollte die Karte richtig "reseted" werden. Wenn du komplette disks durchreichst würd ich dir empfehlen das immer so zu machen im VM template wie zB bei mir: (öffne ein unRAID terminal und gib ein 'ls -d /dev/disk/by-id/*' und kopier dir dann den richtigen Pfad raus und so wie im Screenshot in dein VM template rein - VORSICHT, bitte check 2 mal ob du die richtige disk hast ansonsten kannst du dir vieles zerschießen - HINWEIS: Den absoluten namen der disk nehmen ohne :part hinten) Sie dir mal meinen Debian-Bullseye container an evtl wäre der was für dich für kleinigkeiten wenn dir Debian auch als Arbeitsumgebung in einem Browser genügt... (Könntest praktisch von jedem Gerät mit browser zugreifen, ich empfehle aber immer ein ReverseProxy entweder mit htpwd oder Authelia)
 1 point
 -
The solution is a lot simpler. Linux (unRaid) is somehow blocking the device on the host. I found out that you can unload the bluetooth drivers and it works now inside the VM. modprobe -r btusb modprobe -r bluetooth If you want that it persistent between reboot, you have to blacklist these drivers. Normally it is /etc/modprobe.d/ but unRaid does not replace the initial root filesystem (initrd / rootfs) with a block device so changes where are not persistent. In some other forum thread a found something like this for unRaid. (not tested because my system is still running) mkdir /boot/config/modprobe.d/ echo -e 'blacklist btusb\nblacklist bluetooth' > /boot/config/modprobe.d/bluetooth.conf If you still need bluetooth on the host for some docker container. It is probably needed to load the drivers again when the VM isn't running. modprobe btusb modprobe bluetooth1 point
-
Nope. There is definitely something wrong with de_DE somewhere, and what you were seeing in CA (and what I fixed - in retrospect didn't need to be fixed, but the solution actually makes sense) were simply a symptom on the root cause elsewhere. @ich777 @bonienl?1 point
-
Natürlich sollte man niemals eine root-fähige GUI über das Internet verfügbar machen. Meiner Ansicht nach gehört der Remote Access bei MyServers komplett abgeschafft. Unraid hatte bereits in der Vergangenheit eine Sicherheitslücke in der GUI und wer glaubt, dass das die letzte Lücke war, ist naiv. Es gibt auch seit Jahren nach wie vor den Bug, dass der Webserver abschmiert, wenn man auf einem PC die GUI offen lässt. Hatte ich erst die Tage wieder. Bestimmt lustig, wenn ein Angreifer den Grund dafür findet und weltweit Unraid Server blockiert. Als langjähriger Web-Entwickler und nach Sichtung des GUI-Quelltextes, kann ich dir auch sagen, dass kein Hoster dieser Welt so etwas ins Internet stellen würde (Shell Scripte, PHP mit aktivem exec, vollständiger Root-Zugang, etc.). Weiterhin gibt Limetech die folgenden Tipps: man soll ein komplexes Passwort nutzen man soll den öffentlichen Port "zufällig" wählen nicht mehr Ports als notwendig freischalten Dazu kommt: die MyServer Domain ist zufällig In der IT-Sicherheit nennt man sowas Security through Obscurity und das hat mit Sicherheit rein gar nichts zu tun. Schon gar nicht, wenn wie hier alle MyServer Domains und öffentlichen IPs zentral von unraid.net verwaltet werden. Die Sicherheit endet also sofort, wenn jemand den unraid.net Server von Limetech hackt. Wenn der Angreifer dann noch so clever ist und alle aus dem Forum abmeldet, um sie zur wiederholten Eingabe ihres Passworts zu zwingen (um doppelt verwendete Passwörter anzutesten) oder vielleicht einfach ein Phishing-Attacke über die MyServer Domain startet, um den Server-Zugang direkt zu erhalten, dann wird es richtig lustig. Dann hilft übrigens auch kein 2FA im Forum, denn für den Login auf dem Server braucht es das nicht. Eine ähnlich gelagerte Attacke gab es bereits bei Ubiquiti. Zuletzt sei auch angemerkt, dass es gar nichts bringt, dass die MyServer Domain zufällig ist, da durch die Port-Freigabe im Router, natürlich auch alle Zugriffe auf die öffentliche IP-Adresse des Internetanschlusses an den Unraid-Server weitergeleitet werden. Und da draußen sind tausende Bots unterwegs, die den ganzen Tag nach offenen Ports suchen, um mögliche Angriffsziele zu ermitteln. Die Tage haben Forscher zB 3,6 Millionen öffentliche erreichbare MySQL Server gefunden, wovon nicht einer öffentlich erreichbar sein sollte, weil man Datenbanken immer nur lokal nutzen sollte. Fazit: Wer unterwegs auf seine Unraid GUI zugreifen möchte, nutzt dafür bitte einen VPN und wer Backups von seinem Stick in einer Cloud haben möchte, der "baut" sich dafür bitte eine entsprechende Lösung.1 point
-
That's normal if using an fs like exFAT, it doesn't support permissions, you can "skip all" or just disable "preserve attributes" for the operation.1 point
-
Click on the three gears 'Settings' icon and turn off 'Passed Through".1 point
-
Hey printer friends, I have another update. Took on the upgrade octoprint task while maintaining webcam. It was rather easy. I deleted the nunofgs docker for octoprint. I searched community apps for octoprint, selected the docker hub images, found the octoprint/octoprint official docker image. I installed it and configured the template you see in the image attached. I have not figured out how to submit a template to community apps, so for now this should do. I'm not sure 100% if anything might be missing or need a tweak. Let me know how you make out. Note: i did use pretty much all the same values as before. I used the same config folder as the old one. It accepted the configs and everything came right up and all I had to do was create an account. Plugins were all blown away. So you will have to reload all those.
 1 point
 -
Just ran the latest version of pre-clear on a new drive and it appears to have fixed the problems I was having earlier. The problem with it failing was fixed in a previous version, but this latest version is configured to only run the zeroing process once and not twice like it had been doing. I generally buy external drives and shuck them before running pre-clear, but someone had mentioned running pre-clear with the enclosure hooked up to a USB port before taking the drive out of the enclosure. I tried it and so far it's working great. It seems to be running as fast as when performing a pre-clear on a drive physically installed in the array. The real plus is that I don't have to shut down the array to install or remove it. That plus if there's an issue with the drive I won't take a chance of damaging the case when removing it in the event that I need to return it because of a bad drive. I forget who posted the tip, but kudos for that.1 point
-
请问哪里可以下载最新的unRAIDServer-6.9.1-iommu分组”补丁呢?1 point
-
If you are using ssh-agent (or equivalent), you should keep the number of keys loaded under 3, maybe 5 at the most. ssh will attempt every single key in the agent, and every recognizable id_* private key file from the .ssh directory. Most ssh servers will close the connection after 3 attempts of keys or passwords This is because if you don't specify a key file to use in the command line or the ssh client config, it has to try everything in order. and if you have a lot of keys... it would have try them all, looking like someone who doesn't know what the correct / valid key is to the server.1 point