Leaderboard


Popular Content
Showing content with the highest reputation on 01/20/23 in Posts
-
We just moved to TrueNAS Core (virtualised on Unraid) in September to support our bandwidth needs... Looking like it won't be long before we move back (Core sucks for the unfamiliar). As a side note, having support for 30+ drives would be nice for us. Our ZFS pool is 24 drives and we have a JBOD case to add another 36 drives over the next 12 months. We can manage otherwise though.3 points
-
Gerade bei Mindfactory in den Mindstars, die Exos X20 20TB für 299,-: https://www.mindfactory.de/Highlights/MindStar2 points
-
So, it turns out it was merely ONE defective drive in the array; it went to "disabled" on its own a few days after the rebuild, after which I replaced it with a new one, and all of a sudden ALL the UDMA errors on the other drives just stopped. I rebuilt the array again, no errors during that "stress" on the system, and now the system's been up and running for a few days ... no more errors.2 points
-
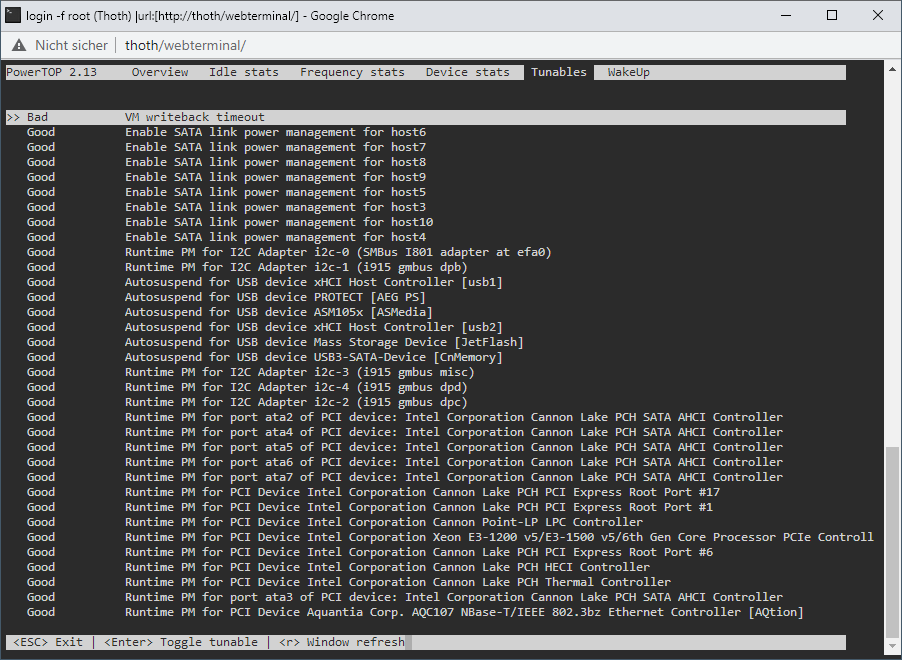
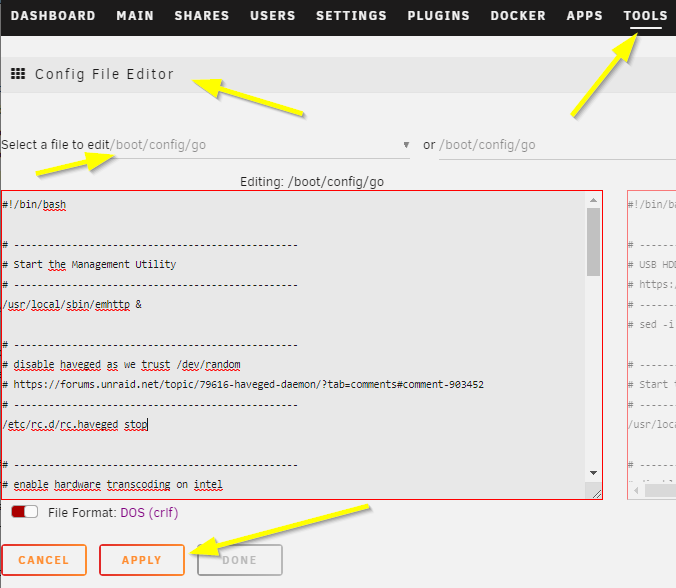
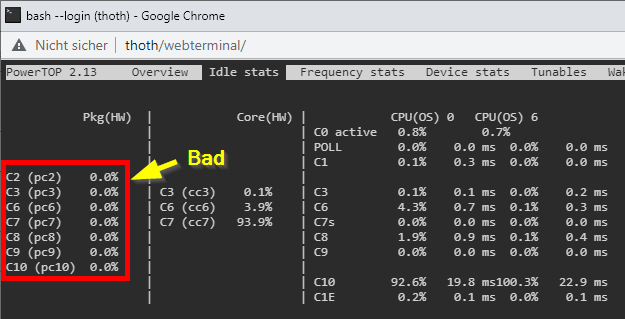
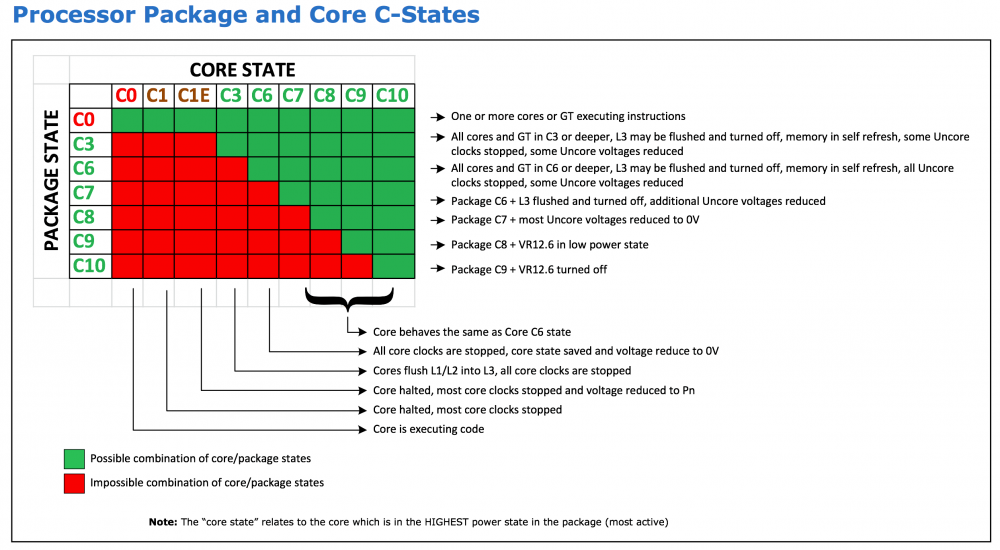
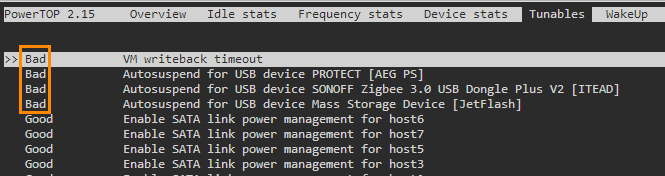
Powertop [Support auf Deutsch] Powertop is an Intel tool (yes, works for AMD, too) to check power consumption states of sata, pcie, usb, etc devices. You can download powertop as follows, then restart your server and it will be automatically installed: mkdir /boot/extra cd /boot/extra wget https://github.com/mgutt/unraid-packages/raw/main/6.11.0/powertop-2.15-x86_64-1.txz Then open your terminal and execute: powertop Now press "TAB" until you reach "Idle Stats" and check your CPU Pkg (HW). Depending of the brand and model of your CPU you can reach different C-States. If your system isn't optimized, you will see this: If you press "TAB" you will see additional information about standby states of different hardware components of your system. In the tab "Tunables" you will see multiple devices which have the state "Bad", which means powertop found devices which do not allow standby/sleep states: Now you can execute the following command to optimize this: WARNING Many SATA controllers (JMB xxx or ASM xxxx) do not support link power management and your disks loose connection after reaching spindown! Read further before executing --auto-tune! powertop --auto-tune &>/dev/null By that all compents will return "Good": Now, your server should reach better C-States. Package C-States This table shows the dependency between CPU Core and CPU Package C-States: Several things are important to reach Package (Pkg) C-States C3, C7, C9 or even C10: Accurate power measurement - do some research how accurate your power meter is (UPS integrated power meters are usually bad) - close your Unraid WebGUI and wait 1 minute! (this closes many background jobs, which cost your energy, use your PC's terminal and "ssh root@tower" to monitor your C-States with powertop) - don't use Unraid in GUI mode (you should avoid this mode, if you want low power consumption) Powertop shows only C1, C2 and C3 Pgk-States This happens if powertop does not recognize your CPU (happens for most AMD CPUs and recent Intel CPUs). Your CPU could still reach C9 or even C10, but powertop is not able to obtain this and shows only C3. BIOS - only Gigabyte 8th or 9th Intel: enable CEC2019 - enable ASPM (Active-State Power Management) in the PCI settings - enable all C-States like C7/C9/C10 in the CPU settings ("auto" usually means "disabled", so select "enable") - disable Audio - disable RGB LED controller - disable Turbo in the CPU settings PCIe cards Some PCIe cards prevent states other than C0 or C3 (Intel). As an example my Qnap Aquantia 10G card allowed only C3 while all my Intel 10G cards allowed C7. Without any installed card I'm able to reach C10. iGPU Install the iGPU driver plugin through unRAID Apps if your CPU has an iGPU hpet Set hpet=disable as a Kernel setting if you have an 8th, 9th or 10th Intel CPU as there is a bug which can cause crashes (shouldn't be necessary anymore since unRAID 6.10) CPU governor Use the tips & tweaks Plugin to set the CPU governor to "powersave" or use the below commands in the Go file. 10G networking SFP+ DAC consumes less power than SFP+ SR/LR and both less than 10G RJ45. Depending on your internet connection the most efficient scenario is not to use a 10G switch. Instead directly connect your client with your server and use a second 1G cable to connect with your internet router. By that your 10G controller/card goes to sleep while your client is powered off. In comparison an active connection to a 10G switch never allows sleep states. MTU Surprisingly a user was not able to reach any C-State other than C1E after setting the MTU to 9000. SATA Controller Some mainboards or pcie cards provide SATA ports through an additional SATA controller. Sadly some of the most popular and usually well supported JMB xxx and ASM xxxx controllers have an incompatibility to "powertop --auto-tune" because it sets all SATA ports to "med_power_with_dipm". To bypass this problem, you should not use "powertop --auto-tune". Instead read the "Commands" paragraph to set the commands manually. Then you can remove the line with the "med_power_with_dipm" setting or you can set each hostX individually. Example: # Enable SATA link power management (this skips SATA host3 and host4) echo med_power_with_dipm | tee /sys/class/scsi_host/host1/link_power_management_policy echo med_power_with_dipm | tee /sys/class/scsi_host/host2/link_power_management_policy echo med_power_with_dipm | tee /sys/class/scsi_host/host5/link_power_management_policy echo med_power_with_dipm | tee /sys/class/scsi_host/host6/link_power_management_policy If you are using the ASM1166 you could even try to update the firmware. NVMe A user found out that a specific NVMe SSD allowed only C2, while with a Samsung Evo Plus the system reached C10. Power supply An unnecessary high-power and/or inefficient power supply can raise the power consumption by 5 to 15W. Choose wisely: - as low power (watt) as possible - as efficient as possible (like Titanium grade) - avoid dual power supply setups (server grade hardware is not build for efficiency) If you plan to build a setup with extremely low power consumption, consider these power supplies: - PicoPSU (up to 200 watts, but is limited to ~4 SSDs as it has low 5V output) - Corsair RM550x (2021) (this looses only 1 watt more than a PicoPSU at 10W to 20W load!) - BeQuiet Pure Power 11 FM 550W (similar to the Corsair, but 2 watts more than a PicoPSU, but cheaper than the Corsair) Notes: - As of writing this post all other power supplies are much more inefficient. So don't think for example a Corsair SF450 is more efficient than the Corsair RM550x (2021) although the former is Platinum grade . It's not. I have both and the Platinum looses 4W more at 10W load. The reason is that some of the most recent power supplies include a new technology to reach the future ATX12VO standard, which has the requirement of being extremely efficient at low loads. For example Seasonic told me in 06/2022 that power supplies for ATX12VO are still in development. - An HDD can consume up to 30W if you switch on your server, but in this state the other server components do not reach their maximum load. So summarize wisely to obtain the correct power supply size. - Do not buy the Corsair / BeQuiet if you don't reach a power consumption under 30W: Above this, usual Platinum / Titanium power supplies are more efficient. Commands Instead of using "powertop --auto-tune" you could add the following power-saving commands to your /boot/config/go file (stop your array and execute them through your terminal to test them first) with the Config File Editor Plugin: # ------------------------------------------------- # Set power-efficient CPU governor # ------------------------------------------------- /etc/rc.d/rc.cpufreq powersave # ------------------------------------------------- # Disable CPU Turbo # ------------------------------------------------- [[ -f /sys/devices/system/cpu/intel_pstate/no_turbo ]] && echo "1" > /sys/devices/system/cpu/intel_pstate/no_turbo [[ -f /sys/devices/system/cpu/cpufreq/boost ]] && echo "0" > /sys/devices/system/cpu/cpufreq/boost # ------------------------------------------------- # Enable power-efficient ethernet # ------------------------------------------------- # enable IEEE 802.3az (Energy Efficient Ethernet): Could be incompatible to LACP bonds! for i in /sys/class/net/eth?; do dev=$(basename $i); [[ $(echo $(ethtool --show-eee $dev 2> /dev/null) | grep -c "Supported EEE link modes: 1") -eq 1 ]] && ethtool --set-eee $dev eee on; done # Disable wake on lan for i in /sys/class/net/eth?; do ethtool -s $(basename $i) wol d; done # ------------------------------------------------- # powertop tweaks # ------------------------------------------------- # Enable SATA link power management echo med_power_with_dipm | tee /sys/class/scsi_host/host*/link_power_management_policy # Runtime PM for I2C Adapter (i915 gmbus dpb) echo auto | tee /sys/bus/i2c/devices/i2c-*/device/power/control # Autosuspend for USB device echo auto | tee /sys/bus/usb/devices/*/power/control # Runtime PM for disk echo auto | tee /sys/block/sd*/device/power/control # Runtime PM for PCI devices echo auto | tee /sys/bus/pci/devices/????:??:??.?/power/control # Runtime PM for ATA devices echo auto | tee /sys/bus/pci/devices/????:??:??.?/ata*/power/control Note: EEE can cause problems with 2.5G Intel Ethernet. Config File Editor: Debugging Here are some helpful terminal commands. Spin down all disks (Unraid only) for dev in /dev/sd?; do /usr/local/sbin/emcmd cmdSpindown="$(grep -zoP "(?<=name=\")[a-z0-9]+(?=\"\ndevice=\"${dev: -3})" /var/local/emhttp/disks.ini | tr -d '\0')"; done Obtain ASPM status of all devices: lspci -vv | awk '/ASPM/{print $0}' RS= | grep --color -P '(^[a-z0-9:.]+|ASPM )' Watch CPU frequency: watch -n3 "cpufreq-info | grep 'current CPU'"
 1 point
 -
CA Appdata Backup / Restore v2.5 Welcome to a new epsiode of the appdata backup plugin The previous thread is located here: https://forums.unraid.net/topic/61211-plugin-ca-appdata-backup-restore-v2/ IMPORTANT! Starting with Unraid 6.12, this plugin will be deprecated. As already stated, there will be a complete rewrite of it. Please have a look at the new thread for it ----------------------------------------------------------------------------------------- What happened? I stumbled upon some bugs while using Squids plugin and made pull requests. Squid told me, he has only limited time and asked me if I want to publish a new version of the plugin. So we decided to deprecate his version in favor of "my" version. For now, the plugin has fixed for error detection and some other new features (see changelog). More to come. Anything I should consider? YES! Since the updated version shows you error during backup/verification (and even while stopping/starting containers), it COULD happen, that you see errors after update which were not there before. In most cases, these errors/warnings were there before but supressed. Errors like "File changed as we read it" or "Contents differ" (during verification) tells you, that some files are still in use. Post here (with your log) in that case.
 1 point
 -
I would like to suggest an option to backup the header of encrypted disks. Currently if something catastrophic was to happen to a disk and just screw up the headers - the data would be irretrievable. While I know a solid backup strategy should be utilized - there are scenarios wherein a simple recovery of the header could void the need for restore from backups. This can result in a quicker/easier time in restoring data on an encrypted disk. It's also possible that this could be used to simply get a system back up and running.1 point
-
Nö, aber für dich wird es übersichtlicher. Okay... kenn ich nicht, aber wird auch passen, ich bin eben noch immer Fan von Noctua wenns um Luftkühlung geht.1 point
-
Thank you! I mistakenly assumed that I was on the latest version.1 point
-
Danke,war erfolgreich und läuft jetzt auf xfs. Gesendet von iPhone mit Tapatalk1 point
-
Hallo Datacollecter, so war der rsync-Befel zur Ausführung gebracht worden und ja, mir scheint hier der Pfad zur Disk benannt. Ich starte das Ganze mal mit dem Pfad zu /mnt/user/x. Dann sollte es also funktionieren ! Allerherzlichsten Dank für Deine Aufmerksamkeit. Wenn dies mein Problem löst, teile ich das auf diesem Wege mit !!! Schönes Wochenende ,,, Telekomiker

 1 point
 -
Nein, nicht die Summe. Sie muss nur schlicht größer bzw gleich groß sein, wie die größte Festplatte im Array1 point
-
Pass through. I would suspect, since unraid’s MO is to be able to move your usb and drives to new computers without loss, then you could move everything over to the unraid VM in proxmox. You would need to install proxmox on a unused drive or partition, spin up an unraid vm with usb and pci controller for the hard drives as passthrough. However, this is my first time using unraid so heed and precautions needed.1 point
-
Braucht man alles nicht machen. Im BIOS habe ich auch noch nie was eingestellt. Hast du denn den Plex Pass? Und wie sieht es hier aus (WebGUI)?
 1 point
 -
duh, sorry lol1 point
-
Hi together, Since I’ve been searched for long time how to get a coral running on my system and the CORAL USB is sold out or crazy more expensive finally I found a solution that worked for me. I was able to order a good price dual edge tpu, but I had only pcie x1 free on my board. After a few unsuccessful attempts, I finally found the right one. I found the “Dual Edge TPU Adapter - PCIe x1”. I plugged in, installing the 'Coral Accelerator Module Driver' app, change the frigate config to Dual and it just works! The advantage is, for the same price of a Coral USB I have now two Cores instead of one! Here is the link for the adapter from Github: https://github.com/magic-blue-smoke/Dual-Edge-TPU-Adapter And I ordered here: https://www.makerfabs.com/dual-edge-tpu-adapter.html1 point
-
I don't know if anyone ever tried the restore method until now, but I just did and here are some notes, as far as I can see the described method can't work at least on array drives: - Backed up with the script, with array running - Using info from https://wiki.archlinux.org/title/Dm-crypt/Drive_preparation#Wipe_LUKS_header I erased all keys on an array drive and the header - Tried restoring with the restore command, both with array stopped and started This only asked me to confirm overwriting of existing headers on the other drives, not about the one that had it wiped. Seems the "if cryptsetup luksDump $i &>/dev/null; then" purposefully would not include any disk that does not already have a valid header, seems the opposite of what is wanted Manually running cryptsetup luksHeaderRestore /dev/sdd --header-backup-file /boot/luks/luks-headers-backup-20230120132359/0QEMU_QEMU_HARDDISK_drive-scsi2.bin properly says no header is detected on that drive and asks to confirm restore. The drive will however not mount. However starting the array (unraid shows unmountable drive) and restoring the same backup file to /dev/mdX instead, then stopping/starting the array it will mount again. Since on Unraid the first 32kB of every drive (/dev/sdX, /dev/nvmeX) is reserved and hidden from view (/dev/mdX starts at 0x8000 of /dev/sdX) one should really only access the mapped drives (also to maintain parity), so for array drives the backup probably needs to be done from this as well and it's a bit of a miracle that cryptsetup luksHeaderBackup /dev/sdX works on array drives despite the offset. There is a difference between cache and array too, as can be seen from unraid mounting them: Jan 20 13:46:30 Unraid2 emhttpd: shcmd (468): /usr/sbin/cryptsetup luksOpen /dev/md1 md1 --allow-discards Jan 20 13:46:32 Unraid2 emhttpd: shcmd (472): /usr/sbin/cryptsetup luksOpen /dev/sdc1 sdc1 --allow-discards Jan 20 13:46:34 Unraid2 emhttpd: shcmd (475): /usr/sbin/cryptsetup luksOpen /dev/sde1 sde1 --allow-discards For cache the partition is mounted directly, but for array it's the mapped device, because it has to go through parity and trim those 32k... More research/testing needed, but it seems to me that different handling is needed for array and cache, and for array it needs to be referenced to slots as well as drives, potentially making it a bit harder to script...1 point
-
Thank you for the fastest forum reply I've ever experienced!!!!! And thanks for the answer Have a nice day1 point
-
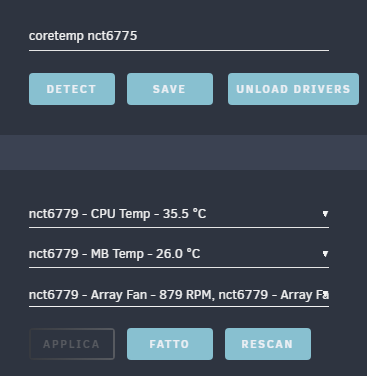
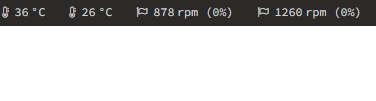
Hello everybody, i have a problem with autofan. It recognizes my sensors and makes the fans go (they are pwm) but I haven't seen the % of use for a few days. I also don't know how to set the second fan which is the CPU one differently to follow the temperatures of the CPU and not the disks
 1 point
 -
Gerade gesehen für 99€ https://www.mindfactory.de/product_info.php/ASRock-B560M-Pro4-DDR4--micro-ATX-So-1200-Bulk-Artikel_1480164.html1 point
-
Bitte lies im den verlinkten Thread weiter den ich gepostet habe. Das ist ein Bug im Kernel und die Fehlermeldung sollte im engeren Sinn gar nicht angezeigt werden bzw. die Fehlermeldung zeigt nicht nur vermeidlich einen Fehler sondern verursacht eigentlich Probleme bzw. mehr Probleme.1 point
-
Thank you very much, it works fine1 point
-
thanks1 point
-
The diags are after the problem but filesystem corruption usually is caused by lost writes, like after an unclean shutdown or a disk write error.1 point
-
On what Unraid version are you? Did you read the first post about cgroup v2? You have to enable cgroup v2 (will be default on Unraid 6.12) for some Distributions so that they are working properly.1 point
-
Oh man.. Leider äußerst nervig wie intensiv man recherchieren muss bevor man sich für Komponenten entscheidet.. In meinem Fall hatte ich die Ssd jedoch noch. Evtl muss ich die dann jetzt austauschen. Was genau wird denn beeinträchtigt am System wenn ich die eingebaut lasse? Stromverbrauch? Performance? Sonstige Fehler? @ich777mach ich und melde mich1 point
-
What you see is the effect of low ram+slow cpu+slow disks (no cache drive). Its a combination of all of them, not a single problem. During File Copy to UNRAID, incoming data is written out to disk (the parity calculation is almost nothing, but the parity write then takes away 50% speed). If the disks cant keep up, data is put into ram until full (btw, UNRAID shows 100% CPU usage during this "no free io slot" period. This is a false reading, look at the CPU temperature, if it keeps low, the io is blocked, not the CPU overloaded). Finally it sends a "STOP PLEASE!" packet to the sender. Then it takes some time to write out the RAM content to the disk, this is the "stalled" period you see. After this it sends a "YOU MAY CONTINUE" packet and transfer starts again. Terracopy and Windows Copy have their own approach how to handle this situation. Windows seems to be more polite, but at the end it is usually much slower. Anyway, the stall is no bug, its a must. You may install the "Tips & Tweaks" Plugin, there you find two settings to play with. "vm.dirty_backround.ratio" and "vm.dirty.ratio" control the level of how much ram is used to cache before io starts and how much ram must be free again until the blockade is realeased. If you buffer too much data in ram, the duration of the stalls will be longer (needs more time to free up more ram from data). If you set them to very low value, transfers will look to be smaller, but stall do not happen anymore or are really short. There is no "good" setting for them, it depends on your hardware and you LAN. You need to experiment a bit. The faster your LAN gets, the more visible this effect will be. Even a cache drive (for writing only, I like to see a read cache too) does not fully compensate for this. For 2,5G LANs a SATA SSD might be sufficient, for higher speeds you need a PCIe NVMe drive. But even then stalls can happen if the cache is not capable to hold the speed for sustained writes.1 point
-
Hi guys... sorry for the long time to replay but I was out for work... Seems that JorgeB had the good idea... it is only happening when I do a hot plug of the disk so I guess is a power drop that disconnect the disk... Is kind of weird because is happening only to that specific disk but if I install the disk with server off and than restart I do not have any issue. Thanks once again for your fantastic help!1 point
-
Thanks @ljm42 I have upgraded to 6.11.5 and provisioned an SSL cert, so all is back up and running for now1 point
-
Also echt keine Ahnung warum, aber jetzt erreiche ich mit dem M920x auch in Unraid C8 und der Verbrauch liegt im Schnitt bei 4W. Wie gesagt mit 2x 2TB NVMe und 1x 8TB SATA SSD. Als nächstes versuche ich dann mal mit M.2 PCIe Adapter eine dritte NVMe zum Laufen zu bringen. Was übrigens ätzend ist, dass man im BIOS scheinbar ohne Num-Feld auf der Tastatur keine Chance hat die Boot-Reihenfolge zu ändern, weil mir die Plus/Minus-Taste fehlt. Auf die im regulären Bereich reagiert das BIOS jedenfalls nicht. EDIT: Ich habe gerade den Tipp gefunden, dass eine der F-Tasten gehen könnte. Muss ich dann mal ausprobieren. Zumindest kann ich beim Booten mit F12 das Bootmenu aufrufen und dadurch zwischen Ubuntu und Unraid wechseln. EDIT: Neben der WLAN Karte habe ich nun auch so einen DisplayPort-Adapter ausgebaut: Hat allerdings nichts am Verbrauch geändert. Mir ist aber noch aufgefallen, dass ich gar nicht das Original Netzteil verwende. Das Original hat 65W. Meins hat 90W. Vielleicht holt man mit dem Original auch noch was raus 😅 Jetzt teste ich jedenfalls den PCIe Adapter. EDIT2: Also mit dem PCIe Adapter + PCIe M.2 Adapterkarte + 1TB NVMe + 8TB SATA SSD + 2x 2TB NVMe rückseitig, erreiche ich nur noch C7. Der Verbrauch liegt nun bei ca 6W In der Konstellation könnte man aber noch problemlos das Gehäuse schließen. Als nächstes messe ich mal mit einem WLAN auf 2x SATA Adapter. EDIT3: Mit WLAN-2x-SATA-Adapter + 2x 8TB + 1x 8TB onboard + 2x 2TB NVMe Onboard erreiche ich nur noch C3 und der Verbrauch liegt nun bei 16W, wobei ich nicht weiß wie effizient das zusätzliche Netzteil ist 🤷♂️ Ich denke ich prüfe das morgen noch mal mit einer PicoPSU gegen. Da weiß ich, dass das Netzteil effizient ist. Das Gehäuse bekommt man auf die Art übrigens nur noch mit sehr viel Glück zu. Würde ich dann auch versuchen.
 1 point
 -
= ca. 2,16W ebenfalls ca. 2,16W Im Normalfall sind Standard PC 4Pin PWM Lüfteranschlüsse für mindestens 9W und meist sogar (ca. 1A) = 12W Maximum ausgelegt. Ich würde aber immer versuchen etwas drunter zu bleiben. Übliche 4Pin Lüfteranschlüsse sind PWM Anschlüsse. Die haben immer und Permamnent ca. 12V. Die gewünschte Drehzahl wird als 'Takt' dem Lüfter vom mainboard per 4.Pin mitgeteilt. https://en.wikipedia.org/wiki/Computer_fan_control#Pulse-width_modulation Es gibt aber so einige (viele) Mainboards, die einen daran angeschlossenen 3Pin Lüfter auch wie früher üblich per 3Pin und abgesenkter Spannung steuern können. Dort ist es also Mainboard abhängig was es kann und von 12V bis 0V ist dann alles möglich. Korrekt. Ein Lüfteranschluß, der beispielsweise 12W verkraftet, könnte einen 12V 2,3A Powerlüfter eines 19Zoll Servergehäuses nicht ausreichend versorgen und könnte versterben. Mit solchen Splitterkabeln kann man die mögliche maximale Leistung des steuerenden Mainboardports auf mehrere Lüfter verteilen und dadurch darf jeder Lüfter im Extremfall nur einen Bruchteil der maximalen Leistung verlangen. Umgehen kann man das mit Lüftersplittern/-steuerungen, die eine eigene Stromversorgung vom Netzteil benötigen/haben. Die nehmen dann bei 4Pin Lüftern nur das PWM Signal vom Mainboard und verteilen das identisch zu allen Lüfteranschlüssen und die Stromversorgung kommt dann selber vom Netzteil. Damit erreicht man mehr Leistungsfähigkeit und behält (in Grenzen) die Drehzahlsteuerung bei. Für 3Pin Lüfter gibt es sowas auch, doch da braucht man dann zusätzlich eine kleine 'Schaltung' auf der Platine, da die steuernde Eingangsspannung per Transistor/Chip dann auf alle Ausgänge hin angepasst wird. Das hängt davon ab, wie Du Deine 2 Lüfter steuern/regeln/einstellen willst. - Regelung beider Lüfter von einem Mainboardanschluß direkt (Noctua brauchst Du dann nicht, sondern nur das Y-Kabel) - Steuerung von zwei Mainboardanschlüssen (Noctua brauchst Du dann nicht. Den Zustand hast Du ja jetzt schon; dann sollte das Mainboard gewisse Steuerungs-/Regelungsfunktionen bieten) - Steuerung beider Lüfter vom einem Mainboardanschluß, aber vom Noctua gedrosselt (dann eben den Noctua per 4Pin ans Mainboard und mit dem Y-Kabel zu den Lüftern, sofern eben Gesamtleistung nicht 12W bei 1A überschreitet, ansonsten die Mainboardverbindung durch das Netzteilkabel ergänzen) - Steuerung nicht vom Mainboard, sondern durch manuelles Einstellen des Noctua eine einzuhaltende Drehzahl vorgeben (kein Kabel zum Mainboard stecken, sondern nur das Stromversorgungskabel vom Netzteil zum Noctua und dann per Y-Kabel zu den beiden Lüftern.) Wie die Anleitung und Beschreibung des Noctua schon sagt ist das Kabel mit Netzteilanschluß für die Versorgung des Noctua gedacht um damit bei sehr leistungshungrigen Lüftern eine Stromversorgung vom Netzteil und ein Signal vom Mainboard zu ermöglichen. Solltest Du das Mainboard nicht an den Noctua anschließen, kann dieser über dass Kabel mit Strom versorgt, auch eigenständig als Steuerung agieren (aber ohne Temperaturregelung) und dann kannst Du mit dem Drehrädchen die Drehzahl von 0 auf Max anpassen (sofern Du nicht die NoStop Funktion aktivierst). Da Deine beiden Lüfter eher wenig elektrische Leistung schlucken (zusammen wohl unter 5W), kannst Du beide per Y-Kabel direkt am Mainboard oder auch mit zwischengeschalteter Noctua-Lüftersteuerung ohne extra Stromversorgung am Mainboard betreiben. Mit dem Noctua dazwischen kannst Du das PWM Steuerungssignal des Mainboard über den Noctua Regler drosseln/teilen. Das mache ich, da die Mainboardsteuerung mir temperaturabhängig einfach viel zu hoch dreht und die Lüfter dann zu laut sind. Damit teile ich das Mainboardsignal per Regler herunter und die Lüfter drehen langsamer. In Deinem Fall mußt Du die Temperatur aber im Auge behalten und zumindest in der Angangszeit etwas experimentieren, welche Drehzahl noch ausreichend ist. Dabei beachten: - nicht zu weit runter regeln, daß die Lüfter evtl. nicht ordentlich/zuverlässig starten - die 2 Lüfter haben unterschiedliche Durchmesser und sofern die ansonsten gleich motorisiert sind fördern sie dann bei gleicher Drehzahl unterschiedliche Luftmengen. (vorne 14cm würde einblasend mehr Luft in das gehäuse hereinpressen, als der hintere 12cm heraussaugt.) Aber da das Gehäuse ansonsten nicht Lufdicht ist und ein Netzteil oft auch einen heraussaugend/-blasend montierten Lüfter hat und vielleicht sogar noch eien Grafikkarte da aktiv Luft urch das Slotblech presst, kann das schon passen. Ist eben sehr individuell vom Gehäuse und den Komponenten.1 point
-
Going to ask a stupid question... why? I assume you want to connect all your drives via USB/Thunderbolt docks... but again why? To me the point of the NAS is that it is all self contained, as much as possible, to the point where I do not have to grab a bunch of docks hanging off the computer.1 point
-
Can't get the above ~800mbit any higher, but its good enough for now. Tried a couple combinations of buffer sizes/flow control/offload, but nothing seems to make a difference. I'll see if I can figure something out if it goes to ~500 again.1 point
-
@VRx Thank you so much for your effort for providing this. I had a lot of non-computer things going on and hadn't seen this for a long time. Sorry for that. I have now successfully integrated vchanger and I think your effort has paid off. I will monitor the ongoing daily use of vchanger and if it is stable I'll let you know in a while, so that it can be put into the frquently updated container. Thanks again and all the best1 point
-
...ich würde ins Array keine SSDs packen. Bei angepeilten 12-20TB würde ich da mit 2 noien 14/16/18TB Disks anfangen, eine Parity, eine Daten...das spart die Performance Penalty und wird/sollte lange reichen. nVMe würde ich als Cache/Pool nehmen, ab 1TB, 2 Stück. Eine Intel Plattform, evtl. wg. günstigem MB sogar noch S1151v2 mit einem i3 und 32GB (non)ECC RAM. Erstmal ein einfaches, günstiges Gehäuse mit etwas Platz. Sähe dann so aus: https://geizhals.de/?cat=WL-2960302 ...Tastatur, Monitor und Maus sollte vorhanden sein?? Kann man aber evtl. auch mit nem S1200 oder S1700 bauen. beim NT weiss sicher @mguttwelches das sparsamste Modell ist.1 point
-
More detail is now available here https://unraid.net/blog/ssl-certificate-update-21 point
-
See if this helps: https://forums.unraid.net/topic/133846-unable-to-view-management-console/?do=findComment&comment=12164501 point
-
Thanks for this, Juan. You set me on the right path. I also saw your comment on the Github issues page for the vnc-version only working with Catalina. I dug around a bit and have a working docker run command that seems to be working. I'm currently installing Ventura using VNC without having to manually build the image. This looks to have done it for me. docker run -i \ --device /dev/kvm \ --device /dev/snd \ -p 50922:10022 \ -p 8888:5999 \ -v /tmp/.X11-unix:/tmp/.X11-unix \ -e "DISPLAY=${DISPLAY:-:0.0}" \ -e EXTRA="-display none -vnc 0.0.0.0:99,password=on" \ -d --privileged \ sickcodes/docker-osx:ventura1 point
-
And make sure you make a backup of the LUKS headers, e.g.:1 point
-
Die Karten passen alle, da es nur Adapter von PCIe Slot auf M.2 Slot sind. Das Board kann die Karte also nicht mal erkennen.1 point
-
Deleting the file contained in the Root Config folder: healthcheck-disable Allows the container to start up again and function as normal.1 point
-
Just uninstall NerdPack, upgrade then install Nerd Tools1 point
-
AMEN!!!! It's yours and I would do like you want no matter what anybody tells you. I often just give in sometimes and take the path of least resistance. I don't want my VPN to update and crash all my stuff so I make sure I check it now and then and let the rest do its thing, but I totally get your doing something a tad different.1 point
-
外国人?? 这到底是要点,还是不点哦。。。 给unraid的点,,,不点亮即可~~~~~~~ CPU隔离,是不是 ,黄色的,属于保留给 unraid系统独用??? 最近发现,docker的 ,选定CPU好像没什么用。。。transmission 下PT的时候,经常CPU 全员爆满。。 12代 12500t 没办法,,安装了 虚拟群晖 ,把 transmission 挂在群晖里了。。1 point
-
Please add selection boxes to each container, along with the appropriate buttons at the bottom, i.e. "start selected", "stop selected", "update selected" "pause selected", "resume selected" "move to top" "move to bottom" The additional buttons could be below their "all" counterparts, and optionally only appear when any selection checkbox is filled.1 point
-
I installed these 2 containers: Repository: gotenberg/gotenberg Repository: apache/tika In Paperless i added these 3 varibles: Name / Key: PAPERLESS_TIKA_ENABLED Value: 1 Name / Key: PAPERLESS_TIKA_ENDPOINT Value: http://IP-of-tika-container:9998 Name / Key: PAPERLESS_TIKA_GOTENBERG_ENDPOINT Value: http://IP-of-gotenberg-container:3000/forms/libreoffice/convert# http:// before IP seems to be important. Only IP didnt work for me. Hope this helpes
 1 point
 -
With a lot of help from an unraid user on reddit I was able to figure this out and am posting here for anyone else tryin to do this. Prerequisites- Router and network switches must support VLANs. You will need to research the configuration of these for your particular brand. Docker service and VM Manager must both be disabled in settings (set enabled to "No"). In Settings>Network Settings set Enable VLANs to "Yes" for your desired ethernet port (eth1 in the pic) and click "Apply". This will add several new settings. Enter your desired VLAN number, set Network protocol (optional) and set address assignment(s) (optional). Click "Apply" once again. In Settings>Docker enable Advanced View. Check the box next to the new network you have just added (eth1 in the pic) and enter the proper subnet and CIDR. Gateway will be the address of your router. Once you have finished, set Docker Enable to "Yes" and click "Apply" Finally, in the configuration settings for your docker container set Network Type to your newly added custom network (Custom:eth1 in the pic) and click "Apply". Note: I am not an expert on networking by a long shot. It took me quite a lot of digging through various forums to piece this together. Some of it may be wrong. If anyone sees any errors please let me know and I'll make the appropriate edits.


 1 point
 -
my two cents (but I'm a noob). I had to do this a few times as the docker stop commands didn't result in an actual container stop. Get you docker container id using docker container list then ps auxw | grep yourcontainerid to get the pid then kill -9 yourpid If that doesn't work, you've got a zombie process and I'm afraid you'll need a reboot to unlock it1 point
-
Thanks for the reply, I've added a static route now on both configs - Some improvements, but I still having some issues. On the simple server - I can now connect to the Unraid UI and to the pfsense UI. but I still can't access anything else on the network. I've tried the firewall rules because of the firewall log: (first one 192.168.0.31:8123 is the source, the 10.253.0.2 is the destination) it looks like the remote device (the VPN peer) try to talk to the local service, but when the local service try to "take back" there's an issue. on the complex server, it's basically the same + but I can't access the main UI as it forward automatically to the local domain (unraid.privateFQDN.org) and it stops there. dockers on the unraid server (using the IP address) connect perfectly. Edit: Found the fix the the issue, not sure why my config is causing it - but the scenario here is Asymmetric Routing. The solution is to enable "Bypass firewall rules for traffic on the same interface" under System/Advanced/Firewall & NAT: That fix both of the issues described above.1 point
-
You need to install the graphics driver for the display adapter. Open device manager, look for the display adapter (should say Microsoft Basic Display Adapter). Right click it and select update driver. Point it to the qxl folder on your Virtio ISO disk and let 'er rip! Sent from my SM-G930P using Tapatalk1 point