Leaderboard


Popular Content
Showing content with the highest reputation on 05/25/22 in all areas
-
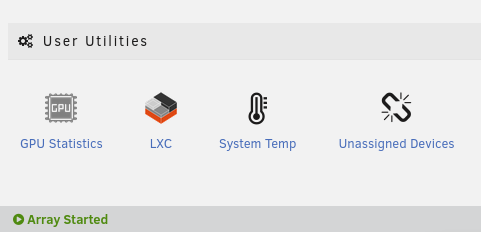
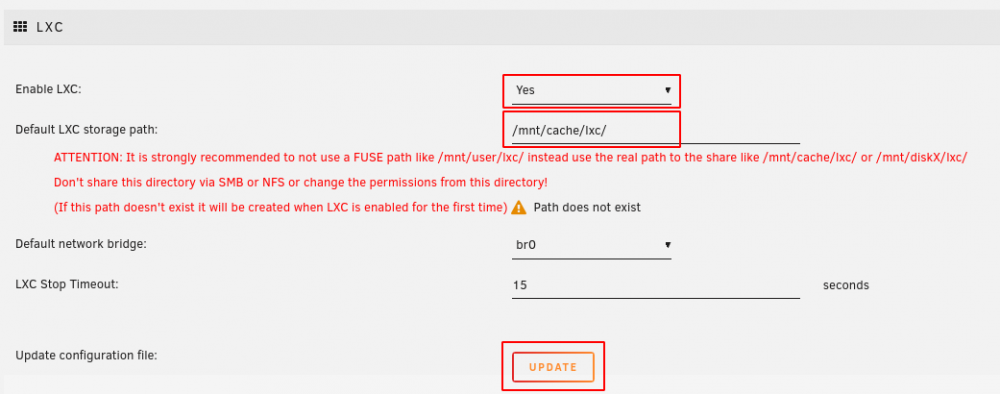
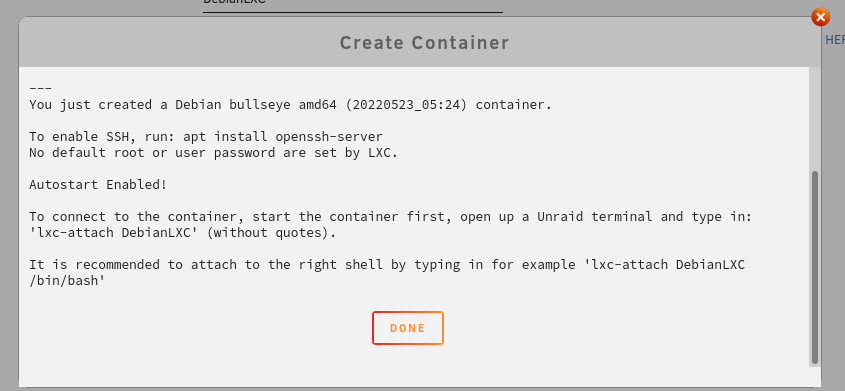
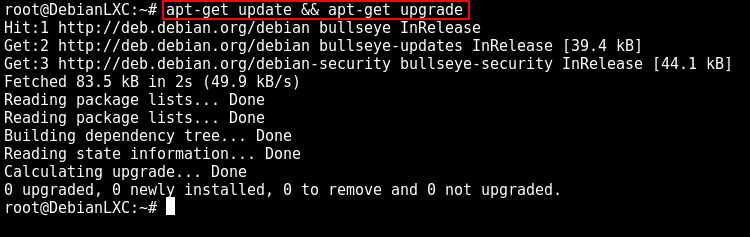
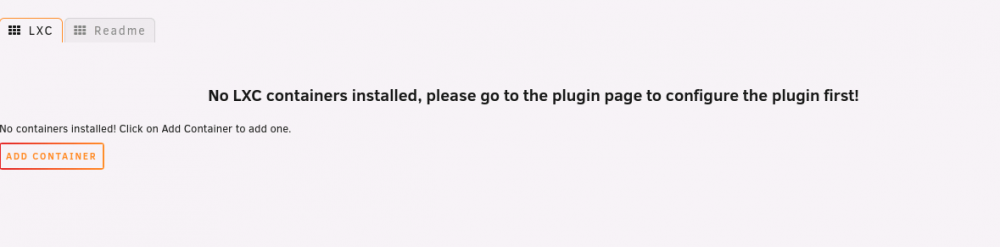
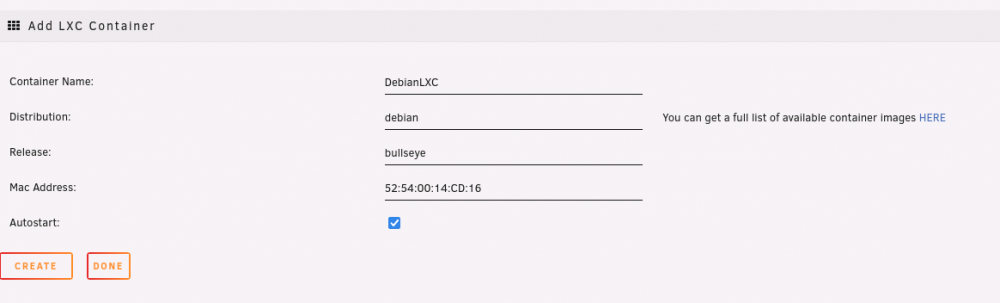
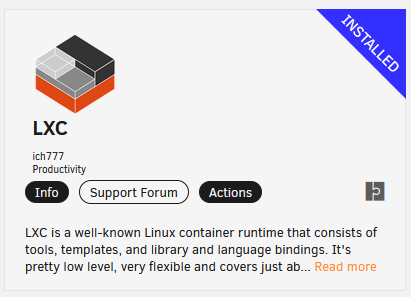
LXC (Unraid 6.10.0+) LXC is a well-known Linux container runtime that consists of tools, templates, and library and language bindings. It's pretty low level, very flexible and covers just about every containment feature supported by the upstream kernel. This plugin doesn't include the LXD provided CLI tool lxc! This allows you basically to run a isolated system with shared resources on CLI level (without a GUI) on Unraid which can be deployed in a matter of seconds and also allows you to destroy it quickly. Please keep in mind that if you have to set up everything manually after deploying the container eg: SSH access or a dedicated user account else than root ATTENTION: This plugin is currently in development and features will be added over time. cgroup v2 (ONLY NECESSARY if you are below Unraid version 6.12.0): Distributions which use systemd (Ubuntu, Debian Bookworm+,...) will not work unless you enable cgroup v2 To enable cgroup v2 append the following to your syslinux.conf and reboot afterwards: unraidcgroup2 (Unraid supports cgroup v2 since version v6.11.0-rc4) Install LXC from the CA App: Go to the Settings tab in Unraid an click on "LXC" Enable the LXC service, select the default storage path for your images (this path will be created if it doesn't exist and it always needs to have a trailing / ) and click on "Update": ATTENTION: - It is strongly recommended that you are using a real path like "/mnt/cache/lxc/" or "/mnt/diskX/lxc/" instead of a FUSE "/mnt/user/lxc/" to avoid slowing down the entire system when performing heavy I/O operations in the container(s) and to avoid issues when the Mover wants to move data from a container which is currently running. - It is also strongly recommended to not share this path over NFS or SMB because if the permissions are messed up the container won't start anymore and to avoid data loss in the container(s)! - Never run New Permissions from the Unraid Tools menu on this directory because you will basically destroy your container(s)! Now you can see the newly created directory in your Shares tab in Unraid, if you are using a real path (what is strongly recommended) weather it's on the Cache or Array it should be fine to leave the Use Cache setting at No because the Mover won't touch this directory if it's set to No: Now you will see LXC appearing in Unraid, click on it to navigate to it Click on "Add Container" to add a container: On the next page you can specify the Container Name, the Distribution, Release, MAC Address and if Autostart should be enabled for the container, click on "Create": You can get a full list of Distributions and Releases to choose from here The MAC Address will be generated randomly every time, you can change it if you need specific one. The Autostart checkbox let's you choose if the container should start up when the Array or LXC service is started or not (can be changed later). In the next popup you will see information about the installation status from the container (don't close this window until you see the "Done" button) : After clicking on "Done" and "Done" in the previous window you will be greeted with this screen on the LXC page, to start the container click on "Start": If you want to disable the Autostart from the container click on "Disable" and the button will change to "Enable", click on "Enable" to enable it again. After starting the container you will see several information (assigned CPUs, Memory usage, IP Address) about the container itself: By clicking on the container name you will get the storage location from your configuration file from this container and the config file contents itself: For further information on the configuration file see here Now you can attach to the started container by clicking the Terminal symbol in the top right corner from Unraid and typing in lxc-attach CONTAINERNAME /bin/bash (in this case lxc-attach DebianLXC /bin/bash): You can of course also connect to the container without /bin/bash but it is always recommended to connect to the shell that you prefer Now you will see that the terminal changed the hostname to the containers name this means that you are now successfully attached to the shell from the container and the container is ready to use. I recommend to always do a update from the packages first, for Debian based container run this command (apt-get update && apt-get upgrade): Please keep in mind that this container is pretty much empty and nothing else than the basic tools are installed, so you have to install nano, vi, openssh-server,.. yourself. To install the SSH Server (for Debian based containers) see the second post.


 6 points
 -
I have never had luck using the updater. I recommend following the manual update instructions in post 1; they’ve worked for me for… many iterations.3 points
-
Since the 6.10.0 update, logs are only displayed in black and white via the logterminal pop-up window. Even though this might improve the readability at first glance, the different coloring of info, warn and error messages have unfortunately also disappeared with this change. This made it very easy to see if something is wrong or to filter out relevant info. For me and probably many others, this was a crucial feature that I now miss very much. Now all I see is a pile of text that becomes even more unreadable on longer lines due to the larger font with line breaks. If you go to Tools/System log you can see what it looked like before.2 points
-
I guess that you can adjust most of the settings through some trickery in Unraid as well. For any fixes or incompatibility issues however, you will be relying on Unraid/Limetech to update the corresponding components of their system. And from what I read, it can be a hazzle to get TimeMachine up and running reliably as is. Therefore I think there is a certain advantage of running TimeMachine as a Docker image. The docker image used (https://github.com/mbentley/docker-timemachine) is in active development and quick to fix issues. The focus of that project is clear - TimeMachine and nothing but TimeMachine. I have been using this solution for a couple of months and it has been rock solid.2 points
-
Bug will be fixed in 6.10.22 points
-
The newest release 4.1 and 4.0 added influxdb among other changes and the container template on the community applications page needs to be updated accordingly. You can change the repository field to "lscr.io/linuxserver/scrutiny:8e34ef8d-ls35" until it gets updated.2 points
-
I attempted to setup Nextcloud AIO on Unraid but I can't seem to get to work. I tried using an Ubuntu VM and a guide but I get an error saying the DNS doesn't point to this server. I have no idea what could be causing the issue. I have spend days trying to set it up but nothing works.1 point
-
This thread is meant to provide support for issues related to the Time Machine Application Template view on GitHub How does this Application work? This application is based on the docker container mbentley/docker-timemachine. It will create its own share for TimeMachine clients and thus does not use the existing network share functionality in Unraid. What is the best way to start using this Application? I think the best way would be to start with the parameters left at their default and work your way up from there. You will need to map a path on your host to the container for persistent data storage. For that path, you will need to execute the following command so that the container can write to it (in this example /mnt/user/timemachine is the path on the host that is used by TimeMachine): sudo chown -R 1000:1000 /mnt/user/timemachine/ Where can I get more information about configuration options? As mentioned above, this application is based on mbentley/docker-timemachine. Therefore the most extensive and up to date information is available in the documentation of that project . Why the frequent Updates (daily?!)? As this template is based on the docker image from mbentley/docker-timemachine, all updates that are pushed to docker hub from the maintainer of mbentley will also appear as updates for Unraid. Frequent updates on docker images can have many reasons. Even if no changes to the core implementation of dockerized application are made, any docker image is based on a base image. This base image usually is in turn based on an operating system like ubuntu, arch, debian etc. If a maintainer wants to always provide an image with all security patches of the underlying base image, he may choose to automatically build and push new images for his own application, everytime an updated base image becomes available.1 point
-
After multiple recent support issues with SanDisk brand USBs, we don't recommend buying SanDisk USBs for Unraid at this point. Either due to counterfeit devices being sold or a manufacturing change directly from SanDisk, multiple users have attempted to boot SanDisk USBs and found out that they do not register a unique GUID and therefore, cannot be properly licensed with Unraid. Multiple attempts at contacting SanDisk on this issue have gone nowhere. For a great rundown on the best USBs for Unraid, @SpaceInvaderOne made an exhaustively researched video on the topic: (Spoiler) Some of the best flash drives were: Samsung bar plus USA ---- https://amzn.to/32TtQyp UK ---- https://amzn.to/3004ooU DE --- https://www.amazon.de/Samsung-MUF-32BE4-EU-Flash-Speicherstick/dp/B07CVVHCTG/ Samsung Fit Plus USA --- https://amzn.to/3hFboha UK --- https://amzn.to/39vSsOR DE --- https://www.amazon.de/Samsung-Flash-Drive-MUF-32AB-APC/dp/B07HPWKS3C BONUS Ones confirmed to work @ich777 recommendation for Amazon.de users: https://www.amazon.de/Transcend-JetFlash-Extreme-Speed-32GB-USB-Stick/dp/B002WE6CN6 Kanguru - tested and recommended by @AlastorX50 https://www.kanguru.com/products/kanguru-flashblu30-usb3-flash-drive https://www.kanguru.com/products/kanguru-ss3 https://www.kanguru.com/products/kanguru-flashtrust-secure-firmware-usb-3-0-flash-drive1 point
-
Hello. My name is Conner. I have OSD – Obsessive Server Disorder. They say the first step is to admit you have a problem. Here is my story. It all started innocent enough. Last year, anticipating a $600 stimulus check, I decided I would build an Unraid server. I had a handful of unused components from a decommissioned PC – a 1st gen Ryzen, 8GB of DRAM, a motherboard, a small NVMe drive. I had packed too many 3GB drives in my small daily driver PC, and it would always be powered on, running my Plex server. Relocating those drives and off-loading that task to a small server seemed to be a reasonable idea at the time. The build went mostly smooth. I only overshot my budget by a small amount. An extra fan here, an internal USB header cable there. The extra money spent to make it clean was worth it to me. I loaded up the media server on the machine. Then I started thinking, “What else can it do?” This is where I went down a rabbit hole of trouble. Found a good deal on some 6TB drives. I bought 3 of them. Future proofing is good, I felt. It was nice to see that extra storage space. The 8GB of DRAM seemed inadequate, as I started installing more Dockers, so added 8GB more. I’m up to 28 Dockers installed, with 22 running all the time. At least another half dozen pinned in CA, to try out in the future. I started with an old GT760 to do some hardware transcoding. But felt it worth upgrading so I could handle NVENC H.265. A Quadro P400 only costs around $100. The power supply I had was very old and less than trustworthy, so a new one was ordered. I found a great deal on a UPS, to prevent those annoying unclean shutdowns from summer thunderstorms. Looking for an offsite backup solution, I again repurposed those 3TB drives I moved, I took those out of the server, and put them in external USB enclosures, to swap and safely keep at work. I ended up buying 4 more drives (two 6TB and two 8TB). The Intel NVMe is small and slow, so now have a 500GB to install as cache in the upcoming weeks. I worry how I’m affecting my family. I have already corrupted my son. He really enjoys being able to request and add media through one of the Dockers, and stream to his (or his girlfriend’s) apartment. The domain name I purchased makes it easier for him, as well as allows me to get around the DNS firewall at work, to access the server. My wife rolls her eyes when another package arrives, with more of my “toys”. But I feel she may be enabling me. I may need to add the Amazon driver to this year’s Christmas list. I was thinking that Limetech may consider creating a sub-forum, where folks like us can help each other through our OSD issues. But I decided that may not be the best idea – it would be like holding an AA meeting down at the local pub. Thank you for letting me share my story.1 point
-
Does anyone know if this would be fixed in later versions or is disabling this the proper thing to do, seems like a band-aid. Im asking because i don't think its ready for me to upgrade, just too many various issues all over here and reddit. Are the devs making a list of these issues to address or are we suppose to dive in, update and fix whatever arise's as we find it? Sorry this is not meant to be condescending i just don't know how long i should wait it out or if now is as good as it gets.1 point
-
After installing the update, my server connected immediately to the 'Mothership'. Thanks for the fix.1 point
-
It's not, IT mode uses the mpt3sas driver, not megaraid_sas. 9341-8i is also megaraid, you'd need the 9300-8i firmware, but likely it will require crossflashing, it probably won't accept direct flashing, try googling "lsi 9340 it mode", instructions on how to should be easy to find.1 point
-
Beats the snot out of what I was doing, recompiling the kernel with LXC and doing it all command-line. KUDOS!!! I'm still on 6.9.2, so I have to stick with what I've got for now1 point
-
Follow this procedure from the online documentations accessible via the ‘Manual’ link at the bottom of the GUI.1 point
-
just for fun, i changed the bus/slot but in the end the wifi controller now reports error code 10, kind a de ja vu :D, it was not reporting any error before this change, so i reverted it back. i dont see any error inside the windows event logs regarding the wifi module, neither in the qemu logs, i does no matter for me, so lets leave it as it is1 point
-
that is the totally the solution i was able to save and revisit the xml after adding the additional xmlns tag into the domain and yes the qemu capabilites, what ever they do, i do not understand it to be honest, but the bluetooth error code 10 is gone, and i was able to connect my bluetooth devices again. thank you so much for resolving this issue PS: note if someone else wants to use this solution for his wifi controller, this did not work, the wifi controller is not return an error code, but i was not able to activate the wifi, but it is not needed for purposes so regarding the BT issue it is resolve 👨⚕️1 point
-
@astronax I think I found the culprit for the issue "xml is not saving". I had a spare usb key with unraid 6.10.1, I had also an additional pendrive, so made the array on that usb pendrive just to test the qemu/libvirt behavior. Just a note on my above post: one, before using the virsh command should export nano as default editor with this command (in terminal): export EDITOR='/usr/bin/nano' then run the virsh command. -------- However it is not needed to run the virsh command and unraid gui in xml view can be used. The issue is that the domain type line is stripped by unraid. When you view your xml in unraid make 2 changes: 1. on the top you will see a line with this: <domain type='kvm'> Change it to: <domain type='kvm' xmlns:qemu='http://libvirt.org/schemas/domain/qemu/1.0'> Then to the bottom add: <qemu:capabilities> <qemu:del capability='usb-host.hostdevice'/> </qemu:capabilities> before the </domain> tag. This time it will save. I found this because using the virsh command failed to validate too, because qemu schemas was not defined. PS: not sure if this will solve your bluetooth/wifi issue, just try...1 point
-
For me, it kind of depends on the system the drives are on. I know on my previous unRAID "server", I had a number of 8TB drives and it took upwards of 24 hours to finish the monthly parity check, mainly due to the machine being overtaxed by me with lots of containers running, and using the machine during that time. Now on my new server with 16TB drives, and lots more horsepower, I don't even notice the check is running until I go onto the server and see it's either running or finished. The parity check now takes around 26 hours or so, so there is no direct correlation from one size to the next, there are lots of other factors. I checked the prices and found the 16TB drives to be the best $/TB so went with them, parity check times be damned!1 point
-
lol. Wasn't a big deal, but the pic struck me as being off a bit, so looked at my own system. Not the first 5 minutes of my life that I won't get back (nor will it be the last)1 point
-
Yes, as long there are no issues with the appdata folder.1 point
-
Ich sichere schon seit Jahren den kompletten Unraid Server mit mehreren TB per Duplicati in die Jottacloud. Denn nur ein Offside Backup ist ein gutes Backup. Die Schlüsselworte dazu lauten Diebstahl und Elementarschäden durch z. B. Feuer, Überschwemmung und Vandalismus.1 point
-
If it works in safe mode it suggests one of the plugins is the problem, uninstall or rename the plg files to see if you can find the culprit.1 point
-
1 point
-
1 point
-
Hi folks, would you please update to the latest plugin and let me know if it solves your connection issues? https://forums.unraid.net/topic/112073-my-servers-releases/#comment-11307901 point
-
That is an old wiki You should start from the wiki in the Documentation linked at bottom of this page.1 point
-
username root password (just hit enter) Only root user has access to the webUI and command line You should set a good password for root.1 point
-
@Mortalic Please see this previous post regarding the GameUserSettings.ini and Game.ini files getting reset to default. Here is how I was able to keep these files from going back to default.1 point
-
Oh wow, great work @ich777 Finally I can stop polluting my unraid install, and/or trying to contort docker into doing things. Now I need to go learn the ins and outs of LXC 😀1 point
-
interested to see how this goes. I have just virtualised unraid on proxmox to also play with lxc alongside....1 point
-
I have looked at it a bit, didn't find anything obvious yet with the first function loop. But I don't really have so much time maintaining this plugin anymore, it happens in sudden cycles. For the sake of it, can you post output of "lsscsi -u -b" as well (which is the actual output the plugin uses now)? Just wanna see if there's something different with that output with you SAS drives. In worst case I might need your database file, which contains all data as serial numbers etc., but I'll ask for that later (private download) if I need and you approve it. Else try this command on one disk you know works, and one that doesn't: smartctl -x --json /dev/sg<id> It's important that you use the "sg" assignment.1 point
-
Just upgraded to 7.1.66, as with the previous version there is pretty much no risk to upgrade if you are already on the 7 series.1 point
-
Hi @XPHOENIX, happy to address your doubts. We don't yet offer WIFI AC in Europe because the AC cards we use from our Vendor are on a parts shortage. These Qualcomm chipsets in general are super difficult to find right now. We definitely would like to offer some and we're working on it. Are you asking about LTE modems (hardware)? Or LTE service? Specific to the modems, the US only modems we currently offer are for use with LTE bands commonly found in the US. We'd like to offer a EU specific one and we're currently evaluating some options. Also, our EU operation is still relatively small and we want to make sure we're not "biting off more than we can chew". In other words, we want to make sure that what we provide is tested and will work. Our primary focus is our Vault lineup of products. Each port on the Vault is connected to the Vault's CPU via PCIe. This applies to every Vault that we sell. As such, as long as the software you install on your Vault supports dual WAN, then the hardware will support it. pfSense certainly supports this. In the near term, we have a lineup of 2.5G Vaults about to be released (in June, 2022) and we are targeting a 10G product later this year. There's a lot to unpack in your 5th point here, so i'll try to address everything, below. There are a lot of different products out there and it would be very difficult for us to compare ourselves to every one of them. Sure, lots of customers end up comparing us to Netgate because a lot of our customers end up using Protectli hardware with pfSense. One useful point of comparison is VPN throughput and you can find some throughput testing we did across our product lineup a while back here, here, and here. I'm not aware of the specific video you reference specific to the Netgate 6100 where they "guarantee...each port is independent of the others..." but I suspect this is related to Netgate having used an internal switch on some of their products, which the 6100 does not use. In this way, the 6100 has network ports that are all connected directly to the CPU. As stated above, all Protecli products have network ports directly connected to the CPU. We have never used an internal switch. I hope this addresses your questions. Please let me know if you have any other questions or if anything is unclear. Thanks1 point
-
I have an issue open requesting his wizardry.1 point
-
As far as I know it does not work with exposed ports. You have to create a bridged interface in your subnet. So if you IP is 192.168.0.[something] it must be 192.168.0.[a free IP] like 192.168.0.200
 1 point
 -
While I am happy of my Cruzer Blade, I have to bring your attention to this PSA : Some suggestions on the thread. Just to comment on your proposals characteristics, not considering the brand : the Glide's objective seems to be more towards drives that would be transported in a bag and needs to be protected. That's not relevant here. as for compact Cruzer Fit vs regular Cruzer Blade, people have divergent opinions on that. Some like that the Fit does not stick too much of the case, other think that the very small size increase temperature and its not that good for electronics You'll have to decide what fit's best your use case.1 point
-
FYI Unraid 6.10.2 will have a fix for this.1 point
-
Lokal kann das nur gehen, wenn swag im br0 Netzwerk mit eigener fester IP läuft oder du unRAIDs Ports zb auf 5000/5001 änderst, damit 80 und 443 für Swag genutzt werden kann.1 point
-
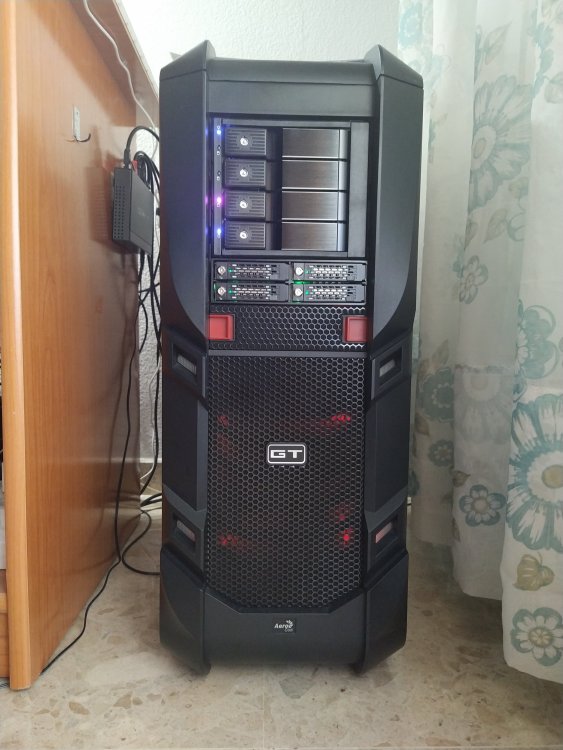
Hello again, if possible, after upgrading my NAS case to a more convenient one, I would like to request the following one INSTEAD of the first one. The case now is: Aerocool GT-S Black Edition. Thank you very much.
 1 point
 -
Go into Security on your Google account and create an App Password for your server to use.1 point
-
Be careful when buying the Samsung Fit drives. I bought one from Amazon UK and it was dead within a week. Got one direct from Samsung and no probs so far. They also run quite warm when accessed continuously so lifespan wont be that great.1 point
-
There is no "Add Template" on the docker tab. There is "Add Container" which then gives you a completely blank slate page. For more details on using this check out this forum post: GUIDANCE ON ADDING A DOCKER HUB CONTAINER1 point
-
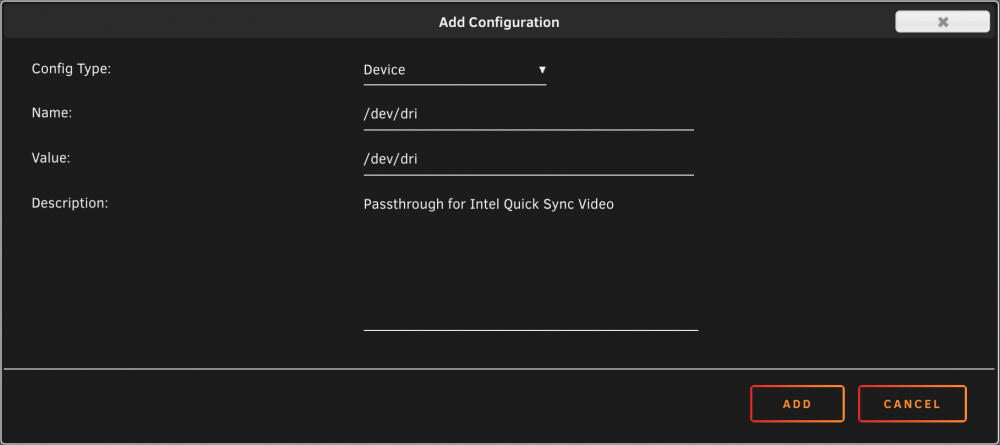
just some fyi from my problems i have a ASRock E3C246D4U2-2L2T with P2.10 bios and i can confirm igpu transcoding with a i7-8700T. on this setup the details as follow installed Intel GPU TOP and GPU Statistics nothing added to go file recently added to the plex container setting after igpu stopped working added device Name: /dev/dri Value: /dev/dri bios p2.10 has settings primary graphics adapter [onboard vga] igpu multi-monitor [enabled] onboard vga [enabled] I also have a ASRock E3C246D4U it was flashed with bios p2.30 but unraid was not detecting the (Display controller: Intel Corporation CometLake-S GT2 [UHD Graphics 630] ) I had to flash L2.34 bios to get the settings to get igpu in bios to detect in unraid. i had to mess around with unraid, to get it to work. Not sure what fixed it but it works now. Not exactly in order i did it all, as it was trial and error. what i did was flashed bios L2.34 install Intel GPU TOP and GPU Statistics Made sure transcoding was enabled in plex. hdr unselected. but still was not working, Then i did lots, and not sure what did it. eg added to the go file " modprobe i915 " I also had to remove the unraid boot usb and put into my windows computer and copied the file " i915.conf " from my working unraid server to the directory /config/modprobe.d as it was missing. i think it has something to do with white listing the driver, because i read some where it blocks it loading, which i believe what was my main problem. because it kept saying /dev/dri was missing. so the driver was not loading. change the relevant permissions on our Quick Sync Device which we do by typing into the terminal window: " chmod -R 777 /dev/dri " then edited container Head over to the Docker Tab, click on the your Plex container. Scroll to the bottom click on Add another Path, Port, Variable Select Device from the drop down Enter the following: Name: /dev/dri Value: /dev/dri after all this i finally got it to wok
 1 point
 -
I tried again from the dockers console. No go. Tried it in the unraid console using chown -R 1000:1000 /mnt/user/Appdata/Nodered/.npm This fixed the issue and allowed me to update the palletes.1 point
-
I purchased the ASRock Rack E3C246D4U and there is a way to enable the iGPU without installing the beta BIOS. I'm currently running P2.30 with iGPU enabled. There is a key combination you need to press when booting your system. After powering on the boot splash screen will display the ASRock Rack image and the message “Updating FRU system devices”. When you see "Updating FRU system devices" press ctrl+alt+F3 and it will load the BIOS menu. In BIOS menu, you will see an additional page labeled IntelRC Chipset. Select System Agent (SA) Configuration, then Graphics Configuration, and then Enable IGPU Multi-Monitor.1 point
-
The current BIOS supporting iGPU in addition to BMC video is 2.21A, but, yes, you need a modified BIOS to support iGPU/Quicksync. With the public/regular BIOS it is BMC video only and the iGPU cannot be utilized for QSV hardware transcoding. Incorrect sensor readings. My MB temp is currently reading 85C via IPMI. There is no way it is really that hot and Linux/unRAID are reporting the MB temp as 32C.1 point
-
Either mover is not running, or it was running when you enabled it. The setting doesn't take effect until mover starts again1 point
-
Confirmed That renaming the drive while it's stuck at "syncing the filesystem" worked for me. It "unstuck" immediately. Crucial 4GB gizmo.1 point
-
same issue ubtunu 18.04 by running: sudo dhclient enp3s0 I was able to get a connection again1 point